SharePoint Online has grown in popularity since its release as part of the Office 365 corporate offering (now Microsoft 365). It began as a basic document management system but has now grown to include a content management and content services platform, an intranet gateway for business information and applications, a groupware platform, a social platform, and a platform for developing bespoke web applications. As a result of these evolving use patterns, many people have discovered that the normal SharePoint storage capacity is insufficient. However, don’t worry — we have you covered with an in-depth guide. You can get all the storage you need to finish the necessary task on your site. You will, unfortunately, need admin status to get the storage as they are the main license holder and adjustments to the storage can only be made on these permissions.
- Increase storage limit in the Admin center
- Increase storage limit in the SharePoint admin center
- Using PowerShell scrips to increase the storage
I have put together a list of different approaches you can take to increase the storage on SharePoint. The last one is more of a decrease in content to increase the storage, however, by looking at metrics you can assess how much unnecessary content you have and remove them all to free up existing storage and make your SharePoint network cleaner and easier to manage. You can clear unnecessary themes preloaded onto your site or network for updates. Follow through for more information on increasing SharePoint storage.
Increase storage limit in the Admin center
If you have already reached your maximum storage limit in SharePoint, you may need to purchase more. If you haven’t reached your limit, head down to the next section. Otherwise, please follow the steps below.
- Sign in to your Office 365 account.
- Click the
 app launcher icon in the top left. (1)
 - Then select “Admin” from the menu. (2)
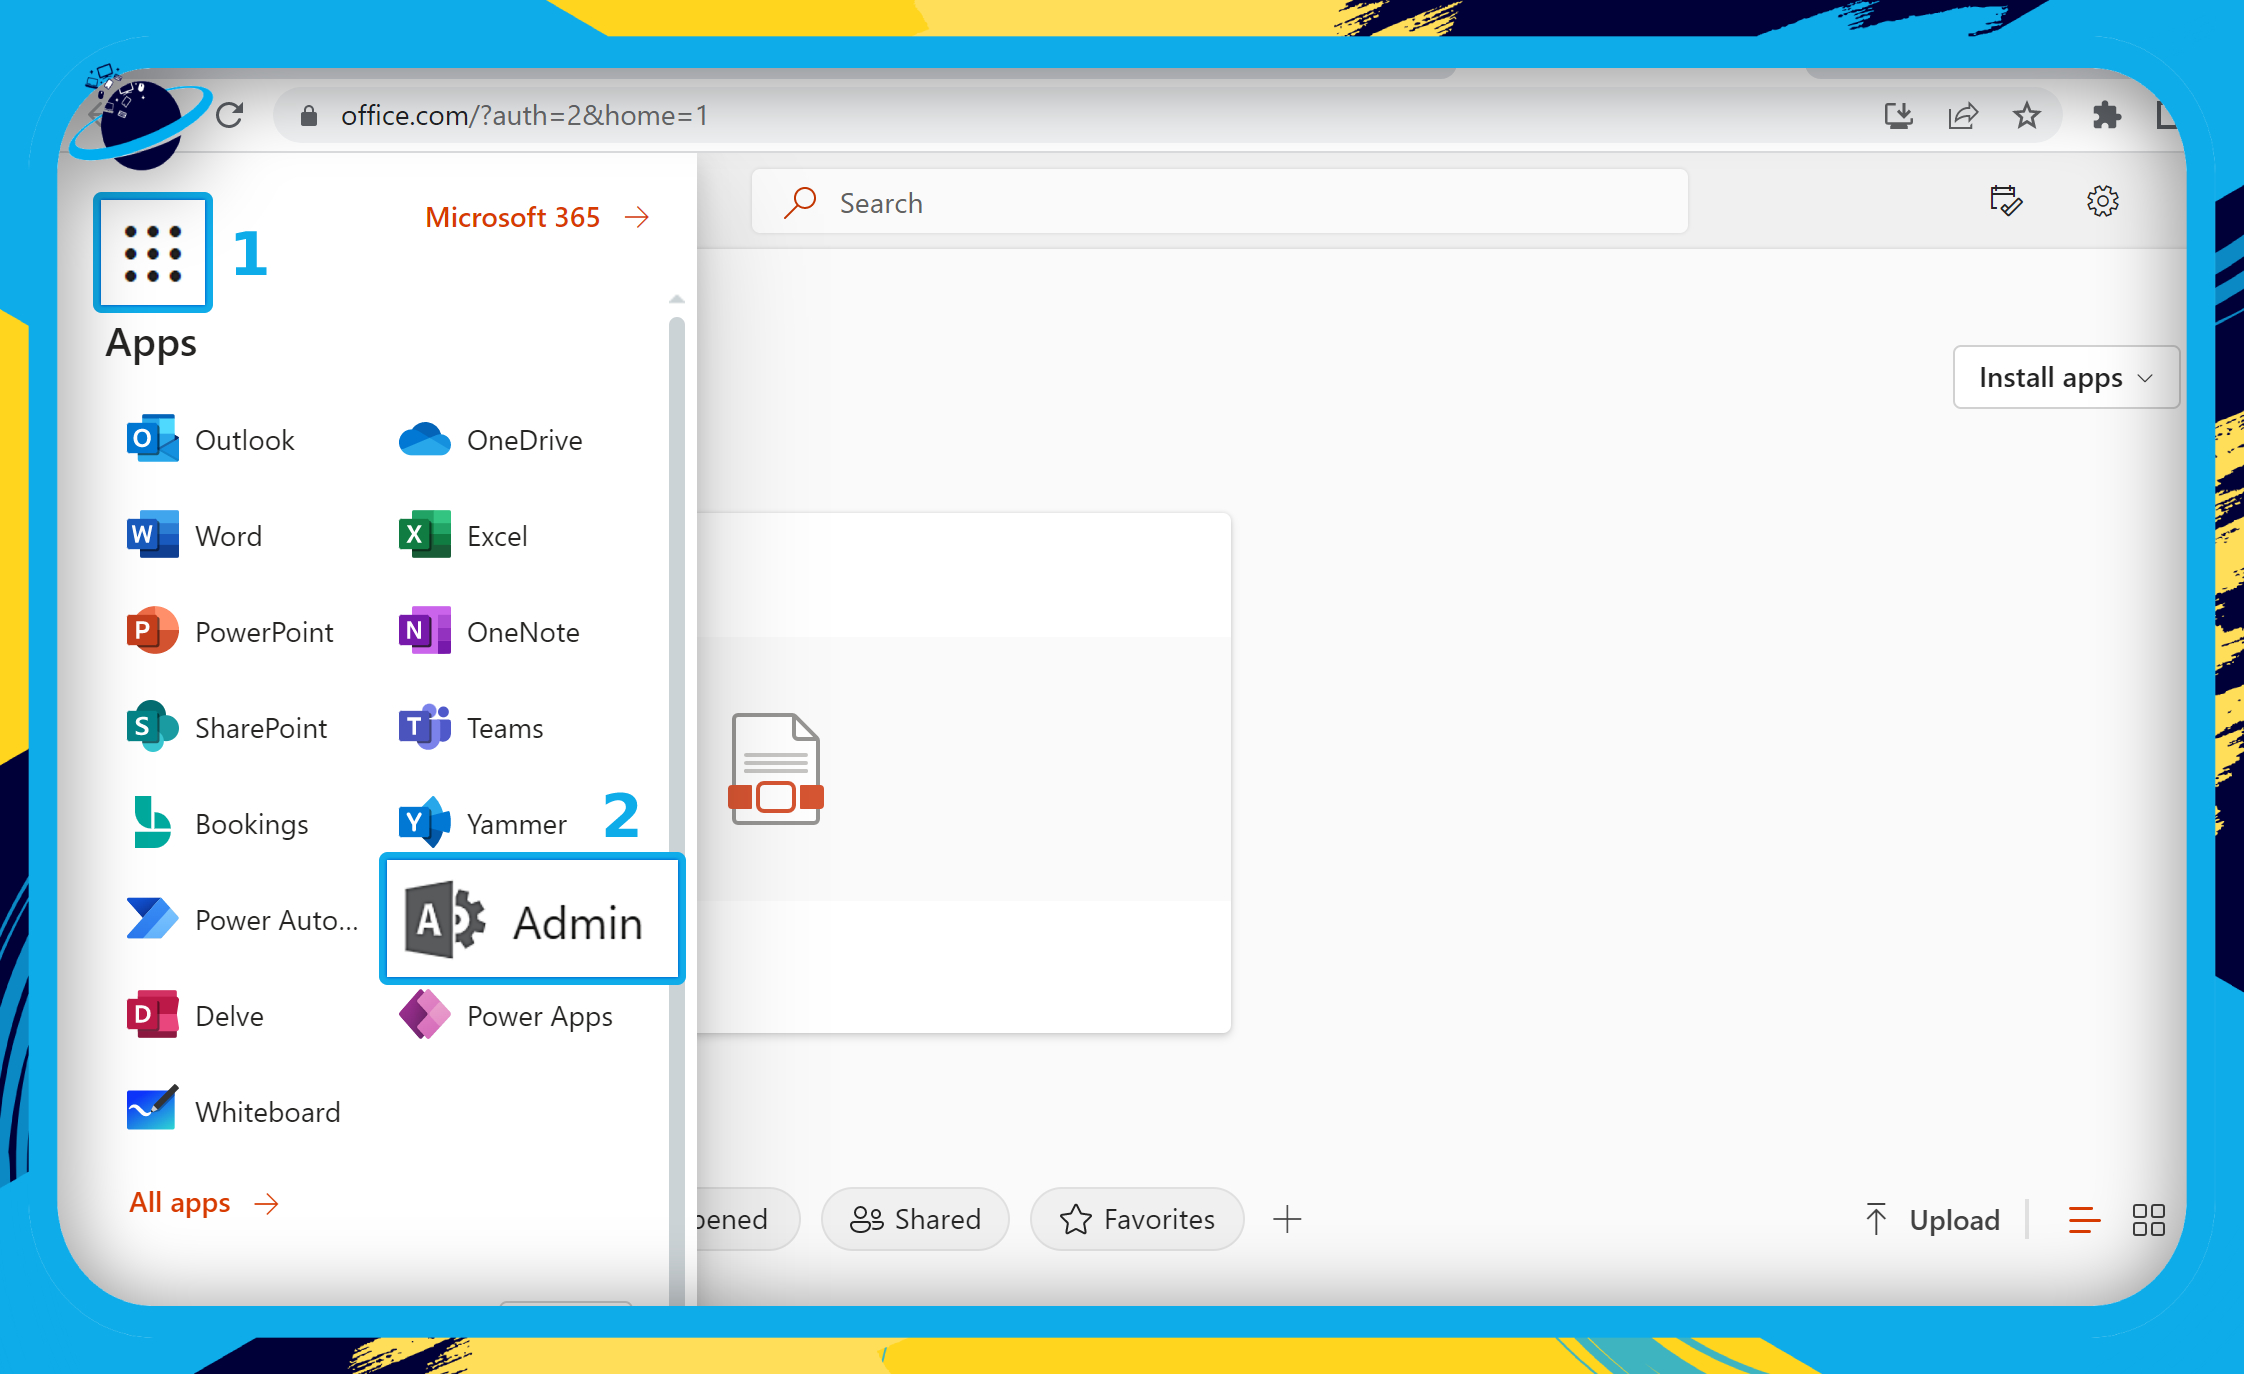
- Go to “Billing” on the left menu of your Admin center.
- Then select “Purchase services.”
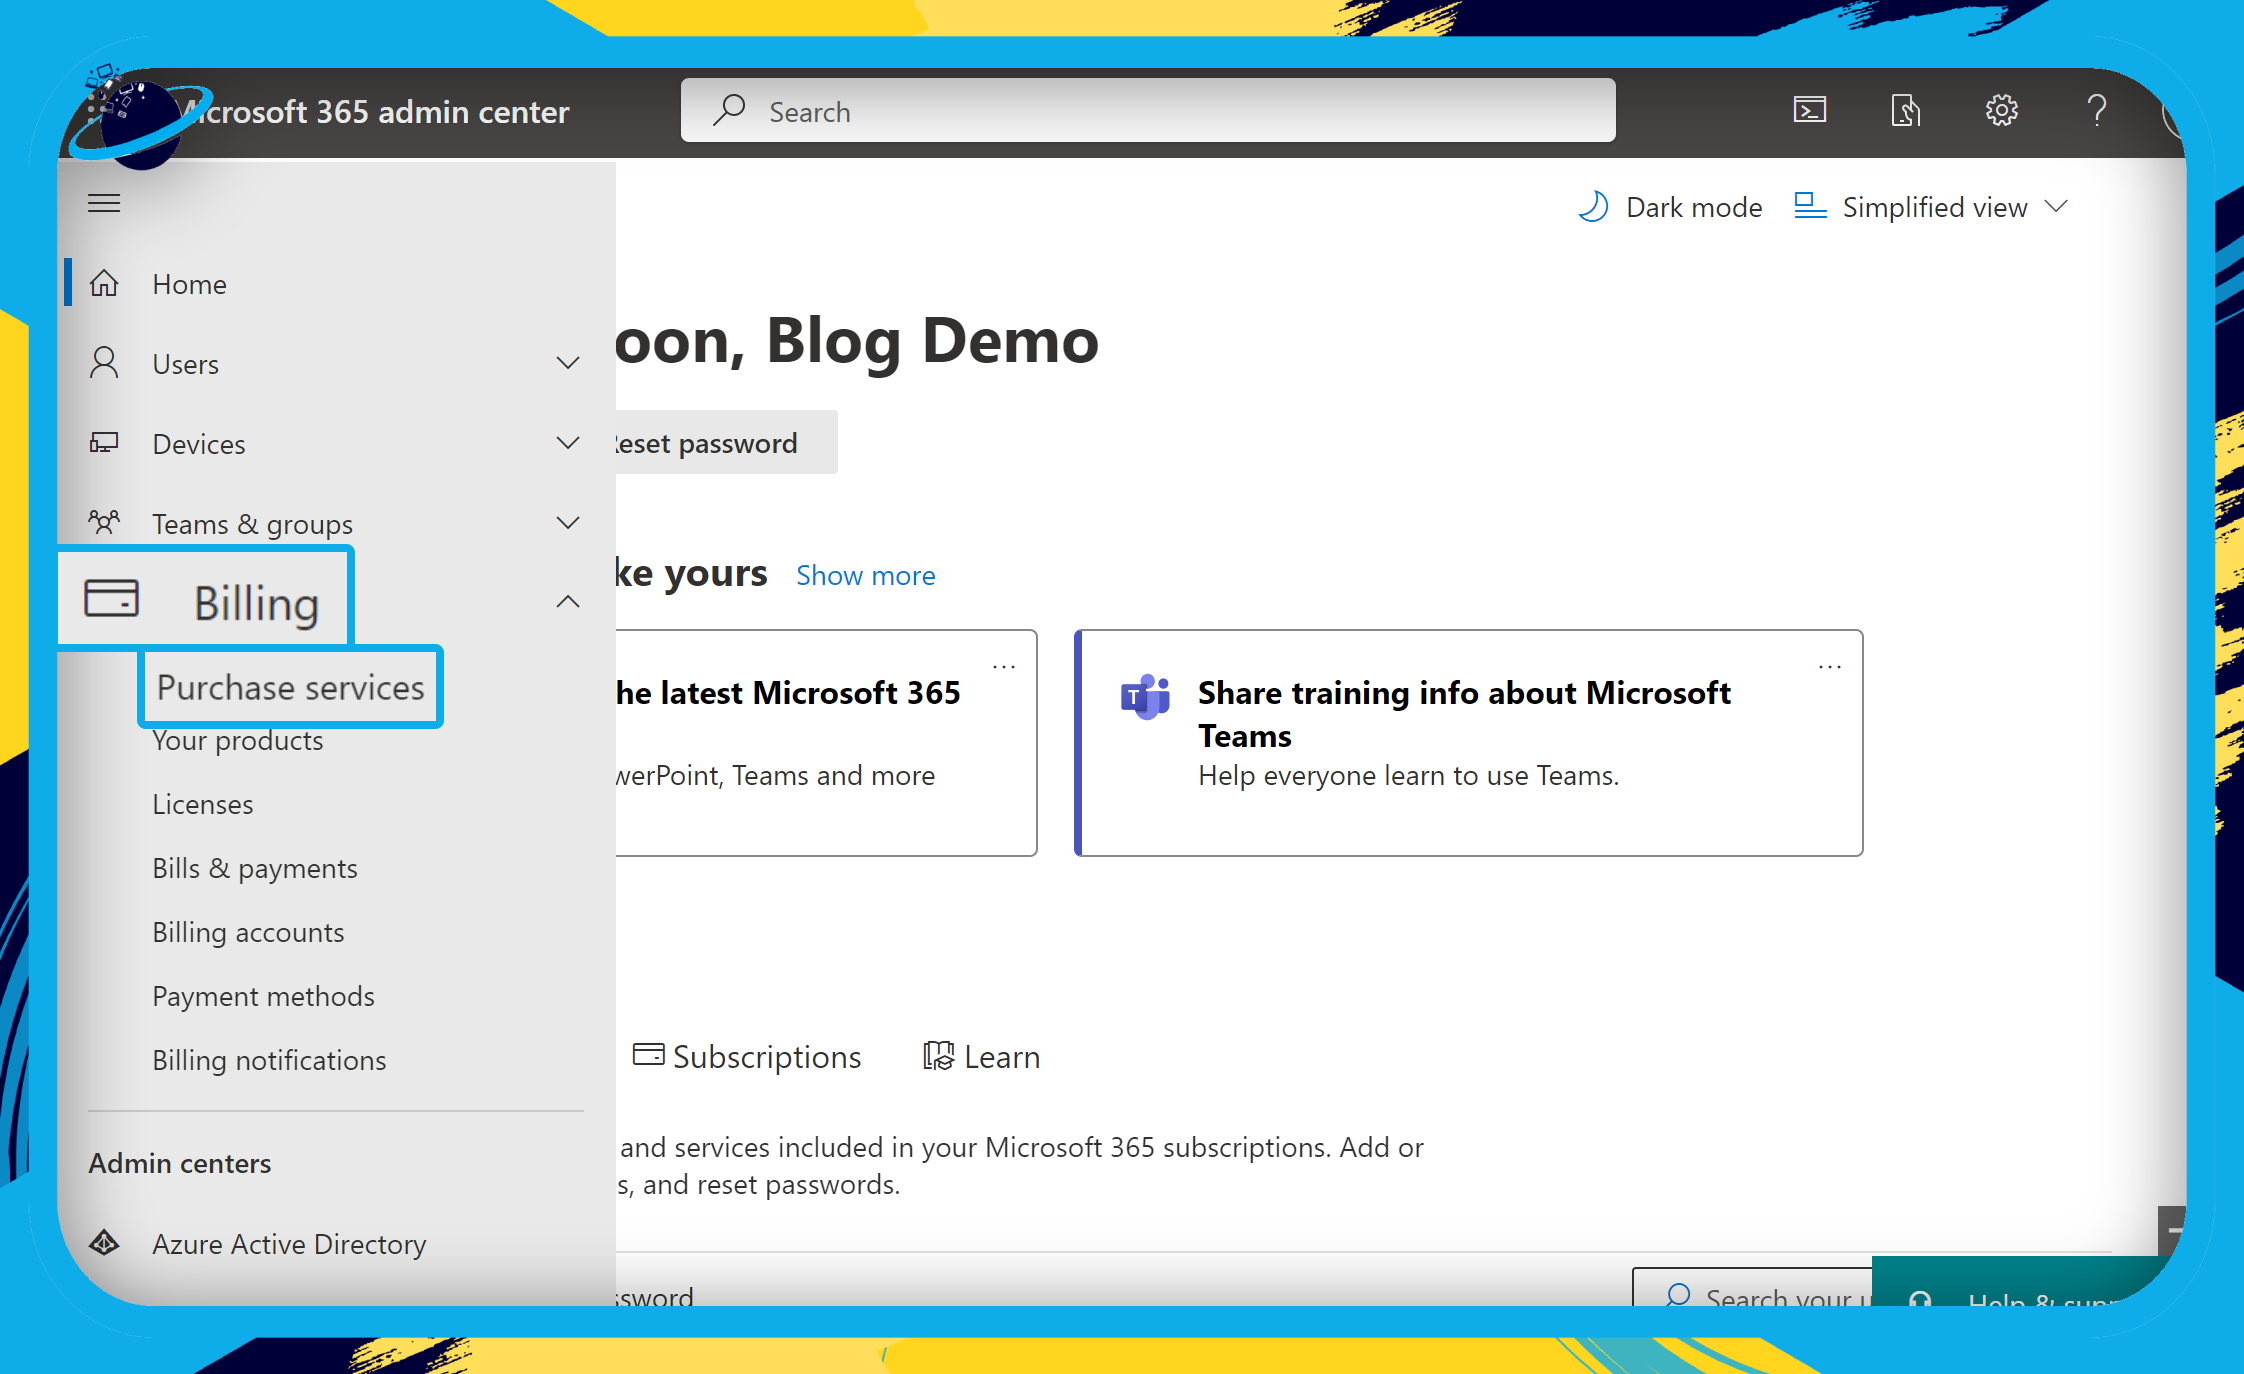
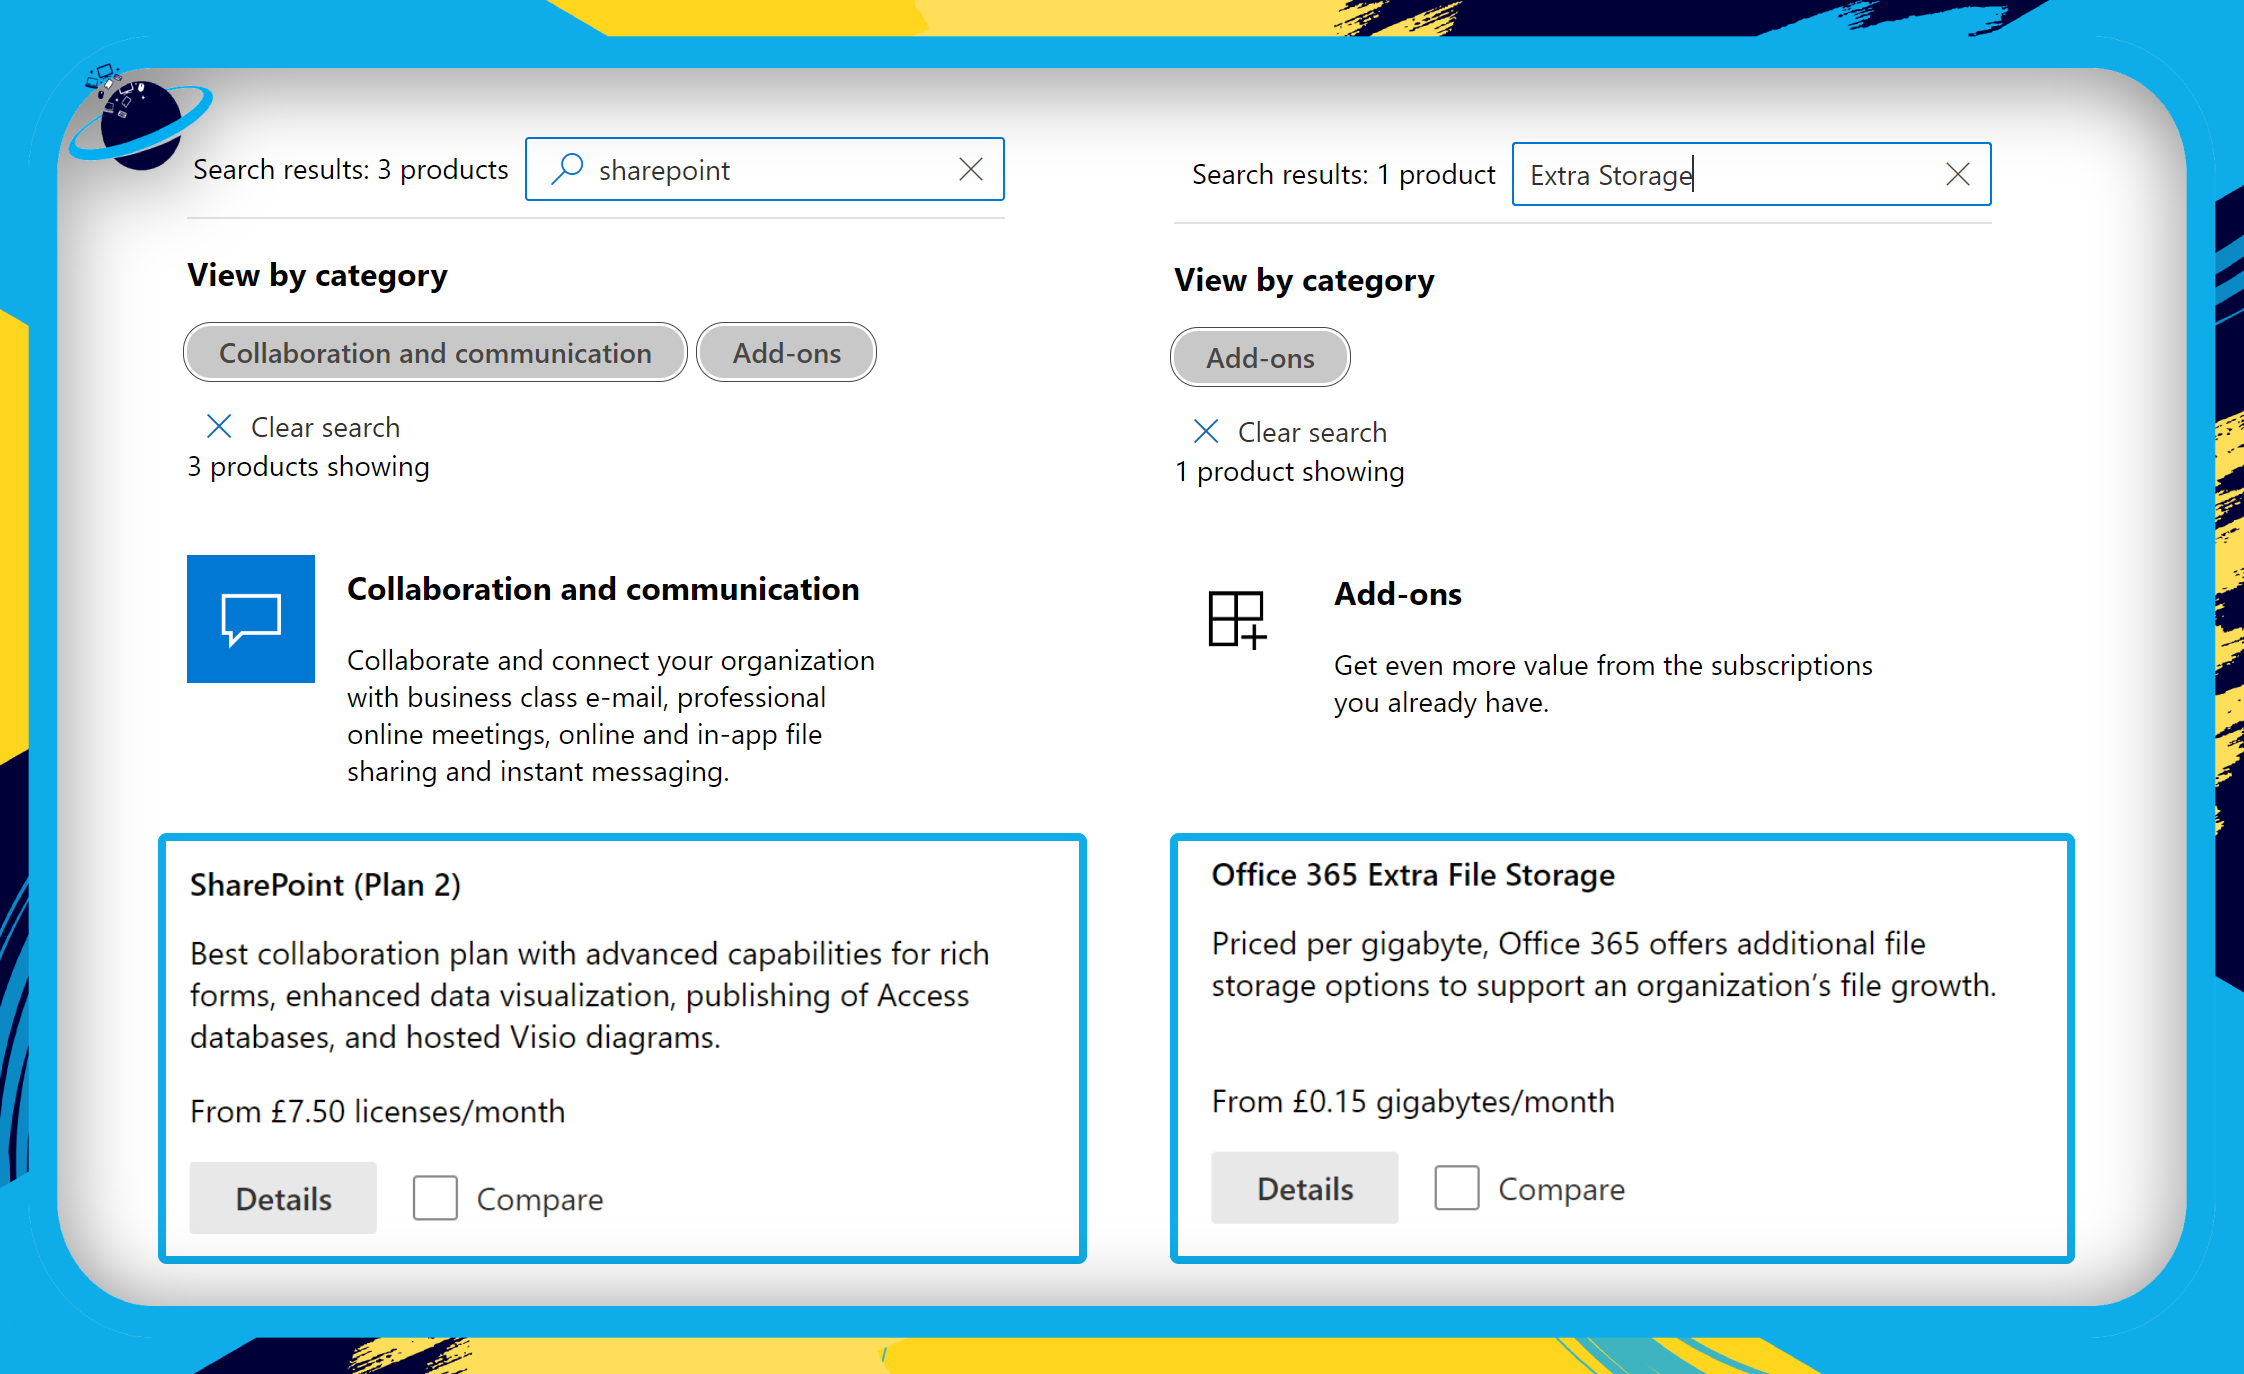
There are two services of interest:
Firstly, search for “SharePoint” and click “Details” next to “SharePoint (Plan 2).” Plan 2 offers more storage than the 1TB limit in Plan 1.
Secondly, type “Extra storage” and click “Details” next to “Office 365 Extra File Storage.” This service allows you to add additional storage priced by gigabytes per month.

Increase storage limit in the SharePoint admin center
By default, your SharePoint storage is located in a central pool from which all sites may draw. Depending on your use as a global or SharePoint admin, you don’t need to increase storage capacity or reallocate space. Everything is handled automatically: websites use what they need when they need it. SharePoint resets all storage limits to 25 TB when you switch from manual storage limits to pooled storage (25600 GB). (Keep in mind that the total storage capacity of your company may be less than 25 TB.) Below is a step-by-step tutorial to help you get started.
SharePoint Online assigns a storage allocation based on the number of users. Per licensee, the bundled SharePoint Online storage allocation is 2TB plus 5 GB. A 500 user Office 365 plus SharePoint Online subscription, for example, would give 22 TB of storage (2 TB + (.005 TB *1000 users)). This storage is included and accessible to all Office 365 tenant site collections, and it acts as a common pool from which anybody using SharePoint Online can draw. Additional storage is available if you’ve used all your basic SharePoint storage. Follow through to see how you can take advantage of the limit and increase it for your users.
Step by step process – increase the storage limit
- Sign in to your Office 365 account.
- Click the app launcher icon in the top left. (1)
- Then select “Admin” from the menu. (2)
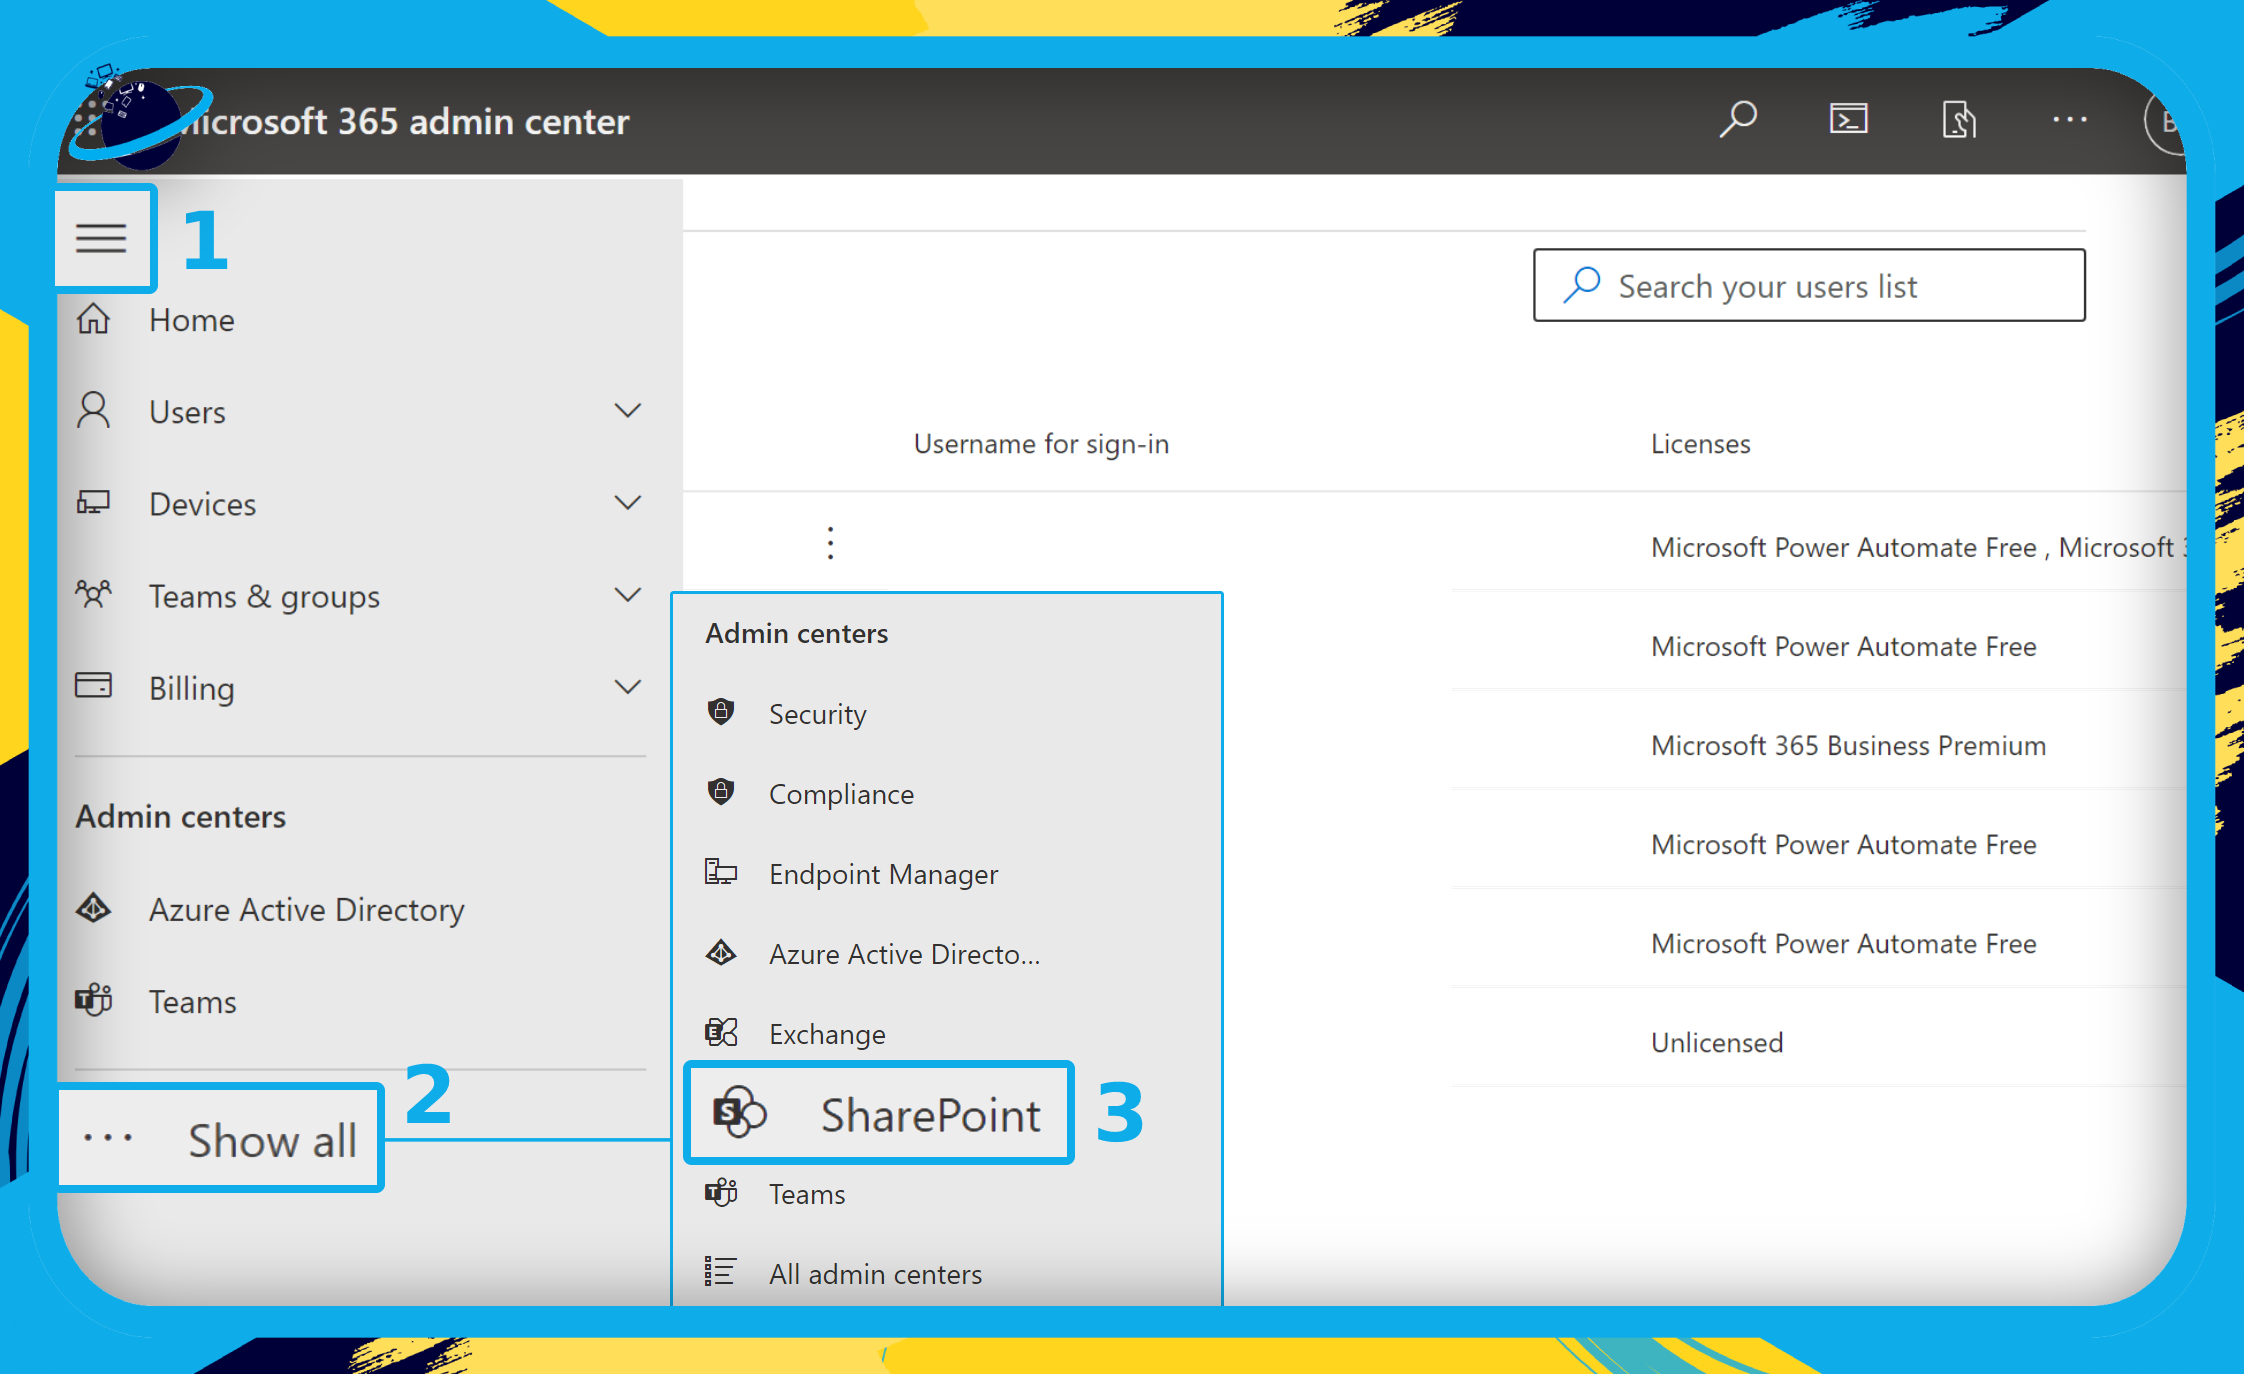
- Click the
 menu icon in the top left of your Admin center. (1)
 - Click “Show all” to reveal more Admin centers. (2)
- Then select “SharePoint” from the list of Admin centers. (3)
- Go to “Settings” in the left menu of the SharePoint Admin center. (1)
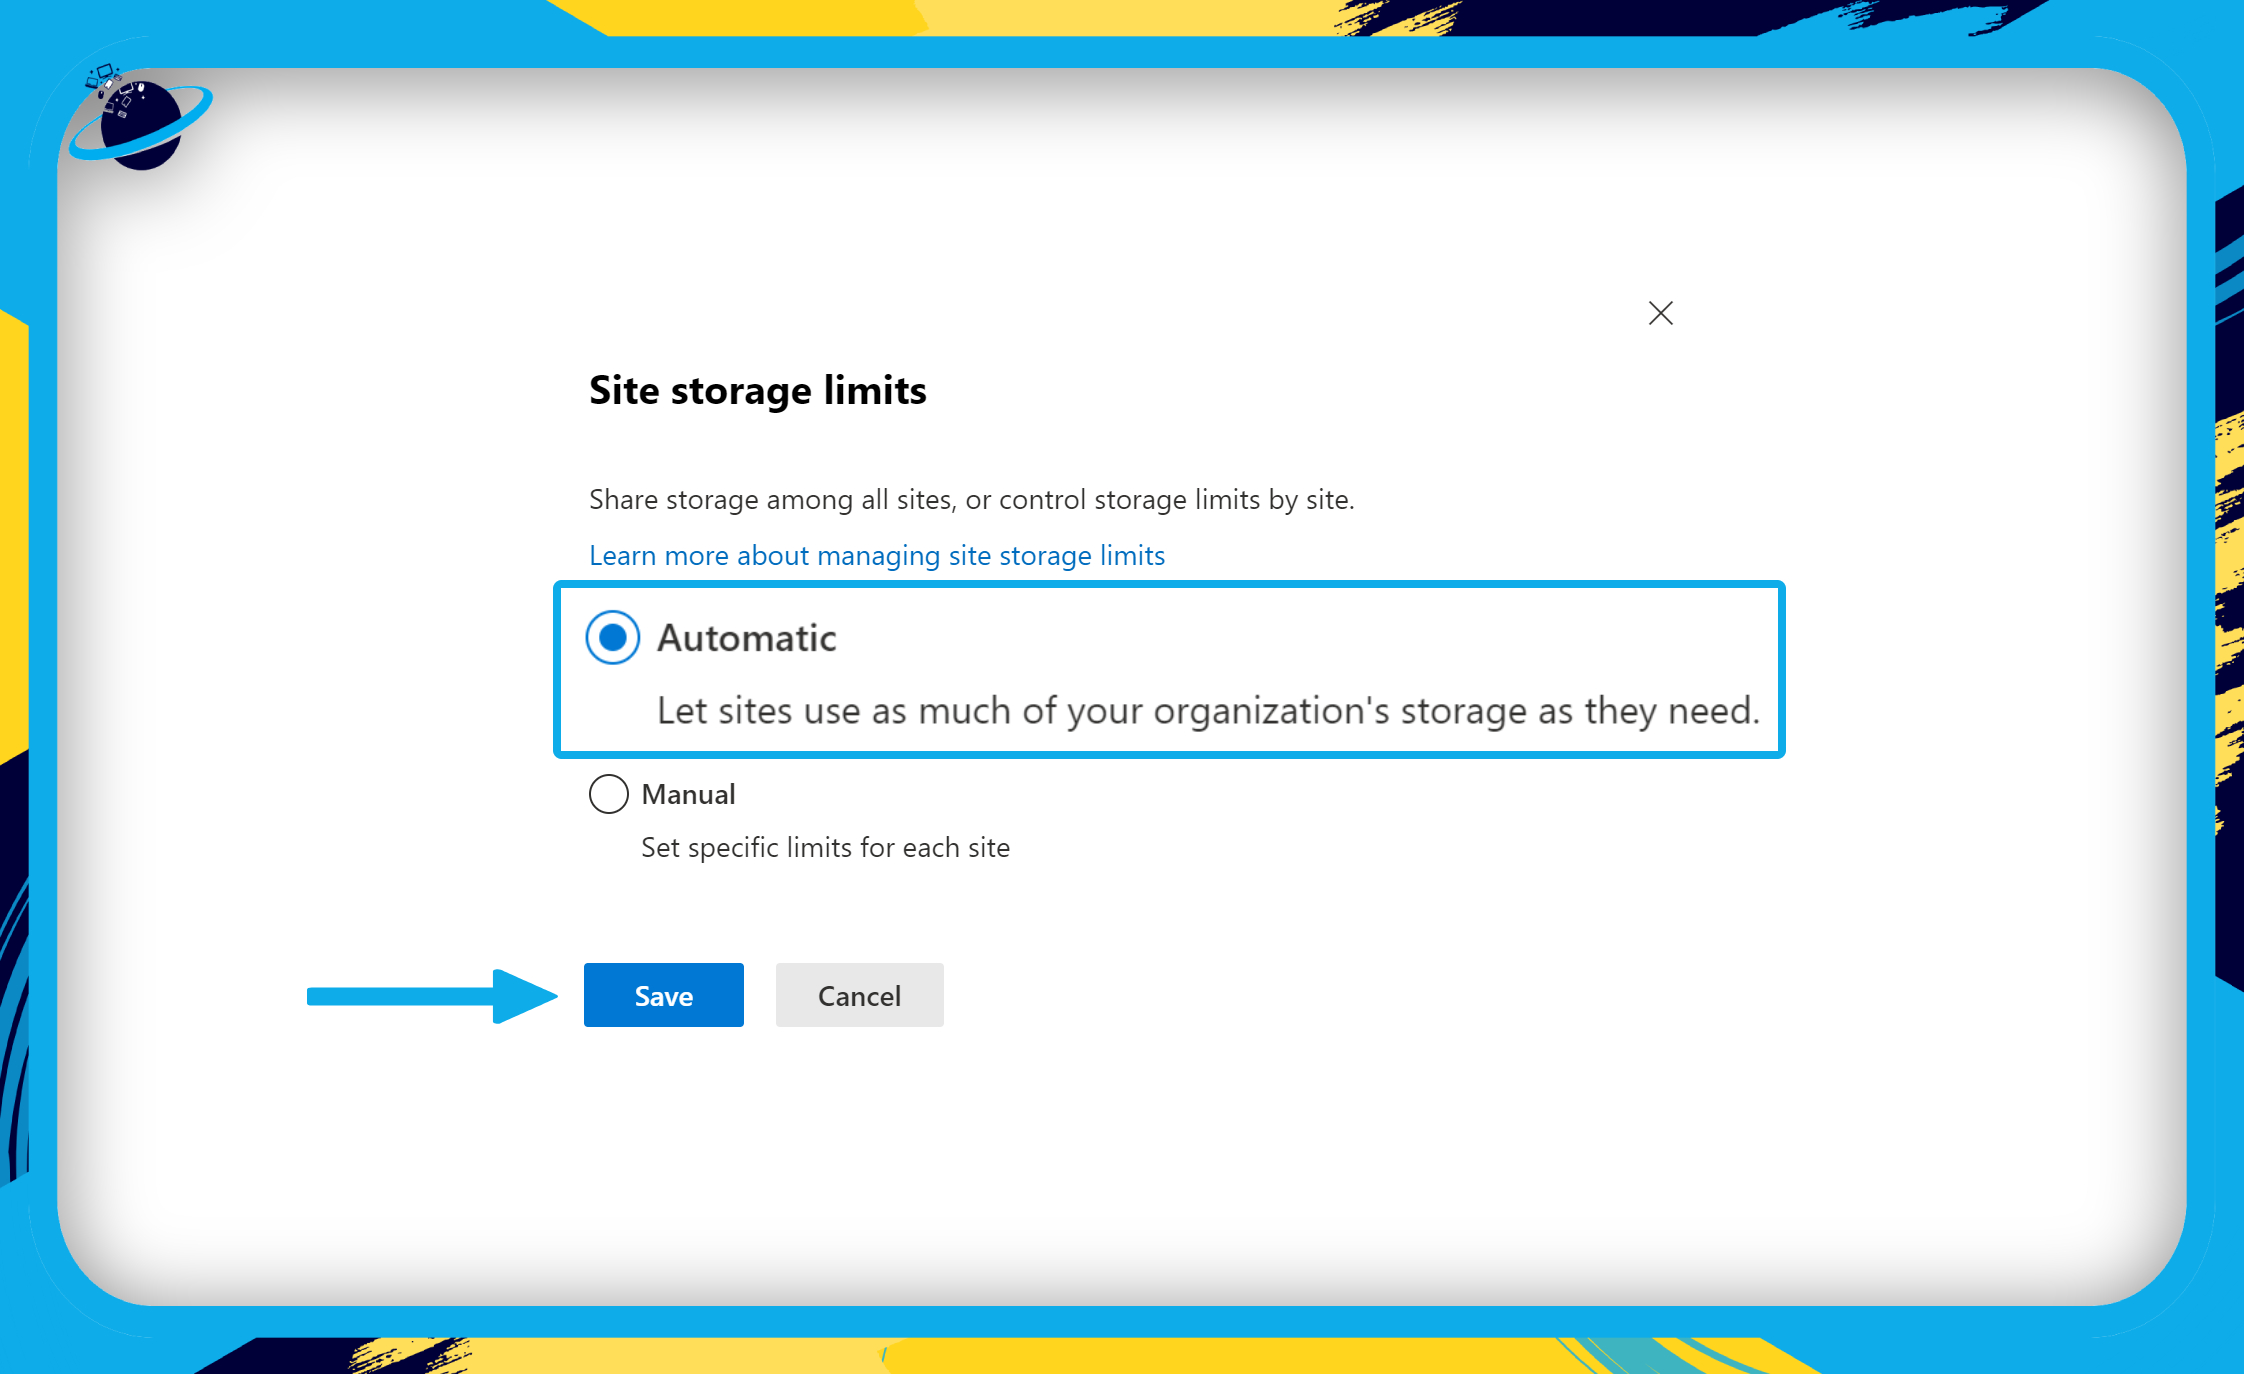
- Then select “Site storage limits.” (2)

- Finally, set the storage limits to “Automatic” and click the “Save” button.
By settings the storage limits to “Automatic,” every site will have access to as much of your organization’s storage as they require.
You can edit the storage limit to your preferences to ensure that users within your organization have an adequate amount of storage to conduct tasks within your SharePoint network. Many people have wondered if and how they may expand their SharePoint storage above the current 25 TB limit, so they aren’t compelled to buy more (expensive) SharePoint Online storage. The frequency of this request indicates that many businesses have already exceeded the recently increased SharePoint Online storage limit of 25 TB.
Our plan covers a small to mid-scale business, therefore having a huge database with over 25TB of storage is not required. However, you can advance plans to get more storage like the 25TB plan or pay extra and get additional storage depending on your requirements.
Using PowerShell scrips to increase the storage
To increase the storage in SharePoint Online, you may use Windows PowerShell. To begin, you’ll need to connect Windows PowerShell to the SharePoint Online Site. Please take the time to explain the method to us. PowerShell is a task automation system that consists of a command-line shell, a scripting language, and a configuration management framework that works across platforms. PowerShell is compatible with Windows, Linux, and macOS.
Increase the storage of SharePoint using PowerShell
Let’s look at how to alter the storage quota for a SharePoint Online site collection using PowerShell (SharePoint Online management shell).
To alter the site collection storage quota in SharePoint Online, use the Set-SPOSite PowerShell cmdlets from Microsoft.
You must enter the StorageQuota in MB here.
For example, if you wish to set a site collection to 10GB, you must supply 10240, as seen above.
The site collection storage space will be set to 10GB when you run the above PowerShell script:
PowerShell is a scripting language that is often used to automate system administration. It’s also utilized in CI/CD systems to develop, test, and deploy solutions. The.NET Common Language Runtime underpins PowerShell (CLR). .NET objects are used for all inputs and outputs. There’s no need to parse text output to get information out of it. The following are some of the characteristics of the PowerShell scripting language:
- Functions, classes, scripts, and modules make it extensible.
- Formatting mechanism with a lot of flexibility for simple output
- Dynamic type system with an extensible type system
- Support for standard data formats such as CSV, JSON, and XML is built-in.
That’s it for this Blog thank you for taking time out to read our content, please feel free to email our team about how it went if you followed the steps or if you need more help with the questions we answered in this Blog.