Permissions within any system dictate what one can and cannot do; this is the case for Microsoft 365 mailboxes- such as the kind you see in Outlook. Simply put, permissions are the guidelines within which you operate in or on a system- the more limited your permissions in a Microsoft 365 mailbox, the less you can do.
| Permission | Description |
| Full Access | Full delegate access allows you to open a mailbox, view its content, and distribute new content via the mailbox in question. |
| Send As | This level of delegate access does not allow you to read a mailbox’s messages; however, it does allow you to send messages via the mailbox, as though the mailbox owner sent it. |
| Send on Behalf | This level of delegate access mimics the “Send As” permission level. Despite this, messages sent will reveal a delegate access user composed the email. |
Today, I’ll break down the three key recipient permissions for Microsoft 365 mailboxes. We’ll start at the bottom with “Send on Behalf” permissions, followed by “Send As.” I’ll be covering the “Full Access” permission level last as it grants the least privileges — shocker, I know.
Contents:
- [1] How do “Send As” permissions work in Microsoft 365 mailboxes
- [2] How do “Send on Behalf” permissions work in Microsoft 365 mailboxes
- [3] How do “Full Access” permissions work in Microsoft 365 mailboxes
- [4] How should I delegate staff to my mailbox
- [5] How to delegate permissions to your mailbox
- [6] Recap & Farewell
How do “Send As” permissions work in Microsoft 365 mailboxes?
Basic things I can do with “Send As” permissions
Users delegated access to your mailbox with the “Send As” permission level possess the permission to compose and deliver messages- without notifying the recipient of the news that a delegate user sent their message. Despite this, a delegate user with this permission level does not possess the ability to read messages received by the mailbox. While this permission is not particularly complex, it has many uses. Take, for instance, if you need to deliver messages on behalf of another user without exposing that someone else is communicating with the message recipient.
How “Send As” operates with EAC
EAC or Exchange Admin Center is a platform utilized to modify and configure administrative settings regarding the Microsoft Exchange service. The EAC contains three key delegate types: mailboxes with user accounts, mail users with accounts, and mail-enabled security groups, each of which can interact with user mailboxes, linked mailboxes, resource mailboxes, shared mailboxes, distribution mailboxes, dynamic distribution mailboxes, and mail-enabled security groups. In other words, you cannot receive this permission level for mailboxes of an unmentioned recipient type or if your mailbox is of an unlisted delegate type.
| Exchange Admin Center recipient types | Exchange Admin Center delegate types |
| User mailboxes | Mailboxes with user accounts |
| Linked mailboxes | Mail users with accounts |
| Resource mailboxes | Mail-enabled security groups |
| Shared mailboxes | |
| Distribution mailboxes | |
| Dynamic distribution mailboxes | |
| Mail enabled security groups | |
| Microsoft 365 groups |
How “Send As” operates with Powershell
Powershell is a task automation and management program capable of interacting with the Microsoft 365 suite- thanks to importable modules. Unfortunately, the “Send As” permission level does not permit access to actions within Powershell. However, this is not the case for both low permission levels; “Send on Behalf” happens to be the opposite.

How do “Send on Behalf” permissions work in Microsoft 365 mailboxes
Basic things I can do with “Send on Behalf” permissions
When you are delegated access to a mailbox with the “Send on Behalf” permissions level, you gain sending permission for the mailbox. Despite this, you cannot send messages as the mailbox owner. As you may notice: when you receive an email from a similar delegate, you are shown both who they’re responding on behalf of and who they are. This form of delegate access differs from having “Send As” permissions, where someone can take your word for another’s. The information will often be provided to recipients by an automated addition to your message, stating the message was sent by “<Delegate> on behalf of <Mailbox owner>.”
How “Send on Behalf” operates with EAC and Powershell
You can use the Exchange Admin Center to delegate the following mailbox types to other mailboxes: mailboxes with user accounts (a mailbox with connected users), mail users with accounts (a user with an account, i.e., not a third party), mail-enabled security groups (sometimes used to gatekeep SharePoint sites), and distribution groups (used to deliver messages to multiple mailboxes at once). Accounts delegated as such can interact with: user mailboxes, resource mailboxes, distribution mailboxes, dynamic distribution groups, mail-enabled security groups, and Microsoft 365 groups. Differing from “Send As” delegates, you can also interact with shared mailboxes via Powershell- a command-line automation management tool.
| Exchange Admin Center recipient types | Powershell recipient types | Exchange Admin Center delegate types |
| User mailboxes | Shared mailboxes | Mailboxes with user accounts |
| Linked mailboxes | Mail users with accounts | |
| Resource mailboxes | Mail-enabled security groups | |
| Shared mailboxes | ||
| Distribution mailboxes | ||
| Dynamic distribution mailboxes | ||
| Mail enabled security groups | ||
| Microsoft 365 groups |
How do “Full Access” permissions work in Microsoft 365 mailboxes?
Basic things I can do with “Full Access” permissions
Despite its name, those delegated to your mailbox with “Full Access” do not possess full access in a literal sense; they’re able to open the mailbox, read the content within, add additional content and remove existing content. However, they’re not capable of sending messages addressed as you, nor on your behalf.
How “Full Access” operates with EAC and Powershell
Unlike with “Send As” or “Send on Behalf” delegates, those assigned “Full Access” must be only a mailbox with user accounts, mail user with an account, or mail-enabled security group. Consistently limited, the said delegates are only shown to interact with user-mailboxes, resource mailboxes, and shared mailboxes. However, they’re reportedly capable of interacting with discovery mailboxes via Powershell- this is peculiar as other delegate types have no interactions with such mailboxes.
| Exchange Admin Center recipient types | Powershell recipient types | Exchange Admin Center delegate types |
| User mailboxes | Discovery mailboxes | Mailboxes with user accounts |
| Resource mailboxes | Mail users with accounts | |
| Shared mailboxes | Mail-enabled security groups |
How should I delegate staff to my mailbox?
Please note, you can pair delegate access roles to grant more significant levels of access to a person.
| Full Access | Send on Behalf | Send As |
| Best utilized as a form of read-only access | You can use it interchangeably with “Send As” until trust is established or where the recipient mailbox does not represent anything significant. | Not recommended on accounts representing your company or other significant entities/people. As such, this write-only access mode should only be allocated to those well-trusted |
How to delegate permissions to your mailbox
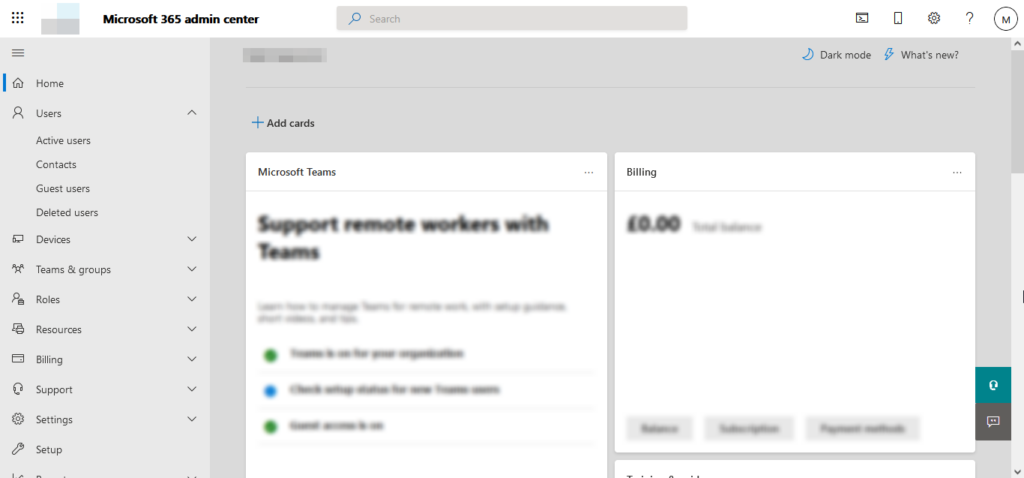
Step 1 – Open the Microsoft 365 Admin center
Mailbox delegations take place within the Exchange admin center. We can access the Exchange admin center via the Microsoft 365 Admin center, as well as the suite’s other relevant admin centers.
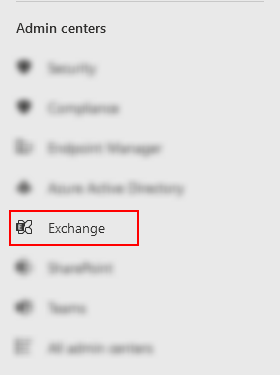
Step 2 – Open the Exchange admin center
At the bottom of the task list on the left, you will find a number of options. Find and select the “Show all” option. In its place, a number of additional options will appear. One of which will be labeled “Exchange.” Select it to open the Exchange admin center.
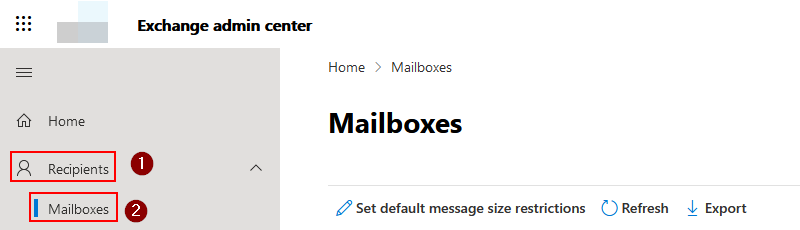
Step 3 – Access available mailboxes
You can access a list of available mailboxes within the Exchange admin center via the left side panel. First select “Recipients” followed by “Mailboxes.” You may notice the content to the right of the panel is altered as you proceed through this step.
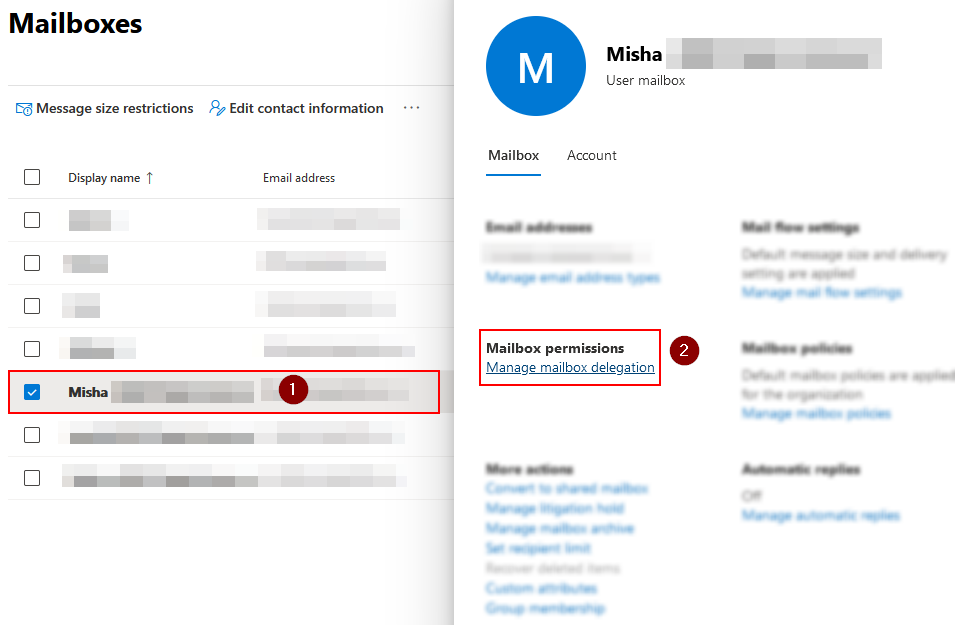
Step 4 – Select a mailbox to delegate to users
Within the list/table presented you will be able to spot a number of mailboxes, both user and shared alike; amongst them should be the mailbox you’re looking for. Should it not be there, please ensure you’re signed in to the correct account, or that the mailbox in question is associated with your Microsoft 365 group. After finding the mailbox you’re looking for you can select it- this is done with a left-click. When you click the mailbox name you will notice an info card appear, inside it, select “Manage mailbox delegation” under the “Mailbox permissions” header.
Step 5 – Choose the delegation settings to configure
In the menu replacing the prior card you will find a descending list of options- each with a label, elaboration, and button. Giving a button a left-click will provide an additional menu where you can select users to delegate your chosen permissions to.

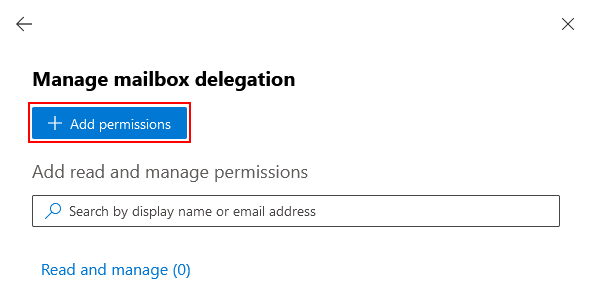
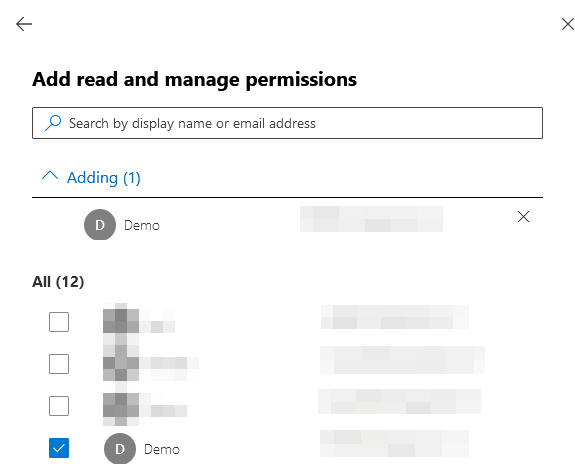
Step 6 – Allocate permissions to your intended recipients
In the new menu select “Add permissions” to access a final menu, in which you can select permission recipients from a list.
Recap & Farewell
Recap
Microsoft 365 utilized three main delegate roles for mailboxes which can be group assigned or individually assigned to users. “Send As” and “Send on Behalf” serve as write-only access roles. While “Full Access” offers read-only permissions. While “Send As” and “Send on Behalf” can be used in place of each other, it’s generally not advised to delegate untrusted staff with “Send As” to important mailboxes.
Farewell
As usual, offering thanks to our readers for their support is the intention of our closing section. We’d be pleased to know you found this post helpful and informative. If you have any more Microsoft 365 related queries, please consult our related articles (listed below). However, if you have other questions, consider looking at the rest of the site. We frequently post new stuff each week and may have the guide or troubleshooting tips you need. Regardless, we wish you a good day/night- farewell, readers.
Our related articles:
- How to change the default text color in Word – Orange is the new black right? Or whatever the kids say these days. This post teaches readers about the default text color in Microsoft Word and how to change it to suit your preferences- black can get boring after all.
- Excel: How to get day of week from date – Tired of pulling up your smartphone’s calendar to figure out when [insert date] is? Me too, friend. Fortunately, I’ve got something to help us both. Come along and read about extracting days of the week from dates.
- SharePoint: can’t add site members: Causes and fixes – If you’re urnning into issues adding site member’s to your SharePoint site, I recommend reading this post- within which you’ll find a useful solution.
- What is the simplest way to transfer files from Google Suite to SharePoint? – Out with the old and in with the new- simple to say, not always simple to do. Fortunately, we’re quite good at explaining things. Consult the following post if you’d like a comprehensive guide to switching from the Google Suite to SharePoint.