Microsoft’s Power Automate is a piece of software that allows users to automate activities in a variety of Microsoft applications. Anyone may use Power Automate to construct automated operations using flows. With low-code, drag-and-drop tools and hundreds of prebuilt connections, you can easily automate repetitive, tiresome processes. You may record and visualize your end-to-end processes with a process consultant, and you’ll get guided counsel for creating flows and specific insights that take the guesswork out of determining what to automate. With the evolution of new technological trends, instruments that serve as the backbone for new breakthroughs become increasingly sophisticated over time. Especially for someone who may have little or no expertise with complicated technologies that need an understanding of backend programming and their respective languages (based on the tool you are using). Follow through for a complete guide on how you can use Power Automate — we’ll cover all the necessary steps to help you use the tool as well as navigate around the features that are used within Power Automate.
After some research, we came up with a list of different points that will help to better understand the platform and help you create an amazing workflow with Power Automate.
Sign up for a Microsoft 365 for Business licence, which includes Power Automate and its impressive capabilities, here for as little as $5 per month. As well as Power Automate, all Microsoft 365 licences include incredible communication and productivity tools, such as Teams, 1TB of cloud storage per user, and business-class email. Purchase Microsoft 365 subscriptions here today.
Overview of Power Automate
We’ll go through an overview of the Power Automate platform in this section. This will provide the user with a visual representation of the platform. Please bear in mind, however, that the platform is susceptible to future changes.
- Before you begin using Power Automate, make sure you have a solid, dependable browser installed, such as Firefox or Chromium Edge.
- Have access to a reliable internet connection.
- Sign in using your Microsoft account.
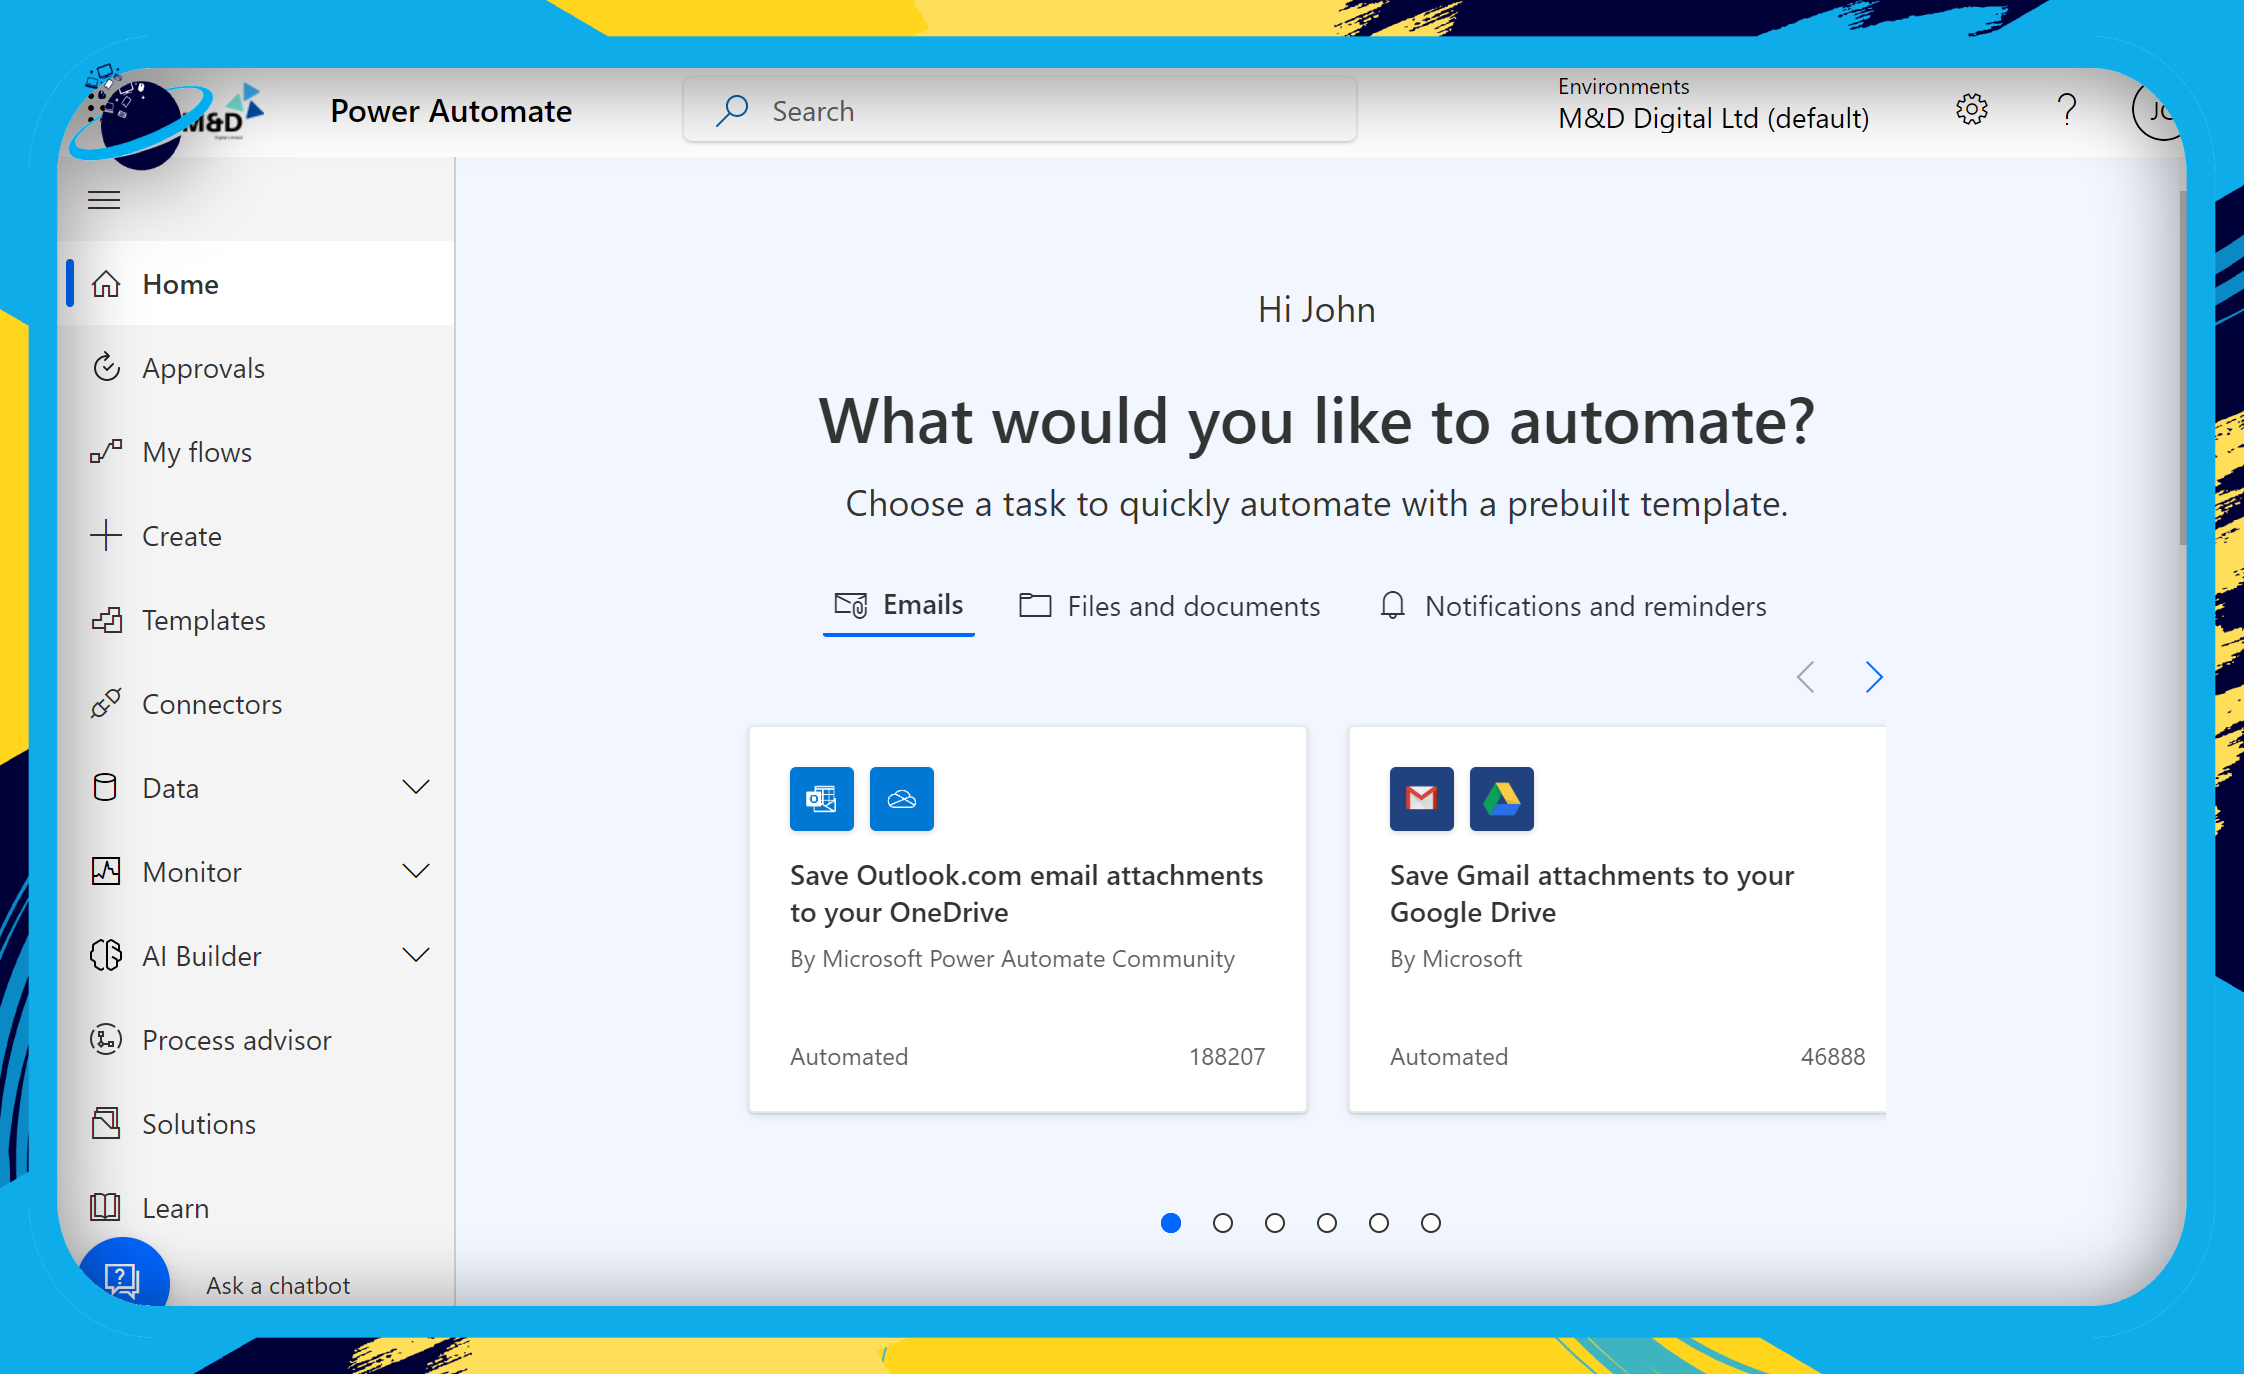
Power Automate Home page
This is Power Automate’s main interface, from which you may go to other pages and learn more about the software’s features on the left. The great thing about Power Automate is that you can either create your own flow from scratch or utilize one of the templates, which offer ready-to-use on-the-go processes.
Connectors
Connectors are services that enable the Power Automate platform to do tasks such as uploading files from your computer to your OneDrive account without the need for human intervention. Apart from that, one of these connections has the ability to link with your phone, allowing you to get updates about your processes while on the road.
On the power automate home page there is a dedicated button for connectors just press it and access the required connectors.
These are some of the more popular connectors available for use, the ones such as Outlook and SharePoint are the main ones you may want to automate such as conversations may also want to automate procedures on your site linked to your Twitter feed. These act in many ways to plugins on a regular website.
A.I Builder
From time to time, certain jobs may necessitate the use of artificial intelligence in order to create a satisfactory output. This is where the AI Builder tool in Power Automate comes in handy! AI Builder enables your flows to forecast certain outputs and improve a company’s overall performance. Microsoft AI powers the functionality, which gives users a click-and-point experience. In other words, you don’t need any prior expertise or knowledge!
Step by step process – How to access Power Automate
Power Automate can be accessed from via any browser. You will need to have access to Microsoft 365 business standard or premium in order to get Power Automate as its features are mainly made to automate business-related tasks such as auto-emailing.
- You can access Power Automate directly using this link.
- Otherwise, you can sign into your Office account.
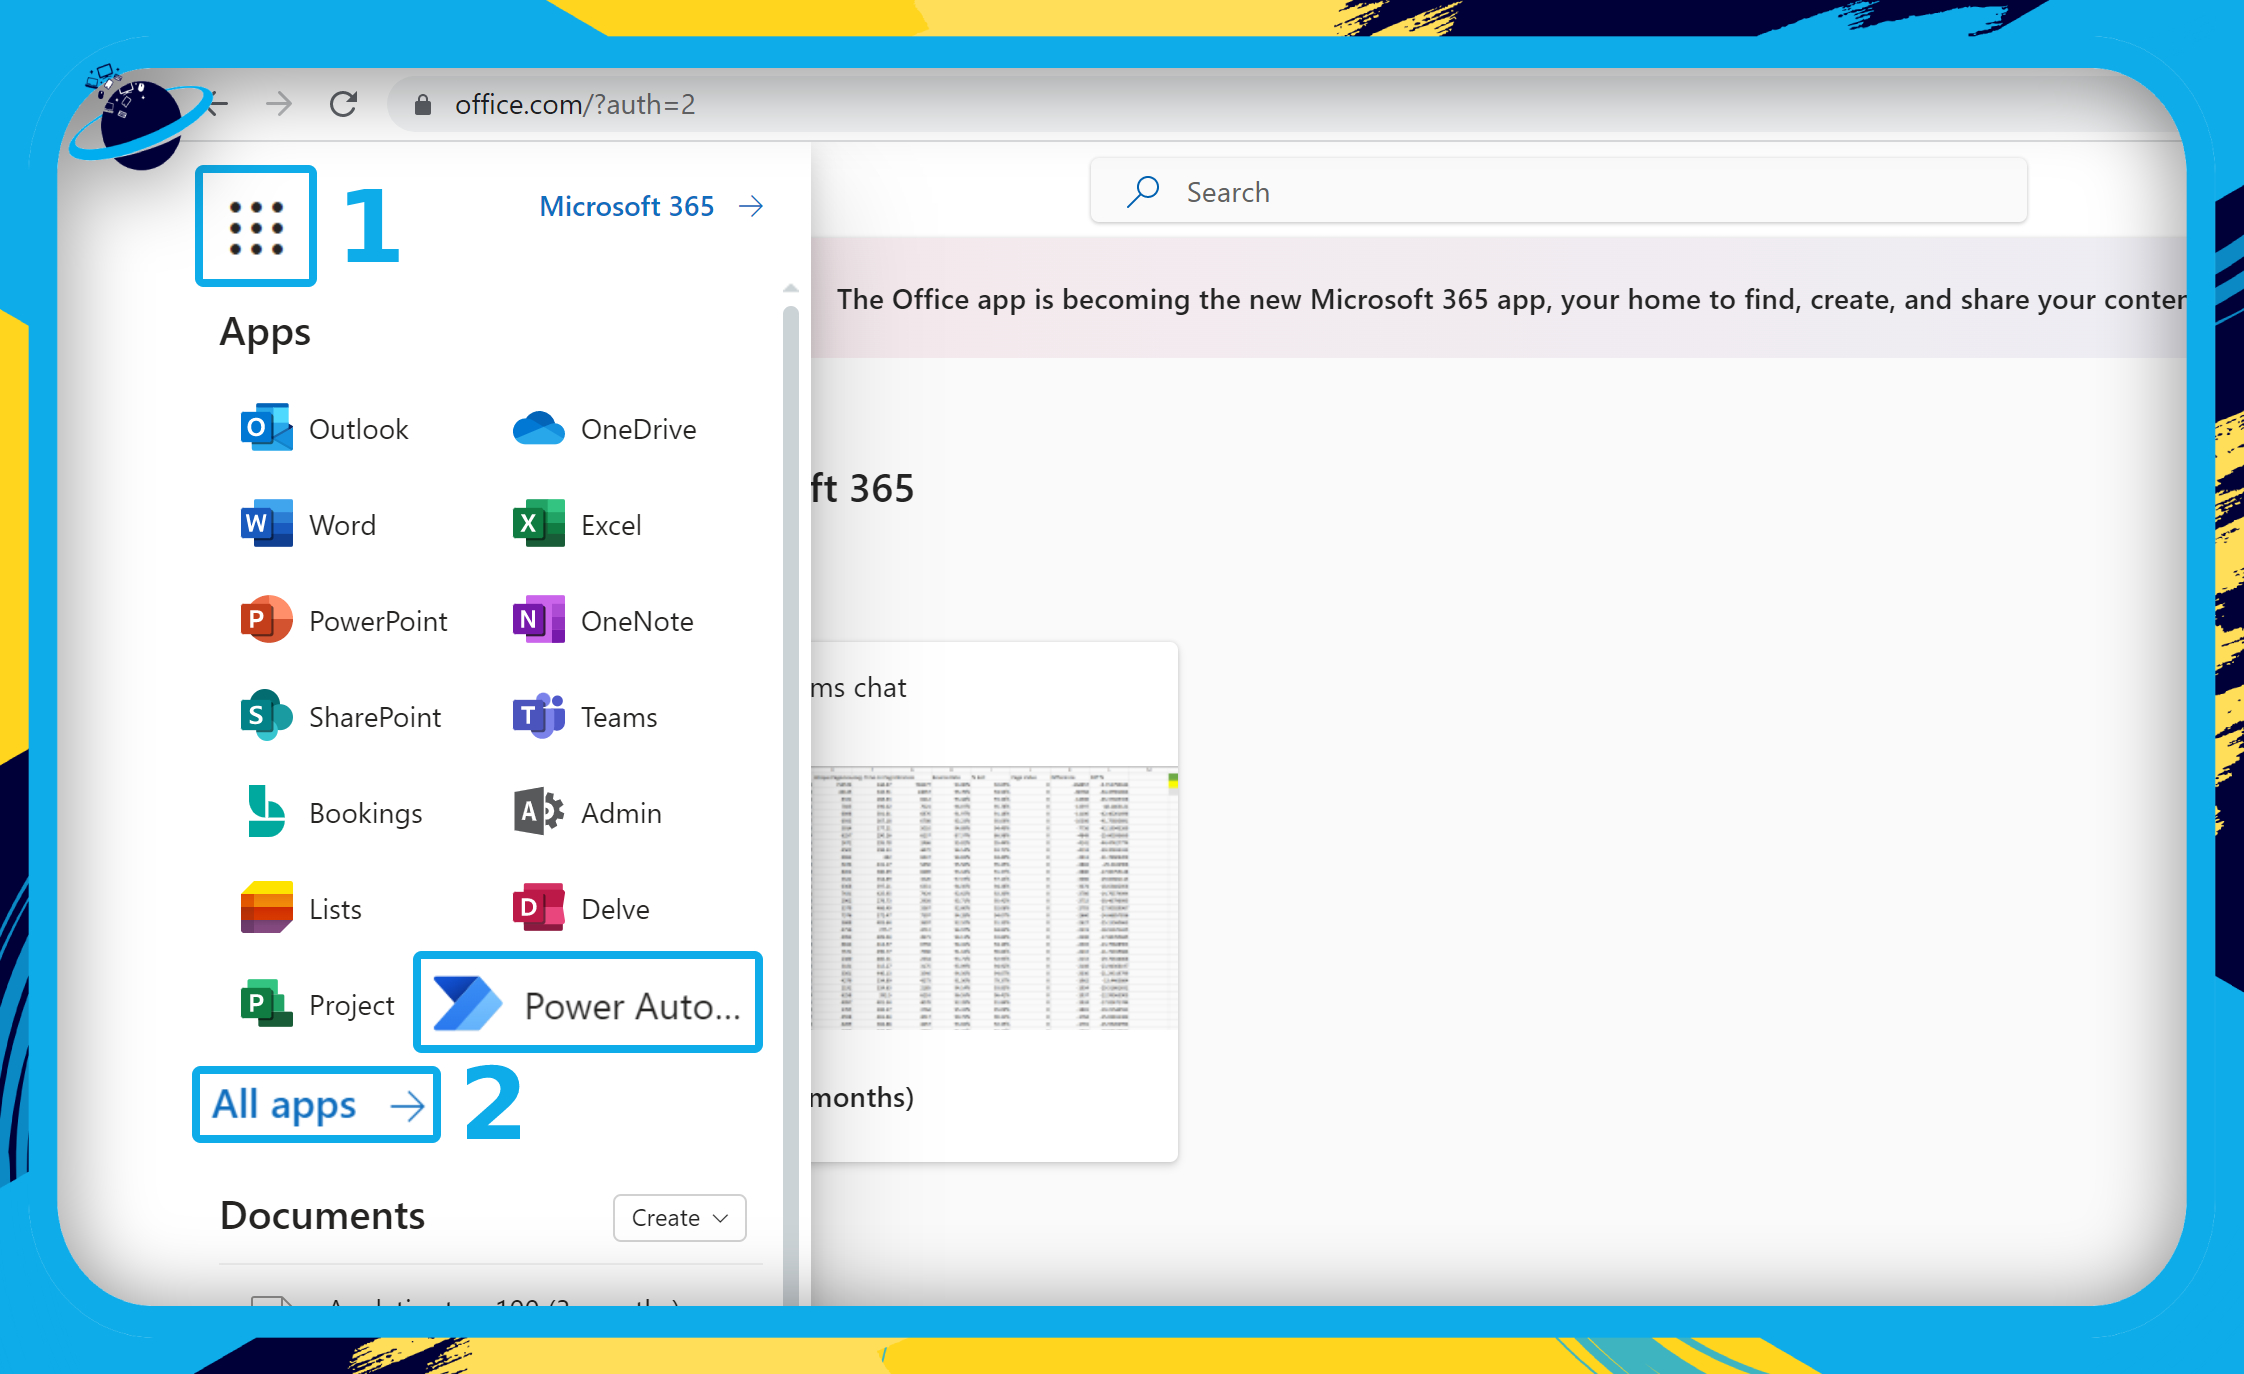
- Click the
 app launcher icon in the top left corner. (1)
 - If you can’t see Power Automate, click on “All apps.” (2)
- Then select “Power Automate” from the apps list.
That’s pretty much it really, you are now in Power Automate and you can carry out essential tasks within the program to help better your overall Office experience.
Data
The user’s linked power automation services are listed on this page. There are several alternatives! The restrictions apply solely to the degree that they are necessary.
The graphic below depicts all of the services I’ve utilized throughout my Power Automate tinkering. Users, on the other hand, have the power to upgrade or detach any services at any time.

Examples of where Power Automate can be used
Here will go over some potential examples where you can find it useful to use Power Automate follow through and see how you can use this asset.
There are a few key principles to keep in mind
The following are the two most common automation operations that we use:
- A trigger is something that initiates a procedure. In a nutshell, it’s a place to start. Triggers can be set to occur at a specific time or when a specific behavior is completed.
- When a trigger or other prompt from a user happens, an action is triggered.
Notifications for new emails received can be sent automatically
We’ll demonstrate how anyone may activate automatic notifications for any emails they receive in this example. This is the simplest method to begin using Power Automate. So, with that out of the way, let’s get started:
- Start by clicking on “+ Create.”
- Then select “Automated cloud flow.”
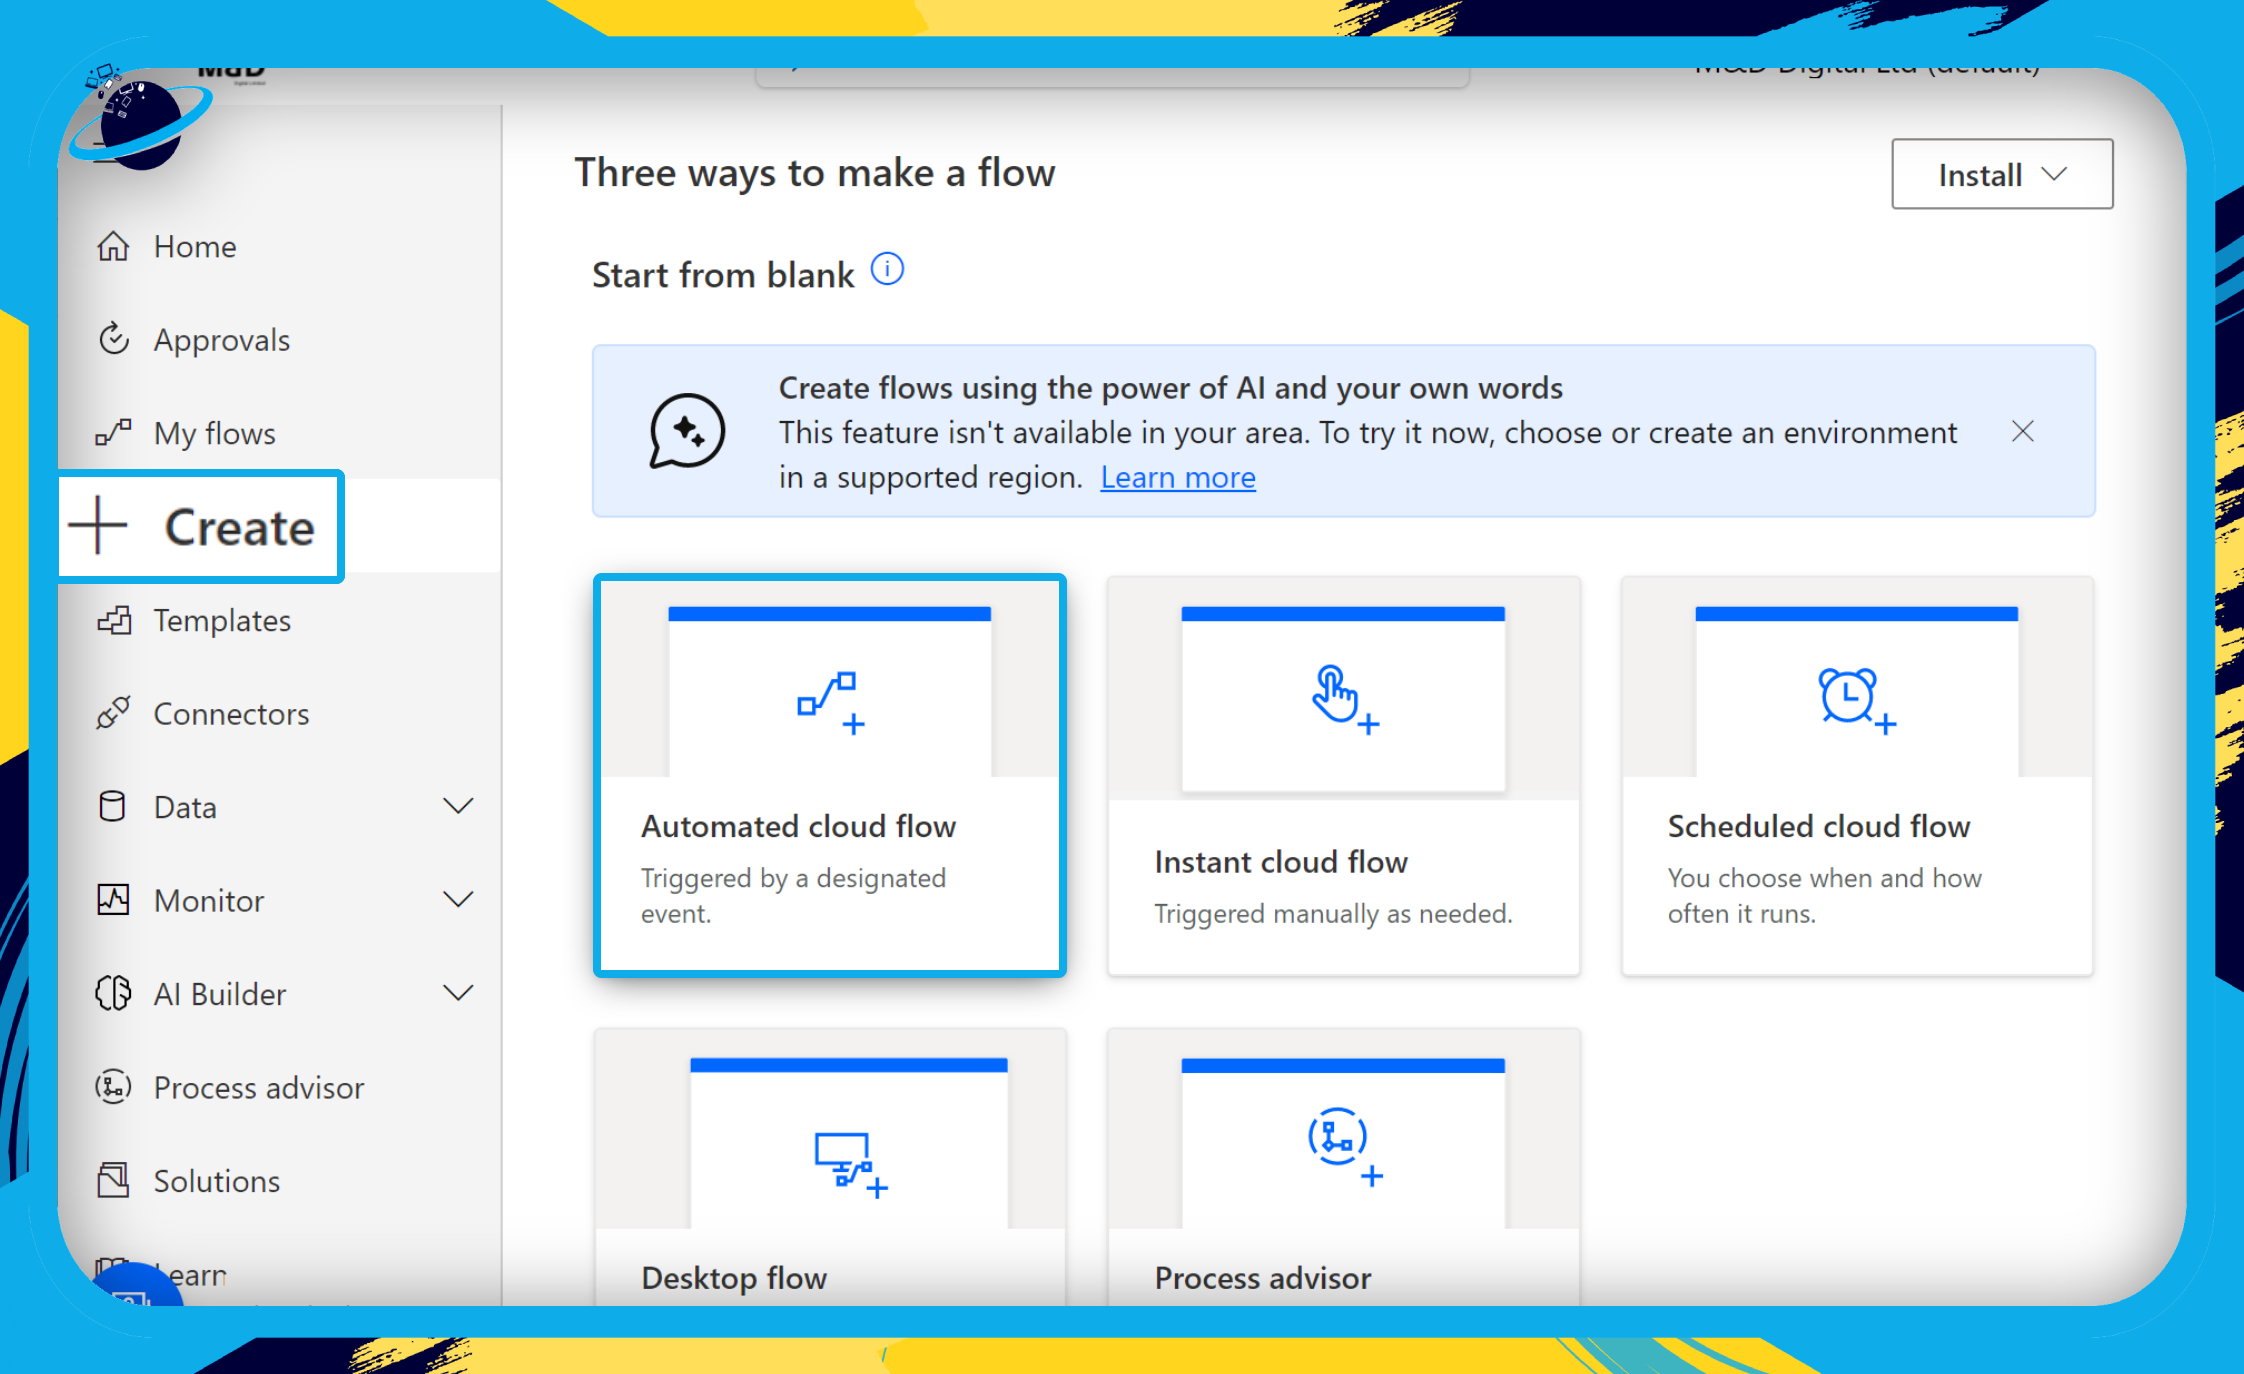
There are various templates to choose from, whether you want to automate tasks such as sending repeat emails or even more complex tasks such as automating copies of files between SharePoint accounts. Have a scroll through and see what you specifically require.
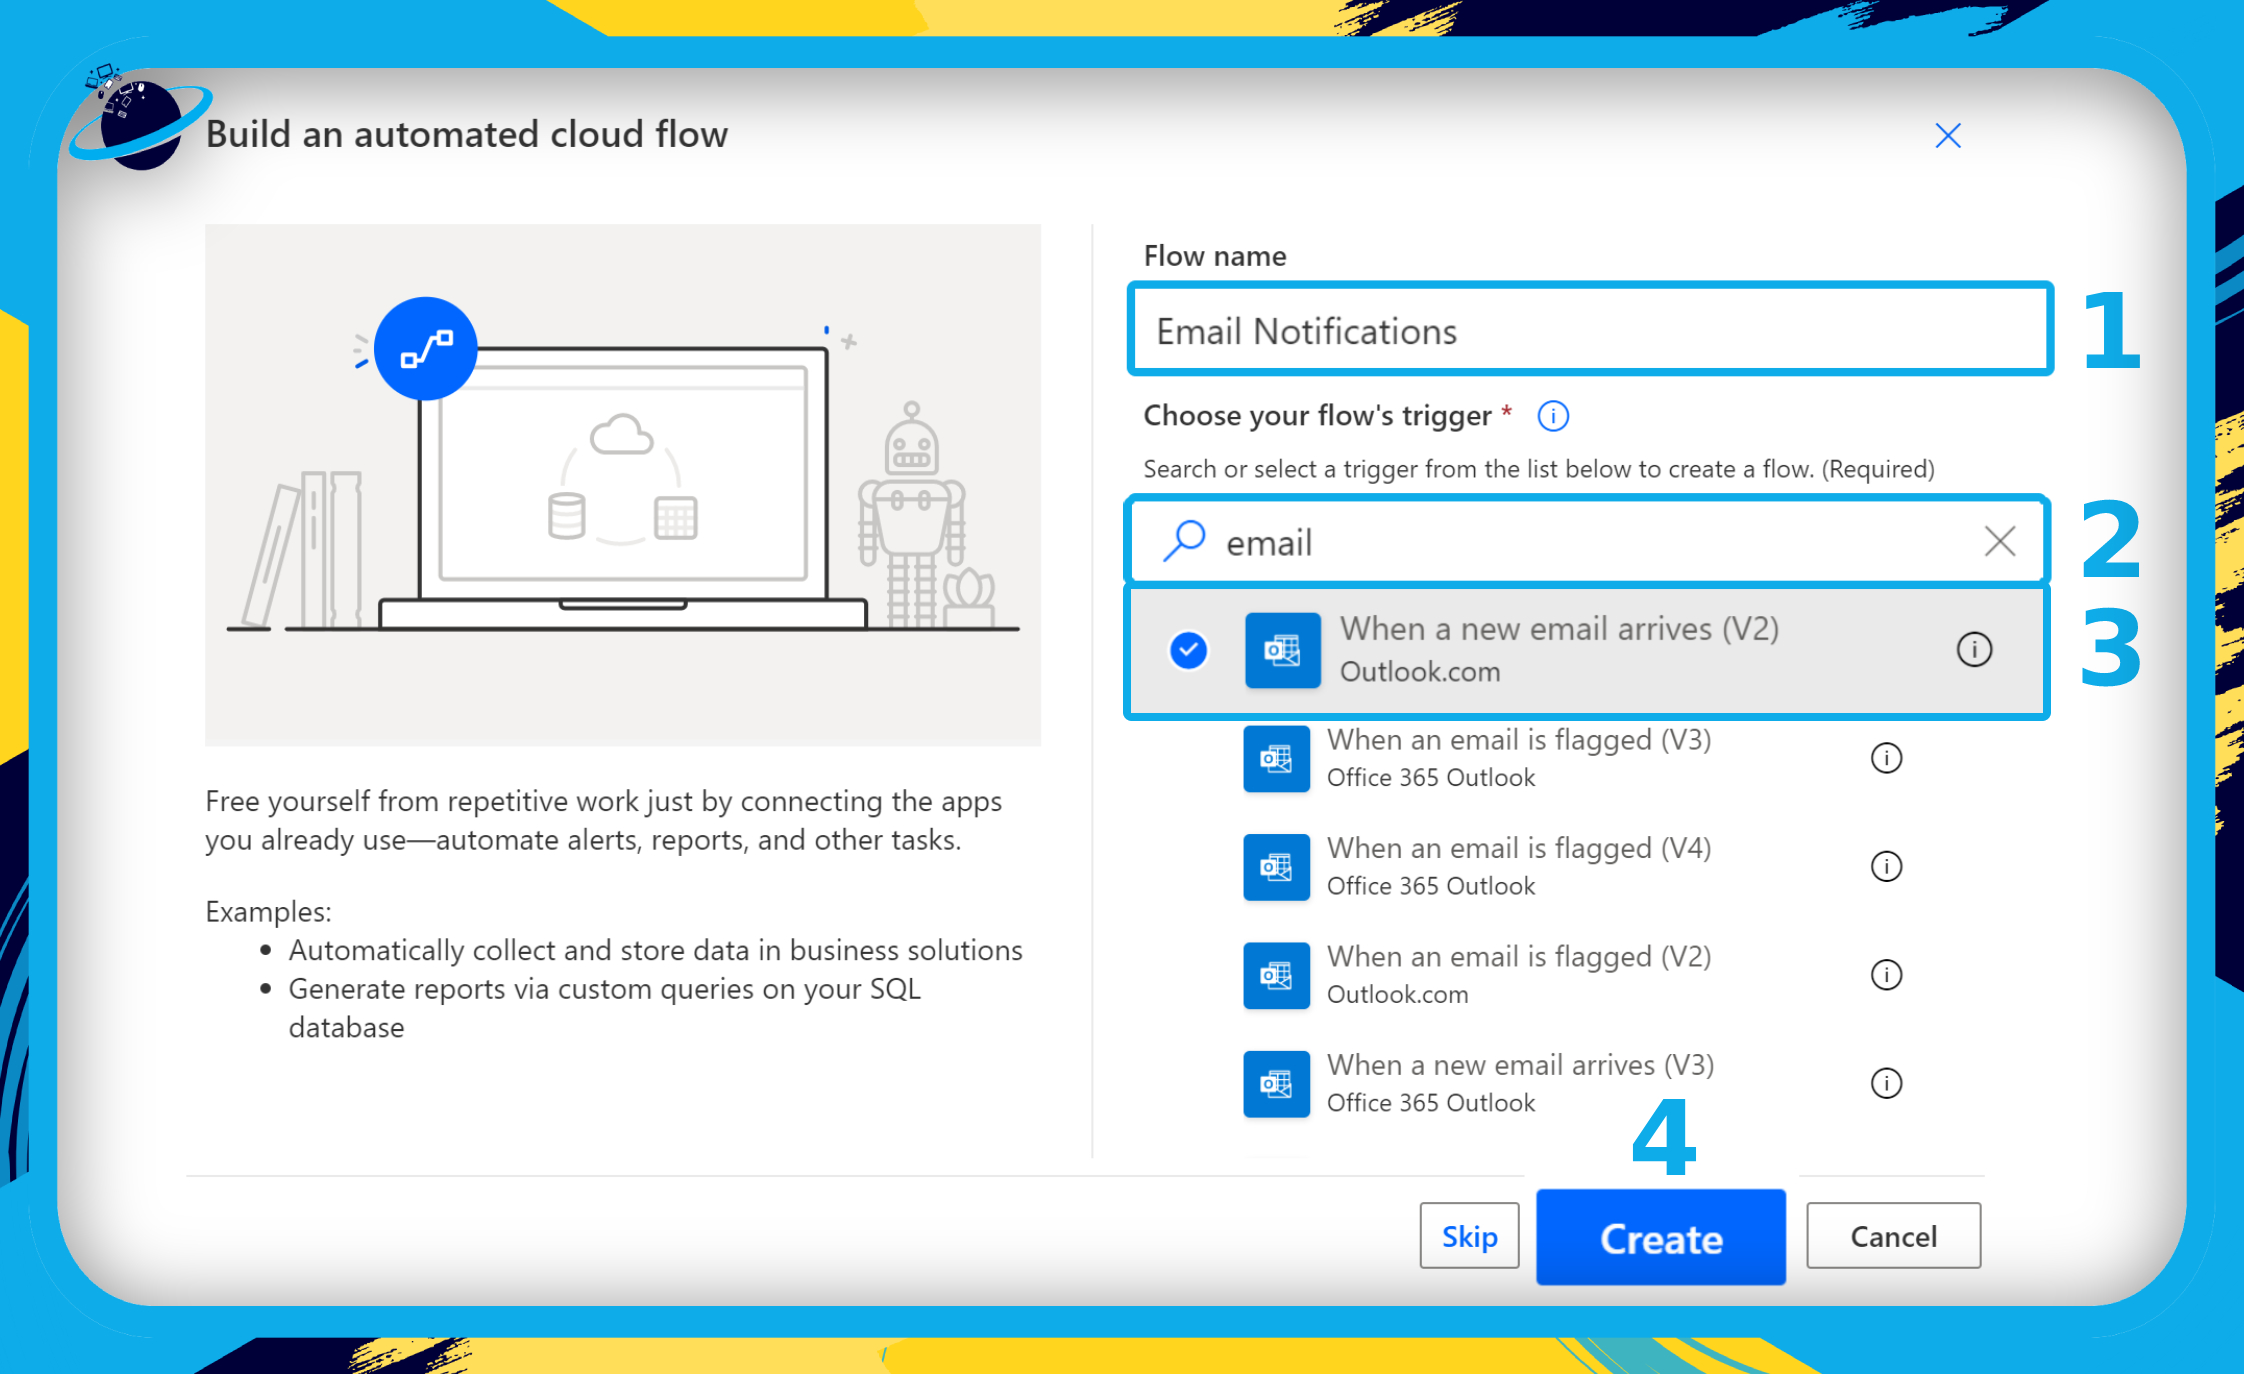
- To automate email notifications, add a Flow name (optional). (1)
- Type “email” in the search bar. (2)
- Select “When a new email arrives.” (3)
- Then click the “Create” button. (4)
Connect to an Outlook account when prompted and follow the onscreen instructions.
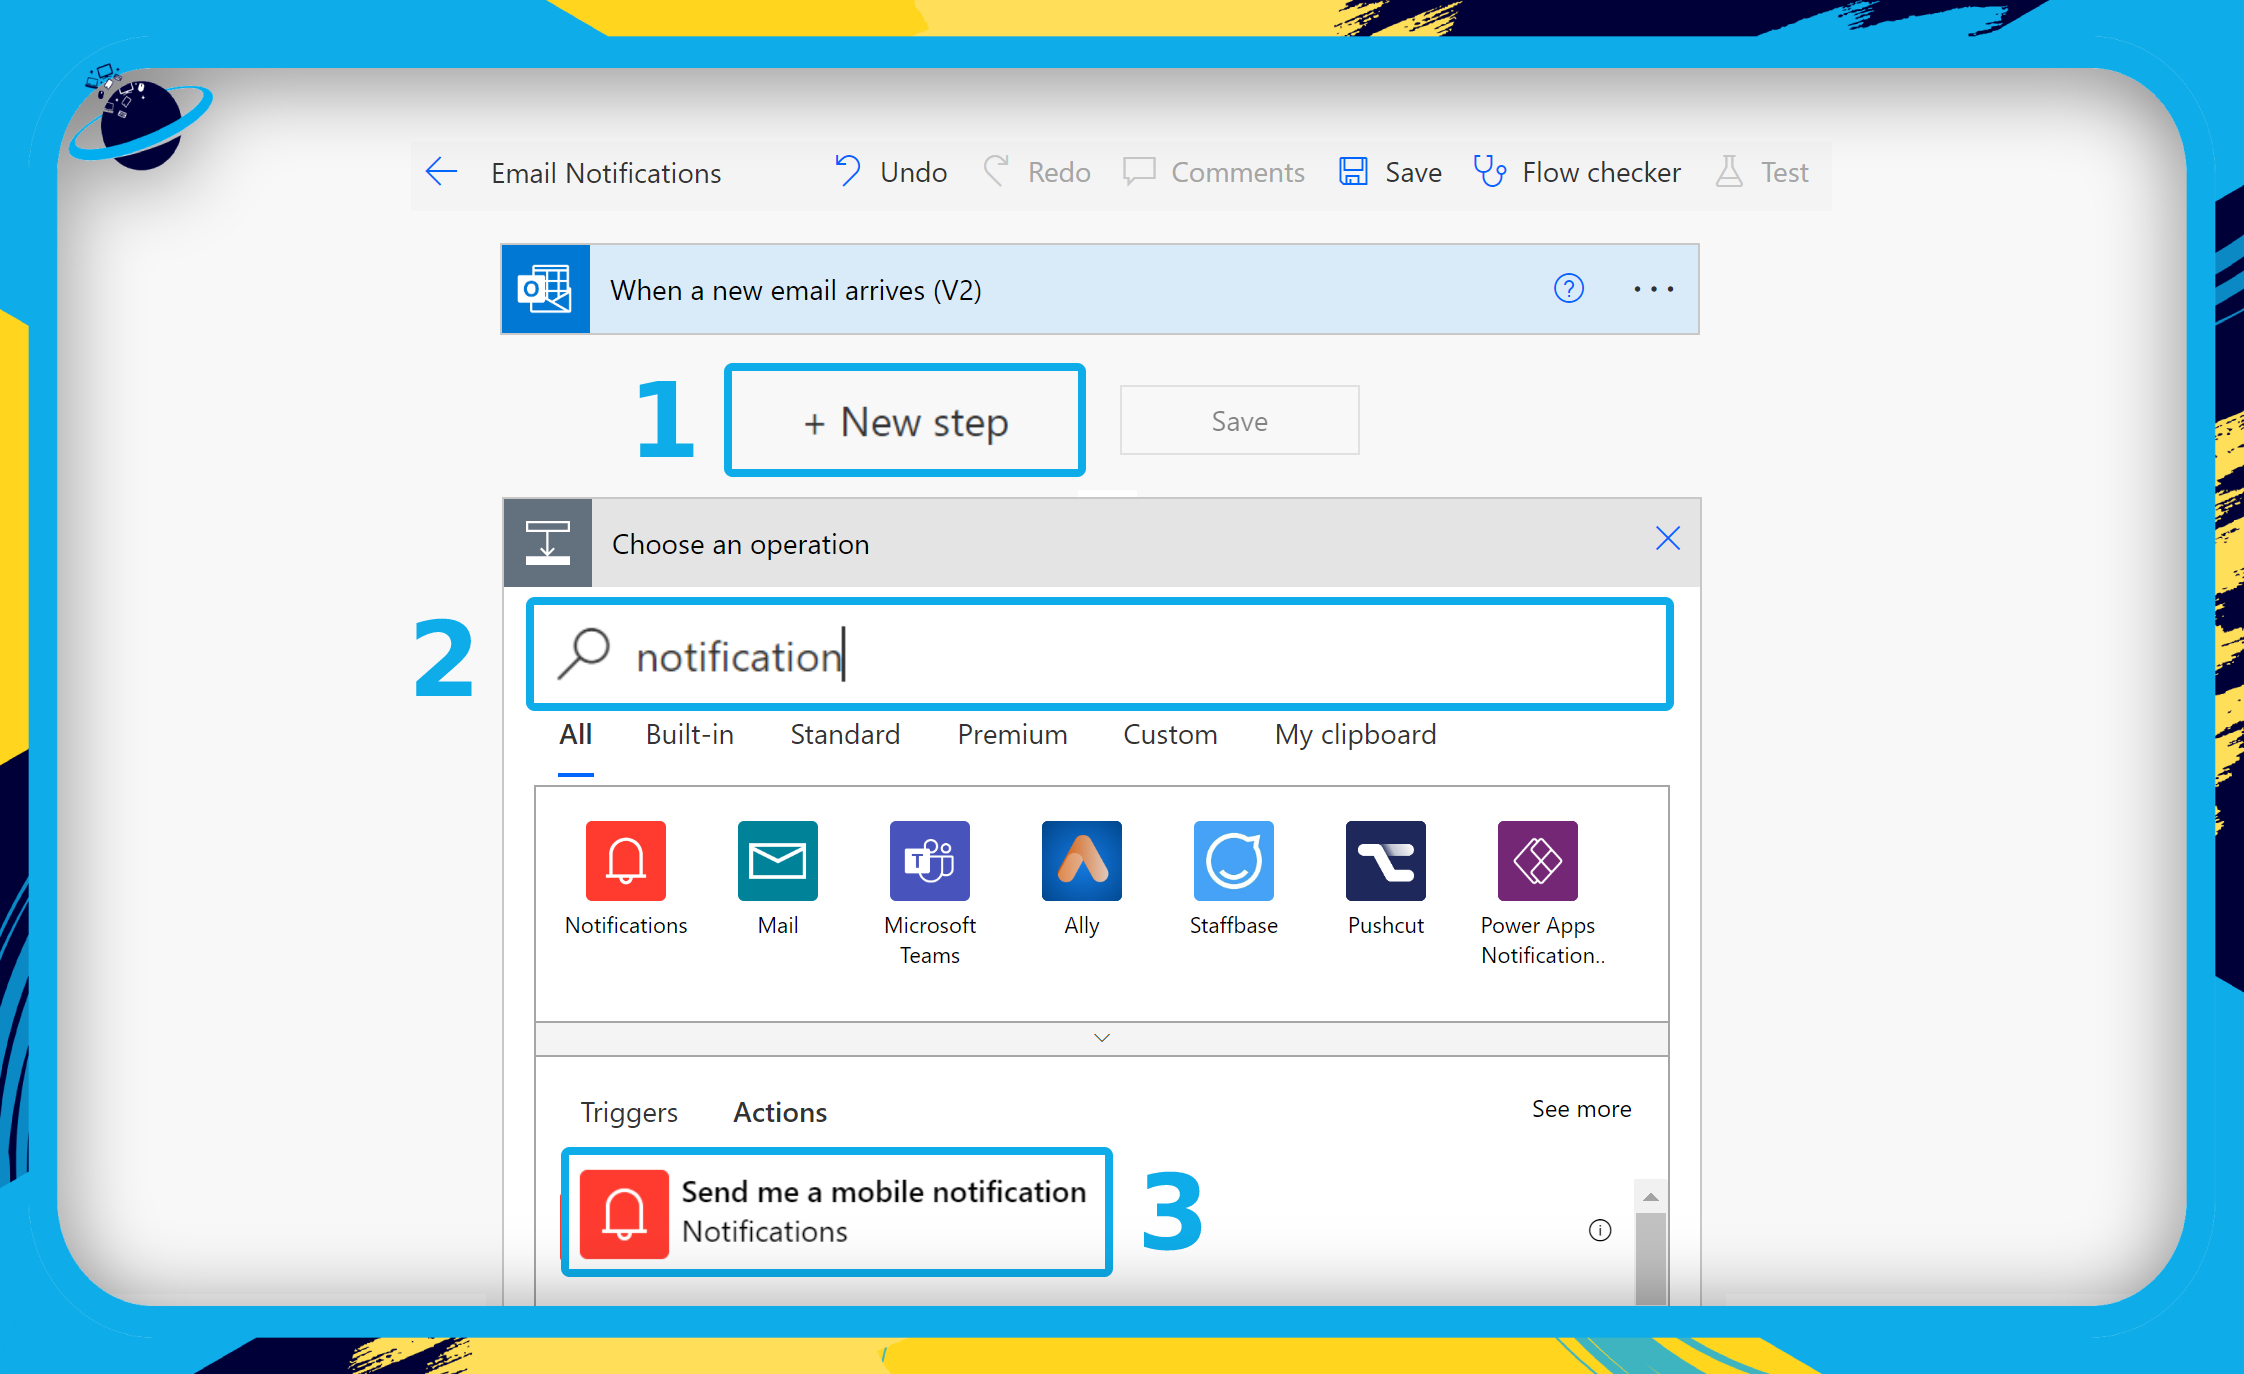
- Click “+ New step.” (1)
- Type “notification” into the search bar. (2)
- Then select a notification from the list of actions. (3)
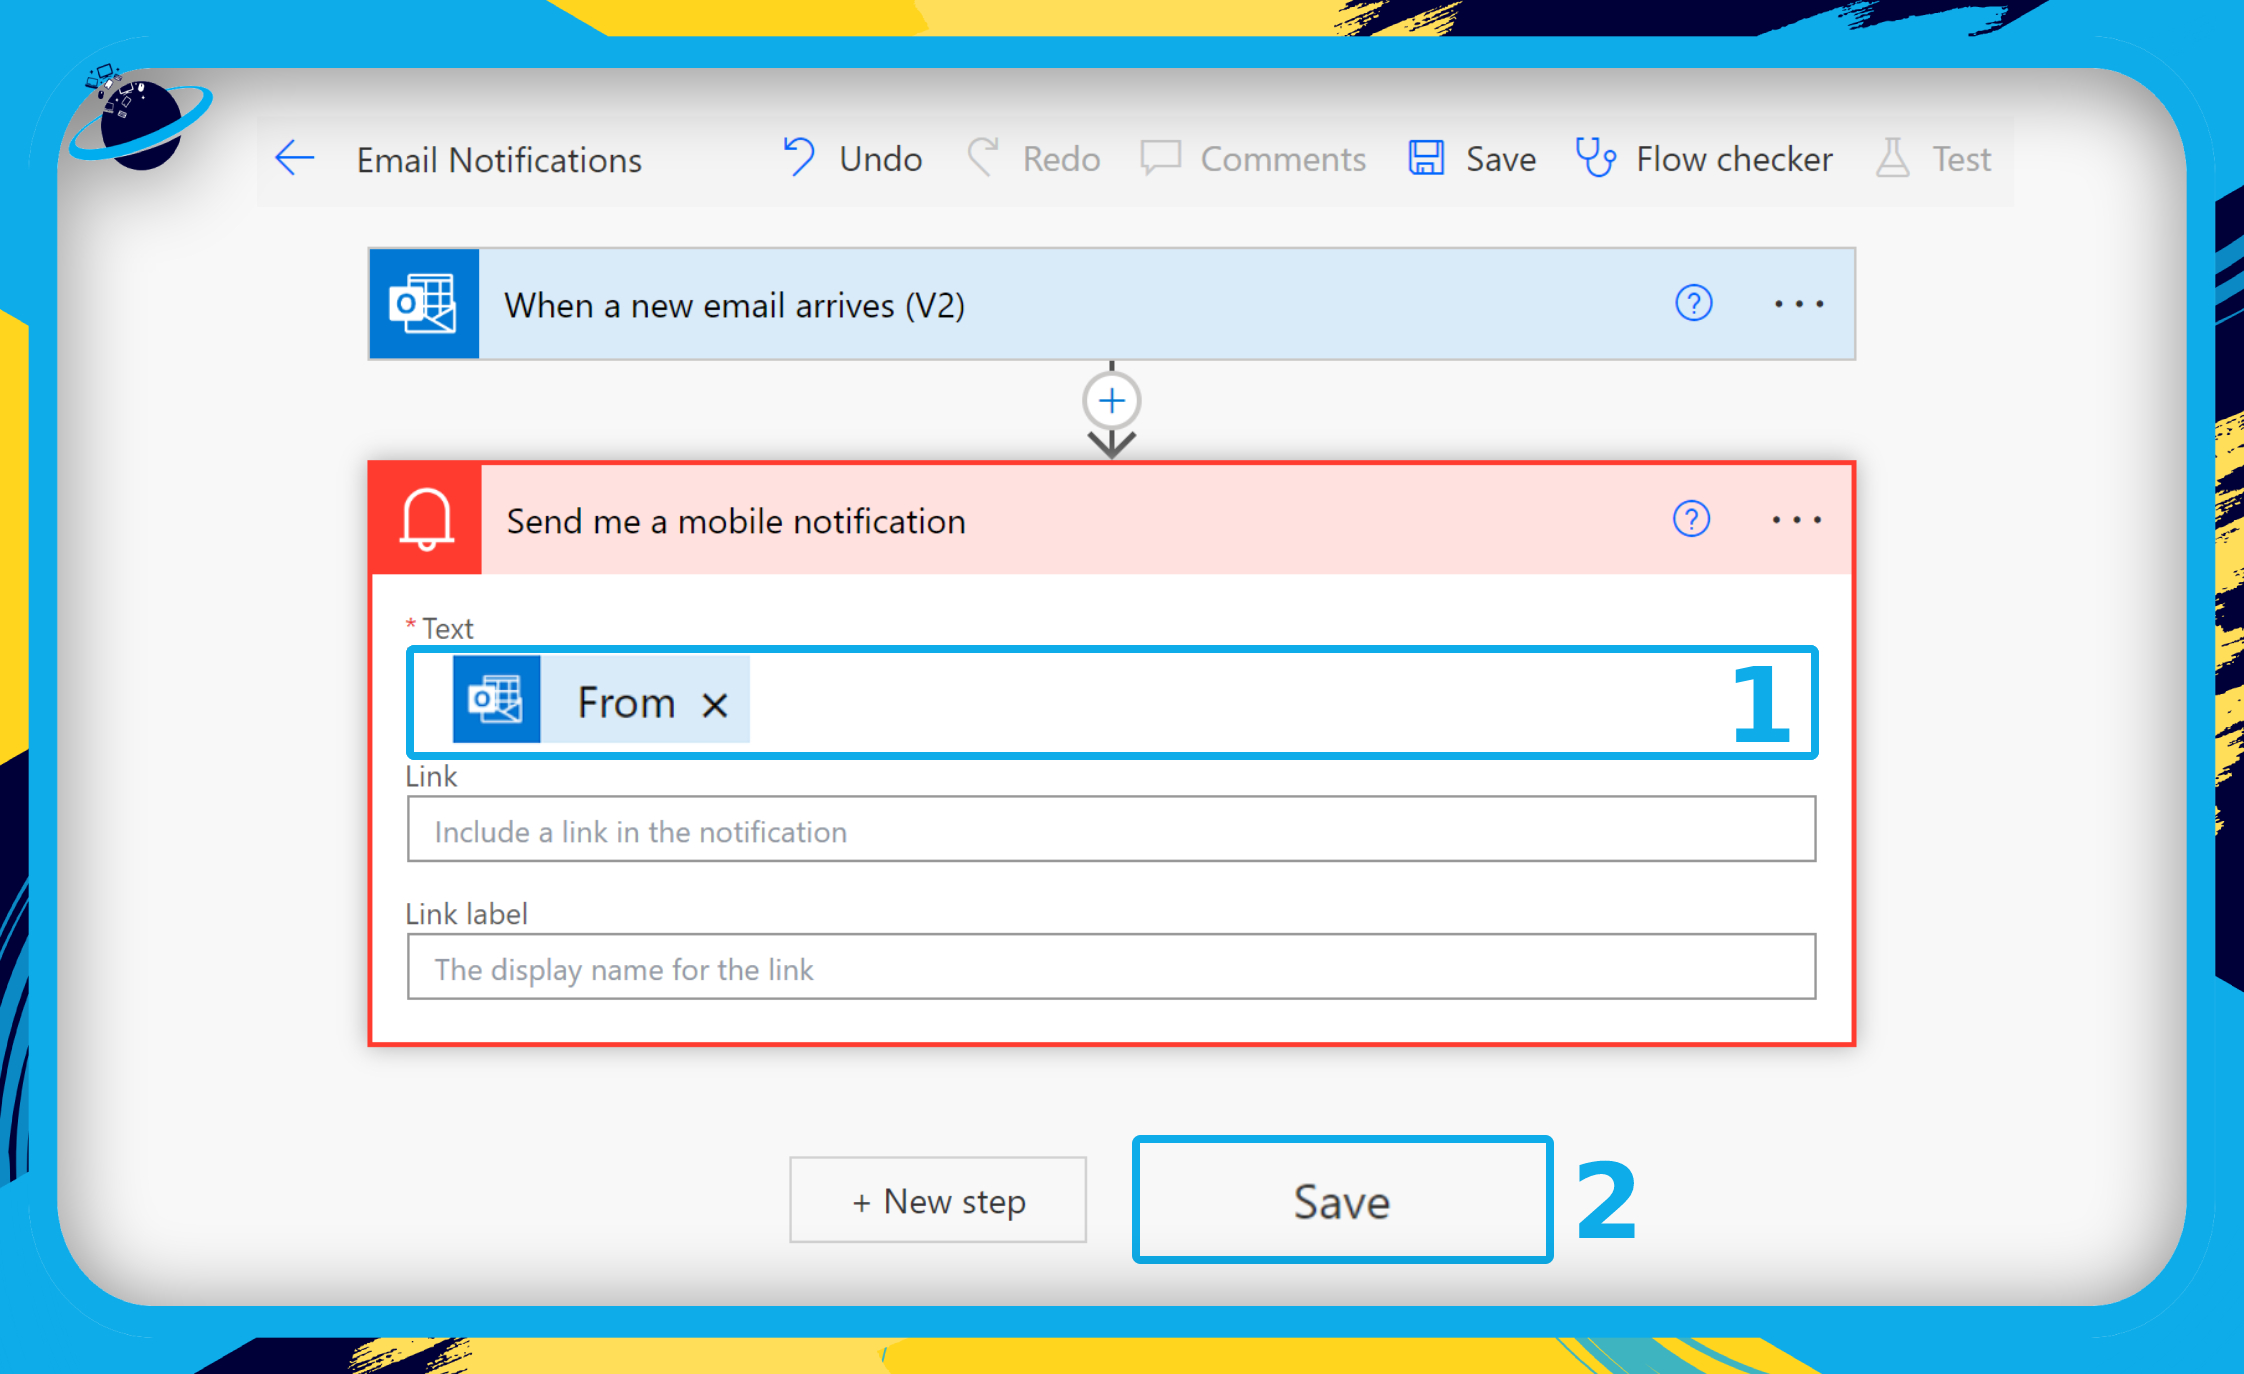
- Click the “Text” box and select from a list of possible options — we chose “From.”
- Finally, click the “Save” button.
When you try to open your email service through your browser, you’ll find the link to your email. If you have numerous email addresses, be sure to modify the number, u/0/ to u/(email address)/. For example, if we have three emails and want to use the second one, we should put in u/1/, and for the third email, we should enter in u/2/. The numbering system you use is entirely dependent on the number of emails you send and the email provider you use.
Wrapping it up
If you want to learn more about Power Automate and other Power Platform capabilities, I recommend going to Microsoft Learn, which is an official Microsoft site that allows students and professionals to learn about the newest technologies for free, including Cloud Computing, Low Code Development, and more. Fun fact: Along with the extensive learning content, you can win some cool badges and prizes. So go ahead and learn.
That’s it for this Blog thank you for taking time out to read our content, please feel free to email our team about how it went if you followed the steps or if you need more help with the questions we answered in this Blog.