Apple devices function extremely well together, this interconnecting array of devices form what’s called the Apple eco-system. Here you can directly manage devices with one another for instance managing notifications from your Apple smartwatch or controlling where the camera roll input feed will direct to, the iPhone or another Apple device. You can even connect a whole series of other devices under one account, and it helps users manage their devices in the most effective manner. However, there are still issues and some relate to imports from one device to another. In this blog, we will look at the import issues regarding “Import from iPhone” options greyed out in Mac Notes app. Notes is a highly functional app used to keep track of information by jotting down key points, important lists, and much more to help keep you organized. One key function is the seamless input between iPhone and Mac through the “Import from iPhone” option. Users have reported this feature doesn’t work correctly, so here we will address this issue and find ways to fix it. Follow the step-by-step guide below to see how you can find a proper solution to resolving the “Import from iPhone” options greyed out in the Mac Notes app.
- Connect both devices to the same Wi-Fi network
- Pair your device with Bluetooth
- Use the same iCloud account to sign in
- iOS and macOS versions should be updated
There are four possible solutions to the problems you may be having, listed above. These are the first things you should verify because the continuity function (which is directly in charge of the “Import from iPhone” option) is dependent on both Bluetooth and Wi-Fi. We will address this issue and ensure that the feature is once again working.
–
Step by step process – Connect both devices to the same Wi-Fi network to resolve iPhone import issues
- First, click on the
 Wi-Fi icon in the top right.
 - Make sure the
 Wi-Fi toggle is on.
 - Then click “Wi-Fi settings…” at the bottom of the dropdown menu.
- Next, check the Wi-Fi network name and ensure that it’s the same on your iPhone.
- And ensure that the Wi-Fi is “Connected.”
For you to use the “Import from iPhone” option, you must ensure that you have your iPhone and Mac device, connected to the same wireless network. However, sometimes you may have been connected to your iPhone’s hotspot or data causing this issue to accrue in the first place. However, following the steps above will ensure you have the correct Wi-Fi setup on both the iPhone and your Mac OS device.
Check WiFi on iPhone
It may be worthwhile to carry out similar steps on your iPhone if you want to ensure the connection works or if you are still having the same issue persistently preventing you from resolving the “Import from iPhone” option is greyed out.
- To begin, turn on your Wi-Fi connection.
- Connect to the same wireless network that you linked to on the Mac. If you’re joining the network for the first time, you’ll need to input the security key. If you’ve already connected to the network, iPhone will reconnect immediately.
- If you’re using the same wireless network and have trouble with the continuity camera, consider disconnecting and reconnecting the network. This may help the function work correctly in some cases.
- On a Mac, you may toggle the connection on or off by clicking the Wi-Fi icon in the top menu bar.
- Toggle the connection on iPhone by swiping up to access Control Centre.
- You can toggle the connection on iPhone by swiping up to access Control Centre. Force press the settings icon to turn on or off Wi-Fi if your iPhone has the 3D capability.
You’ll notice a blue tick next to the network and the connected Wi-Fi symbol in the upper right-hand corner of your display when you’ve joined the network. Contact your network administrator if you don’t know the Wi-Fi network’s password.
–

Step by step process – Pair your device with Bluetooth to resolve iPhone import issues
With the assistance of Bluetooth, you can have your iPhone connected to your Mac device in order for you to reactivate continuity which will help in resolving “Import from iPhone” options greyed out in Mac Notes app. You may also use this method to connect to a Personal Hotspot, which allows you to share your iPhone or iPad’s cellular data connection (Wi-Fi + Cellular) when you don’t have access to a Wi-Fi network.
Step by step guide – Pair your device with Bluetooth
- Firstly, open “System Preferences”.
- Now click on “Bluetooth”.
- After that, enable the connections.
- Now go to your iPhone and click on “Settings”.
- After that click on “Bluetooth”.
- Finally, enable the connections.
The name of your Mac will appear in the Bluetooth settings on your iPhone, along with the status of the connection. Similarly, the name of your iPhone will appear in the Bluetooth settings on your Mac, along with the state of connection. In addition, the necessary icons will be displayed in the top menu bar. When the devices are linked, you’ll see a chained link icon on your iPhone and a Bluetooth icon with three dots on your Mac.
Your iPhone will display in the list of Bluetooth devices on Mac once you’ve activated Bluetooth on both devices. It will display your iPhone’s name and the status “Not Connected.” To pair, click the “Connect” icon next to your Bluetooth name. If the “Connect” button isn’t visible, control + click or right-click on the iPhone’s name and select “Connect to Network.”
–
Step by step process – Use the same iCloud account to sign in and resolve iPhone import issues
Aside from having Bluetooth and Wi-Fi turned on, you’ll also need an Apple ID to use this function. You might be wondering what we’re talking about. The continuity camera, like other continuity capabilities, is meant to effortlessly transition from your iPhone to your Mac. As a result, you’ll need to authenticate into your iCloud account on both your iPhone and Mac. So, how do you know whether you’ve successfully logged in?
Step by step guide – Use the same iCloud account to sign in
- Firstly, open “System Preferences”.
- Select the iCloud option next.
- Use your Apple ID to log in.
- You may need to sign out and sign back in if you’ve already logged in.
On your iPhone, the procedure is identical. On the Settings tab, tap the “Settings” icon in the programme tray and pick your photo. You can see all the devices that are logged in and sharing the same Apple ID in this section.
First, check to see whether your MacBook is listed on your iPhone. You may need to log in and out again on your phone, just like you did on your MacBook. You may now utilise the continuity camera to scan and photograph your papers. Remember to enable two-factor authentication in the “Password & Security” section of your Apple ID.
–
Step by step process – macOS versions should be updated to resolve iPhone import issues
Although Apple strives to make new software updates available to as many older devices as possible, there are some instances where it may be in your best interest to install the most recent and greatest right away. For example, certain software inconstancies may be caused by Apple directly, which may restrict certain functions as a security backup. As a result, upgrading the software on your Apple device may assist you in resolving the import problem.
Step by step guide update – macOS
- Select System Preferences from the Apple menu in the upper left corner of your screen.
- Then choose Software Update.
- Select Update Now or Upgrade Now from the drop-down menu:
- Update Now downloads and installs the most recent updates for the current version.
- Upgrade Now installs a significant new version, such as macOS Big Sur, with a new name.
In depth – Step by step process – Connect both devices to the same Wi-Fi network
Step by step breakdown
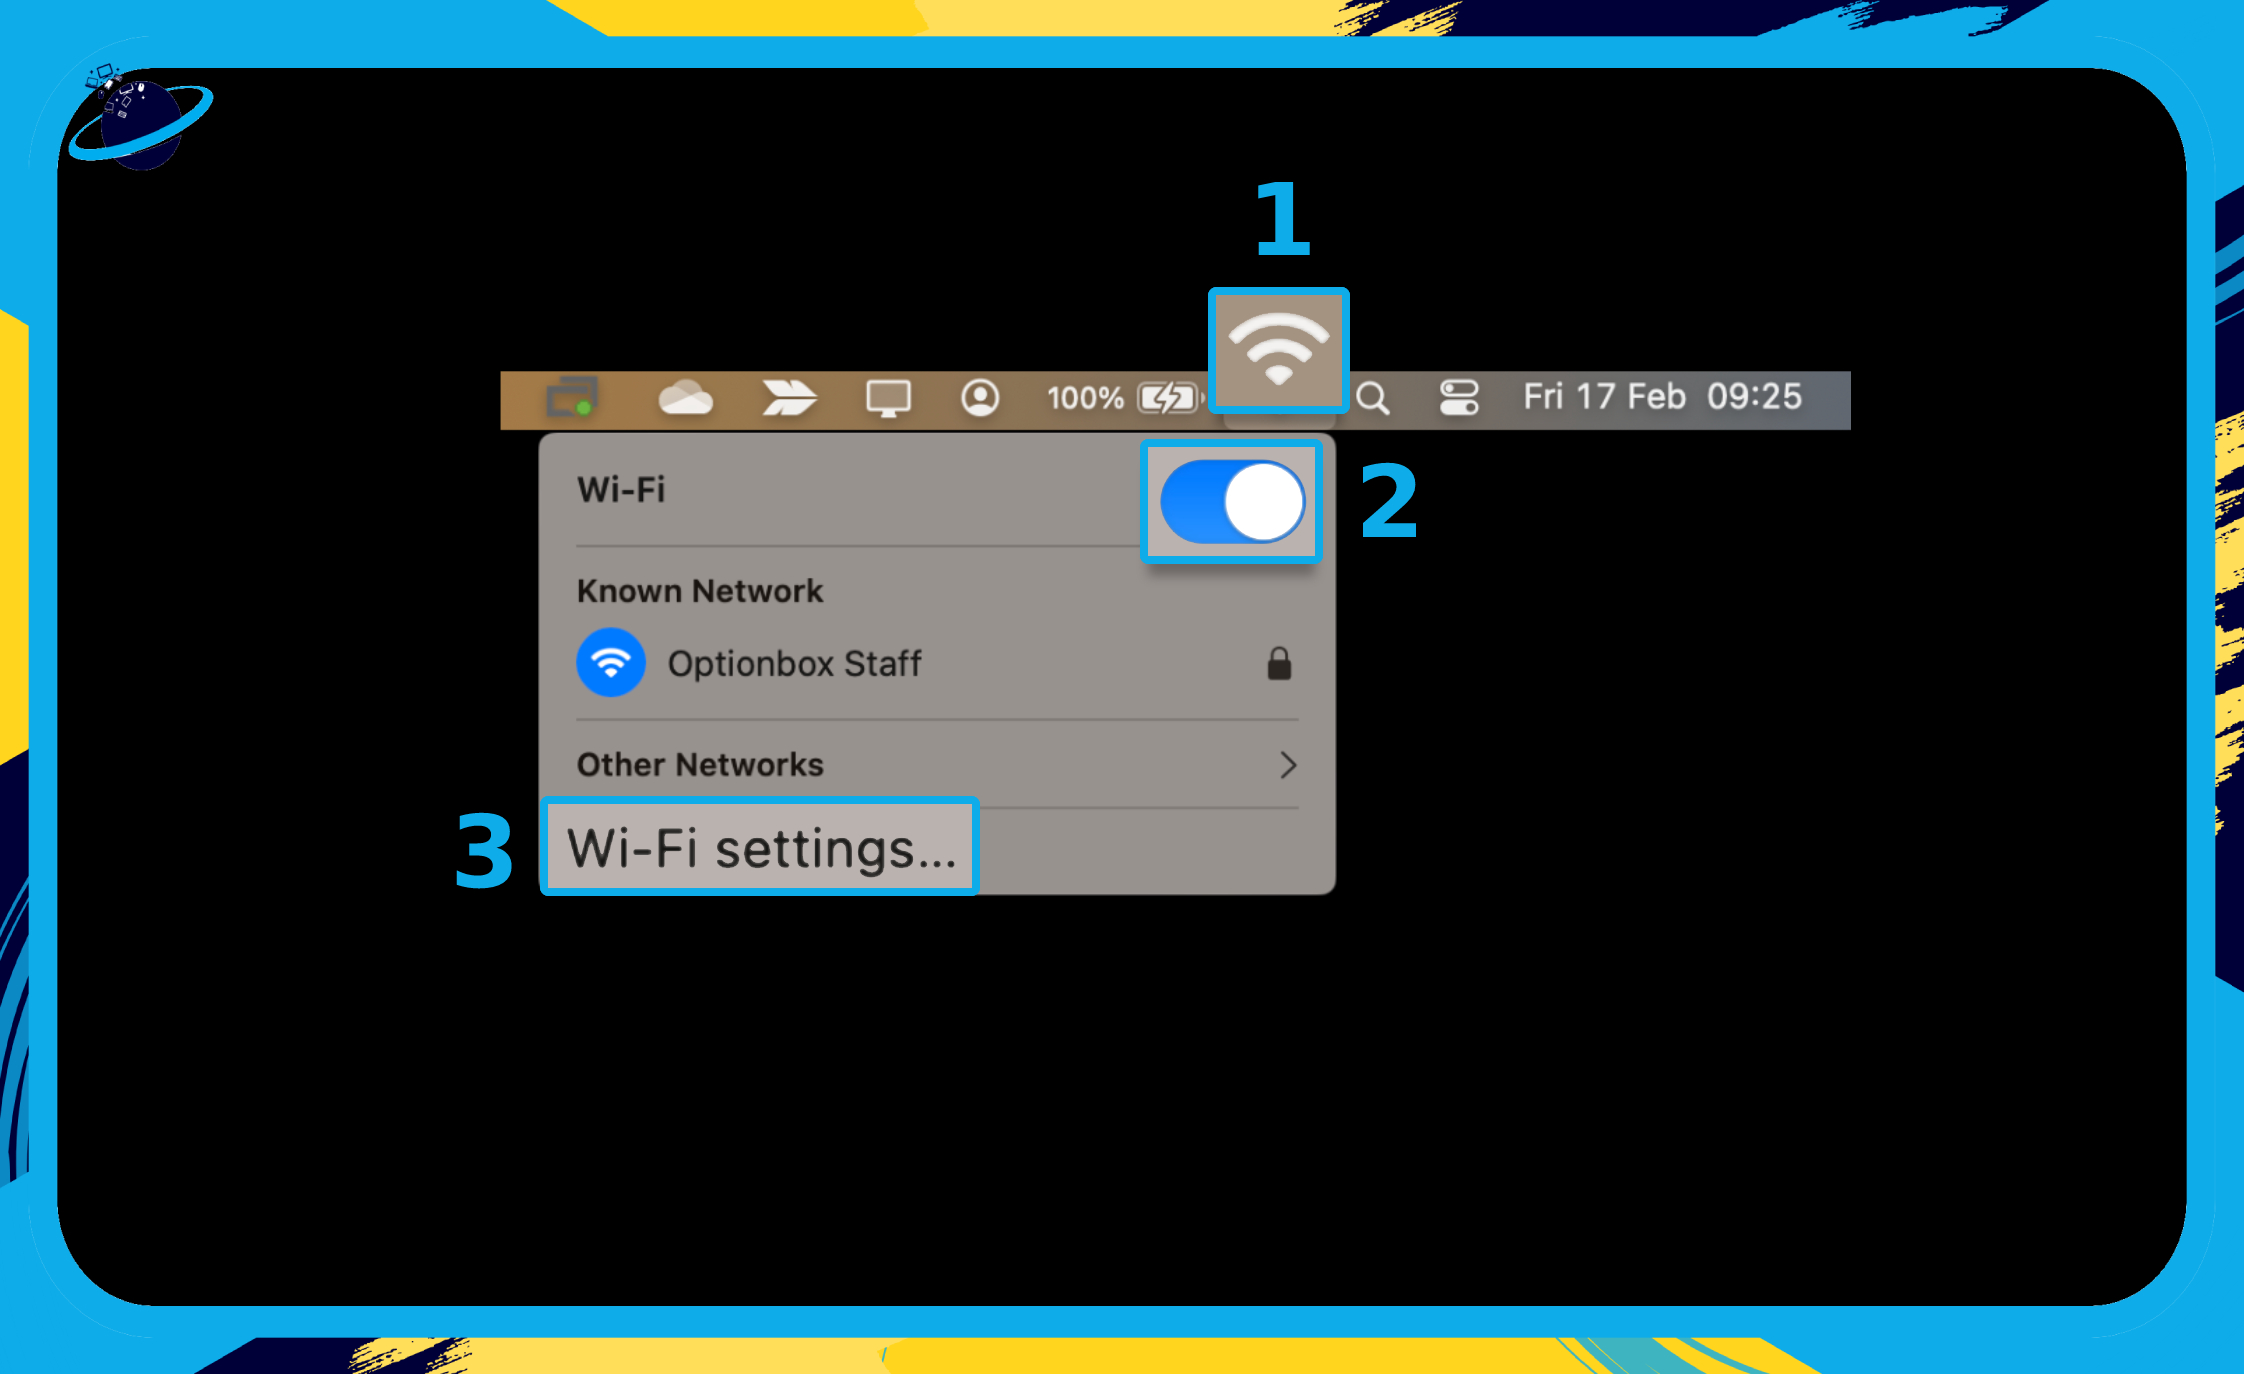
- First, click on the Wi-Fi icon in the top right. (1)
- Make sure the Wi-Fi toggle is on. (2)
- Then click “Wi-Fi settings…” at the bottom of the dropdown menu. (3)
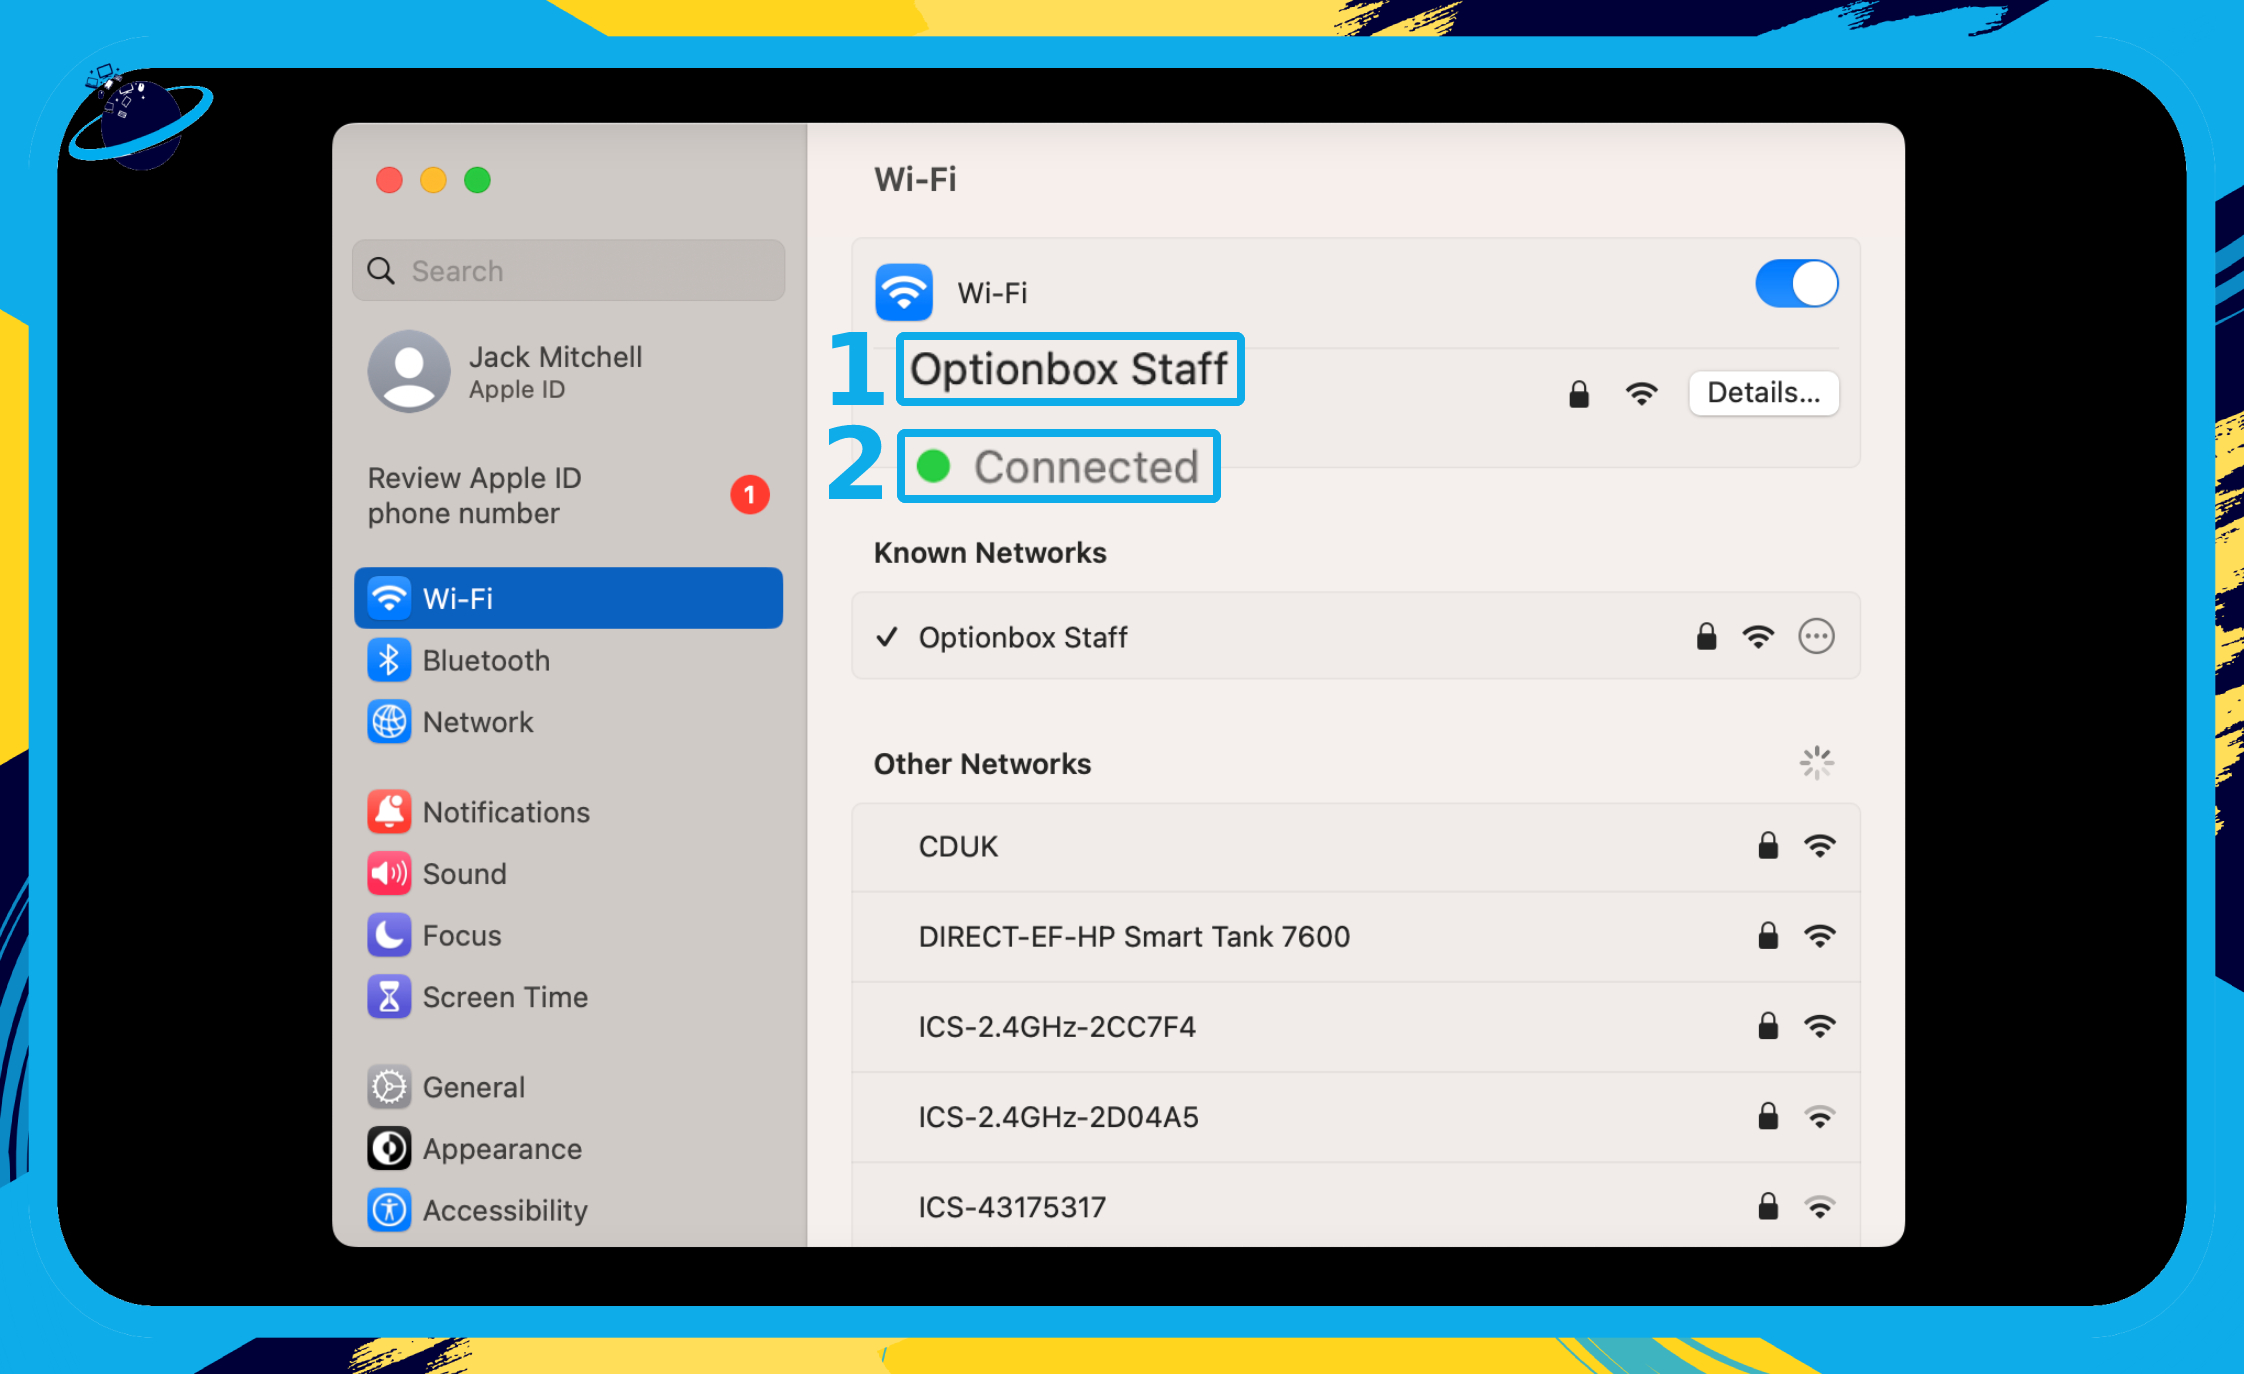
- Next, check the Wi-Fi network name and ensure that it’s the same on your iPhone. (1)
- And ensure that the Wi-Fi is “Connected.” (2)
That’s it for this Blog thank you for taking time out to read our content, please feel free to email our team about how it went if you followed the steps or if you need more help with the questions we answered in this Blog.