Depending on the environment, such as at work or in a school, restricting users’ ability to create new groups or teams in Microsoft Teams could be needed. However, it is a complicated process for most people who need to do it, and it may be more worth it to educate better on the subject.
There is only a single way to restrict group creation in Microsoft Teams. It revolves around creating a group and changing the creation options of all its users via PowerShell. It is worth knowing that Microsoft says not to do this as it affects many other features and to educate people on it.
How to create a group for users who can make new groups:
- Go to the admin center on office 365
- Go to Teams and groups and find active teams
- Click “Add a group.“
- Then choose the type of group.
- Finalize the group and add members
You will need:
- Azure AD premium license or Azure AD Basic EDU license
- PowerShell
Content list:
Why restrict group creation in Microsoft Teams?
Microsoft recommends that you don’t change the group creation options because several different software uses Microsft groups in one way or the other. However, if your business requires it or your school wants to implement it, you can do it by changing and restricting the Microsoft 365 groups creation to members of certain groups or security groups.
The big reason schools would want to restrict Microsoft Teams group creation could be that the school might fear the students would use the ability to create new teams or groups to spread inappropriate content around the school. Another reason could be that they want to avoid people using individual teams for bullying; most students and teachers fail to realize that they can be (and are) monitored when they use Microsoft teams.
Of course, schools won’t want to allow bullying to continue if it is within their capability to stop it, so teachers would agree with this decision. The same would probably go for businesses, as they wouldn’t want bullying to occur within their organization and want to stop it, and it would be inappropriate for the business. The problem with this decision is that it affects people’s ability to create new content, and it is made worse if they need to do things on a new team because they would have to re-do the steps to undo the changes, which most people wouldn’t want to do.
If a business or school is concerned that users are doing work that is unrelated or inappropriate for a work environment, then it would be an excellent idea to train the users in what Microsoft Teams can do. That is especially true because a business or the school can see almost everything that the students do, as their Microsoft work or student accounts are connected to the school system and are all parts of certain groups.
It would be good to train users for this instead of restricting access for a few reasons, such as how much of a hassle it would be to do once, and revert changes won’t be as simple as going somewhere pressing a toggle. You can still restrict access if you want, but I recommend that you train people either way and then put them into a group that can make new groups.
There are a few features that will be affected by changing this.
- Yammer
- Outlook
- SharePoint
- Planner
- Power Bi classic
- Microsoft Stream
- Microsoft Teams
- Project for the web / Roadmap
An important thing to note is that some members of specific roles will be exempt from changes, which means they can still create groups. An example of this is global admins can continue to make new groups with software like SharePoint or Exchange. I have created a list of some of the other roles that can still make groups.
| Role | Where it relates |
| Partner Tier 1 Support | Exchange admin center Azure AD Microsoft 365 admin center |
| Partner Tier 2 Support | Exchange admin center Azure AD Microsoft 365 admin center |
| Directory Writers | Azure AD |
| Exchange admin center | Exchange admin center Azure AD |
| Teams Service Administrator | Exchange admin center Azure AD |
| User Administrator | Azure AD Microsoft 365 admin center |
| SharePoint Administrator | Azure AD Microsoft 365 admin center |
To find out who can make new groups, you should get the admin who will control the group creation settings and the people that can create the groups to have an Azure AD Basic EDU license or an Azure AD Premium license.

How to restrict group creation in Microsoft Teams
First, you need to make a group that people who would need to create new groups would join— this allows anyone in that group to make more. Another thing to note is that admins don’t need to be a part of this group to make more. Only one group per organization should be made not to cause any confusion.
- Go to the admin center on office 365
- Go to Teams and groups and find active teams
- Click “Add a group.”
- Then choose the type of group.
- Finalize the group and add members
Use PowerShell commands
You must use the “preview” version of Azure AD Power for Graph to change the group guest access settings. I have come across a document from Microsoft docs covering how to install this if it is new to you. If you have the 2.0 “general availability,” you will need to uninstall it, which can be done by entering “Uninstall-Module AzureAD” when you are on PowerShell. After this, you can install the correct version by typing “Install-Module AzureADPreview,” you can then enter “Install-Module AzureADPreview” to check for any updates if you have this version already.
Use a notepad/ text editor and write down the following.
You will need to copy the following text onto a text editor, for example, notepad or “Windows PowerShell ISE.”
Type the group name of the group you just made to replace <GroupName>.
For example:
$GroupName - "Group Creators"
Next, save as “GroupCreators.ps1.”
To find where it has been saved on PowerShell, enter “CD <FileLocation>.”
Enter “.\GroupCreators.ps1” to run the script
When asked, sign in with an admin account.
Go to this Microsoft document and press “Copy” on this bit of code.
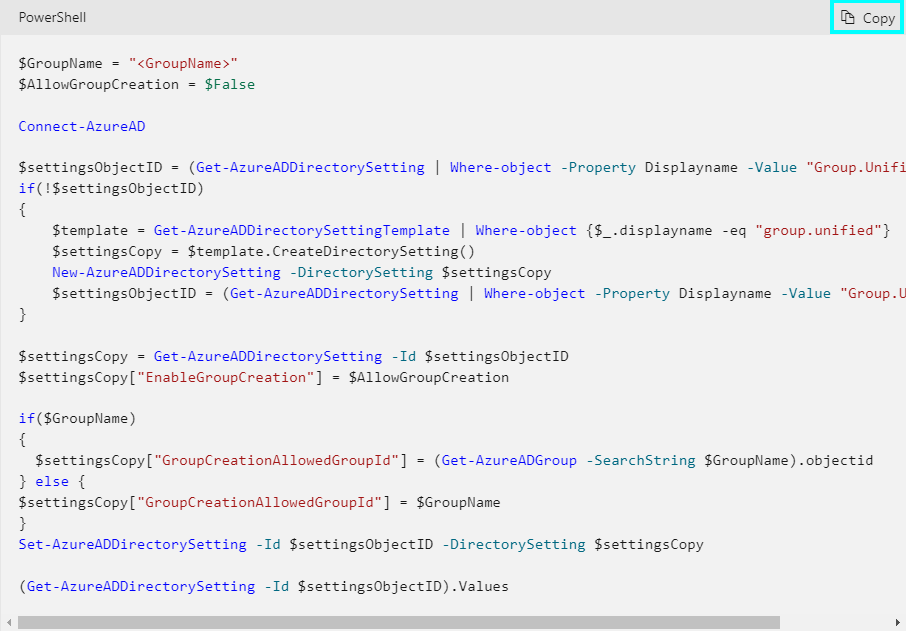
Updated changes will be shown on the last line.

Source – Microsoft documents
If you need to go back on these changes, you will need to go back and run the script and enter $GroupName as <name of groups> and $AllowGroupCreation to “True” then run.
Check it works
It can take up to 30 minutes before changes usually take place. You can check if this has worked by trying this.
- Use an account out of the group you created and sign in.
- Find “Planner.”
- Choose “New Plan.”
- This option should be disabled.
- Then try it with an account in the group.