Spam filters are vital for blocking unwanted emails from cluttering your inbox. But legitimate emails can sometimes end up in the junk mail. Fortunately, there are several ways of fixing this issue, and we’ll take you through each of those methods in this article.
Stop legitimate emails going to junk (app version of Outlook):
- Click on the junk email that should have gone to your inbox.
- Click ‘Not Junk’
 in the top menu.
 - Check the box next to ‘Never send messages from <email> to the Junk folder.’
- Then click the ‘OK’ button.
Stop legitimate emails going to junk (web version of Outlook):
- Right-click on the junk email that should have gone to your inbox.
- Go to ‘Junk,’ then click on ‘Not junk.‘
- Check the box next to ‘Always trust emails from.’
- Then click the ‘OK’ button.
Please continue reading our visual, step-by-step guide on how to troubleshoot legitimate emails going to junk in Outlook 365.
How to stop legitimate Outlook 365 emails going to junk in the web version of Outlook
The methods below are for the web version of Outlook.

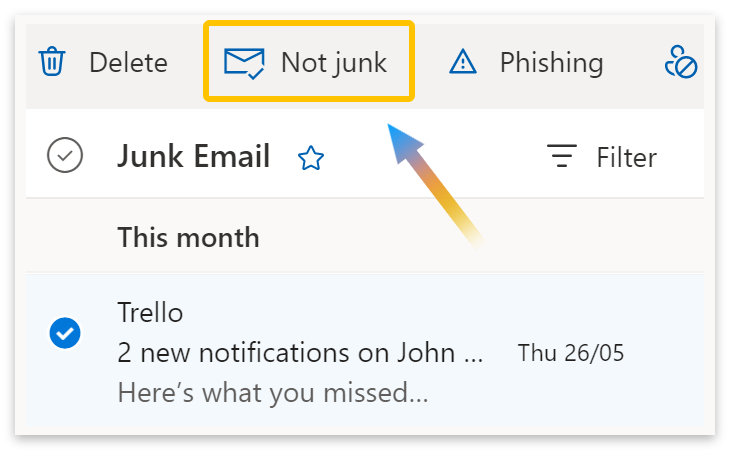
Method 1 – Mark the email as Not Junk
If you find a legitimate email in your junk folder, the first action is to safelist the sender so that future emails don’t end up in the same place. Please start this guide by opening Outlook and heading to your junk folder.
- Select the email that you want to want to keep in your Inbox.
- Then click on Not junk.
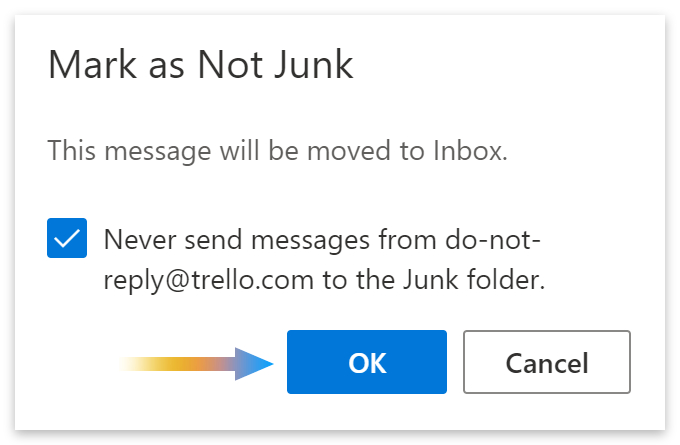
- A box will appear asking you to confirm this action.
- Ensure the box next to Never send messages from <email> to the Junk folder is checked.
- Then click the OK button.
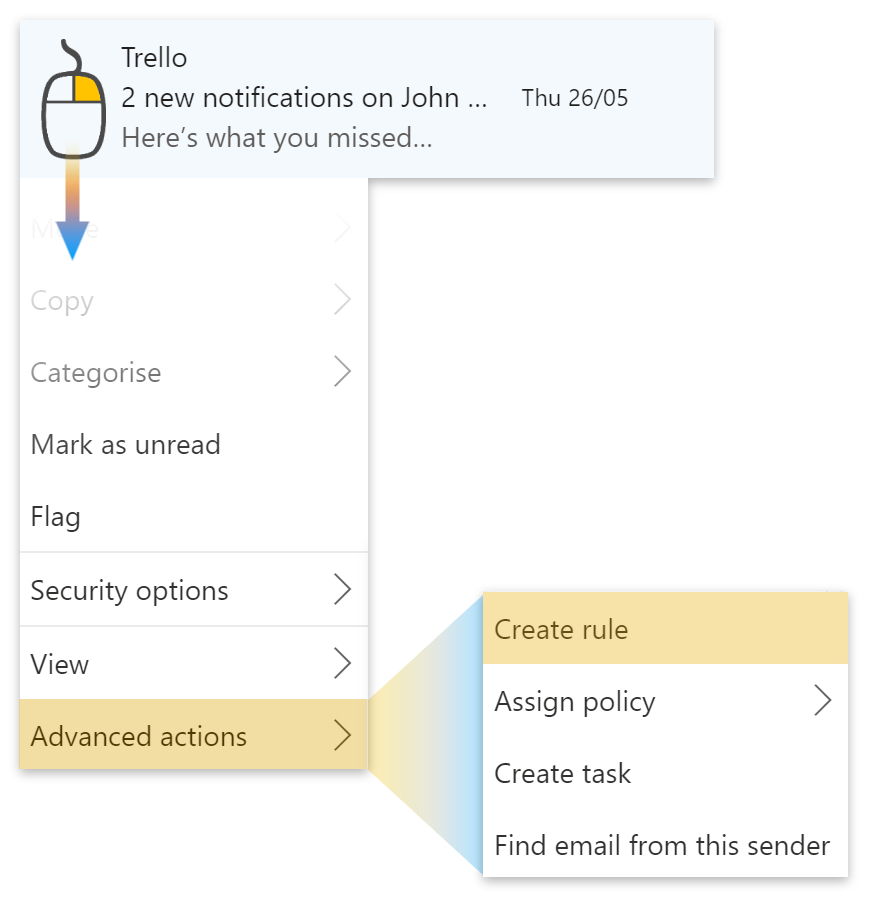
Method 2 – Create a rule
The spam filter often catches emails from ‘do not reply.’ So creating rules is effective in cases where common words, phrases, and senders end up in your Junk folder.
- Right-click on the email you want to create a rule for.
- Go down to Advanced actions at the bottom of the popup menu.
- Then select Create rule.
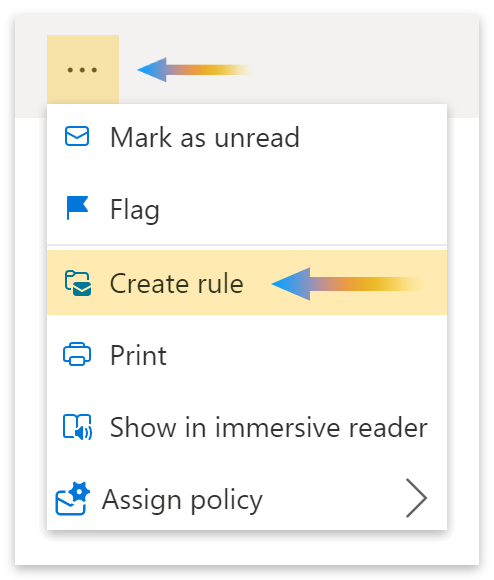
- Alternatively, click the three dots on the top menu.
- Then select Create rule from the dropdown menu.
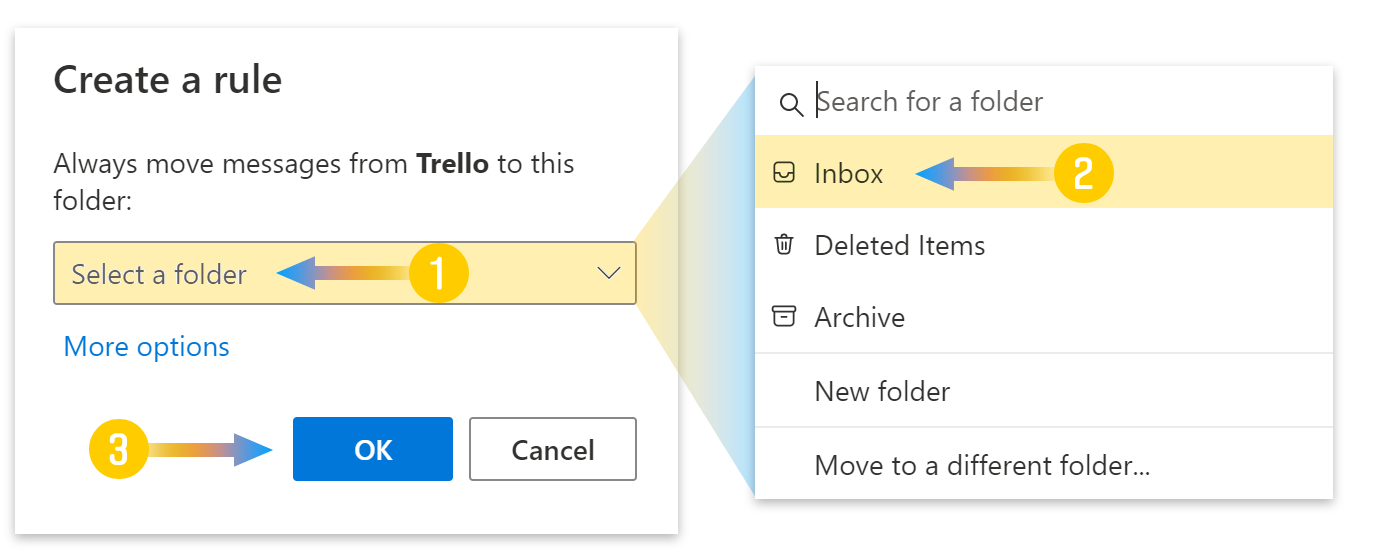
- A box will appear titled ‘Create a rule.’
- Click on Select a folder. (1)
- Choose Inbox (or another location) from the dropdown menu. (2)
- Then click the OK button. (3)
Create advanced rules
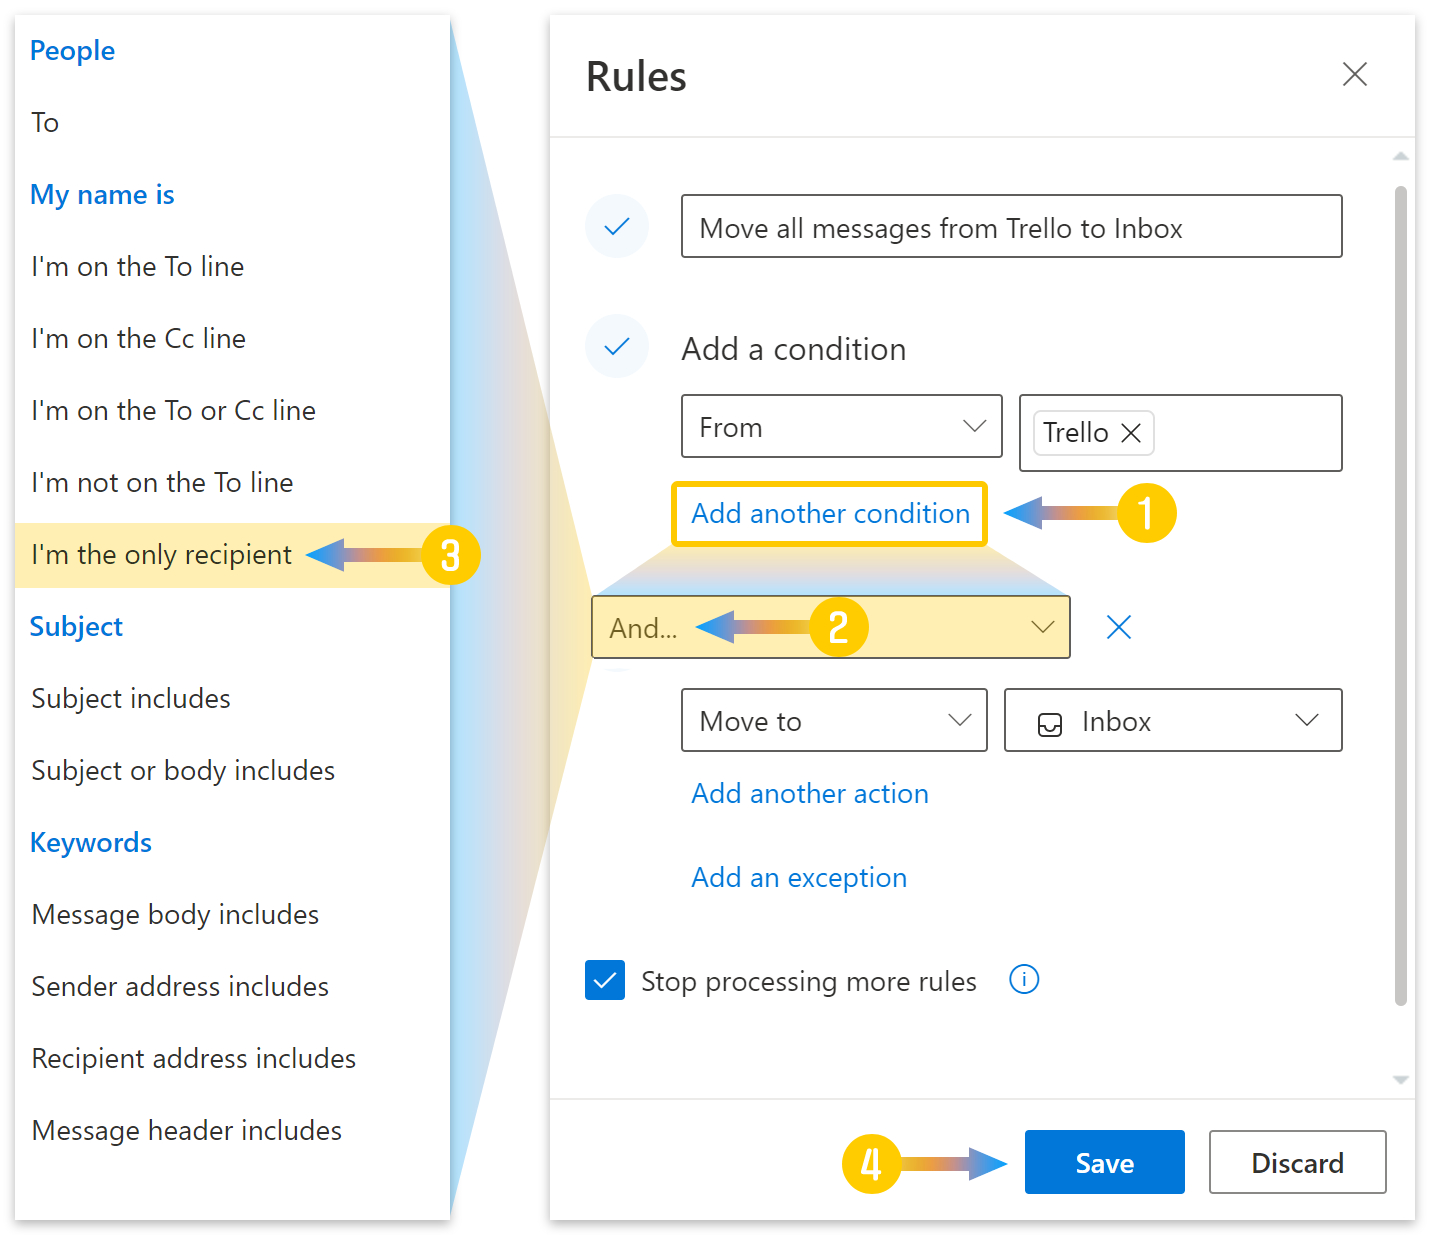
Sometimes you will receive spam and legitimate emails from a sender. In that case, moving all messages from that sender to your inbox might not be the ideal solution. You can solve this problem by adding new conditions to the rule.
A helpful condition is to move emails to the inbox only if you are the only recipient of the email. That can work as spam emails are generally sent out to multiple recipients.
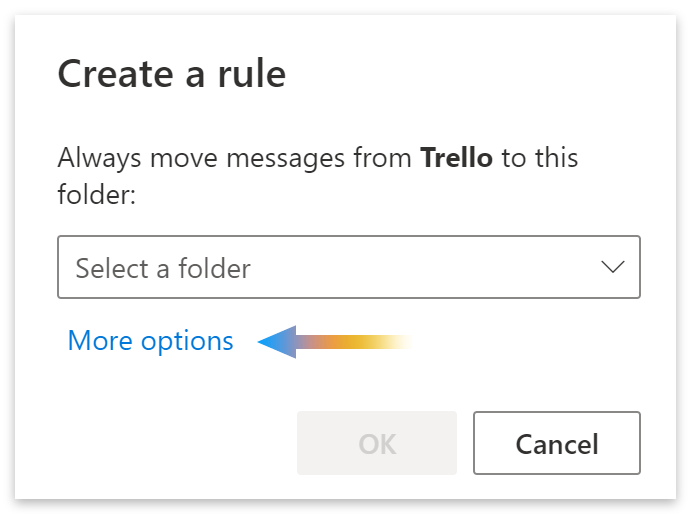
- Again, right-click the email and go to Advanced actions > Create rule.
- Click on More options.
| You can access rules by clicking on the settings icon |
- Click on Add another condition. (1)
- Then click on And in the select box. (2)
- Select I’m the only recipient from the popup menu. (3)
- Finally, click the Save button. (4)
Method 3 – Save sender as a contact
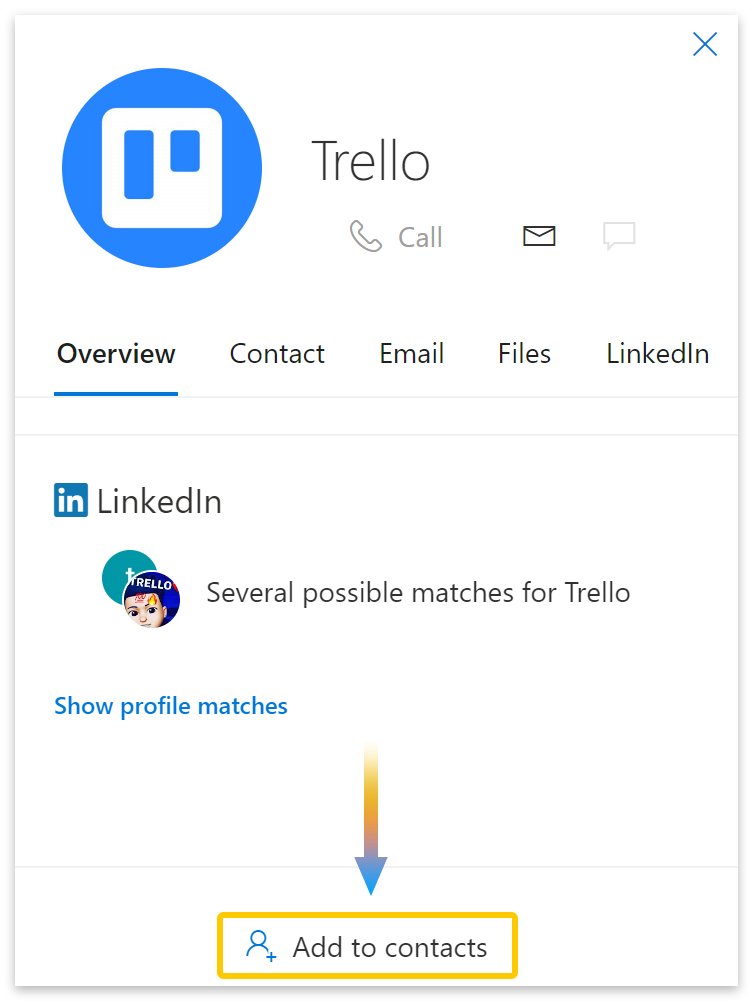
Saving the sender as a contact can work as Outlook won’t usually send emails from your contacts to the Junk folder. Please start this guide by selecting a legitimate email that landed in your Junk folder.
- Open the email.
- Click on the sender’s name or email address.

- Click on Add to contacts at the bottom of the popup box.
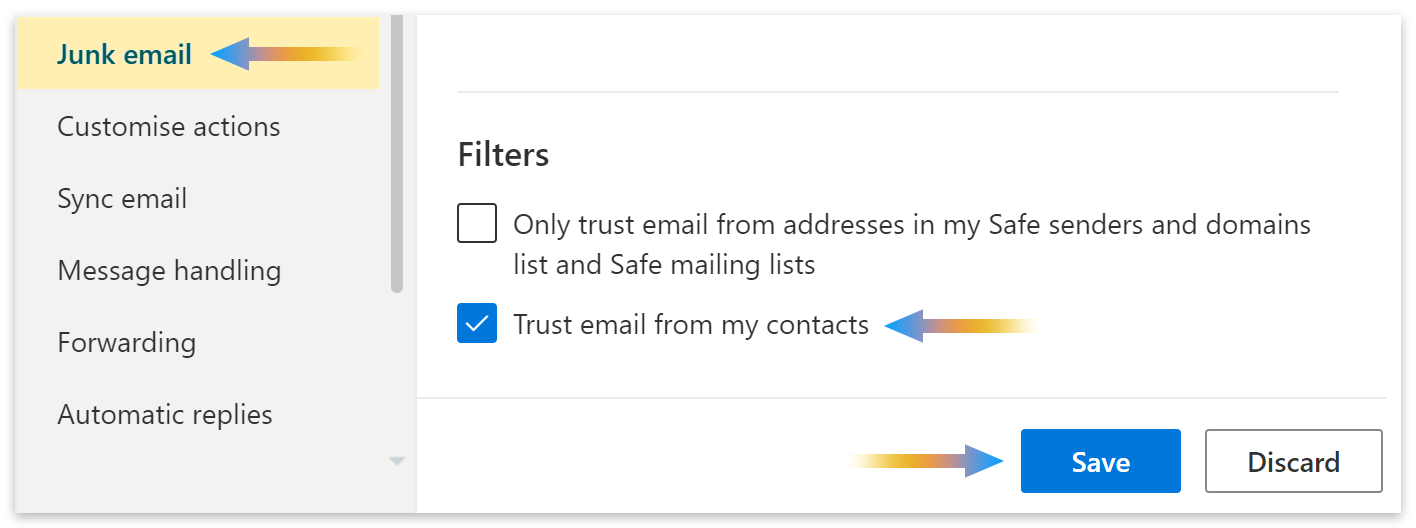
- To make sure Outlook trusts your contacts, click on the settings icon
 in the top menu.
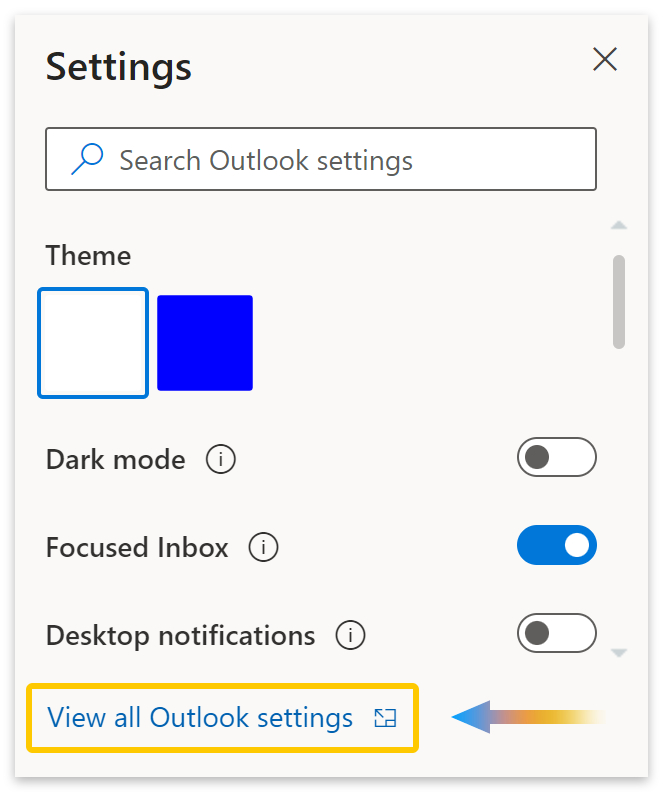
 - Click on View all Outlook settings.
- Go to Junk email.
- Then select the box next to Trust email from my contacts and click the Save button.
Method 4 – Remove blocked senders and domains
If emails from a particular sender frequently land in your junk folder, then Outlook has likely added them to the ‘blocked senders’ list. Please follow this guide to unblock senders.
- Click on the settings icon in the top menu.

- Click on View all Outlook settings at the bottom of the dropdown menu.
- Click on Junk email on the left menu.
- Then click the bin icon
 next to the senders you want to unblock.

- Click the Save button at the bottom of the window.

How to stop legitimate Outlook 365 emails going to junk in the app version of Outlook
The methods below are for the app version of Outlook.
Method 5 – Mark the email as Not Junk
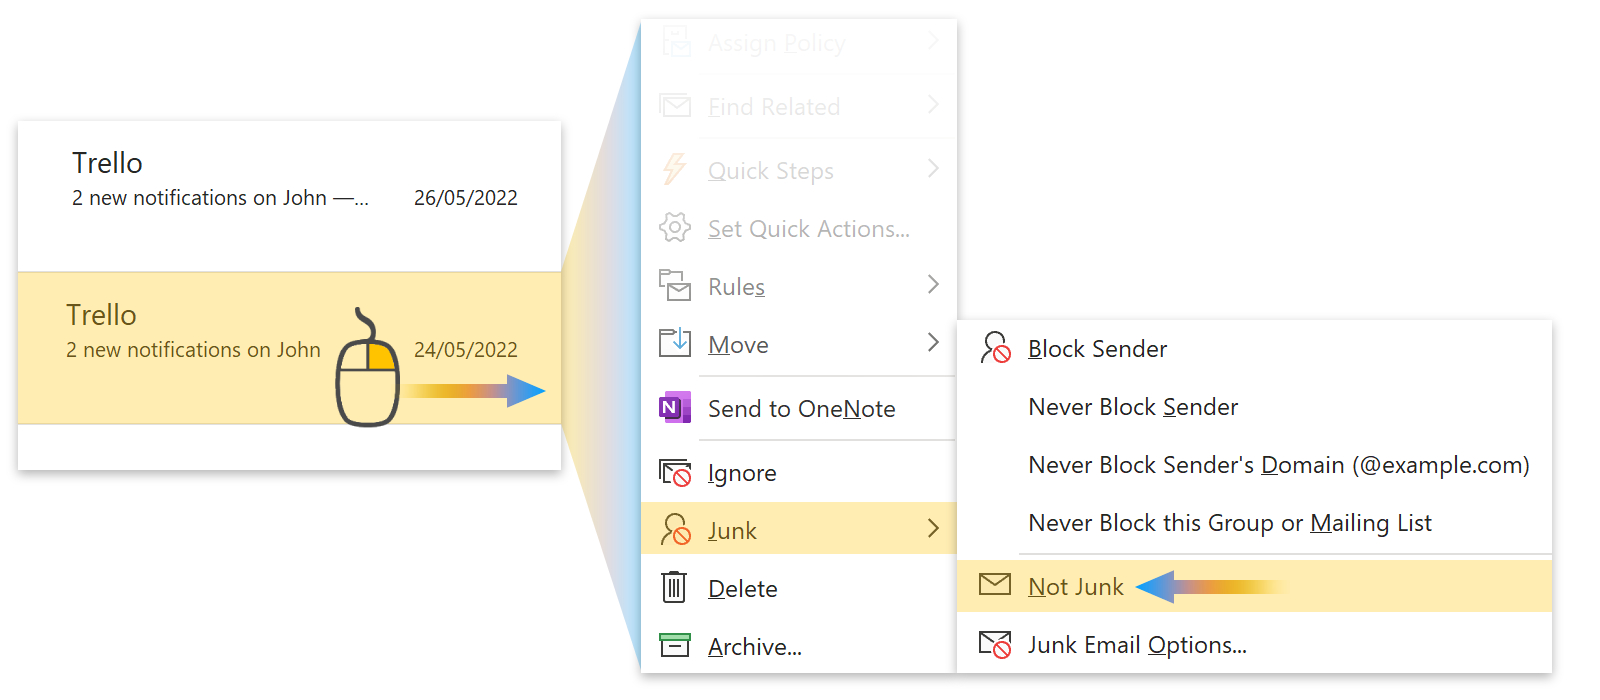
- Right-click on the email you want to move to your inbox.
- Go to Junk, then click on Not junk.
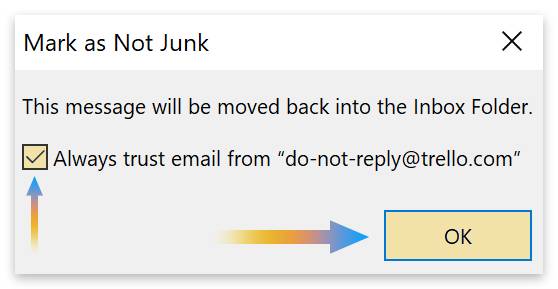
- Keep the box checked next to Always trust email from.
- Then click the OK button.
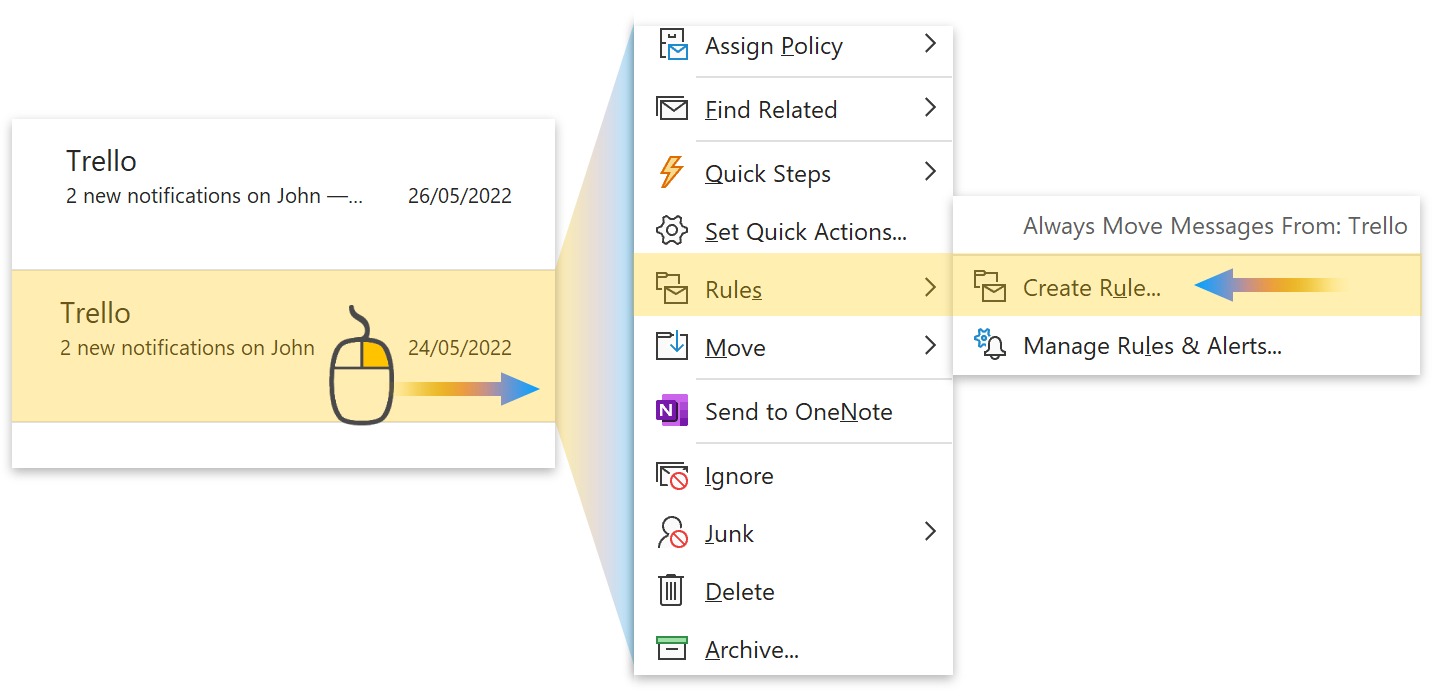
Method 6 – Create a rule
- Right-click on the email you want to create a rule for.
- Go to Rules, then select Create Rule.
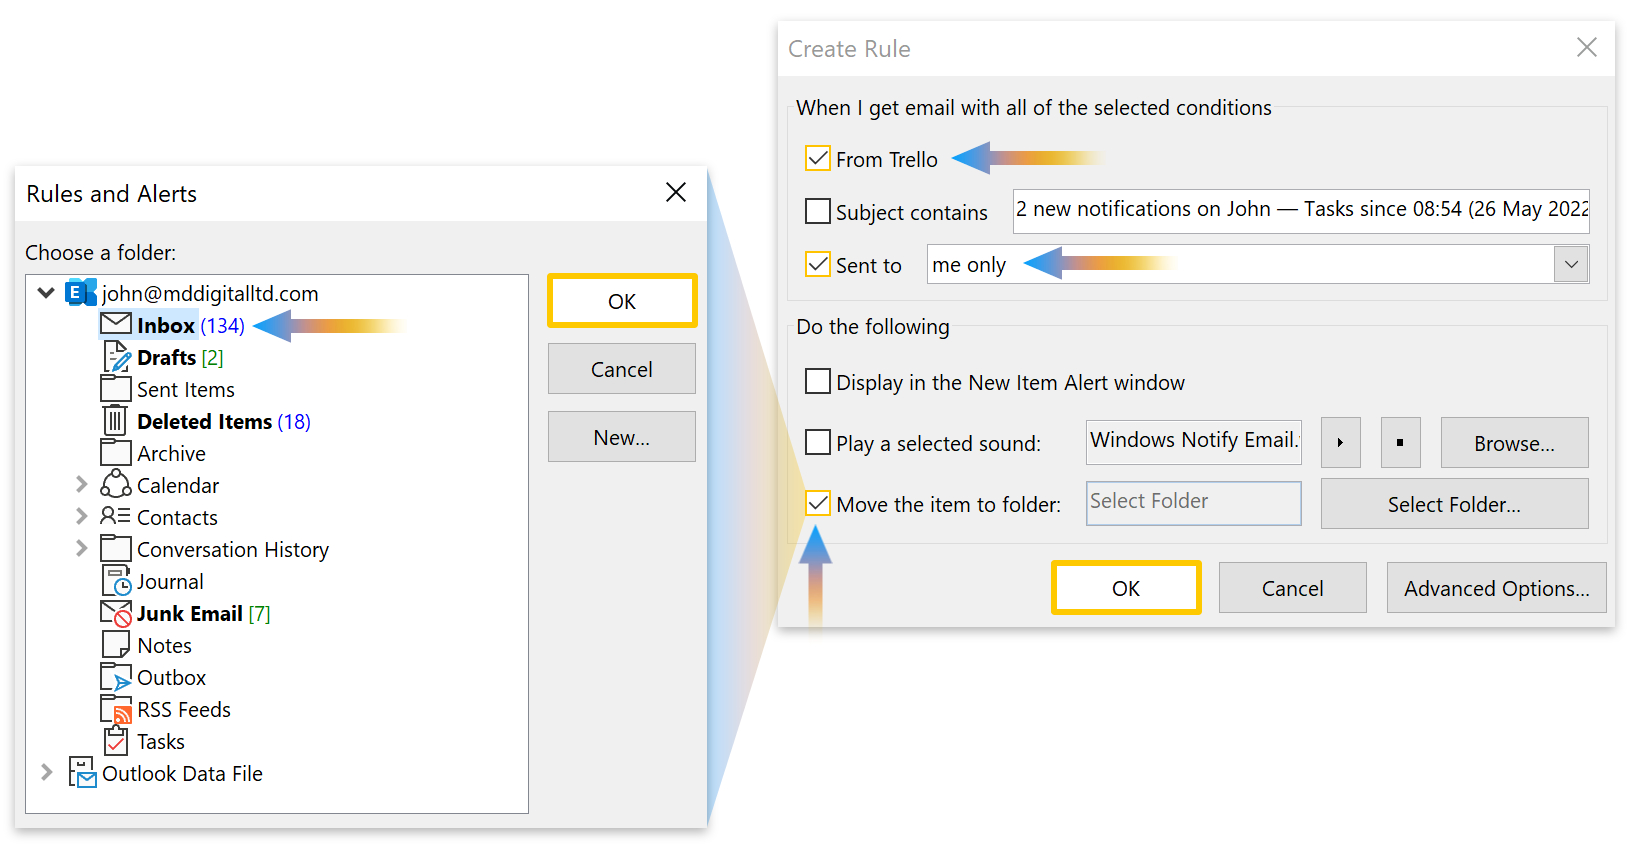
- Check the box next to From.
- Check the box next to Sent to and choose me only (optional).
- Check the box next to Move the item to folder.
- Select Inbox from the popup box.
- Click the OK button in the Rules and Alerts box.
- Then click the OK button in the Create Rule box.
Method 7 – Save sender as a contact
Adding a sender to your contacts can prevent their emails from ending up in your Junk folder. You can add a sender to your contacts by following the quick steps below:
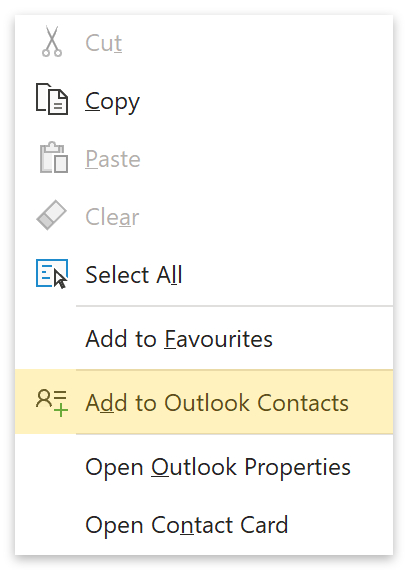
- Right-click on the sender’s name or email address.

- Select Add to Outlook Contacts from the dropdown menu.
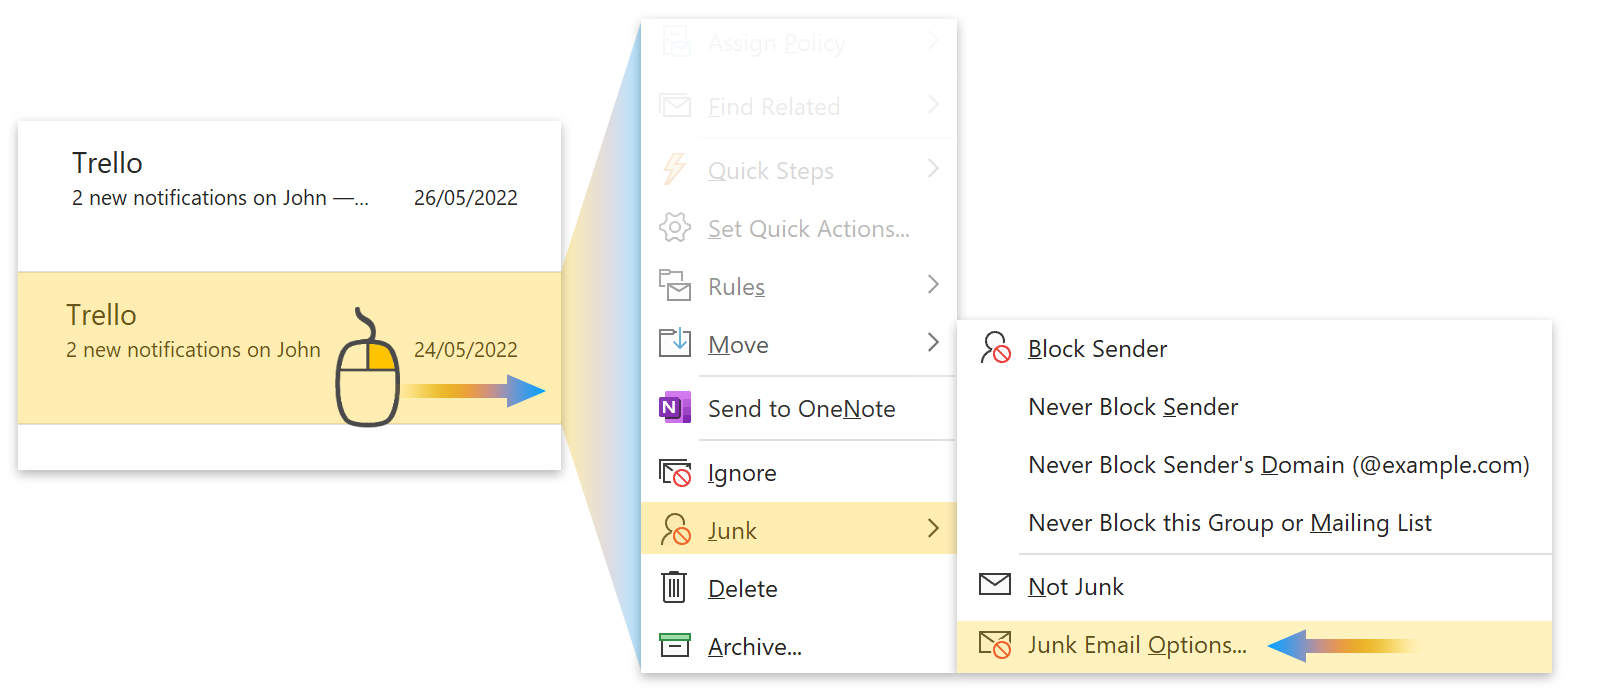
- Next, right-click on the junk email.
- Go to Junk, then select Junk Email Options.
- Click the Safe Senders tab.
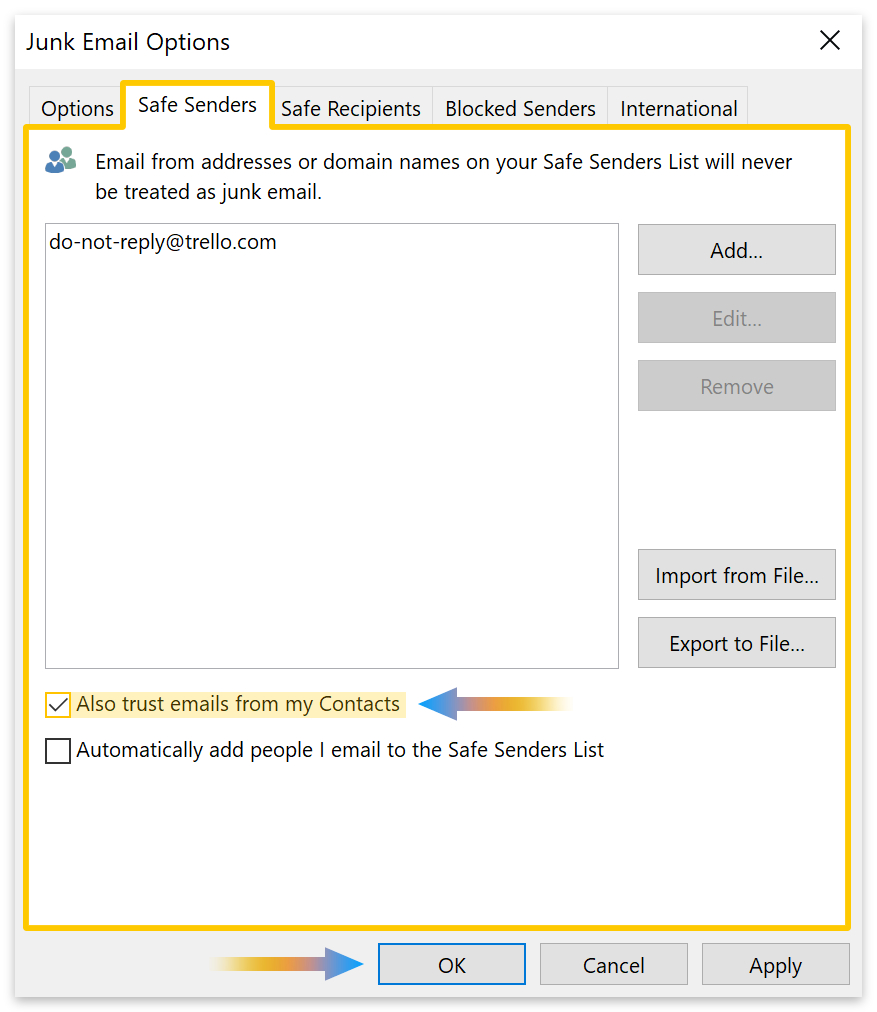
- Check the box next to Also trust emails from my Contacts.
- Then click the OK button.
Method 8 – Remove blocked senders and domains
You can try to solve the problem of legitimate emails landing in your junk folder by checking to make sure the sender has not been added to the blocked list.
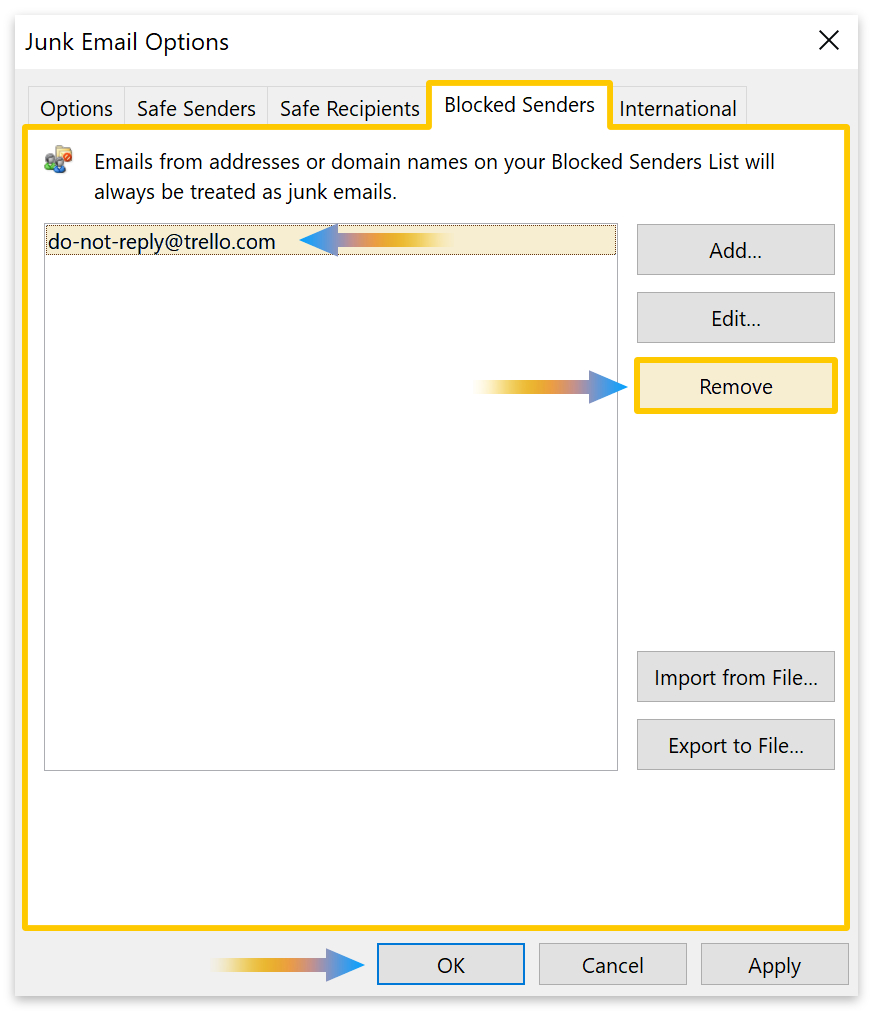
- Right-click on the junk email.
- Go to Junk, then select Junk Email Options.
- Next, click on the Blocked Senders tab.
- Click on the blocked sender’s email address.
- Click the Remove button.
- Then click the OK button.
Method 9 – Change the filter level
Legitimate emails may frequently land in your junk folder if your filter level is high. To remedy this problem, please follow the steps below:
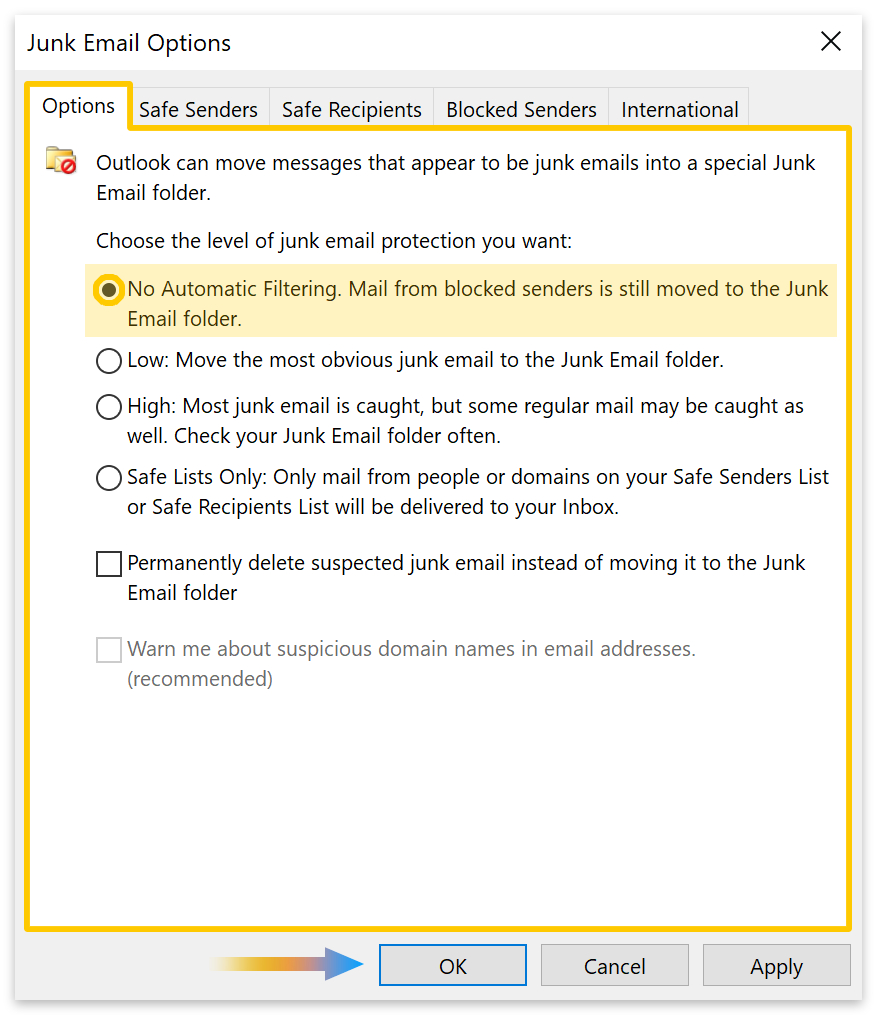
- Right-click on the junk email.
- Go to Junk, then select Junk Email Options.
- Select No Automatic Filtering in the Options tab.
- Then click the OK button.
Conclusion
If you want to stop emails from a particular sender from going to your junk folder, method 1 (app version) and method 5 (web version) should work for you. But if you only want to keep legitimate emails from that sender, we suggest creating a rule as described in method 2 (app version) and method 6 (web version).
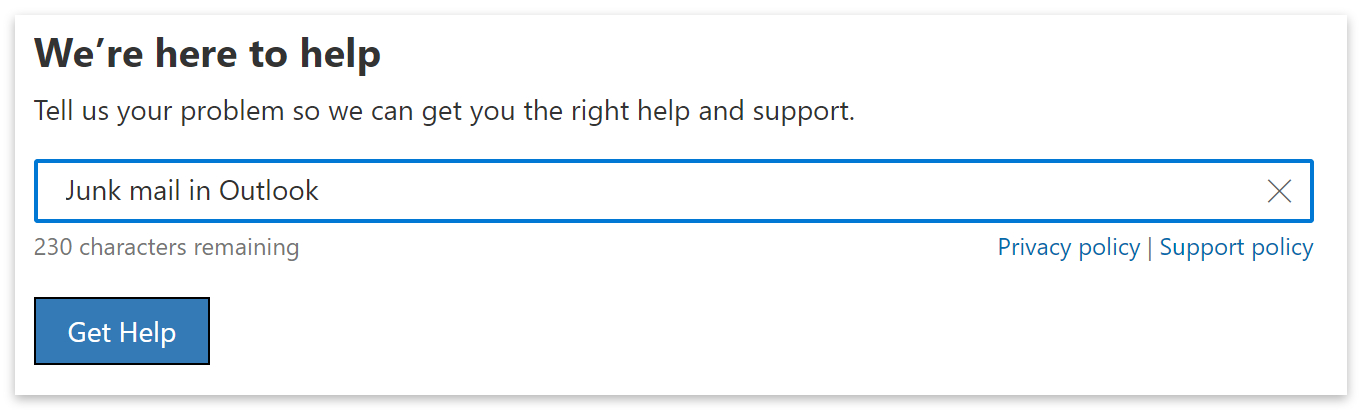
If none of the methods have worked, you could try visiting Microsoft’s support center. There, type in ‘Junk mail in Outlook‘ into the search bar and follow the questions to troubleshoot your problem.
Thanks for reading.