Welcome! In today’s digital workplaces, it’s essential to master virtual collaboration tools like Microsoft Teams. Screen sharing is a powerful feature that can make online meetings more productive and engaging. This guide will teach you everything you need to know, from basic requirements to troubleshooting and best practices. Let’s unleash the full potential of your virtual collaboration with Microsoft Teams screen sharing. Enjoy!
 Table of content

Don’t have Microsoft Teams? Get your preferred version here:

Why Screen Sharing in Microsoft Teams?
In today’s digital workspace, clear communication is key to success. Microsoft Teams screen sharing is one of the pivotal features that makes this possible. Let’s dive into what makes this tool indispensable:
Enhanced Communication
You’ve probably heard the phrase, “A picture is worth a thousand words.” Well, in a remote working environment, a screen share might be worth even more.
- Displaying your work in real time prevents misinterpretation and allows for immediate feedback.
- Visually presenting data makes it easier for your team to understand and retain information.
Increased Efficiency
With Microsoft Teams screen sharing, gone are the days of lengthy, back-and-forth emails trying to explain an intricate Excel formula or a complex Powerpoint slide.
- Screen sharing eliminates ambiguity. Instead of trying to articulate complex ideas in words, simply show your team what you’re working on.
- It’s perfect for quick, impromptu meetings. Need a second opinion on your work? Just share your screen!
Facilitates Learning and Collaboration
Whether you’re onboarding a new team member or working on a collaborative project, screen sharing makes the process seamless.
- Training becomes easier when you can guide your team visually through a new software or workflow.
- For collaborations, live editing during a screen share allows everyone to contribute their ideas in real-time.
In short, Microsoft Teams screen sharing is an essential tool for fostering clear communication, efficient workflows, and collaborative team culture in our increasingly digital workplaces.
Stay tuned as we delve deeper into the technical how-tos of this powerful feature in the following sections!
Basic Requirements for Microsoft Teams Screen Sharing
Before we dive into the how-to’s of screen sharing, let’s ensure your system meets the basic requirements needed to take full advantage of this fantastic feature.
Software Requirements
Microsoft Teams is very flexible and can be accessed through a variety of platforms:

Web browser:
Microsoft Teams is available on most modern browsers, such as Google Chrome, Microsoft Edge, and Safari. However, certain features like background effects might be unavailable on the web version.

Desktop app:
For the best and most complete experience, we recommend using the Teams desktop app, available for both Windows and macOS.

Mobile app:
Teams also has a mobile app available for iOS and Android, but keep in mind that screen sharing from mobile devices may have some limitations.
Remember to always keep your Teams app up-to-date, whether it’s the web, desktop, or mobile version. Software updates not only improve security and fix bugs but also frequently add new features and enhancements.
Hardware and System Requirements
While Teams is designed to work on a wide range of devices, let’s look at some general guidelines to help ensure a smooth screen-sharing experience.
![]() Teams on Windows PC – Software & Hardware requirements:
Teams on Windows PC – Software & Hardware requirements:
| Software / Hardware | Requirement |
|---|---|
| CPU | Minimum: 1.1 GHz, dual core |
| Memory | 4.0 GB RAM |
| Hard disk | 3.0 GB available disk space |
| Display | 1024×768 screen resolution |
| Graphics | Windows OS: Graphics hardware acceleration requires DirectX 9+ with WDDM 2.0+ (WDDM 1.3+ for Windows 10 Fall Creators Update) |
| Operating system | Windows 11, Windows 10 (excluding Windows 10 LTSC for Teams desktop app), Windows 10 on ARM, Windows 8.1, Windows Server 2019, Windows Server 2016, Windows Server 2012 R2 |
| .NET version | .NET 4.5 CLR+ |
| Video | USB 2.0 video recording camera |
| Devices | Standard laptop microphone, camera, and speakers |
| Video calls and meetings | Processor: two cores minimum. For background video effects, Windows 10 or a processor with AVX2 instruction set is required |
| Joining a meeting using proximity detection in Microsoft Teams Rooms | Requires Bluetooth LE. Enable Bluetooth and use the 64-bit Teams client for Windows. Unavailable on 32-bit Teams clients. |
| Teams live events | For producing a Teams live event: Core i5 Kaby Lake processor, 4.0 GB RAM+, and hardware encoder. Check unsupported decoders and encoders recommendations |
| Avatars for Teams app | For the best experience with the avatars for Teams app: four-core CPU and at least 8 GB of RAM |
![]() Teams on macOS – Software & Hardware requirements:
Teams on macOS – Software & Hardware requirements:
| Software / Hardware | Requirement |
|---|---|
| Computer and processor | Intel Core Duo processor |
| Memory | 4.0 GB RAM |
| Hard disk | 1.5 GB available disk space |
| Display | 1280 x 800 resolution or higher |
| Operating system | One of the three most recent versions of macOS. For upgrade information, refer to the official macOS documentation. |
| Video | Compatible webcam |
| Voice | Compatible microphone, speakers, headset with microphone, or equivalent device |
| Video calls and meetings | Requires two-core processor. For better quality, use a four-core processor or better |
| Joining a meeting using proximity detection in a Microsoft Teams Room | Requires Bluetooth LE. Enable Bluetooth on the client device |
Permissions
To share your screen during a Microsoft Teams meeting, you need to have the necessary permissions. If you’re a guest or an attendee without presenting rights, you won’t be able to share your screen. Remember to check your permissions before the meeting starts or ask the meeting organizer to grant you the necessary rights.
To sum up, getting your screen-sharing adventure off to a good start involves up-to-date software, adequate hardware, a solid internet connection, and appropriate permissions. Once these boxes are ticked, you’re all set to share your screen and boost your collaborative efforts in Microsoft Teams. Onwards to the practical steps!
How to Use the Screen Sharing Feature in Microsoft Teams
Microsoft Teams offers a straightforward way to share your screen during meetings, but there are also a few hidden gems and choices you might not be aware of. Let’s get you fully equipped to leverage this feature.
Starting a Screen Share in a Meeting
Follow these simple steps to share your screen in Microsoft Teams:
- Start or join a meeting. Look for the video camera icon in your Teams app to get things rolling.
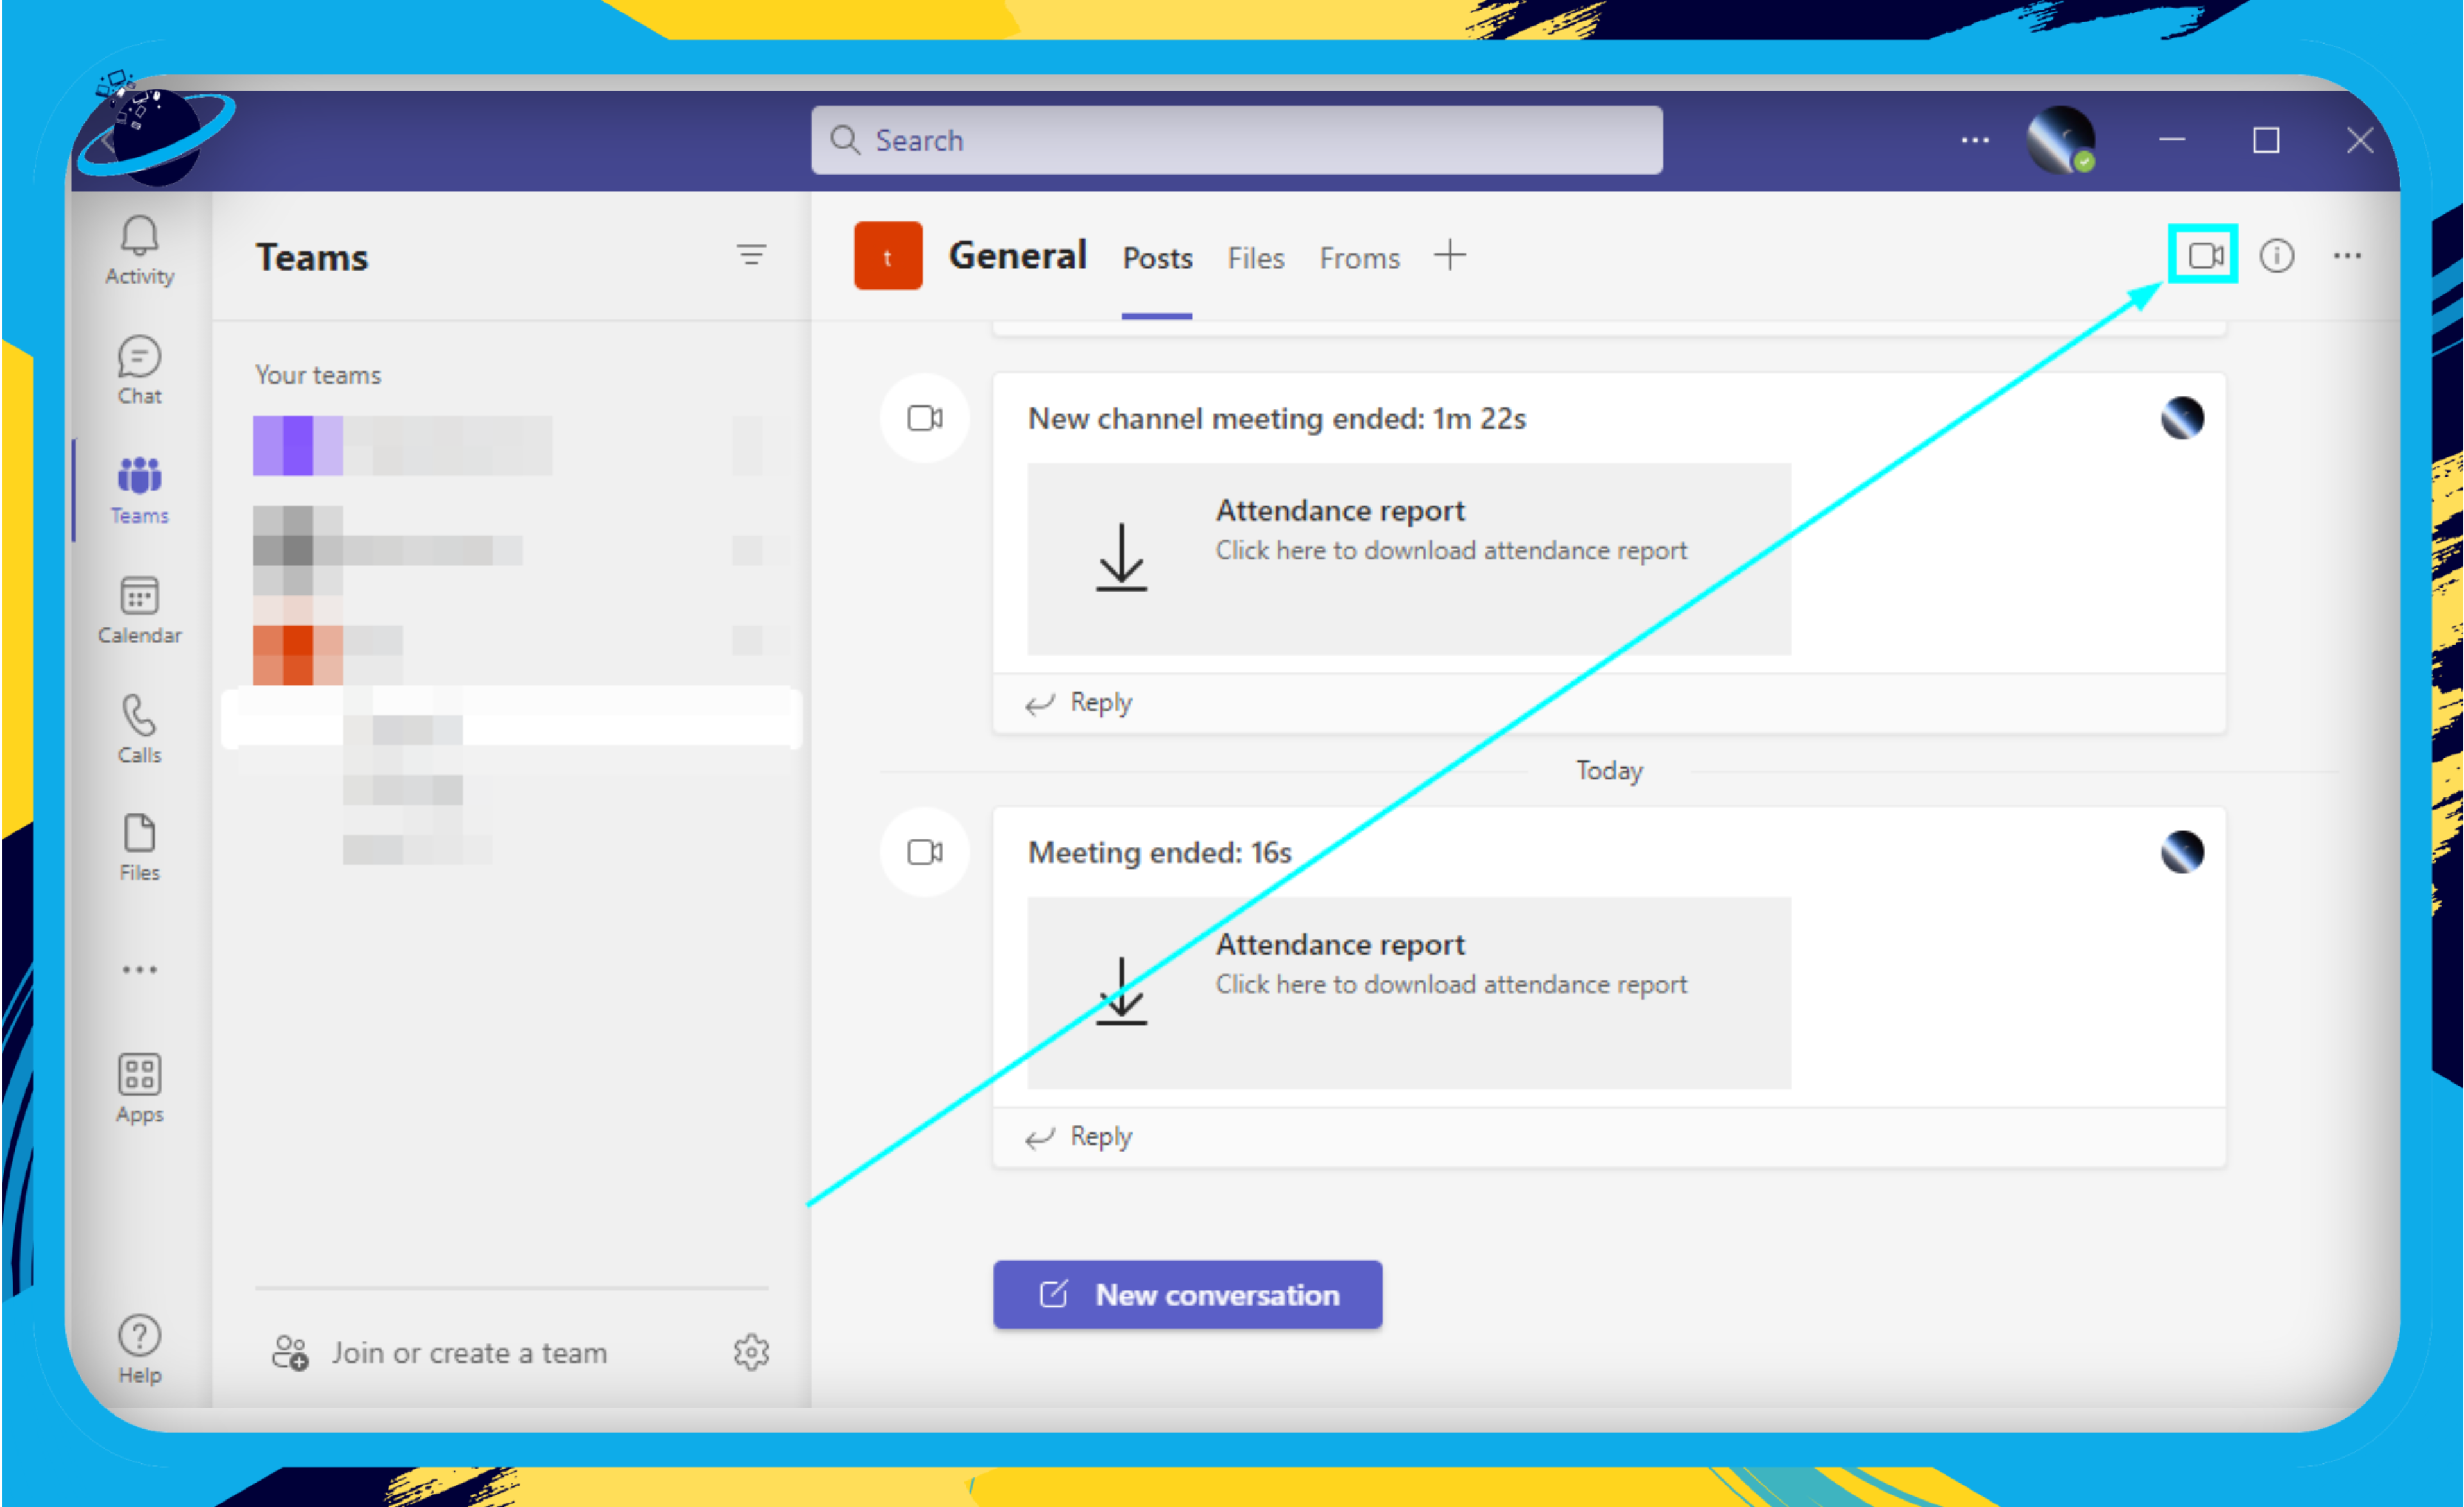
- Once in the meeting, click the “Share” icon in the toolbar, often represented as a square with an upward arrow.
- A dialog box will appear at the top of your Teams window with several options for what to share.
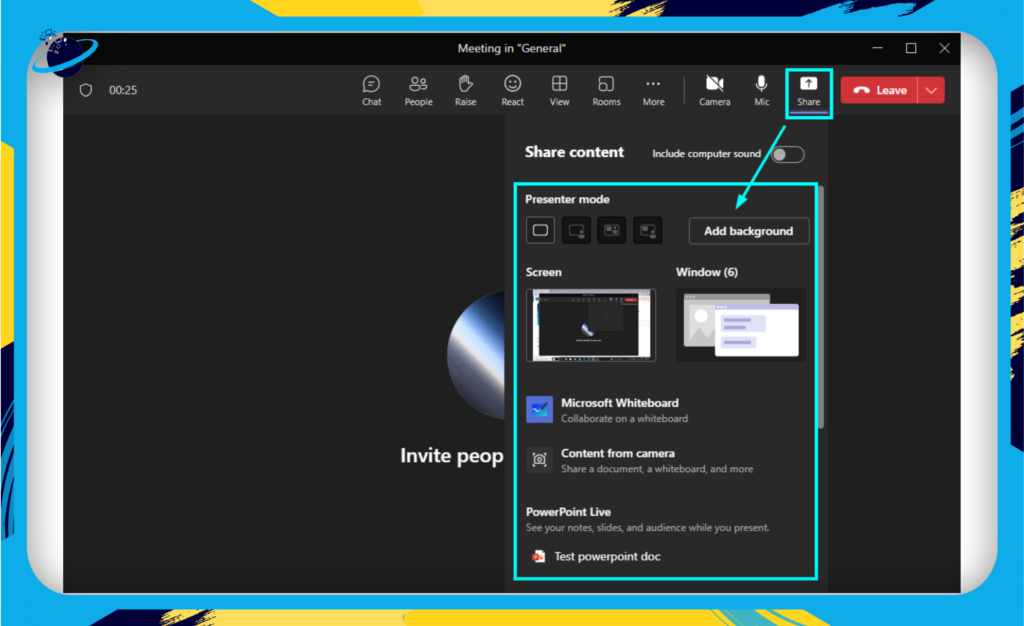
Now that you’ve set up the screen share, it’s time to choose what exactly you’d like to share. Microsoft Teams gives you three primary options:
Sharing Your Entire Desktop
- If you want to share everything visible on your screen, choose “Screen.” This option is great for tasks that involve multiple applications or files.
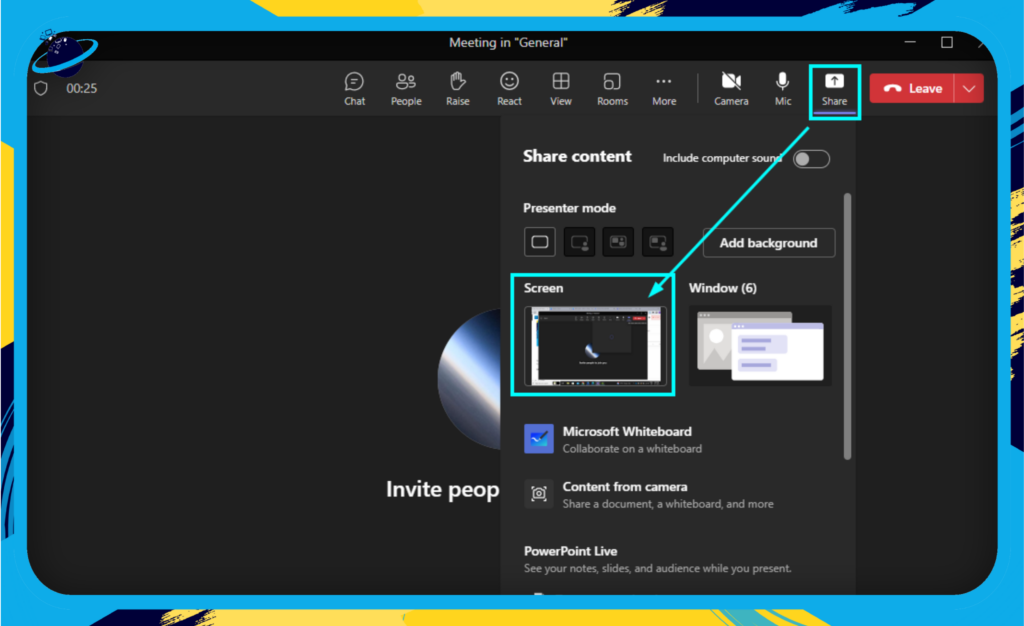
- Be aware that this will show everything on your screen to your viewers, so remember to close any irrelevant or sensitive information beforehand.
Sharing a Specific Window
- For sharing just a specific application or file, select the “Window” option. This will display a list of all open windows on your computer.
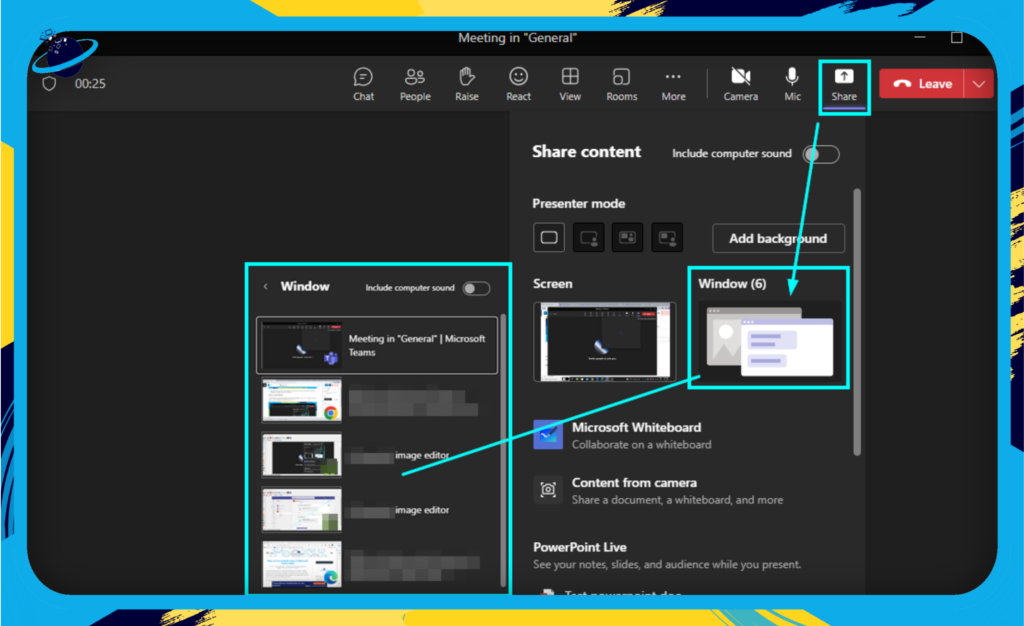
- This is a fantastic choice when you want to focus the team’s attention on a single application and ensure that nothing else distracts them.
Sharing a PowerPoint Presentation
- Teams also allow you to share a PowerPoint presentation directly within the meeting. Select the “PowerPoint” option and pick your file.
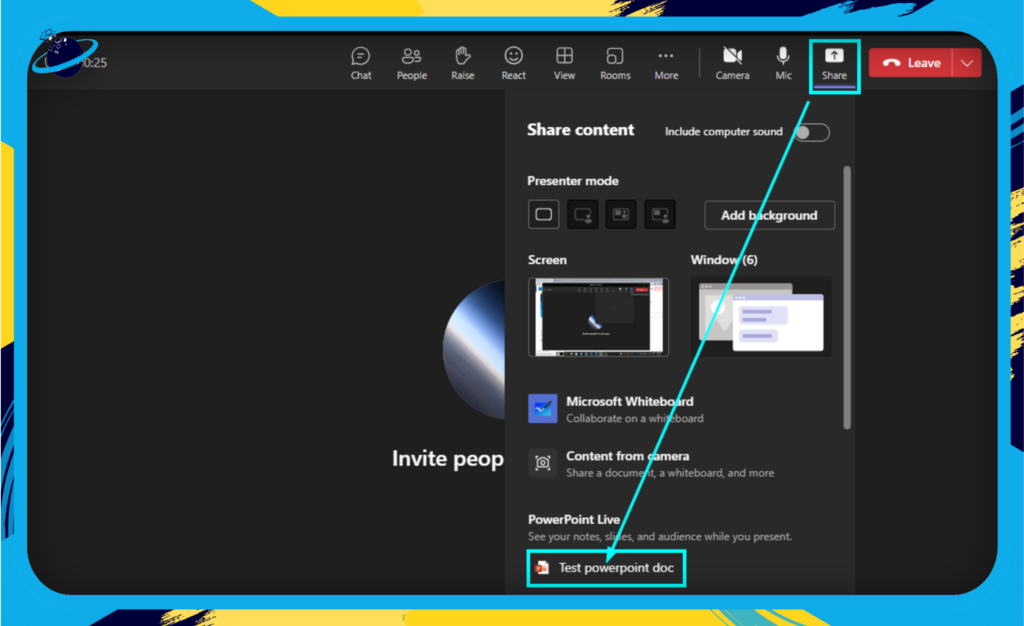
- This feature is unique because it gives you control as a presenter and also allows participants to move through the slides at their own pace if permitted.
Managing Your Screen Share
Once you’re sharing your screen, Teams gives you a range of controls to manage your session:
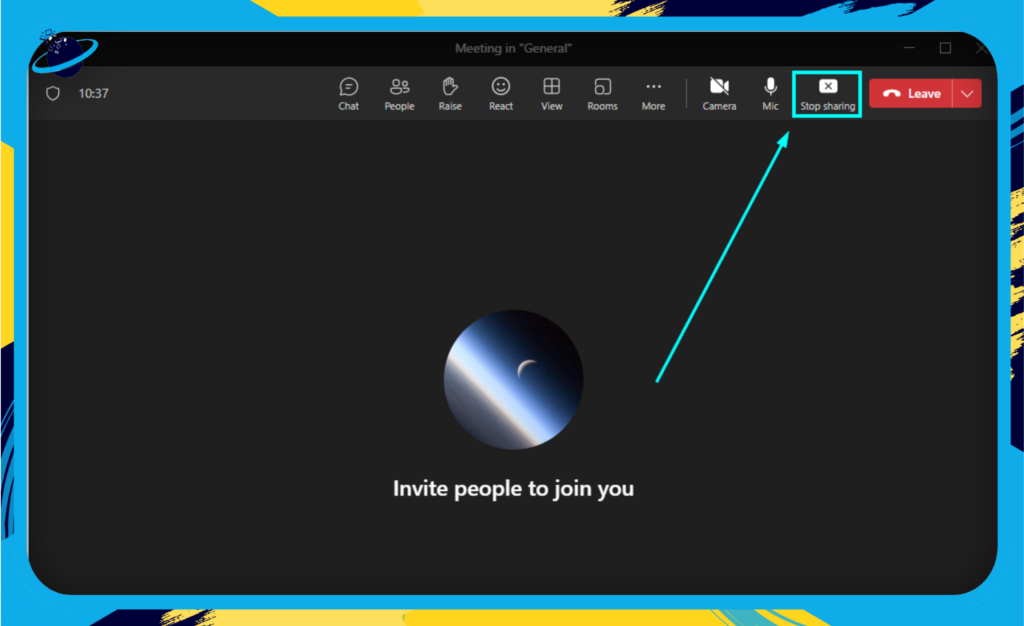
- Pause Sharing: If you need to access something privately during the session, use the “Stop Sharing” button (it looks like a pause symbol inside a square). This will freeze the screen for viewers until you decide to resume.
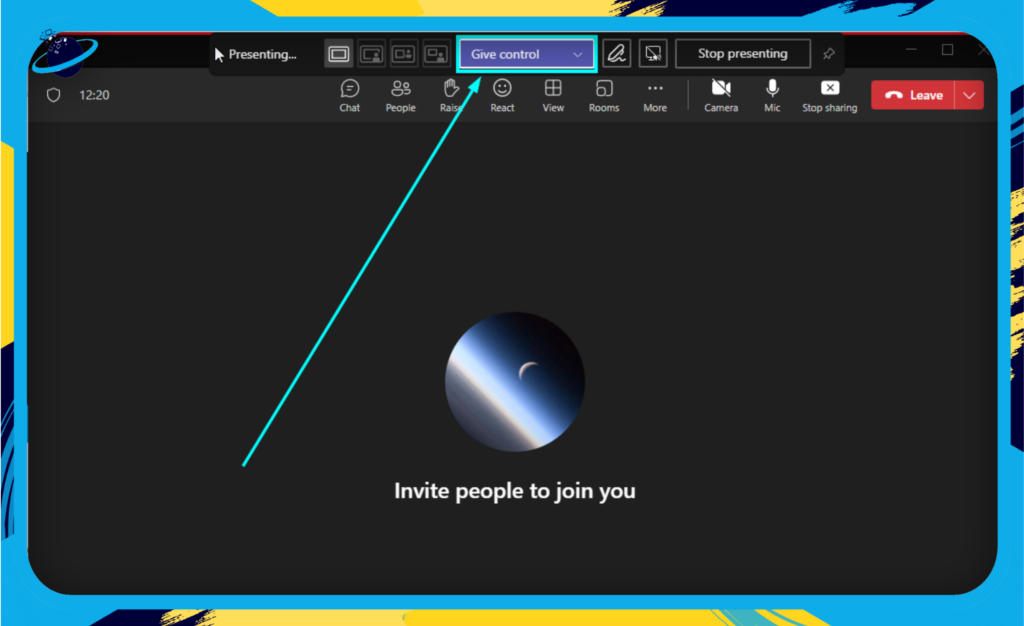
- Give Control: Teams also allow you to pass control of your screen to another participant in the meeting. Simply click the “Give Control” button, then select the participant’s name.
In a nutshell, Microsoft Teams offers a flexible and dynamic screen-sharing experience that caters to different scenarios. Whether you’re giving a detailed presentation or collaborating on a project, understanding how to effectively share your screen can make your Teams meetings more engaging and productive.
Troubleshooting Common Screen Sharing Issues
When navigating the world of virtual collaboration, it’s not uncommon to hit a few bumps along the road. Perhaps you’ve encountered a stubborn ‘Screen sharing isn’t working’ message, or the quality of your shared screen leaves much to be desired. No worries — we’re here to help you smooth out those wrinkles and get back to a seamless screen-sharing experience. Below are some common issues and solutions to get you back on track.
Screen Sharing Isn’t Working
We’ve all been there — you’re ready to present, but the screen just won’t share. Try the following solutions:
- Ensure that Microsoft Teams is up-to-date: Outdated software can lead to various glitches, so always keep your Teams application current.
- Check your network connection: Screen sharing requires a stable internet connection. If you’re experiencing difficulties, try resetting your router or switching to a wired connection.
- Verify permission settings: If you’re attempting to share the screen on a Mac, make sure to grant screen recording permission to Teams in your System Preferences.
Poor Image Quality or Lag
Experiencing blurry screens or lag during your screen-sharing session? Here’s what you can do:
- Close unnecessary applications: Running too many applications can slow down your system and affect screen sharing quality. Try closing any unneeded applications for the duration of your meeting.
- Adjust your screen resolution: Sometimes, a high screen resolution can cause issues. Try lowering your screen resolution to see if this improves the screen-sharing quality.
- Check your network connection: As with most streaming activities, screen sharing is heavily dependent on a stable internet connection. If you’re experiencing lag, this could be the culprit.
Sound Issues During Screen Sharing
Sharing a video, but the sound isn’t coming through? Let’s tackle this:
- Share system audio: When you start a screen-sharing session in Teams, ensure that the ‘Include system audio’ box is checked. This allows your meeting participants to hear the audio playing on your system.
Don’t let a minor hiccup turn into a major roadblock in your virtual meeting. Remember, every tech challenge is an opportunity to learn and improve. Keep these troubleshooting tips handy, and you’ll be back to smooth sailing in no time. Happy Teams-ing!
Best Practices for Screen Sharing
In the bustling world of business, it’s important to communicate effectively and efficiently. And while screen sharing in Microsoft Teams offers powerful collaboration tools, using them properly can be the difference between a productive meeting and a confusing mess. Let’s explore some best practices that can help ensure your screen sharing is a success.
Prepare Your Screen Before Sharing
Before you start sharing your screen, take a moment to make sure everything is ready. It can be distracting for others if they have to watch you open files or search for documents during a meeting.
- Close unnecessary applications: Keep only the apps you need for your presentation open. This will reduce distractions and ensure your computer runs smoothly.
- Check what’s on the screen: Ensure no private or sensitive information is visible.
- Organize your windows: If you plan to switch between different applications or documents, have them open and ready.
Optimize Screen for Viewers
Remember, what looks good on your high-resolution monitor might not look as clear on other screens.
- Adjust your screen resolution: If you have a high-resolution screen, consider lowering the resolution for the duration of your screen share. This can make text and images appear larger for your audience.
- Zoom in when necessary: If you’re showing detailed content like spreadsheets or code, zoom in so that everyone can see clearly.
Maintain Communication
Screen sharing shouldn’t mean the end of a communication. Keep the dialogue going to maintain a productive meeting.
- Ask for feedback: Regularly ask if everyone can see your screen and understand what you’re showing.
- Narrate your actions: When you’re clicking through a presentation or demonstrating something, explain what you’re doing to keep everyone on the same page.
Share Control When Needed
Microsoft Teams allows you to give control of your screen to others. This is useful when you want to collaborate directly on a document or allow someone else to demonstrate something.
- Know how to share control: Familiarize yourself with the process of giving control to another participant.
- Remember to take back control: Once the other participant has finished, remember to take back control of your screen.
By incorporating these best practices into your routine, you’ll be well on your way to conducting efficient, effective, and professional screen-sharing sessions in Microsoft Teams. Remember, the goal is to ensure everyone can clearly see, understand, and contribute to what’s being shared.
Conclusion
In a world that’s increasingly leaning towards remote work and virtual collaboration, understanding and utilizing tools like Microsoft Teams screen sharing is no longer a luxury but a necessity.
Recap of Key Points
Here’s a quick recap of the major points we’ve covered:
- Requirements for Screen Sharing: You need to have the latest version of Microsoft Teams and meet certain hardware and system requirements.
- How to Use Screen Sharing: We’ve walked you through the step-by-step process of initiating a screen share, choosing what to share, and managing the controls while sharing.
- Troubleshooting Common Issues: We discussed some common issues and their solutions, ensuring you’re never stuck when it comes to sharing your screen.
- Best Practices: We’ve shared important tips and etiquette to follow for a smooth and productive screen-sharing experience.
- Advanced Features: We’ve looked into the extra features Teams offers to enhance your screen-sharing experience, like PowerPoint Live and Whiteboard.
- Security and Privacy: Lastly, we’ve highlighted some precautions to keep in mind to protect your sensitive information while sharing your screen.
Final Thoughts
Sharing your screen on Microsoft Teams can improve collaboration and productivity. It helps you present clearly and collaborate intuitively. Practice and explore different options to find what works best for you. Stay updated with new releases to leverage new features. Thank you for joining us on this journey to become proficient in screen sharing. Here’s to more effective meetings!