If you have regular meetings and calls in Microsoft, you may have encountered issues where the audio keeps cutting out. Audio in Microsoft Teams is essential to maintain consistent communication between you and your colleagues. If audio keeps cutting out every time you are in a meeting or call, your work progress could be impacted. In this blog, we will cover the solutions for audio cutting out in Microsoft Teams. Have a read-through and see our full guide on solutions for audio cutting out in Teams.
While in a video conference, many users have reported that audio from the host microphone isn’t consistent, and it keeps cutting out. The solutions shown below should help you address your problem if meeting attendees are experiencing issues with the audio cutting out on Microsoft Teams.
- Turn off noise suppression in Microsoft Teams.
- Clear cached data in Microsoft Teams.
- Update drivers on your Windows device.
Above are some of the solutions you can use to fix the issue of audio cutting out in Microsoft Teams. If you experience audio cutting out, you can progress through the list of solutions to help resolve the issue. You can access settings to turn off noise suppression which actively suppresses background noise. Clearing the cached data can be done from the Teams application folder; you can try this solution if you have audio issues. Another solution is to update your drivers— this needs to be done regularly if you are a Windows user.
Turn off noise suppression in Microsoft Teams to stop audio cutting out
If you have issues with audio, then noise suppression could be a potential catalyst. Noise suppression is a feature used by Microsoft Teams to actively suppress your background noise. While this is good if you have a sensitive microphone that picks up many audio frequencies, it isn’t good for nonsensitive microphones. If your microphone isn’t high quality and noise suppression is on, you could lose audio. Have a read and see what you can do to turn off noise suppression in Microsoft Teams.
- Firstly, open Microsoft Teams on your desktop.
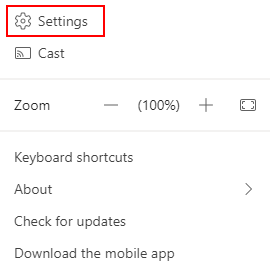
- Now click on “Settings and more,” illustrated by three dots.
- From there, click on “Settings.”
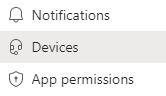
- Now click on “Devices” and find the option for “Noise suppression.”
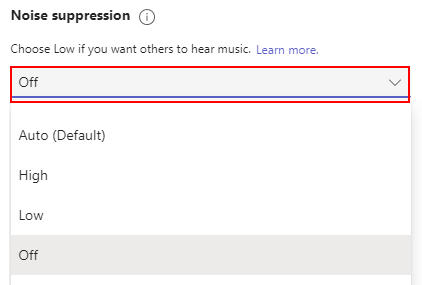
- From the dropdown, select “Off” to complete the process.
Noise suppression will be turned off when the steps above have been completed. You can now proceed with your meeting without the issues of audio cutting out in Microsoft Teams. If you find that there is some background noise, you can either experiment with a lower noise suppression rate or go into a quiet room with reduced background noise.
An in-depth guide on how to turn off noise suppression in Microsoft Teams
If you require more assistance with the steps illustrated below, you can use the in-depth guide to help turn off noise suppression. The guide includes screenshots to better understand the Teams UI and provide more information on some of the complex steps. If you struggle to navigate the UI, you can also use the guide to help.
- Firstly, open Microsoft Teams on your desktop.

- Now click on “Settings and more,” illustrated by three dots.

- From there, click on “Settings.”
- Now click on “Devices” and find the option for “Noise suppression.”
- From the dropdown, select “Off” to complete the process.
When the instructions above have been finished, the noise suppression will be switched off. You may now continue your Microsoft Teams call or conference without worrying about the audio cutting off. If you discover that background noise is still going through to your audience, try going into an area with less noise, or you can choose to lower the suppression rather than turning it off. With the guide above, you can also use the screenshots to better navigate through the UI.

Clear cached data in Microsoft Teams to stop audio cutting out
If turning off the noise suppression hasn’t worked, you can clear cached data in Microsoft Teams. Clearing the cached data will remove any unnecessary scripts of data that could potentially impact your audio input.
Clear cached data for Windows devices
Here is the guide on how to clear cached data on Windows devices. If you use the Windows desktop application, you can use the guide below to help you clear cached data in Microsoft Teams.
- To begin, close Microsoft Teams.

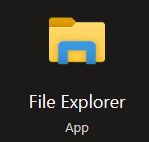
- Open “File Explorer” from there.
- After typing “%appdata%/Microsoft/Teams” in the quick access panel.
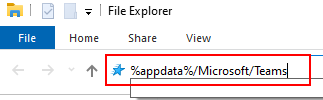
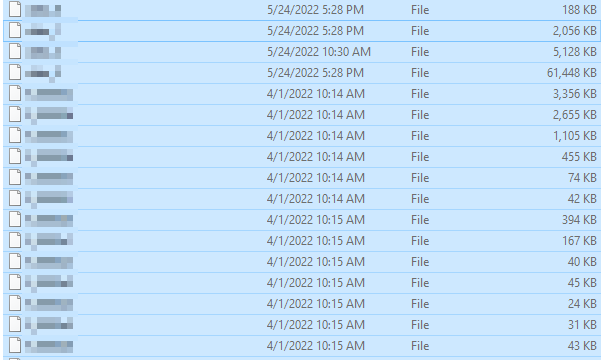
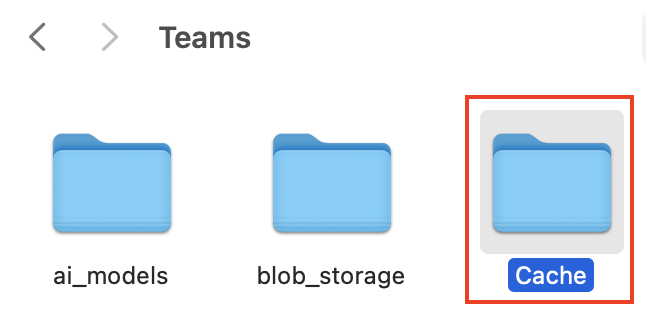
- Open the “Cache” folder from there.

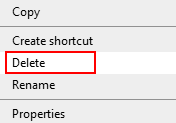
- Everything in that folder should be selected.
- Right-click and select the “Delete” option to end the process.
Clear cached data for Mac OS devices
This guide will show you how to clear cached data on Mac OS devices. If you’re using the Mac OS desktop app, follow the steps below to delete cached data in Microsoft Teams.
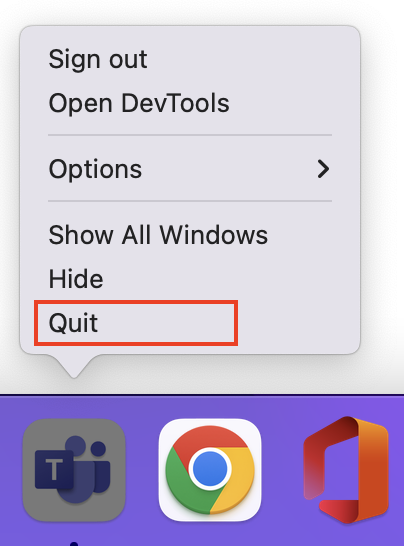
- To begin, right-click on the Teams and select “Quit.”
- After that, open “Finder.”

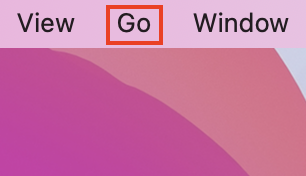
- Select “Go” and then “Go to Folder.”
- “/Library/Application Support/Microsoft” should be typed into the type box.

- Place the folder in the trash.
- Click “Empty” once you have opened the bin.

- Now go to the launchpad.

- Then select “Keychain Access.”

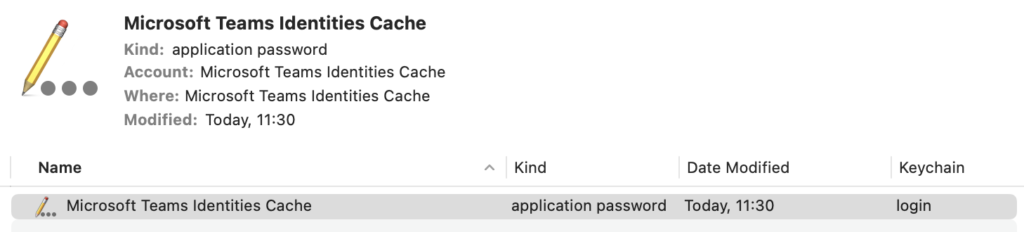
- Now go to the search box and enter Microsoft Teams.

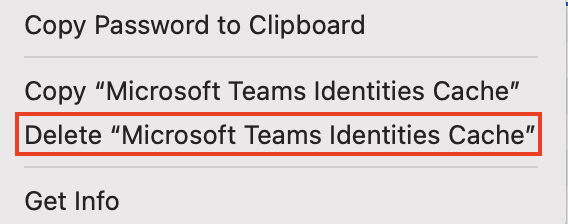
- Right-click on the “Microsoft Teams identities cache” option and choose it.
- Finally, press the “Delete” button.
Summery
Once you have opened Microsoft Teams, you should now be able to use the program without any unnecessary cached data. Audio cutting out could potentially be caused if there have been numerous adjustments to audio settings in Microsoft Teams. Teams will keep a copy of the data, and as it’s trying to process those unnecessary bits of data, it could buffer the audio and cause it to cut out. The process aims to eliminate cached data and prevent it from causing issues with audio.
Update drivers on your Windows device
The final solution is to update drivers on your Windows device. Suppose you find that there are still issues with the audio cutting out, then you can proceed with the following process. Updating your drivers will ensure that hardware on your device runs well with software such as Teams. You can update the drivers from the device manager settings. Have a read and see if you can update drivers on your Windows device.
- Firstly, type out “Device Manager” in your Windows search menu and click on it.
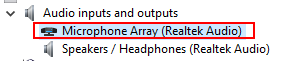
- Select the option for “Audio inputs and outputs.”

- Right-click on the option for your microphone.
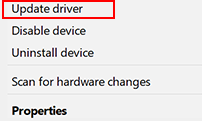
- Finally, click on “Update driver.”
When the steps are complete, you will have successfully managed to update drivers for your device microphones. Your mic will now work well with Microsoft Teams, and you shouldn’t have any issues with the hardware not working with the software.
Conclusion
Thank you for reading our content on fixing the audio cutting out in Microsoft Teams. We have provided three solutions, each to fix your audio-related issues. However, if you still encounter issues with the steps provided, simply add a comment below, and we will address them.