Many administrators have nightmares about users mistakenly destroying documents, versions of documents, folders, list items, document libraries, or lists from SharePoint farms. If this happens in standard Windows Explorer, hitting Shift + Del will permanently remove the item. SharePoint, on the other hand, sends each deleted item to its Recycle Bin, which serves as a sort of backup for users and administrators, allowing them to restore any accidentally deleted items. The Recycle Bin linked with a site collection can be managed in the following way by a SharePoint administrator. However what if you don’t want users to access the recycling bin and restore content? Well there are settings to help to achieve this very scenario where you have a site without the recycling bin. You, unfortunately, can’t directly edit out the recycling bin as it’s a required page, however, you can edit the bin with a series of embeds and back end controls.
Follow the step by step process below to see how you can hide the recycling bin on SharePoint online.
Step by step process – How to hide the SharePoint Online recycle bin
- First sign in to Office 365.
- Use the app launcher and navigate to “SharePoint”, and click on it.
- In SharePoint go to your site.
- Now click on “Settings”.
- Click on “Site contents”.
- Now click “Site Settings “.
- Under “Site Collection Administration” click on “Site Collection Features.”
- Scroll down to “SharePoint Server Publishing Infrastructure”
- Finally, click on “Activate”.
That’s it, once those steps are complete, you will have effectively disabled the infrastructure for the recycling bin. Make sure that the recycling bin is not present when you open your site. To check simply go back to your site and check to see if the recycling bin is there. Once you have confirmed it’s not there, you can republish your site and the changes will be assigned immediately. The only way this will not work is if you have a custom recycling bin embedded into SharePoint — in that case, you just simply need to manually hide the page and that will do. However, by editing the infrastructure directly, you can remove the app. Same with the recycling bin, if you have access to the infrastructure you can edit out the recycling bin.

Recover a deleted file from the SharePoint Online recycle bin
Well with the recycling bin gone, how are you going to get your deleted data back. It is very important to have the recycling feature enabled at some point. You can reverse the process and deactivate the infrastructure and retrieve the file. However, if you are an admin sure im pretty sure you didn’t block the user from the recycling bin just to assign it back.
Even if a user deletes a file permanently or empties the Recycle Bin, SharePoint Online will preserve it for 93 days in the second-stage or site collection Recycle Bin. Administrators are the only ones who can recover data that has been transferred to the second-stage recycling bin.
- Sign in to your Office 365 account first.
- Navigate to admin using the app launcher.
- To see the “Admin centres,” click “Show All.”
- Now, select SharePoint.
- Then select “Settings” from the drop-down menu (Gear Icon).
- Then select “Site settings” from the drop-down menu.
- “Site information” is the option to select.
- Then select “View all site settings” from the drop-down menu.
- Click “Recycle Bin,” then “Second-stage Recycle Bin” at the bottom.
- Click “Restore” after selecting the things you wish to restore.
In SharePoint Online, there is no built-in capability that allows a user to retrieve a file that has been removed for more than 93 days. In actuality, SharePoint Online deletes all material that has been in the first- or second-stage Recycle Bins for longer than that amount of time.
As a result, the only way to ensure long-term backup and recovery of mistakenly lost data is to use a third-party SharePoint Online backup solution. Certain third-party software gives administrators limitless storage of their clients’ SharePoint Online data, as well as frequent backups to keep the data up to date.
The data is not deleted if a person deletes anything by accident. Instead, if the user realises that they lost essential data during the storage period, it can be restored from SharePoint Online’s Recycle Bin (also known as the first-stage Recycle Bin). Unless it is emptied, all deleted items are stored in the Recycle Bin, where they will remain for the following 93 days.
The encryption keys for all of these parts are likewise removed from the platform when data is permanently erased. These pieces are likewise removed from the blocks that contained them. In essence, there is no more information to be gathered.
Step by step process – How to hide the SharePoint Online recycle bin
Step by step breakdown:
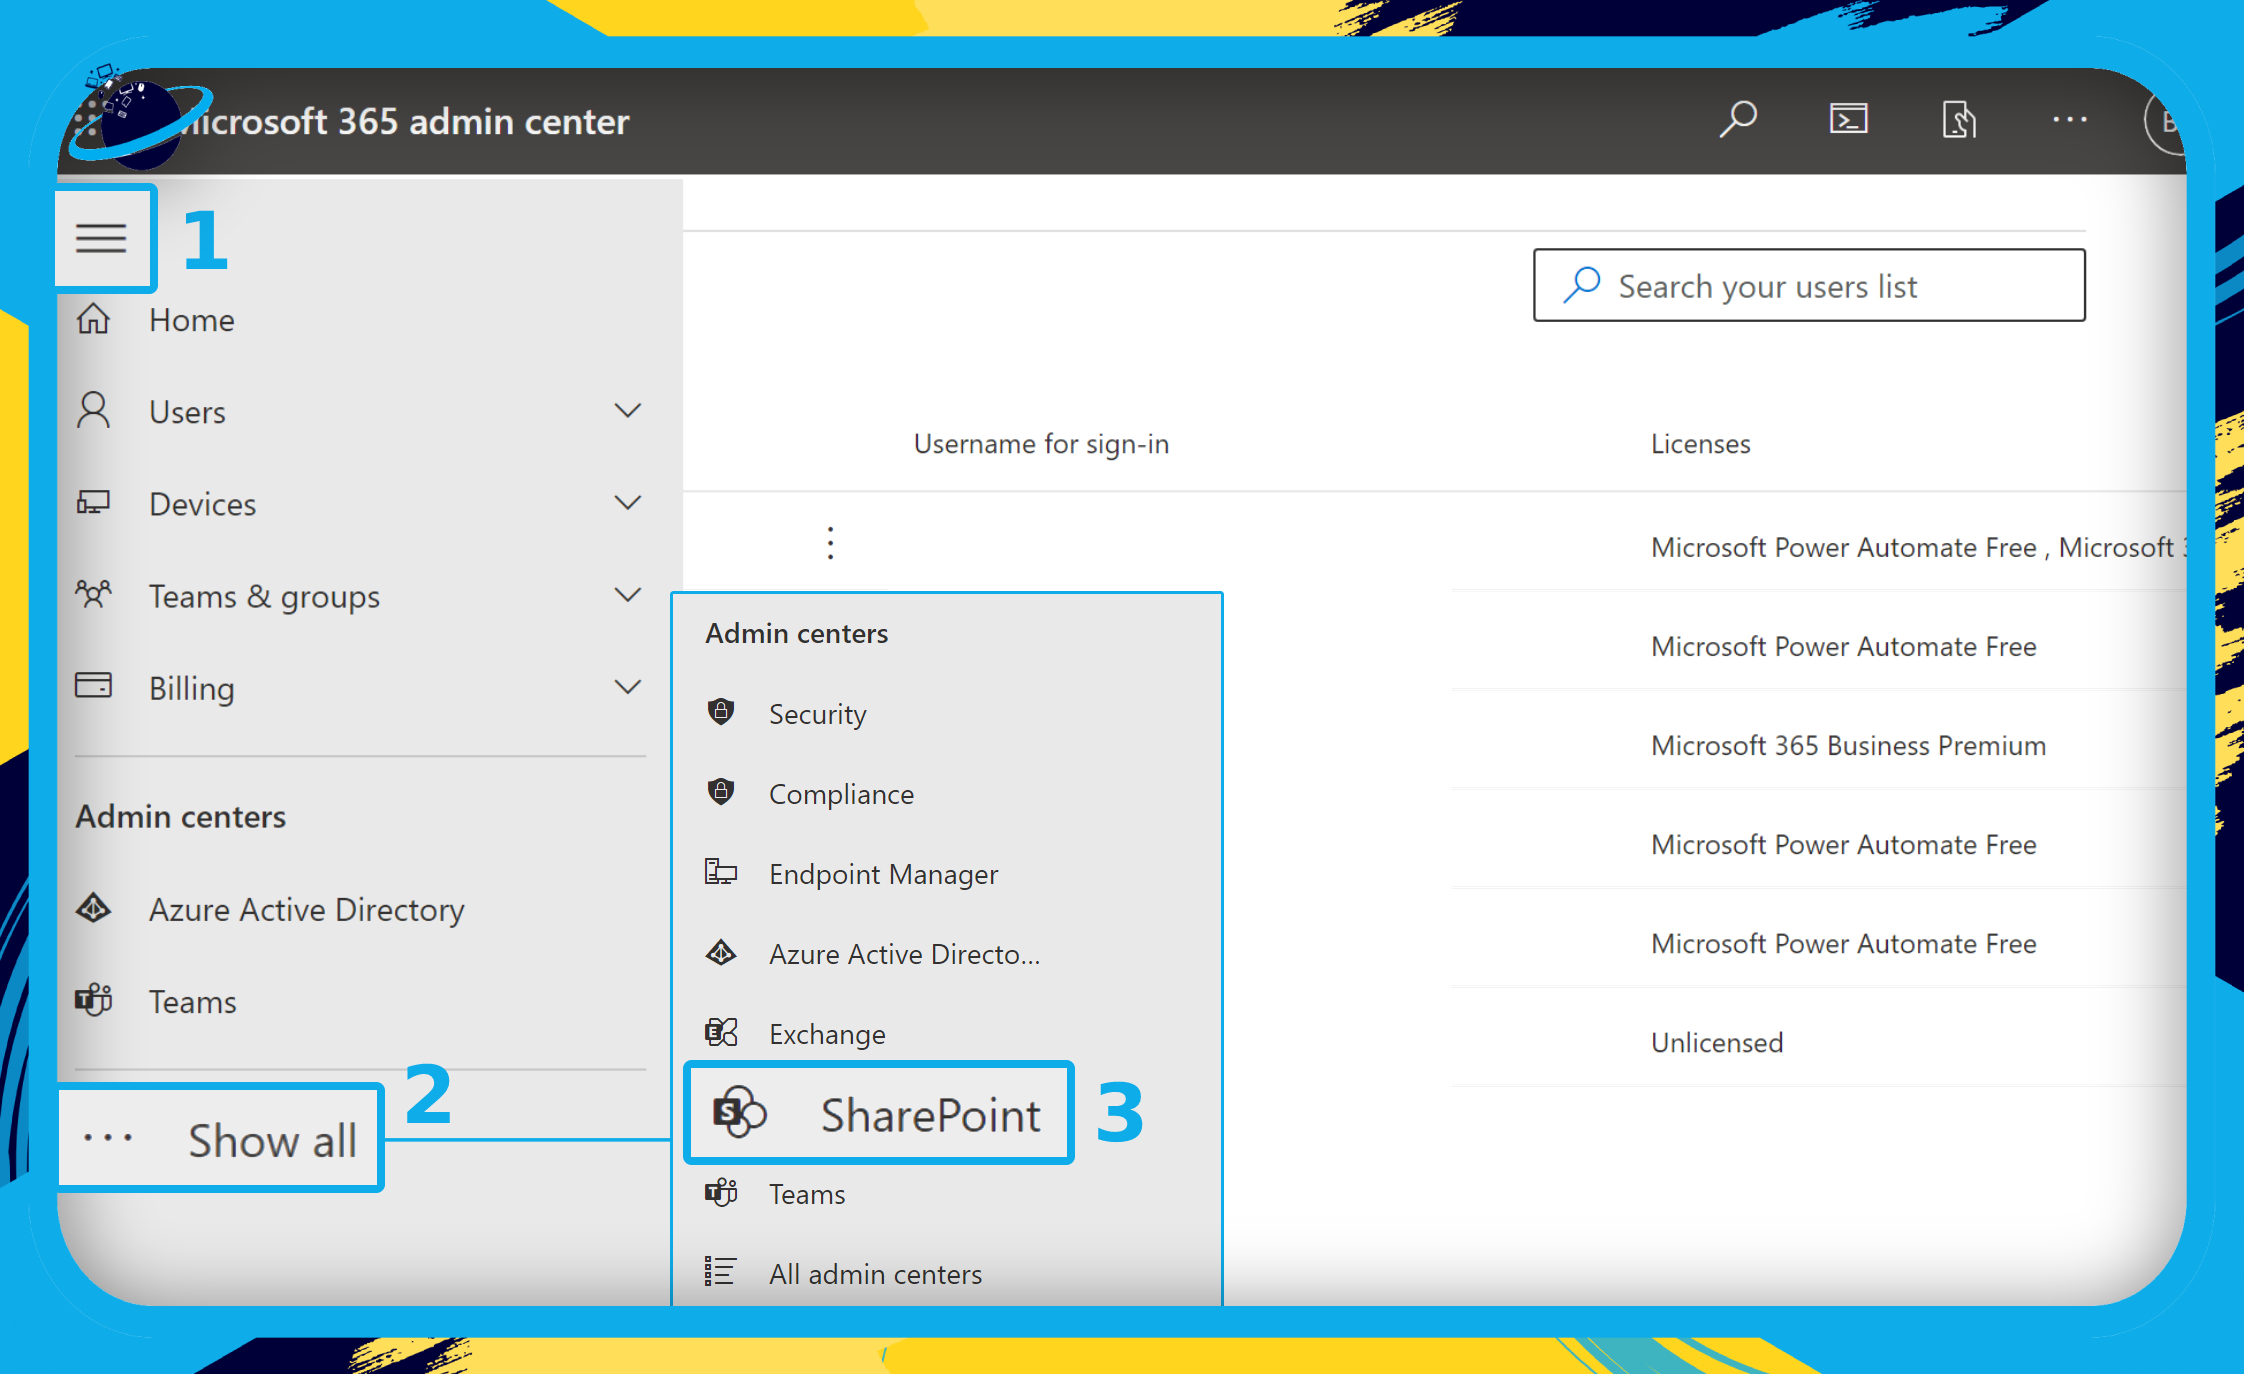
- First, sign in to Office 365.
- Click the
 menu icon in the top left. (1)
 - Click “Show all” to reveal all the Admin centers. (2)
- Select “SharePoint” from the list of Admin centers. (3)
- In SharePoint, go to your site.
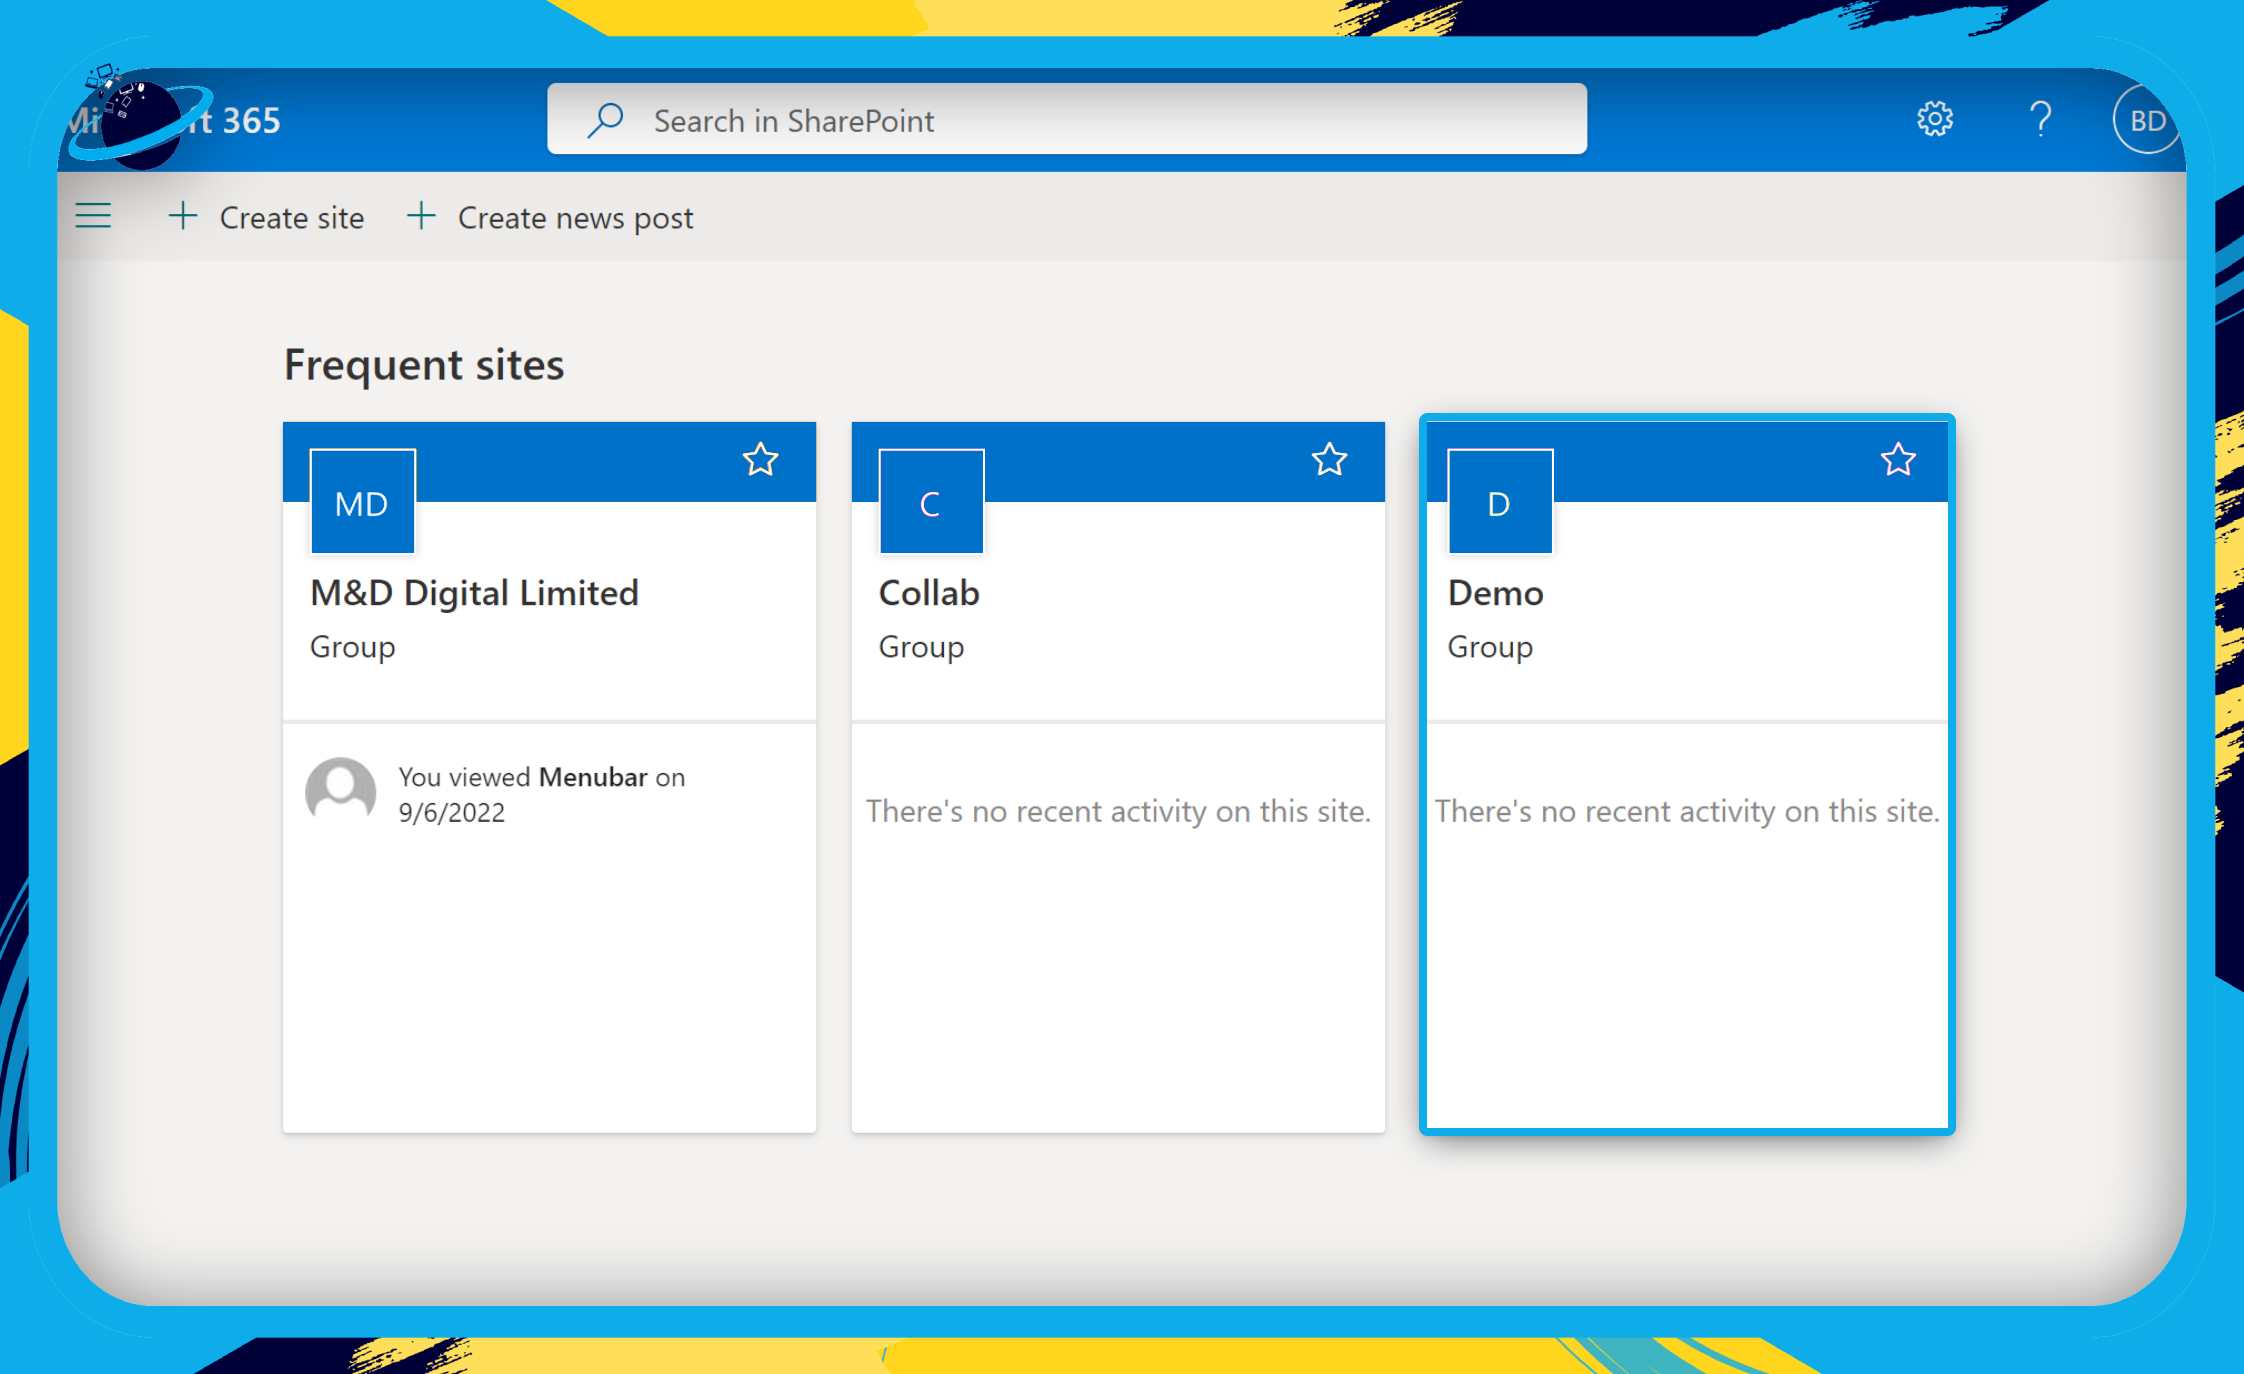
In this example, the site above called “Demo” will be used to create the preview.
- Go to “Site contents” in the left menu.
- Then click on “Site settings.”
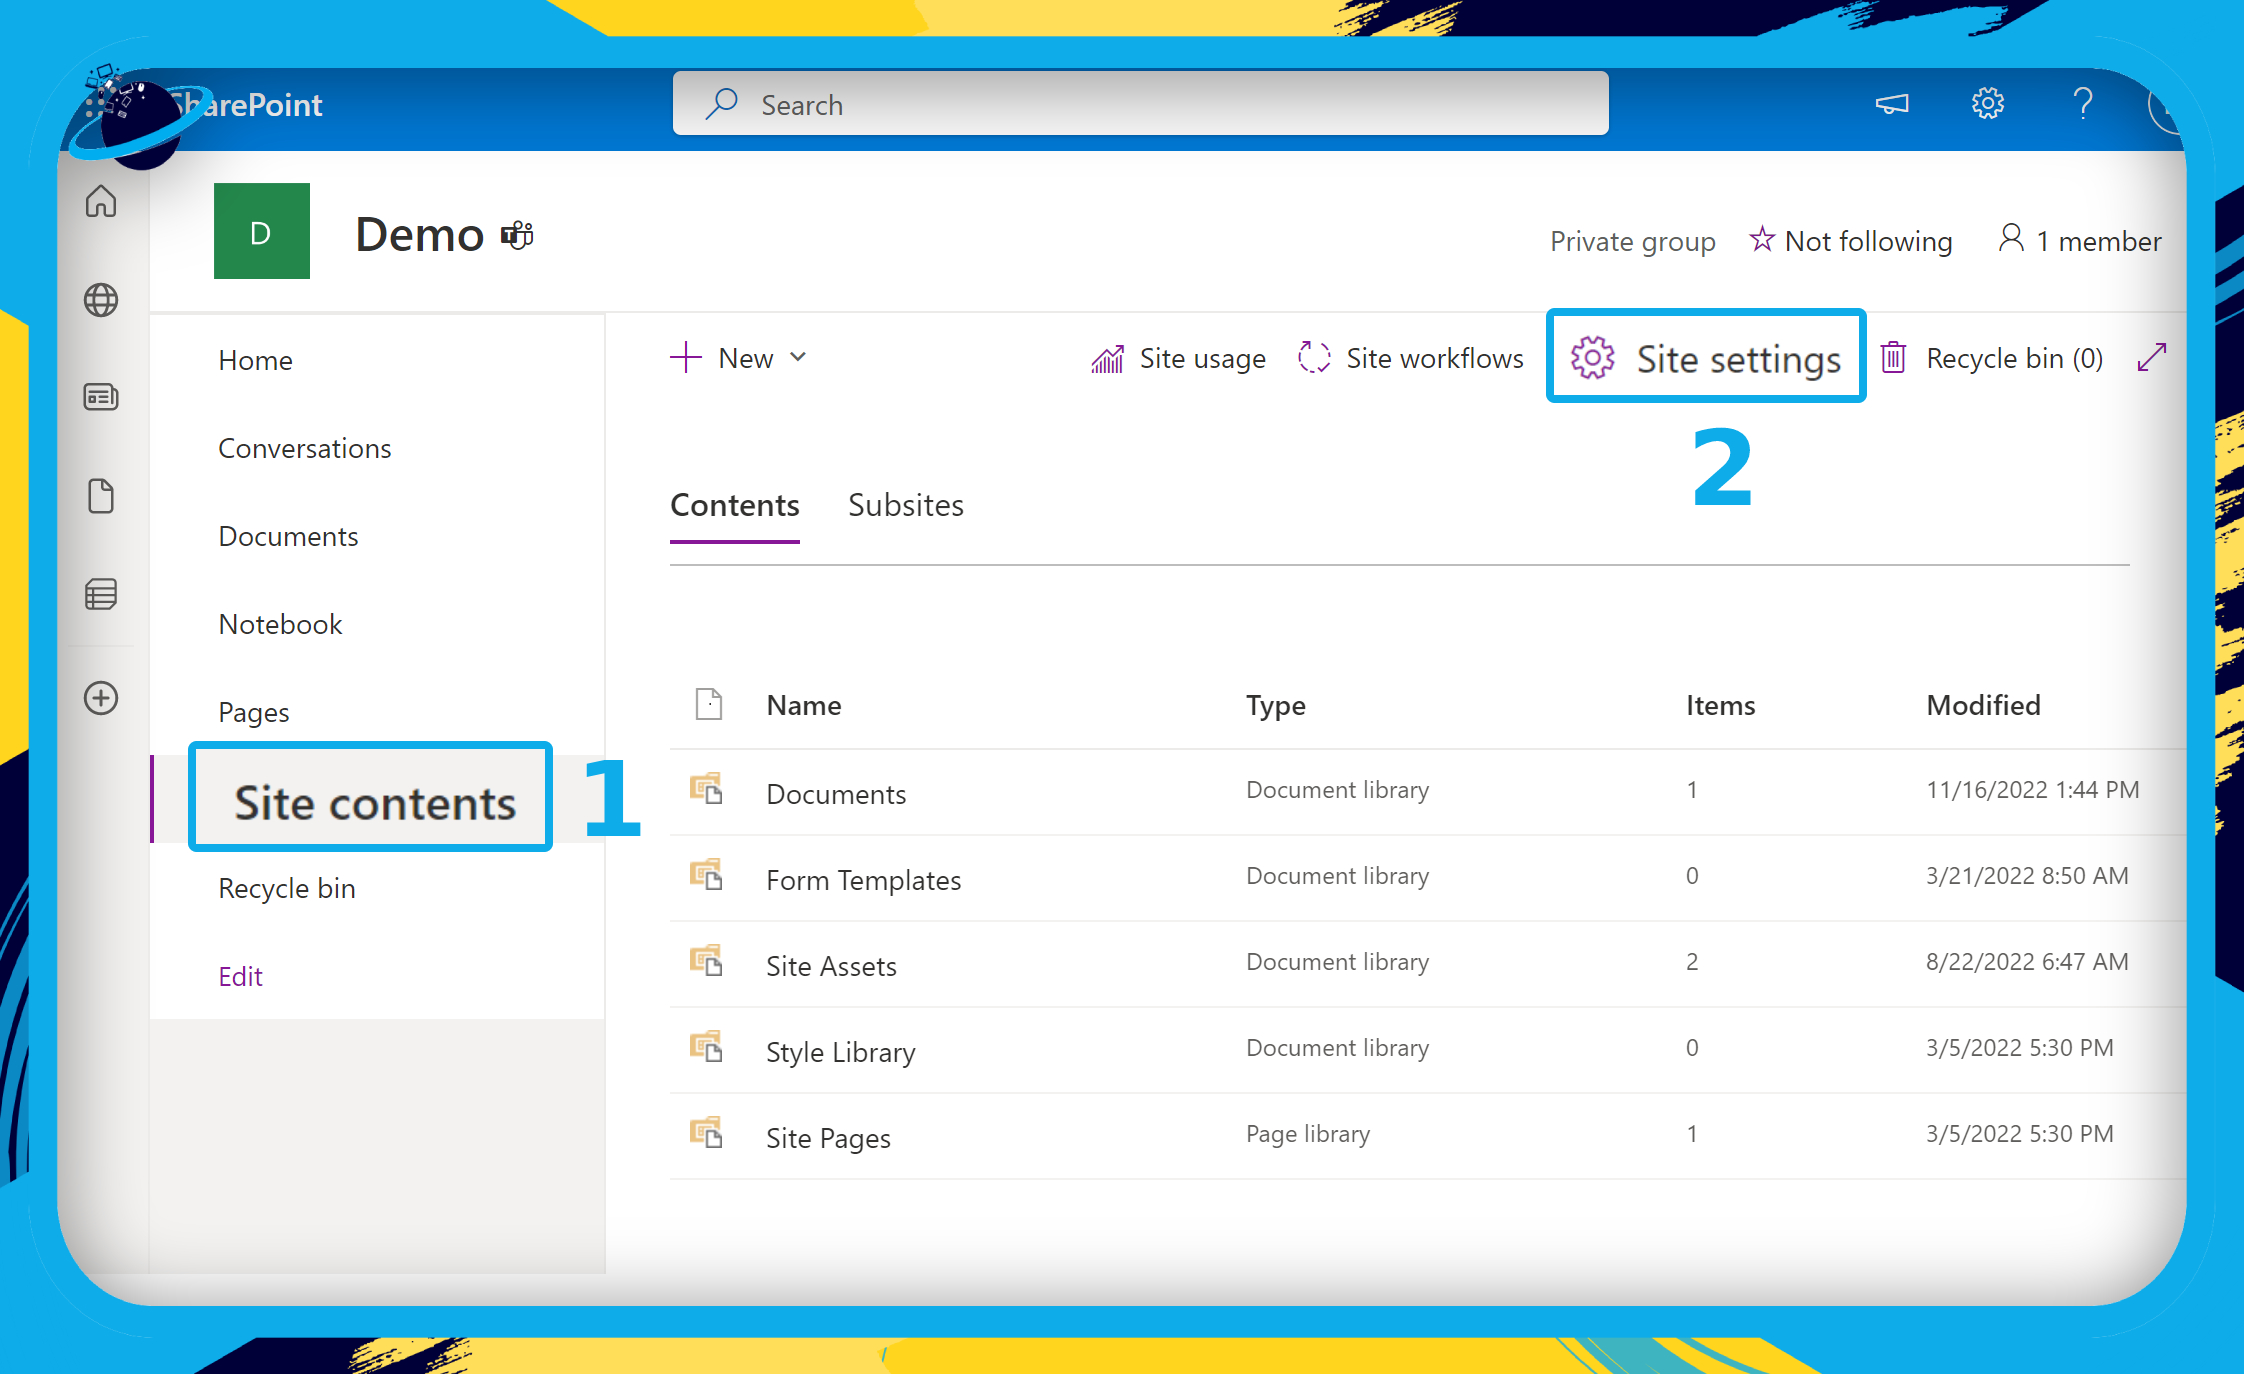
As I stated before site settings have moved to this location on the site page.
- Under “Site Collection Administration” click on “Site Collection Features.”
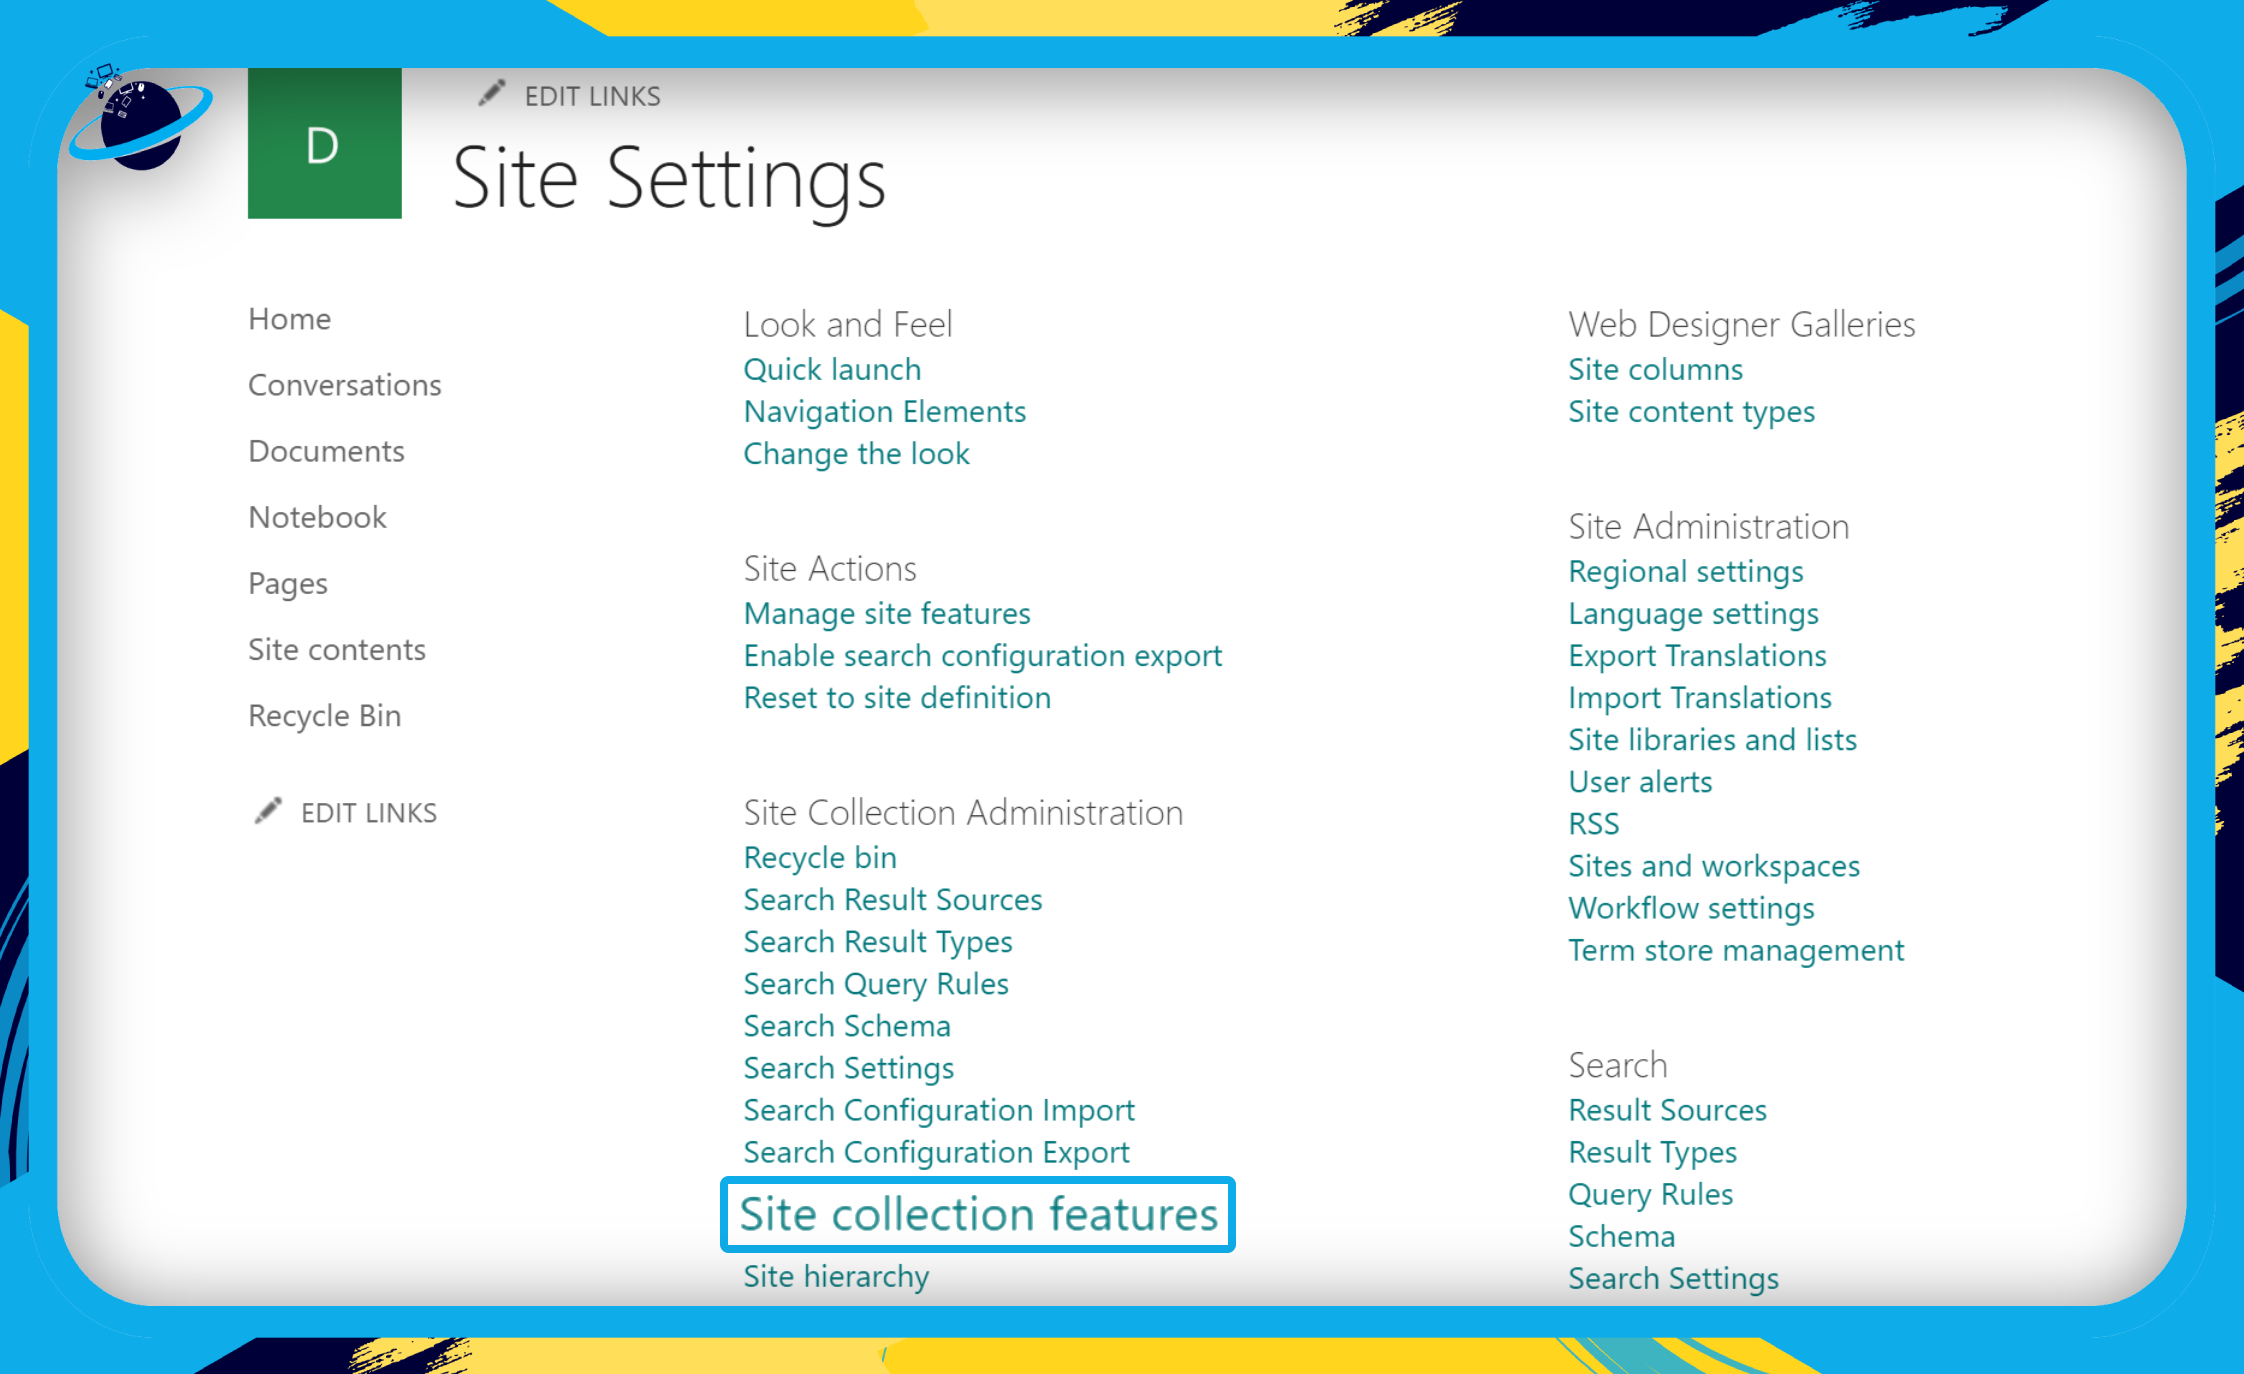
- Scroll down to “SharePoint Server Publishing Infrastructure.”
- Then click on the “Activate” button.

That’s it for this Blog thank you for taking time out to read our content, please feel free to email our team about how it went if you followed the steps or if you need more help with the questions we answered in this Blog.