Within Microsoft Excel, users possess the ability to ensure a particular portion of their sheet remains in view at all times. This comes in 3 forms and is referred to as freezing.
| Method | Description |
| Freeze panes | Freeze all above selected row/all behind selected column |
| Freeze top row | Freeze the top row of sheet |
| Freeze first column | Freeze the first column of sheet |
Below you’ll find information regarding the 3 ways to freeze columns and rows in Excel as well as an image example of each method in use.
Quick links:
Freezing methods overview
Freeze panes
The freeze panes default option is the most useful, yet difficult method. Due to granting you the ability to freeze columns or rows within one tool. The tool works by freezing columns above a selected column, or alternatively, freezing columns to the left of a selected column.

Freeze top row
The freeze top row option is responsible for freezing the upmost row in your sheet. This would be ideal for large lists/tables where your headers are far from new entries/elements. As such, freezing it would allow it to be visible no matter how low you must scroll.

Freeze first column
The freeze first column option takes care of keeping the first column of your table/list visible when you scroll left or right too.


Freeze panes demo
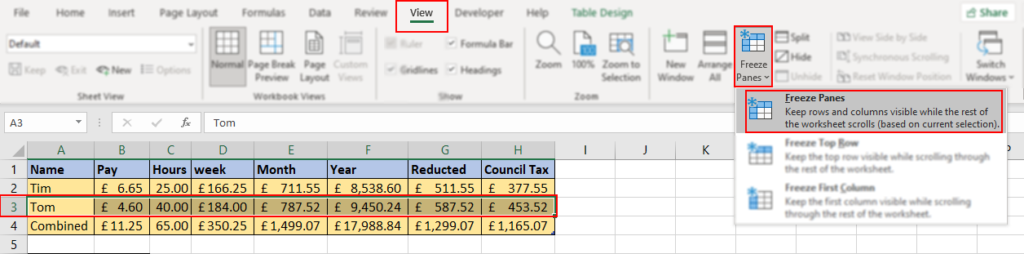
Step 1 – Select the boundary
- Anything above a selected row or to the left of a selected column will be froze, while items to the right or beneath the selection will be left as they were.

Step 2 – Freeze your zone
- Open Freeze Panes within the View tab and select Freeze Panes.
Step 3 – Scroll to test your freeze
- If you froze columns, try scrolling horizontally, or vertically if you froze a row.

Freeze top row demo
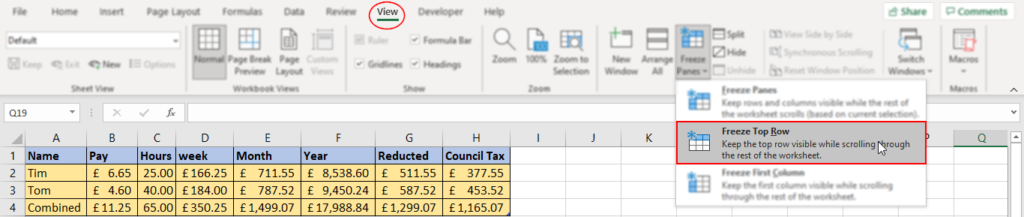
Step 1 – Select freeze top row from the freeze panes dropdown
- From the ribbon navigate to the view tab and click Freeze panes to activate its dropdown. From the list select Freeze top row.
Step 2 – Scroll to test your freeze
- Scroll vertically to ensure the freeze occurred correctly

Freeze first column demo
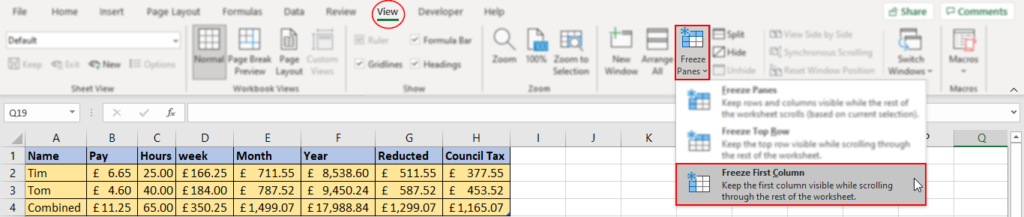
Step 1 – Select freeze first column from the freeze panes dropdown
- From the ribbon navigate to the view tab and click Freeze panes to activate its dropdown. From the list select Freeze first column.
Step 2 – Scroll to test your freeze
- Scroll horizontally to ensure the freeze occurred correctly.

End note
Recap
Excel rows and columns can be frozen to ensure part of your sheet remains in view at all times. This is done via the freeze panes button in the view tab. The freeze panes button provides 3 options. Freeze panes which will freeze a number of columns or rows based on your selection. Free top row operates by freezing the top row of your sheet, while freeze first column will free the first column in your sheet.
Farewell
As usual, this section is dedicated to thanking readers for their support. We’d be pleased to know you found this post useful and/or informative. If you have any more Office 365 related queries, please consult our related articles (listed below). However, if you have other queries, consider looking at the rest of the site. We’re frequently posting new stuff each week and may just have the guide or troubleshooting tips you need. Regardless, we wish you a good day/night. Farewell readers.
Our related articles:
- A complete guide to using OneDrive to transfer files to a new computer – OneDrive is a cloud storage platform offered as part of the Microsoft 365 suite. With it, your various folders and files may be stored online and downloaded for use from anywhere with an internet connection. As such, OneDrive is very useful if you’re looking to get files from one computer to another without wanting to mess around with storage devices.
- A complete guide to fixing OneDrive sync issues on Mac – OneDrive sometimes has issues, and many users have claimed that OneDrive isn’t synchronizing on their Mac OS devices, however, there are solutions available. In this blog, we will cover the most effective approaches to help users fix sync issues on their OneDrive devices. We will address some of the causes of why OneDrive won’t sync correctly and what users can do to help resolve these issues. Use the guide below to see how you can resolve OneDrive sync issues on Mac OS devices.
- Ways to delete a OneDrive shared library – OneDrive’s Shared libraries (or SharePoint sites) serve as large collections of various documents, media and content for your team/organization. In this post we’ll be giving you a short image guided walk through on deleting your OneDrive shared libraries. Additionally, to ease any potential confusion, we’ll also go over why you may still be seeing your shared library afterwards.
- Guide to deleting document libraries in SharePoint Online – SharePoint Online uses document libraries to store various files and folders created by you (the user). If a user for some reason decided they no longer required a document library, they could exercise the ability to delete it. Albeit, that requires actually knowing how to go about it. Fortunately for us, it’s quite straightforward. In this short post we’ll be guiding you through deleting document libraries with an image assisted walkthrough. We’ll additionally let you know why you may be unable to delete a certain library and under what circumstances your lost data can be restored.