Often within Microsoft OneDrive, the user may wish to share a folder with another user. Sometimes however, the desired recipient of the folder may not use the Microsoft OneDrive application. Chances are you are reading this blog post today, as you find yourself in a predicament akin to this.
Now, the simple answer to this question is yes, you can share a OneDrive folder with someone who does not use OneDrive. This, however, is dependent on the settings that have been put in place by your organisation. That, though, is something that we will get into later.
In order to share files on OneDrive, it is as simple as right clicking the folder of your choice and clicking ‘Share’.
Now, if this alone is not enough detail for you to work with, then do not worry. As is the case with every blog post, we will not only offer a step by step of the process, but then delve into the process further, offering a more thorough walkthrough with accompanying screenshots to best aid you.
Step by step: How to share a OneDrive folder with someone who doesn’t have OneDrive
- First, go to Office.com and open Microsoft OneDrive.
- Find the folder you wish to share with someone.
- Right click on the file or folder, and click ‘Share’.
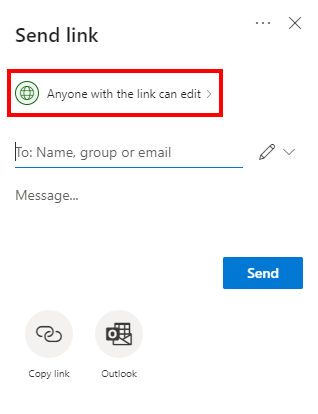
- Now, you will be presented with a small pop up menu. Here, click ‘Anyone with a link can edit’ in order to edit who the folder can be accessed by.
- Go back to the initial screen of that small menu and enter the name(s)/email(s) you wish to share the file with.
- Click ‘Send’.
We will now delve into the more detailed walkthrough.
So, your first step will be to open Microsoft OneDrive. You can do this manually, if that better suits you, or you can instead use the application launcher present in any other Microsoft application, such as Outlook.

After opening OneDrive, you will be greeted by its main menu and a list of the documents and folders you have stored within your OneDrive. Once you have found the folder you wish to share with the external user in question, right click on the file. After doing this, click ‘Share’.

Clicking ‘Share’ will open a small menu for you to look at. There will be a sentence that reads ‘Anyone with the link can edit’, and it is this that you will want to click if you want to edit who can change aspects of your folder.
After clicking this, you will be able to see the sharing options in case you wish to edit them. Again, this is not a fundamental aspect of the process, but is there if you wish to change the settings of who can edit/access your shared folder.
After making any changes to this that you wish to, enter the names or emails you wish to share the folder with in the bar presented. After you have done so, select ‘Send’ to share the file.
It was mentioned above that you may need to edit, or at least view, the settings for your organisation external settings. This is what we will look into now.
In order to see if you can share a OneDrive folder with someone who does not have OneDrive, you must view the OneDrive share settings within your Microsoft Admin center.
As was the case with the above process, do not worry if steps are not enough for you to work with. Not only will we offer a step by step guide of the process, but then delve into the walkthrough further, offering a more thorough analysis with accompanying screenshots to best aid you.
DISCLAIMER: In order to follow this walkthrough, you will need access to Microsoft Admin. In order to go into this, you must be a Global Admin. If you are not, then you should try and get in touch with your local provider in order to edit this status.
   |
STEP-BY-STEP: HOW TO SHARE A ONEDRIVE FOLDER WITH SOMEONE WHO DOES NOT HAVE ONEDRIVE
- Go to Office.com and open a Microsoft application to begin with.
- From here, click the application launcher in the top-left corner of your screen.
- Now, click the ‘Microsoft Admin’ heading.
- From the Microsoft Admin center, look to the left-sided list of options.
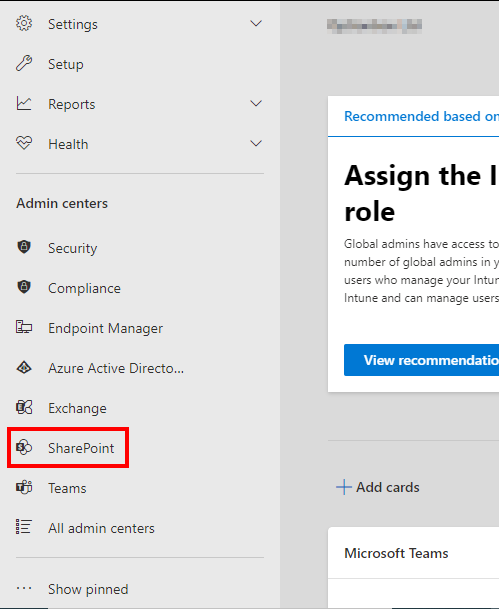
- At the bottom should be an option titled ‘Show All’. Click this.
- Now, click the option titled ‘SharePoint’.
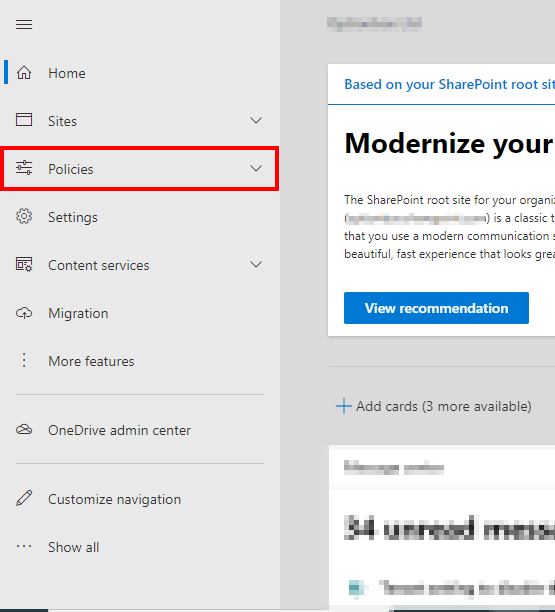
- Clicking this will bring you to a new dashboard of options. From here, you should look to click ‘Policies’.
- Under this will be an option titled ‘Sharing’. Click that.
- Doing so should present you with a slider to edit your SharePoint and OneDrive sharing settings.
- Make sure they are both at the most permissive allowance.
As was mentioned, do not worry if the steps alone are not enough for you to work with. We will now look deeper into the process.
So, your first step will be to open a Microsoft application. Seeing as though you are accessing Admin, it does not matter which. Of course, you can access Admin manually if you so wish, however this tutorial will access it through the application launcher on Microsoft, which can be found in the top left corner of your screen.

Clicking ‘Admin’ will bring you to the Admin dashboard. On this dashboard will be a list of subsections you can choose to roam, each offering a different outlet of settings. At the bottom of this list will be an option titled ‘Show All’, and it is this that you will want to click.

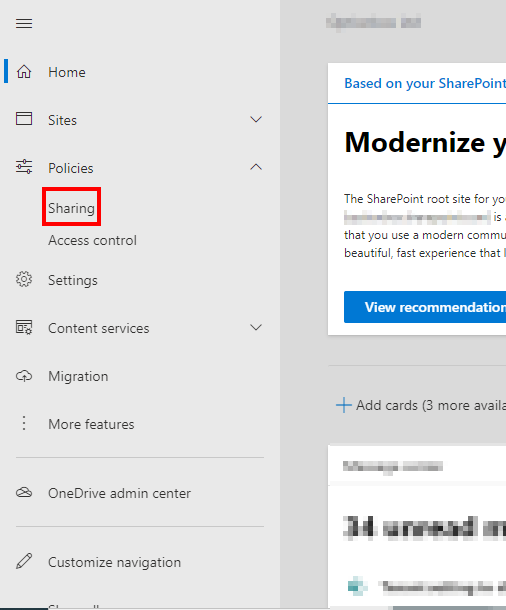
Clicking this will, perhaps obviously, show you every subheading you can click to edit settings. From this position, you will want to click the option titled ‘SharePoint’, which will navigate you to the admin center of Microsoft SharePoint. It is from here that you will be able to view your share settings.
From the SharePoint admin center, you will once more need to look towards the left side of your screen, where there should be yet again another listing menu. Of everything here, you should opt to click the option named ‘Policies’.
Clicking ‘Policies’ will open a very small dropdown menu, presenting you with two new subheadings. Here, click ‘Sharing’.
Clicking ‘Sharing’ will bring you to a new menu, with two sliders that you can alter. These sliders dictate the level of permissions allowed in sharing files from either SharePoint or OneDrive. To allow full accessibility for OneDrive, then the slider for it should be at the very top of the line. The OneDrive slider has been highlighted by the red circle below.

Thank you for taking the time to read this blog, I hope you found it as helpful as you wanted it to be! As always, if you run into any issues following the tutorial, or simply wish to let us know your thoughts on it, then please don’t hesitate to get in touch with a member of our team.