PowerPoint is problematic without slides, albeit it’s just as problematic when you aren’t able to remove any slides at all. Humans are after all prone to making mistakes. Fortunately, this is quite the easy fix.
Solution (revert to normal view):
- Open your presentation.
- Navigate to “View” via the ribbon.
- Select “Normal” as your view.
- Right click the slide you wish to delete.
- Select “Delete.”
Below we’ll be going over this step-by-step with images, so don’t worry if you couldn’t follow. We’ll additionally be covering how you can hide and unhide slides, as opposed to deleting them.
Quick links:
Deleting a slide in PowerPoint
Step 1 – Switch to view tab
- Find “View” in the ribbon and click it to switch to the tab. From here we’ll be able to check our current viewmode and switch to the normal view if it isn’t already active.

Step 2 – Ensure “Normal” is selected
- When you’re using alternate view modes, PowerPoint may prevent you from accessing the slide deletion options. As such, it’s important to revert to the normal view before trying to delete anything.

Step 3 – Right click the unwanted slide
- Right clicking the unwanted slide will bring up its context menu. We’ll need that to access the delete option.
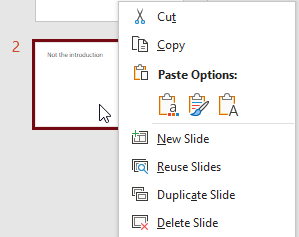
Step 4 – Select “Delete Slide”
- After selecting “Delete Slide” your slide will be removed. If you have made a mistake, the action (provided it was the most recent one) will be reversible via the ctrl+z shortcut on Windows.


Hiding a slide in PowerPoint
Step 1 – Right click the soon to be hidden slide
- We’ll need to bring up the slide’s context menu if we want to hide it. To do so, hover over the slide and give it a right click.
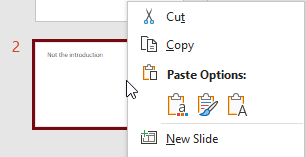
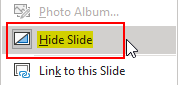
Step 2 – Select “Hide Slide”
- From the context menu, you’ll be able to find and select “Hide Slide.” Selecting this option will, as implied by its name, hide your slide. This will be indicated by the slide shifting transparent.
Revealing hidden slide in PowerPoint
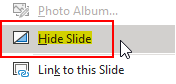
Step 1 – Right click the hidden slide
- We’ll need to bring up the slide’s context menu if we want to reveal it. To do so, hover over the slide and give it a right click.
- Step 2 – Select “Hide Slide”
- From the context menu, you’ll be able to find and select “Hide Slide.” Selecting this option will, despite its name, reveal your slide. This will be indicated by the slide no longer appearing transparent.
Our related articles:
- PowerPoint won’t save as a PDF: Causes and Fixes – Finished an informative new PowerPoint presentation, only for disaster to strike at the export stage? There are a magnitude of reasons you may not be able to export a PDF, but there’s also just as many fixes. In this post, we’ll be exploring both. Please read along to find out more.
- What does “linked file isn’t available” mean in PowerPoint – Going through old presentations, or perhaps making something new? If you’ve run into this error code, chances are you’ve attempted to link an external file wrong, or that file no longer exists. Read along to find out what’s causing your issue, and how we can help you fix it.
- PowerPoint won’t print Presentation Notes: Causes and Fixes – Struggling to remember your words? Perhaps you’re just trying to rehearse. Regardless, it’s a doubtless struggle without presentation notes. In this post, we’ll present the causes and means to fix missing presentation notes. Have a look and learn more.
- PowerPoint isn’t recording my voice: Causes and fixes – Just recorded a new presentation and found no narration was captured. Well friend, the world needs to hear your wonderful voice. So we recommend you read along as we discover the causes of this problem and get to fixing them.