 Key Takeaways
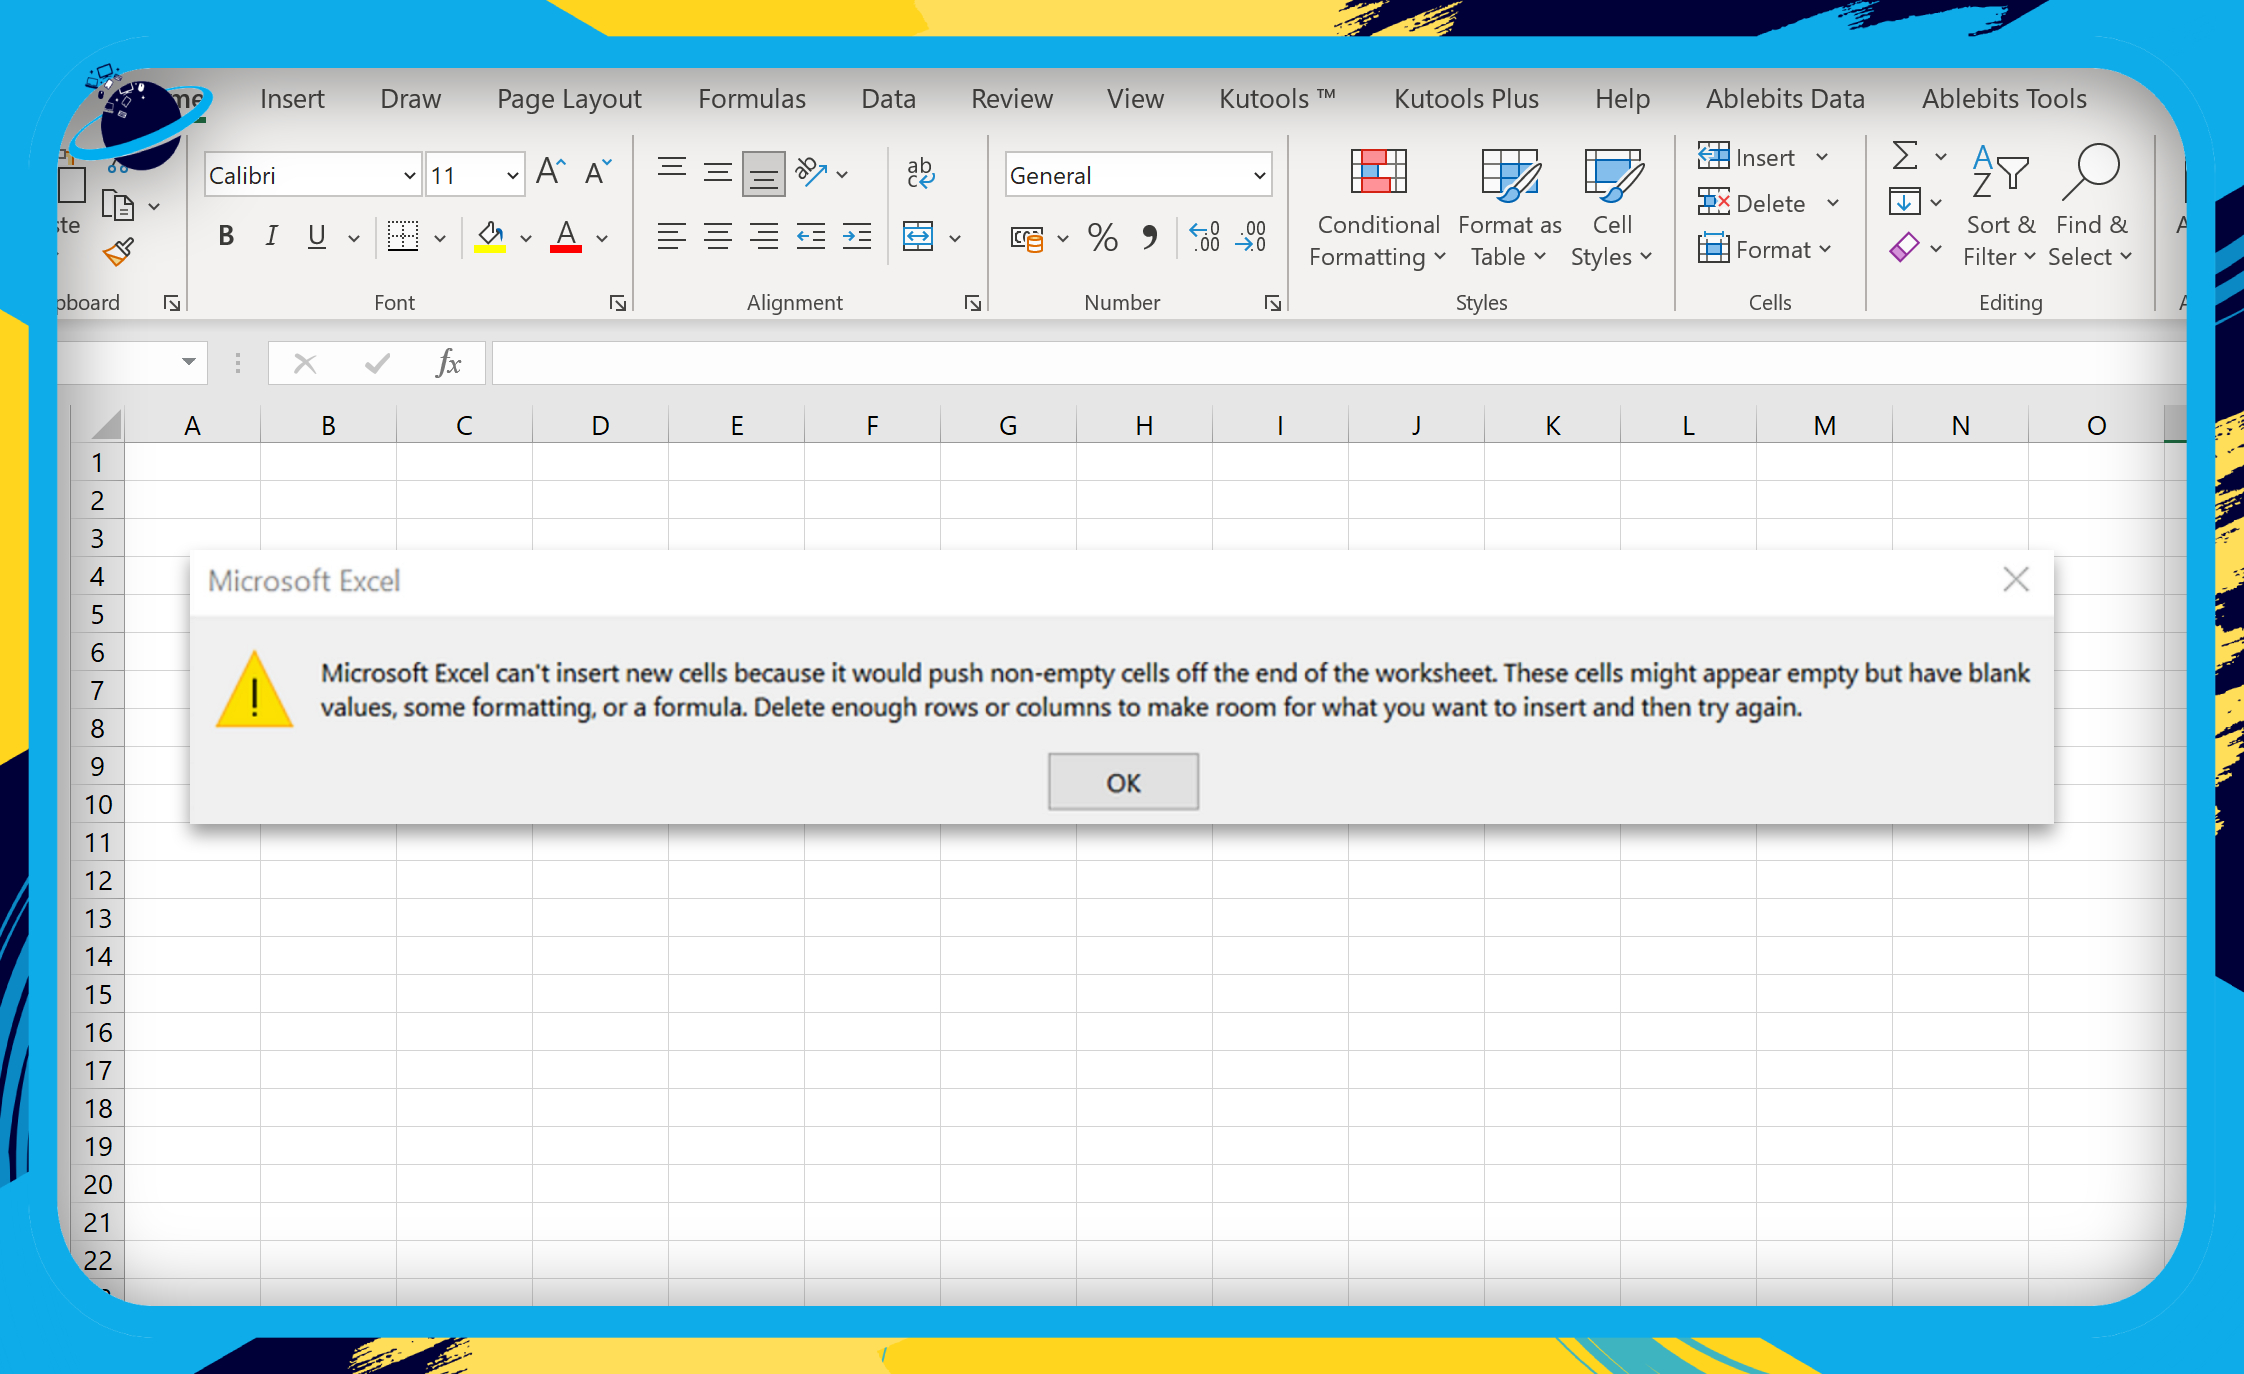
 The error “Microsoft Excel can’t insert new cells because it would push non-empty cells off the end of the worksheet” is normally caused by formatting in unused cells.
 There are six potential solutions to Excel not allowing you to insert new cells. Start with solution 1 [click here], which is the most likely fix.

If you are getting the error, “Microsoft Excel can’t insert new cells because it would push non-empty cells off the end of the worksheet” when using Excel, here’s how you can actually fix it.
6 ways to actually fix the cannot insert new cells Excel error:
- Solution 1: Clear content and formatting from unused cells.
- Solution 2: Unprotect the sheet.
- Solution 3: Unfreeze panes.
- Solution 4: Unmerge the rows and columns.
- Solution 5: Open the file in Excel for the Web.
- Solution 6: Copy the data to a new sheet.
Don’t have time to read the blog? Please download our comprehensive PDF walkthrough, which covers each method contained within this post. Click here to download the PDF guide.
Content creators: Please feel free to use our PDF and images on your website — just be sure to credit us by linking to this article. Thanks!

Overview: what causes the cannot insert new cells Excel error?
Users have reported an error that prevents them from inserting cells into a spreadsheet. The error occurs if inserting a new cell causes a used or “non-empty” cell to be pushed off the worksheet. If the cells you want to replace appear empty, you may need to clear formatting before inserting new cells. You may also need to turn off cell protection, which could prevent you from removing cell data.
How to fix Microsoft Excel not letting you insert new cells
If you get an error while inserting cells into an Excel spreadsheet because it would push non-empty cells off the end, you can use these 6 solutions to actually fix the problem.
How to clear content and formatting from unused cells to fix the cannot insert new cells Excel error
 Solution 1: Clear content and formatting from unused cells to fix the cannot insert new cells Excel error
Formats are often used in Excel worksheets to highlight and manipulate data. However, despite the utility of cell formats, they can also present difficulties when trying to insert cells into your worksheet. That’s because removing the cell data does not remove the cell format. And that’s why clearing the format can help resolve the “cannot insert new cells” error.
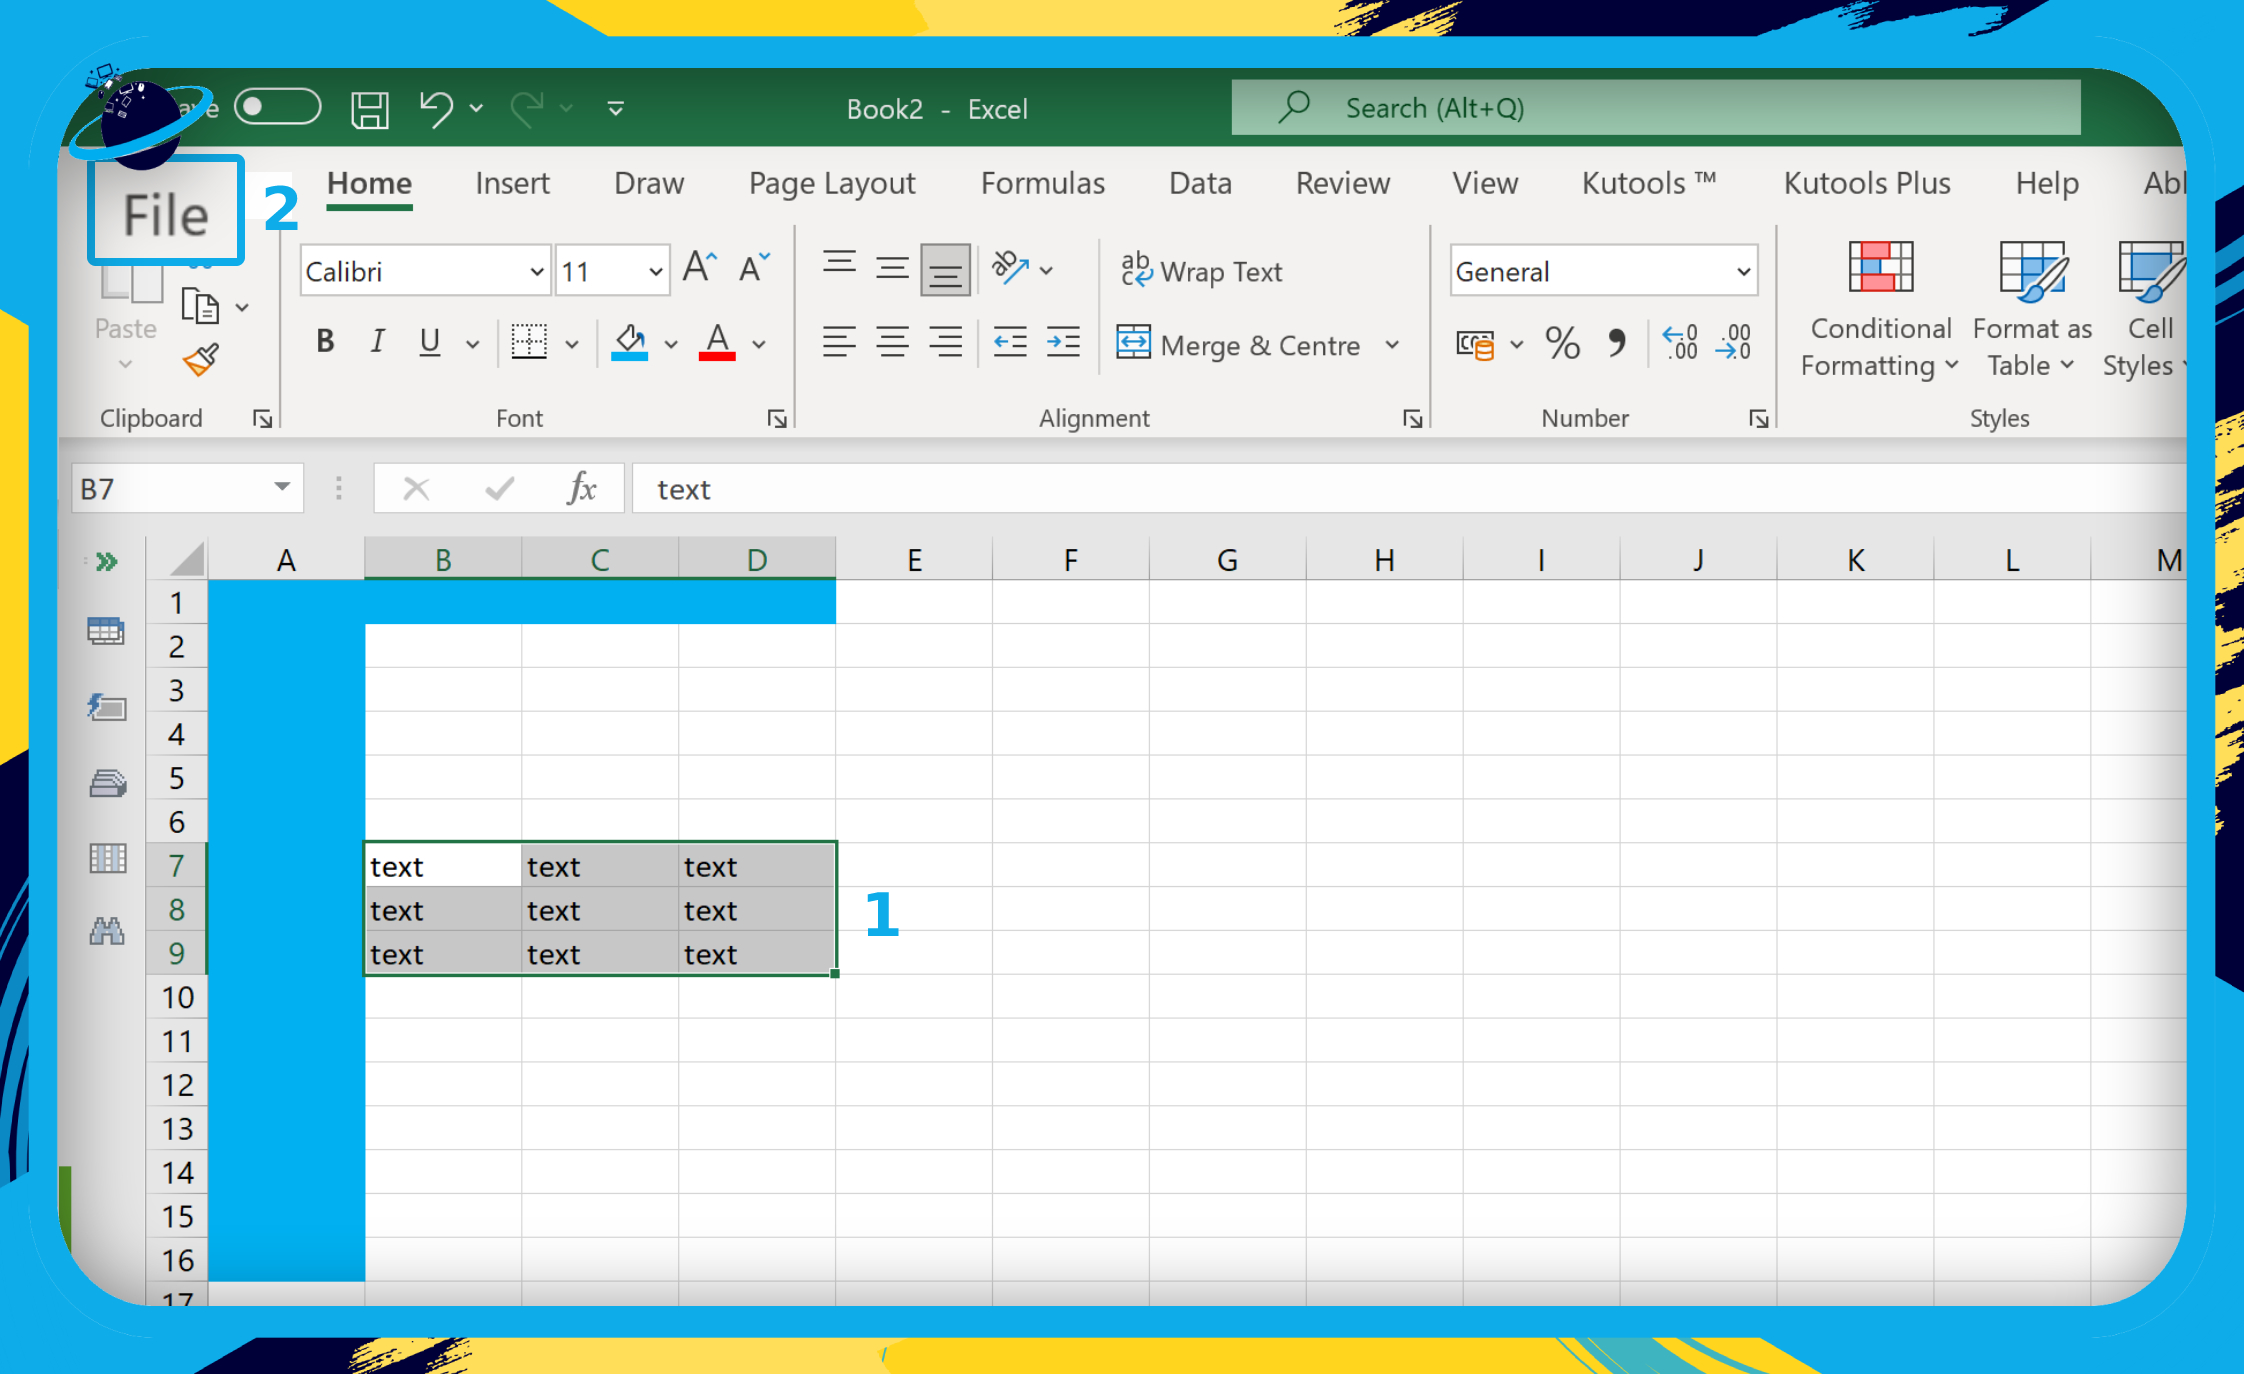
- Select the cells to clear their formats. [1]
- Press the (Command/Control + Shift + Down) keys to select all the cells below your chosen point.
- Press the (Command/Control + Shift + Right or left) keys to select all the cells left or right of your chosen point.
- Click the
 triangle icon in the top left to select all the cells in your worksheet. You can also press the (Command/Control + A) keys to select all the cells.
- Click on the “Home” tab. [2]
- Click the
 rubber icon in the ribbon’s “Edit” section. [3]
 - Then select “Clear All” from the dropdown menu. [4]
You should “Clear All” instead of the other options if you are unsure what the cells’ formatting contains.
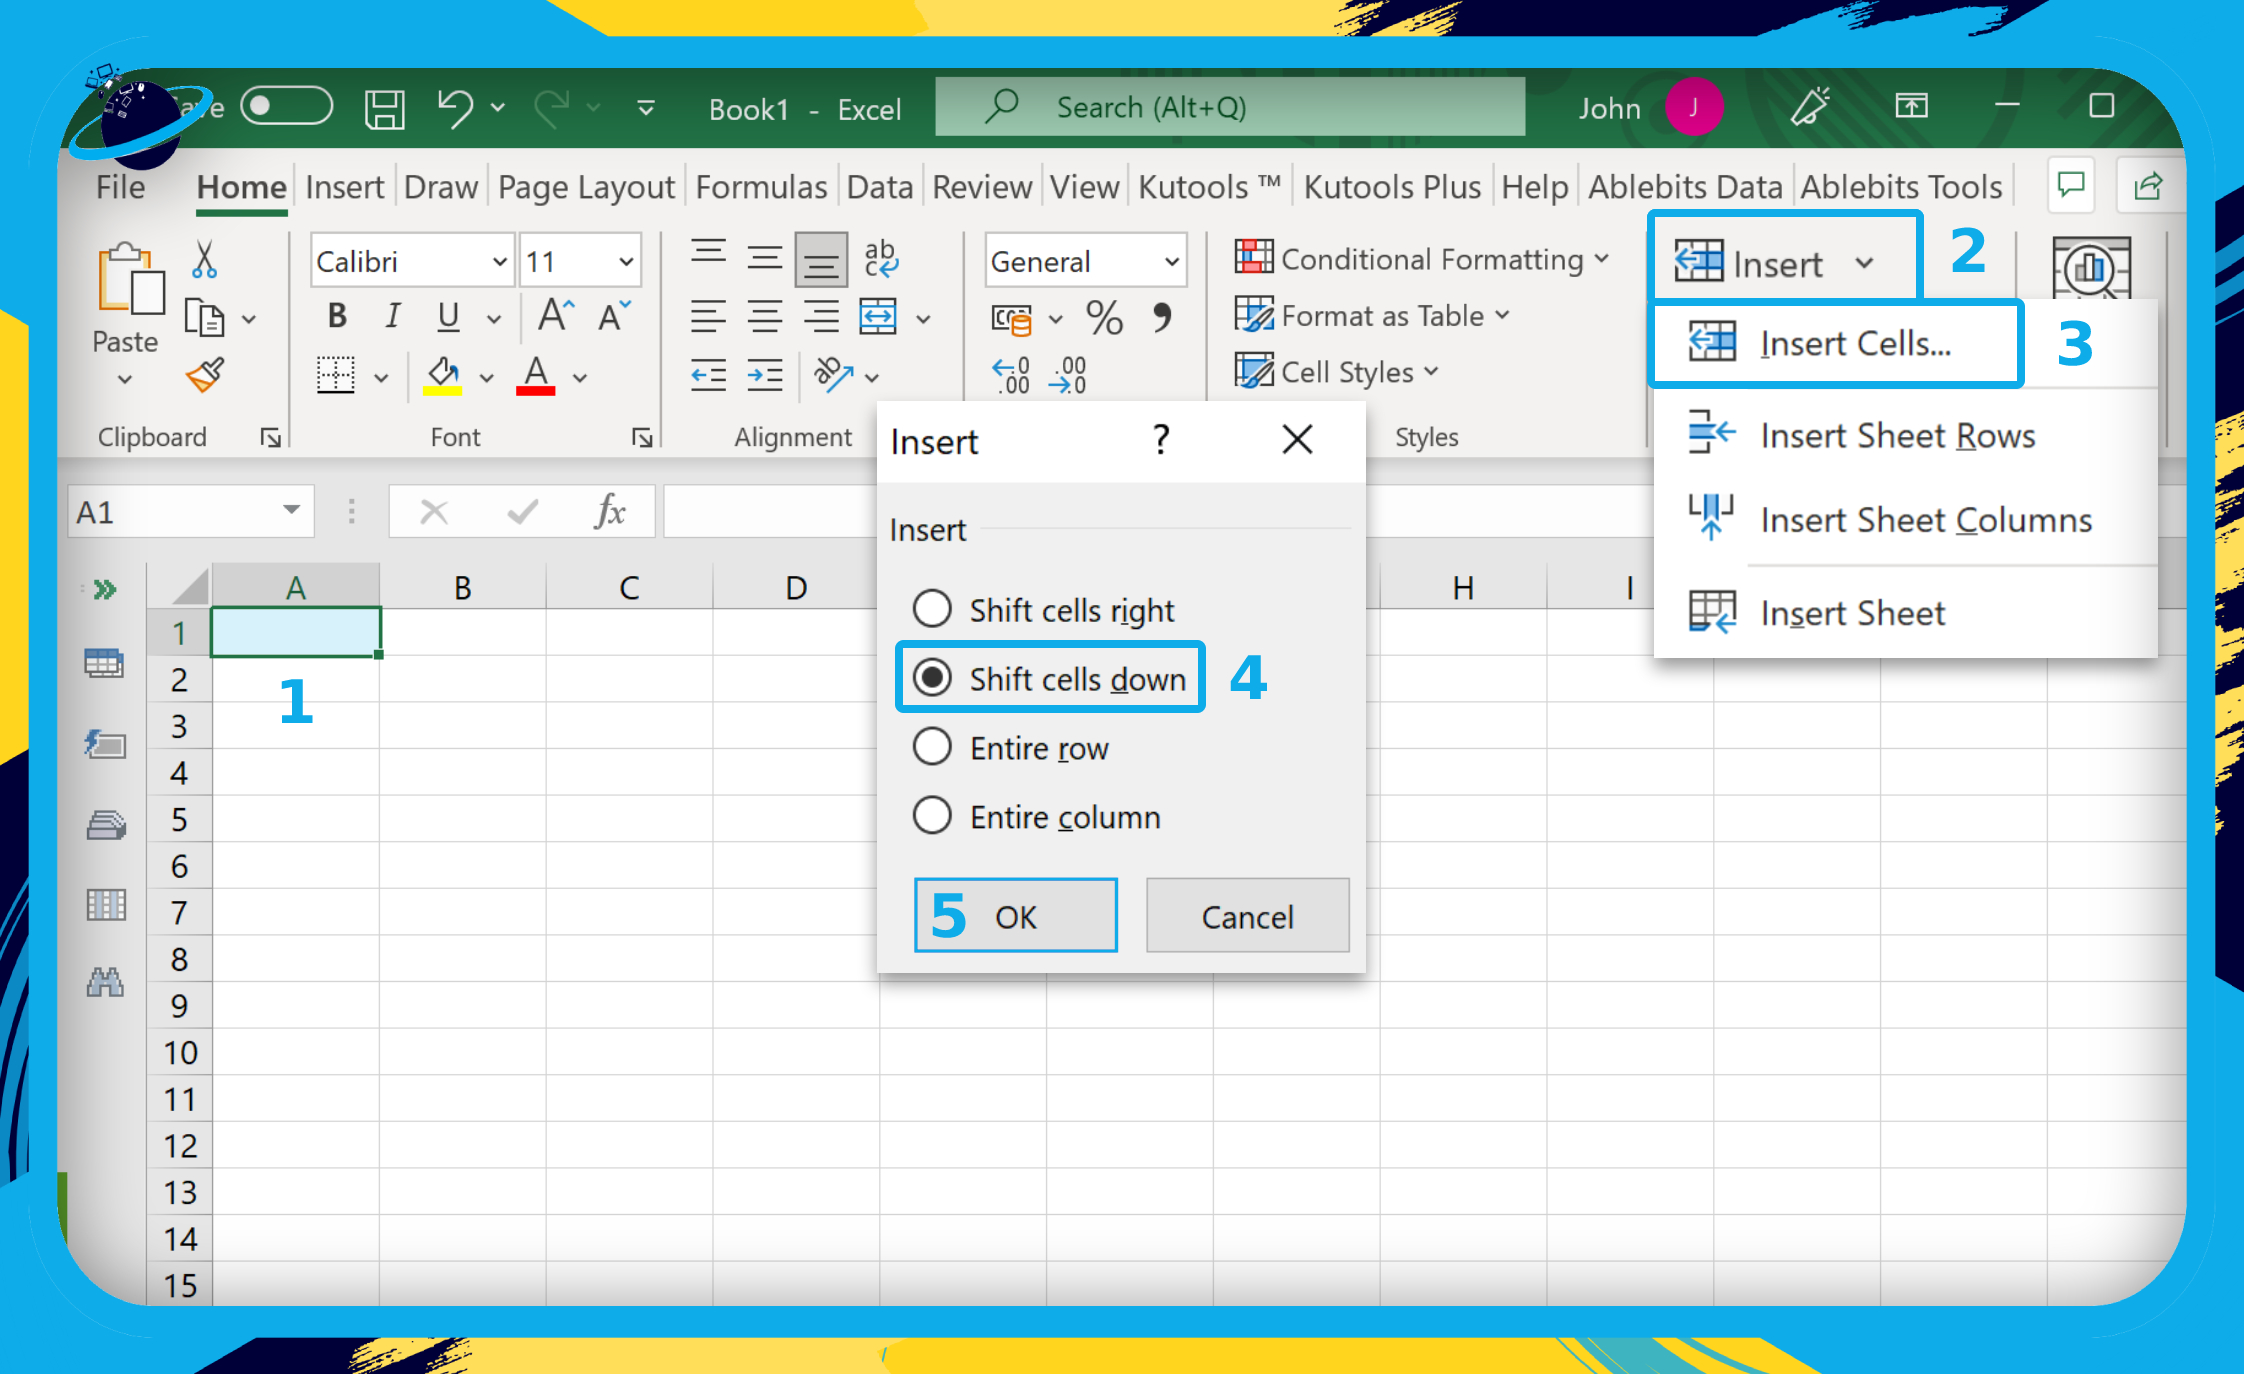
- Select the cell where you want to insert new cells. [1]
- Click “Insert” in the top menu. [2]
- Select “Insert Cells” from the dropdown menu. [3]
- A popup box will open — select “Shift cells down.” [4]
- Then click the “OK” button. [5]
You should now see the inserted cells without the error message. However, if you are still having trouble inserting cells, please try the next solution.
Solution 2: Unprotect the sheet to fix the cannot insert new cells Excel error
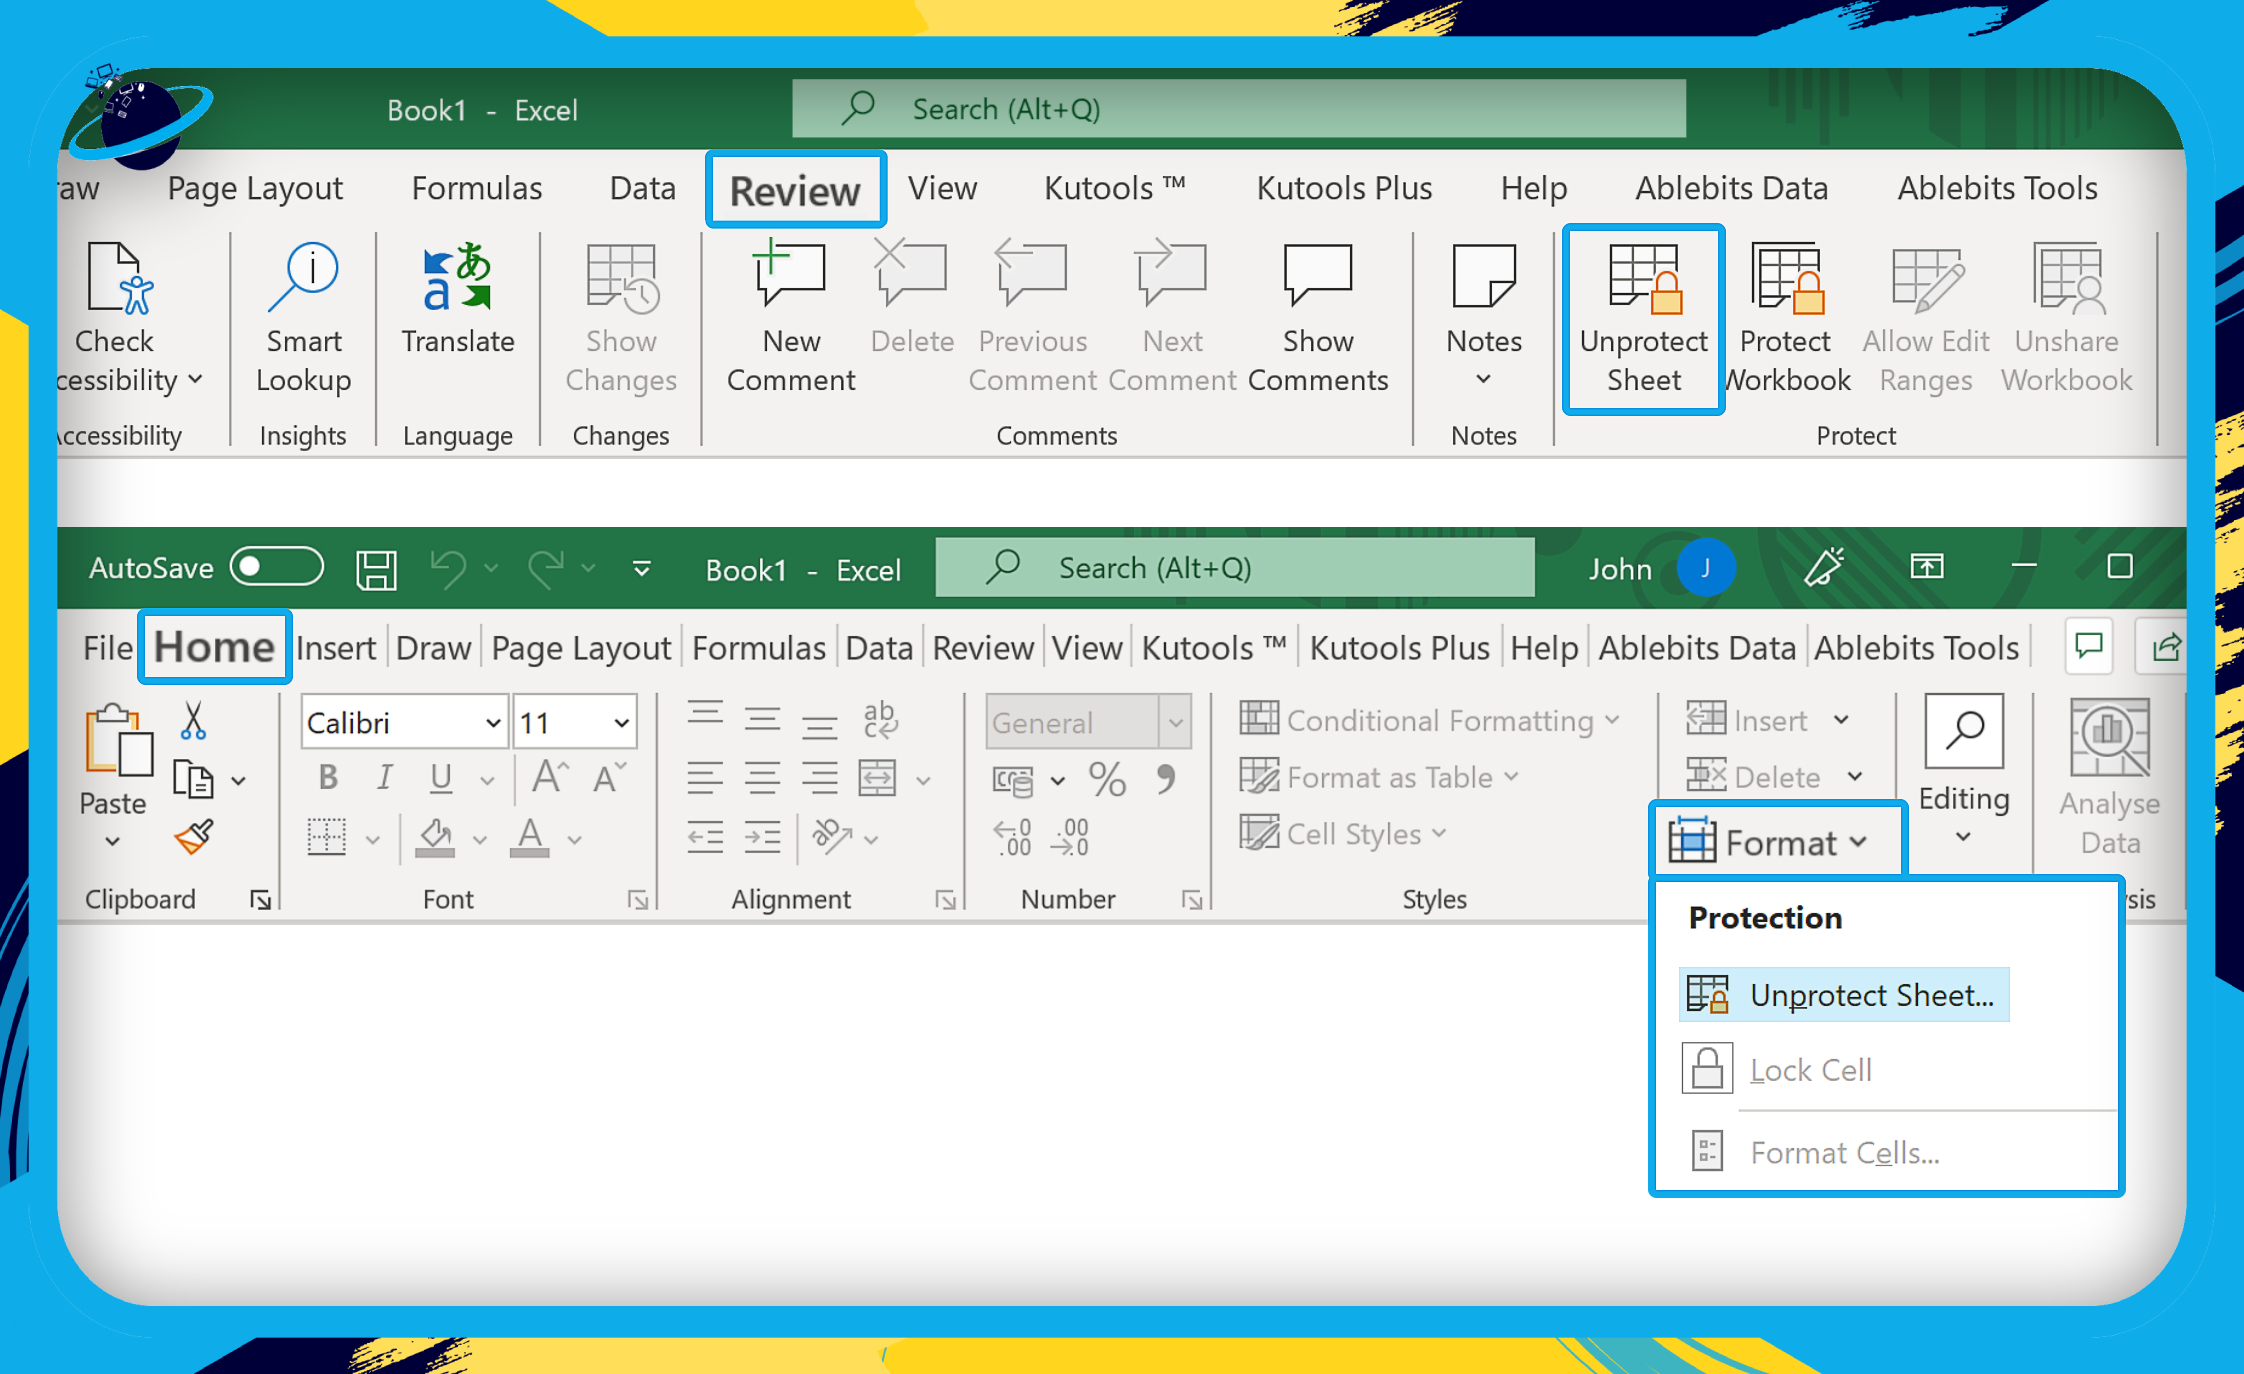
If your worksheet is protected, you won’t be able to clear the cell formatting or remove the content. That means you will continue to see the “can’t insert new cells” error. To resolve the problem, you must “Unprotect” the worksheet.
![]() Note: You will need to download the
Note: You will need to download the ![]() desktop version of Microsoft Excel, as you cannot protect or unprotect cells in the web version.
desktop version of Microsoft Excel, as you cannot protect or unprotect cells in the web version.
- In the “Review” tab, click “Unprotect Sheet.”
- Or, in the “Home” tab, click “Format,” then select “Unprotect Sheet.”
If you still can’t insert new cells after unprotecting the sheet, please move on to solution 3.
Solution 3: Unfreeze panes to fix the cannot insert new cells Excel error
The freeze panes tool is designed to keep sections of your worksheet static while you scroll. That helps with referencing or comparing different rows or columns. However, frozen panes can also prevent you from inserting new cells. So, if the solutions above did not solve the “can’t insert new cells” error, try unfreezing panes.
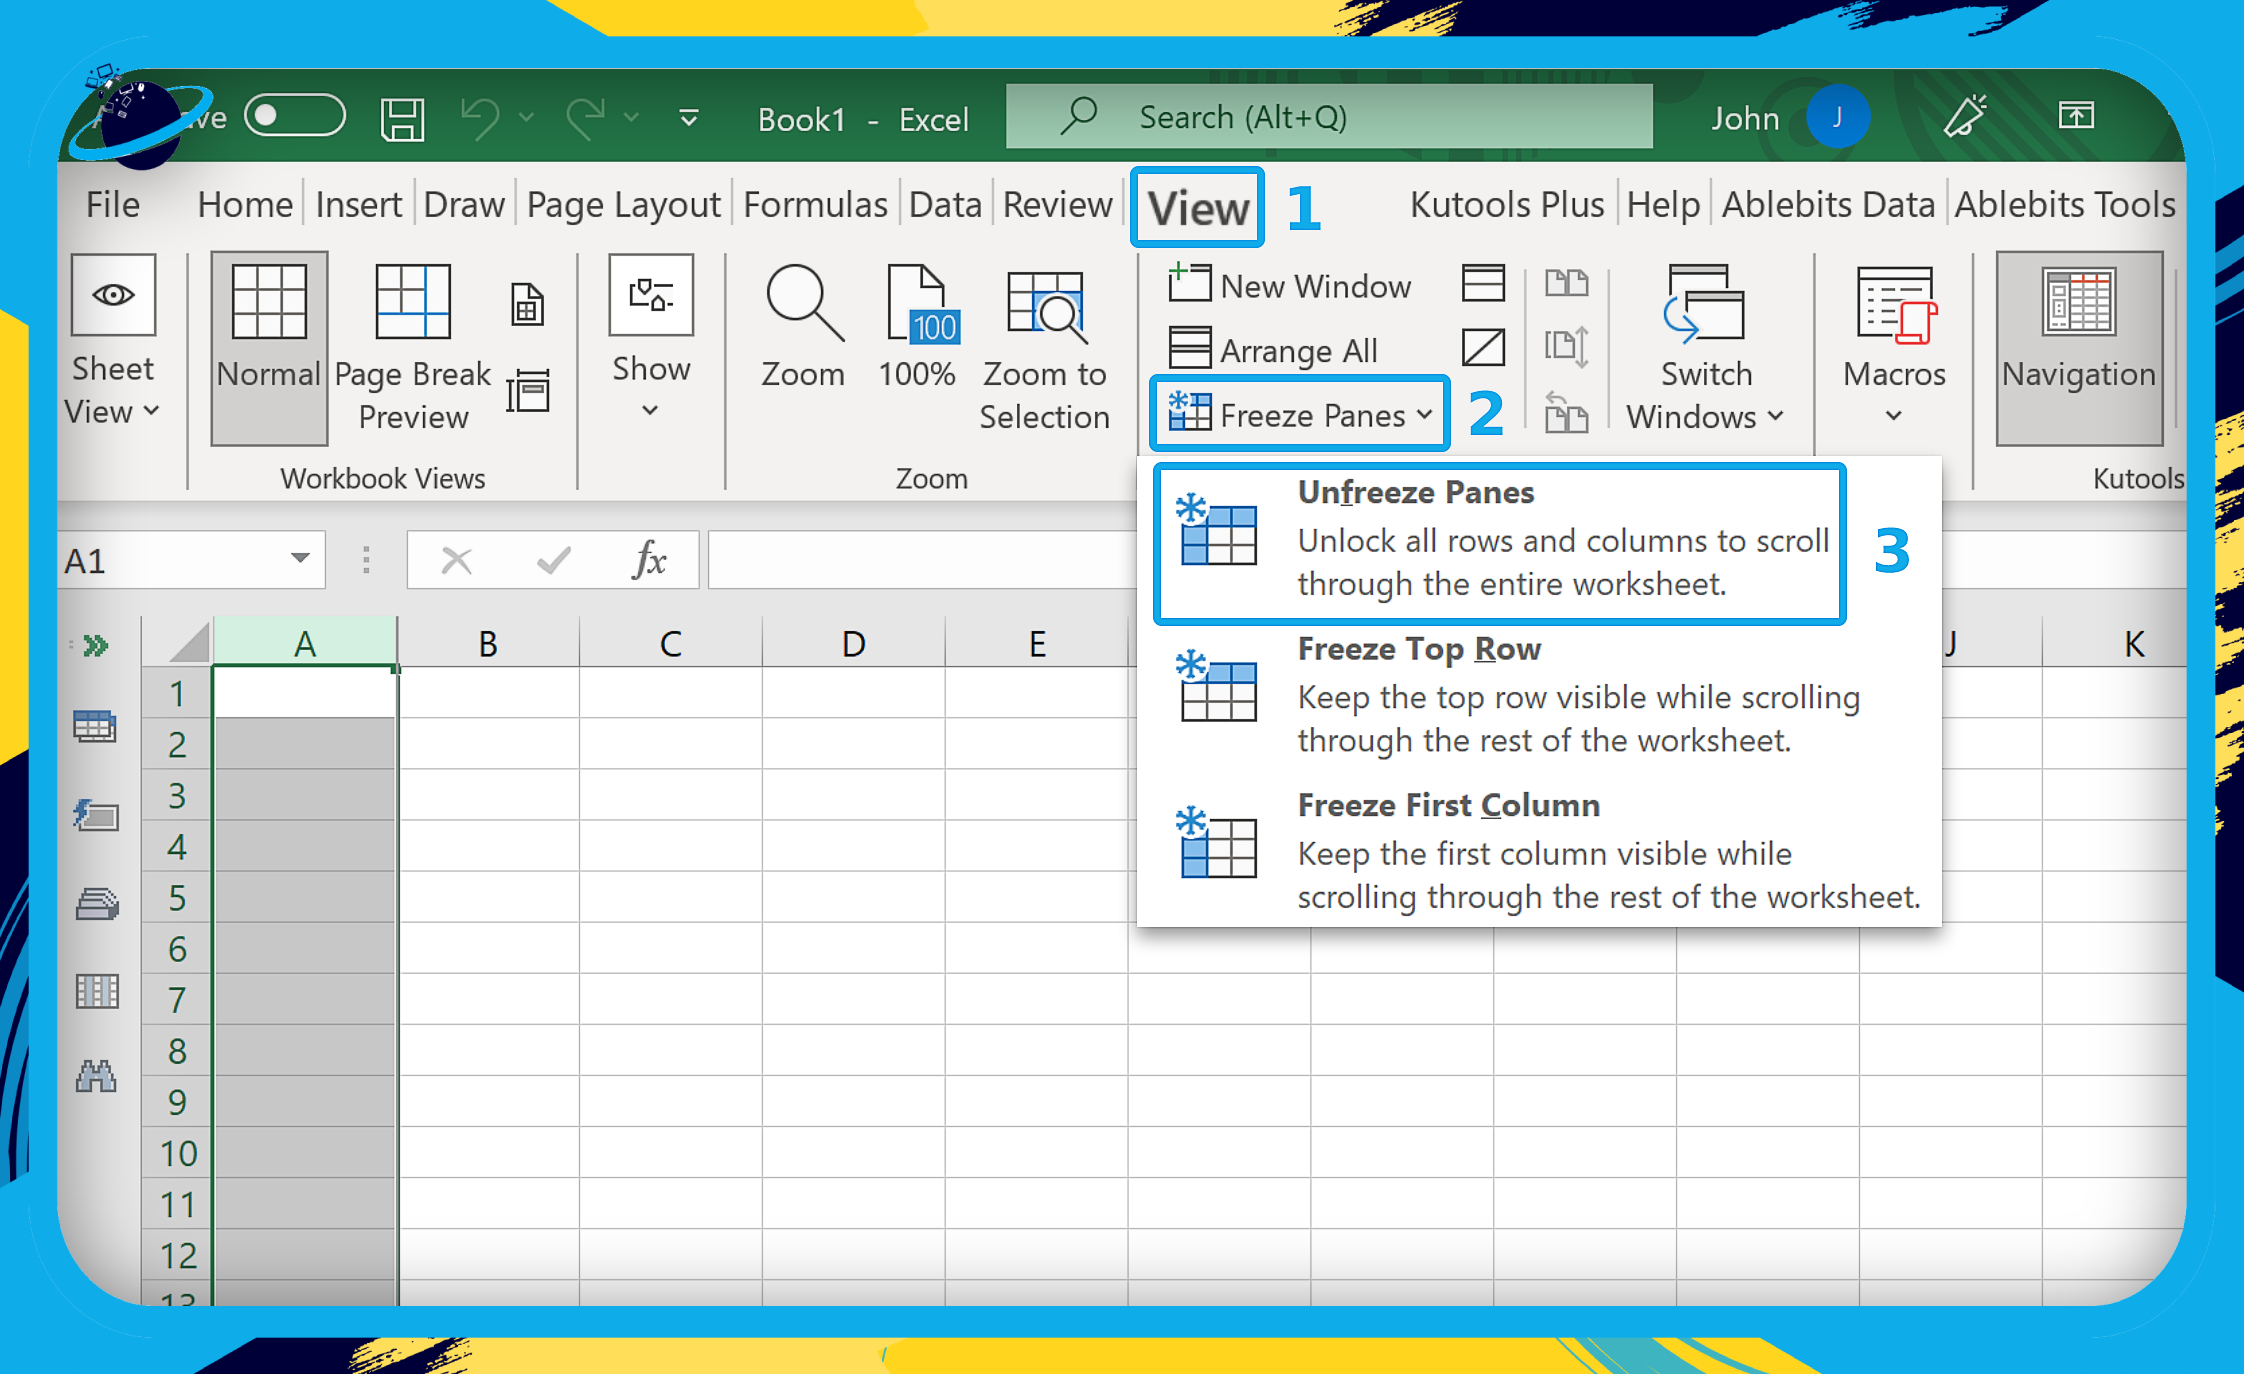
- Firstly, open your Excel worksheet.
- Click the “View” tab in the ribbon. [1]
- Click
 “Freeze Panes.” [2]
 - Then select “Unfreeze Panes” from the dropdown menu. [3]
- If no panes are frozen, the top option will be “Freeze Panes.” In that case, do nothing more and move on to the next solution.
If you still can’t insert new cells after unfreezing the panes, please move on to solution 4.
Solution 4: Unmerge rows and columns to fix the cannot insert new cells Excel error
If the rows and columns are merged in a Microsoft Excel worksheet, chances are you will need help inserting new cells. That is often the case if you have a complete worksheet where every cell is used either for formatting or content. In this instance, you will need to unmerge those cells and continue using no space for new content.
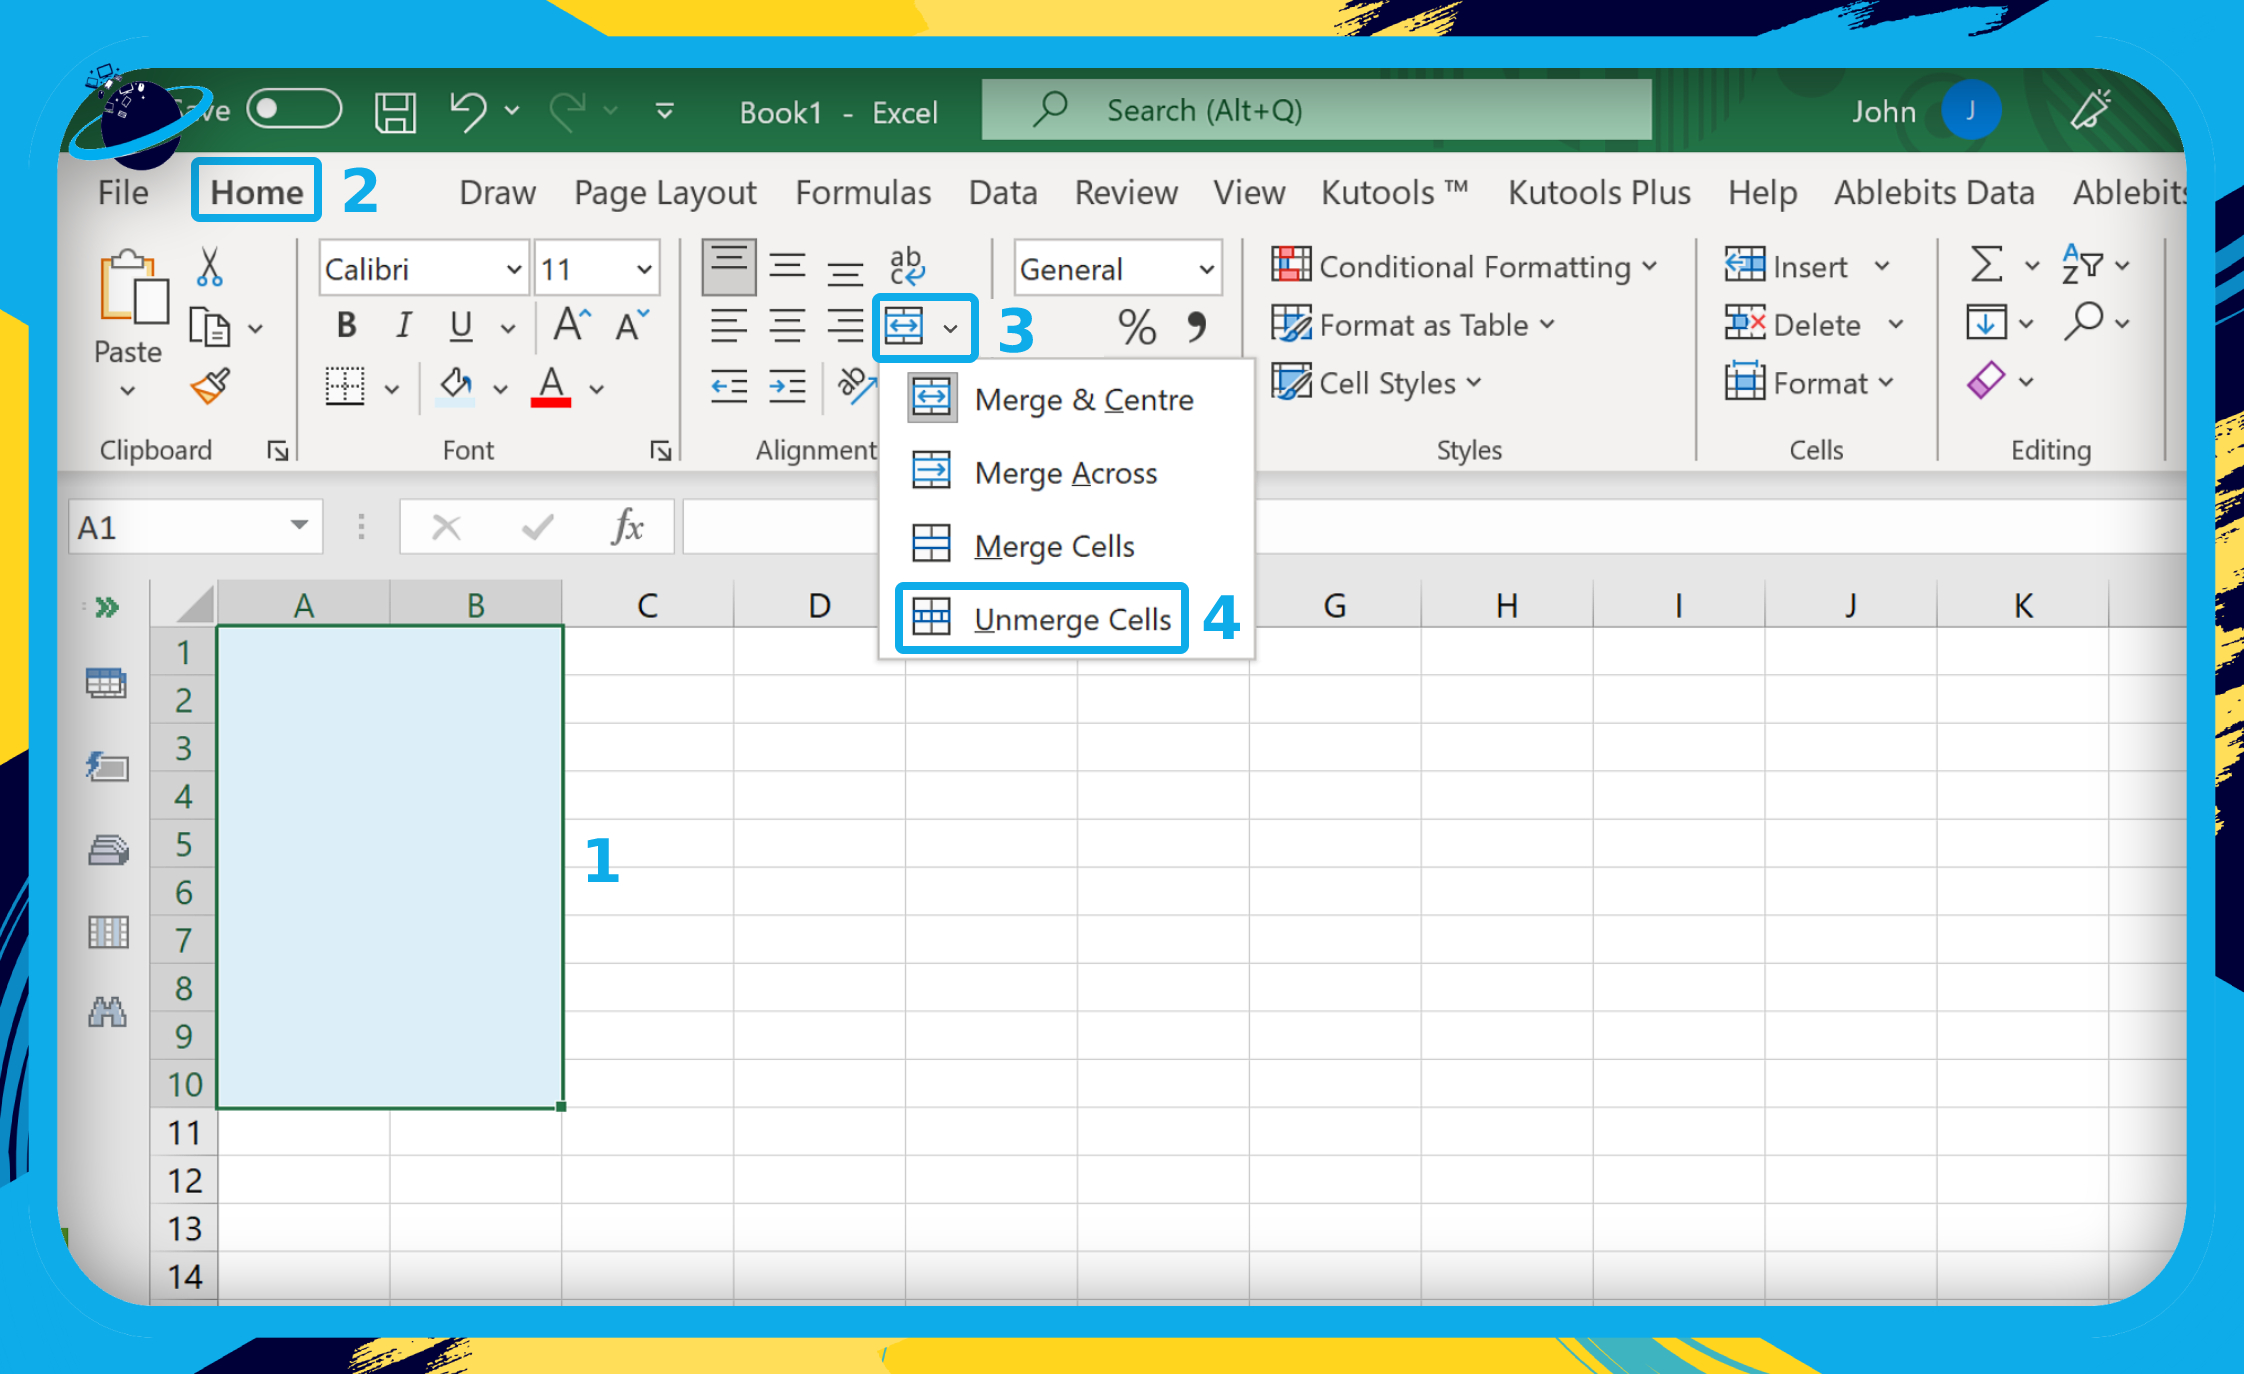
- First, open your Excel worksheet.
- Select the merged cells. [1]
- Click the “Home” tab. [2]
- Click the small down-arrow next to the
 “Merge & Center” icon. [3]
 - Then select “Unmerge Cells” from the dropdown menu. [4]
If you still can’t insert new cells after unmerging the cells, please move on to solution 5.
Solution 5: Open the worksheet in the web version to fix the cannot insert new cells Excel error
If you have OneDrive sync enabled, you should be able to access your Excel worksheet on the web without any additional actions. However, if your online and offline files at not synced, you must upload your worksheet to OneDrive using the following steps.
![]() Note: If your OneDrive sync has been paused, click the
Note: If your OneDrive sync has been paused, click the  blue or
  white cloud icon in the taskbar. Then click the
 ![]() gear icon, and select “Resume syncing.”
gear icon, and select “Resume syncing.”
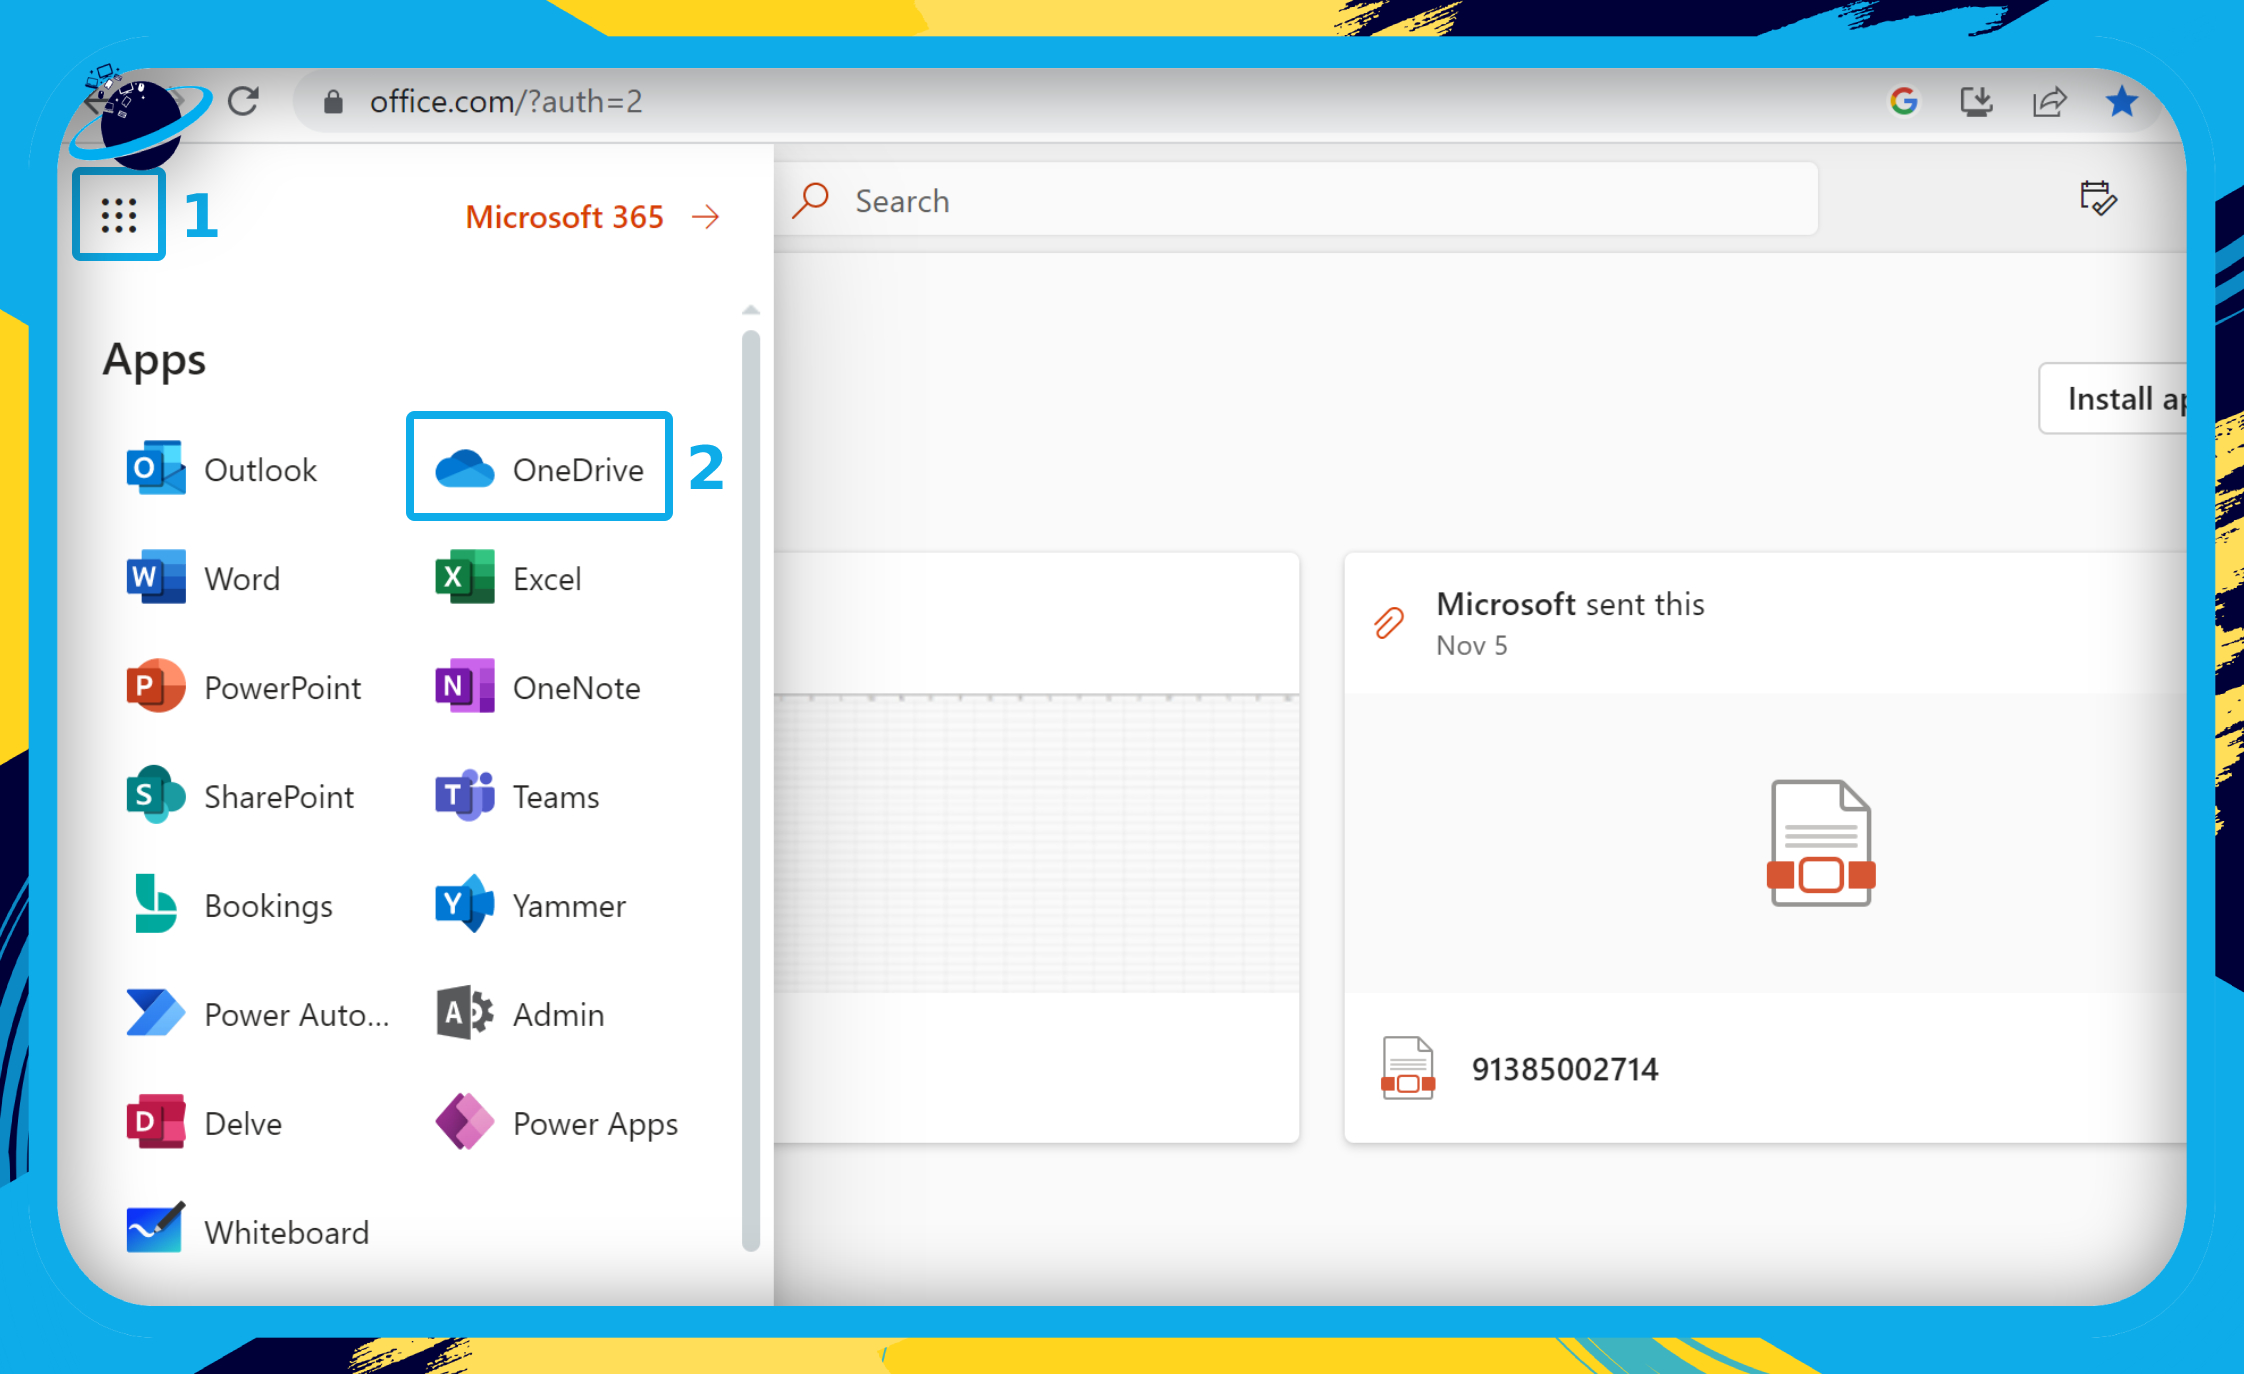
- First,
 go to Office.com and sign in with your Microsoft credentials.
 - Click the
 app launcher icon in the top left corner. [1]
 - Then select “OneDrive” from the Apps list. [2]
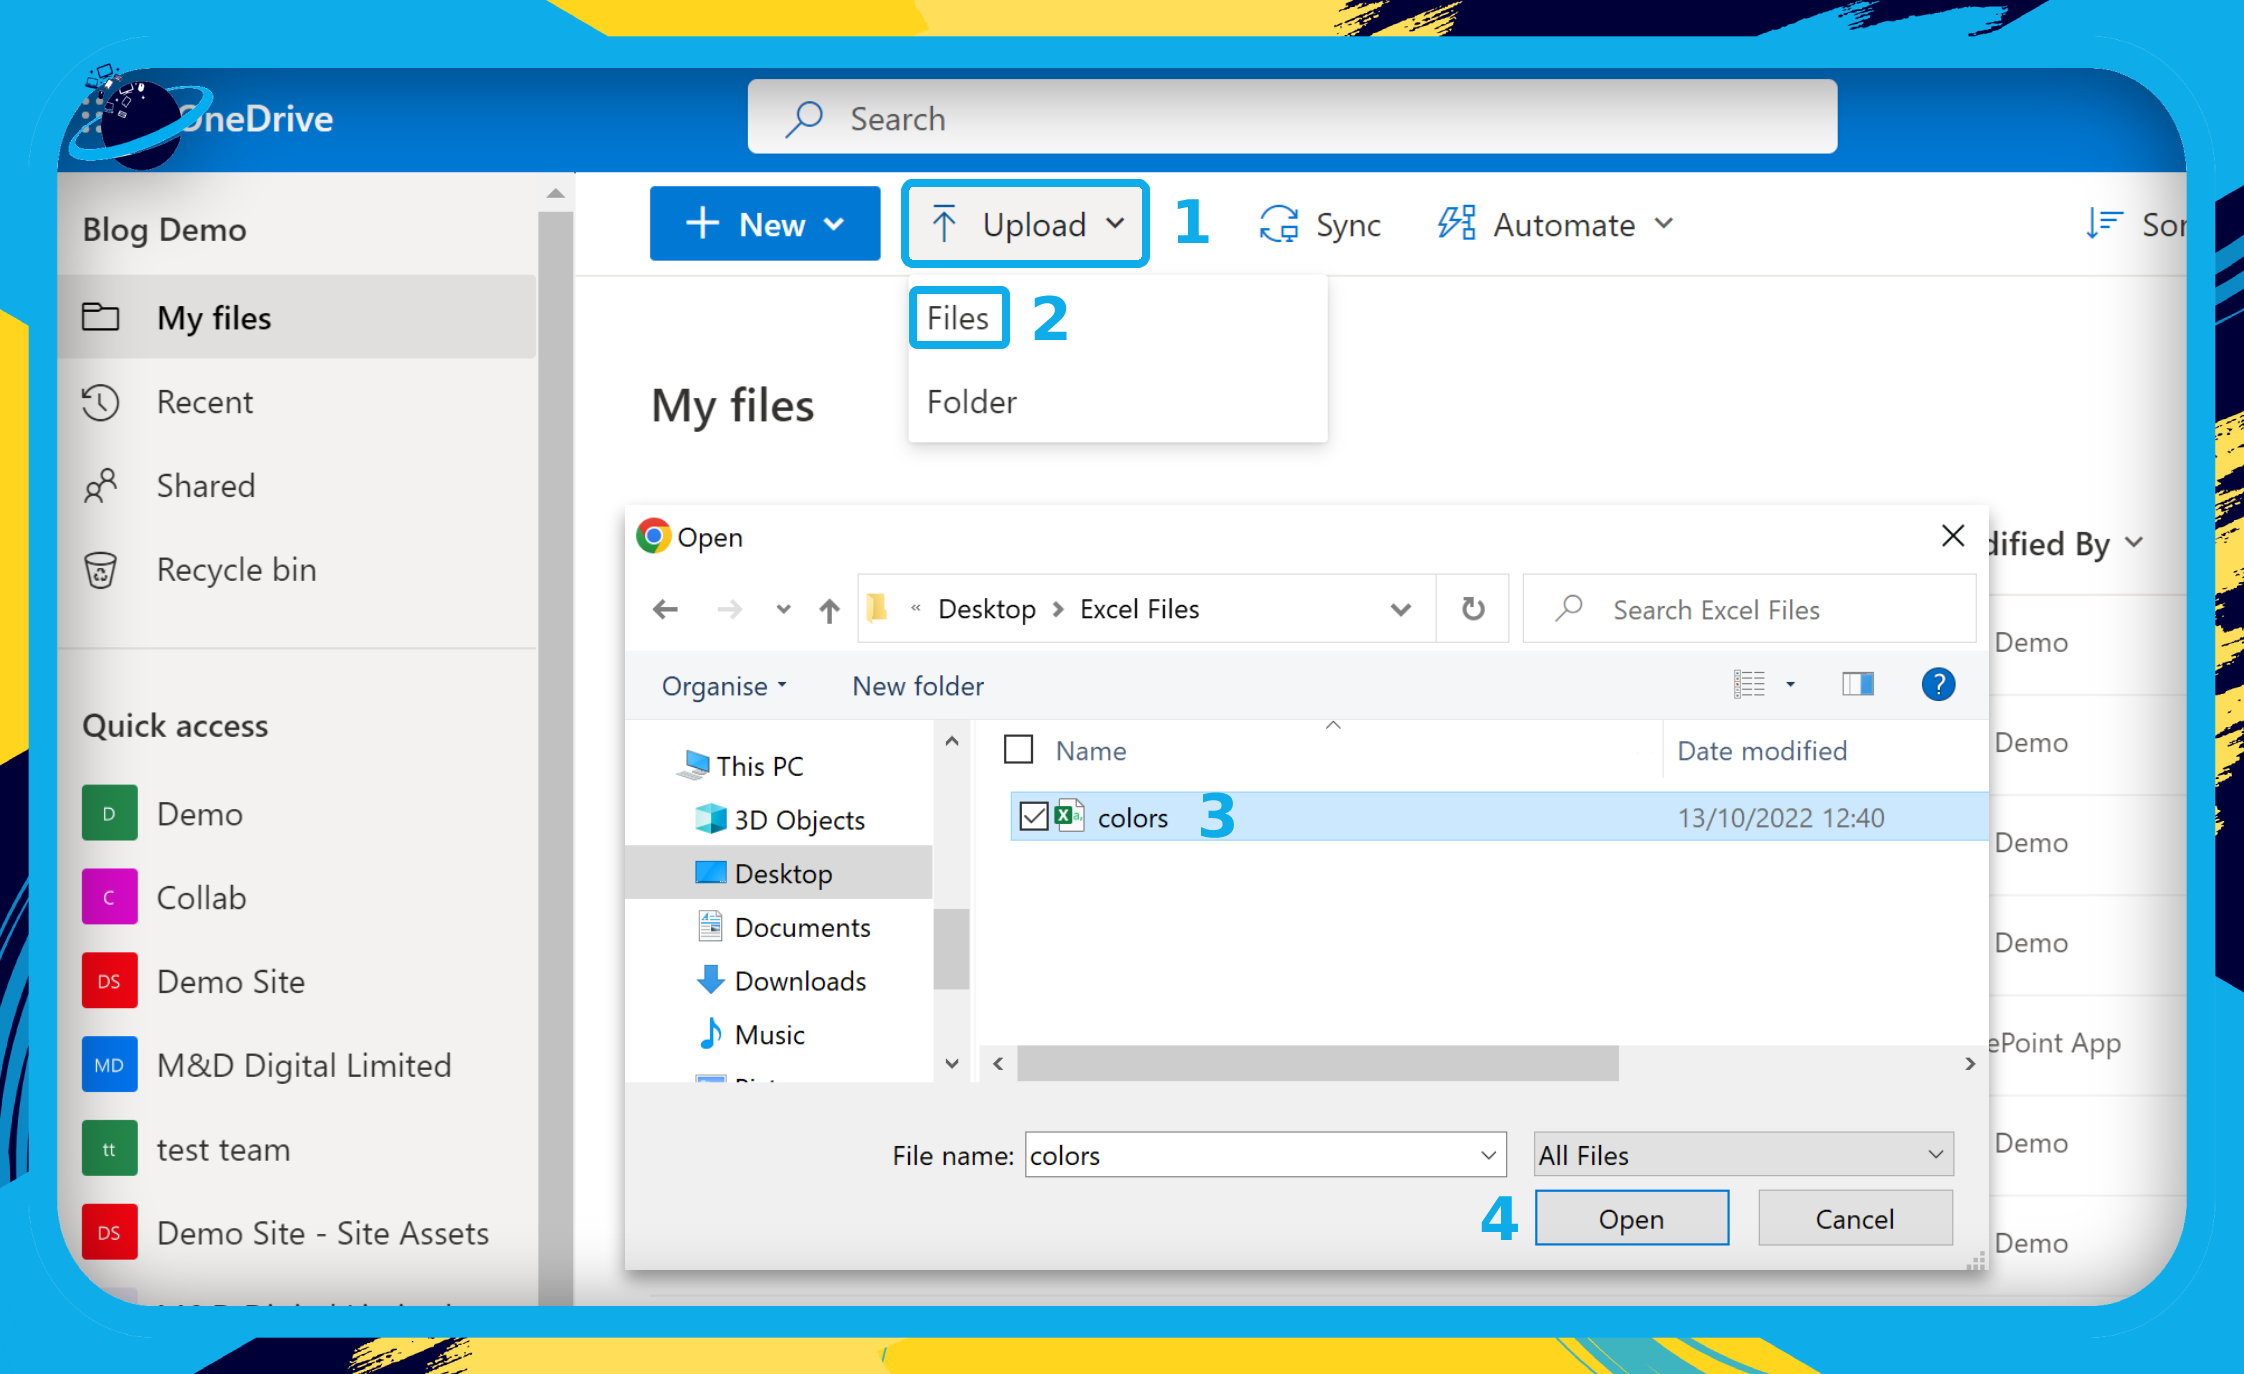
- Click the “Upload” button at the top. [1]
- Select “Files” from the dropdown menu. [2]
- Locate and select your Excel workbook in the File Explorer. [3]
- Then click the “Open” button. [4]
You can now locate your uploaded workbook in the files list and click  to open. However, if you still can’t insert new cells, please move on to solution 6.
Solution 6: Copy the data to a new sheet to fix the cannot insert new cells Excel error
Another possible solution is to transfer the data to a new worksheet. By copying the cell contents without their formats, or by copying just the cells that you need to preserve, you should be able to avoid the “can’t insert new cells” error.
- First, open your Excel worksheet.
- Select only the cells which contain the data you wish to preserve. [1]
- Press the Command/Control + C keys to copy the cells.
- Then click on “File” in the top menu. [2]
- Click on “Blank workbook” in the “Home” tab.
- Select a cell in the new worksheet.
- Then press the Command/Control + V keys to paste the content.
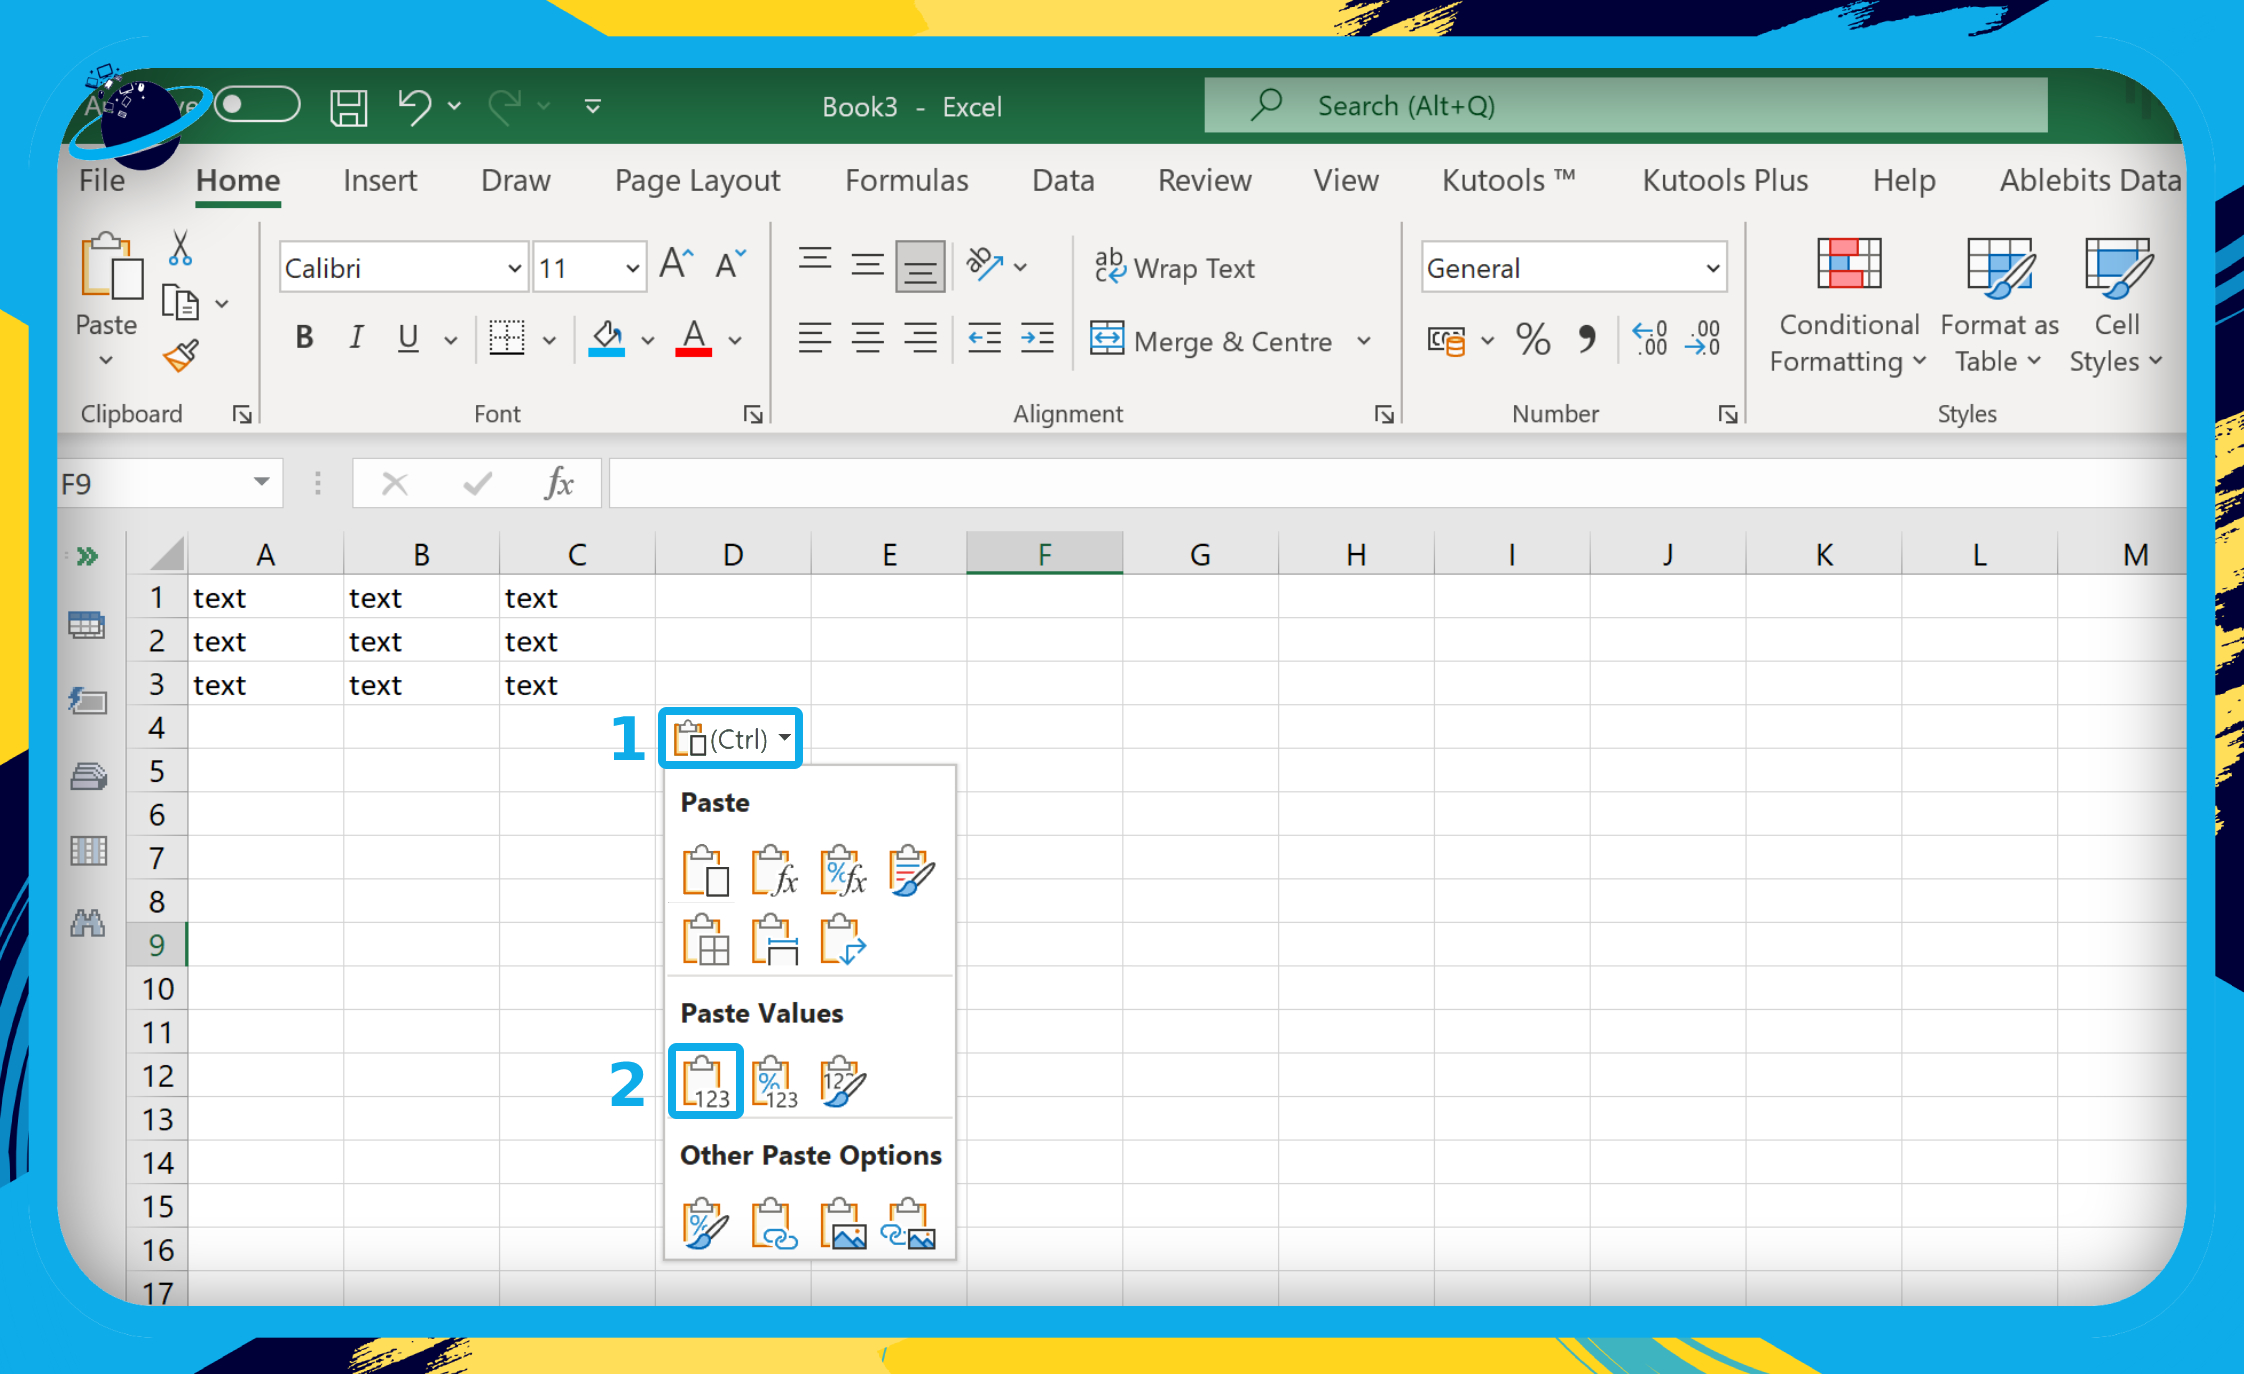
- To paste cells without formatting, click the
 “Paste Options” icon. [1]
 - Then click the
 “Values” icon under the “Paste Values” header. [2]
If you now try to insert a cell into the document, you will no longer be presented with the error, as only the cells containing the required information are available on the document. You can now continue to work on your Excel document in the new location, and when you save the document, you can replace it with the one that displays the error.
You should now be able to insert new cells because used cells are no longer located at the end of the worksheet.
Frequently Asked Questions (FAQ): Cell errors in Excel
 How do I enable insert cells in Excel?
The formatting applied to a row or column you select will be carried over to any new rows or columns you enter. After inserting, you can pick the Insert button and choose one of the following options if you don’t want the formatting to be applied:
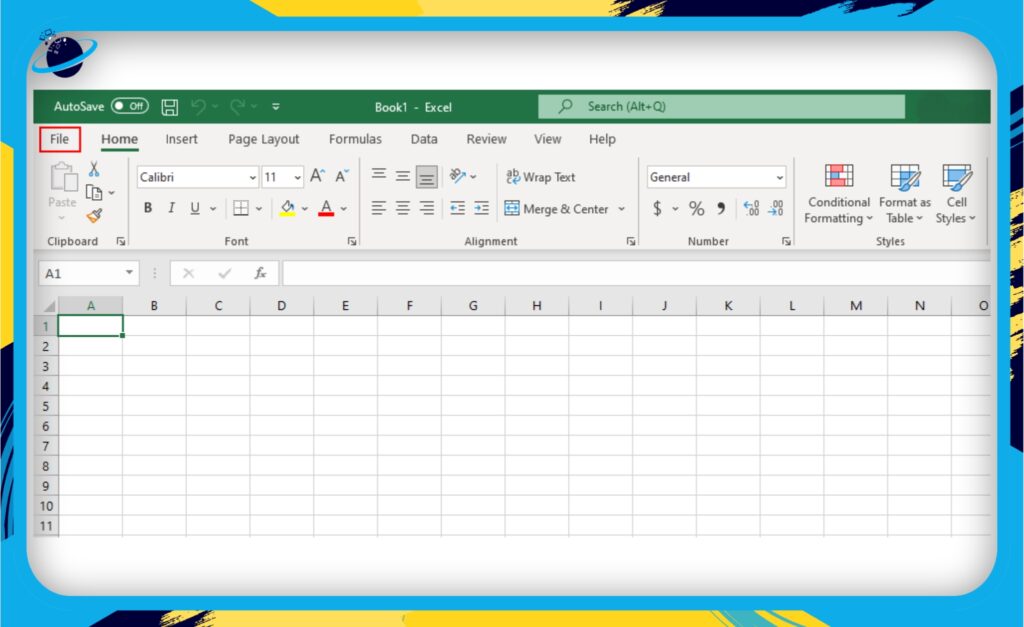
- Firstly, in your Excel document, click on “File.”
- Now click on “Options.”

- After that, you need to click on “Advanced.”
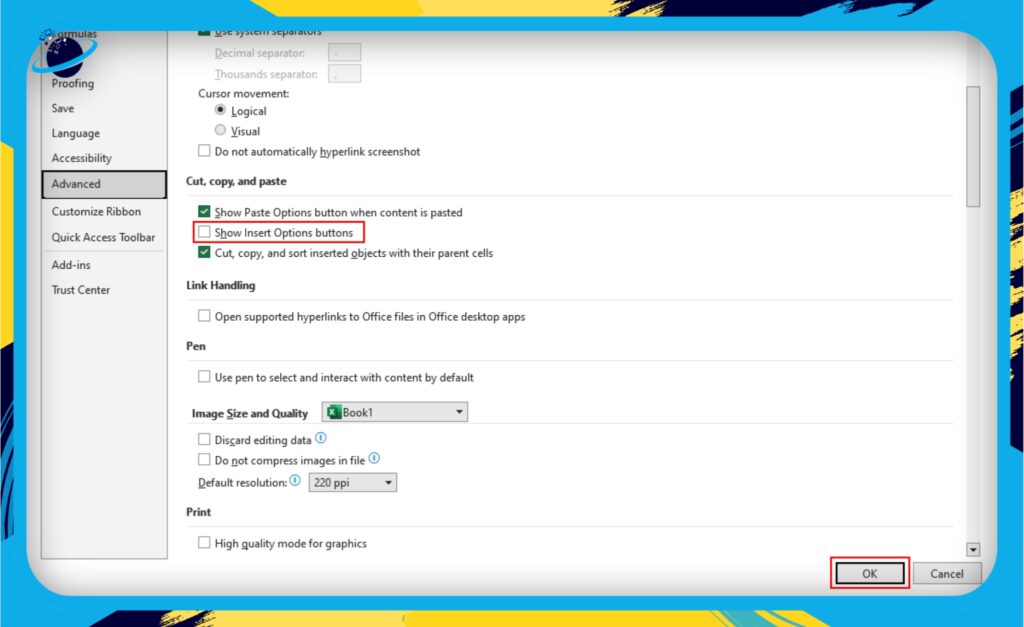
- Under the “Cut, copy and paste” section, ensure the “Show Insert Options buttons” option is checked.
- Finally, press “OK.”
Once you have the steps, you will manage to enable the insert cells option. You can now continue to input formatting, and it will not shift over cells which can cause issues with the inability to insert new ones later.
Why won’t Excel Let me insert anything?
There are a few reasons why Excel will not allow you to insert anything into the document. Excel won’t let you insert cells onto a document because there is formatting on your document. Users may be unaware that they are currently present in the document. You need to clear the formatting from the cells on your document if you want to insert new cells onto the document. You can use our method on “How to clear content and formatting from unused cells.”
If you have cleared the formatting and noticed the cells are still not inserted, it is because there are frozen panes in place. You will need to use the methods above to ensure that the cells are unfrozen and not locked.
Why is the Insert button disabled in Excel?
Using Excel, you can disable the insert button when inserting cells into a document. You can use the method below to turn the feature back on and make sure that the insert button is available.
- First, select “File” in your Excel document.
- then choose “Options.”
- Following that, you must select “Advanced.”
- Ensure the “Show Insert Options buttons” are selected under “Cut, copy, and paste.”
- Press “OK” to complete the process.
The insert button may also be disabled because there is no space available on your document. The program will show an error message; however, go through the process above to ensure that you can insert cells into a document.
Why can’t I delete rows and columns in Excel?
If you find that you cannot delete rows or columns in Excel, it is because they are protected or locked by a user who owns the document. You cannot delete locked cells in any circumstances until they are unlocked. To resolve this issue, you will need to use the “How can you disable cell protection?” method above to clear cell restrictions on the document.
Conclusion
Thank you for reading through our content on how you can resolve the error of not being able to insert cells on a Microsoft Excel document. We have provided various solutions you can use to help fix errors that can cause the inability to insert cells into a document. I recommend you go through each of these solutions provided to ensure that you understand better what to do to fix the errors. If you require further assistance, drop a comment below, and we will address your problems.