A business should look for ways to continue functioning while keeping sensitive documents safe to avoid data breaches. You can do this by categorizing their content and using labels to protect their information; Microsoft Information Protection contains some solutions to help businesses with this.
Microsoft Information Protection (MIP) is a series of features and technologies, instead of a single program, that assists in helping organizations classify, label, and protect data, which would be based on the level of sensitivity. This article will cover how its features can benefit users.
Content list
- What is Microsoft Information Protection?
- The different types of Data Protection
- Know Your Data
- Protect Your Data
- Prevent Data Loss
- Govern Your Data
- Microsoft Information Protection
- Sensitivity Labeling for Files and Folders
- Container Labeling for Groups and Sites
- Conclusion
What is Microsoft Information Protection?
Microsoft Information Protection (now known as Microsoft Preview Information) is a series of features and technologies that users and businesses use without knowing; this helps by letting an organization classify, label, and protect its data and is based on the level of security.
A few of the ways an organization can use labels include:
- Helping users to understand how vital certain kinds of information are.
- Helping Compliance administrators to find out where sensitive types of information are.
- Helping Security administrators to give data access and data loss prevention policies depending on the label of the information.
While researching this topic, I asked people on the Microsoft Community Forums about Information Protection; this is what an individual advisor had to say about this.
Thank you for posting on Microsoft Forum.
Microsoft Information Protection (Currently Microsoft Purview Information Protection) features help you identify, classify, and protect sensitive information while ensuring that your organization’s productivity and collaboration are not impacted.
Contrary to common belief, MIP (Microsoft Information Protection) is not a single product but a collection of technologies that are integrated into several components of the Microsoft 365 environment. Microsoft 365 compliance includes MIP capabilities, which provide you with the tools to know your data, protect it, and prevent data loss.
De Paul N. Kwizera

The different types of Data Protection
As there is a multitude of different terminologies when it comes to data, Microsoft took the time to break them down into a few different segments to make it easier to follow for admins so they can understand each of the areas better; this will allow them to maintain the way that would be the best for the business.
I will split these into four separate categories and discuss what they can do for organizations; these will be “Know Your Data,” “Protect Your Data,” “Prevent Data Loss,” and “Govern Your Data.”
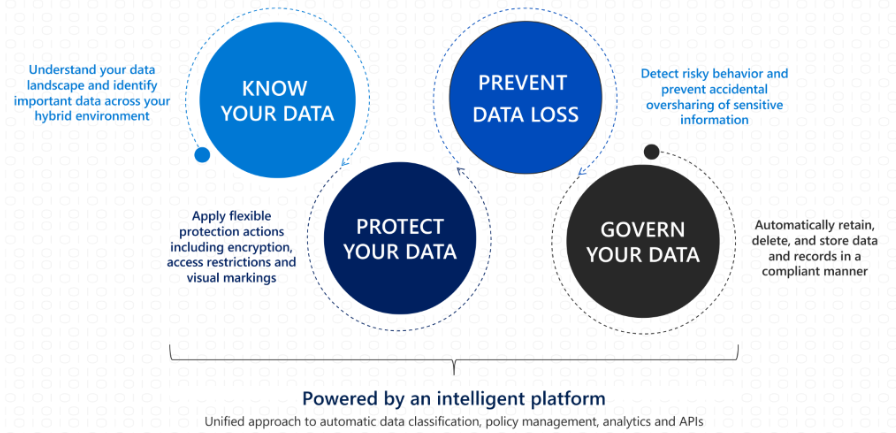
Know Your Data
Know Your Data is a section that allows businesses to have a better understanding of their data landscape and allows admins to identify essential and sensitive data and documents from the cloud or on-site; this lets the organization transfer data to different workloads and also lets admins identify data that needs labeling before it can be migrated to the cloud as part of the regulation process.
Protect Your Data
Protect Your Data is a section that allows an organization to encrypt their data to protect it by using “Information Protection Labeling” by Microsoft Keys, “Double Key Encryption” (DKE) or “Bring Your Own Keys” (BYOK), “Office Message Encryption,” also “configure access restrictions” and “configure visual markings.” All of these ways of protecting your data can be done using Microsoft Azure; there is the way of extending Information Protection to Microsoft Defender for Cloud Apps, which can be done in Microsoft Defender.
Prevent Data Loss
This section is about the types of ways to prevent loss of data, in which businesses can create and edit policies about Data Loss Prevention for “Data-in-Transit,” “Data-in-Use,” and “Data-at-Rest,” which will stop any accidents involving sensitive data being shared.
Govern Your Data
This section covers ways to govern your data; by showing businesses ways to keep their data due to labels and policies, businesses can make a defensible disposal strategy using data disposition reviews and store data on Microsoft 365. Microsoft also follows regulatory requirements with the option to label items as “immutable,” meaning that they cannot be changed over time.
Microsoft Information Protection Labeling
Sensitivity Labeling for Files and Folders
As one of the first solutions within Microsoft Compliance, businesses will need to protect their company-owned information and give it a classification, or Labeling Taxonomy as Microsoft has named it. This process can be difficult and time-consuming because it means that a business will need to take the time to try and put the parts that the taxonomy document has defined under configurations and permissions into different labels. One of the reasons this can take such a long time is that the business may often externally shares encrypted data; this makes it harder to seek help on this topic.
Businesses who haven’t created the taxonomy first may try to make the document while making the labeling configurations, which would take a lot of effort and time to do without the base taxonomy. Some businesses may want to set up auto-labeling because it may be easier for the admins, so they don’t have to choose the correct labels for the information; however, the problem with this is that the user won’t know the level of sensitivity of the data. Therefore it is wise for businesses to take the time to manually label data which would let users identify parts of the data.
Container Labeling for Groups and Sites
The next type of labeling, known as “Container labeling,” gives businesses the option to give a Sensitivity Label to things like Microsoft 365 groups and Teams channels, and SharePoint Sites. This form of labeling could be enabled already, but in case it isn’t, you will need an admin to go to the Information Protection Section of the Compliance Portal. You will find a banner talking about “Setting up container level labeling for your organization,” press turn on, and it will start running in the background, then configure it. It should give you a link to let you sync the labels; you may have to wait up to 24 hours for the changes to take effect. After the configuration notification clears, users should have the option to apply the labels to groups and sites by viewing the labels.
Conclusion
Microsoft Information Protection is a series of features and options that organizations can use to secure business information; businesses would need to maintain security over this information as a way to avoid data breaches and data losses; this would be preferable as a data breach alone can cost a fortune to a business. Microsoft Information Protection allows admins to label different types of information to avoid confusion and categorize it.