 Key Takeaways
 You can paste Loop components into a “New mail” in Outlook [More…] or insert them using the inbuilt components. [More…]
 When you create a Loop component in Outlook, it won’t appear in your workspaces.
To resolve that, search for the name of your component in the ![]()
![]() Microsoft Loop app. Click to open the component, then click the
Microsoft Loop app. Click to open the component, then click the ![]() “Shared locations” icon at the top. Select
“Shared locations” icon at the top. Select ![]() “Add to workspace” from the dropdown. And finally, select a workspace. [More…]
“Add to workspace” from the dropdown. And finally, select a workspace. [More…]

- Paste your Loop component into a new mail
- Start by clicking the
 “Copy” icon in the top right of the component.
 - Next, open

 Outlook.
 - Click the “New Mail” button at the top.
- Enter the recipients’ names in the “To” box.
- Add a descriptive subject.
- Then right-click in the main body of the message and select “Paste.”
- Finally, hit the “Send” button.
- Start by clicking the
- Insert the inbuilt Loop components
- First, open Outlook.
- Then click “New Mail” at the top.
- You can click the
 Loop icon at the top of the “Message” tab.
 - Or, head to the “Insert” tab and click “Loop Component.”
- If the Loop icon is greyed out, click the main body of the email (where you type the message), or try using the web version of Outlook.
- First, open
We’ve also created a video to guide you through the process:
 Overview: What is Loop and why should I use it in Outlook?
![]() Note: To use Microsoft Loop, it must be enabled in your Apps admin center. To do that, please read our complete guide:
Note: To use Microsoft Loop, it must be enabled in your Apps admin center. To do that, please read our complete guide:![]() How to enable and access Microsoft Loop for your organization
How to enable and access Microsoft Loop for your organization
This is what a Loop component looks like:
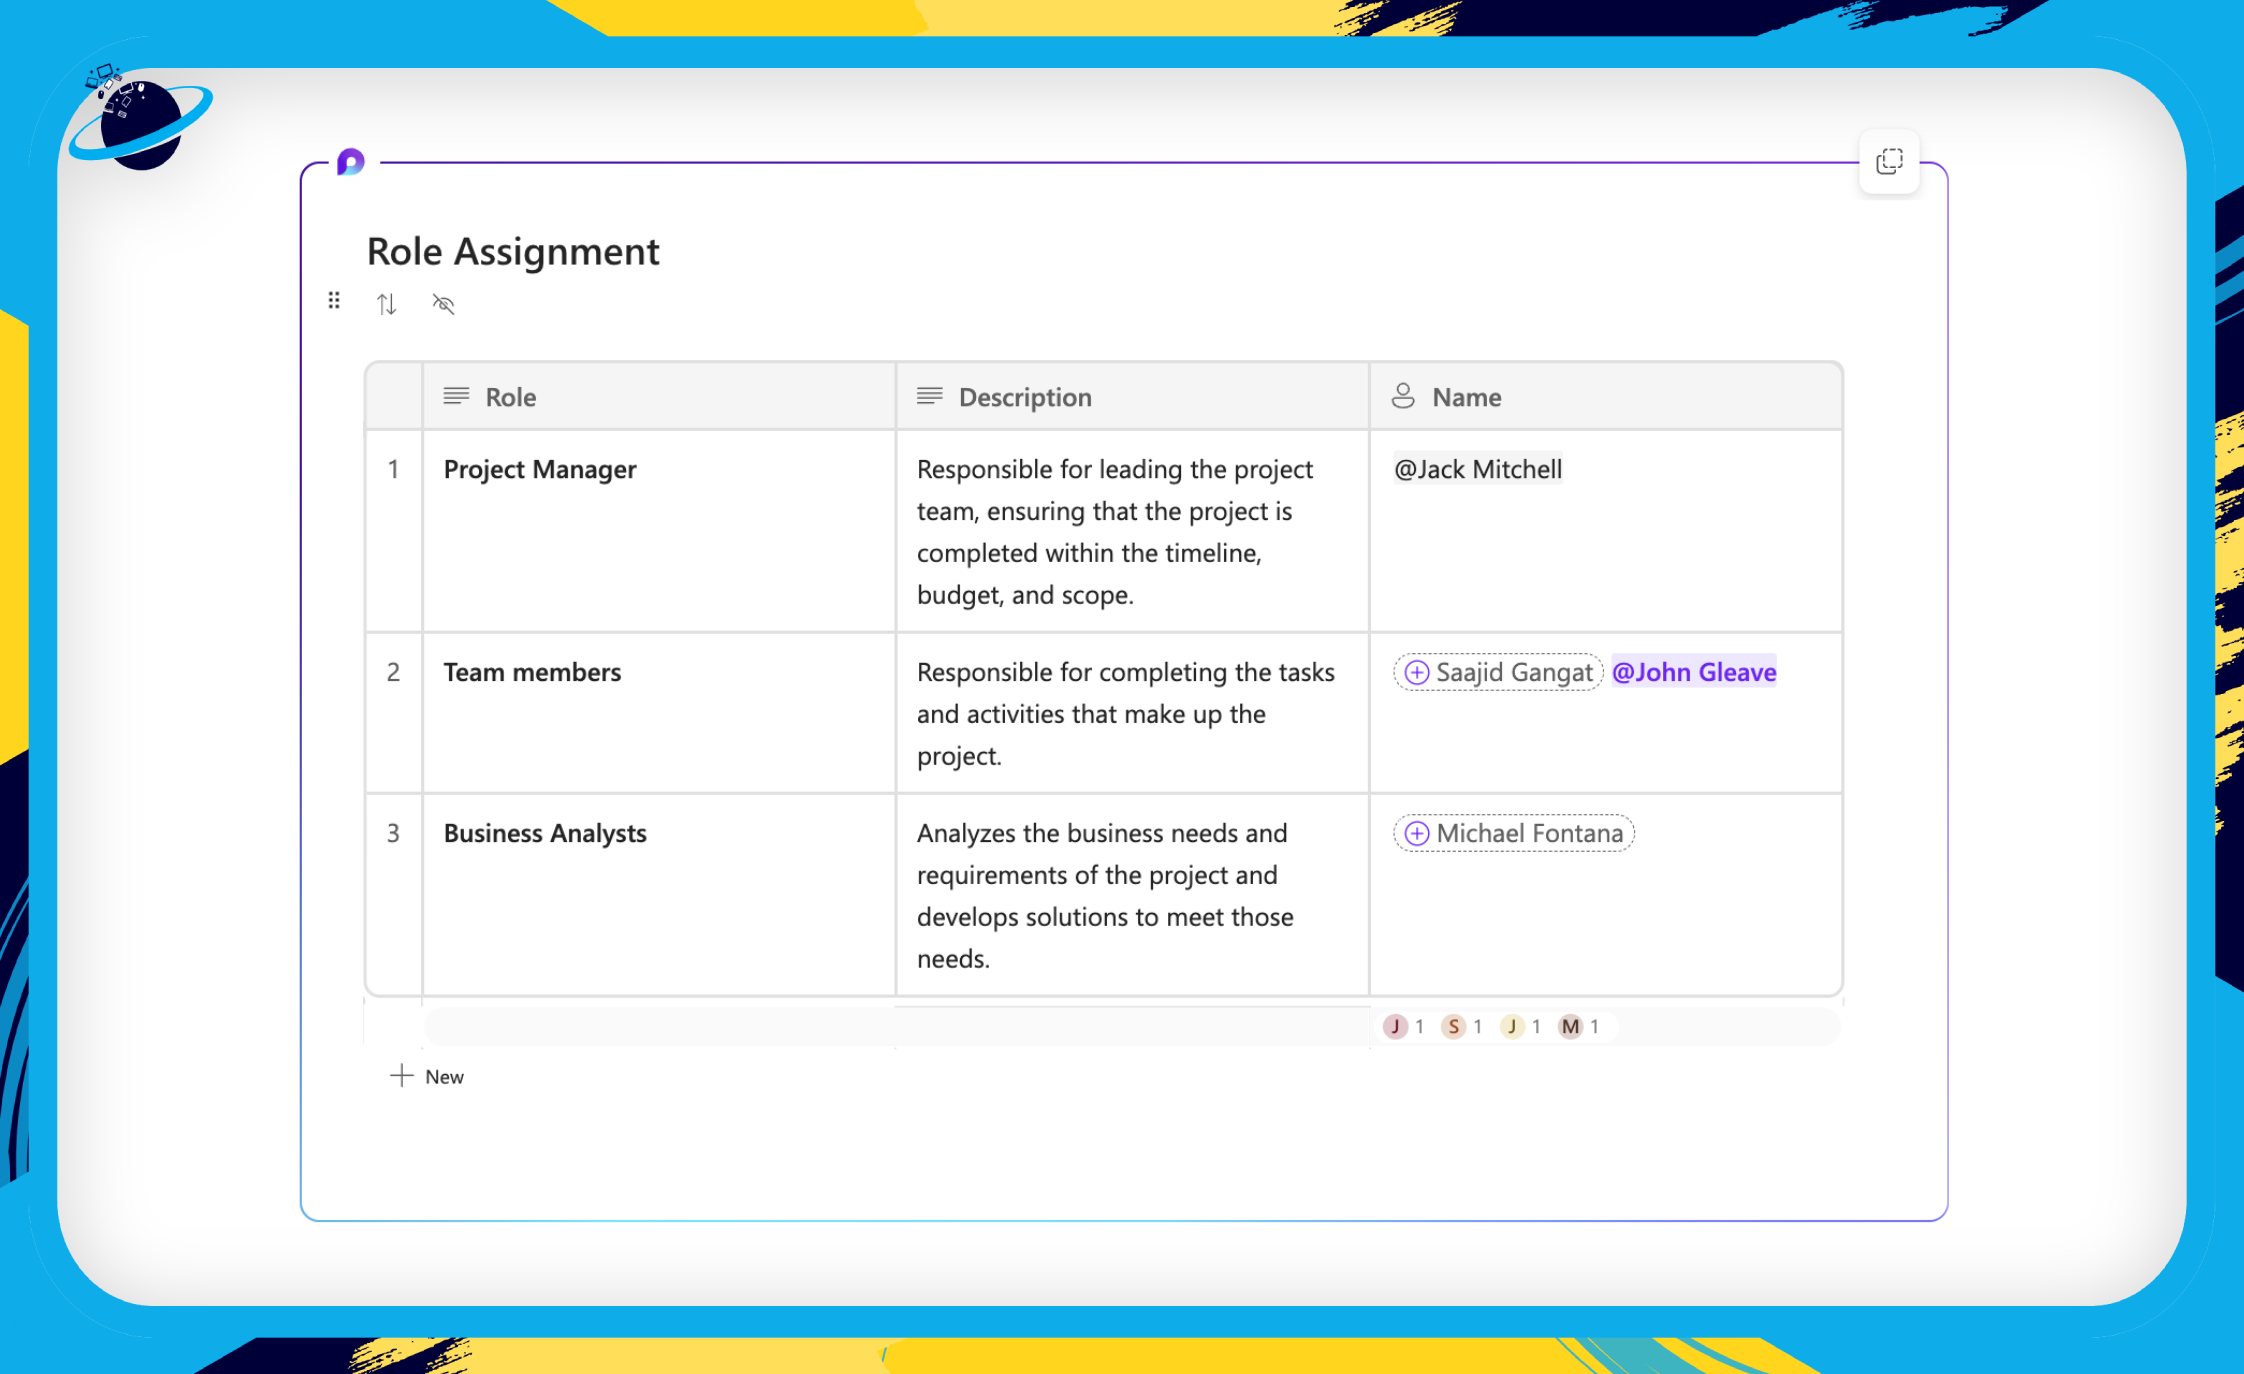
You can share Loop components with anyone in your organization. However, in order to interact with the components, they must be using Outlook as their email host.

 How Microsoft Loop integrates with Outlook:
Paste a Loop component into Outlook
In this section, we’ll show you how to embed a Loop component into Outlook by copying and pasting it.
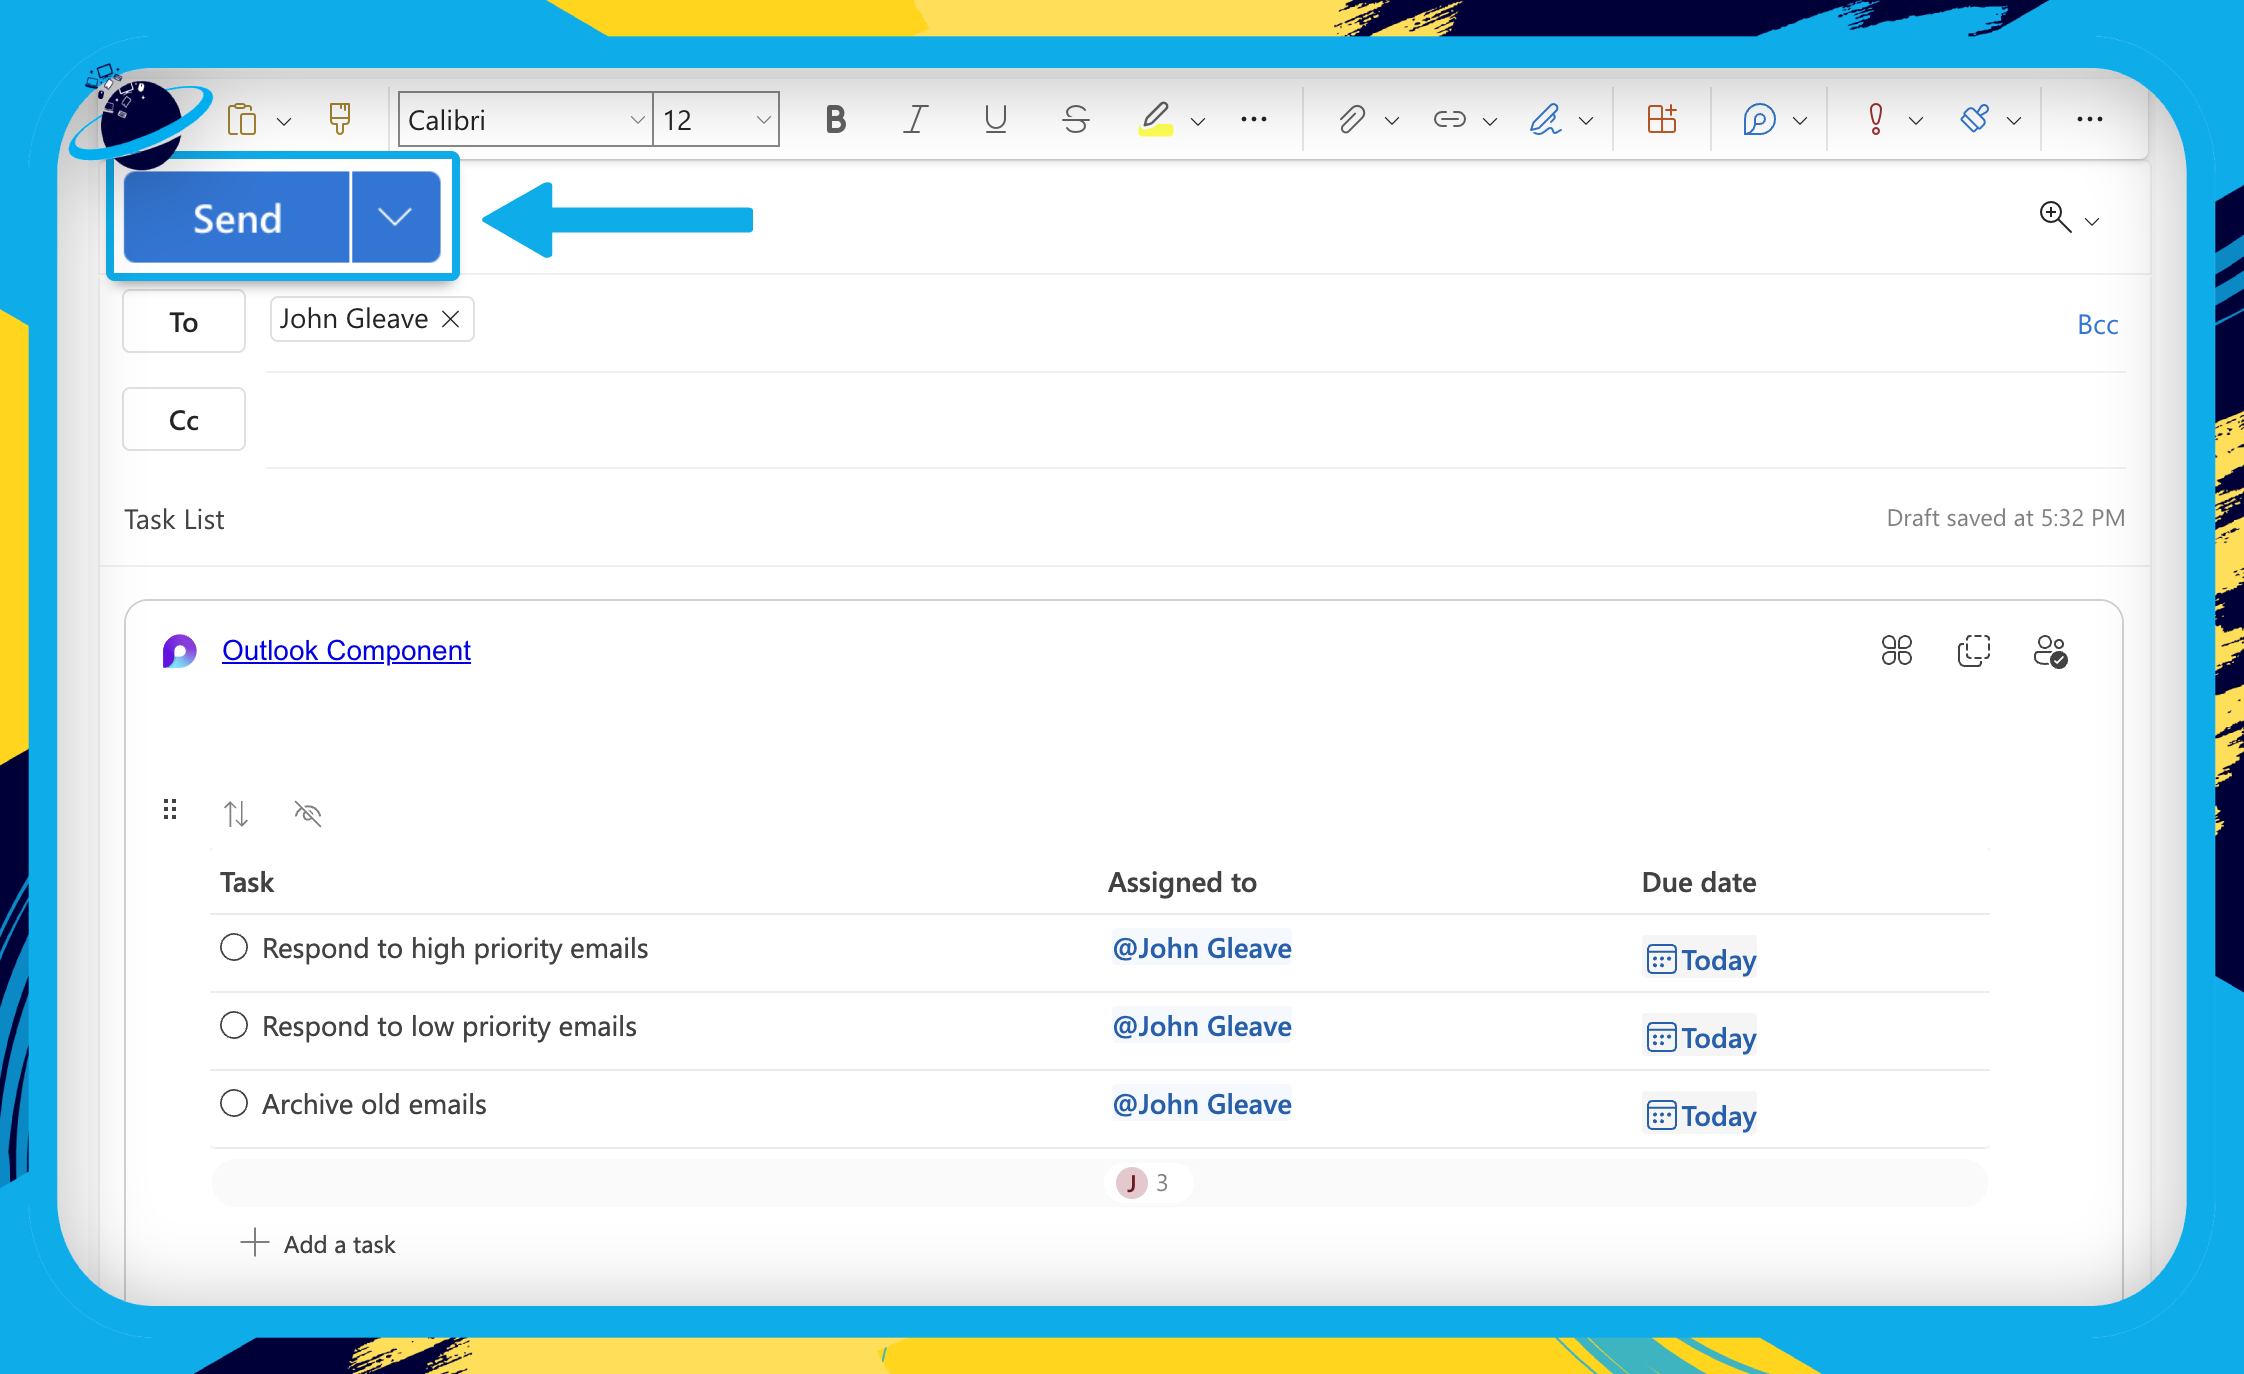
To paste a Loop component into Outlook, start by clicking the ![]() “Copy” icon in the top right of the component. [1] You can also click the
“Copy” icon in the top right of the component. [1] You can also click the ![]() “Copy” icon next to the “Share” button at the top to copy the whole page. [2]
“Copy” icon next to the “Share” button at the top to copy the whole page. [2]
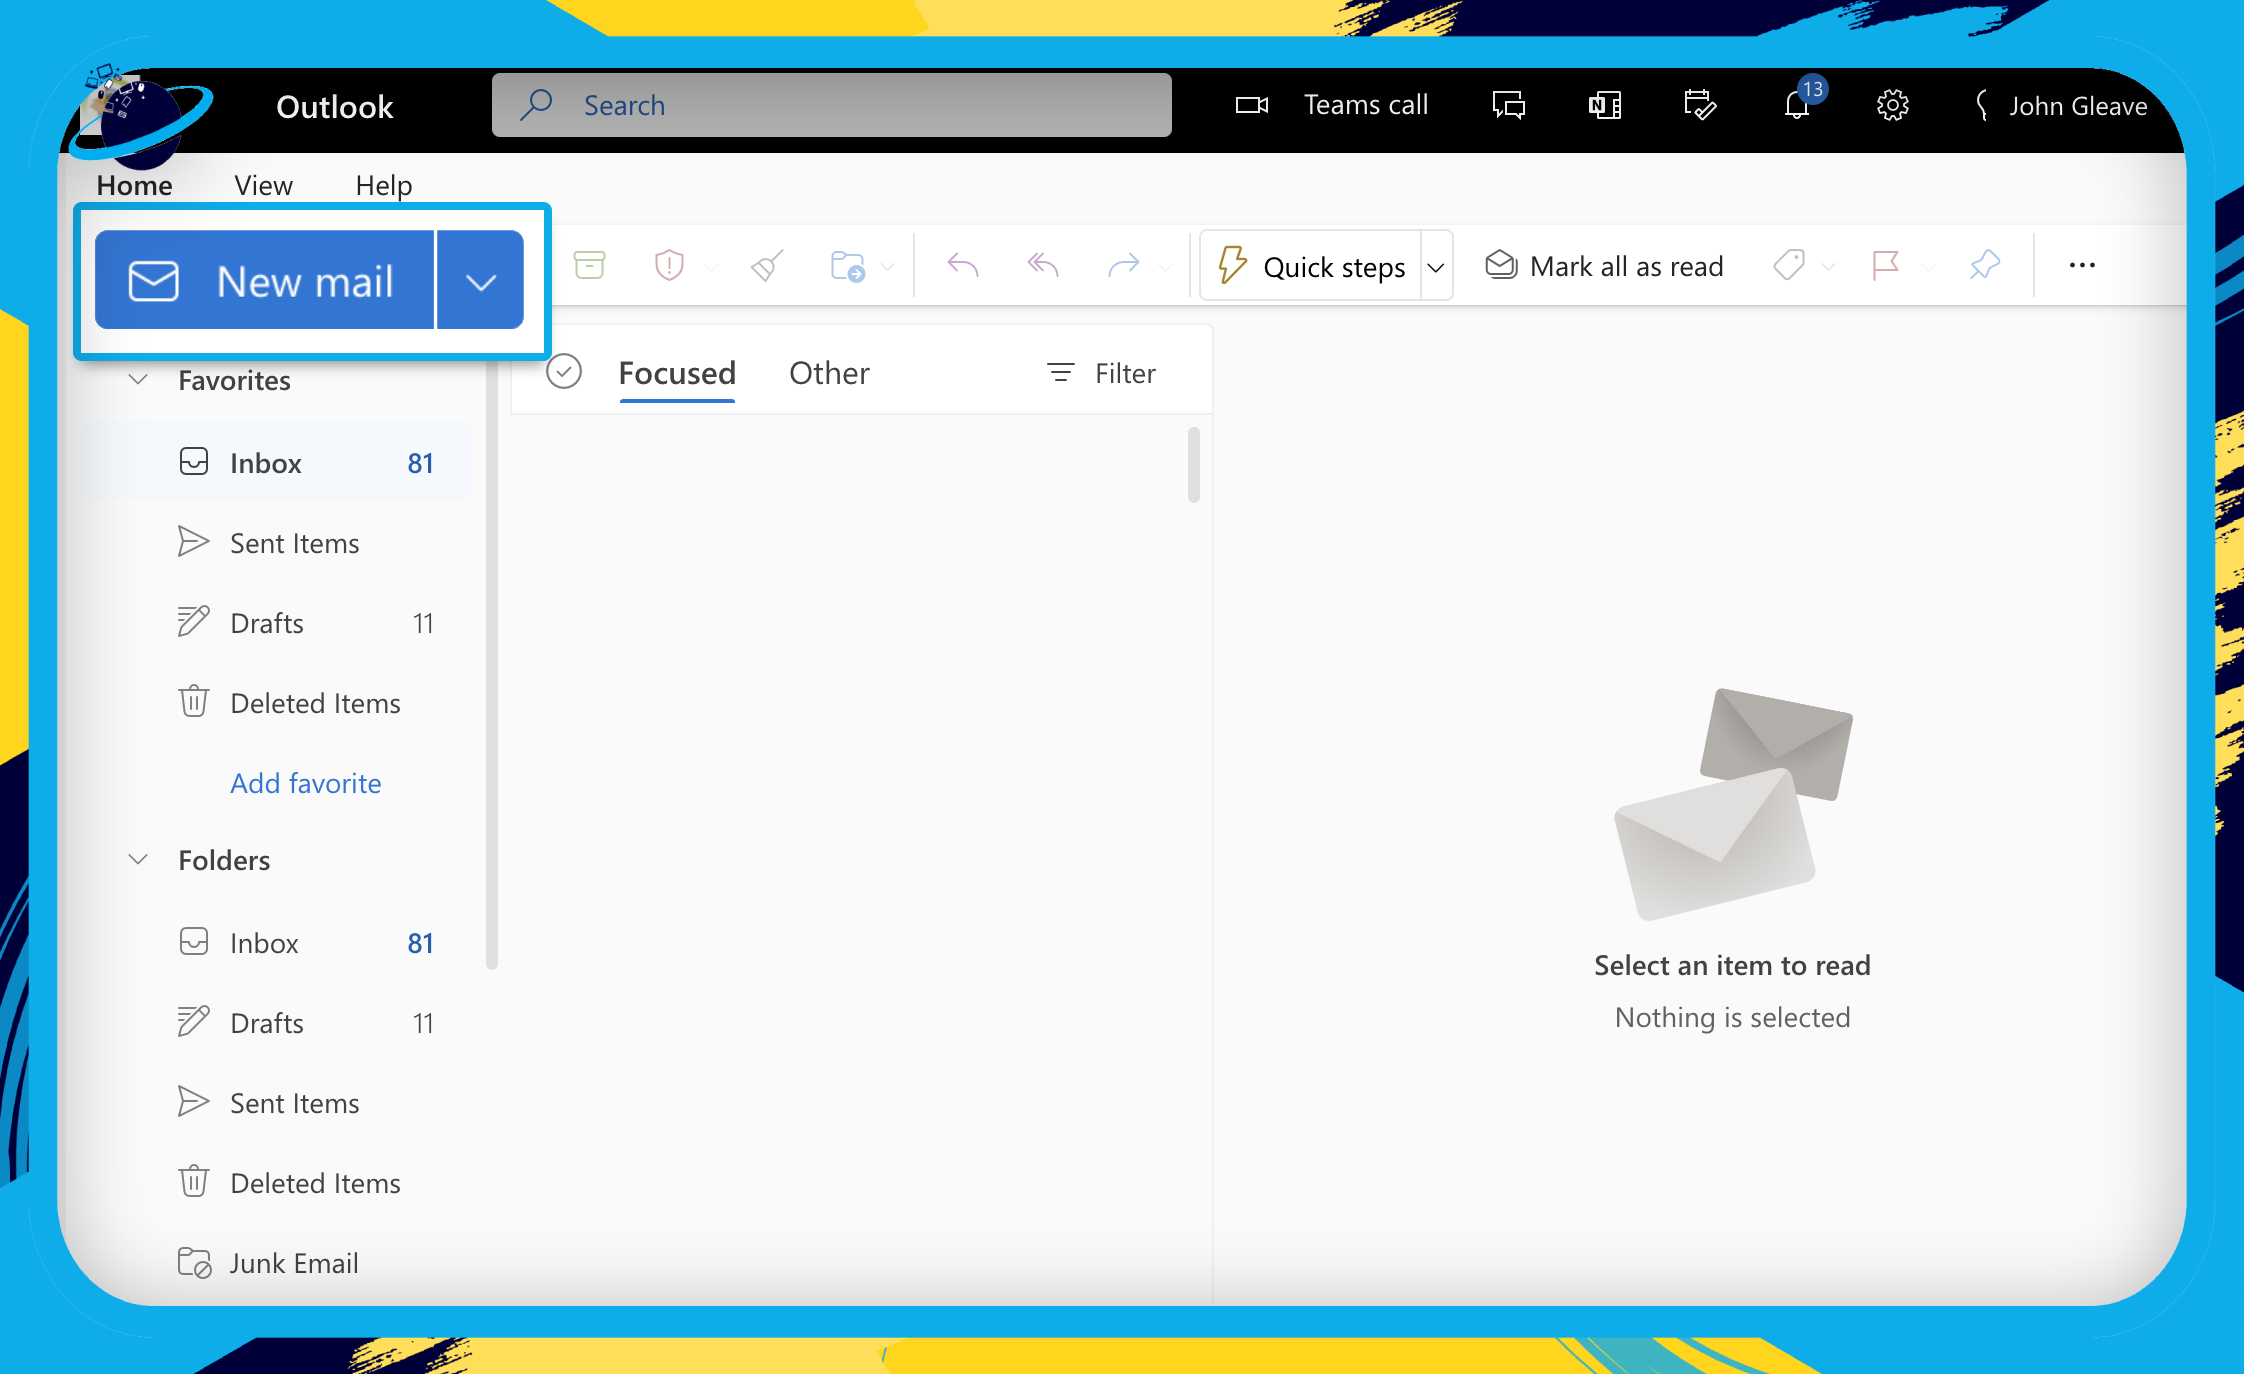
- Next, open Outlook.
- Click the “New Mail” button at the top.
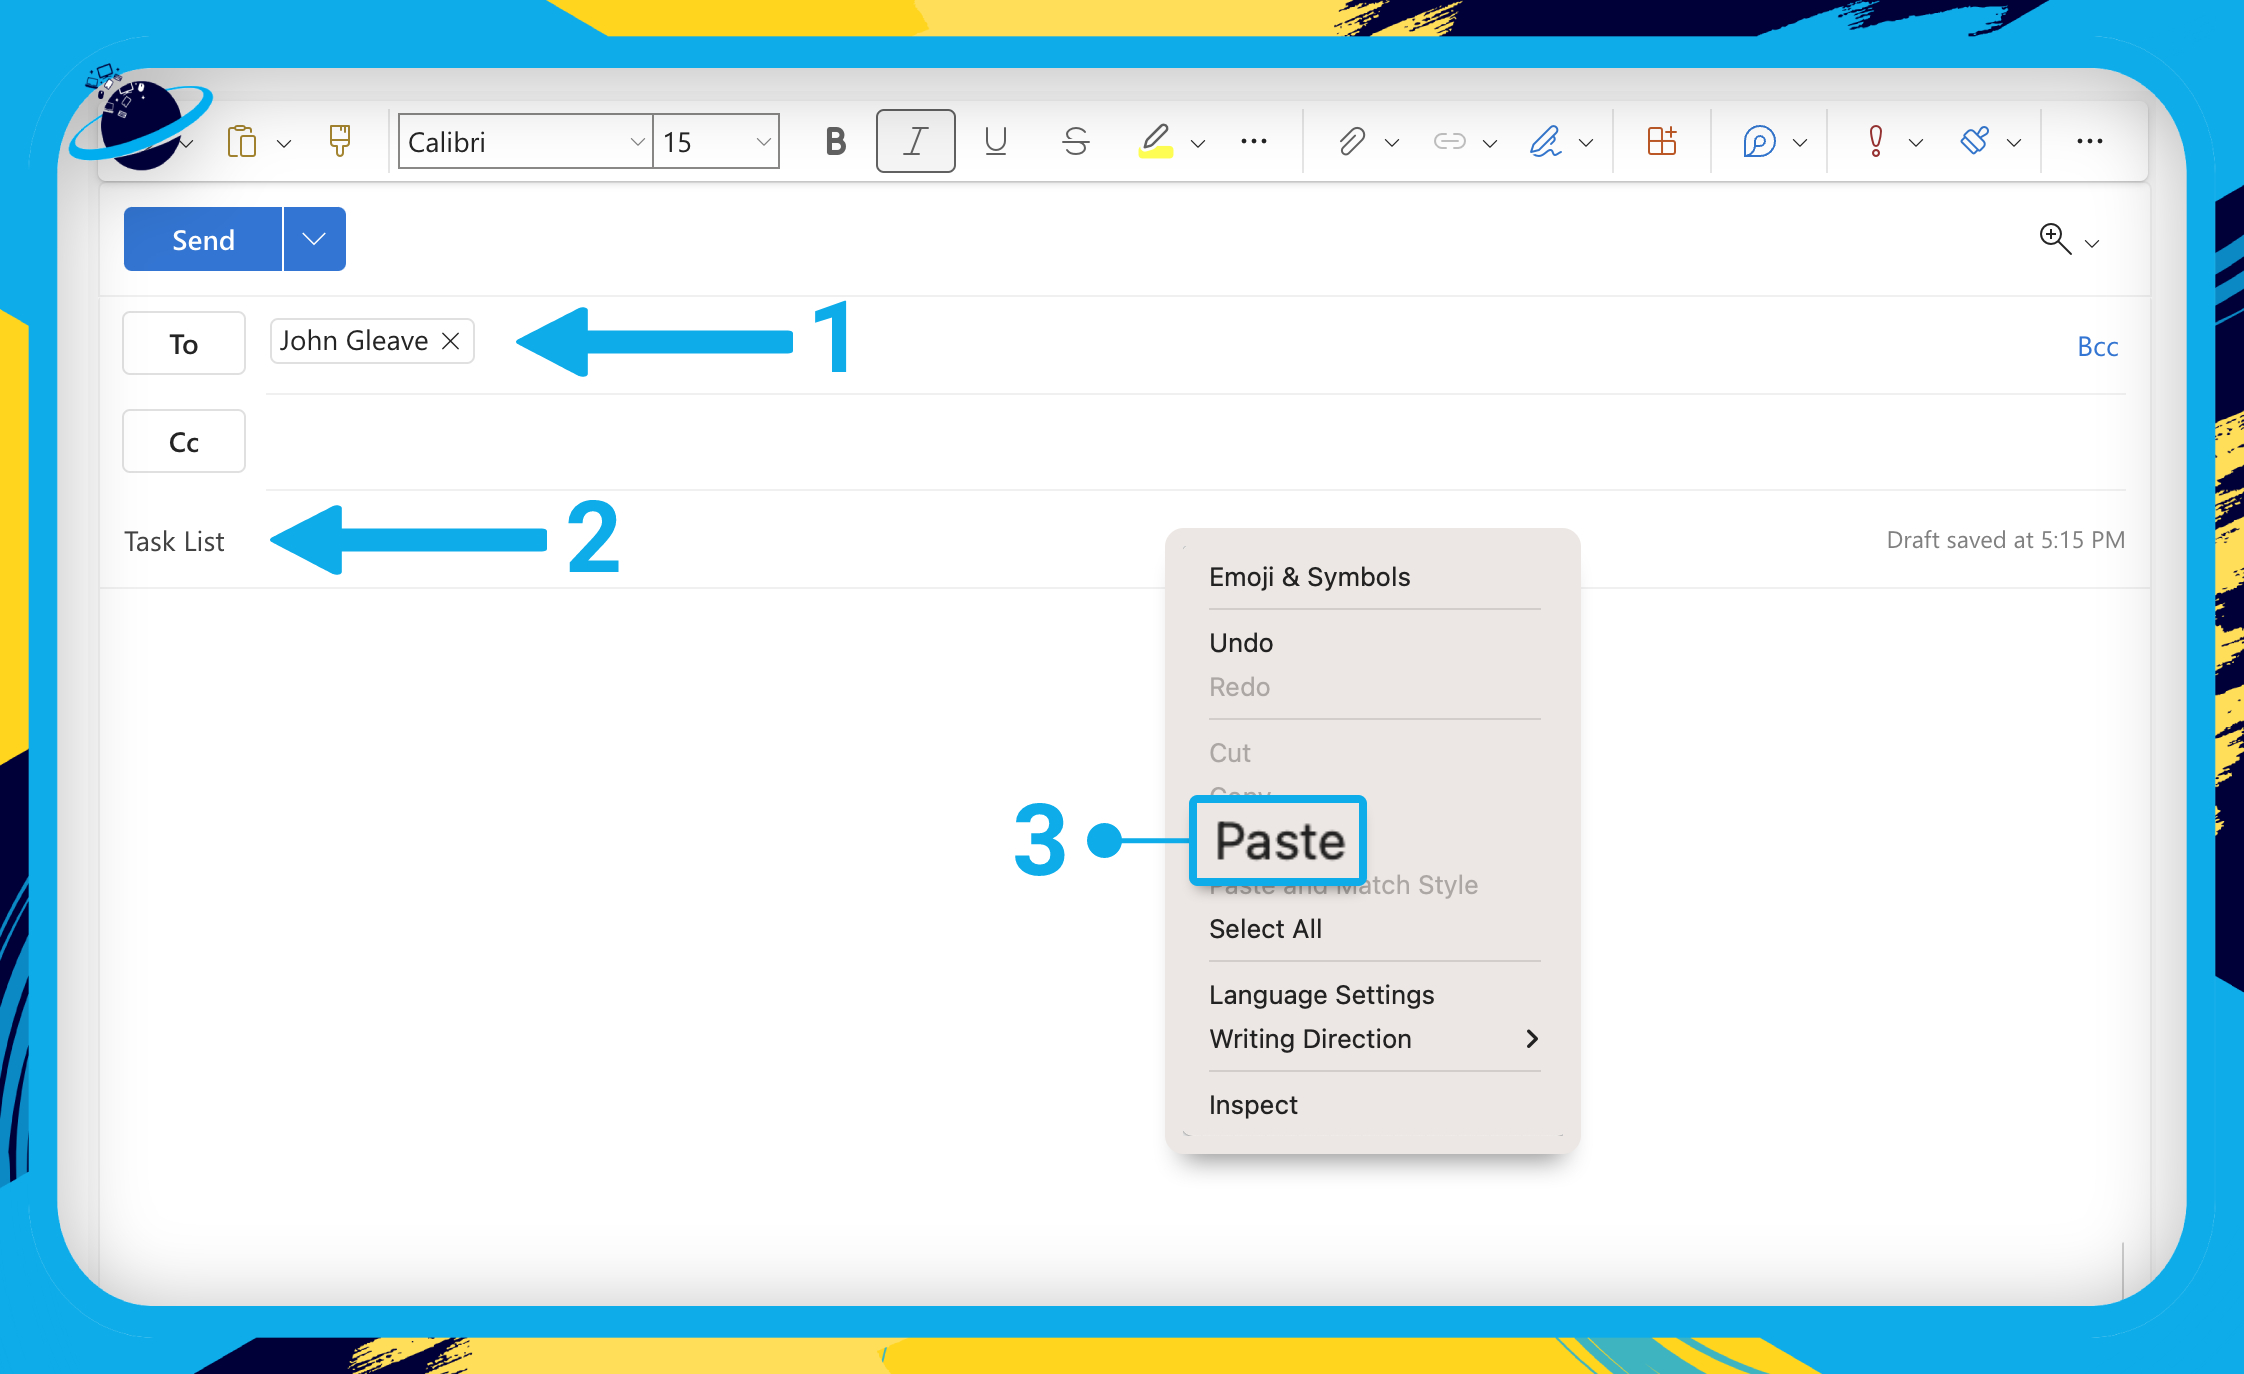
- Enter the recipients’ names in the “To” box. [1]
- Add a descriptive subject. [2]
- Then right-click in the main body of the message and select “Paste.” [3]
You can then continue to build the component from Outlook if required. Once you’re finished, hit the “Send” button and the recipients will be able to modify the component and collaborate with you in real-time.
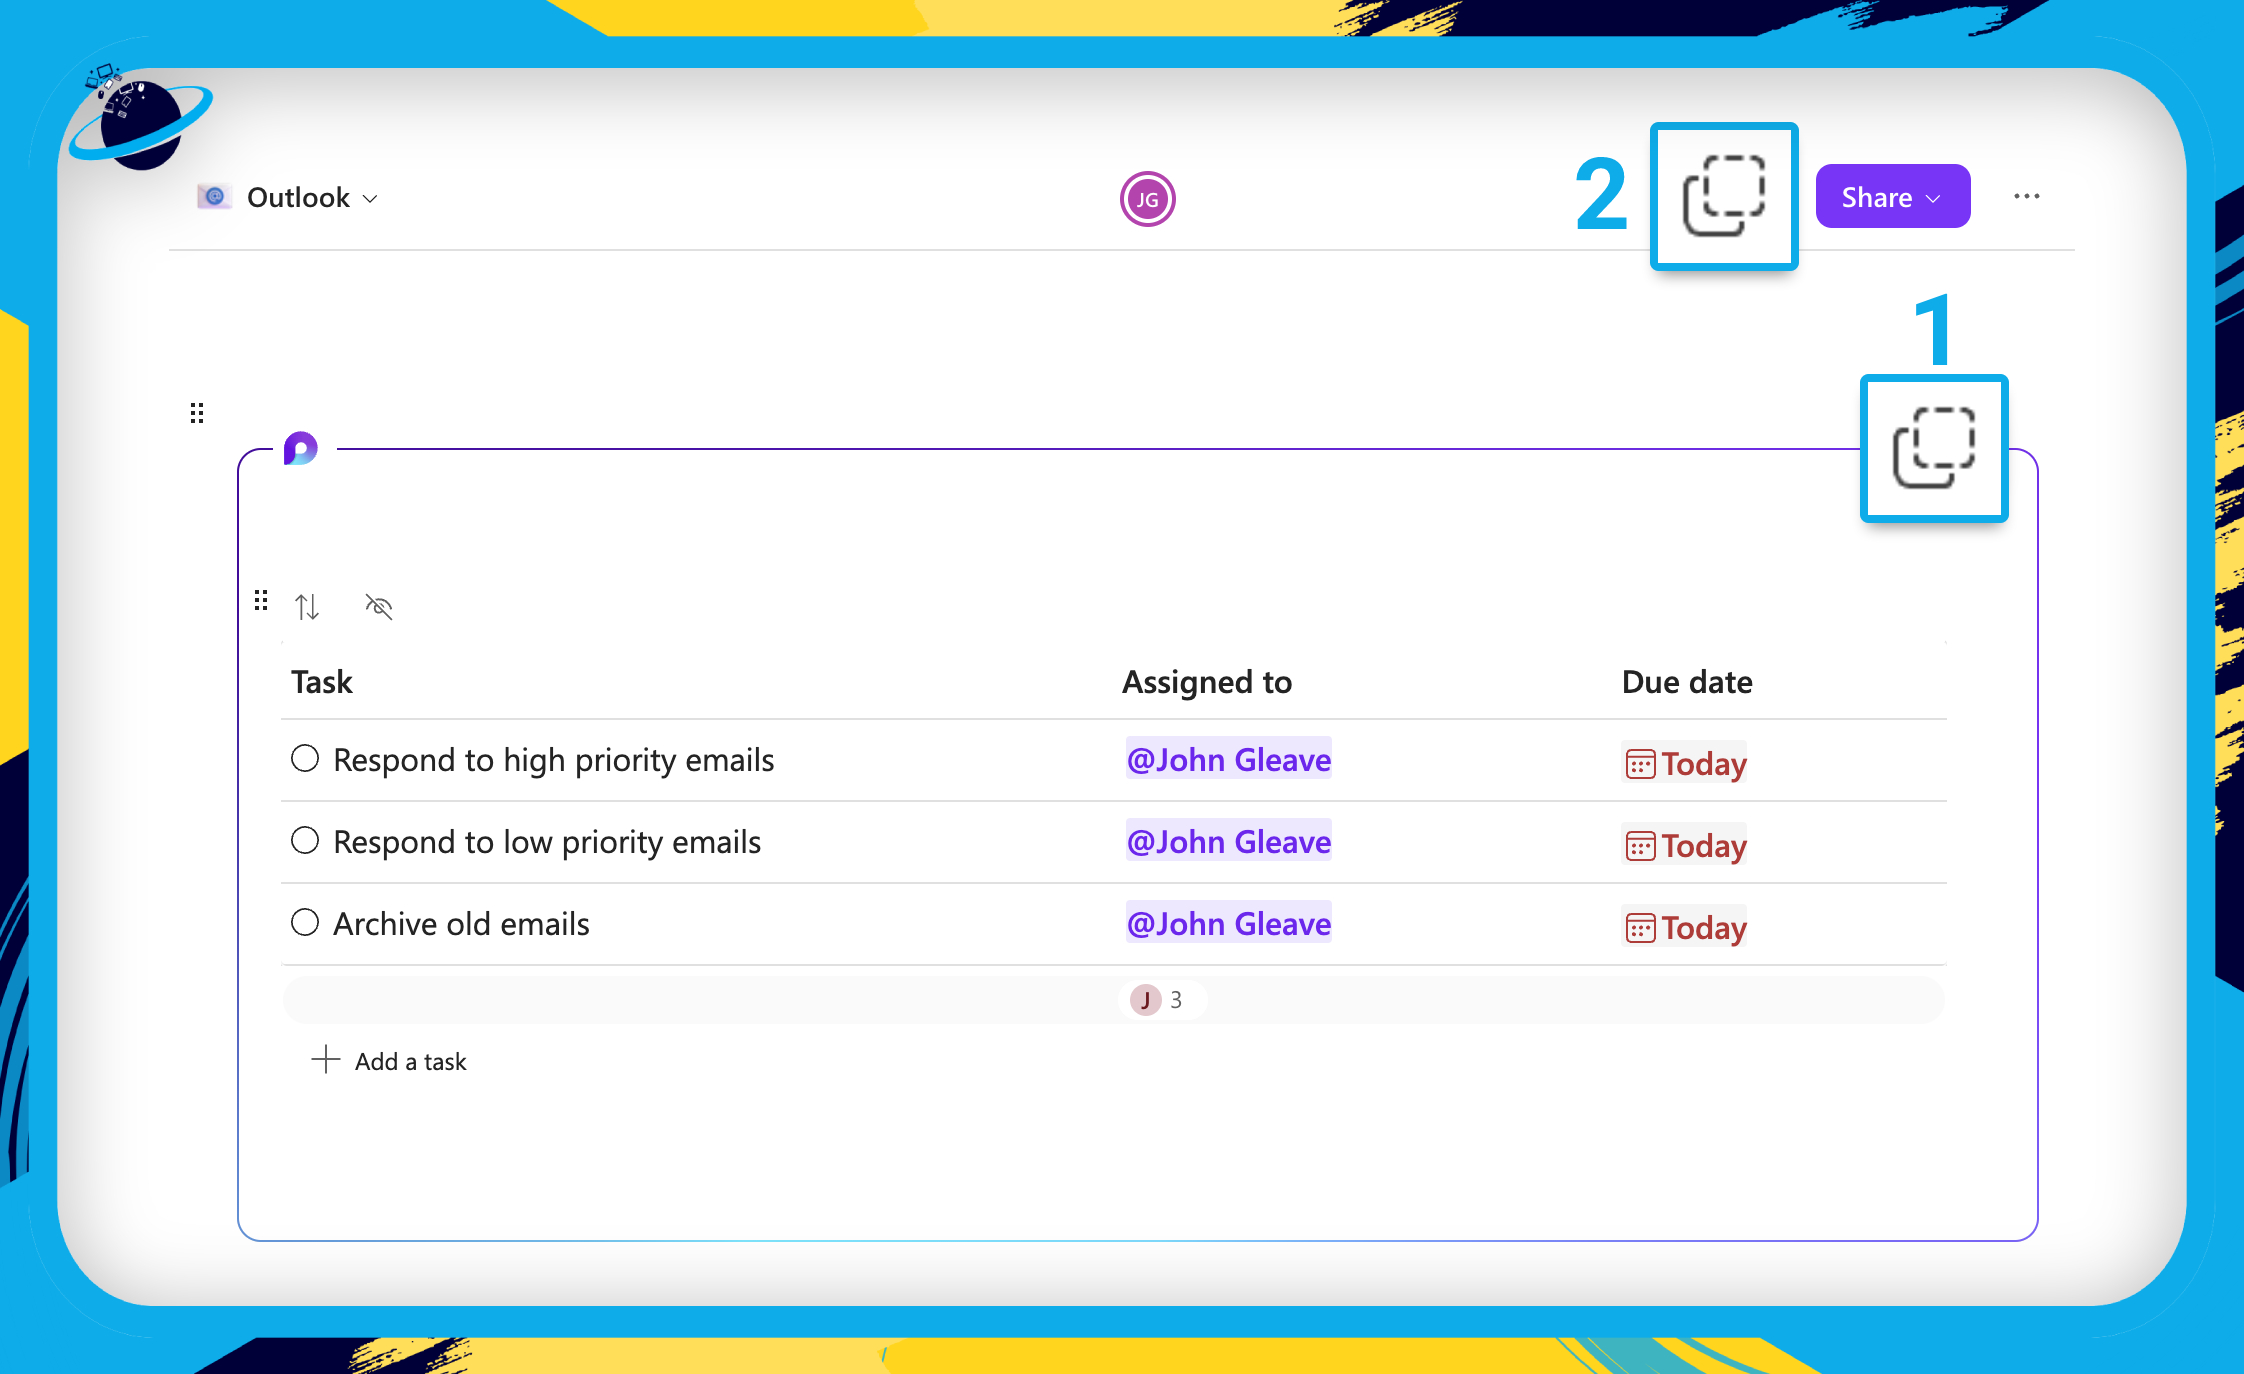
![]() Note: When you @ mention people in your Loop component, their names will appear in the “To” box.
Note: When you @ mention people in your Loop component, their names will appear in the “To” box.
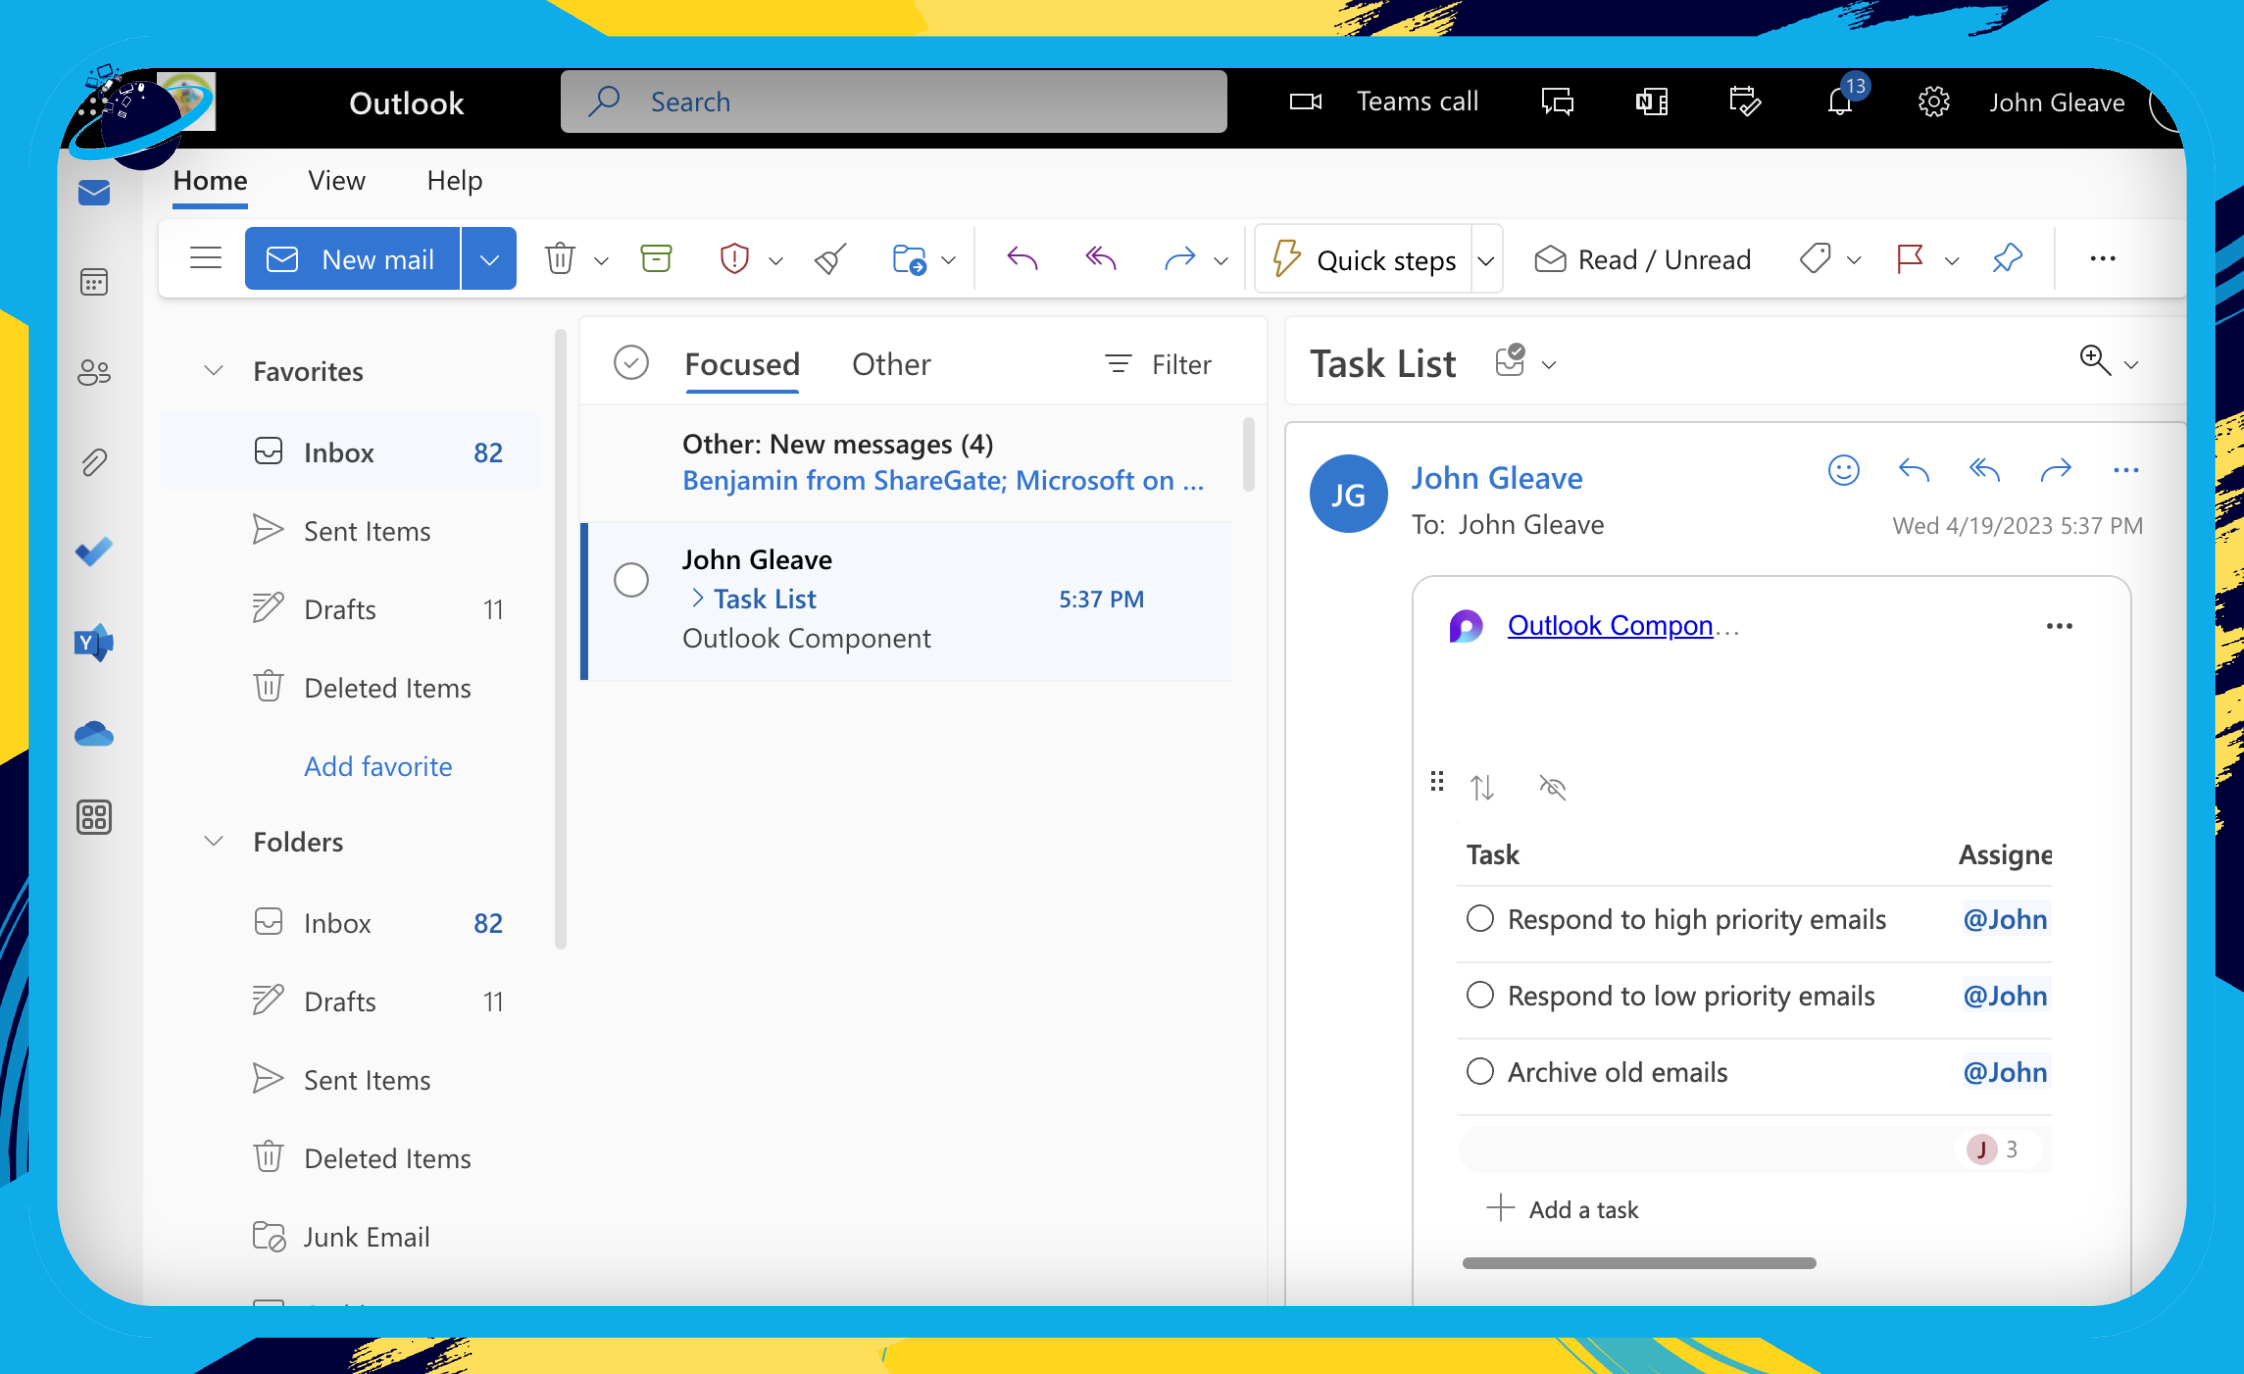
Here’s what the recipient would see when they receive the email:
Insert a Loop component into Outlook
In this section, we’ll show you how to embed a Loop component into Outlook by using the built-in components.
As with Microsoft Teams, Outlook has the option to insert Loop components directly into the application. There are also two additional components in Outlook that you won’t find in the Loop app at present. Those are the Paragraph and Q&A components, which we’ll look at in more detail shortly.
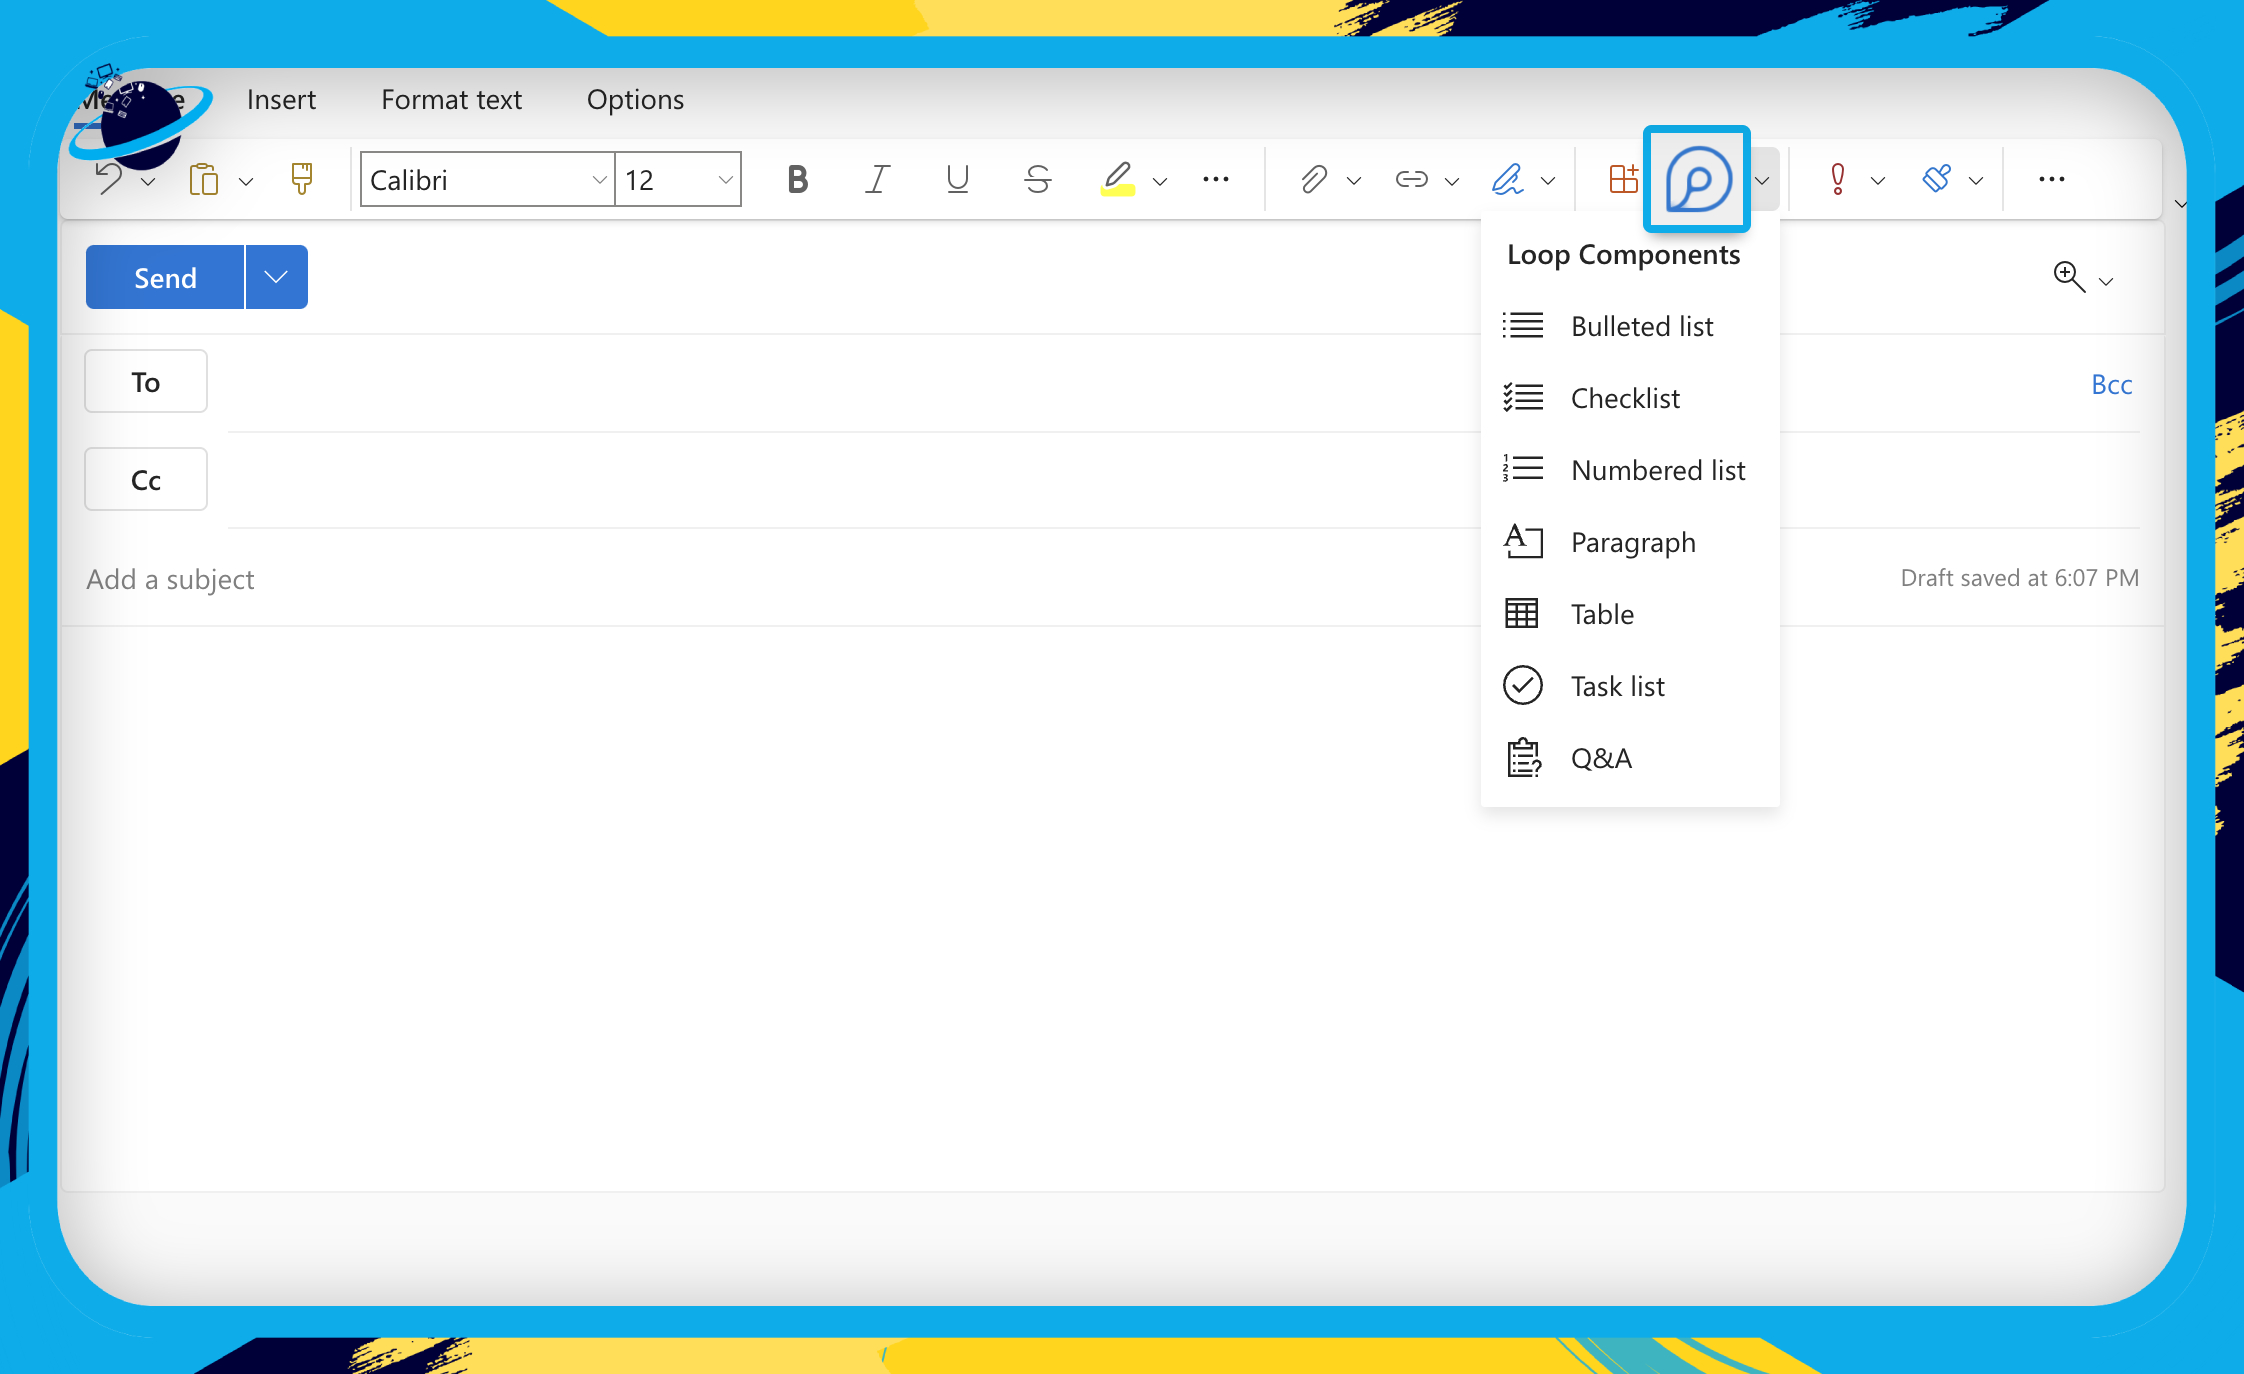
- First, open Outlook.
- Then click “New Mail” at the top.
You can click the ![]() Loop icon at the top of the “Message” tab. Or, head to the “Insert” tab and click “Loop Component.” If the Loop icon is greyed out, click the main body of the email (where you type the message), and it should become active.
Loop icon at the top of the “Message” tab. Or, head to the “Insert” tab and click “Loop Component.” If the Loop icon is greyed out, click the main body of the email (where you type the message), and it should become active.
If you’re using the desktop version of Outlook, try using the ![]() web version instead.
web version instead.
Insert a Q&A Loop component into Outlook
In this section, we’ll show you how to use the Q&A component, which features exclusively in Outlook.
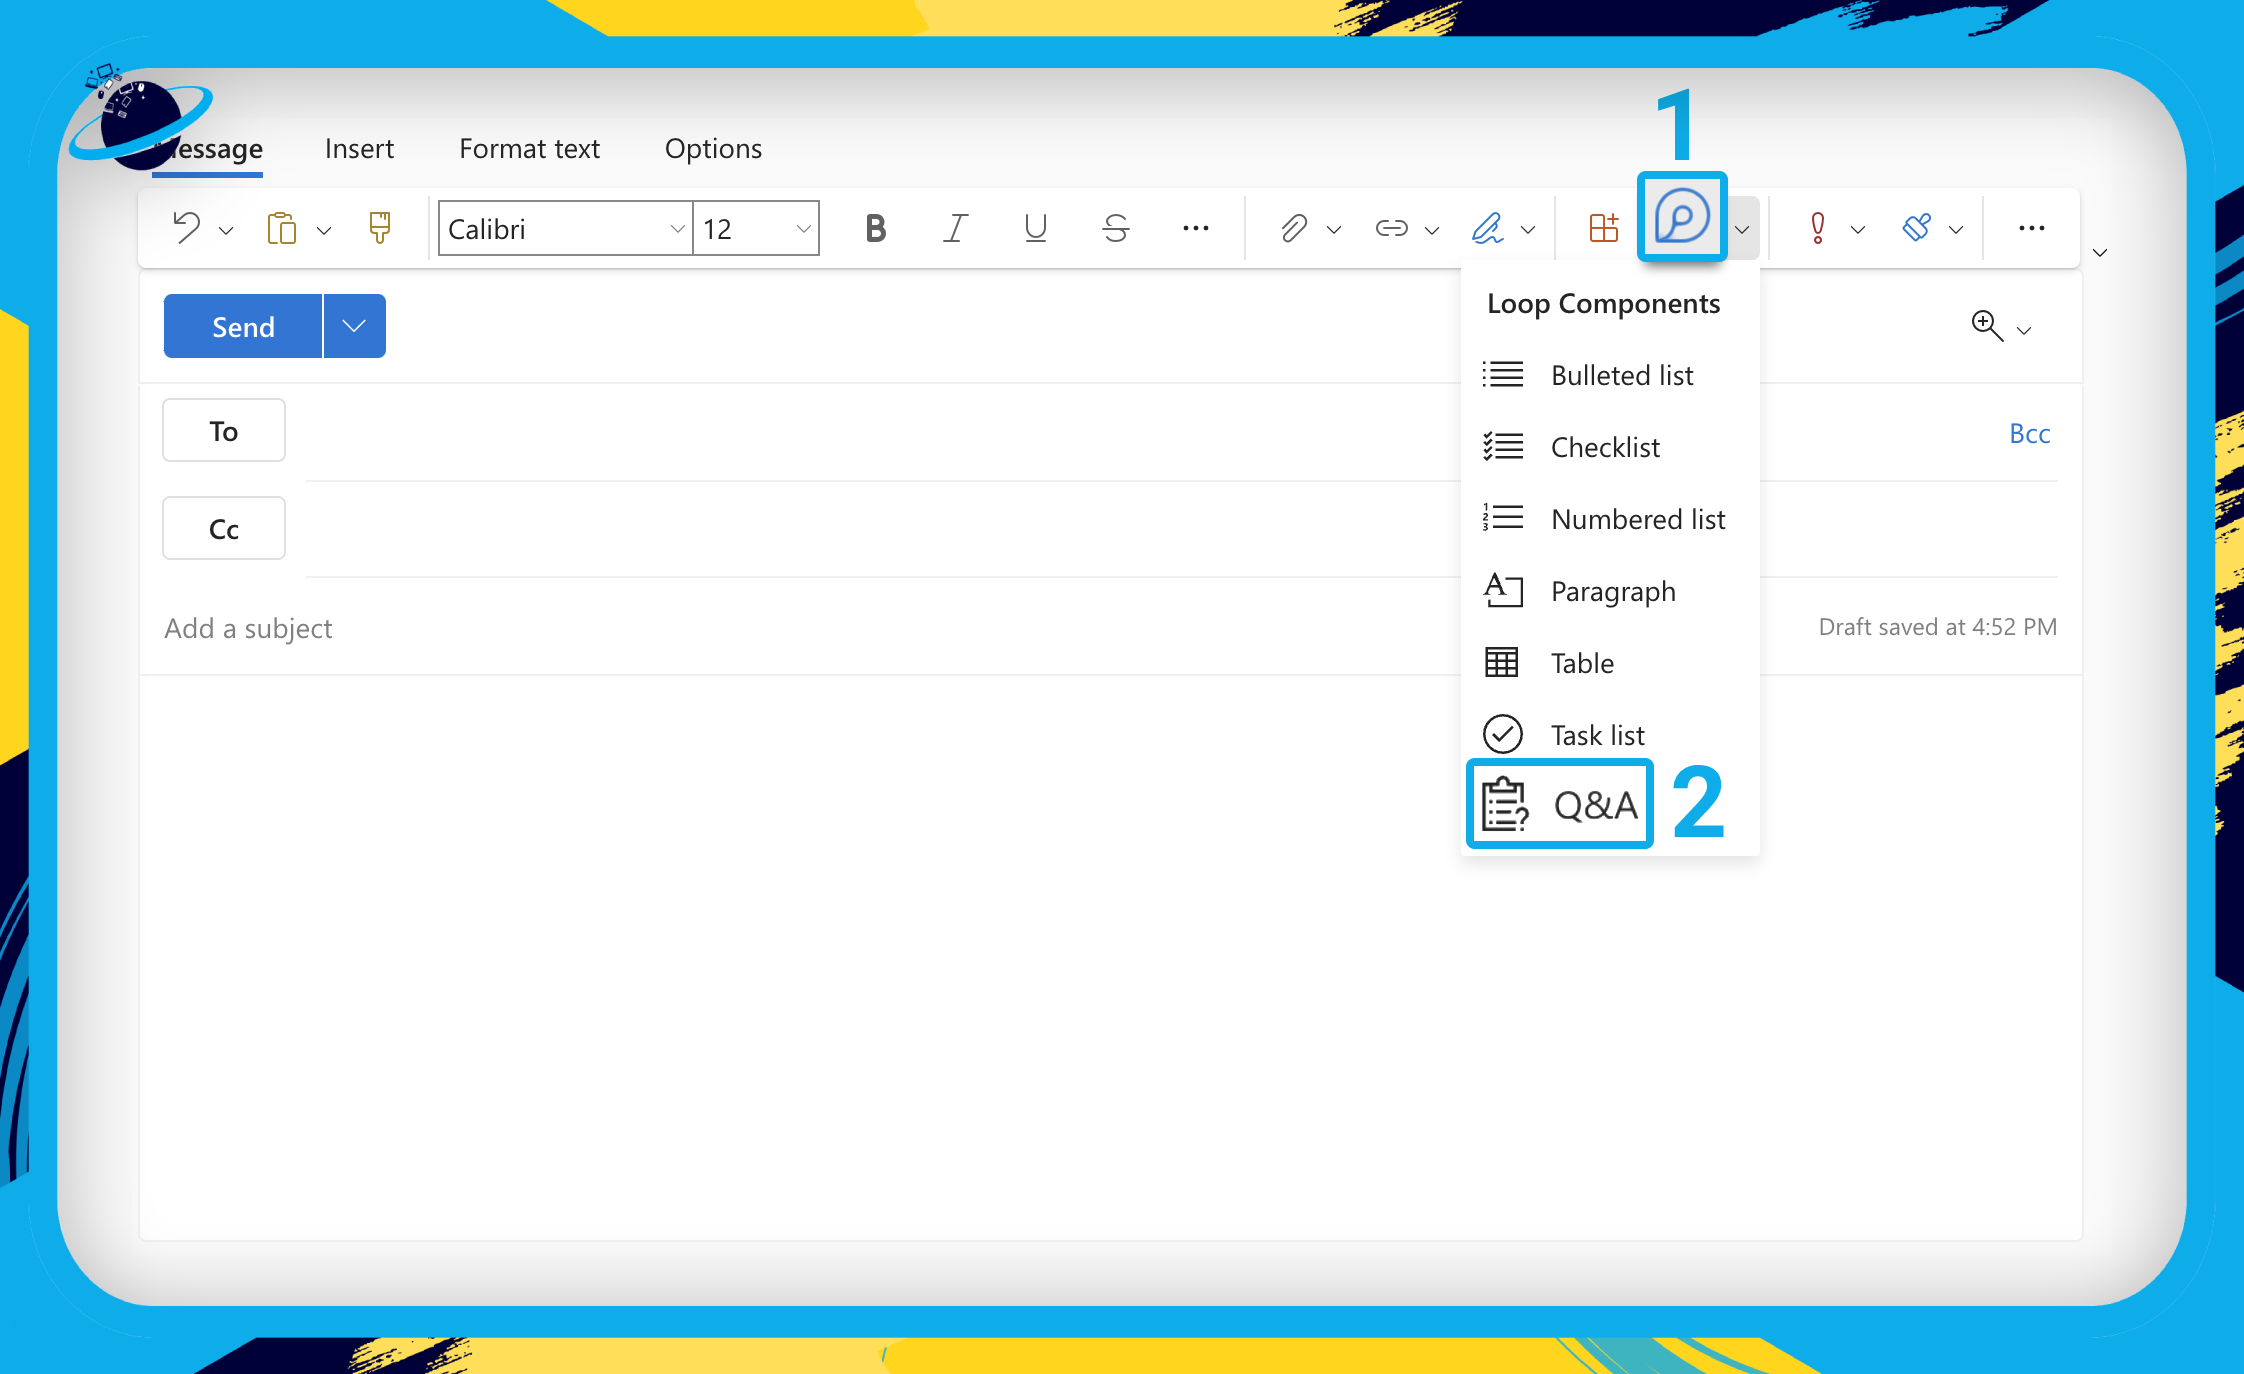
- First, create a new mail in Outlook.
- Click below the “Add a subject” line, then go up and click the Loop icon. [1]
- Select
 “Q&A” from the dropdown. [2]
If you want to ask a multiple choice question, you can do that by adding a checklist to the answers. Otherwise, leave the answers blank so the recipient can add their own.
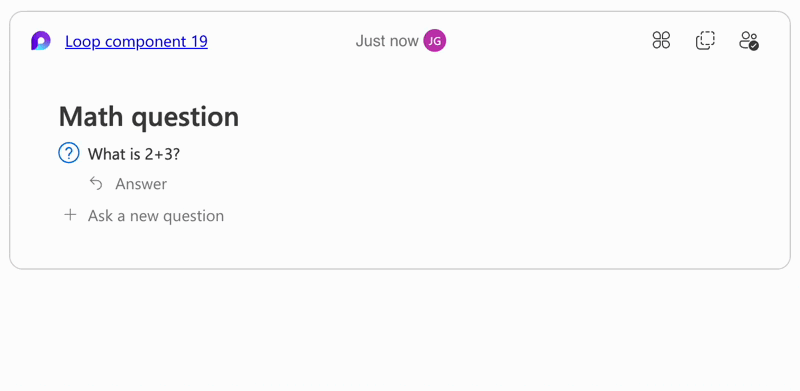
- Add answers and click
 “Answer” to add more.
 - Click
 “Ask a new question” to add more questions.
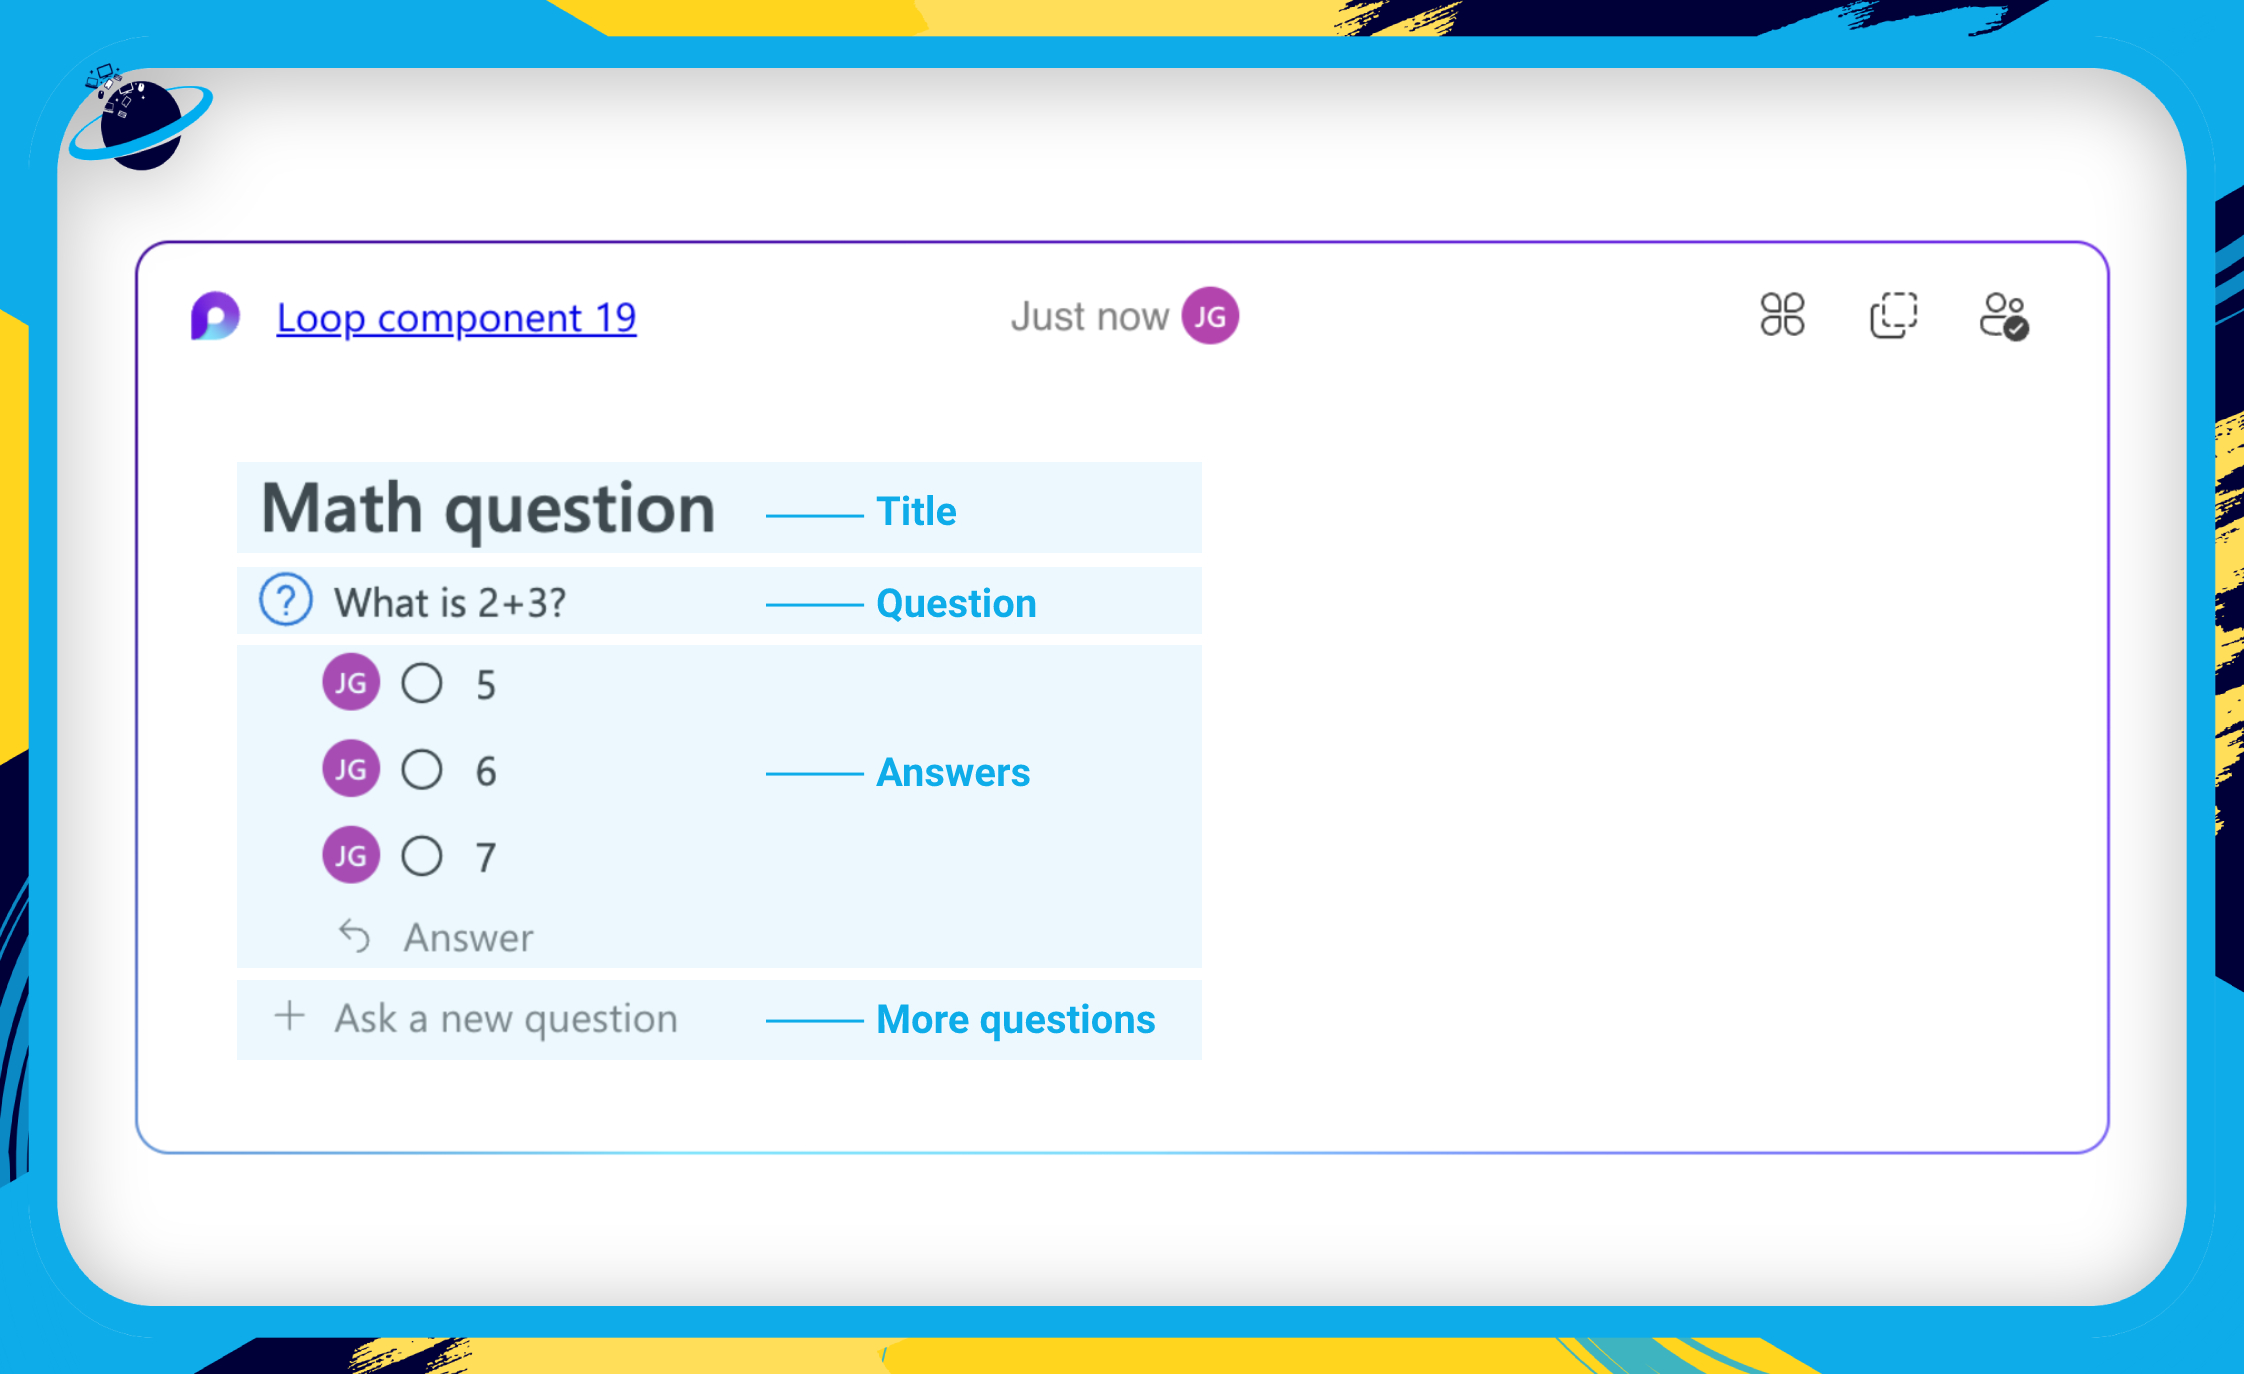
Once complete, send the mail to your chosen recipients. If you want to work on a Q&A template outside Outlook, you need to copy the component and paste it into a different application, such as Loop or Teams.
Add a Loop component to a workspace
In this section, we’ll show you how to keep track of your Outlook components.
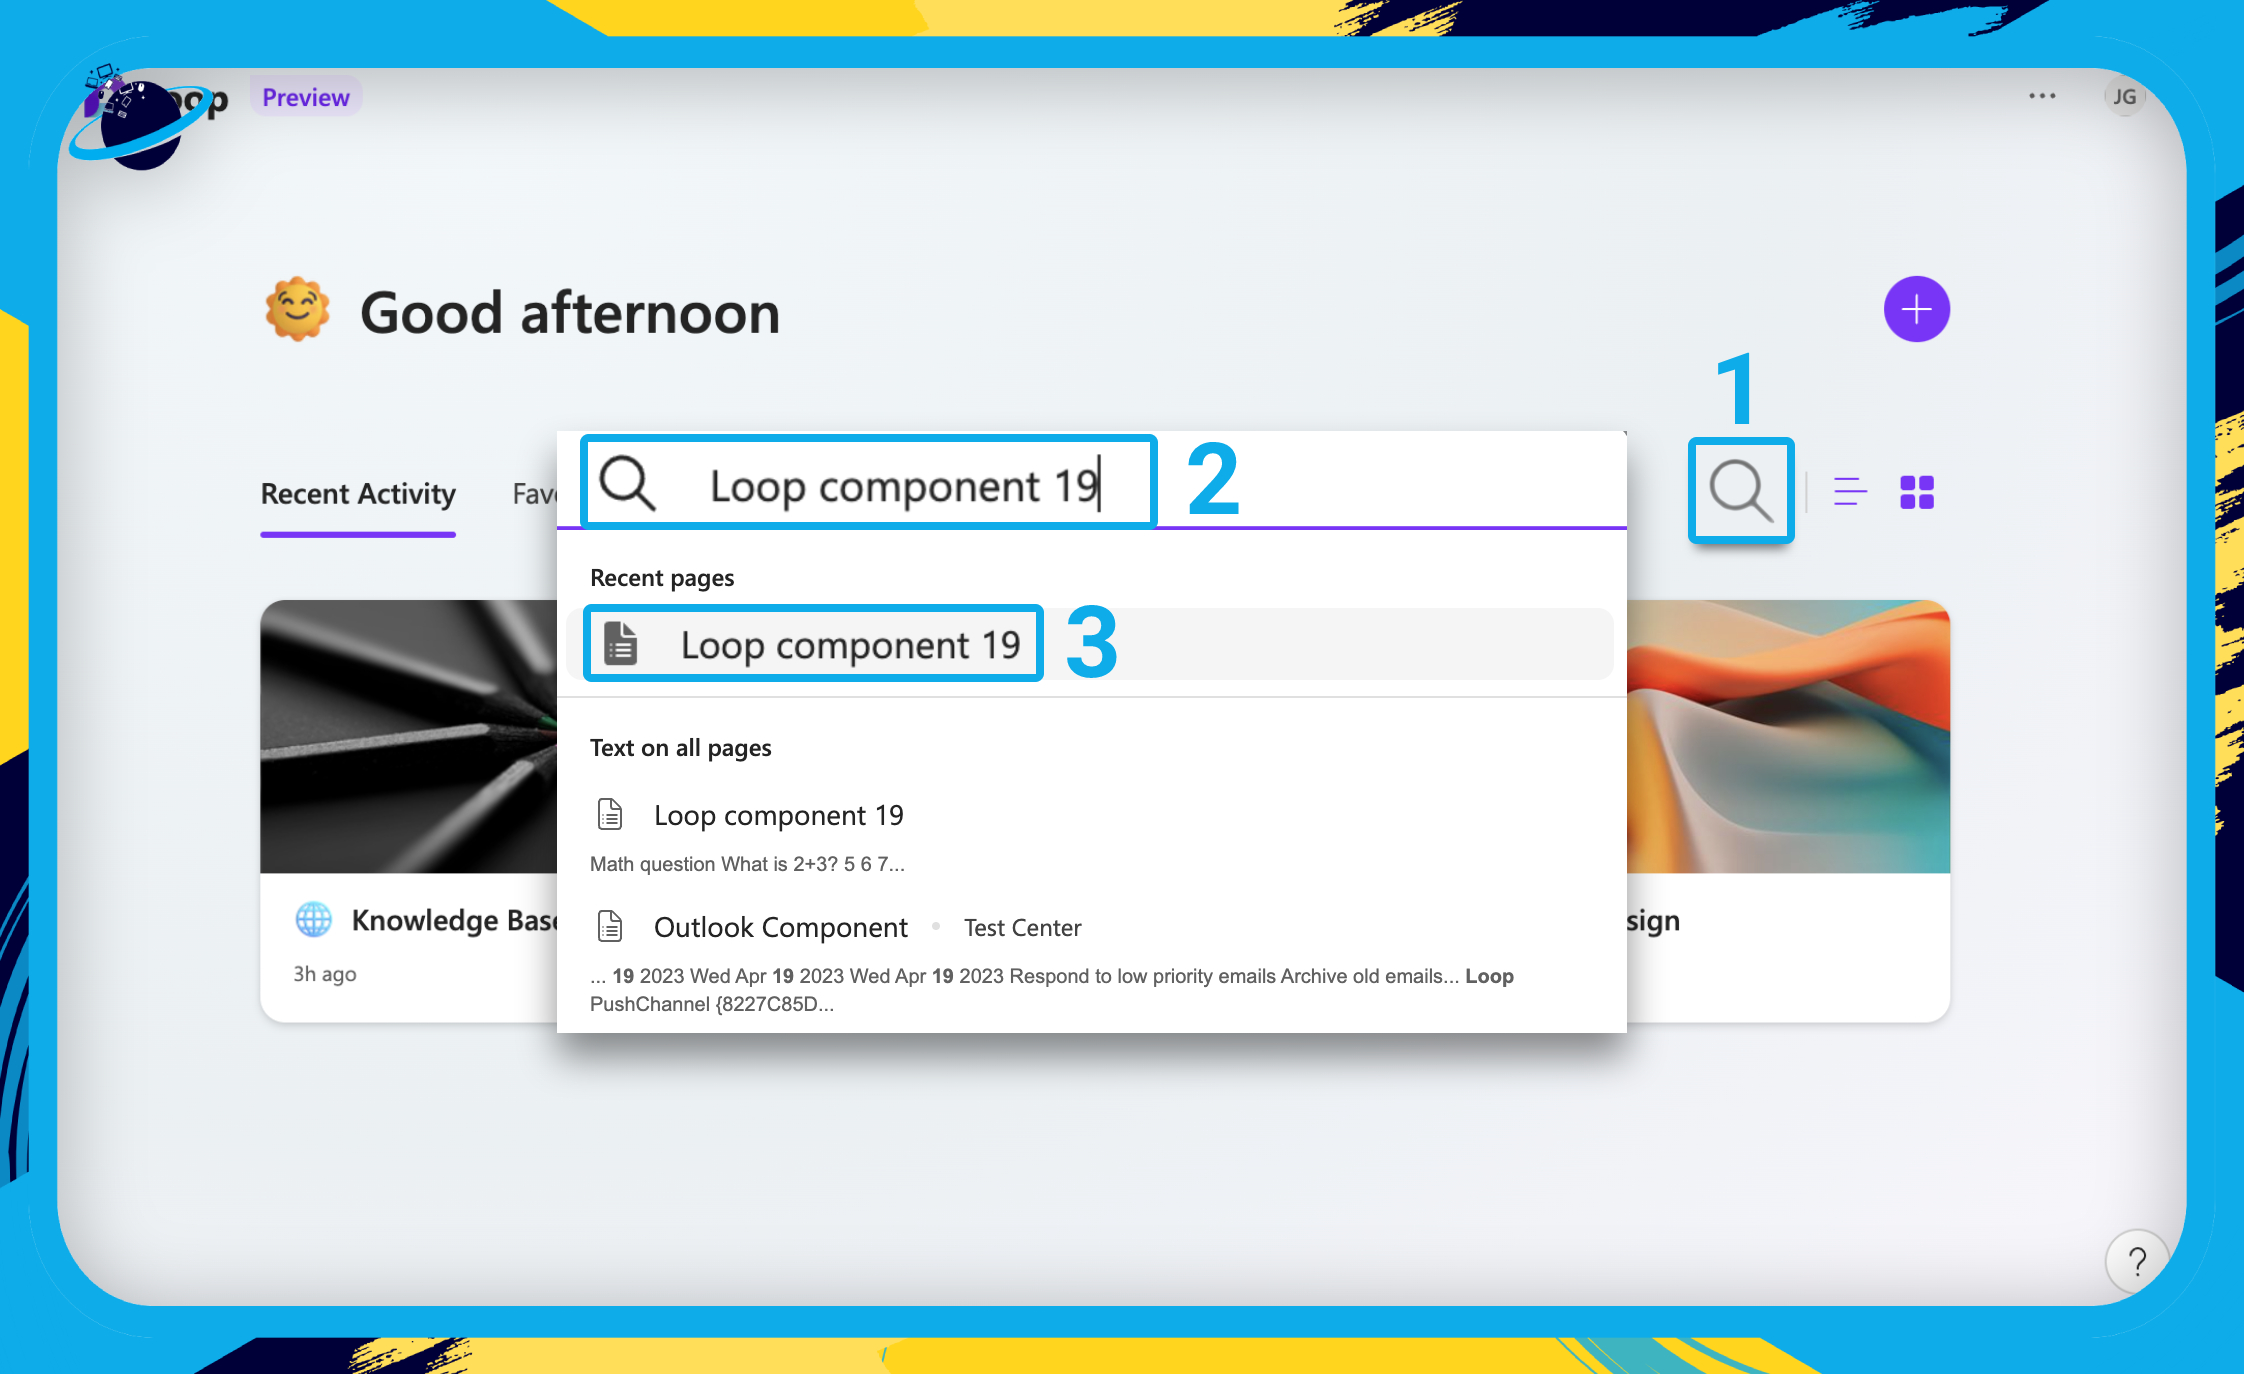
When you create a component in Outlook, it won’t appear in your workspaces. That can make them difficult to keep track of. A simple solution is to check your sent items or keep a copy of the Loop link somewhere. Another way is to add the component to a workspace.
- To do that, check the name of your component in the top left.

- Then head over to the
 Microsoft Loop app.
 - There, click the
 search icon. [1]
 - Search for the component’s name — our’s is “Loop component 19.” [2]
- Then select the component from the results list. [3]
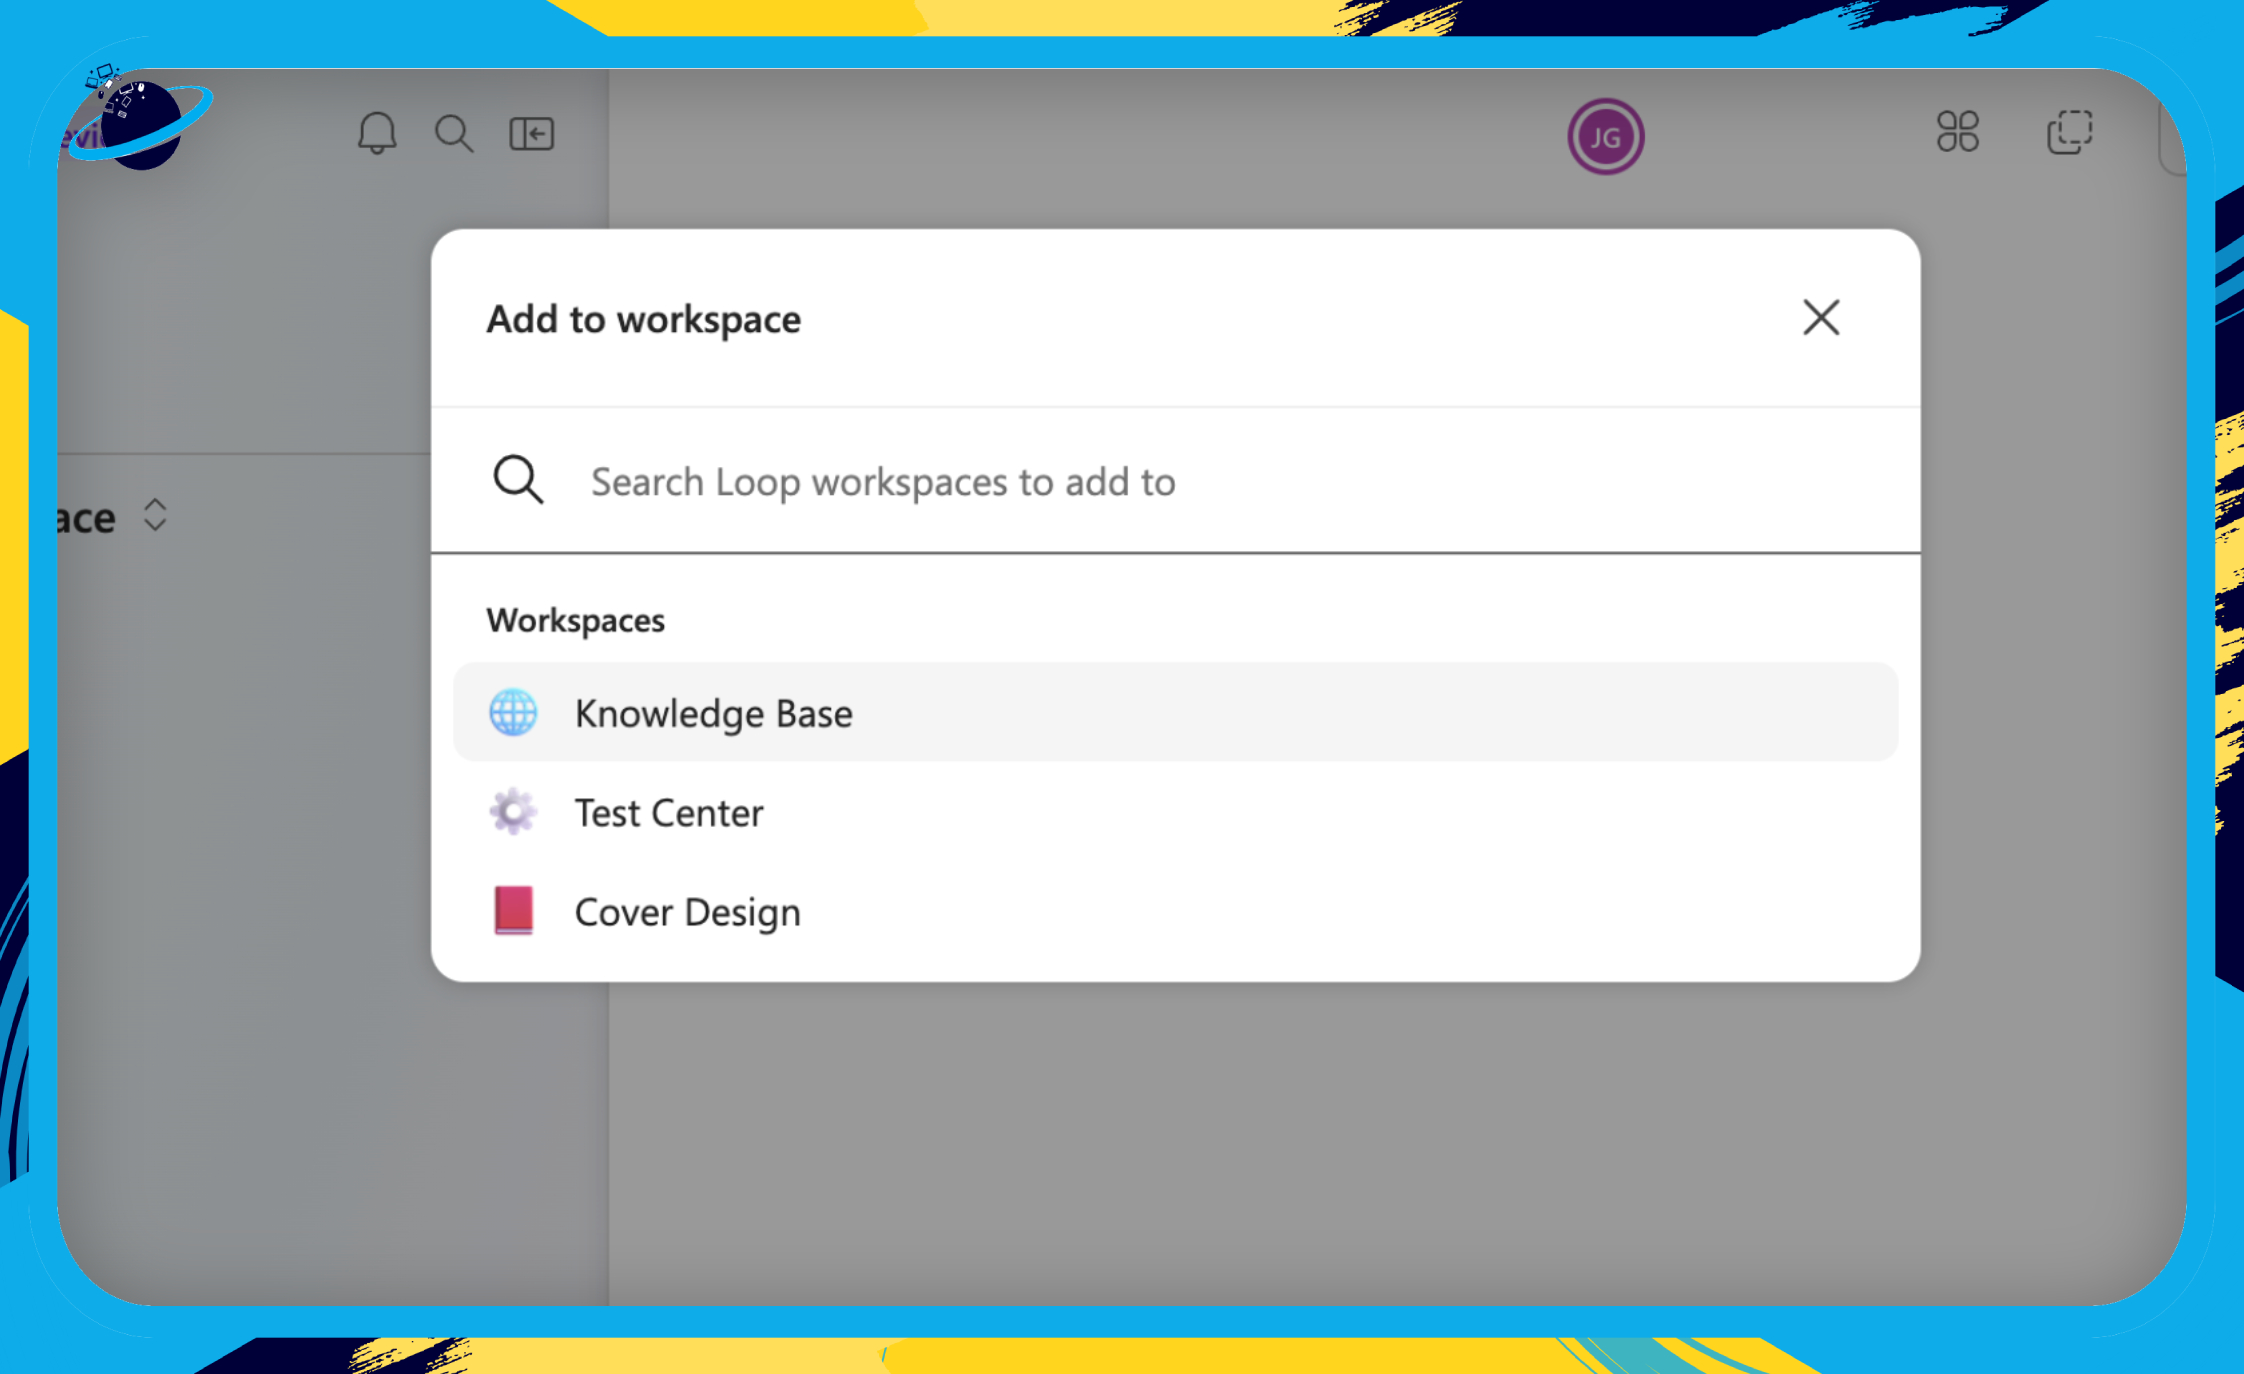
- Now click on the
 “Shared locations” icon in the top right. [1]
 - Click
 “Add to workspace” at the bottom. [2]
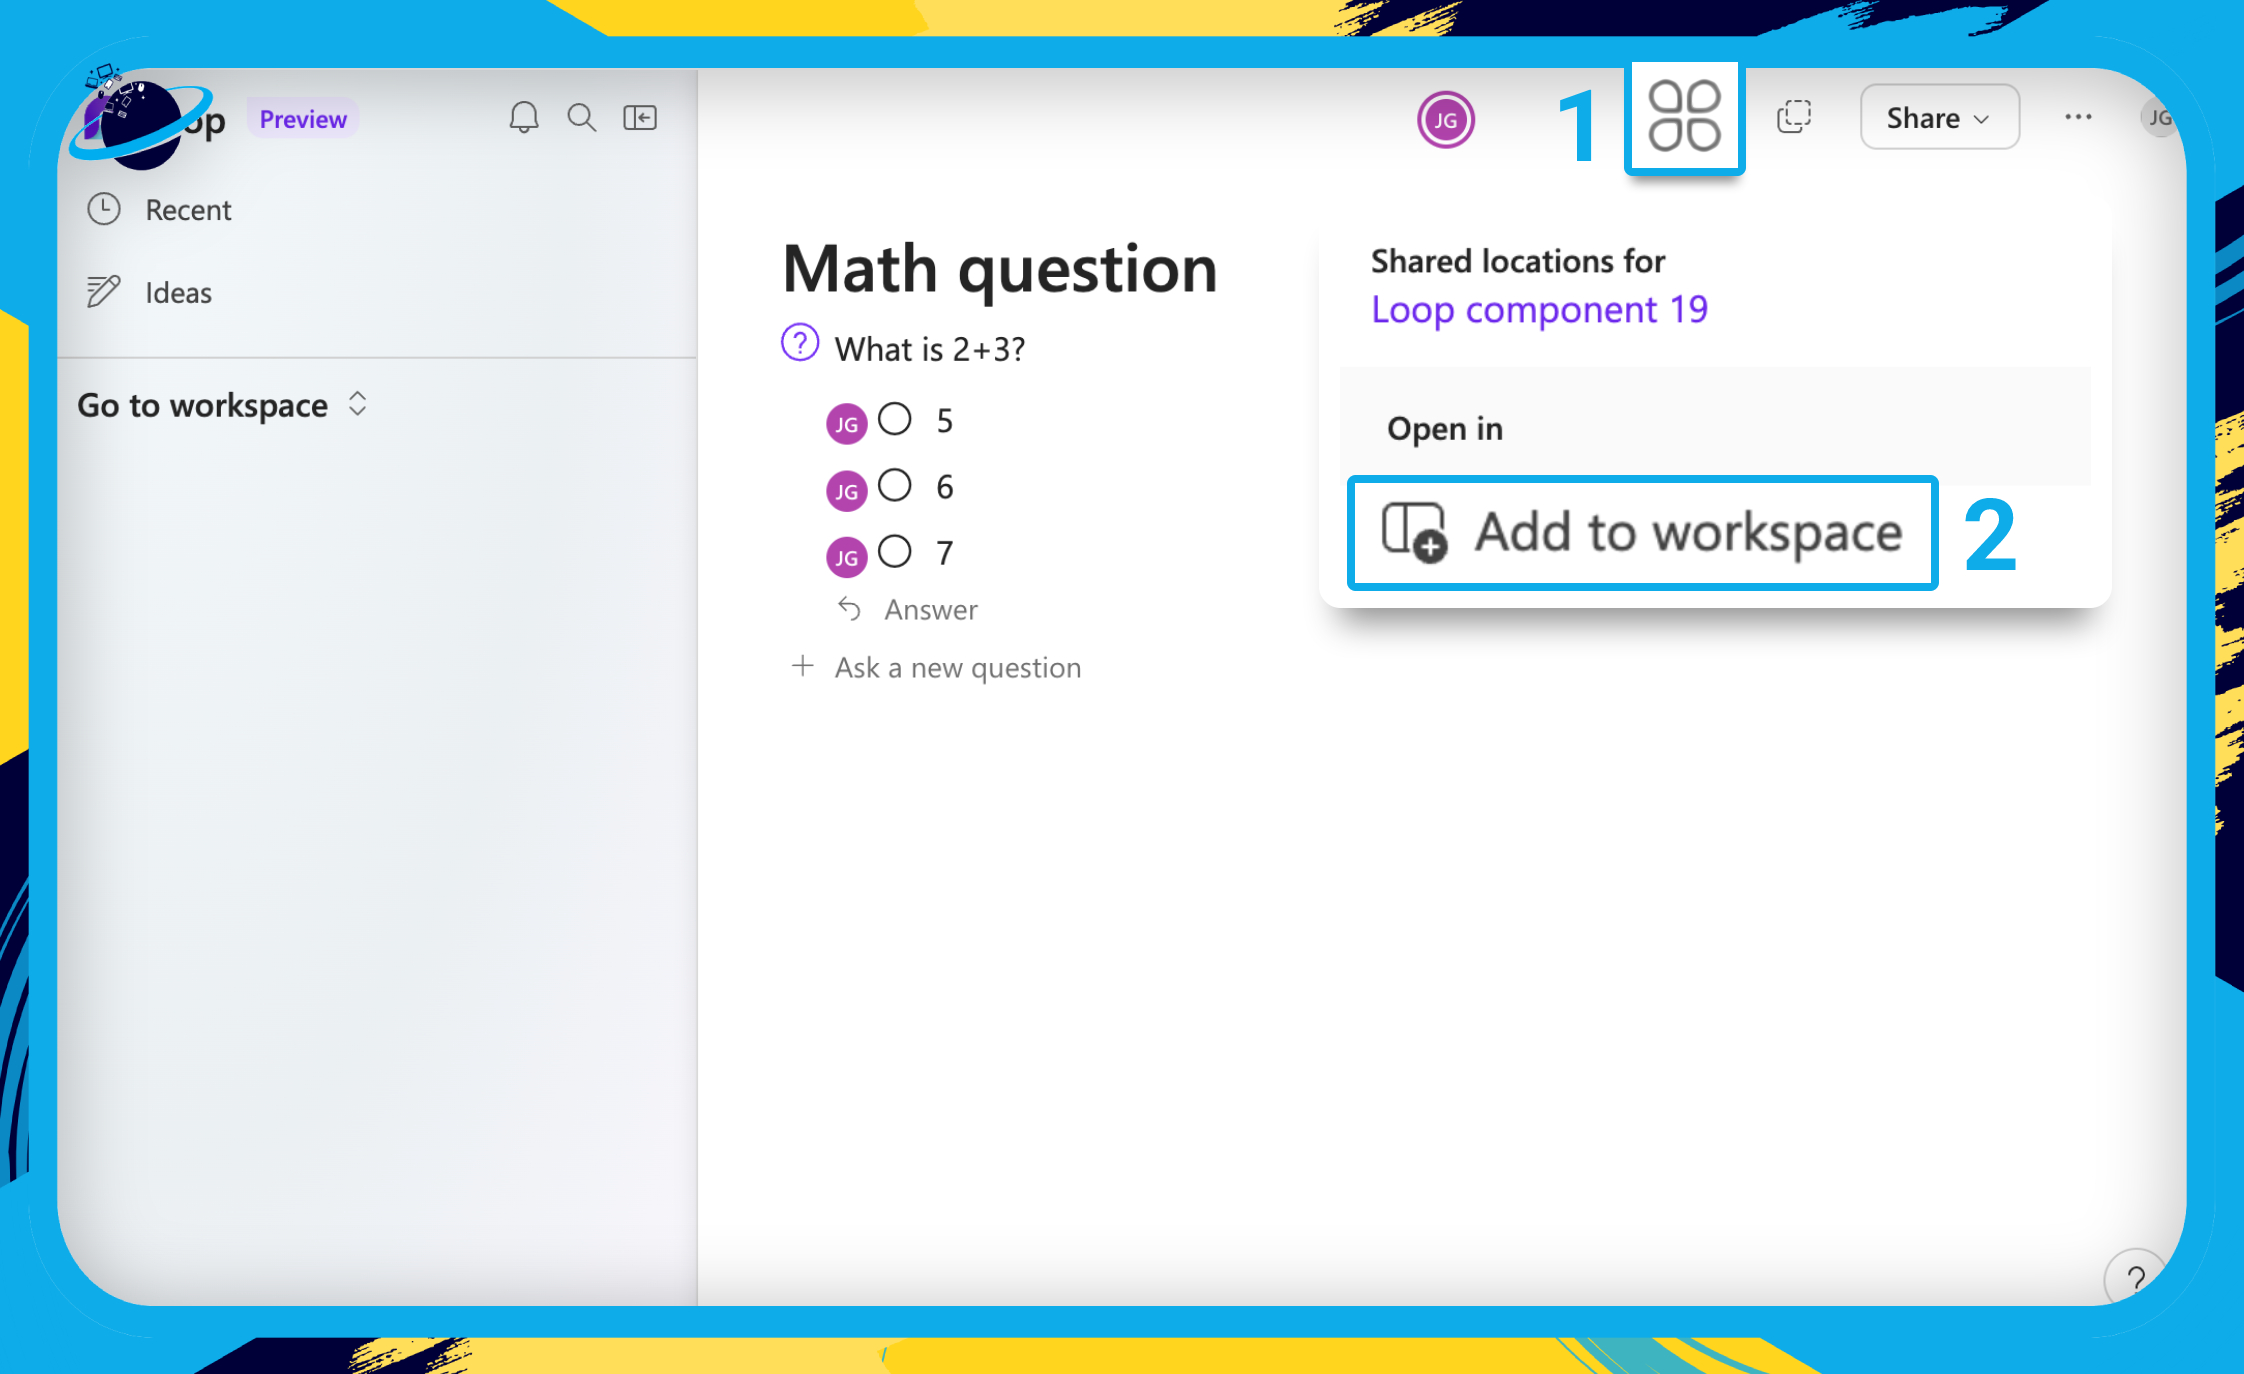
- Finally, select a workspace to add your component to.
Frequently Asked Questions (FAQ)
 How do I Loop in Outlook desktop?
The web and desktop versions of Outlook both support the use of Loop components. You can use them by creating a “New email” and clicking the ![]() Loop icon in the “Message” or “Insert” tabs.
Loop icon in the “Message” or “Insert” tabs.
Mac users can’t currently use Loop in the desktop version of Outlook. Also, access to Loop is limited in the desktop version, and many users may notice that the Loop icon is greyed out.
If the Loop icon is greyed out for you in the desktop version, we suggest using the ![]() web version (OWA) instead.
web version (OWA) instead.
What is a Loop component in Outlook email?
Loop components in Outlook email are sharable blocks, such as tables, lists, and paragraphs, that teams can modify from various locations in real-time.
Regardless of where you share the component, all instances of it will update when the component is modified, which means Loop components are excellent for project collaboration.

 Conclusion
To use Microsoft Loop in Outlook, your organization will need to ![]() enable Loop. Once enabled, you can create Loop components in the Loop app and paste them into a “New mail.” You can then send the components to people in your organization, who can modify them. All modifications will update across all instances in real-time.
enable Loop. Once enabled, you can create Loop components in the Loop app and paste them into a “New mail.” You can then send the components to people in your organization, who can modify them. All modifications will update across all instances in real-time.
If you use the inbuilt Loop components in Outlook, you can @ mention people without having to share and notify. However, the components you create in Outlook will not appear in your Loop workspaces.
To add an Outlook component to a workspace, search for the name of your component in the ![]()
![]() Microsoft Loop app. Select the component, then click the “Shared locations” icon at the top. Select “Add to workspace” from the dropdown. And finally, choose a workspace.
Microsoft Loop app. Select the component, then click the “Shared locations” icon at the top. Select “Add to workspace” from the dropdown. And finally, choose a workspace.
If the option to insert Loop components is greyed out, try clicking under the “Add a subject” line. If Loop is still greyed out and you’re using the desktop version of Outlook, try the ![]() web version (OWA) instead.
web version (OWA) instead.
Thanks for reading.