Whatever the reason you need to add a delegate to your inbox, it’s a difficult process without instructions because there are quite a few steps. To make setting up delegates a simple process, I created this step-by-step guide with screenshots.
Here’s how you can add a delegate to your inbox in Outlook:
- Open Outlook
- Right-click the root folder in Outlook and click Folder Permissions
- Click Add… and select the user within your organization that you want to delegate access to
- Select the permissions that you want the delegate to have
- Click OK
After you’ve done the process outlined above, you might want to add your inbox to the delegate’s Outlook desktop client folders so they can easily access your account as needed. The process below details how you can add your folder to the delegate’s desktop client:
- Open Outlook
- Click File and then Account Settings
- Click Account Settings…
- Click your email address and then Change…
- Click More Settings
- Click Advanced and then Add…
- Type in the mailbox you want to add
- Click OK
- Leave the Account Settings window and return to the Outlook home page
- The inbox will be in the sidebar. Open it
Throughout the rest of this blog post, I’m going to go through the process of adding a delegate to my inbox on Outlook, demonstrating the entire process with screenshots. Follow the step-by-step guide below to easily add a delegate to your inbox.
   |
Add A Delegate To Your Inbox In Outlook [Step-By-Step With Screenshots]
Whatever the reason you want to add a delegate to your inbox, it’s a really simple process if you follow the process outlined below.
- Open Outlook
- Right-click the root folder in Outlook and click Folder Permissions
- Click Add… and select the user within your organization that you want to delegate access to
- Select the permissions that you want the delegate to have
- Click OK
Please note that you can only follow the steps outlined above if you [and the delegate] have Microsoft Exchange Server accounts. If you are using Outlook for Microsoft 365, Outlook 2019, or Outlook 2016, you can follow the process we’ve detailed.
Here’s the entire process — with screenshots.
- Open Outlook
- Right-click the root folder in Outlook and click Folder Permissions
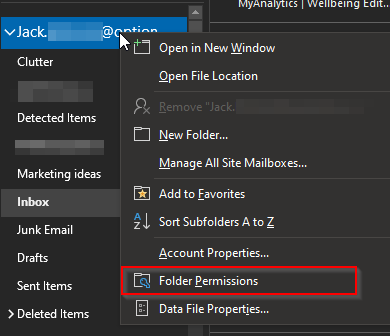
The root folder will be the one with your email as its title [I’ve highlighted this in the screenshot next to number 1].
Right click this and then click Folder Permissions, which will open up the settings that allow you to choose who you delegate your inbox to and customize the permissions they have.
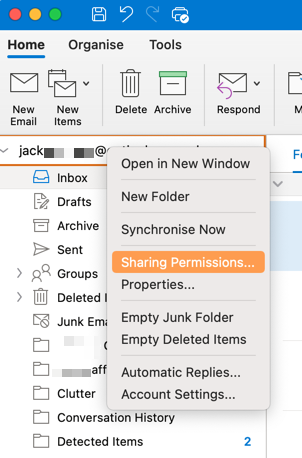
Note that the process is slightly different if you are using Outlook on a Mac. If you are using Outlook on a Mac, right click on the root folder and click Sharing Permissions…[as shown in the screenshot below].
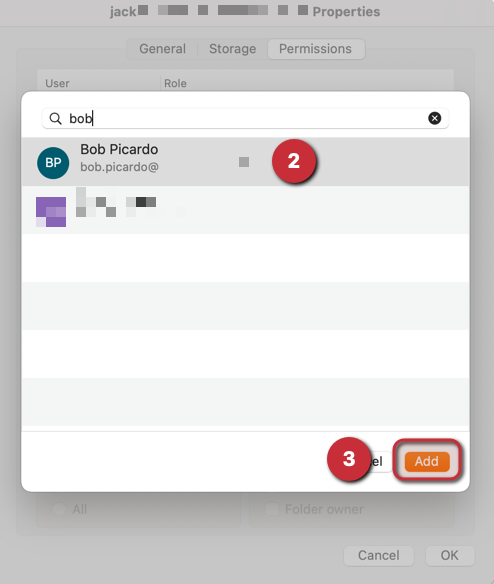
- Click Add… and select the user within your organization that you want to delegate access to
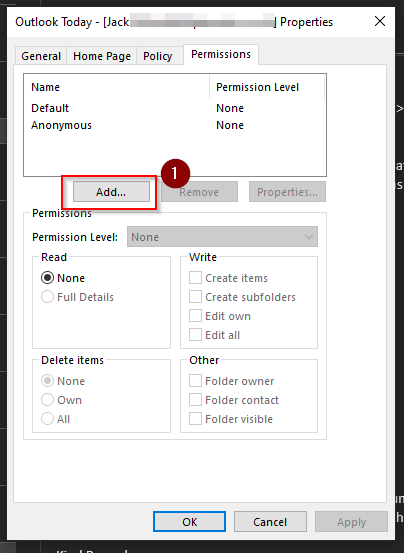
Click Add [Outlook on Windows/Add User… [Outlook on Mac] and then search for the user that you want to delegate inbox access to. For the purposes of this demonstration, I’ve created a fake user [Bob Picardo] who we’re going to make a delegate of my inbox.
Remember, this will look slightly different on a Mac. You should see something similar to the screenshots below.

- Select the permissions that you want the delegate to have
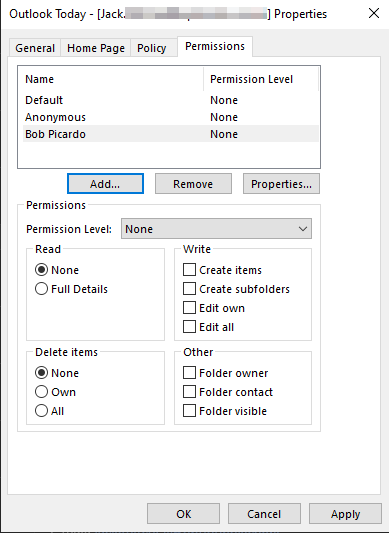
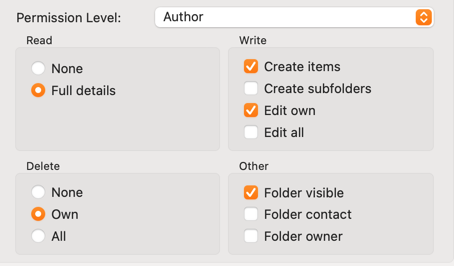
Once you’ve chosen a delegate in the previous step, you can decide on the permissions you want them to have. The screenshot above is from Outlook on a Mac, although it looks very similar on Windows.
As you can see, there are a wide range of permissions available that you can assign to delegates. There are some pre-made configurations created by Microsoft, or you can manually choose the permissions that you want the delegate to have.
Rather than giving the delegate complete access over your inbox [by assigning all permissions], it’s a good idea to consider why you’re adding a delegate to your inbox and choosing just the permissions they’ll need. This enables you to keep control over your data and certain features you don’t want your delegate controlling.
For example, if you just want a delegate to read and respond to your emails, select the ‘Author’ permission level and they’ll be able to read emails, delete emails they create, and create and edit items (emails and calendar entries etc.).
- Click OK
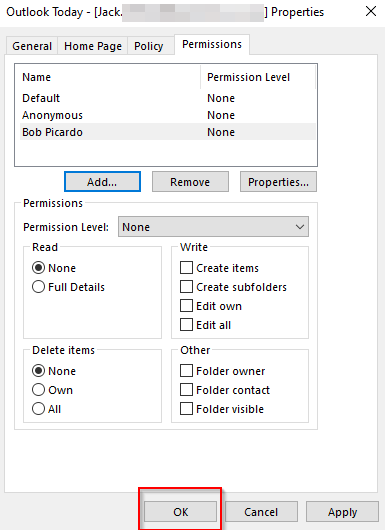
Once you’ve chosen the permissions that you want the delegate to have, click OK.
Modifying the permissions assigned to the delegate are as simple as following the steps through, accessing folder permissions/sharing permissions again and customizing the permissions as you see fit. You can also follow that process to remove a delegate if you no longer want them to have the permissions you’ve granted.
The delegate can now open up your inbox and use it in the way you’ve decided.
Next, I’ll walk you through adding your folder to the delegate’s Outlook desktop client.
   |

How To Add Your Inbox To A Delegate’s Outlook Desktop Client
Once you’ve followed the process outlined before, you’ll need to add your inbox to the delegate’s Outlook desktop client to make it easily accessible. Fortunately, this is an easy process.
- Open Outlook
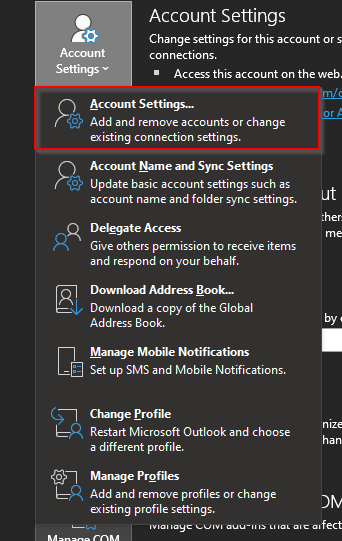
- Click File and then Account Settings
- Click Account Settings…
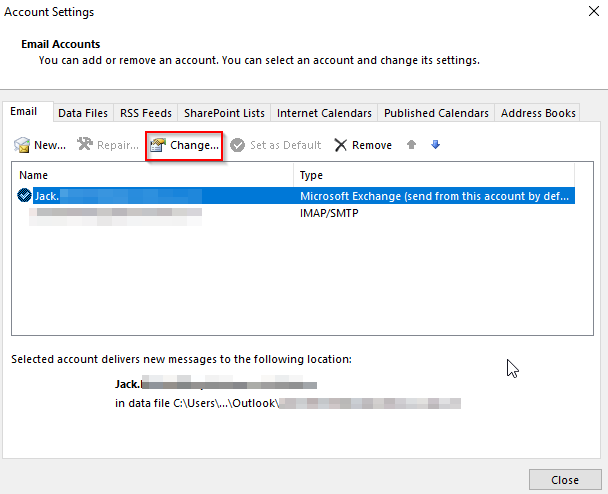
- Click your email address and then Change…
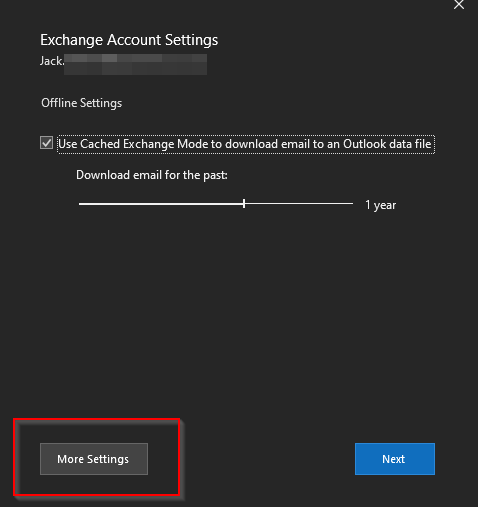
- Click More Settings
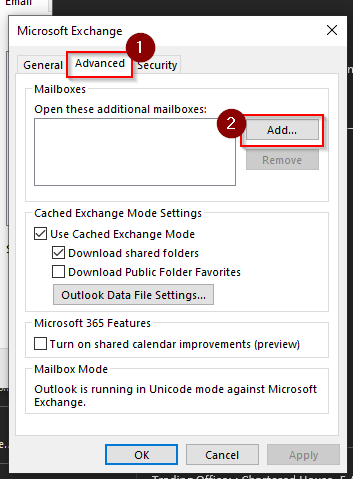
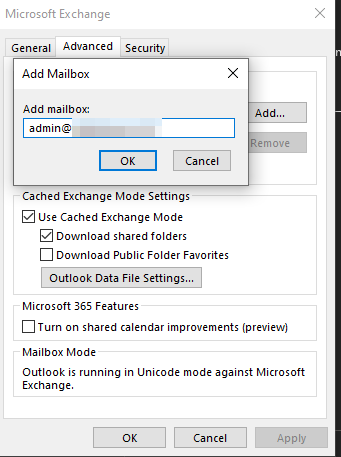
- Click Advanced and then Add…
- Type in the mailbox you want to add
- Click OK
- Leave the Account Settings window and return to the Outlook home page
- The inbox will be in the sidebar. Open it
Here’s a step-by-step guide with screenshots.
- Open Outlook
- Click File and then Account Settings

- Click Account Settings…
- Click your email address and then Change…
- Click More Settings
- Click Advanced and then Add…
- Type in the mailbox you want to add
- Click OK
- Leave the Account Settings window and return to the Outlook home page
- The inbox will be in the sidebar. Open it
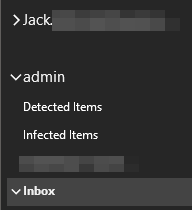
As you can see, the mailbox I added is now in my list of mailboxes. I can open the inbox and see the emails received by that email address.
If you are unable to open your inbox on the delegate’s Outlook desktop client, this suggests you haven’t shared your mailbox properly in the steps outlined previously. Return to the previous steps and ensure you followed them all precisely and set all the necessary permissions.
Thanks for reading! If you have any questions, please leave a comment below and we’ll happily help!