Coordinating requires lots of communication— this can be frustrating without frequent meetings. If you’ve found yourself organizing several meetings, there’s a good chance you’ve forgotten an important detail, missed an invitation, or made a mistake. Such hiccups make editing functions crucial; fortunately, Teams is not lacking them.
Although you’ll add most of your meeting’s relevant info during its conception and creation, Teams permits you to edit and further build upon your scheduled meetings. If you’d like to learn how to do this, refer to the brief guide below.
- Launch your Teams client.
- Open the Teams/Outlook calendar.
- Open your event/meeting’s pop-out menu.
- Select the edit button.
- Configure your meeting accordingly
In this post, I will help you understand how you can edit a scheduled meeting, what you can edit, and what you can change during an ongoing meeting.
As you can see, I have provided several hyperlinks below. If you’re looking for a specific piece of information, you can refer to the following links, which will help you access relevant content quickly. Hence, you won’t have to waste time scrolling.
- How to edit a scheduled meeting in Microsoft Teams
- What elements of a Teams meeting can I edit
- Blog post recap
How to edit a scheduled meeting in Microsoft Teams to add more information
When you schedule a meeting, Microsoft Teams enables you to configure several factors concerning your Teams meeting. But, of course, that’s not the only opportunity Teams will offer. Although most meeting organizers will finish setup immediately, they’re still human— some will make mistakes. In such a case, the correct course of action, assuming you’re aware, is to edit your scheduled meeting. In the in-depth, step-by-step guide below, I will show you how.
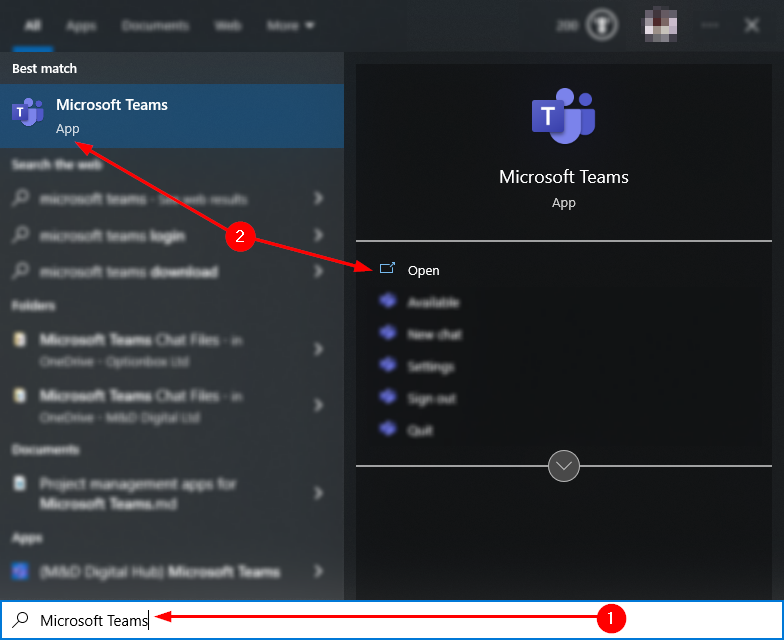
Step 1 — Launch the Microsoft Teams client
Alright. It’s about time we got to work. When you’re ready to start, hit the “Start” key. Then, start typing “Microsoft Teams.” When you spot the correct result under “Best match,” tap the “Enter” key. If you prefer to use the Teams’ web client, you can launch it via Microsoft 365’s Office portal.
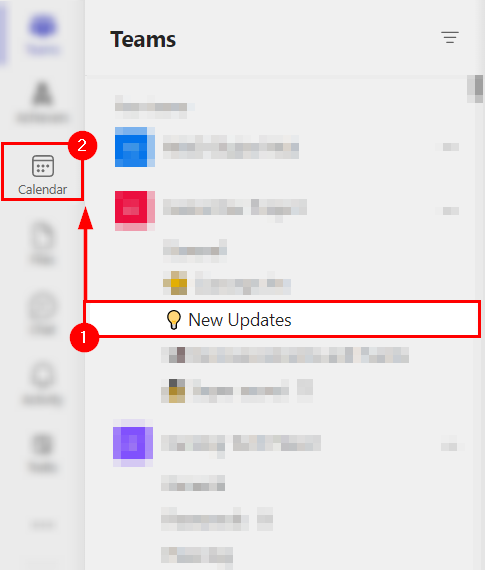
Step 2 — Open the Outlook/Teams calendar
One objective down. Now we need to make our way to Outlook’s/Teams’ calendar. Fortunately, it’s pretty easy to find. Focus on the sidebar on the left side of the window— have you spotted it? It’s a button labeled “Calendar,” the icon unsurprisingly depicts a traditional calendar. I didn’t see that one coming.
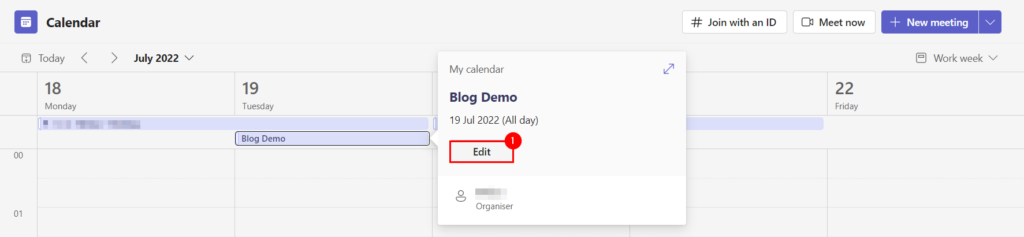
Step 3 — Enter the event/meeting editor
OK, we’ll be finishing shortly. You’re currently looking at your Teams/Outlook calendar. The calendar details and visually displays your scheduled events and meetings. Hence, depending on your organization’s utilization of Teams, the calendar will be either empty or quite busy. Regardless, you need to find and select your Teams meeting— this will produce a pop-out menu, wherein you will click “Edit.”
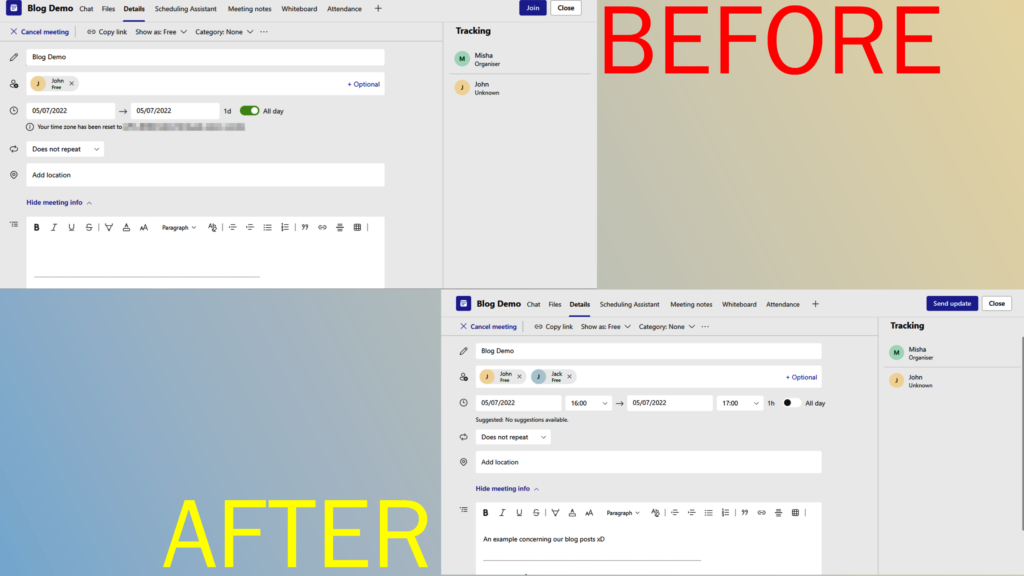
Step 4 — Amend your post
Great! We’ve done it. You’ve finally opened the editing page. From here, you can customize basic parameters like your meeting’s start (and end) time, title, participants (required or optional), location, iterations, and description. There’ll be a little more on this in the section below.

What elements of a Teams meeting can I edit
You can customize meetings in a variety of ways which affords them some degree of complexity— especially if you’re inexperienced with Microsoft Teams. Fortunately, I’ve detailed what you can edit and what everything means. At the end of this section, I have also discussed where you can find and alter your meeting’s advanced settings.
Don’t worry if you haven’t seen the advanced meeting settings before— Microsoft Teams does not permit you to access the page until your meeting’s initial scheduling.
Basic editing
A few options are available to you when you’re editing a meeting. However, you don’t require each one. Though it is generally recommended you add a title, start date, and some participants. Not that Teams will force you to invite anyone.
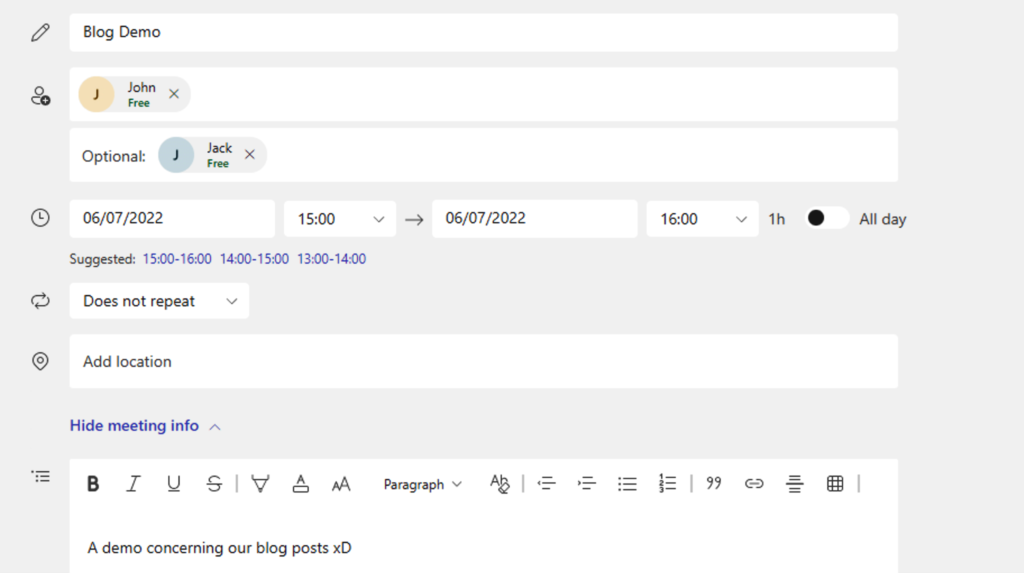
Basic editing fields
- Title — the name of your meeting
- People — your meeting’s participants
- Date — when your meeting starts and ends
- Repeat — whether your meeting repeats and how often
- Location — where your meeting takes place
- Description — written information concerning your meeting
Teams meeting settings
Above the basic editing options, you can see an action ribbon featuring a “Meeting options” button— click it. The page will open within your web browser. Teams will create a new tab if you’re using the web client. On the resulting page, you can find several additional settings concerning your Microsoft Teams meeting. The following options pose a more significant functional impact, contrasting the basic settings, which produce primarily cosmetic effects.
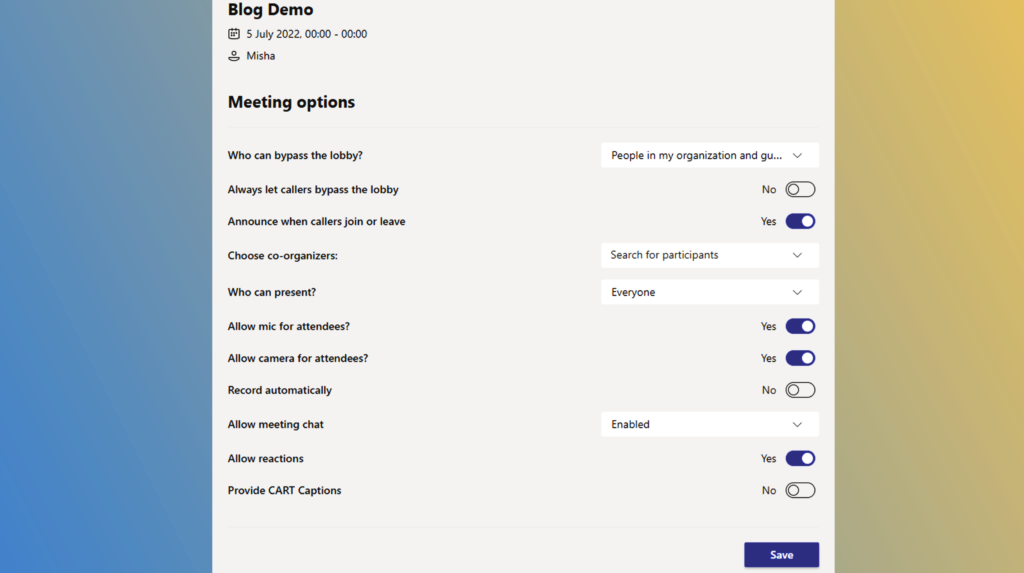
Advanced editing fields
- Who can bypass the lobby — who can join the meeting without being permitted access.
- Always let callers bypass the lobby — callers can always join prior to being permitted access.
- Announces when callers join or leave — should Teams inform participants when a caller joins and/or leaves.
- Choose co-organizers — specify co-organizer’s who’s control of the meeting is similar to your own.
- Who can present — who has access to screen-share and presenting tools.
- Allow mic for attendees — are meeting attendants allowed to speak.
- Allow camera for attendees — are meeting attendants allowed to enable their camera.
- Allow meeting chat — can meeting participates utilize the channel’s unique chat.
- Allow reactions — permit the use of animated responses/emotes.
- Provide CART Captions — toggle subtitles.
Blog post recap
We usually set up Teams Meetings during inception. However, should we need to, we can tweak our scheduled meetings via their corresponding calendar page. The settings in question can range from being relatively simple to somewhat more advanced.
I sincerely thank you for reading this far. If you enjoyed the post or otherwise found it helpful, please consider looking into the related posts I have linked below. Each writer works hard to produce informative, tested, and dependable resources for your work concerning Microsoft 365.