Outlook users generally use the platform for email communications. But that’s not all it has to offer. For example, the application features an in-depth calendar ideal for scheduling events. This benefit excels when you integrate it with Microsoft Planner— turning tasks into events.
Adding Planner tasks to your Outlook calendar is easy. You can follow the guide below if you’d like to try it. But, if it’s not clear enough, you can use the more detailed guide further in the post.
- Go to Microsoft Planner.
- Open your “Plan.”
- Click the
 three dots to reveal the options dropdown.
 - Select “Add plan to Outlook calendar.”
- Toggle “Publish, share with anyone” on.
- Click “Add to Outlook.”
- Set a color and charm for your new calendar (optional).
- Select a calendar group to add the new calendar to.
- Click “Import.”
This post aims to address how you can add tasks to your Outlook calendar. Hence, we’ll need to discuss Microsoft’s platforms, Outlook and Planner. You might be familiar with the former: a popular mailbox application. However, users credit the latter for productivity and task management. If you run into any issues, please consider leaving a comment at the bottom of the post.
I split my posts into digestible parts. However, you might find some sections more relevant than others. If that’s the case, you can use the hyperlinks below. Click a link to access relevant content with ease.
- How to add planner tasks to the Outlook calendar
- How to remove planner tasks from the Outlook calendar
- Use the built-in To Do function in Outlook
- Add tasks to Outlook Calendar from Microsoft’s To Do app
- Blog post recap
How to add planner tasks to the Outlook calendar
Microsoft Planner is a scheduling and productivity tool. In the app, you can set and group tasks into collections. A collection is a labeled group of tasks. A standard task will feature a due date, assigned member, and title, but none of those are requirements. Once you’ve set up a “Plan,” you can export it to Outlook. After, your tasks will appear on your Outlook calendar. I will walk you through this process in the guide below.
Step 1 — Select the illustrated option
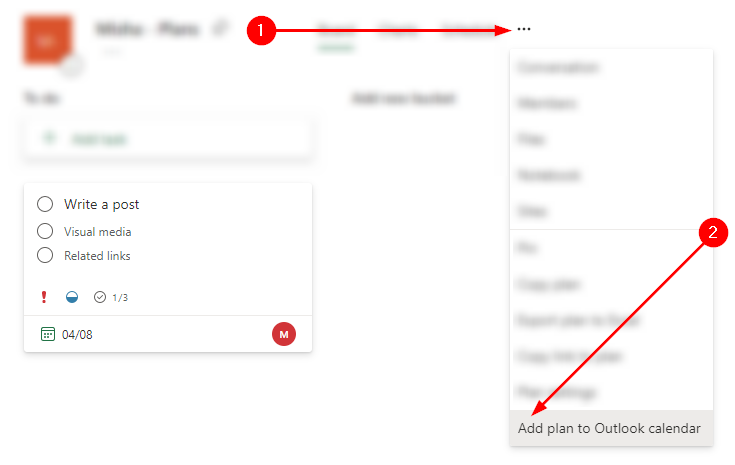
Let’s start with Microsoft Planner. First, open your desired “Plan,” wherein you have set tasks. Then, click the ![]() three dots. It will reveal a dropdown menu. Use that menu to find and select “Add plan to Outlook calendar.”
three dots. It will reveal a dropdown menu. Use that menu to find and select “Add plan to Outlook calendar.”
Step 2 — Add your plan to Outlook via an iCalendar feed
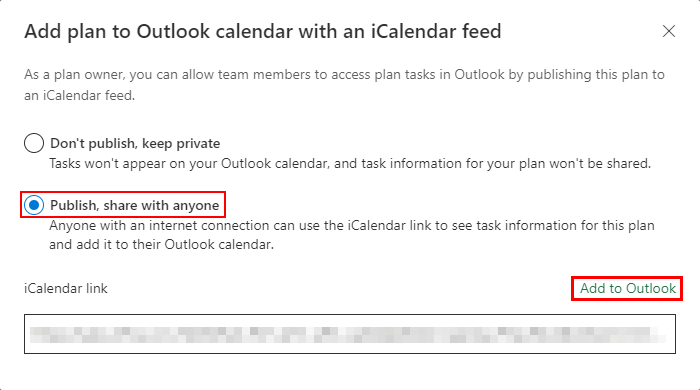
To send our tasks to our calendar, we must take advantage of technologies like iCalendar. By publishing our tasks to iCalendar, we’ll produce the data Outlook needs. Yet, in doing so, we lose some privacy. Anyone with the link we’ll need can view your tasks. They can also add them to their own calendar. But if you don’t think that will be an issue, there is no need to worry. If you’re ready to continue, enable the second option, “Publish, share with anyone,” and click “Add to Outlook.”
Step 3 — Customize your content
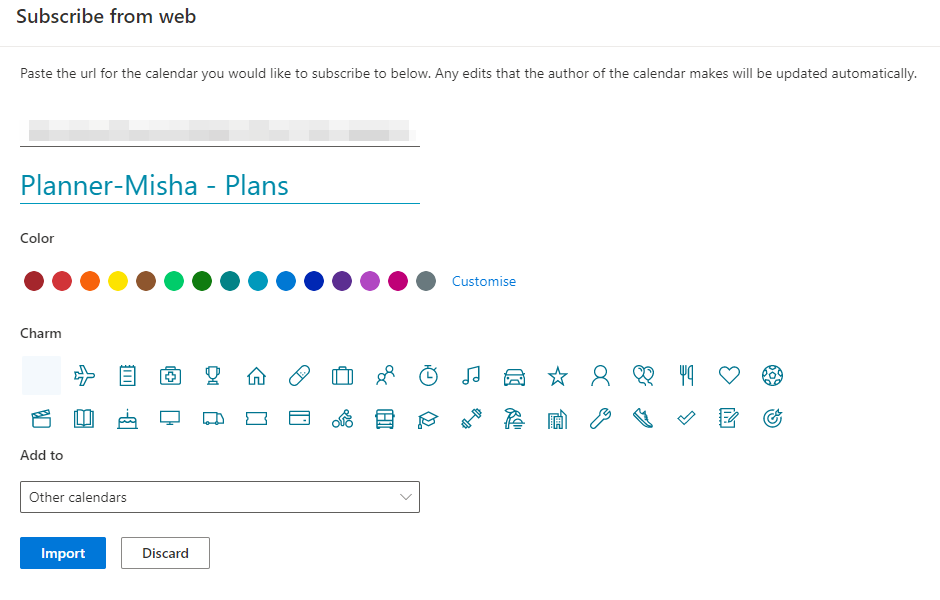
You don’t need to customize your calendar content. Though, there are reasons you should consider. Take readability and organization, for instance. Under normal circumstances, you would read a task to learn about it. But that’s different if you personalize them. You could instead discern information from a task’s color and “Charm.” When ready, select a Calendar to “Add to,” and select “Import.”
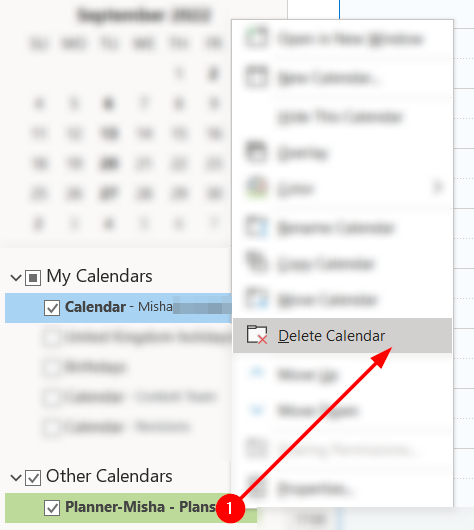
Step 4 — Toggle your “Other” calendars
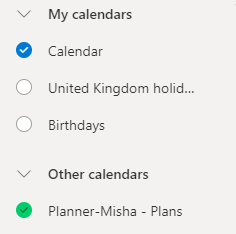
The next step should be simple. You need to find the toggle for your new calendar and enable it. The name should follow the format “Planner-[name of plan].” So, if you named your plan “Misha – Plans,” the calendar would have the name “Planner-Misha – Plans.”
Step 5 — Find your tasks in your Outlook calendar
Look toward the calendar’s main panel. You should spot your tasks appearing as calendar events. If that’s the case, you succeeded. Otherwise, please consider starting over. You might have missed a step or misread some text.


How to remove planner tasks from the Outlook calendar
If you no longer wish to display Planner tasks on your Outlook calendar, you can remove them by following the steps below.
Step 1 — Open your Outlook calendar page
In the Outlook app, navigate to the calendar page. To do so, use the menu on the bottom left corner of the screen. Select the second icon. It should resemble a traditional calendar. To its left, you will spot an envelope icon and a “people” icon on the right.

Step 2 — Opt to delete the Planner tasks calendar
Under the calendar list, find and select your imported calendar. The name should follow the format mentioned earlier; “Planner-[plan name].” For example, mine is “Planner-Misha – Plans.” Right-click the calendar and select “Delete calendar” or “Remove” in OWA.
Step 3 — Confirm your choice via the prompt
Before you delete your calendar, Outlook will ask you to confirm your choice. This prompt is due to the “destructive” nature of the action you’d like to execute. Selecting “Yes” will remove the tasks from your calendar. But this will not occur if you select “No.”

Use the built-in To Do function to add tasks in Outlook
In the browser version of Outlook (OWA), you can use the built-in To Do function. There, you will be able to add tasks and check them off as you complete them. Please follow the steps below to learn how to use the To Do function in OWA.
- First, open the web version of Outlook.
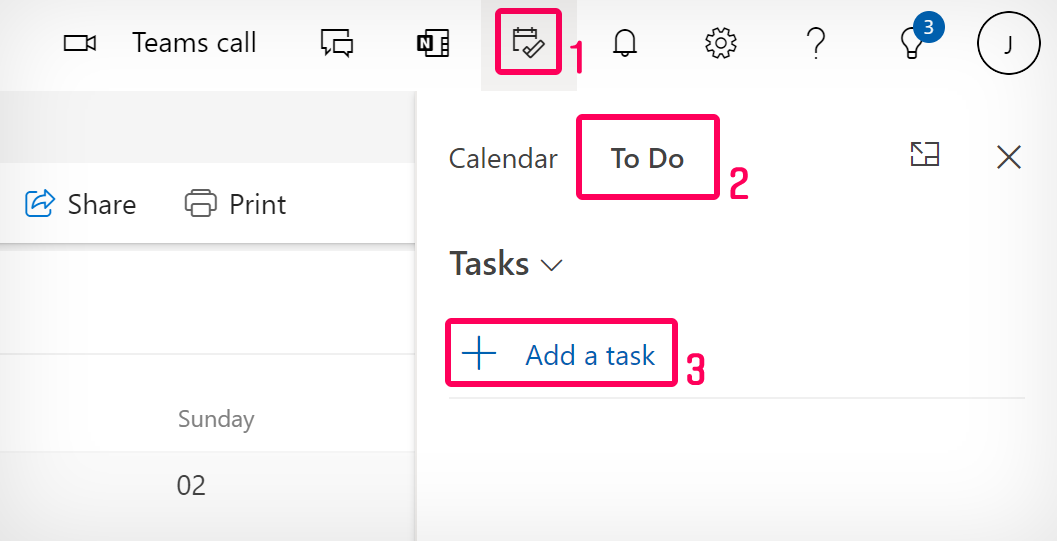
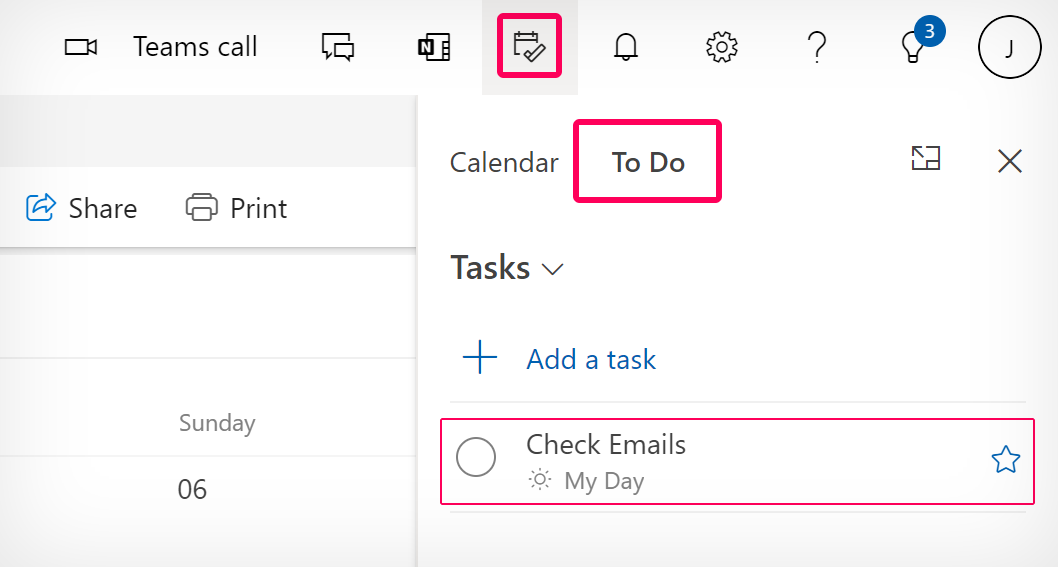
- Click on the
 “My Day” icon located in the top menu next to the bell icon.
 - Then select “To Do” at the top and “+ Add a task.”
- Write in the name of your task and click on “Add.“
- You can set the priority by clicking the star icon.
- And you can drag the task into your calendar.

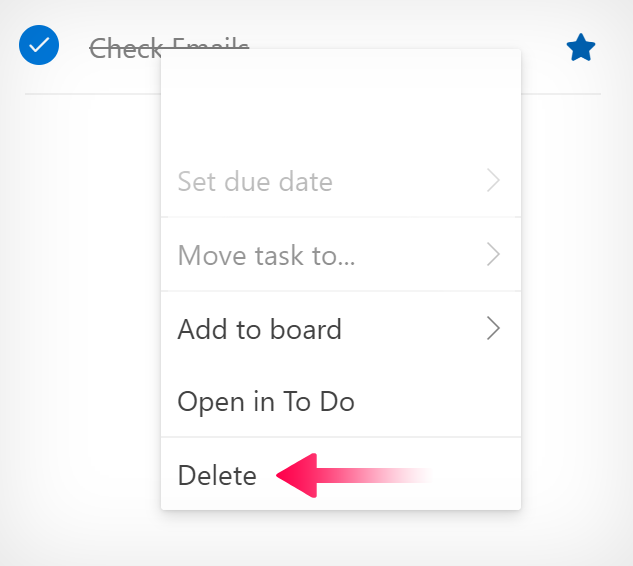
- Click the circular checkbox to mark a task as complete.
- Or right-click the task and select “Delete” from the dropdown menu.
Add tasks to Outlook Calendar from Microsoft’s To Do app
As well as using the built-in function, you can add tasks to your Outlook Calendar from the To Do app. First, go to Microsoft To Do and continue with the steps below.
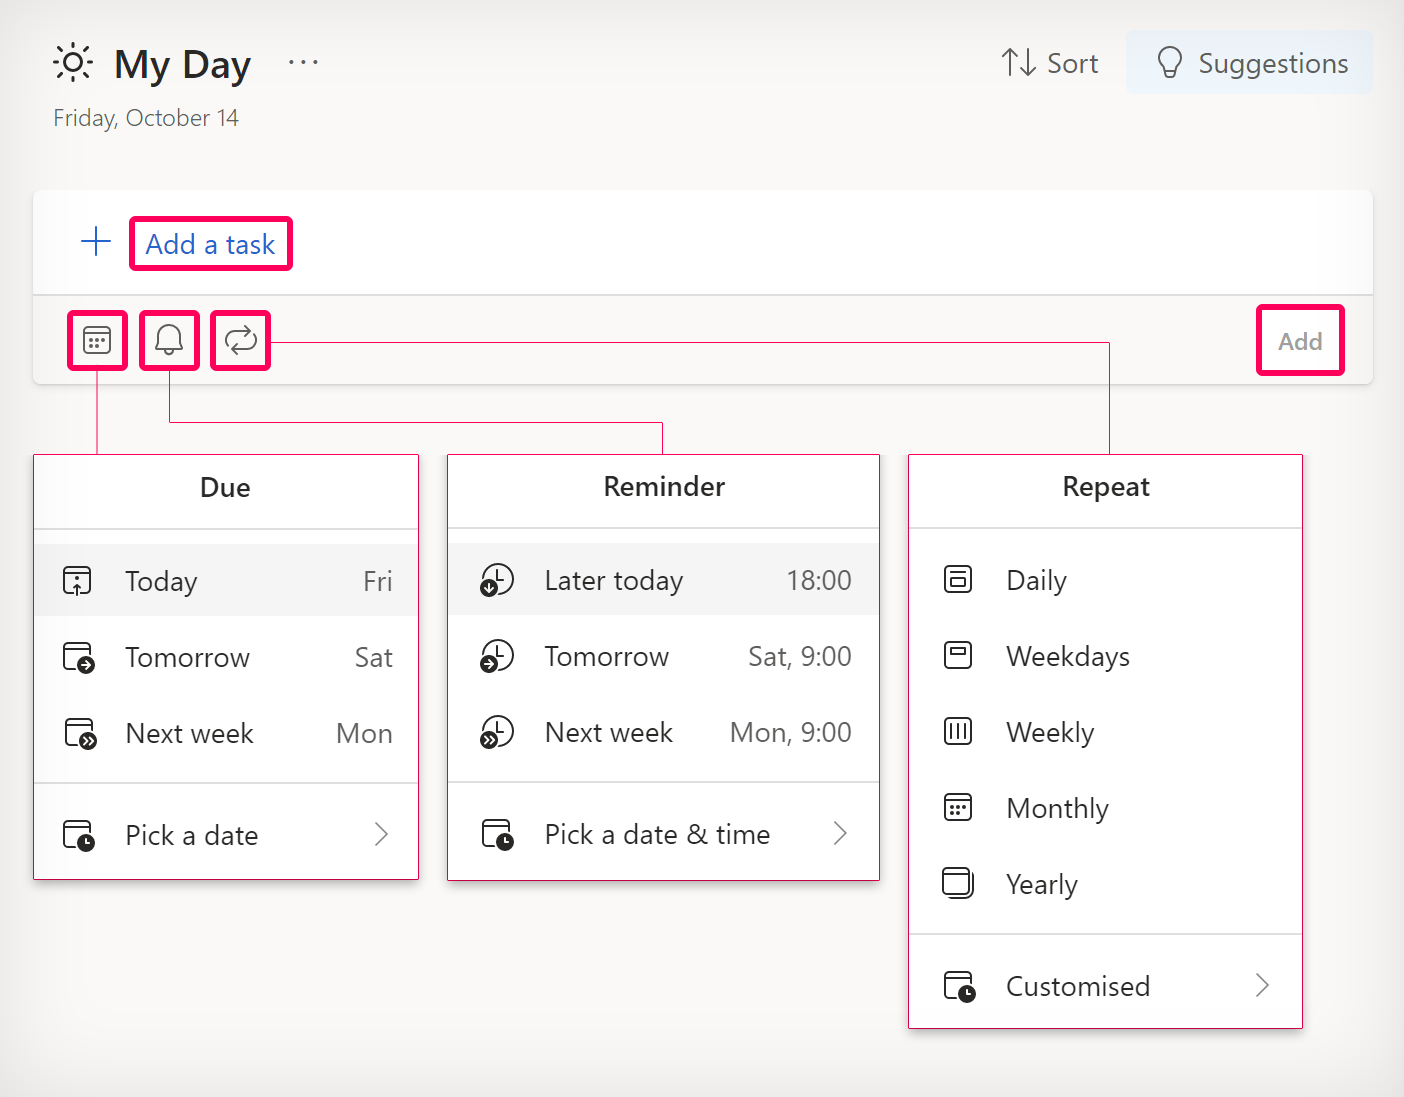
- Click where it says, “Add a task” and type in the name of your task.
- You can add a “Due” date, “Reminder,” or a “Repeat.”
- Then click the “Add” button.
- Now head over to your Outlook Calendar.
- Click on the “My Day” icon located in the top menu next to the bell icon.
- From there, you can click and drag your new task into your Outlook calendar.
Try these add-ins to manage your tasks in Outlook
 | TickTick | • Multi-platform sync across mobile, desktop, tablet, watch, and browsers. • Create to-dos with priorities. • Set reminders. • Track and schedule tasks in your calendar. • Share to-do lists. • Built-in stopwatch to complete tasks on time. • Check-in system and goal setting. • Various text formats. • Track productivity trends with informative stats. |
 | iPlanner Pro | • Create tasks and add assignments or attachments. • Create checklists, buckets, and categories. • Add comments. • Edit and filter tasks: Filter by date, late, bucket, category, etc. • Edit tasks directly from Outlook. |
 | GetBusy | • Add emails into GetBusy for improved email management. • Send tasks to others from your email. • Assign tasks to other users. • Edit emails to trim down information before sending it on to other users. |
Blog post recap
Businesses use Planner for task management and productivity. But, some users prefer Outlook’s calendar for scheduling. If that’s the case, you can display your tasks in Outlook. First, you will need to export your plan as an iCalendar. Then, you can import your iCalendar data as an Outlook calendar. Removing the new calendar is easy. Find the calendar on the calendar page and right-click it. After, select “Delete calendar.” Finally, confirm your choice by clicking “Yes.”
I hope this post helped you resolve your problem. If that’s the case, please consider helping us out. You don’t need to do much. Just read one of our related posts. I’ve linked four below—the former two concern Outlook, whereas the latter regard Planner.