Within Microsoft OneDrive, you are provided the opportunity to precisely select the users you wish to have access to your OneDrive file. Whilst some of you may be content with the default settings, some of you may also want to ensure that web-only access to a file is the only way someone can access your document. Chances are, that’s why you’re reading this blog today.
Now, as it stands, there is not a clear way to allow web-only access to a OneDrive file. However, before you click away from this article in annoyance, there is a means to allow web-only access to SharePoint files, which is essentially the business equivalent to Microsoft OneDrive.
In order to allow web-only access to a Microsoft SharePoint file, you will need to access the SharePoint admin center, through the main Microsoft Admin center, and edit the settings within the Unmanaged Devices subsection of options.
As is the case with every article, do not worry if the above statement alone is not enough detail for you to work with. We will first have a step-by-step guide, before delving into a more thorough walkthrough of the method.
DISCLAIMER: This process requires you to have access to the Microsoft Admin center, which is only possible if you yourself are a global or SharePoint admin. If you are not, or would like to check, your best method would be to get in contact with your IT provider or department.
Step by step: How to allow web-only access to a OneDrive file
- Open a Microsoft application, such as Outlook, through the web portal.
- Click the application launcher in the top left corner of your screen.
- Here, click ‘Admin’ to launch Microsoft Admin.
- From the Admin dashboard, look to the listed menu on the left of your screen.
- Click ‘Policies’, which should open a dropdown menu of two more options.
- Here, click ‘Access Control’.
- On the new menu presented to you, click ‘Unmanaged Devices’, the first option.
- You will be shown a list of three bullet points, with one marked by default.
- Click the second bullet point, titled ‘Allow limited, web-only access’.
- After clicking that, click ‘Save’ at the bottom of the menu to save your changes.
As was aforementioned, do not worry if the steps above are not enough for you to work with. We will now take a look at the process in more detail, with accompanying screenshots placed to best assist you throughout.
So, your first step of the walkthrough is to open a Microsoft application, such as Outlook. Whilst you can also access Admin manually, which some of you may prefer, Admin is very simple to access via another Outlook application.
Once your Microsoft application is open, you will want to click the application launcher in the top left corner of your screen in order to gain access to other apps. Of all the choices offered to you, click ‘Admin’, which has been highlighted below.

Clicking Admin will, perhaps unsurprisingly, bring you to the Admin dashboard. From here, there will be a list of options offered to you. You should look towards the very bottom of this list, where there will be an option titled ‘Show All’.

Clicking this will open a new menu of options for you to browse. Here, you will want to click ‘SharePoint’ in order to open the SharePoint specific dashboard of Microsoft Admin.

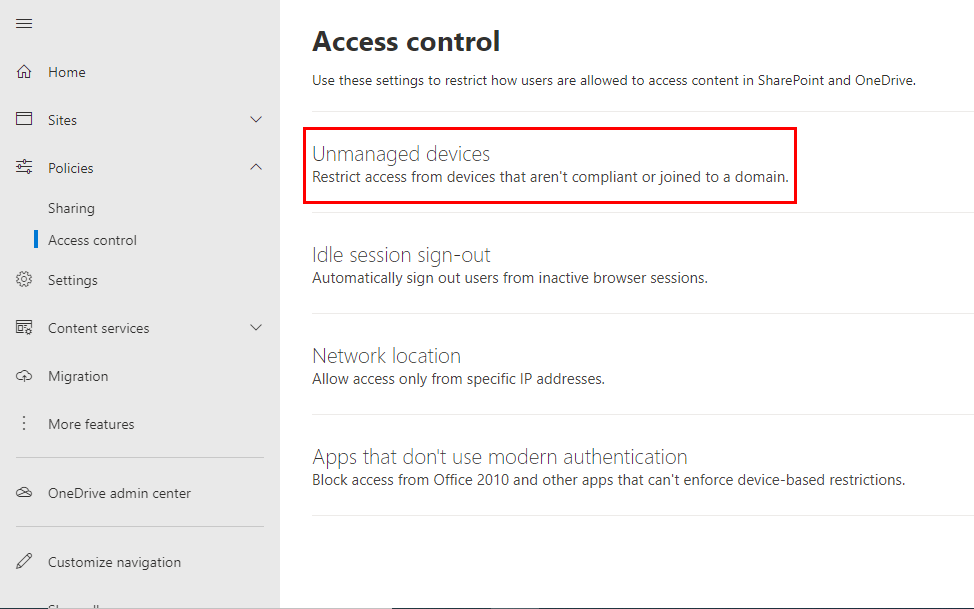
After opening the SharePoint admin dashboard, you will be greeted by a menu quite similar to the initial one you saw upon opening Microsoft Admin for the first time in this method. Again, you will want to look towards the left of your screen, where there will be an option titled ‘Policies’. Click that.

Clicking Policies will offer you two more options in a drop down format, one titled ‘Sharing’, the other titled ‘Access Control’. As you may have guessed by the emboldening, the option you will want to click is the latter of the two.

Clicking ‘Access Control’ will bring you to another menu, where you will now finally be able to reach the ‘Unmanaged Devices’ subsection of options that you need to access in order to allow web-only access to your files.
After clicking ‘Unmanaged Devices’, a menu will appear at the right of your screen. On this menu will be three bullet pointed options, with one already selected as a default setting. Of these three bullet points, one will be titled ‘Allow limited, web-only access’. In order to set your file to web-only access, this is the option you will want to select.

After selecting this bullet point, make sure to click ‘Save’ at the bottom of the screen to save your changes (once you have made a change to the settings, then the Save button will turn blue and allow you to click it). After doing this, you will have successfully allowed web-only access to your Microsoft SharePoint file!
Thank you for taking the time to read this blog, I hope you found it as helpful as you had wanted it to be! As is the case with every piece we write, if you encounter any issues throughout the walkthrough, or simply wish to share some thoughts on it, then please do not hesitate to get in touch with a member of our team.
Below are some links to other blog posts we have published that are of a similar vein to this one. Perhaps, if the above didn’t quite answer the question(s) you were having, then one of the ones listed below will be of better use to you!
How to recover deleted OneDrive files – Business Tech Planet
(A piece that looks at numerous methods to recover OneDrive files you, or another user, have deleted in the past).
How to stop Office 365 automatically saving files to OneDrive – Business Tech Planet
(Looking at the Save Options, this piece analyses how to prevent Office 365 from automatically saving files to your OneDrive).
How to recover permanently deleted files from OneDrive – Business Tech Planet
(This article looks at recovering deleted OneDrive files through the recycling bin within the application).