 Key Takeaways
There are two main methods to delete emails older than a certain date in Outlook: Use
Use ![]() AutoArchive in the Outlook desktop client.
AutoArchive in the Outlook desktop client. Use a retention policy in Exchange.

If your inbox is clogged up with old emails or you need to delete old emails in order to meet regulations, setting it so your Exchange account automatically deletes emails older than a certain time is a good idea.
There are two ways to delete emails older than a certain time. One method — setting up AutoArchive — can be done through the Microsoft Outlook desktop application. The other — using retention policies — can be done through the Exchange admin center. I’ll demonstrate both methods in this blog post.
How to delete emails older than a certain date in Outlook using AutoArchive:
- Right-click the Inbox folder and click “Properties.“
- Click the “AutoArchive” tab.
- Select “Archive this folder using these settings.”
- Choose an “older than” time.
- Click “Permanently delete old items.”
- Click the “OK” button.

How to delete emails older than a certain date in Outlook using retention policies in Exchange:
- First, create a retention policy (jump to full guide).
- Then go to
 Office.com and sign in using your Microsoft 365 credentials.
 - Click the
 app launcher and select “Admin.”
 - Click “Show all” and open the “Exchange” admin center.
- Click “Recipients” on the left menu, then “Mailboxes.”
- Click on the “Display name” of the mailbox you want to change.
- Click the “Mailbox” tab.
- Go down to “Manage mailbox policies” under “Retention policy.”
- Select a “Retention policy” then click the “Save” button.
We’ve also created a video that demonstrates the methods above, and includes further details. You can watch it here on our YouTube:
Throughout the rest of this blog post, I’ll demonstrate both of the processes detailed above.
Overview: How to delete emails older than a certain date in Outlook
There are two main methods to auto-delete old emails in Microsoft Outlook.
- Using AutoArchive in the Outlook desktop client.
- Using a retention policy in Exchange.
AutoArchive is an inbuilt mailbox feature for Outlook that manages your space by moving old or read emails into an archive. You can also permanently delete old items.
A retention policy can achieve the same effect by automatically deleting emails after a defined period of time. It can also be used to affect multiple mailboxes, making it a more powerful feature than AutoArchive. However, you will need admin permissions to create a retention policy.
Method 1: Delete emails older than a certain date in Outlook with AutoArchive
If you don’t have admin permissions, or if you want a simple inbuilt feature to delete your old emails, then AutoArchive is the perfect solution. But you will need the desktop version of Outlook, as AutoArchive is not available on OWA (Outlook Web Access).
The solution for OWA is to right-click your inbox and go to “Assign policy.” You can then select an automatic removal date for old emails.
![]() Please note: Be sure that you want to delete these emails before you follow this process. Once old emails are gone, it could be impossible to recover them depending on your organization’s setup.
Please note: Be sure that you want to delete these emails before you follow this process. Once old emails are gone, it could be impossible to recover them depending on your organization’s setup.
Here’s a demonstration of the entire process so you can easily follow along.
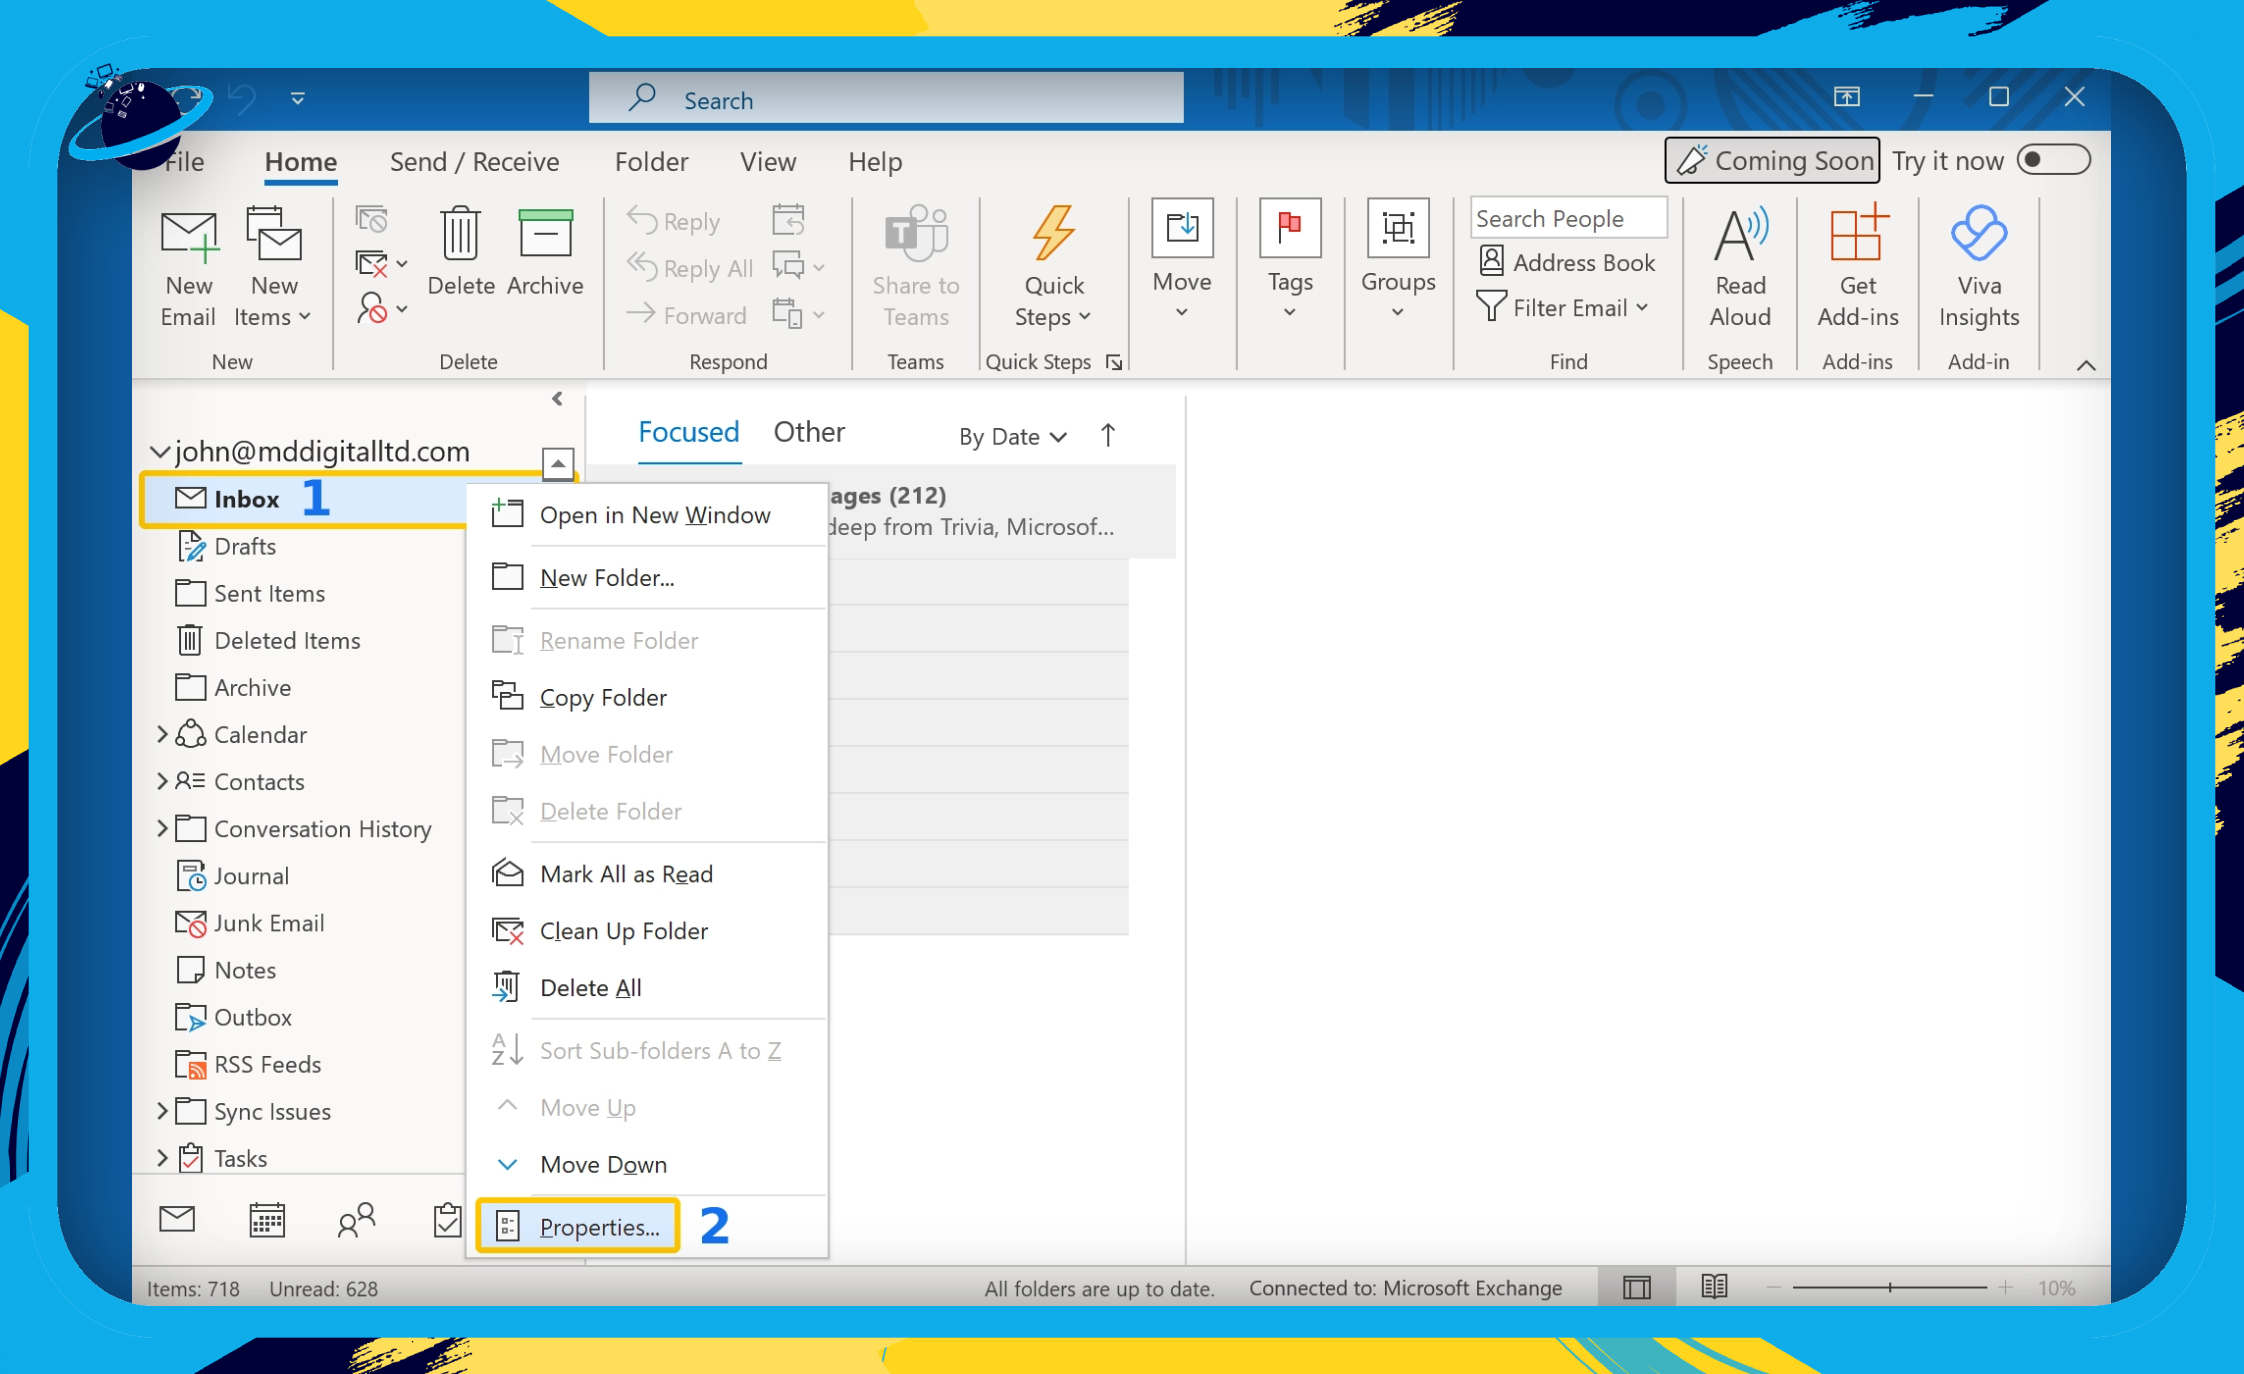
- Open your Outlook app and right click on the “Inbox” in the left navigation pane. (1)
- Then select “Properties…” from the popup menu. (2)
- Click the “AutoArchive” tab.
- Select the circular button next to “Archive this folder using these settings.”
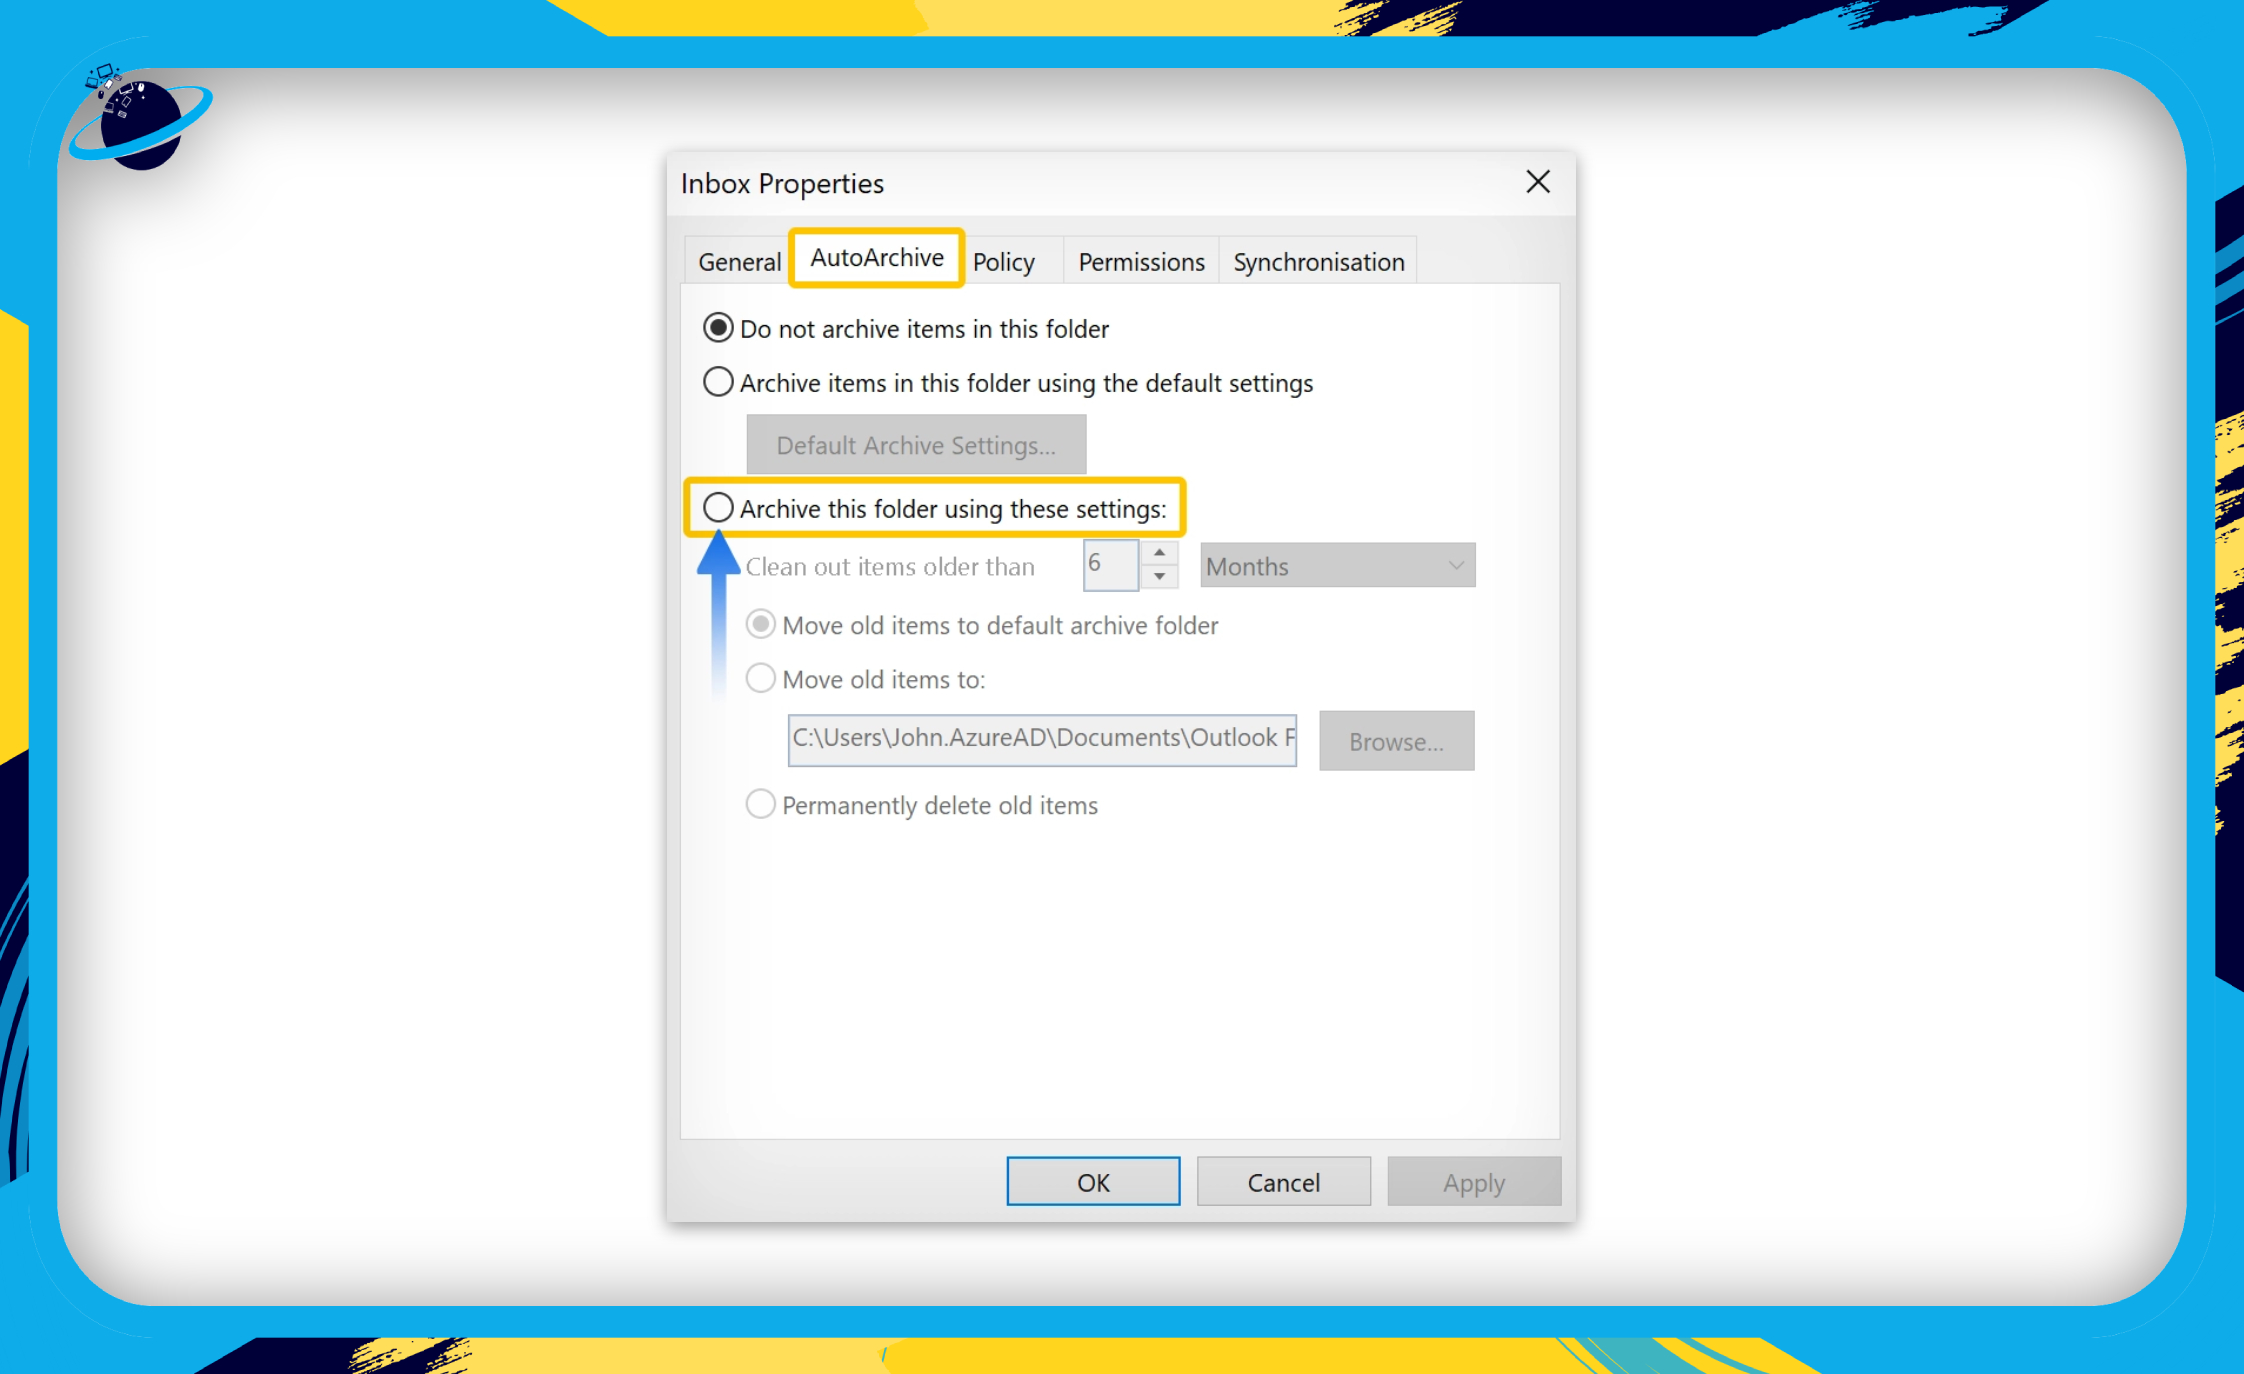
The properties you choose will only affect the folder that you selected. In the example above, the properties will only affect the “inbox.” So, if you have various email folders, they will be unaffected by process you follow here.
- Select a date next to “Clean out items older than.”
- Click the circular button next to “Permanently delete old items.”
- Then click the “OK” button.
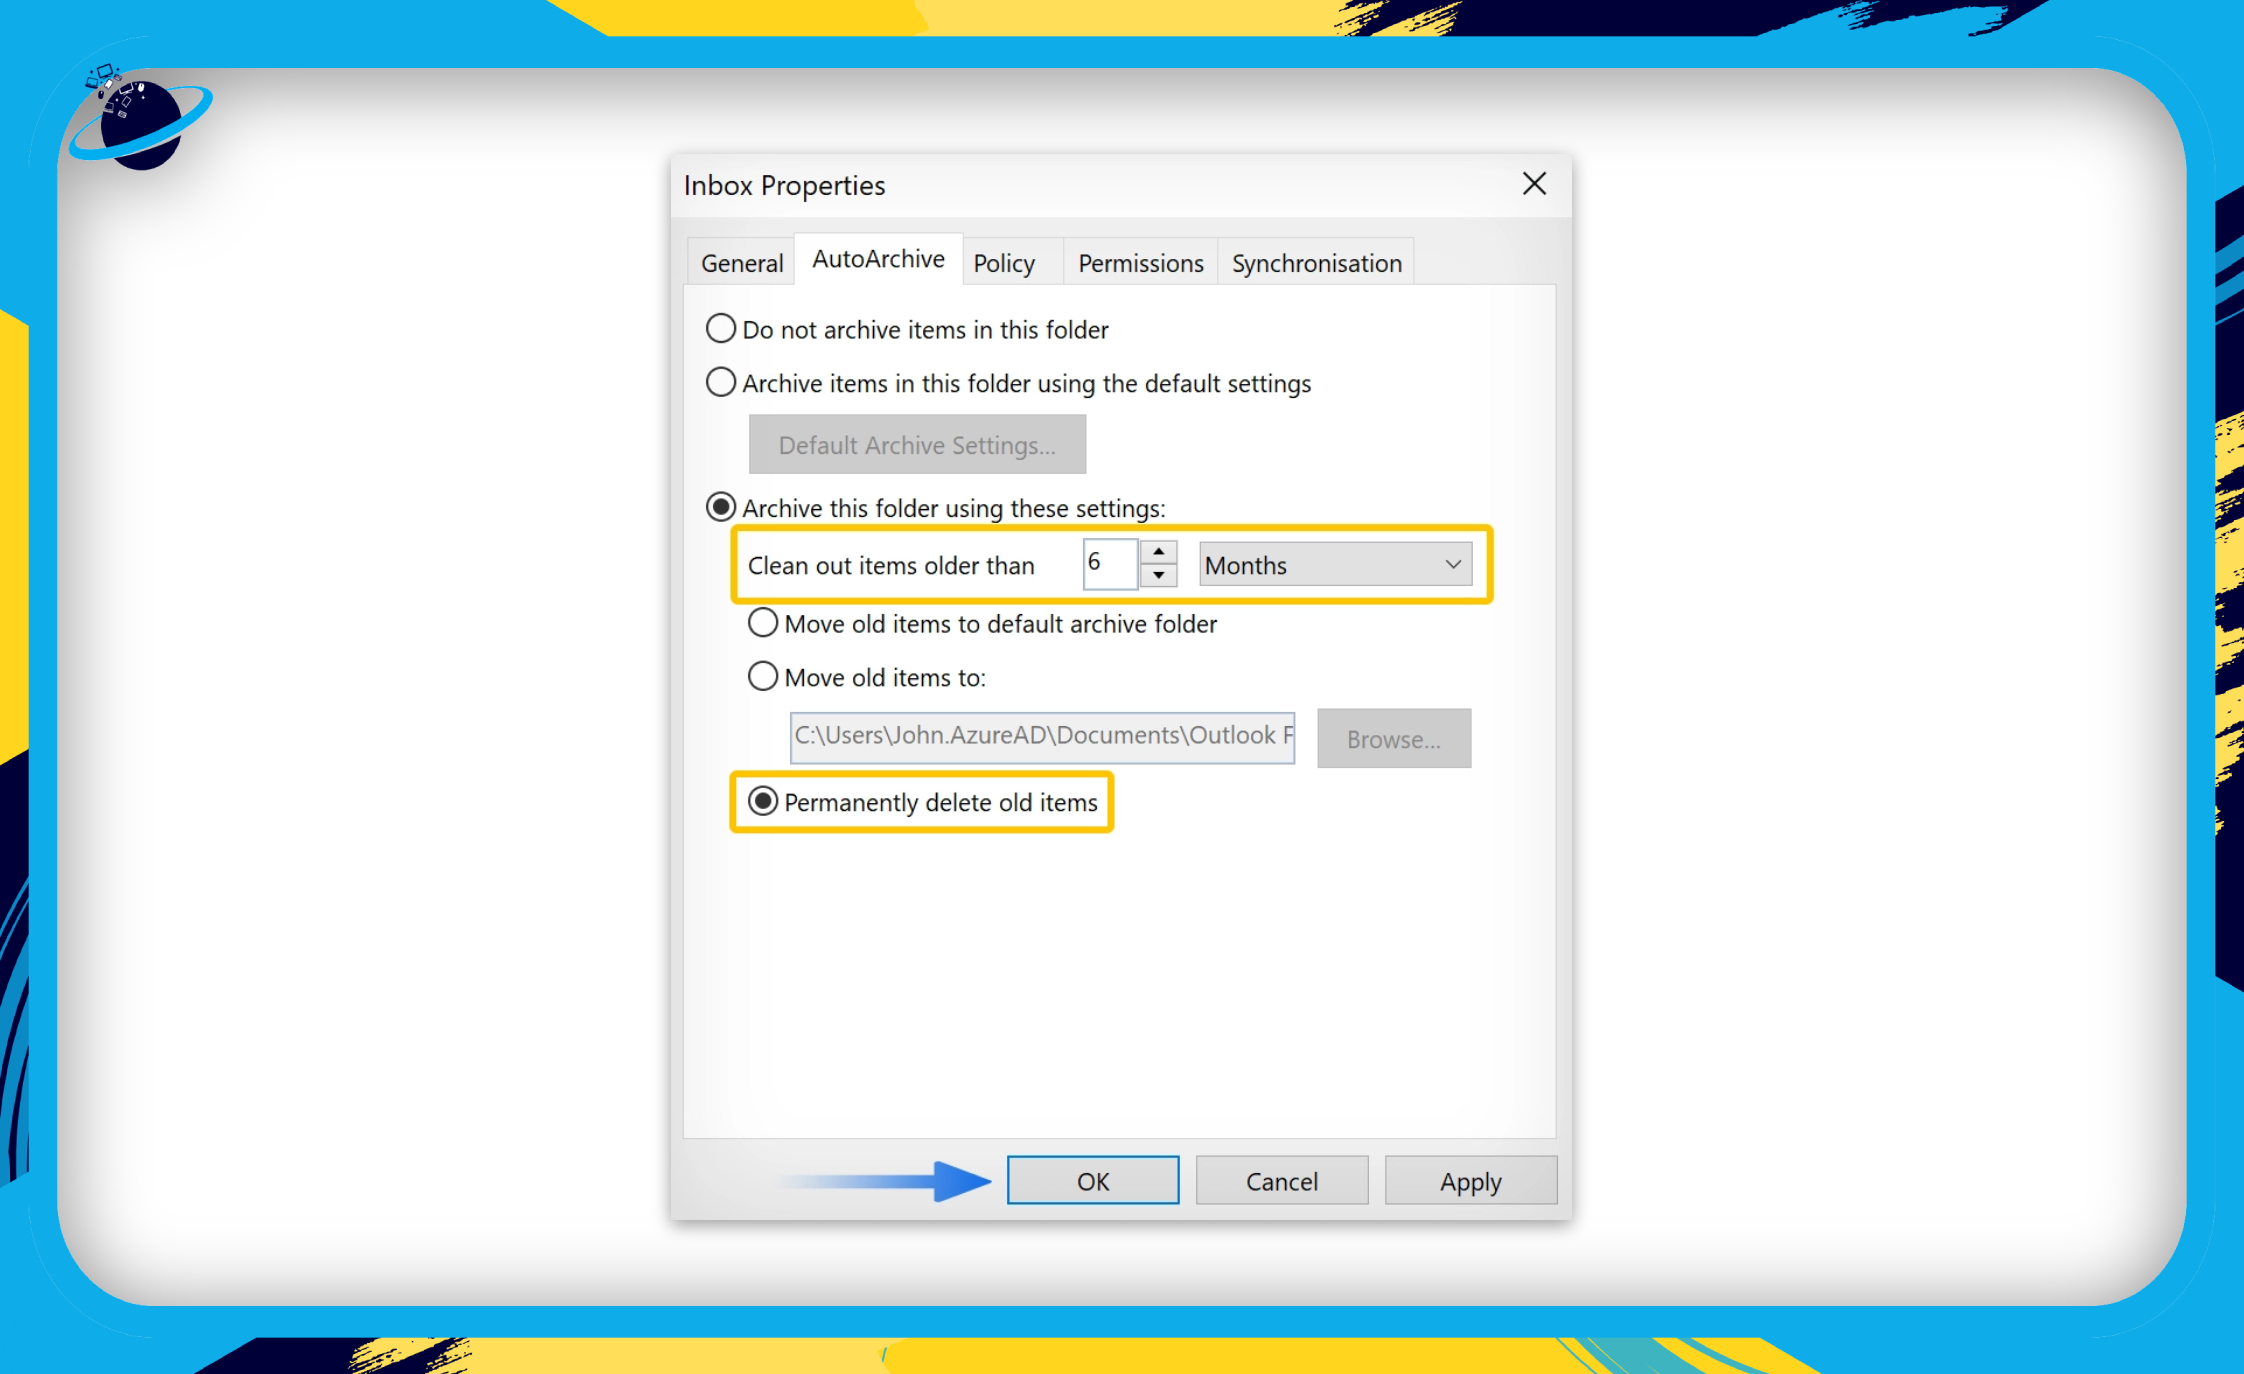
If you want to delete emails that are older than 6 months, click the up or down arrows to “6” and select “Months.” While you have the flexibility to delete emails older than 1 day, we advise against setting a low deletion date.
If you’re sure that you want to delete old items rather than simply archive them, click the circular button next to “Permanently delete old items.“
As a word of warning, this will permanently delete old emails — as the name suggests — and you might be unable to recover emails if you accidentally delete anything that you need. Archiving is a much safer solution unless you’re absolutely certain you want to delete emails and you have everything that you need from those emails.
Once you’ve configured everything, click the “OK“ button and the process will begin immediately. The deletion process may take some time depending on how many emails you have in the folder you’ve set up AutoArchive for.
Method 2: Delete emails older than a certain date in Outlook using retention policies in Exchange
![]() Please note: To follow this process you will need access to your organization’s Exchange admin center. Hence you will need to have one of the following privileges assigned to your user:
Please note: To follow this process you will need access to your organization’s Exchange admin center. Hence you will need to have one of the following privileges assigned to your user:
• Exchange admin
• Global admin
There are two ways of applying a retention policy to mailboxes in Outlook. You can create a policy to affect all Exchange mailboxes, or you can create a policy to apply to specific mailboxes. First, we will look at creating a retention policy for all mailboxes.
 Create a retention policy for all mailboxes
Since the 31st of August, 2021, you can no longer create retention policies in Classic Exchange via the Compliance Management section. Instead, you will need to access the Compliance Center (or Microsoft Purview).
![]() Notes:
Notes:
• The retention policy will only apply to Mailboxes with at least 10 MB of data.
• The policy can take up to 1 week to apply to mailboxes.
• All mail older than your chosen retention date will be deleted upon the policy’s activation.
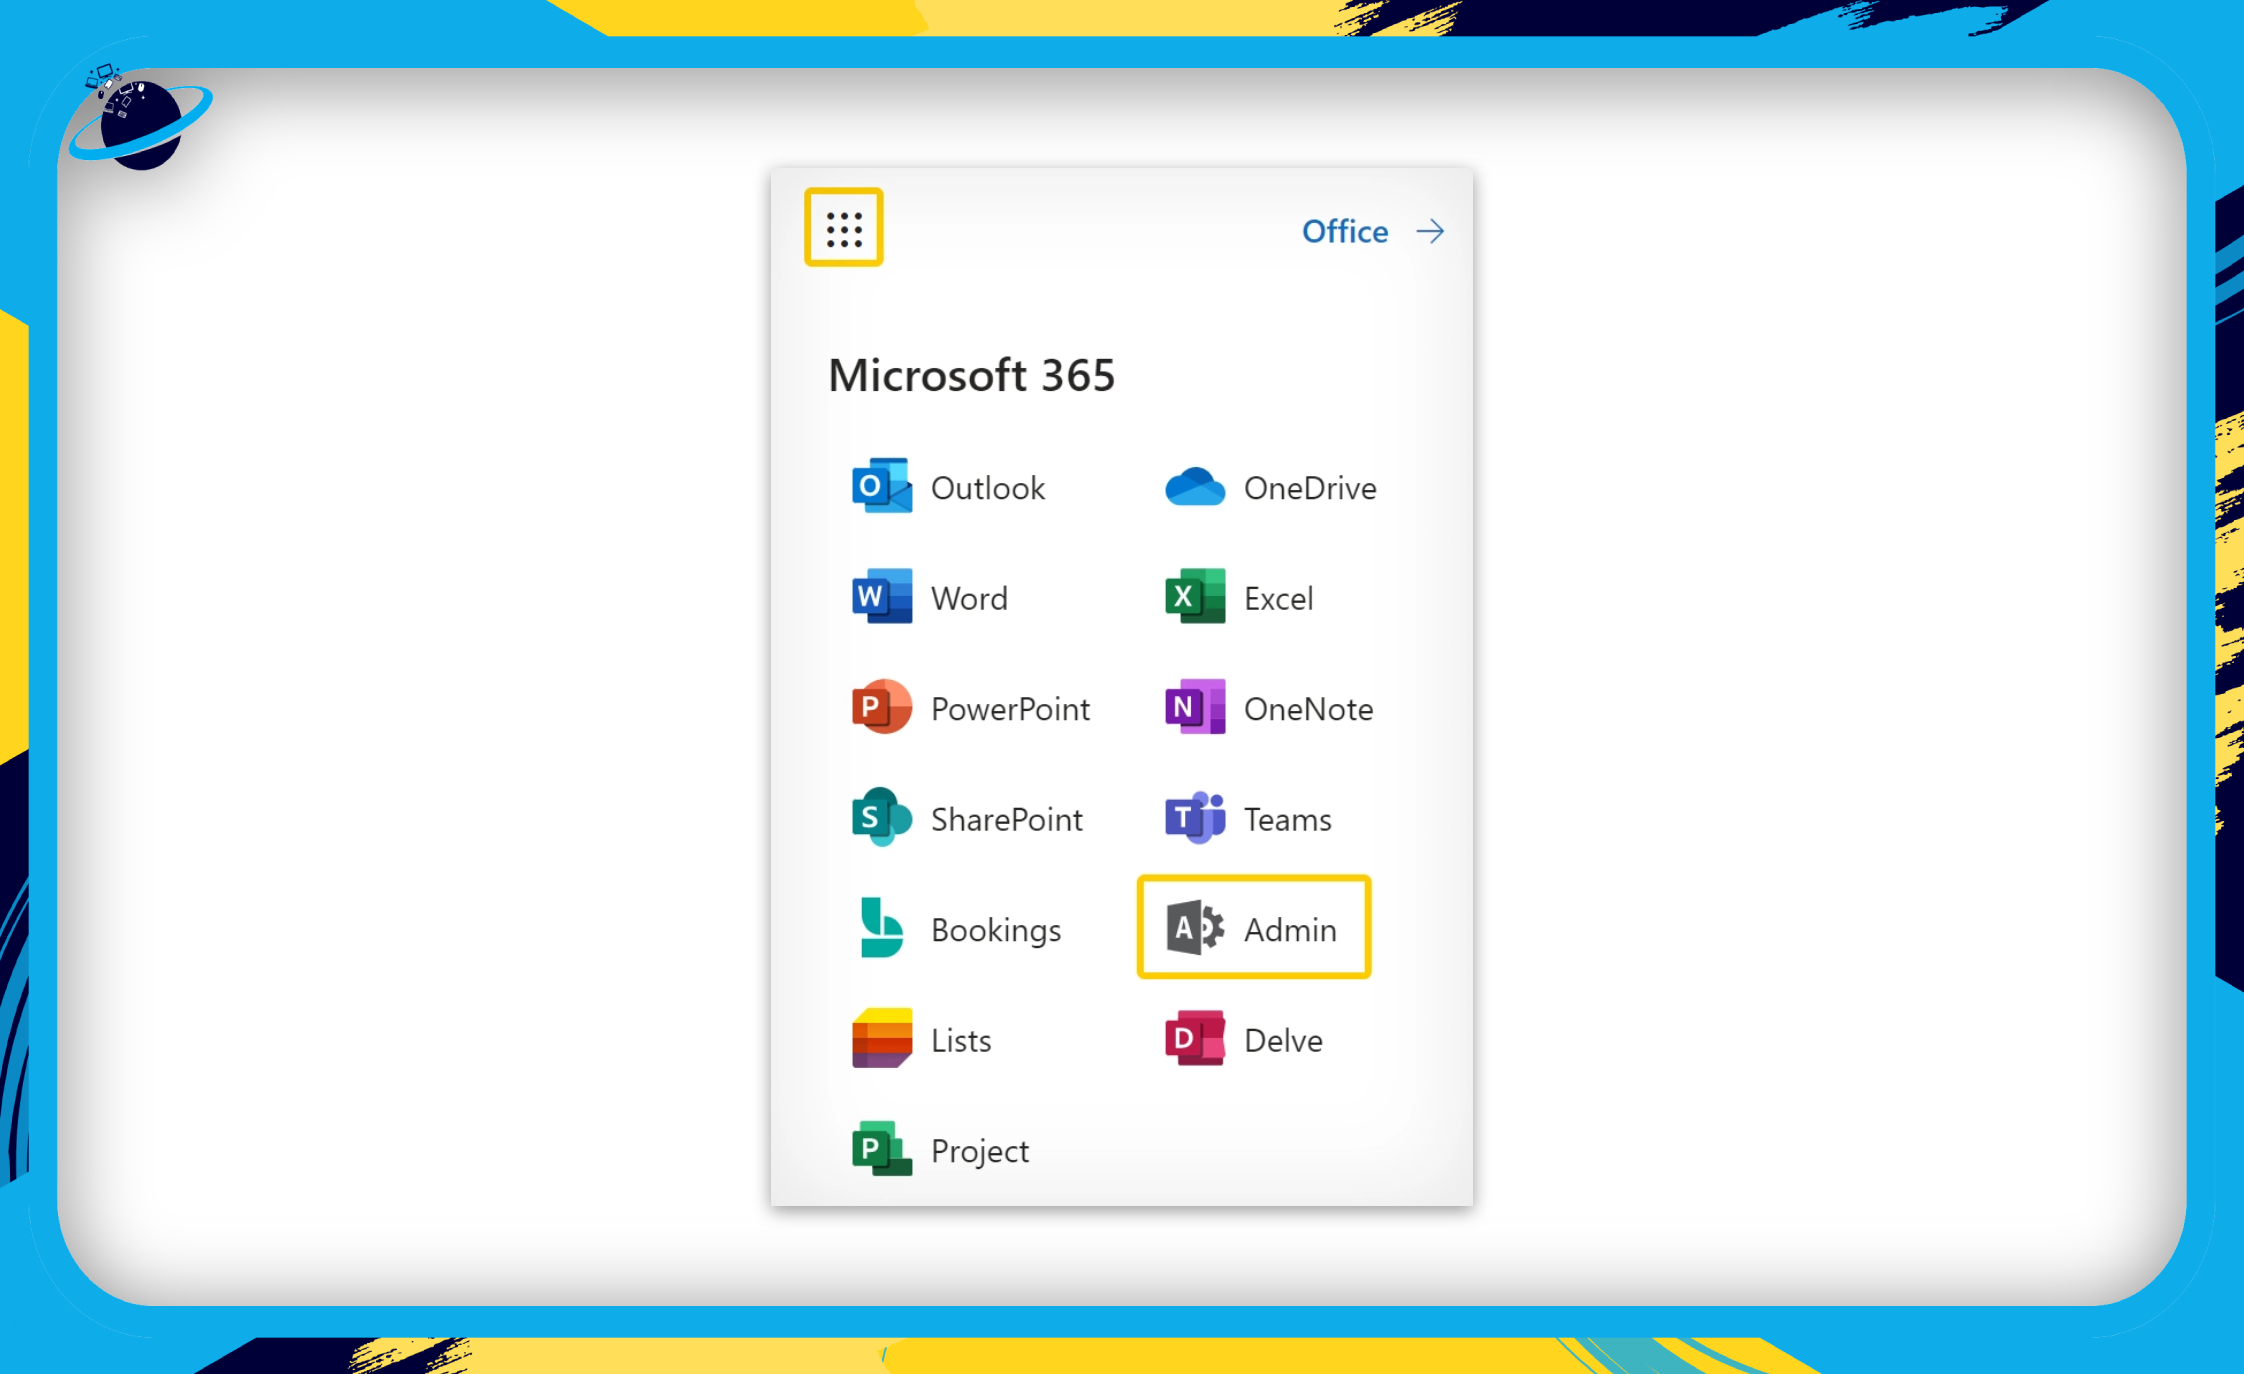
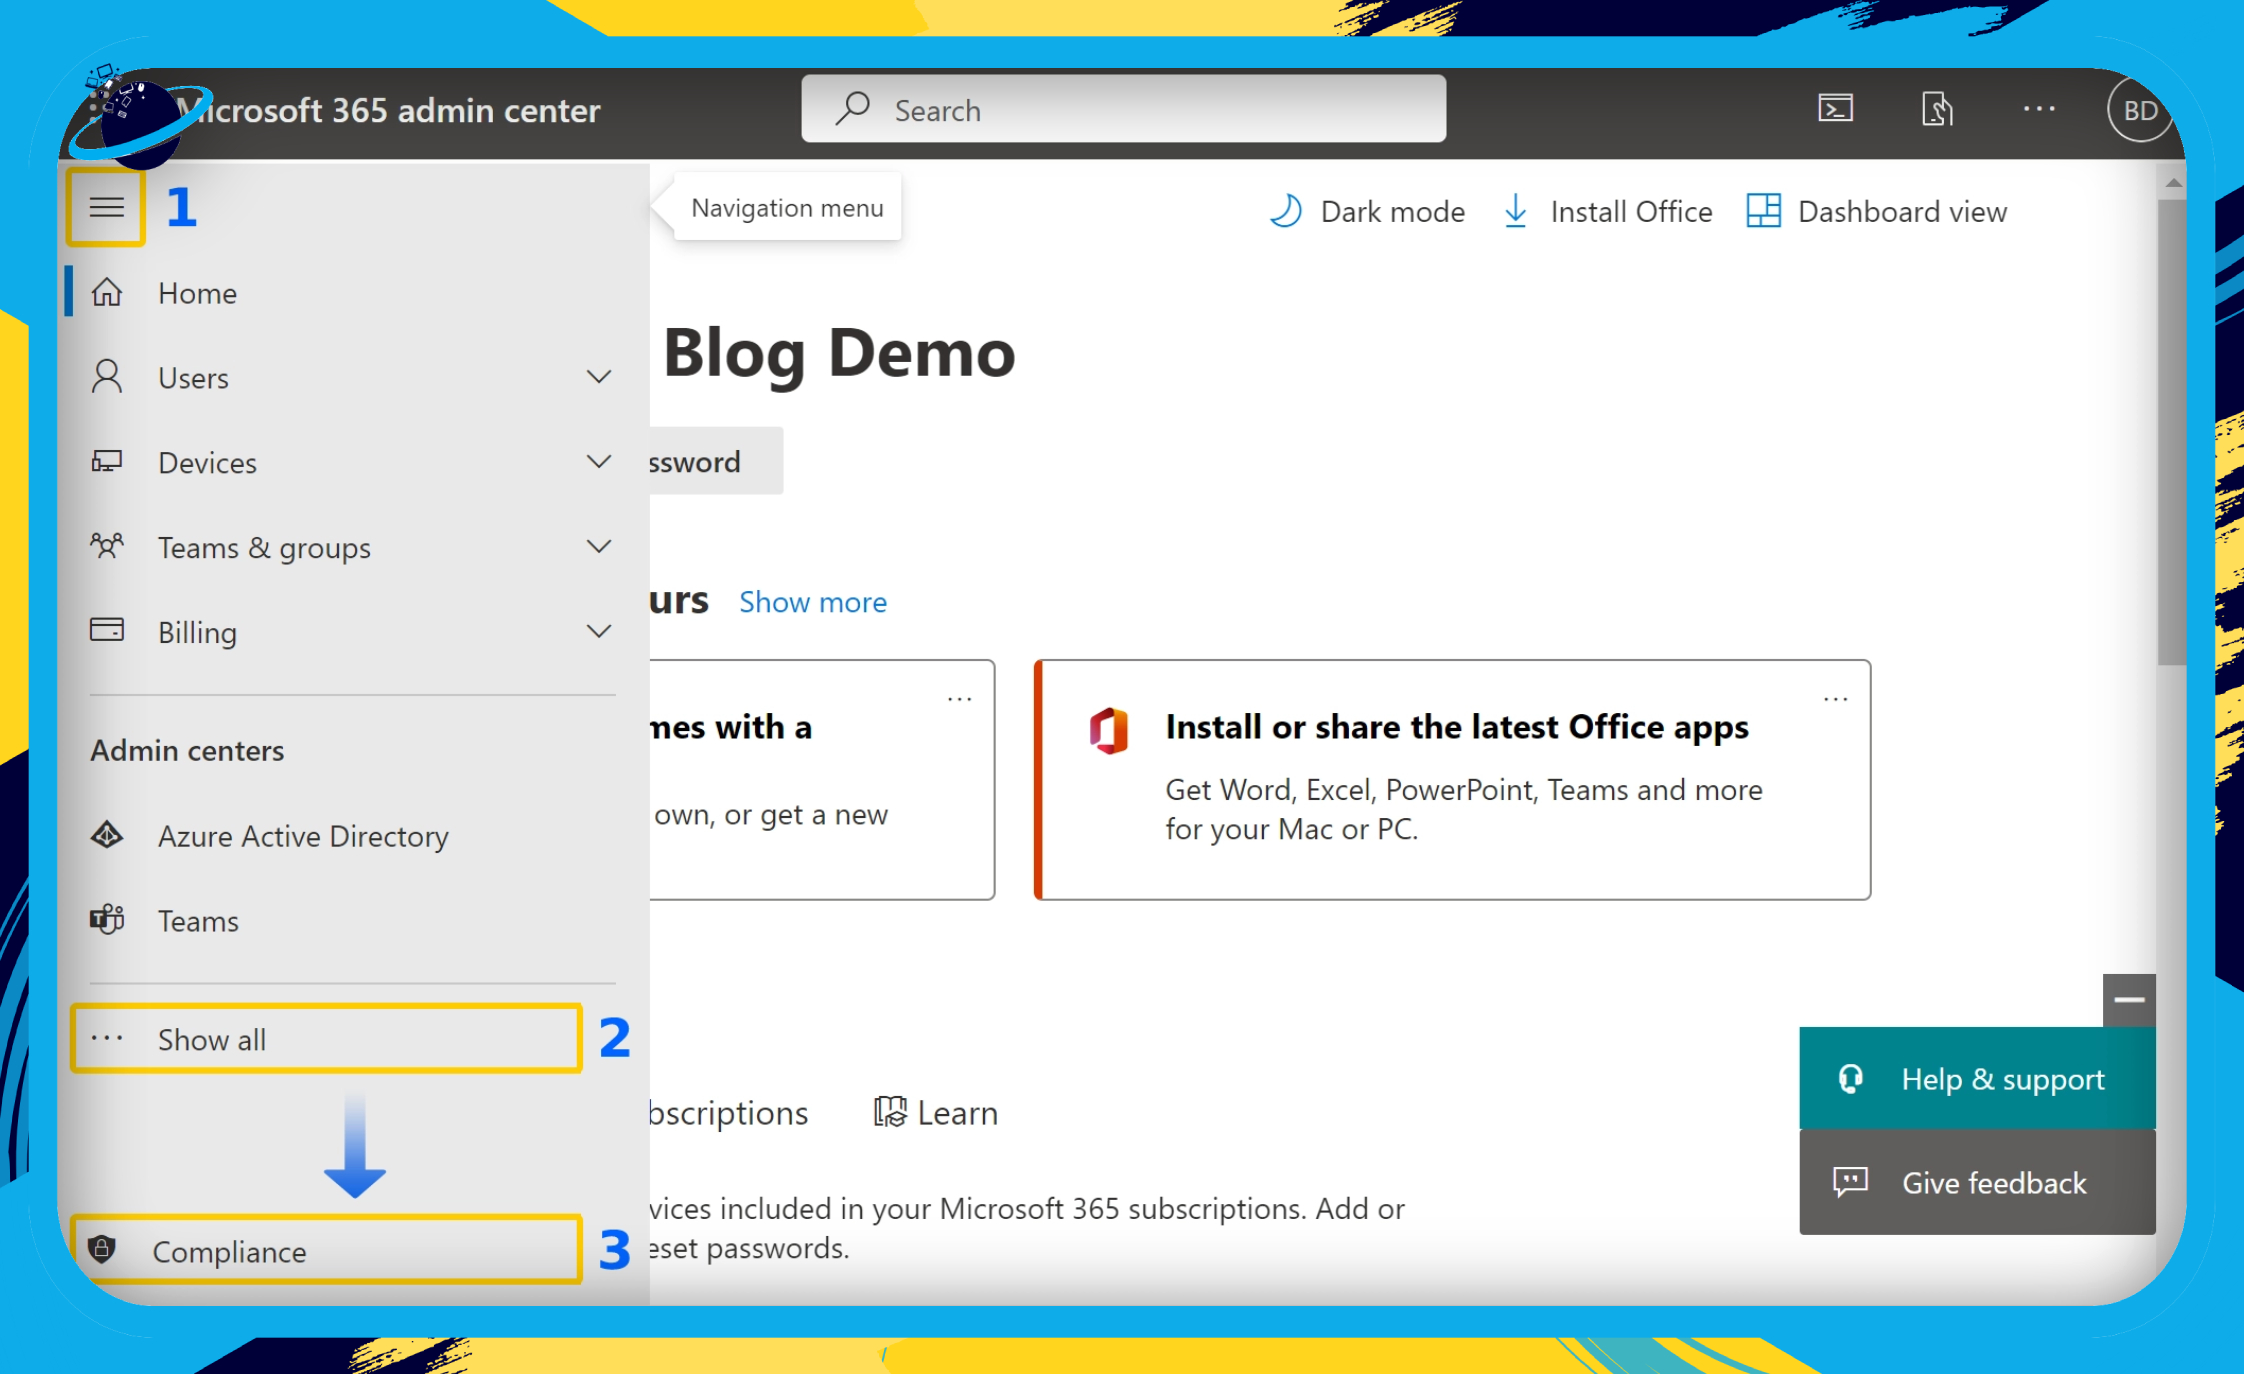
- Open the app launcher and select “Admin.”
- Click on the
 menu icon in the top left corner. (1)
 - Click on “Show all” on the left menu. (2)
- Then select “Compliance.” (3)
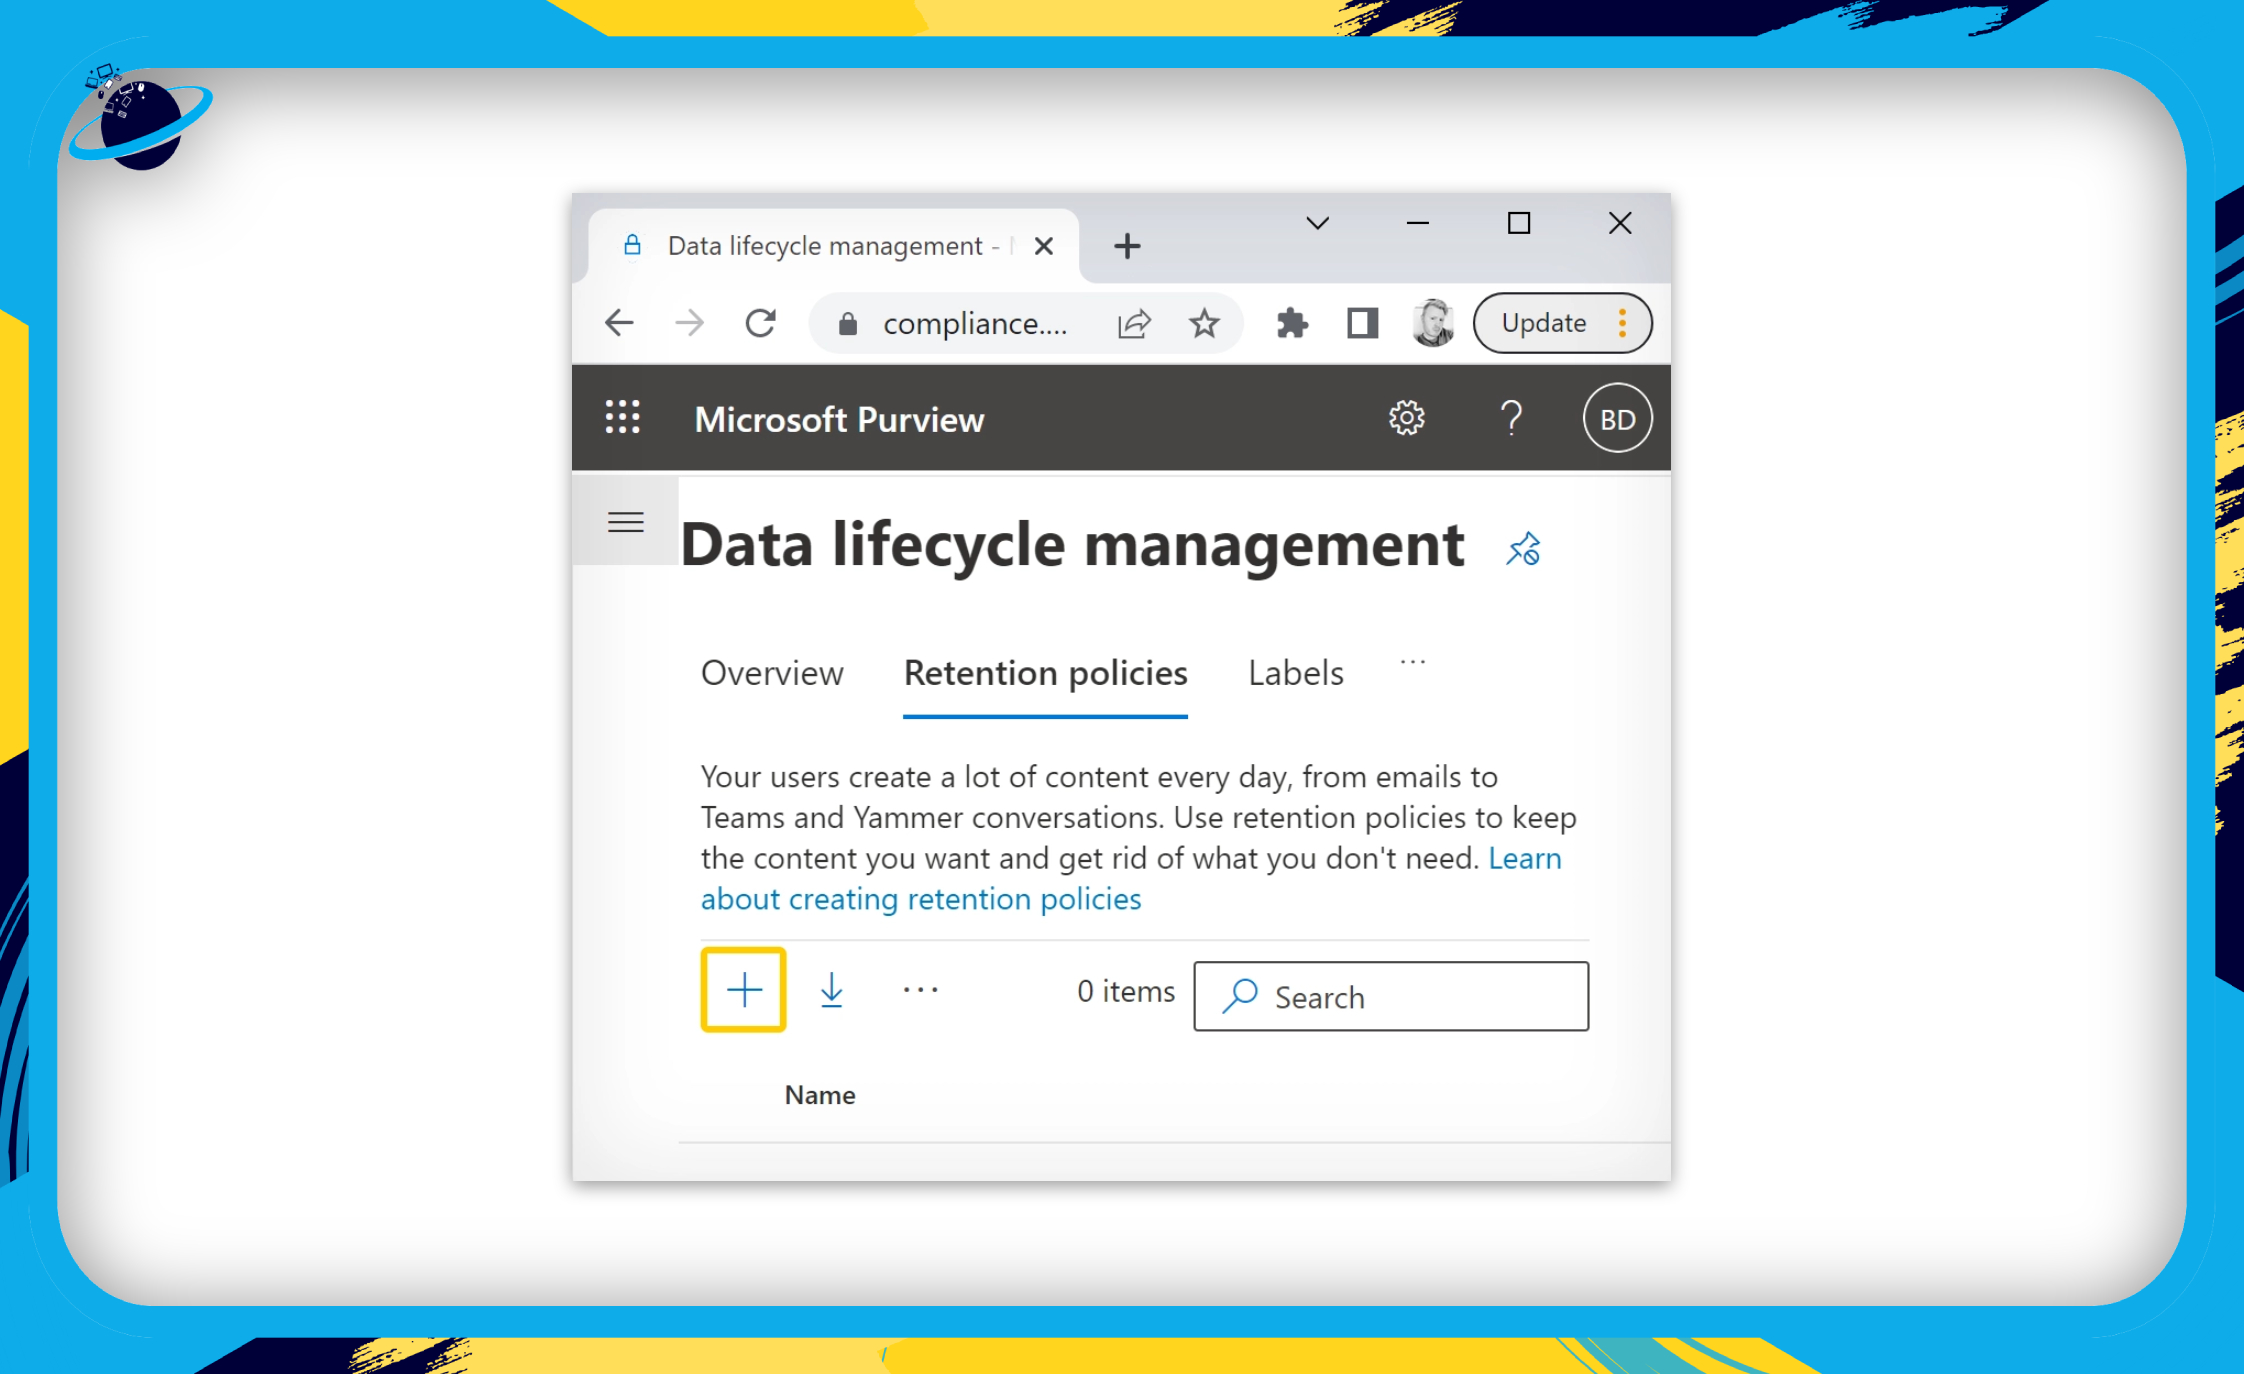
- Click on “Policies” in the Compliance Center’s left menu.
- Then, under the “Data” header, select “Retention.”

- Click the
 plus icon to add a new retention policy.
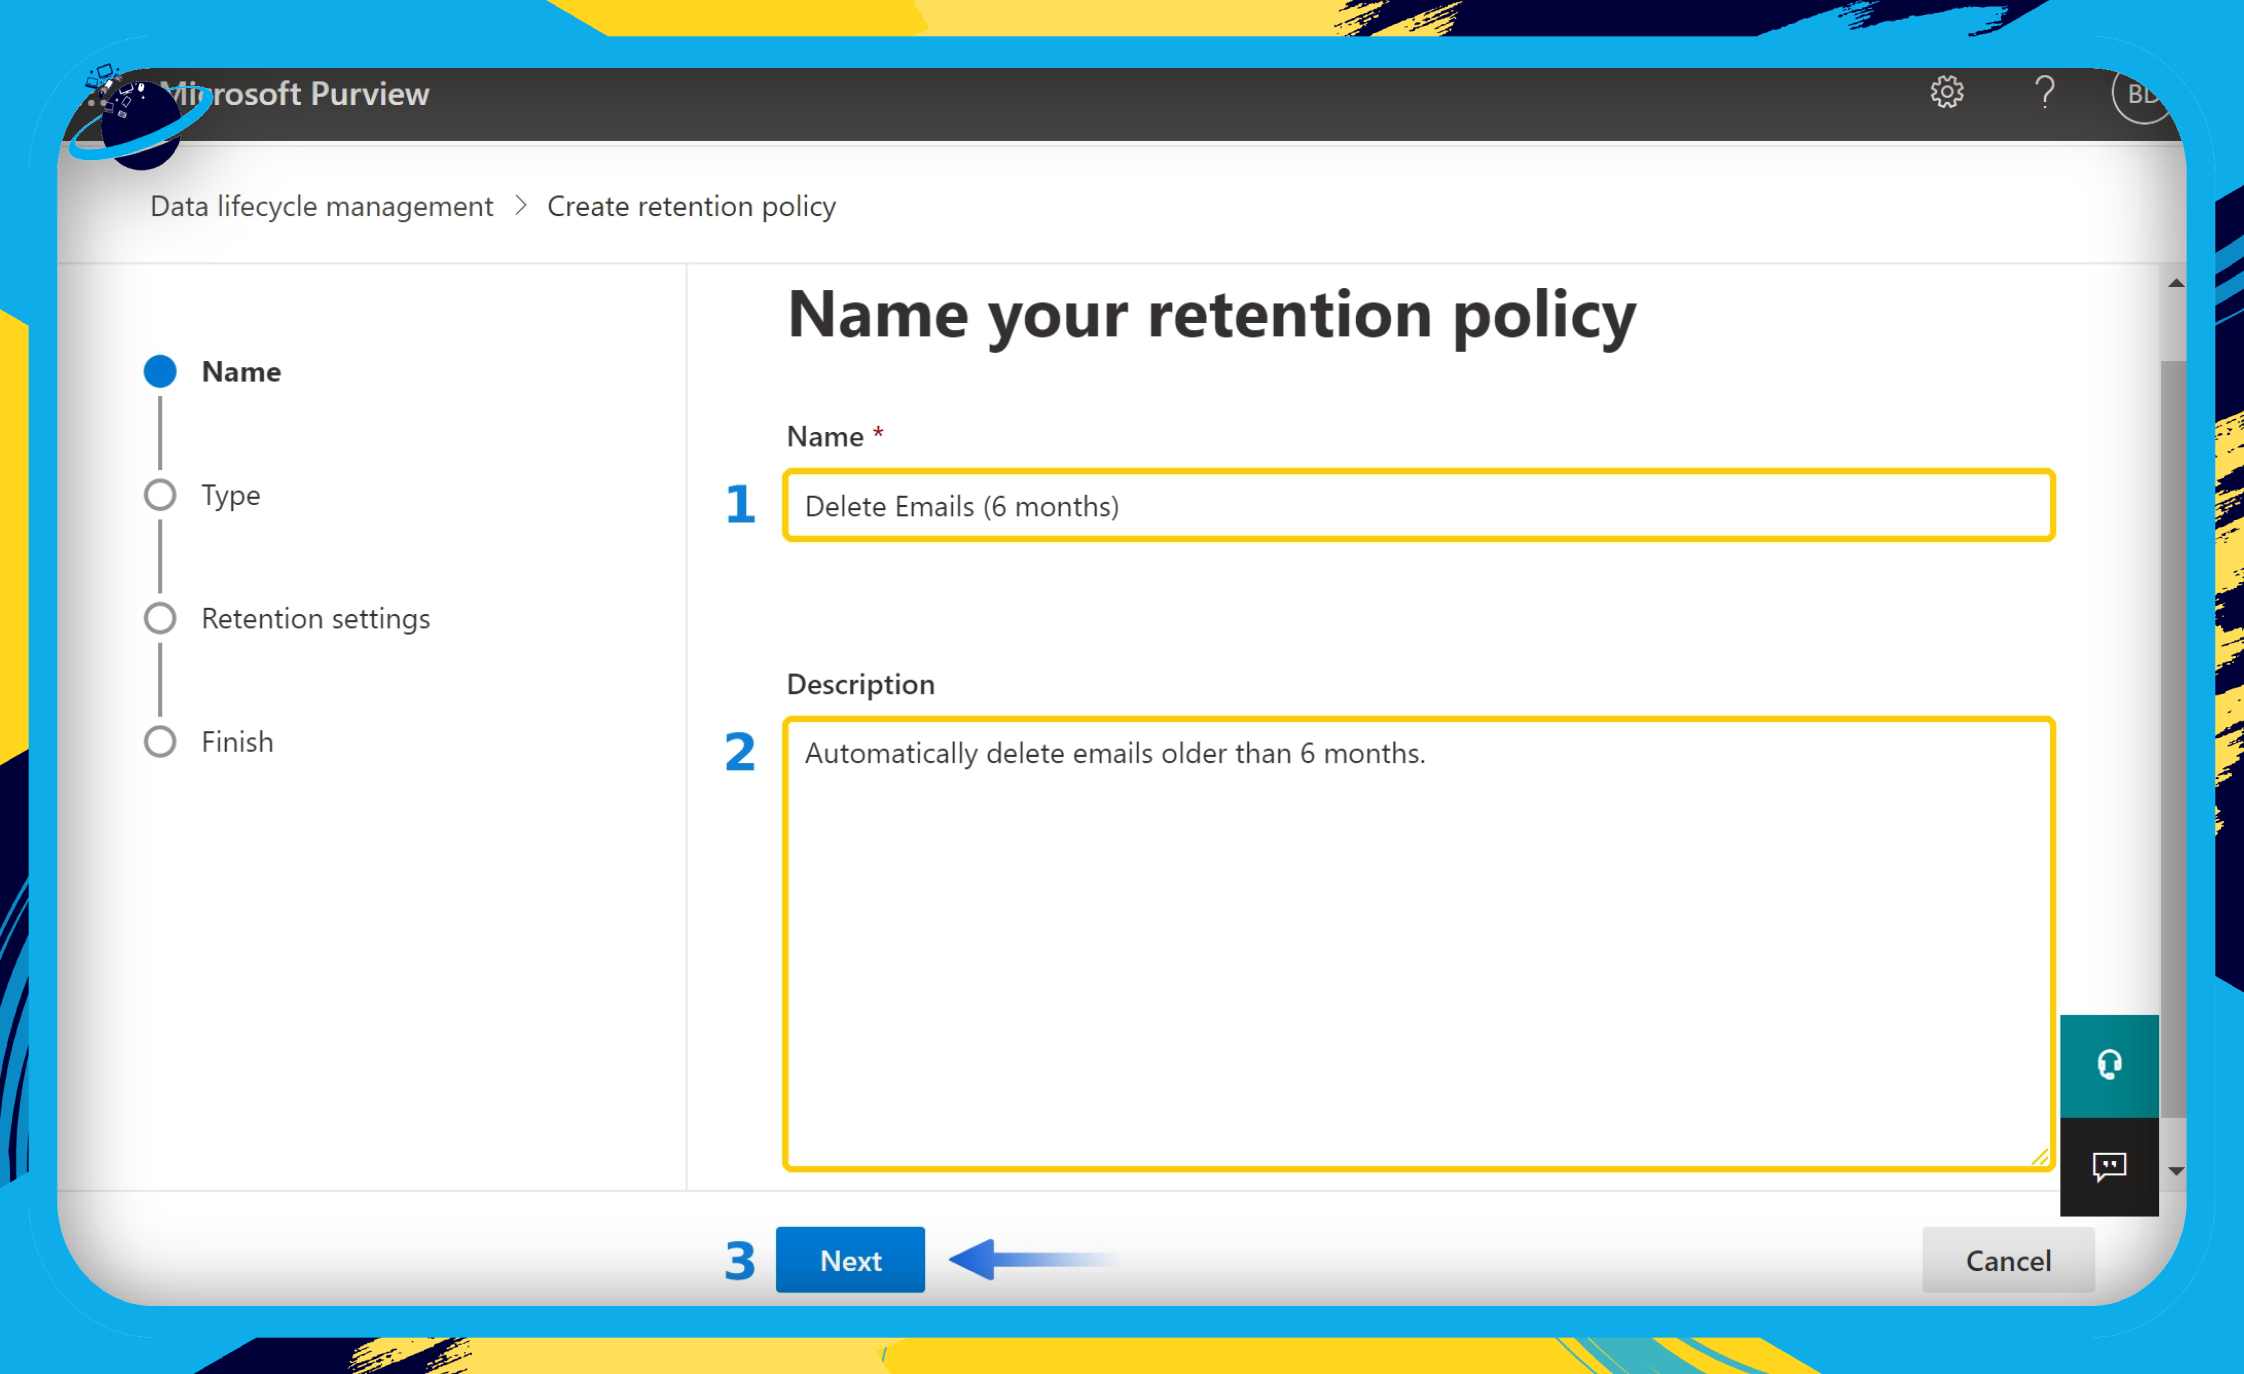
- Name (1) and describe (2) your retention policy.
- Then click the “Next” button. (3)
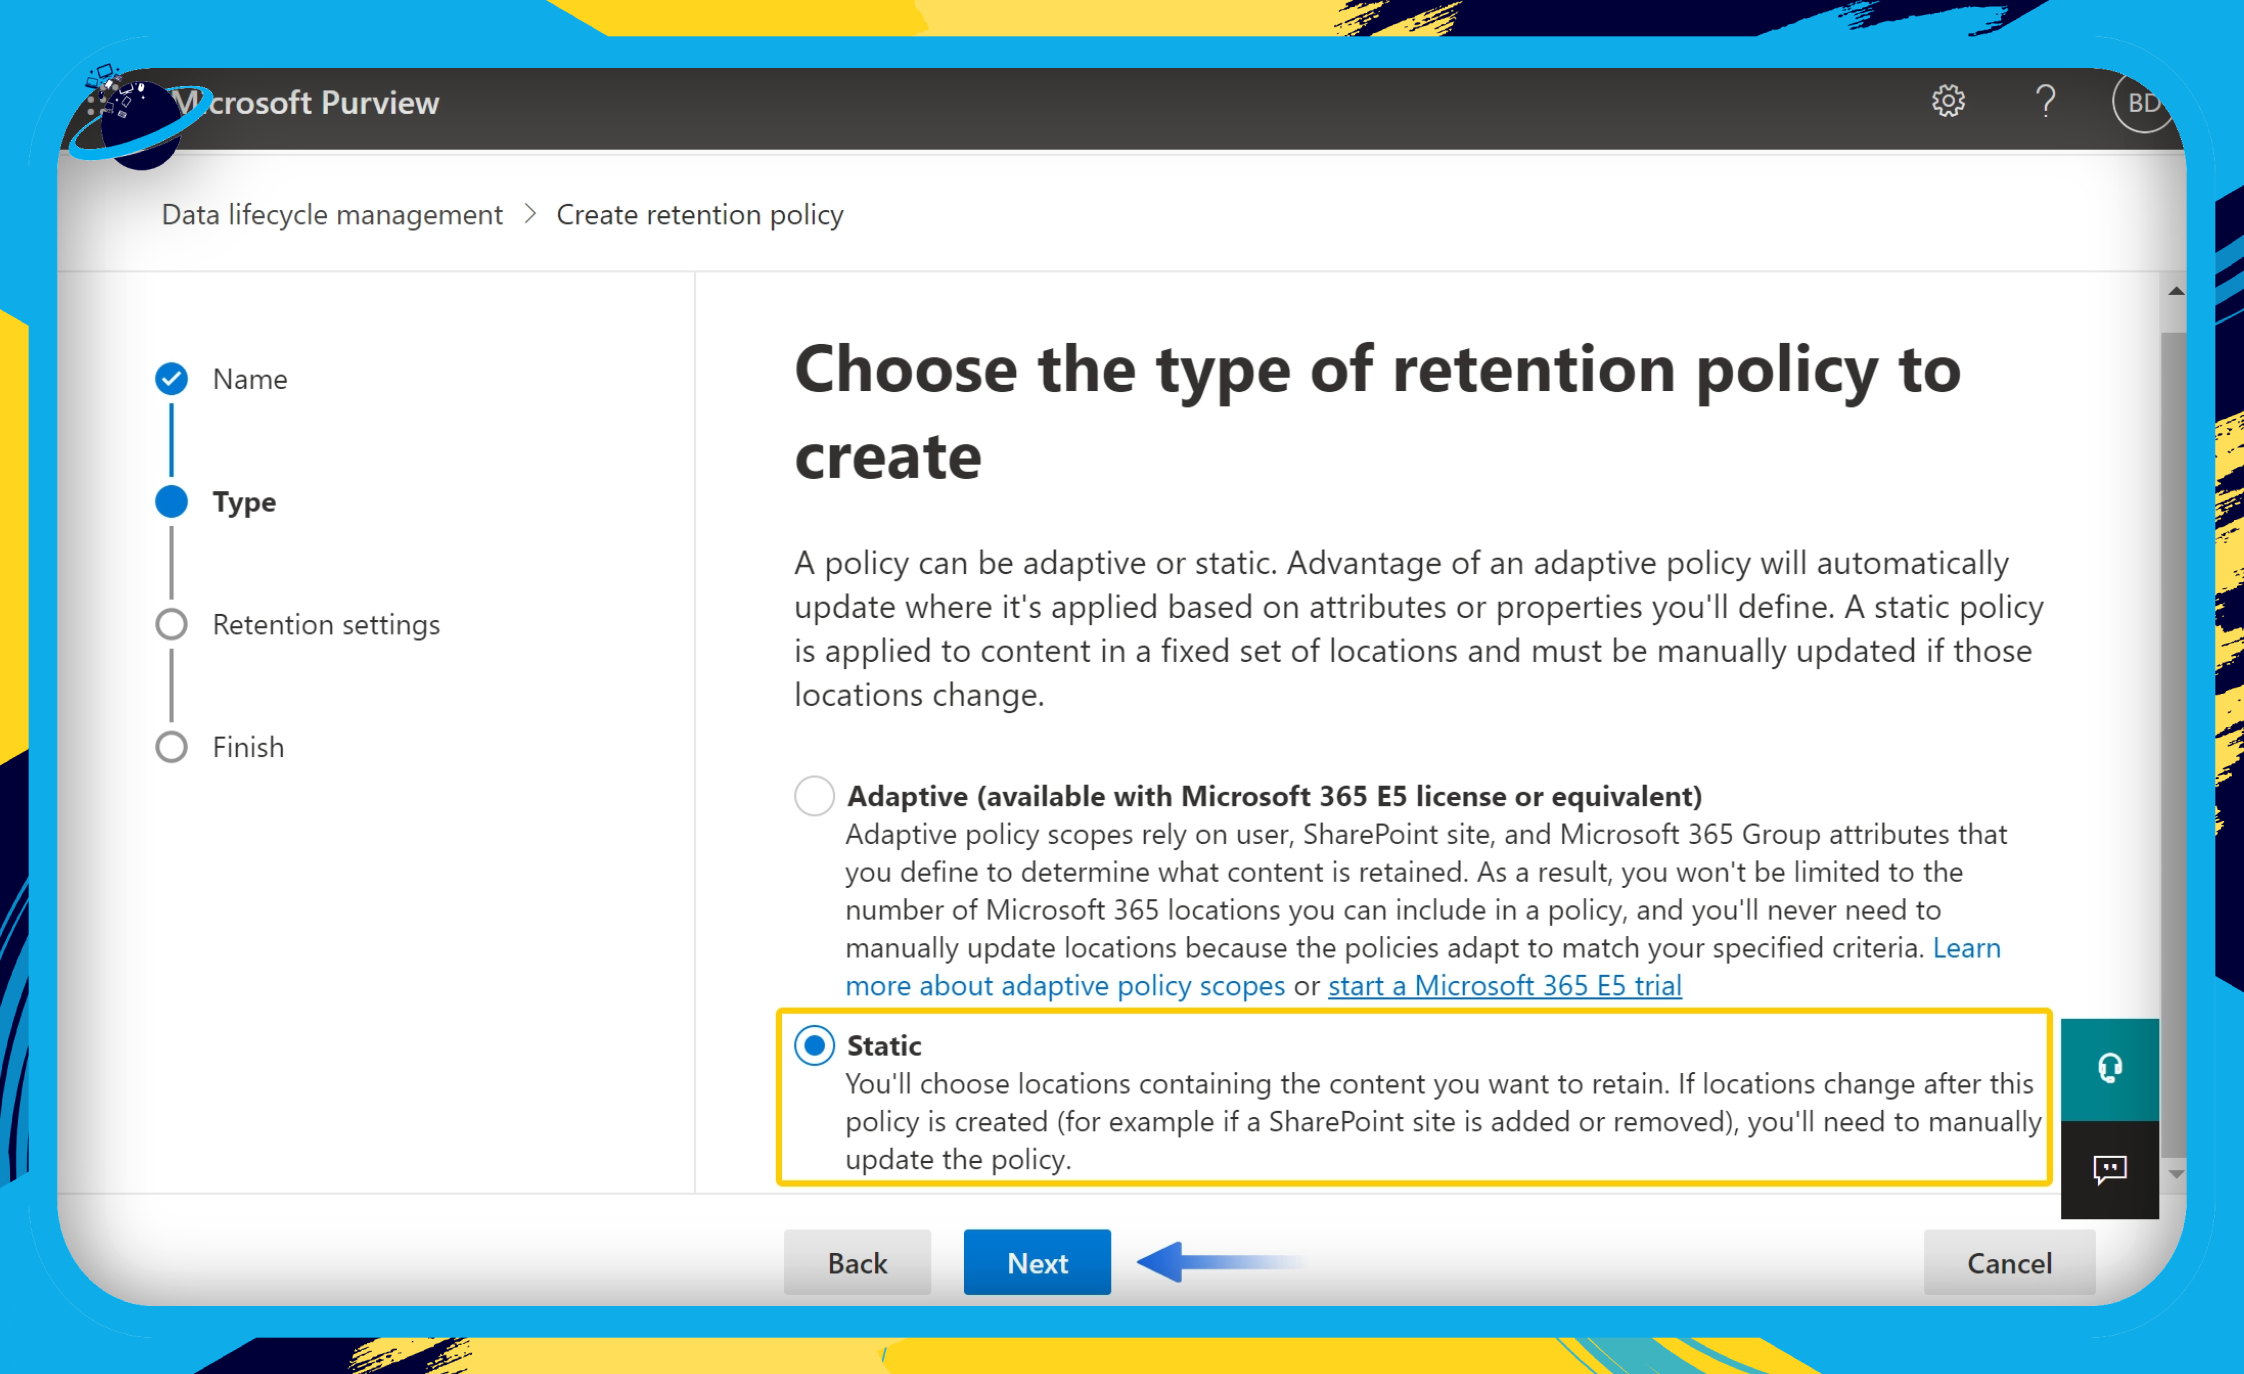
- Select a “Static” retention policy type.
- Then click the “Next” button.
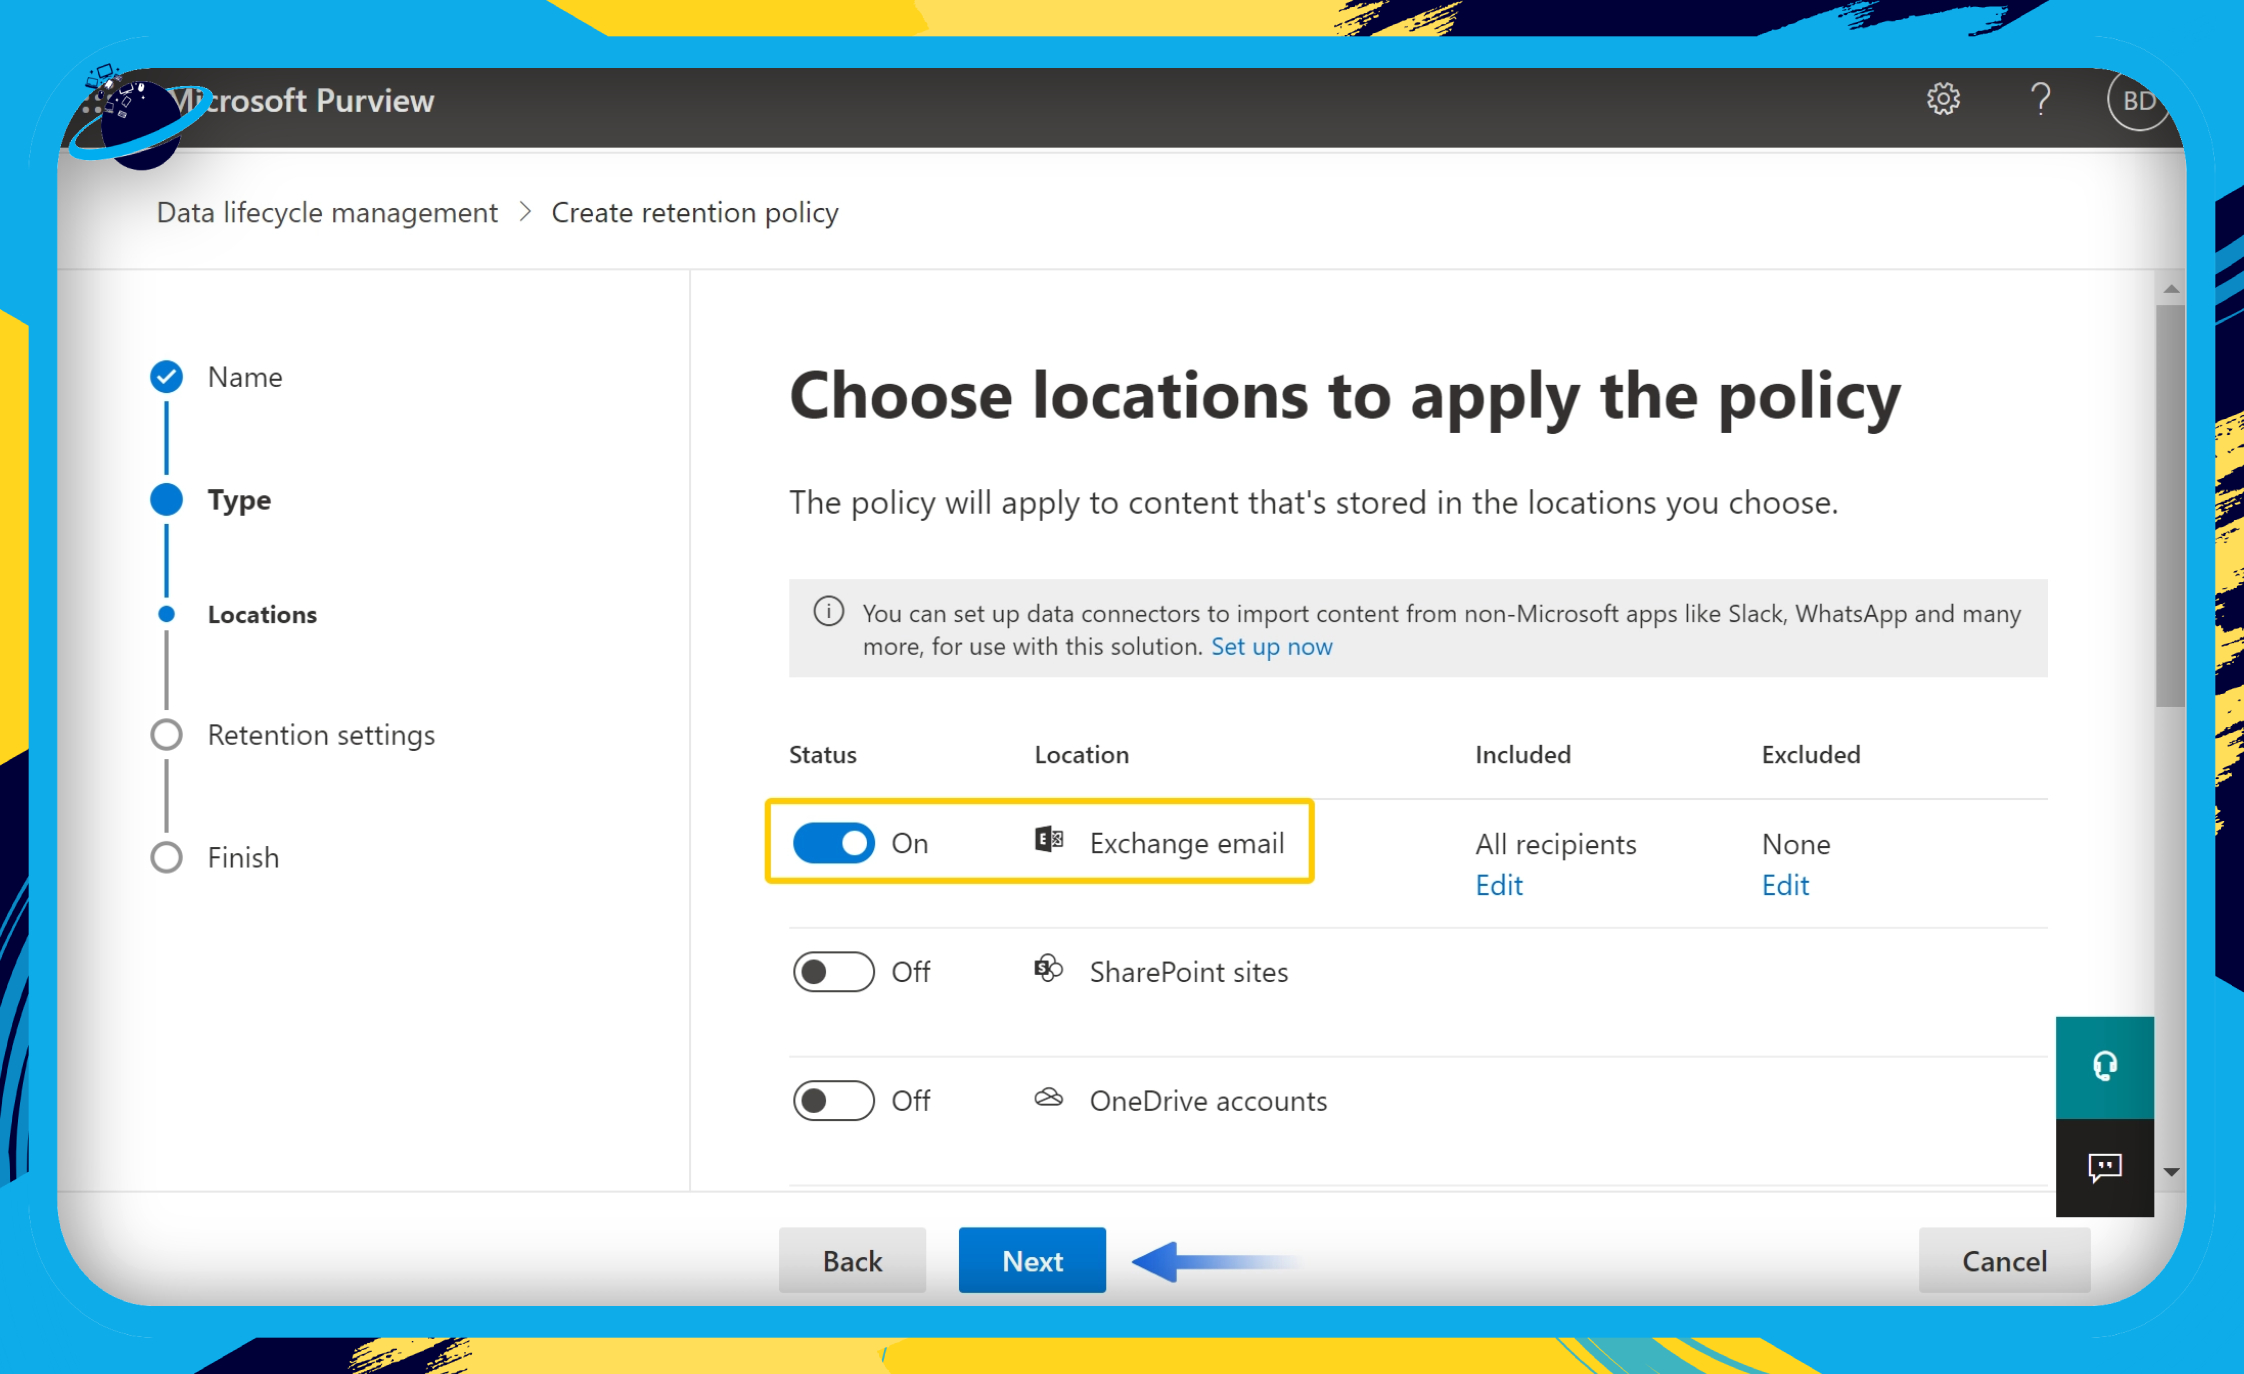
- Toggle on “Exchange email” when choosing a location.
- Toggle off all other locations.
- Then click the “Next” button.
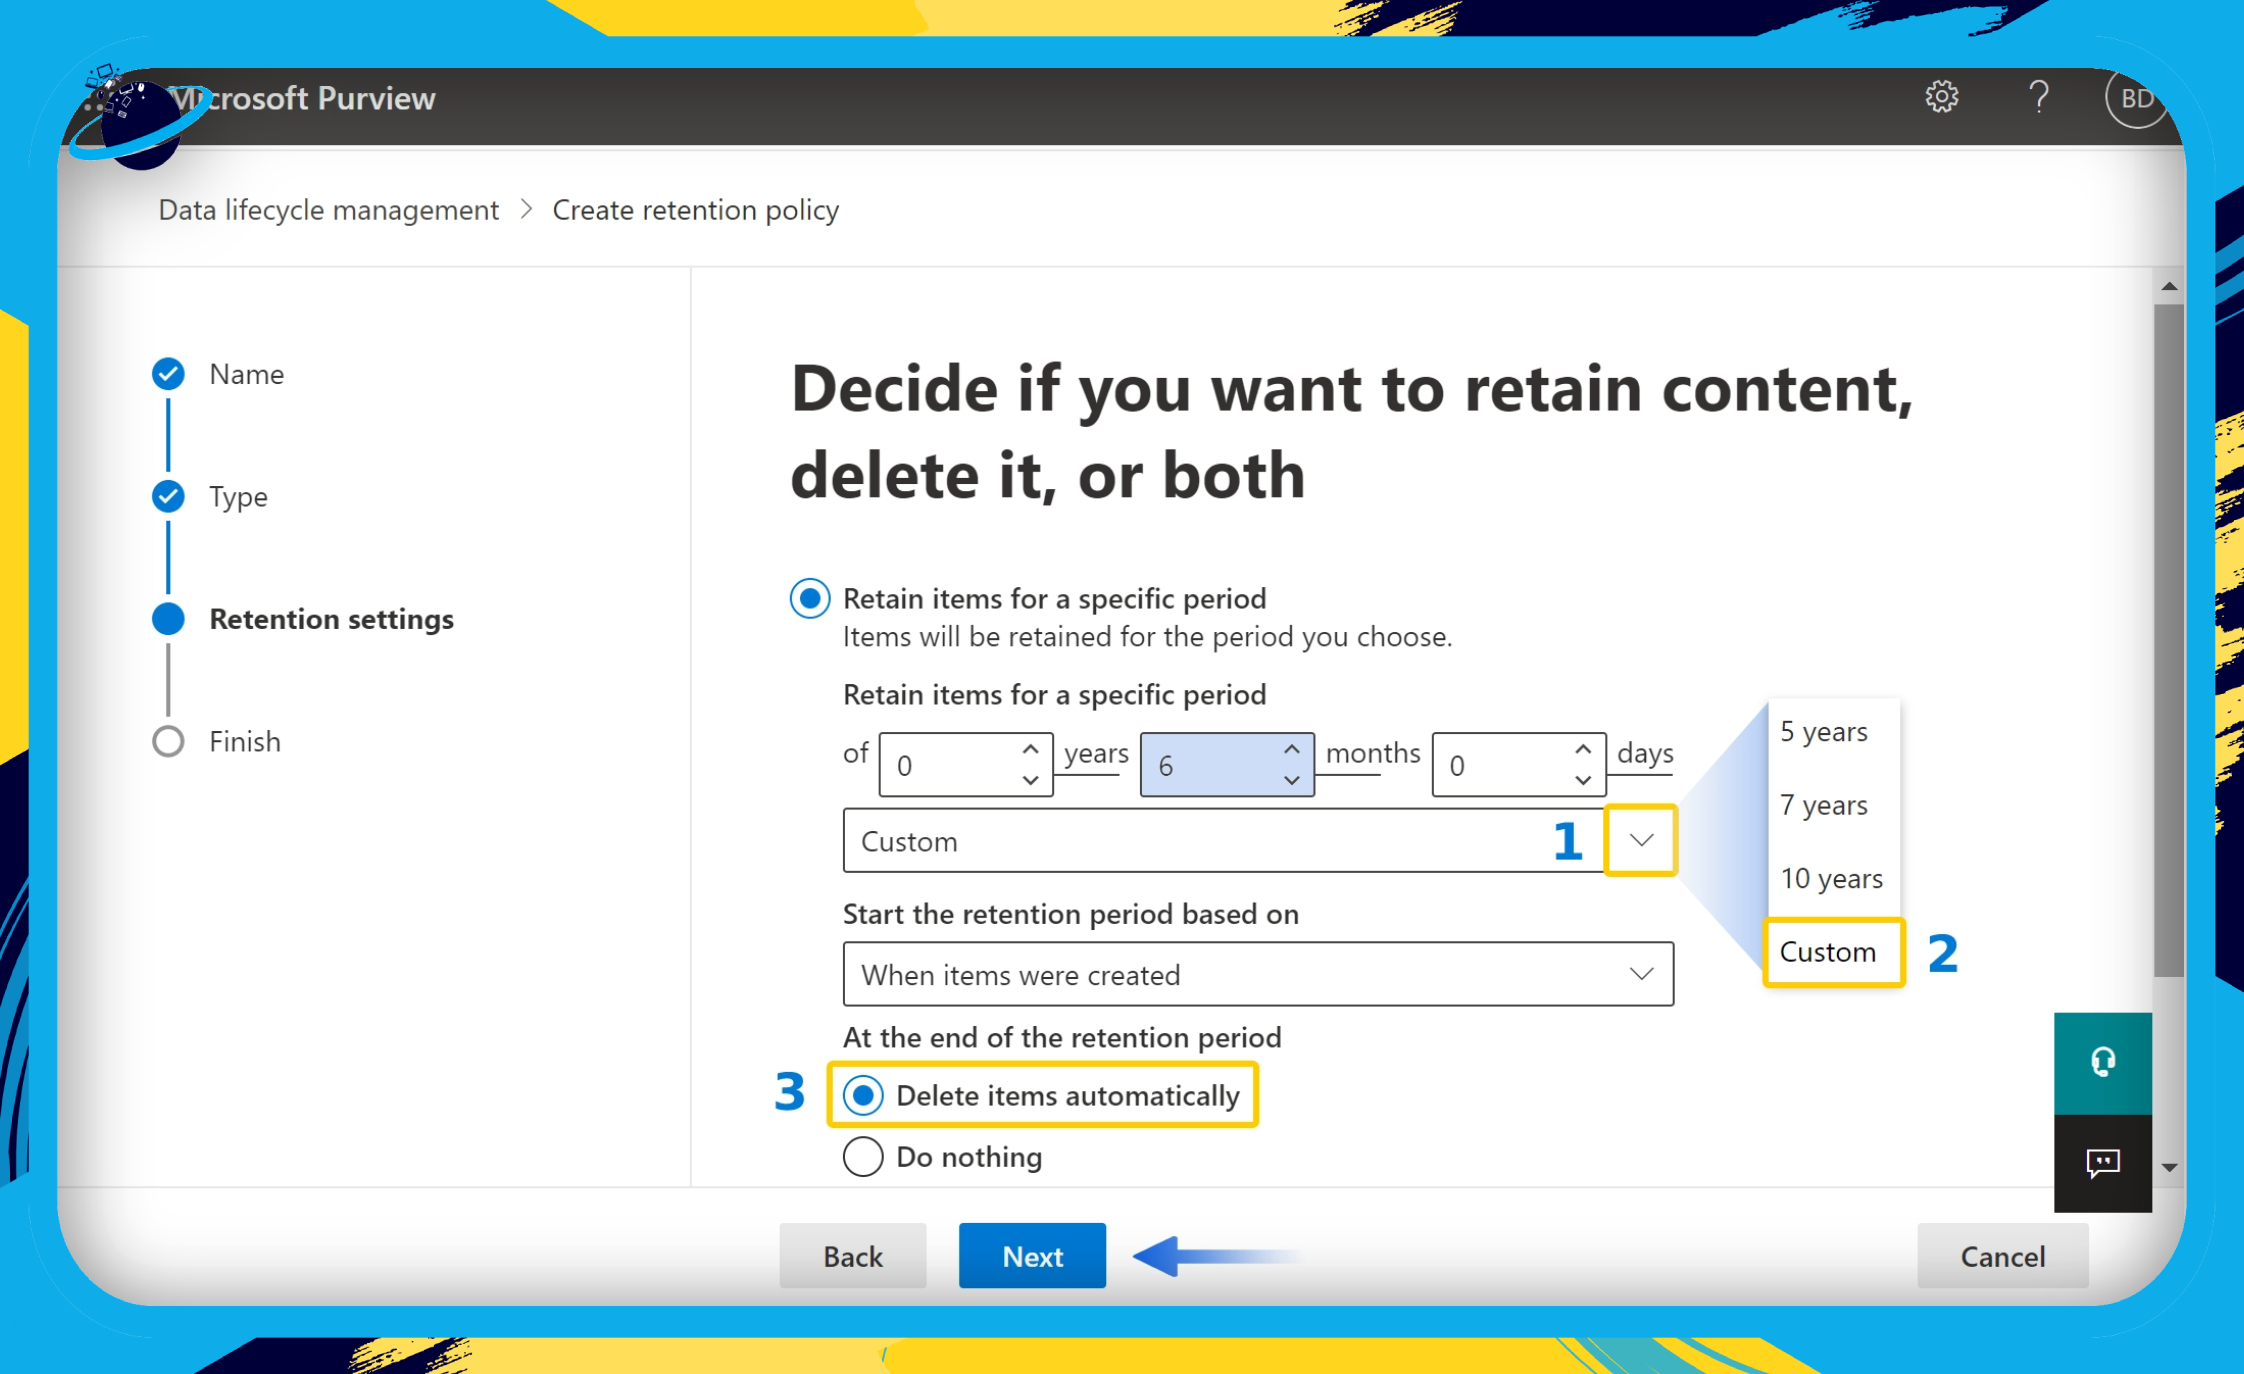
- Click on the select box under “Retain items for a specific period.” (1)
- Select “Custom” from the drop-down menu. (2)
- To delete emails after 6 months, set the years = 0, months = 6, and days = 0.
- Click the circular button next to “Delete items automatically.” (3)
- Then click the “Next” button.
- Finally, review your policy and click the
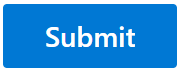 “Submit” button.
| What will be deleted | What won’t be deleted |
|---|---|
| Received emails | Contacts |
| Sent emails | Tasks without an end date |
| Draft emails | Calendar items without an end date |
| Email Attachments | Skype messages |
| Notes | Teams messages |
| Tasks with an end date | |
| Calendar items with an end date |
Create a retention policy for specific mailboxes
![]() Please note: To follow this process you will need access to your organization’s Exchange admin center. Hence you will need to have one of the following privileges assigned to your user:
Please note: To follow this process you will need access to your organization’s Exchange admin center. Hence you will need to have one of the following privileges assigned to your user:
• Exchange admin
• Global admin
- First, go to Office.com and sign in using your Microsoft 365 credentials.
Remember, you can only follow these steps if you are a global or exchange admin. If you are neither, you’ll be unable to follow the steps outlined in this guide.
- Open the app launcher and select “Admin.”
- Click on the menu icon in the top left corner. (1)
- Click on “Show all” on the left menu. (2)
- Then select “Compliance.” (3)
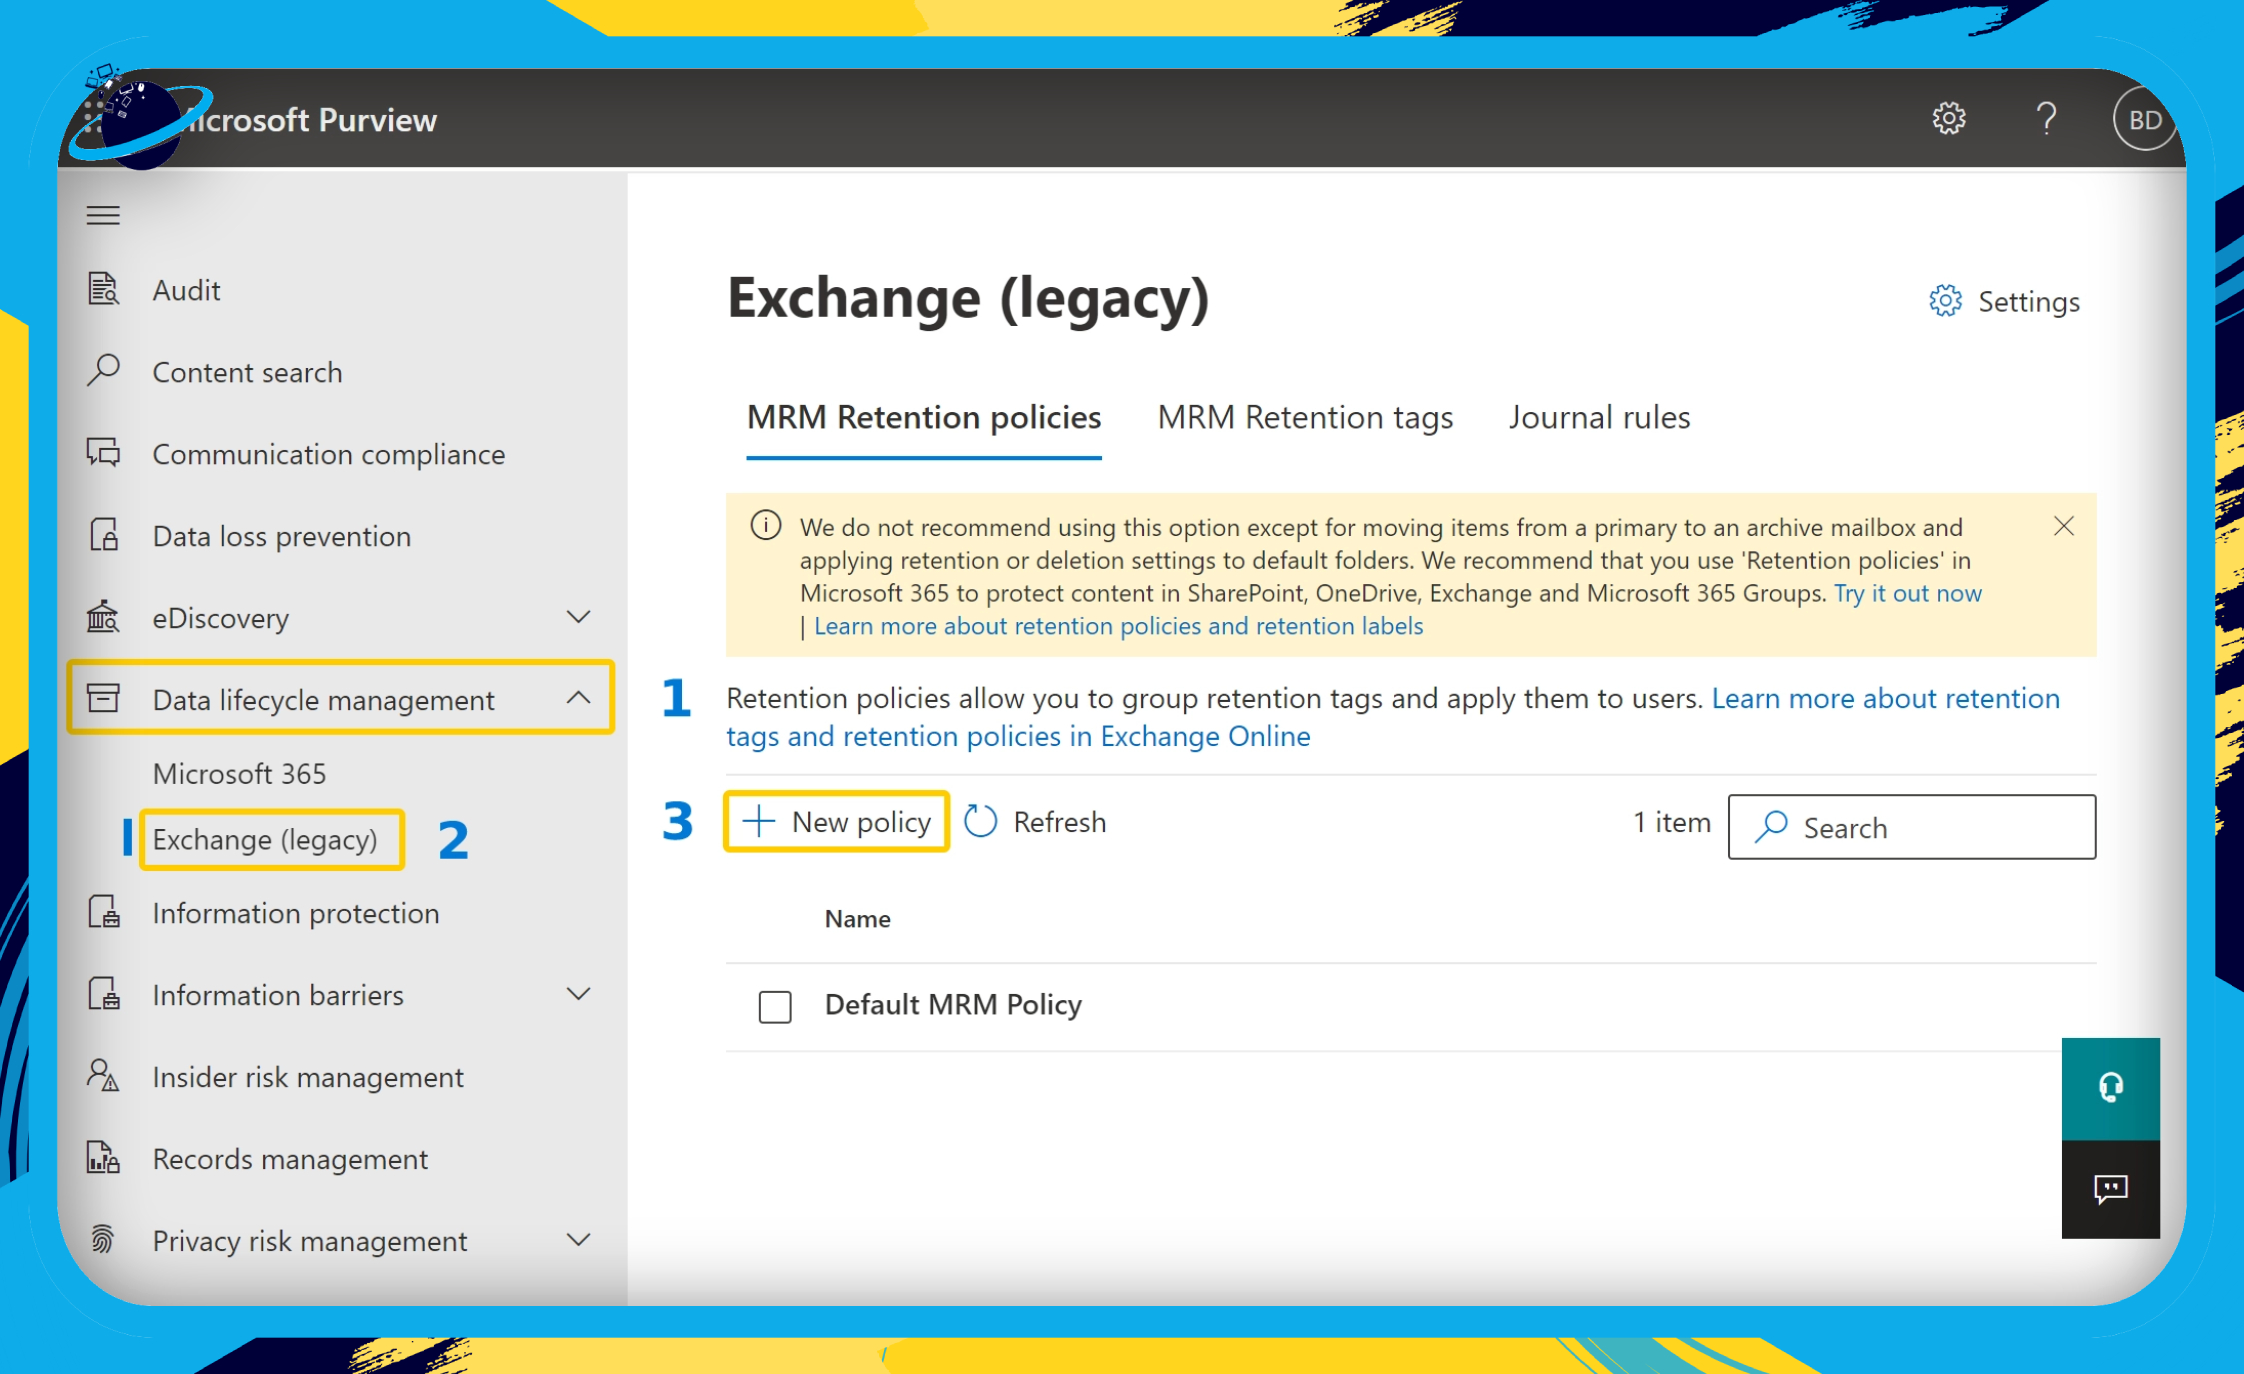
- Click on “Data lifecycle management” in the Compliance Center’s left menu. (1)
- Select “Exchange (legacy)” from the revealed options. (2)
- Then click on “New policy.” (3)
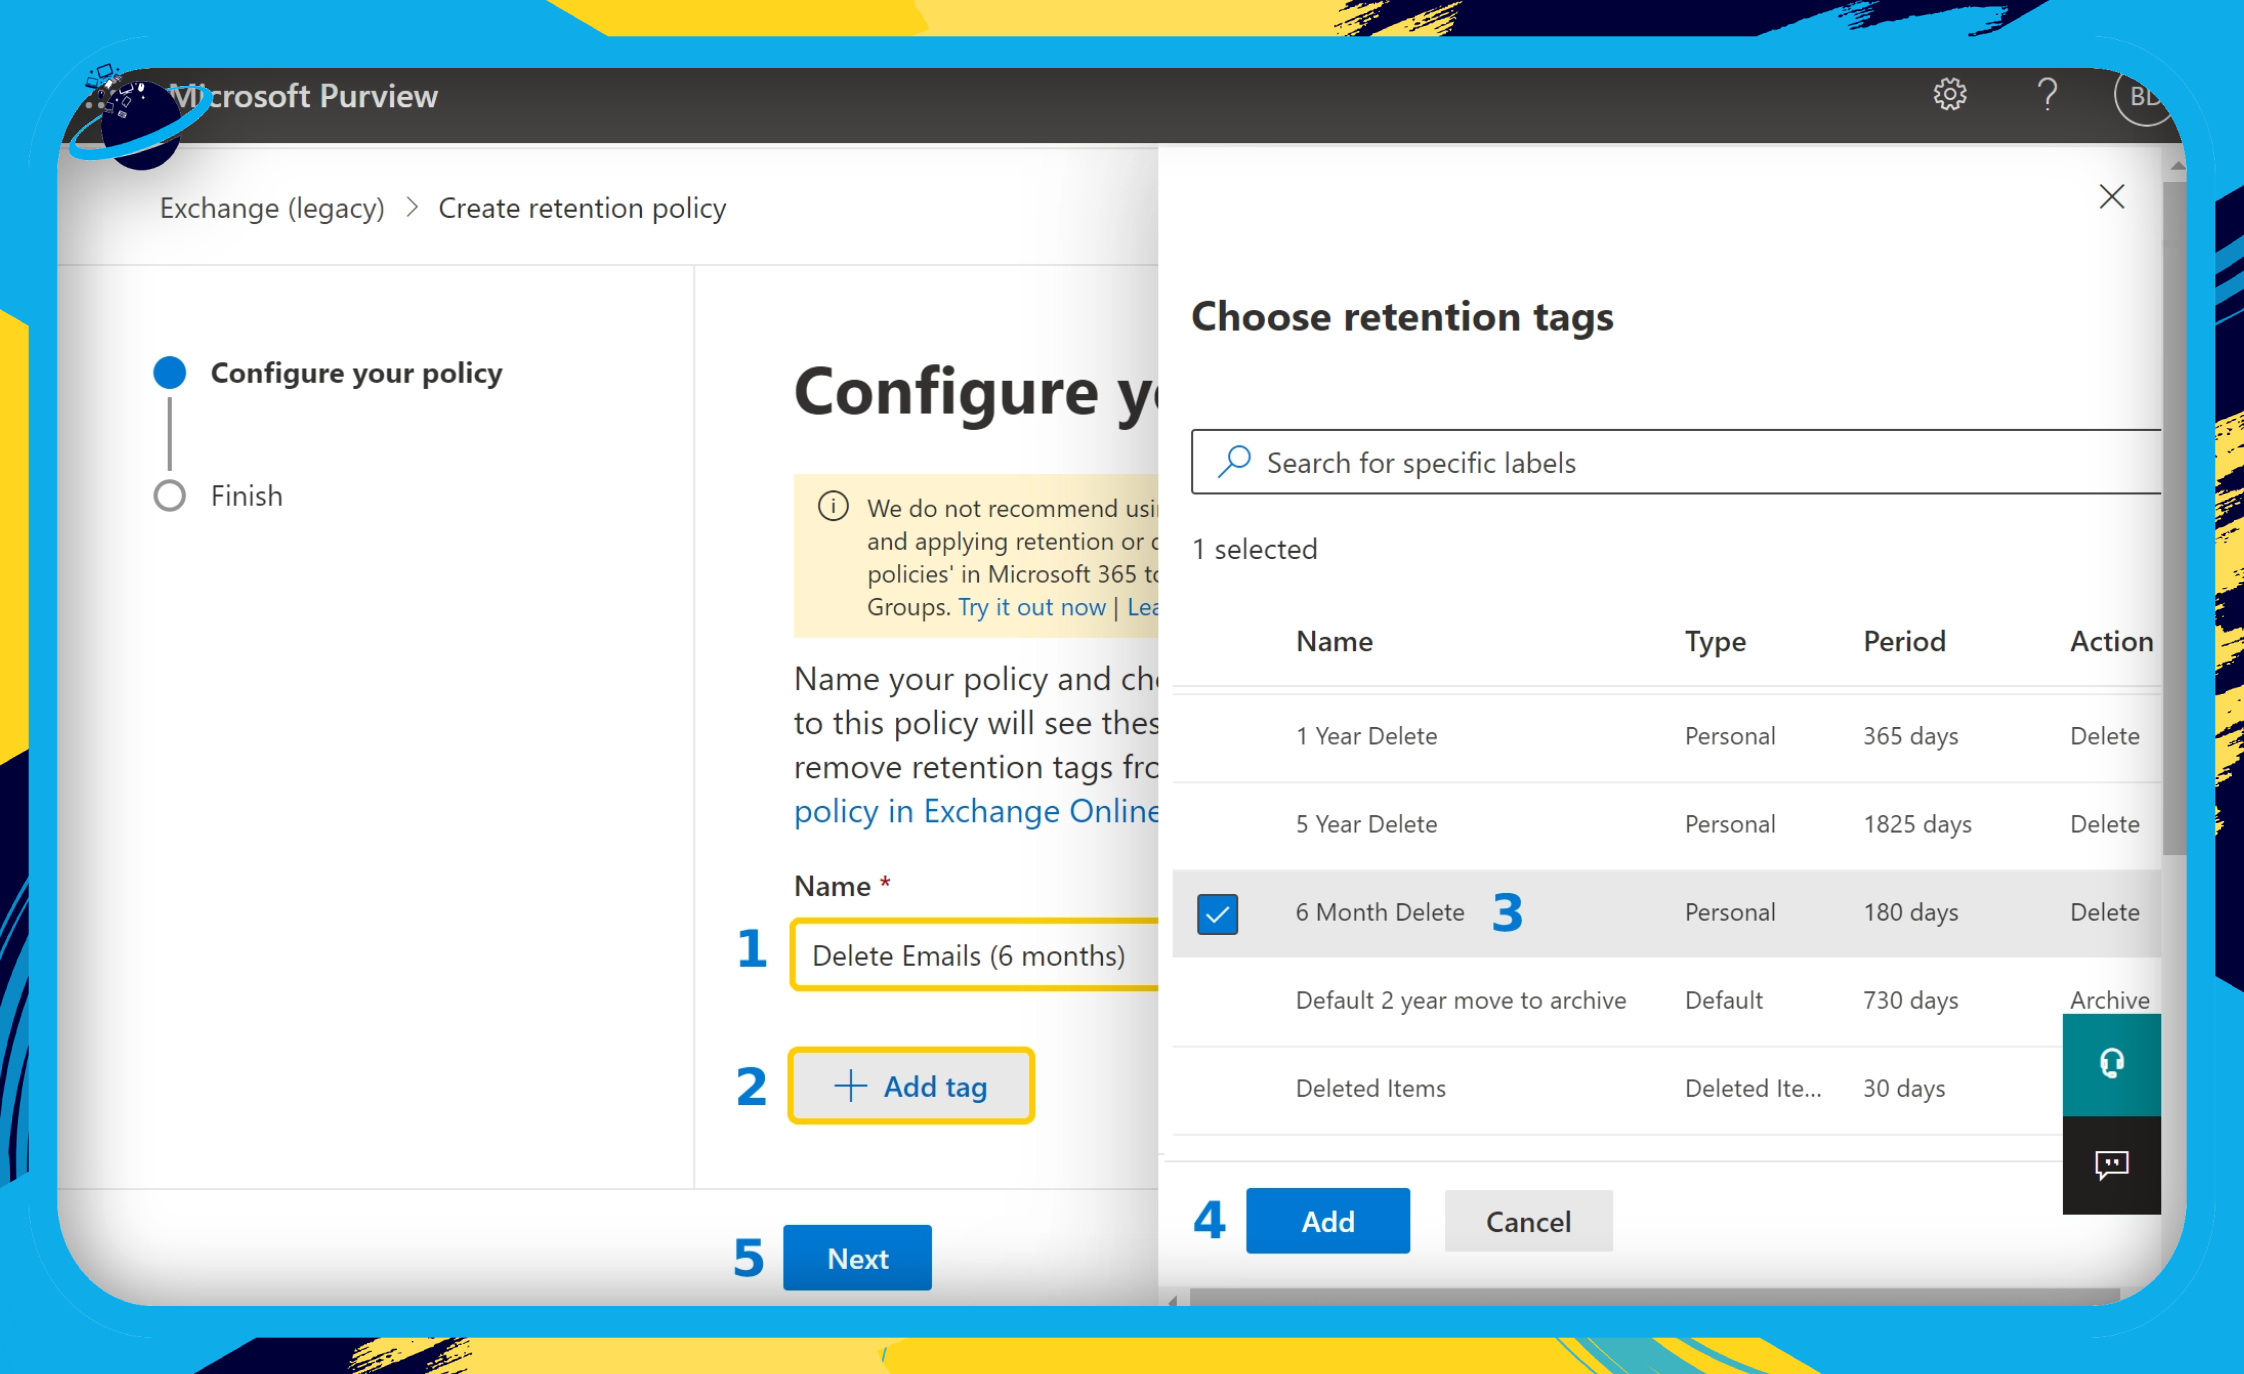
- Enter a name for your new policy. (1)
- Click the “ Add tag” button. (2)
- Select any deletion date (we chose 6 months). (3)
- Click the “Add” button. (4)
- Then click the “Next” button. (5)
- Review your policy and click the “Submit” button.
The next step in this process involves applying the newly created policy to a specific mailbox. To do that, please continue with the steps below.
- Next, go to your “Exchange admin center” by clicking the onscreen button.
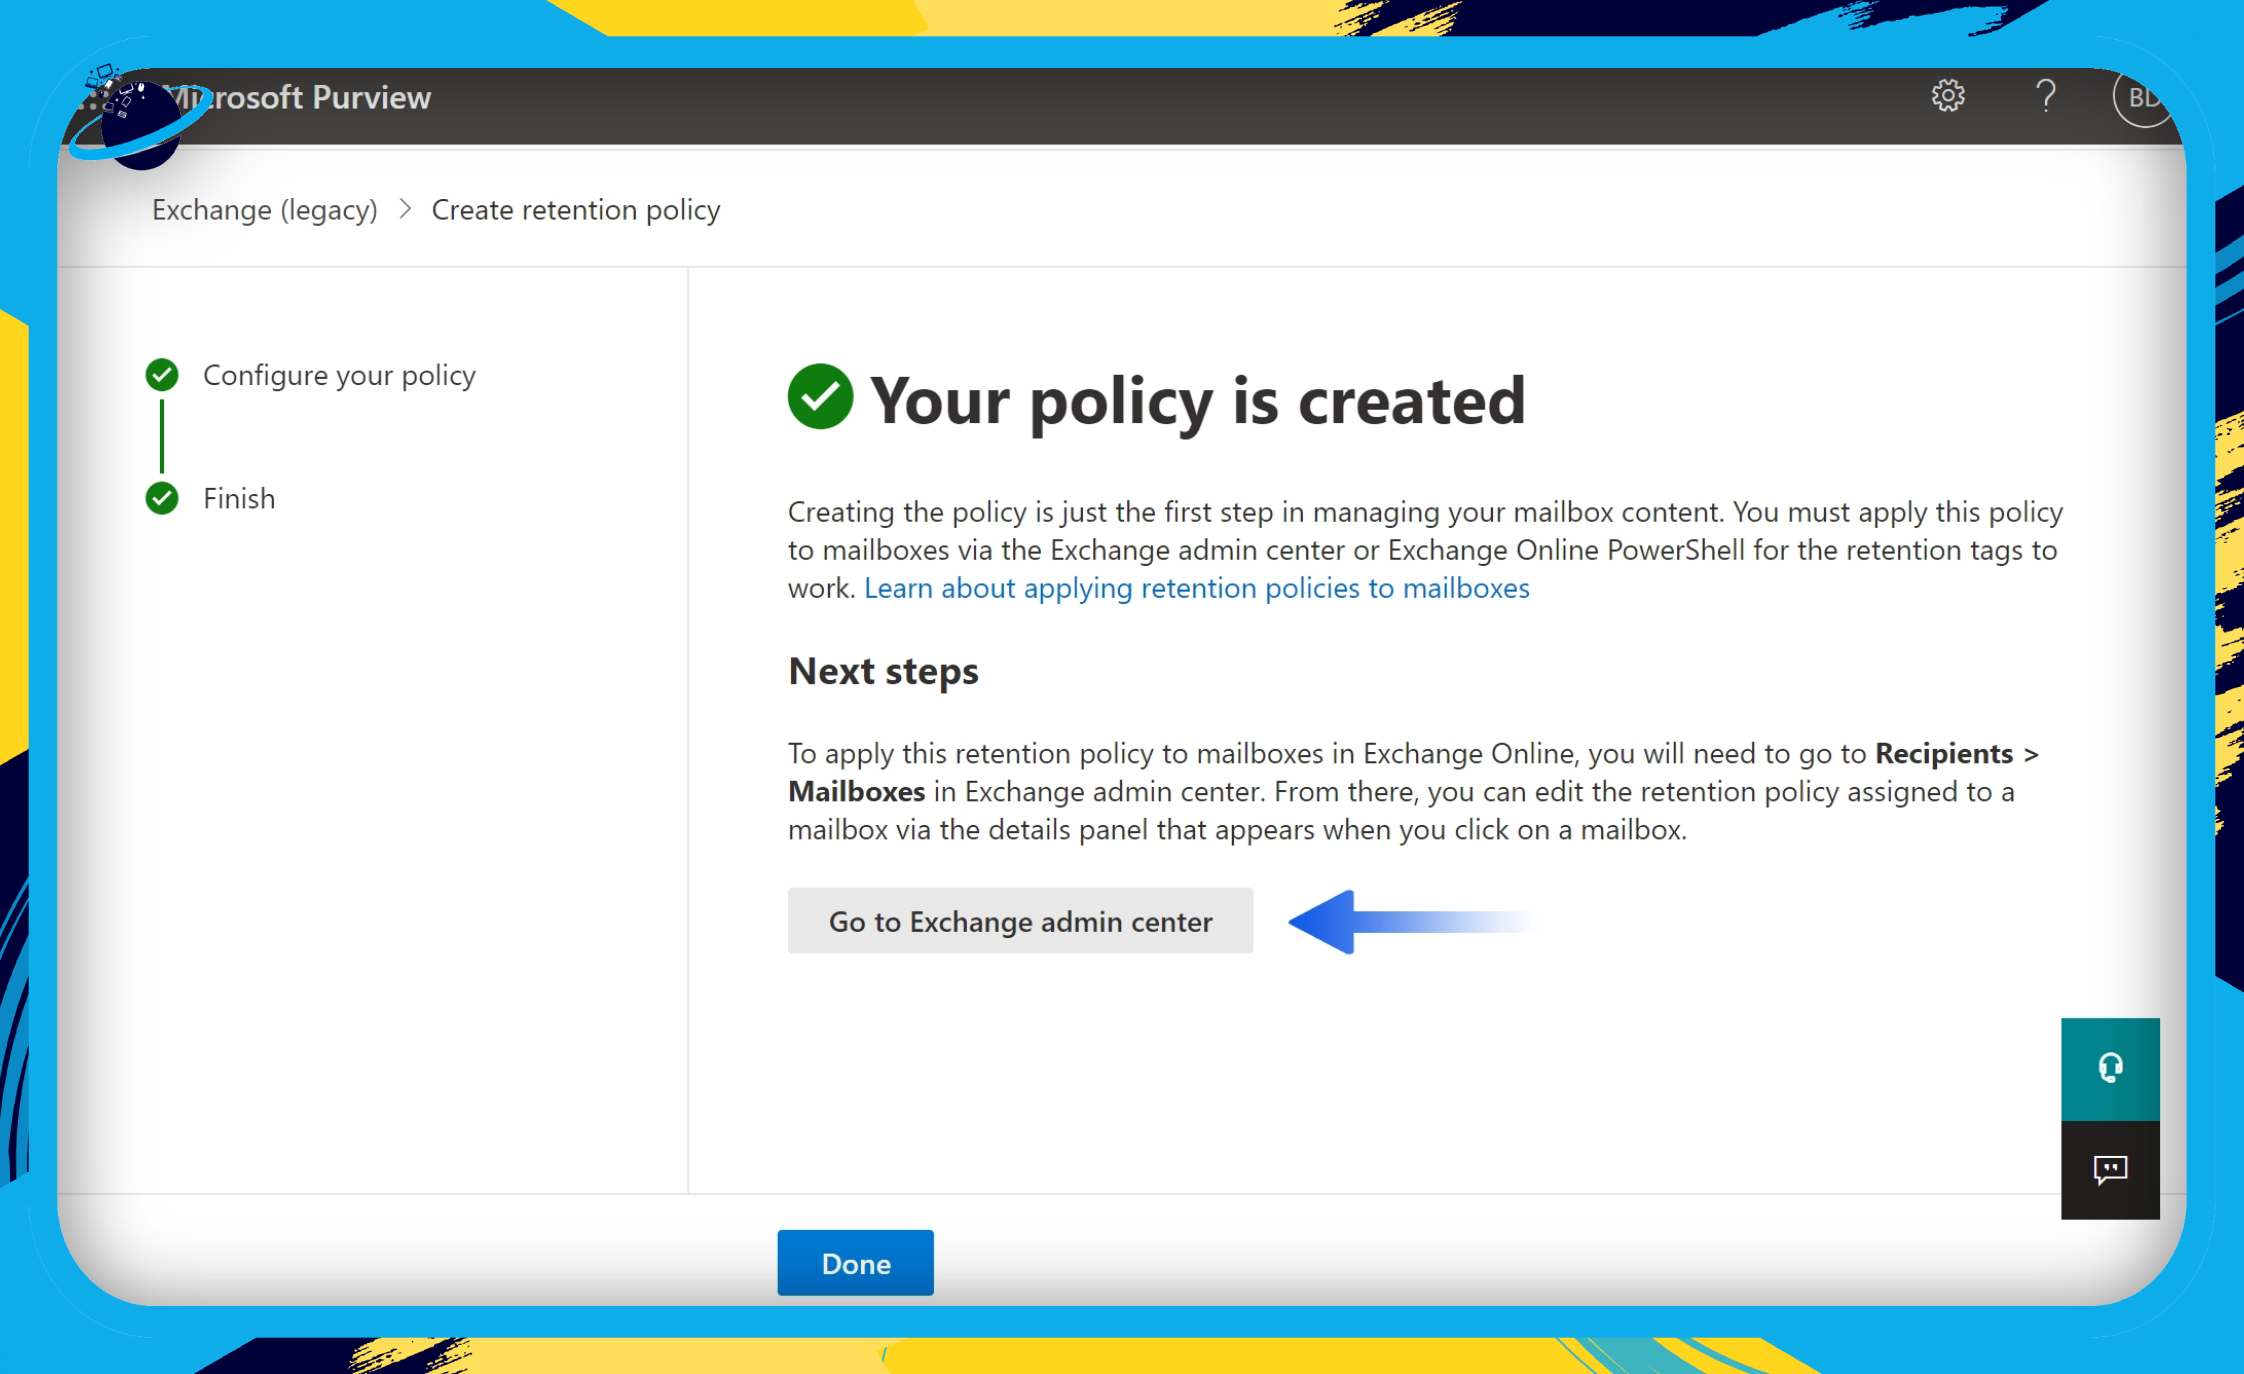
- Alternatively, use this link to access your Exchange Admin Center (EAC).
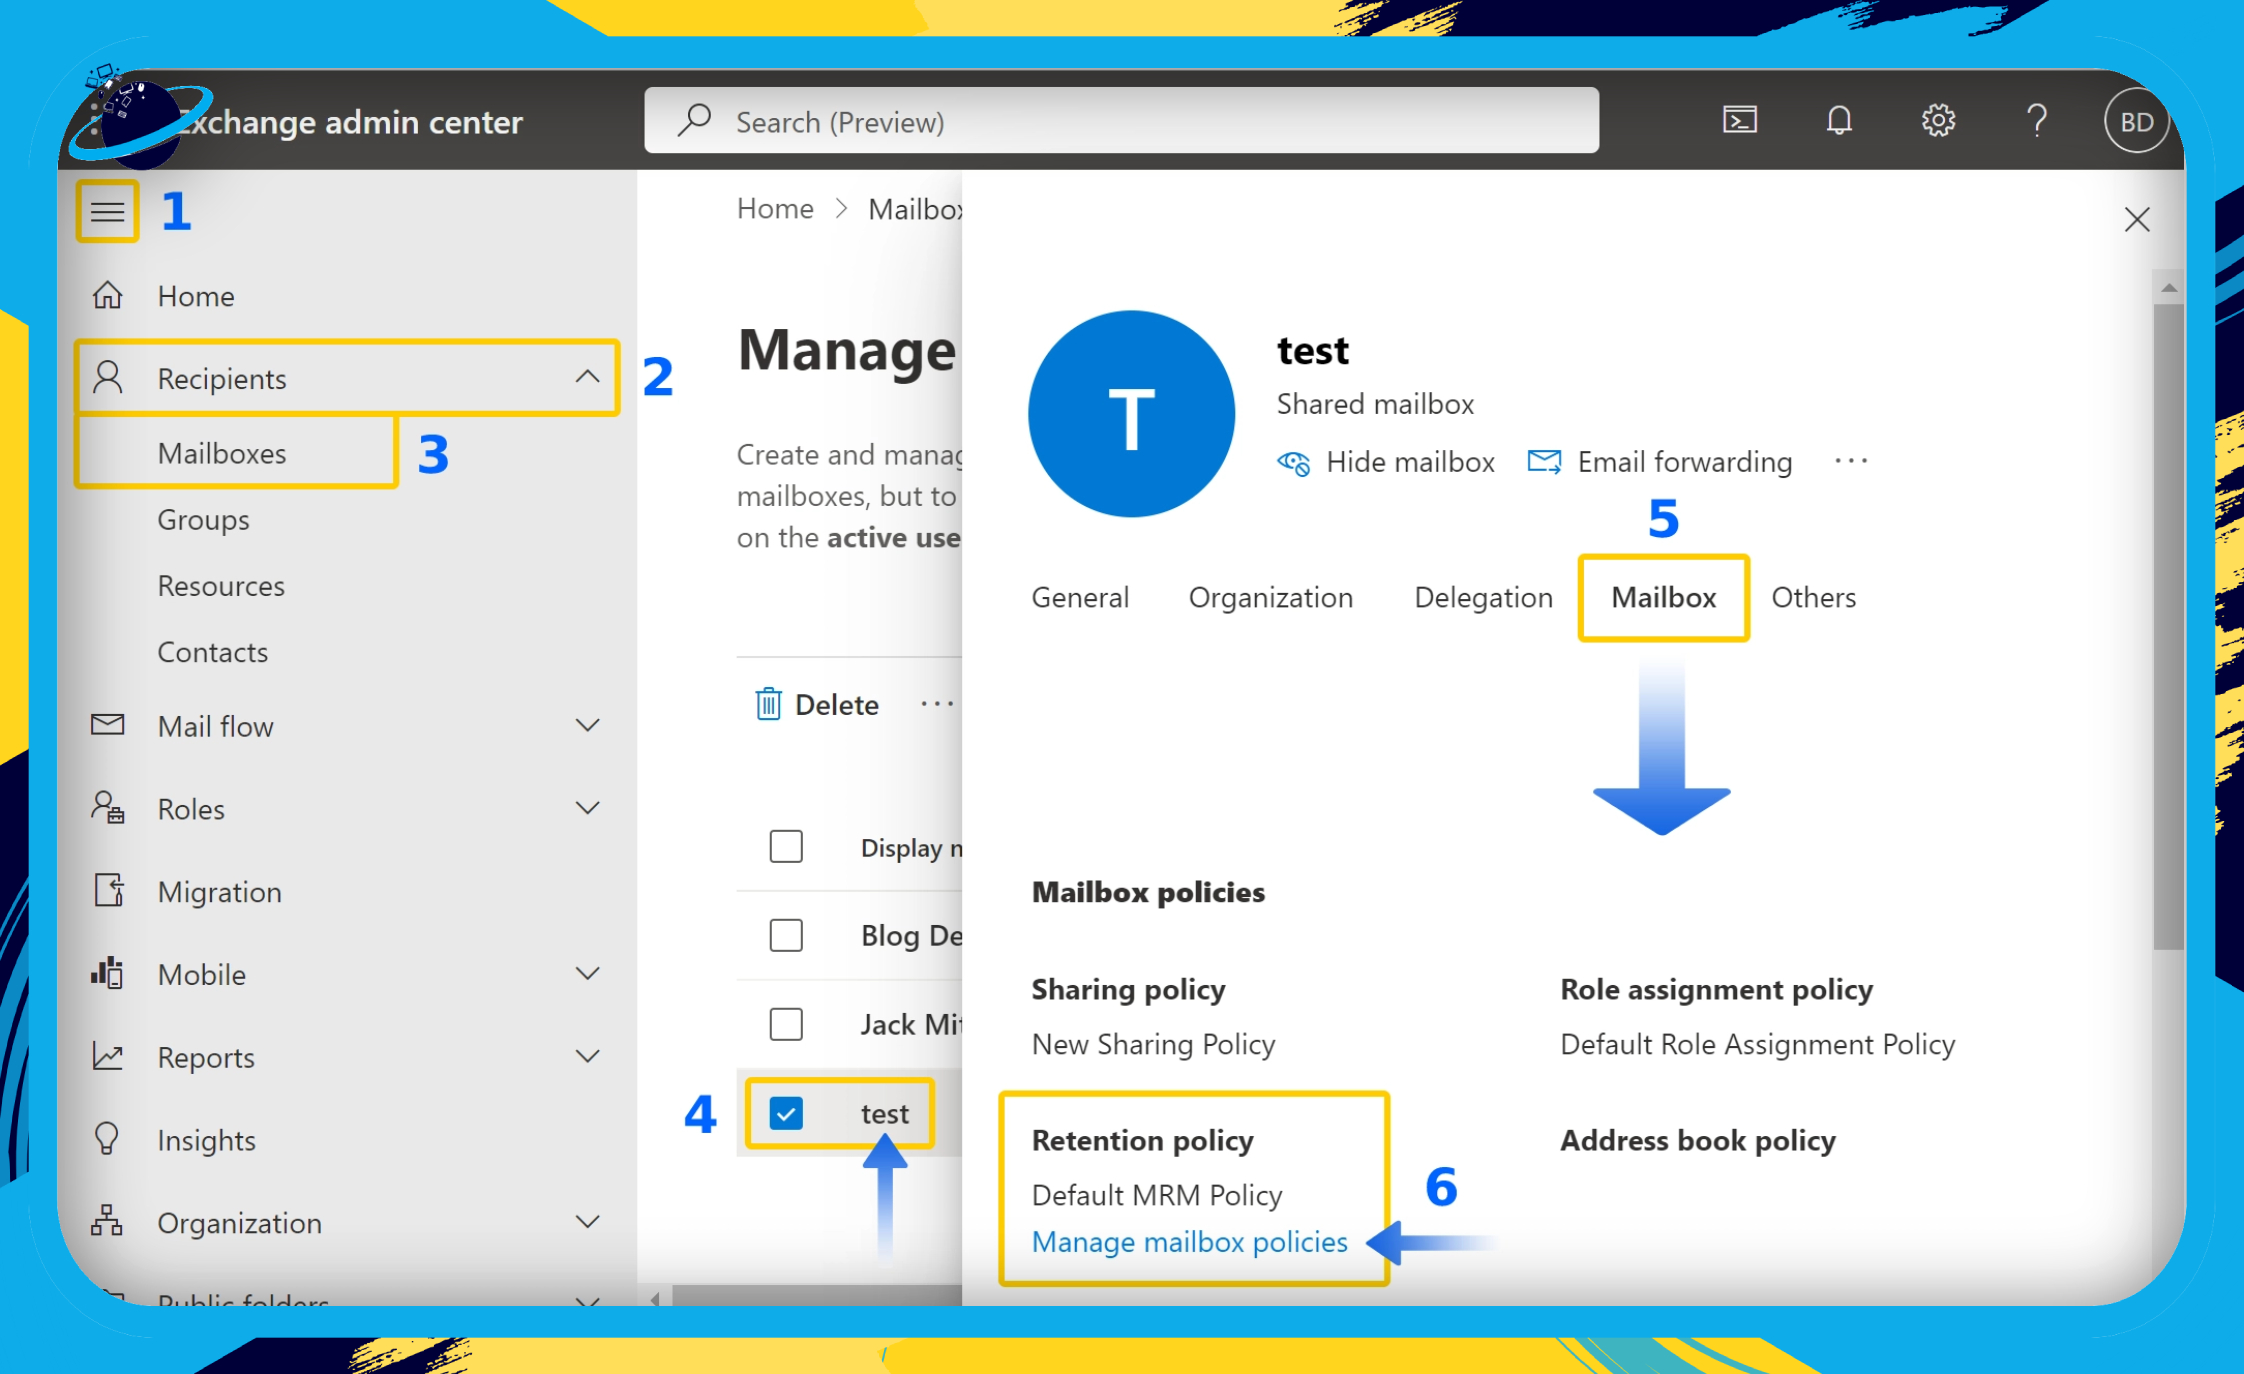
- In the Exchange Admin Center, click on the menu icon in the top left corner. (1)
- Click on “Recipients” in the left menu to reveal more options. (2)
- Select “Mailboxes” from the revealed options. (3)
- Click the display name of the mailbox for which to set a retention policy. (4)
- Click on the “Mailbox” tab on the popup box on the right side of the window. (5)
- Then scroll down and click on “Manage mailbox policies.” (6)
- Click the select box under “Retention policy” and select your new policy.
- Finally, click the “Save” button.
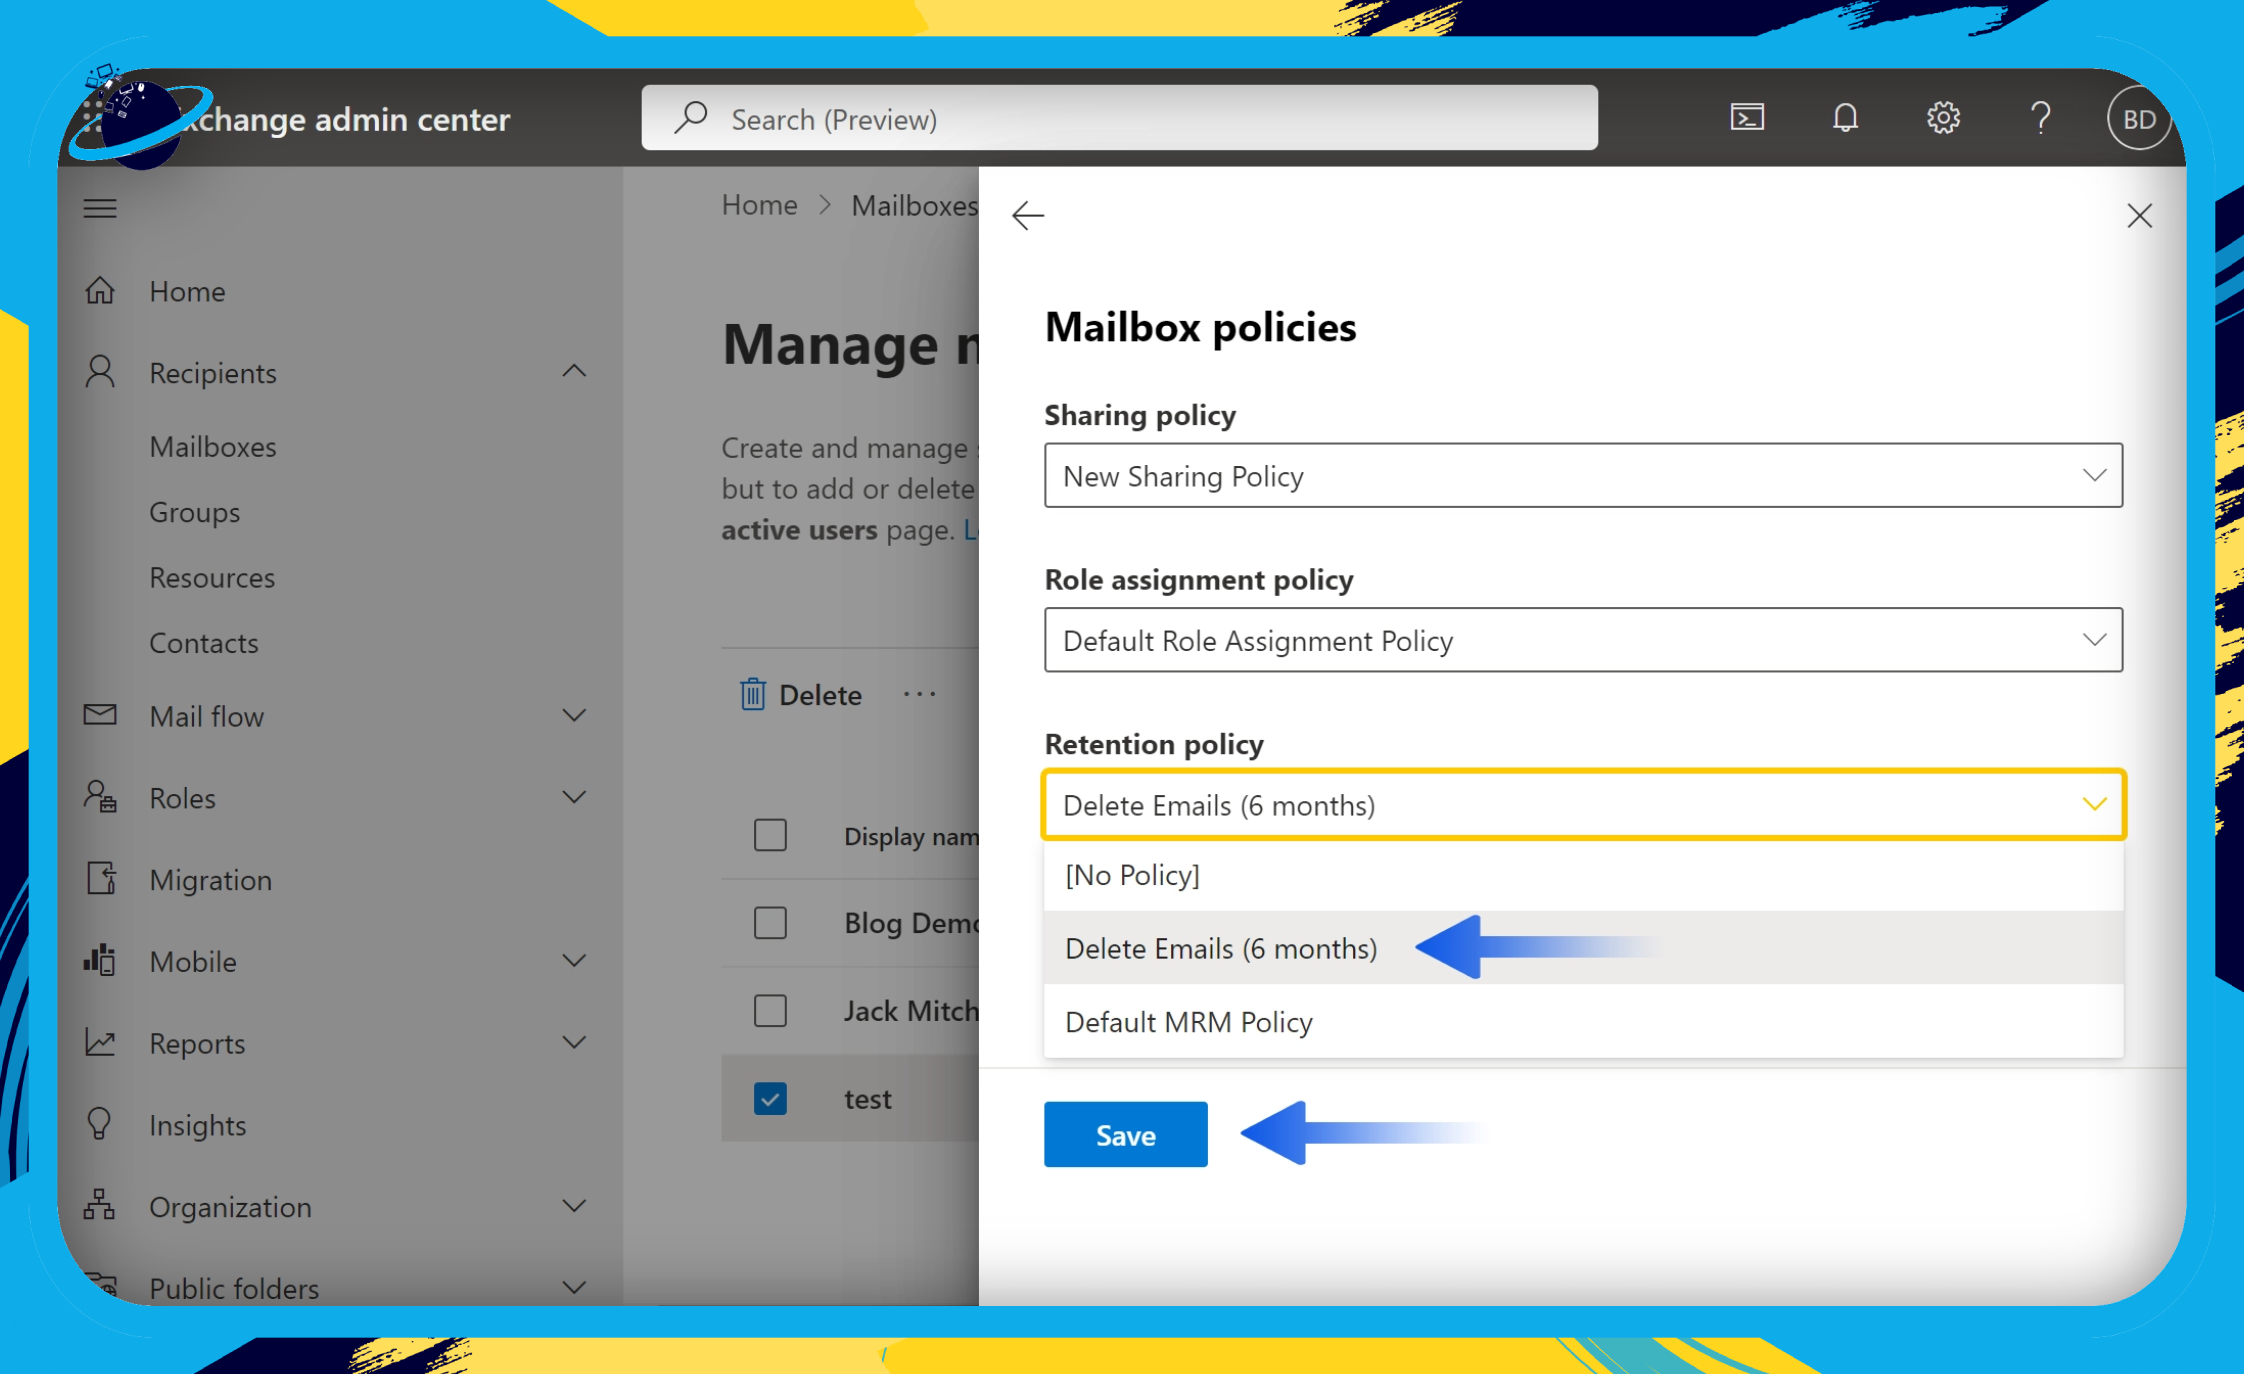
It’s as simple as that — the retention policy is now applied to the mailbox in question. It may take a little while for the changes to synchronise, but the old emails will be deleted gradually once you’ve followed the steps above.
You can also use PowerShell to add your policy to a specific mailbox by using the code below:
Set-Mailbox "[mailbox name]" -RetentionPolicy "[policy name]"To learn more about applying a retention policy to mailboxes in Exchange Online, please visit ![]() Microsoft’s official resource page.
Microsoft’s official resource page.
Frequently Asked Questions (FAQ)
 Can I delete emails by date range in Outlook?
Yes, you can delete emails by date range in Outlook. You can do that in the desktop version of Outlook by right-clicking on the “focused” mail list and selecting “Filter” from the popup menu. Please read the full steps below:
- Right-click on the “focused” mail list and select “Filter” from the popup menu.
- Click on the “Advanced” tab.
- Click the “Field” button under the “Define more criteria” header.
- Select “Date/time fields > Received.”
- Under “Condition,” select “on or after.”
- Enter a date, such as “01/01/2022” under “Value.”
- Then click the “OK” button.
You can now click on the top email and Shift + Click the bottom email to select all. Then, right-click any of the selected emails and choose “Delete” from the popup menu.
How do I mass delete old emails in Outlook?
The easiest way to mass delete old emails in Outlook is to use AutoArchive. You can right click on any mail folder and select “Properties” from the popup menu. Then, under the “AutoArchive” tab, select “Archive this folder using these settings,” then select a date and choose “Permanently delete old items.” Finally, click the “OK” button.

Conclusion
There are two ways to delete emails older than a certain date in Outlook. The first is to use AutoArchive, which does not require admin permissions. The second is to use a retention policy in your Exchange Admin Center, which does require admin permissions. If you need any help, please feel free to leave a comment below and we’ll be happy to help.
Thank you for reading.