Often within Office 365, Outlook particularly, people need to forward their emails to someone. This can be a requirement for many reasons, but the task itself often proves both tedious and time consuming. Be it needing to forward emails from a specific sender, or to a specific sender, neither process is one of particular enjoyment, and that’s probably why you’re here.
This blog is going to detail two methods of automatically forwarding emails. The main one is, of course, how to automatically forward emails from a specific user in Outlook. Following that, though, is a means by which you will be able to forward any messages that come in to a specific user, which may be of use if there is ever a time you need to share significant amounts of content with an individual.
In order to do either of these methods, you will need to access the Rules section of your Outlook settings. From there, you will be able to add a new rule, specifying whose messages you want forwarded or, conversely, who you want certain emails to be forwarded to.
Of course, below will be a step-by-step of each process and, in the event that they aren’t enough, there will be a more detailed, in-depth breakdown of each way following the step-by-step.
First, automatically sending certain emails from a specific sender.
Step by step: Automatically forward emails from a specific sender
- Click ‘Outlook settings’
- Click ‘View all Outlook settings’
- Go to the ‘Email’ subsection, then click ‘Rules’
- Click ‘add new rule’
- Look at the ‘Add a condition’ section. Set the condition to ‘From’, then enter the email you want emails to be forwarded from.
- Below this, in ‘add an action’, select ‘forward to’, then enter the email you want the messages to be forwarded to.
- Click ‘Save’ to save your rule changes.
   |
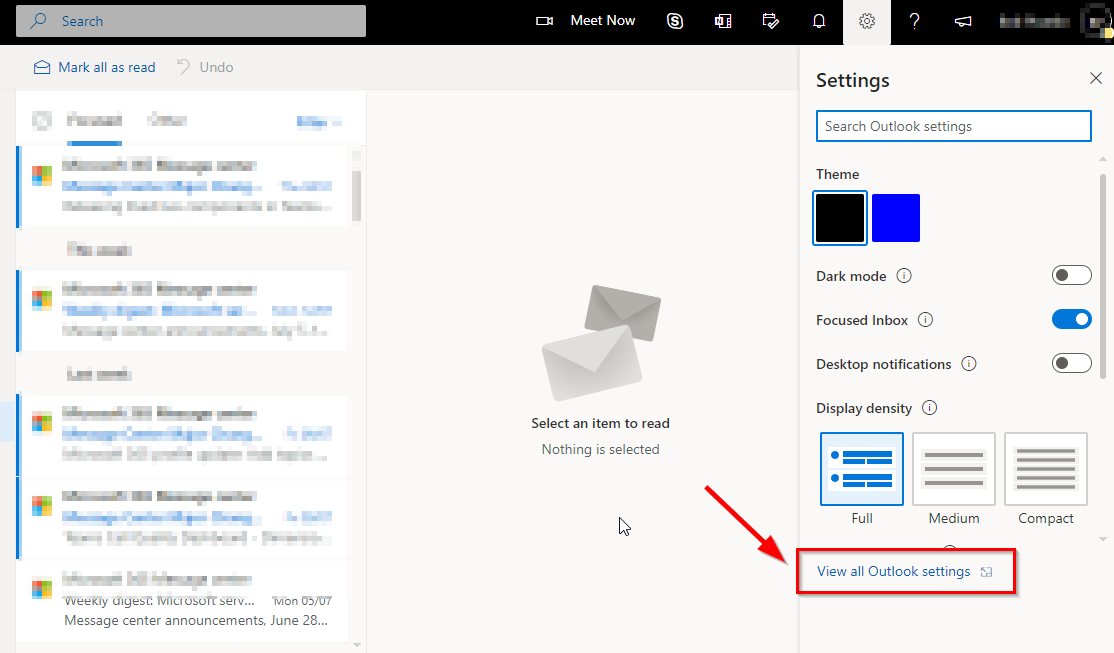
In order to automatically forward emails from a specific sender, you must first access the Outlook settings. In order to do this, click settings when logged into your Outlook account. From there, click view all Outlook settings, which has been highlighted below.
Next, click the email tab, which is just under the general tab you first see on the menu. From here, you will want to find the subsection labelled Rules, and click ‘Add new rule’, which you can find in the following screenshot if you need help finding it:

You will be greeted with a menu. First, name your rule. After you have done this, click the box under the heading Add a condition. In the drop-down menu, select From as your condition, which is under the heading of People at the top of the menu. After this, enter the email address of the person you wish to have emails forwarded from.
Below is an example. The first screenshot shows you where to find the condition, the second shows you where you should enter your email.


After you’ve set the conditions to your liking, you’ll then move to add an action. Select ‘forward to’ as the action, which is seen below, and then enter the email you want the emails to be forwarded to.

After you’ve done this, make sure to save the options by clicking the blue button in the bottom right of the screen. After your changes are saved, you have successfully set a rule to automatically forward emails from a specific sender.
There is another method to automatically forward emails, and it would also require you to create another rule. Although, this method is used to specify who emails should be forwarded to, not emails that will be automatically forwarded if they come from a certain address.

Step by step: Automatically forward emails to a specific sender
- Click ‘Outlook settings’
- Click ‘View all Outlook settings’
- Go to the ‘Email’ subsection, then click ‘Rules’
- Click ‘add new rule’
- Look at the ‘Add a condition’ section. Select ‘Apply to All Messages’
- Look at the ‘Add an action’ section. Select ‘Redirect to’
- Enter the email(s) you want messages to be relayed to.
- Click ‘OK’ to save your rule.

As with the first method, you will need to access the rules subsection. So, to do this, you first need to click settings from the main inbox, before clicking ‘View all Outlook Settings’, highlighted below.

Similar to the first method, from here, you’ll want to find the Rules subsection. To do this, first click the Email tab (which is highlighted in blue below) and then find Rules, which is the third option down underneath the Layout heading. Rules has been emboldened in red below.

From here, click Add new rule, and you will find yourself in the rules menu.

When in the rules screen, you will first want to name your rule. After you have done this, scroll down to the Add a Condition section, where there will be a dropdown menu. This section has been highlighted by the red rectangle in the screenshot below.
After you have opened the dropdown menu, you will want to scroll to the bottom of the list. There, you should find the All Messages heading, with one option underneath it; ‘Apply to all messages’. Click this. The rule has been emphasised with the red arrow.

Next, look to the Add an Action option, just underneath the condition you have just added. Here, on the dropdown menu, you will want to select ‘Redirect (the message) to’, an option that can be found under the heading ‘Route’, the last of the three listed sections on the menu.
The screenshot below shows how to do this. Yet again, the section is emphasised via the rectangle, whilst the rule is pointed to by the arrow.

After you’ve completed this, your rules box will look as thus:

In the empty box next to Redirect to, the one lightly outlined in blue, enter the email address(es) you would like your messages to be forwarded to.
Once you have entered an email, you do have the option to either add another action or an exemption, through the two options in blue directly underneath the Redirect to box. Otherwise though, after you have entered your email(s) that you want to be impacted by the rule, your screen should look like this:

From here, click Save in the bottom right, and your rule will be added. Not only that, but you will have successfully implemented a system to automatically forward emails to a specific sender.
Thank you for reading this blog, I hope it was as helpful as you wanted it to be. As always, if you have any issues, then please don’t hesitate to get in touch with our team.
   |