The standard date format in the UK is different for the US. In the UK, dates are formatted dd/mm/yyyy (day/month/year), whereas in the US, dates are formatted mm/dd/yyyy (month/day/year). If you want to switch from one format to another, you can do that using the desktop and web versions of Microsoft Excel. And in this guide, we’ll show you how!
How to change the date format in Excel from mm/dd/yyyy to dd/mm/yyyy (desktop):
- Select the cell, row, or column that you want to change.
- Press Ctrl+1 or click “Home,” then click the
 pop out icon in the “Number” section.
 - Click on “Custom” at the bottom of the left menu.
- Select “dd/mm/yyyy” from the list.
- Click “OK.”

How to change the date format in Excel from mm/dd/yyyy to dd/mm/yyyy (web):
- Select the cell, row, or column that you want to change.
- Press Ctrl+1 or click “Home,” click the select box in the “Number” section, then select “More Number Formats” at the bottom of the list.
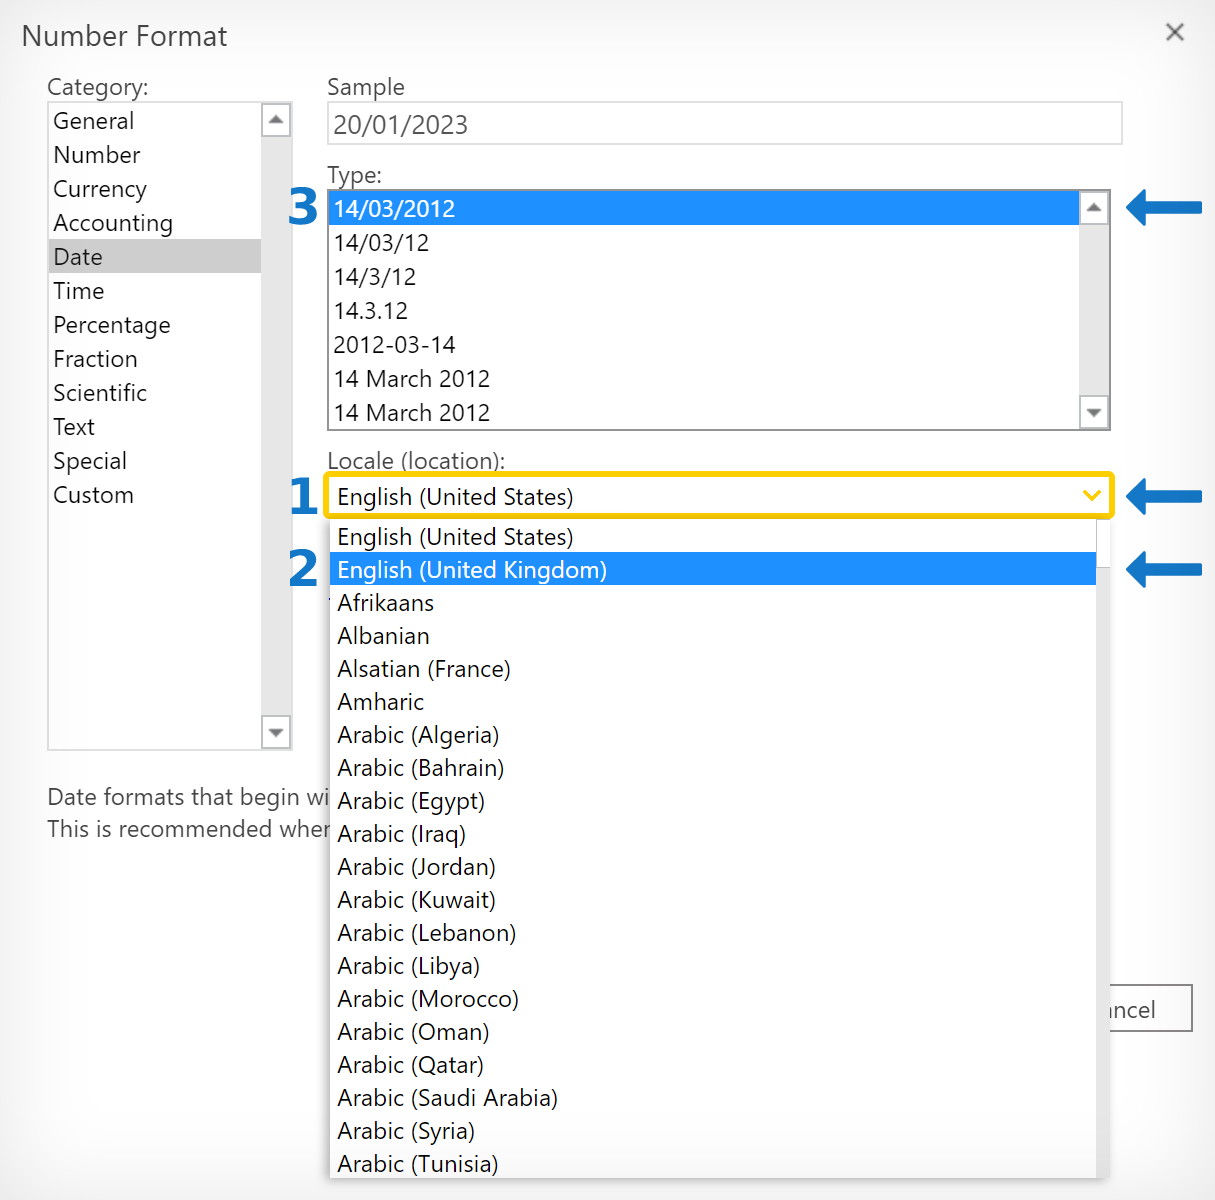
- Click the dropdown box under “Locale (Location).”
- Select “English (United Kingdom)” from the dropdown box.
- Then select “14/03/2012” from the “Type” list.
- Click “OK.”
Please continue reading for a detailed, step-by-step guide on changing the date format in Excel.
How are dates formatted in Excel?
Dates in Excel are referred to as “Serial numbers” and can be stored in long or short-form, as well as numeric values. A simple way to convert or format a date is to use the TEXT function. For example, the function =TEXT(A1, “dddd”) would return “Sunday” if the date in the “A1” cell was “01/01/2023.”
| Date / Time | Format | Result |
|---|---|---|
| 01/01/2023 | d | 1 |
| 01/01/2023 | dd | 01 |
| 01/01/2023 | ddd | Sun |
| 01/01/2023 | dddd | Sunday |
| 01/01/2023 | m | 1 |
| 01/01/2023 | mm | 01 |
| 01/01/2023 | mmm | Jan |
| 01/01/2023 | mmmm | January |
| 01/01/2023 | mmmmm | J |
| 01/01/2023 | y | 23 |
| 01/01/2023 | yy | 23 |
| 01/01/2023 | yyy | 2023 |
| 01/01/2023 | yyyy | 2023 |
| 1:05:06 AM | h | 1 |
| 1:05:06 AM | hh | 01 |
| 1:05:06 AM | h:m | 1:5 |
| 1:05:06 AM | h:mm | 1:05 |
| 1:05:06 AM | hh:mm | 01:05 |
| 1:05:06 AM | s | 6 |
| 1:05:06 AM | ss | 06 |
| 1:05:06 AM | hh:mm:ss AM/PM | 01:05:06 AM |
Method 1: Format dates using a custom format (Desktop)
To demonstrate this method, we’ve created a spreadsheet in Excel with a list of US-formatted dates. You can still follow along if the dates in your spreadsheet are listed differently. However, you will need the ![]() desktop version of Microsoft Excel for the steps below.
desktop version of Microsoft Excel for the steps below.
The same effect can be achieved in the web version of Excel using a slightly different process.
- First, open the desktop version of Excel and the workbook containing your dates.
- Then, select all the cells you want to format.
 Notes:
- A simple way to select cells is to click and drag over them.
- Alternatively, you can select the entire row or column.
- Or select individual cells by pressing Ctrl + click.
- Then, with your cells selected, press Ctrl + 1 on your keyboard.
- Alternatively, click on the pop out icon in the “Number” section in the “Home” tab.
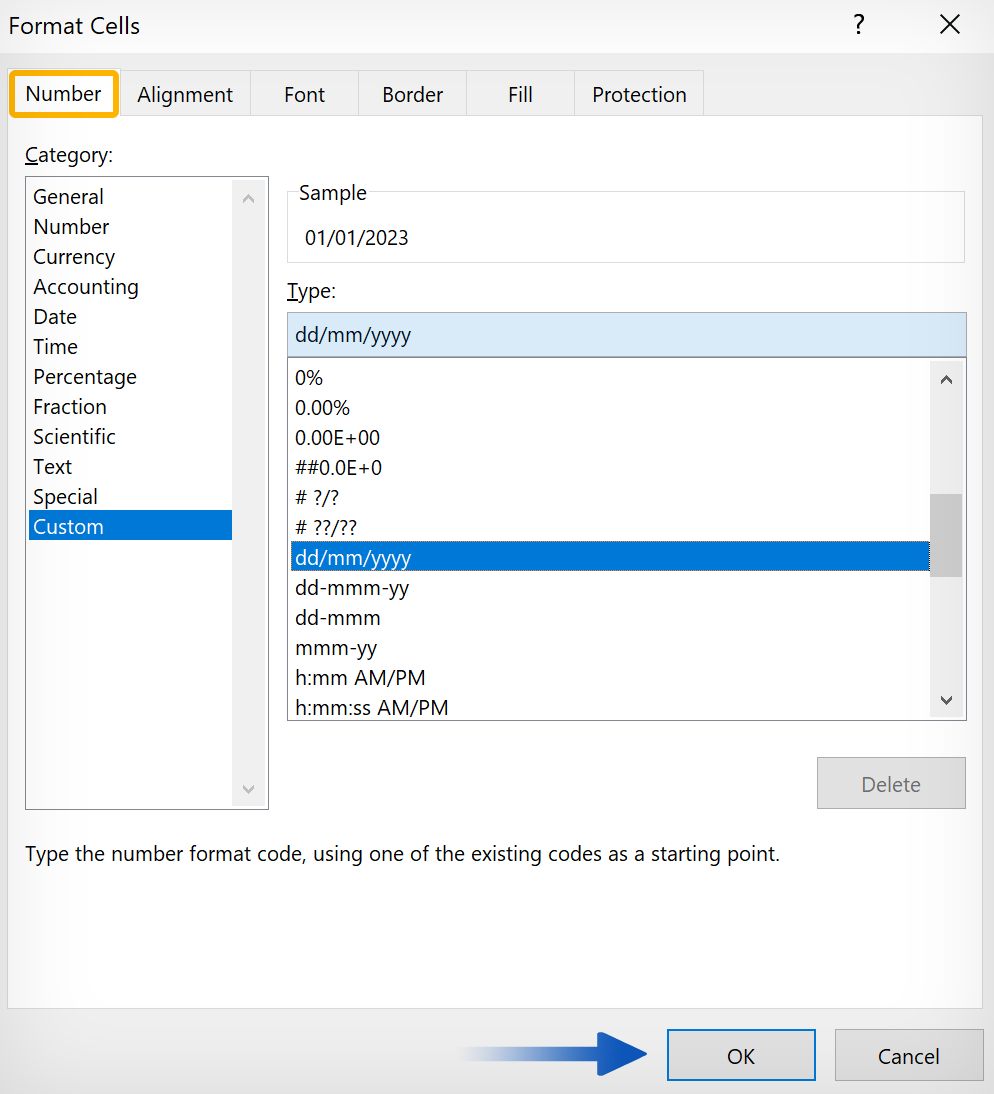
- Next, click on “Custom” at the bottom of the left menu.
- Then select “dd/mm/yyyy” from the “Type” list.
- You can also manually type in the format of your choice into the text bar.
- Click “OK” to finish.
 |
By formatting the whole column instead of individual rows, any additional dates entered into that column will be changed from mm/dd/yyyy to dd/mm/yyyy automatically. You can also use the same process to change a date from dd/mm/yyyy to mm/dd/yyyy. Please view the image below:
Method 2: How to change the date format in Excel from mm/dd/yyyy to dd/mm/yyyy using a custom format (Web)
- First, go to
 office.com and open Excel.
 - Open the workbook containing your dates.
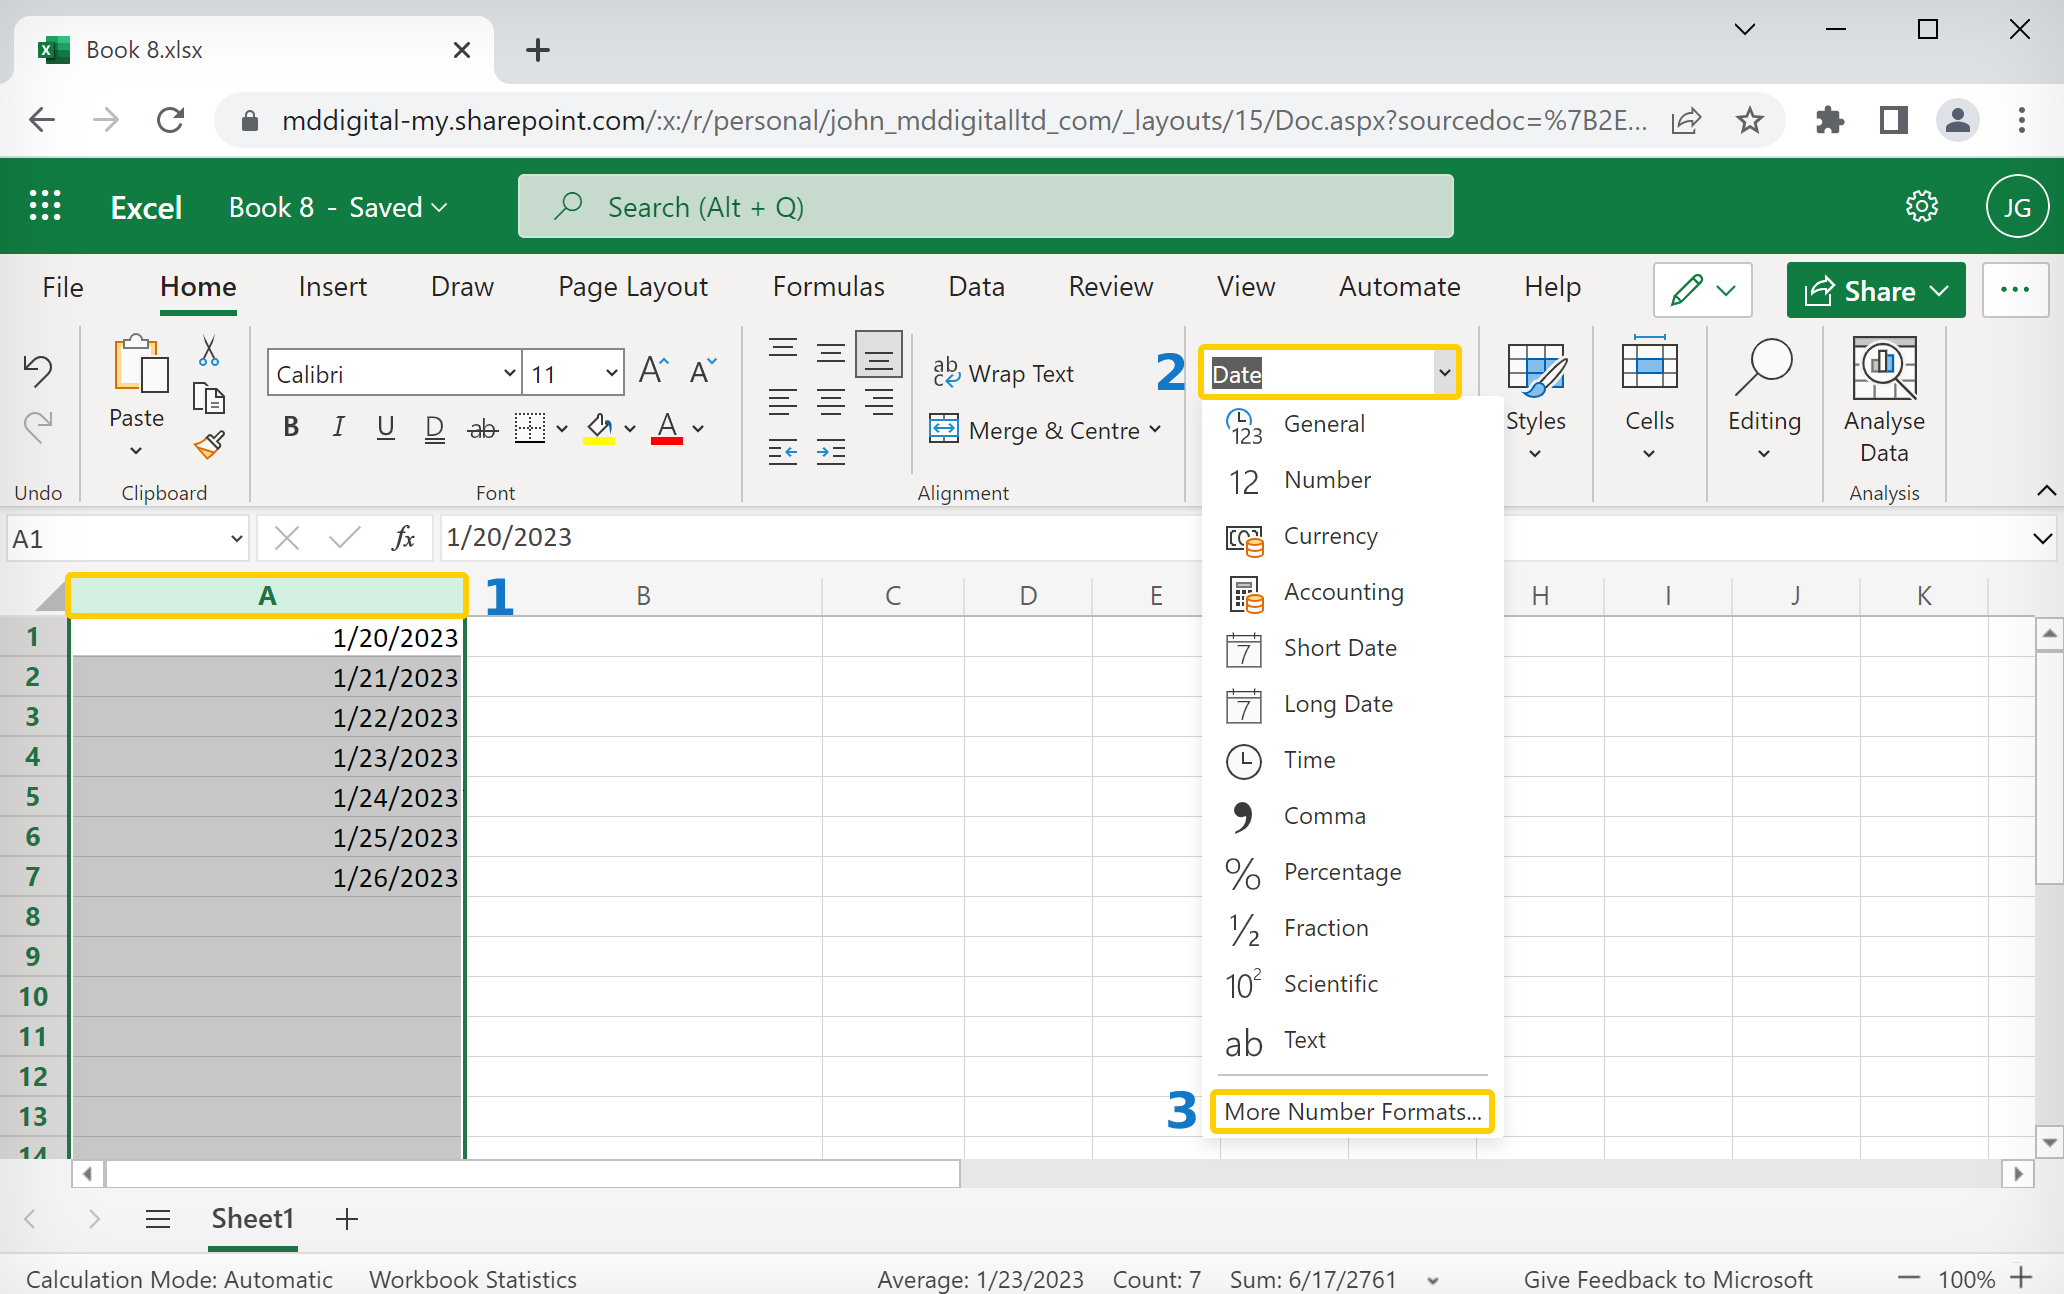
- Select the cells that you want to format.
- Notes:
- A simple way to select cells is to click and drag over them.
- Alternatively, you can select the entire row or column. (1)
- Or select individual cells by pressing Ctrl + click.
- With the cells selected, press Ctrl + 1.
- Alternatively, click the dropdown box in the “Number” section. (2)
- Then select “More Number Formats” at the bottom of the list. (3)
- Click the dropdown box under “Locale (Location).” (1)
- Select “English (United Kingdom)” from the dropdown box. (2)
- Then select “14/03/2012” from the “Type” list. (3)
 |
- Click the “OK” button, and your dates will change from mm/dd/yyyy to dd/mm/yyyy.
- To reverse the process, select “English (United States)” as the location.
- Then select “*3/14/2012” from the “Type” list.
Method 3: How to change date format in Excel from mm/dd/yyyy to dd/mm/yyyy using a formula (Desktop & Web)
If you want to change an mm/dd date to a dd/mm date in the web version of Excel, you can do that by using the TEXT function. Please follow the steps below to learn how.
- First, go to office.com and open Excel, or open your Excel desktop application.
- Open your workbook and select an empty cell on the same row or adjacent to your date.
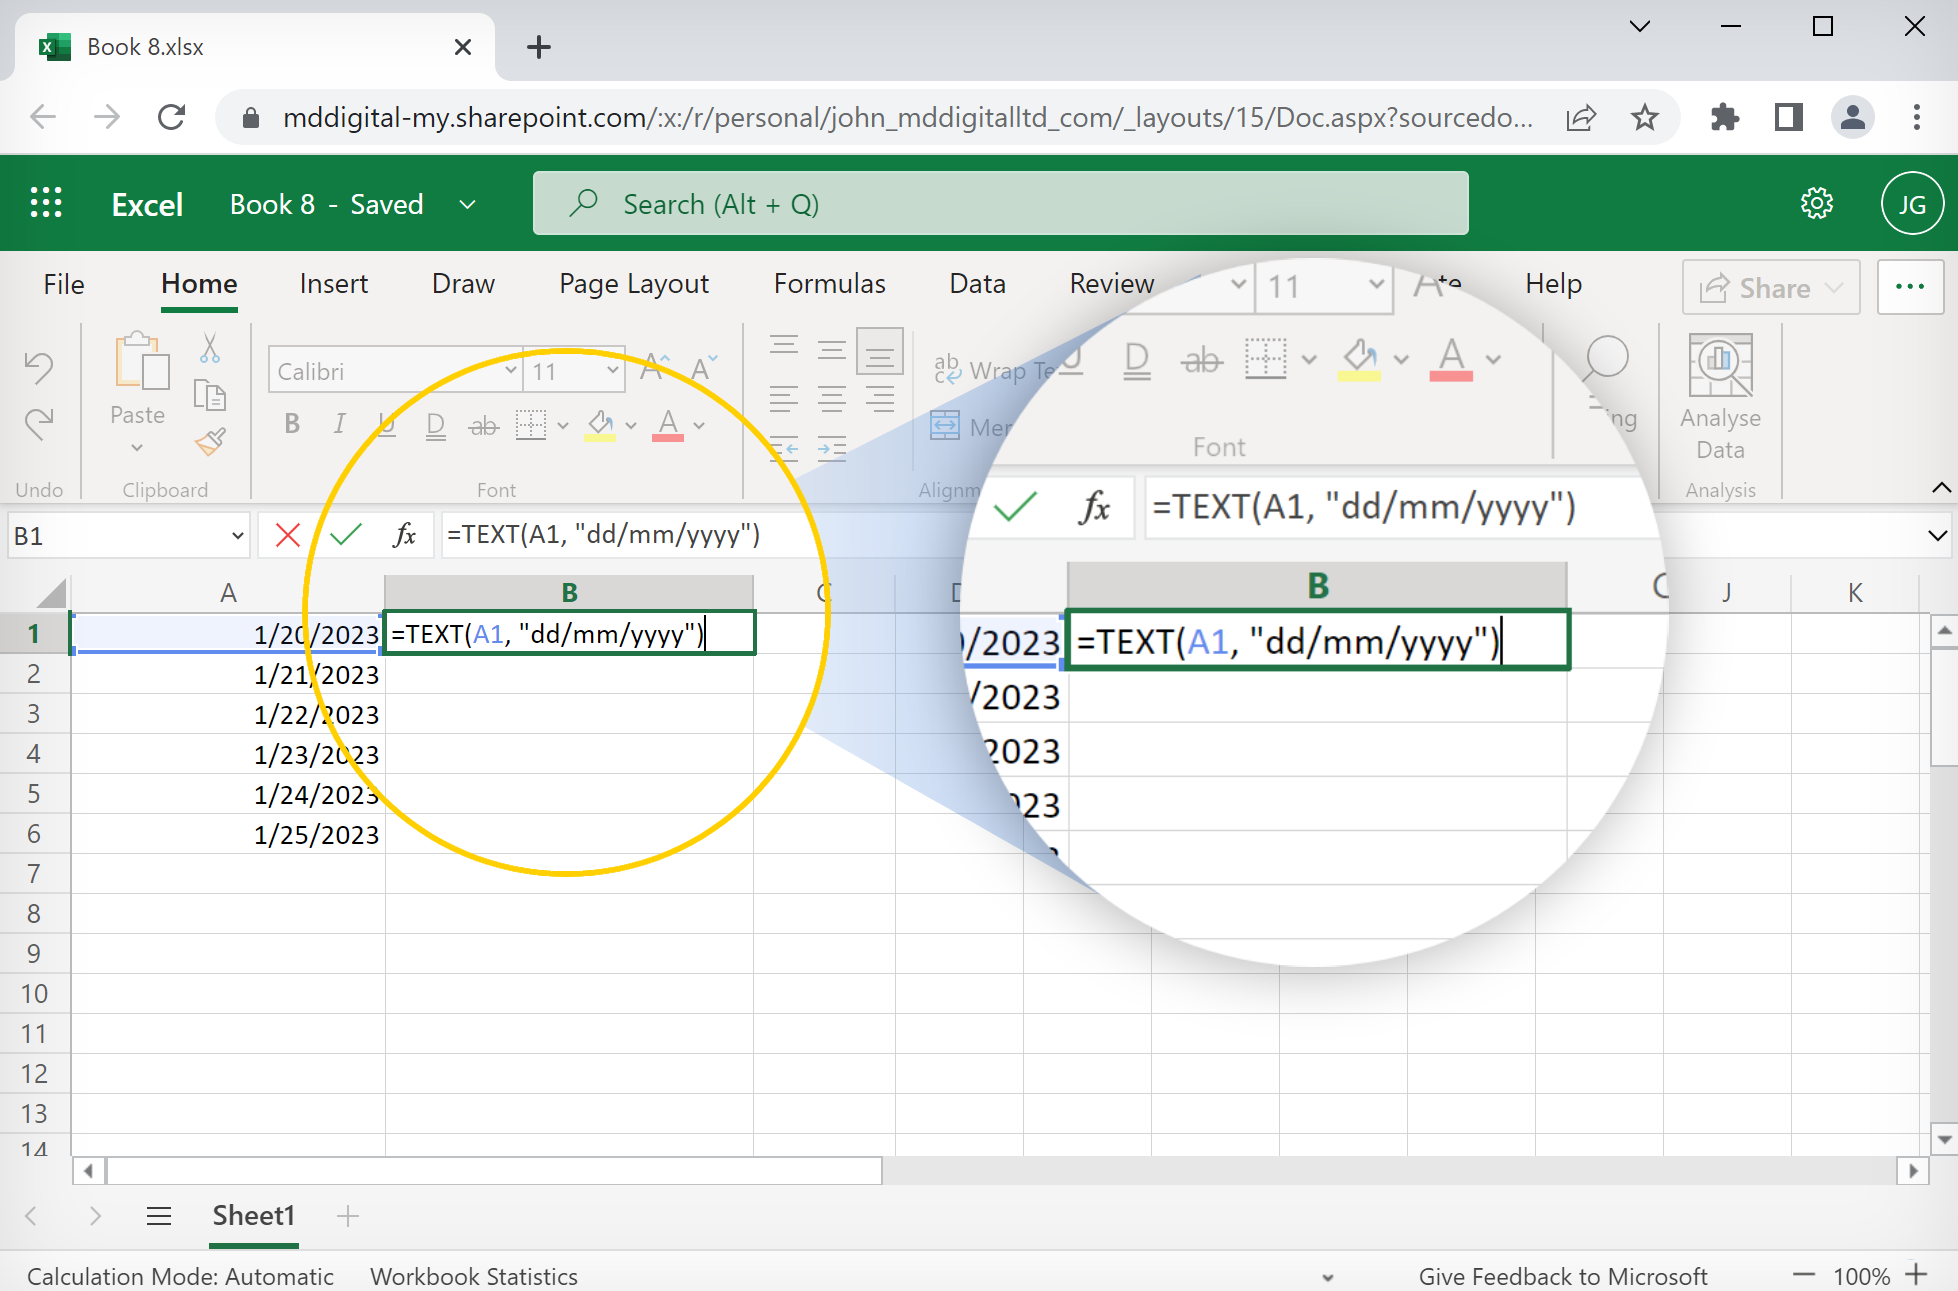
- Then, type the following formula into the cell:
=TEXT(CELL, "dd/mm/yyyy")Replace “CELL” with the cell address of your date (e.g., A1). If your dates are in a list, select an empty cell in the same row as the top date.
- Once you’ve typed in the formula, press the Enter key.
- Click the formula cell and hover over the corner until you see a black
 plus symbol.
 - Then click and drag the function down next to all your dates.
 |
The dates in Column A will automatically appear in Column B with the format changed from the US standard (mm/dd/yyyy) to the UK standard (dd/mm/yyyy).
Method 4: Change the short date format to a long-form date in Excel with st, nd, and rd (Desktop & Web)
So far, we’ve covered how to convert an mm/dd date into a dd/mm date, but there are other interesting ways of formatting dates in Excel. You can’t add st, nd, and rd to the days of the month using a single function, but you can achieve that effect using a formula.
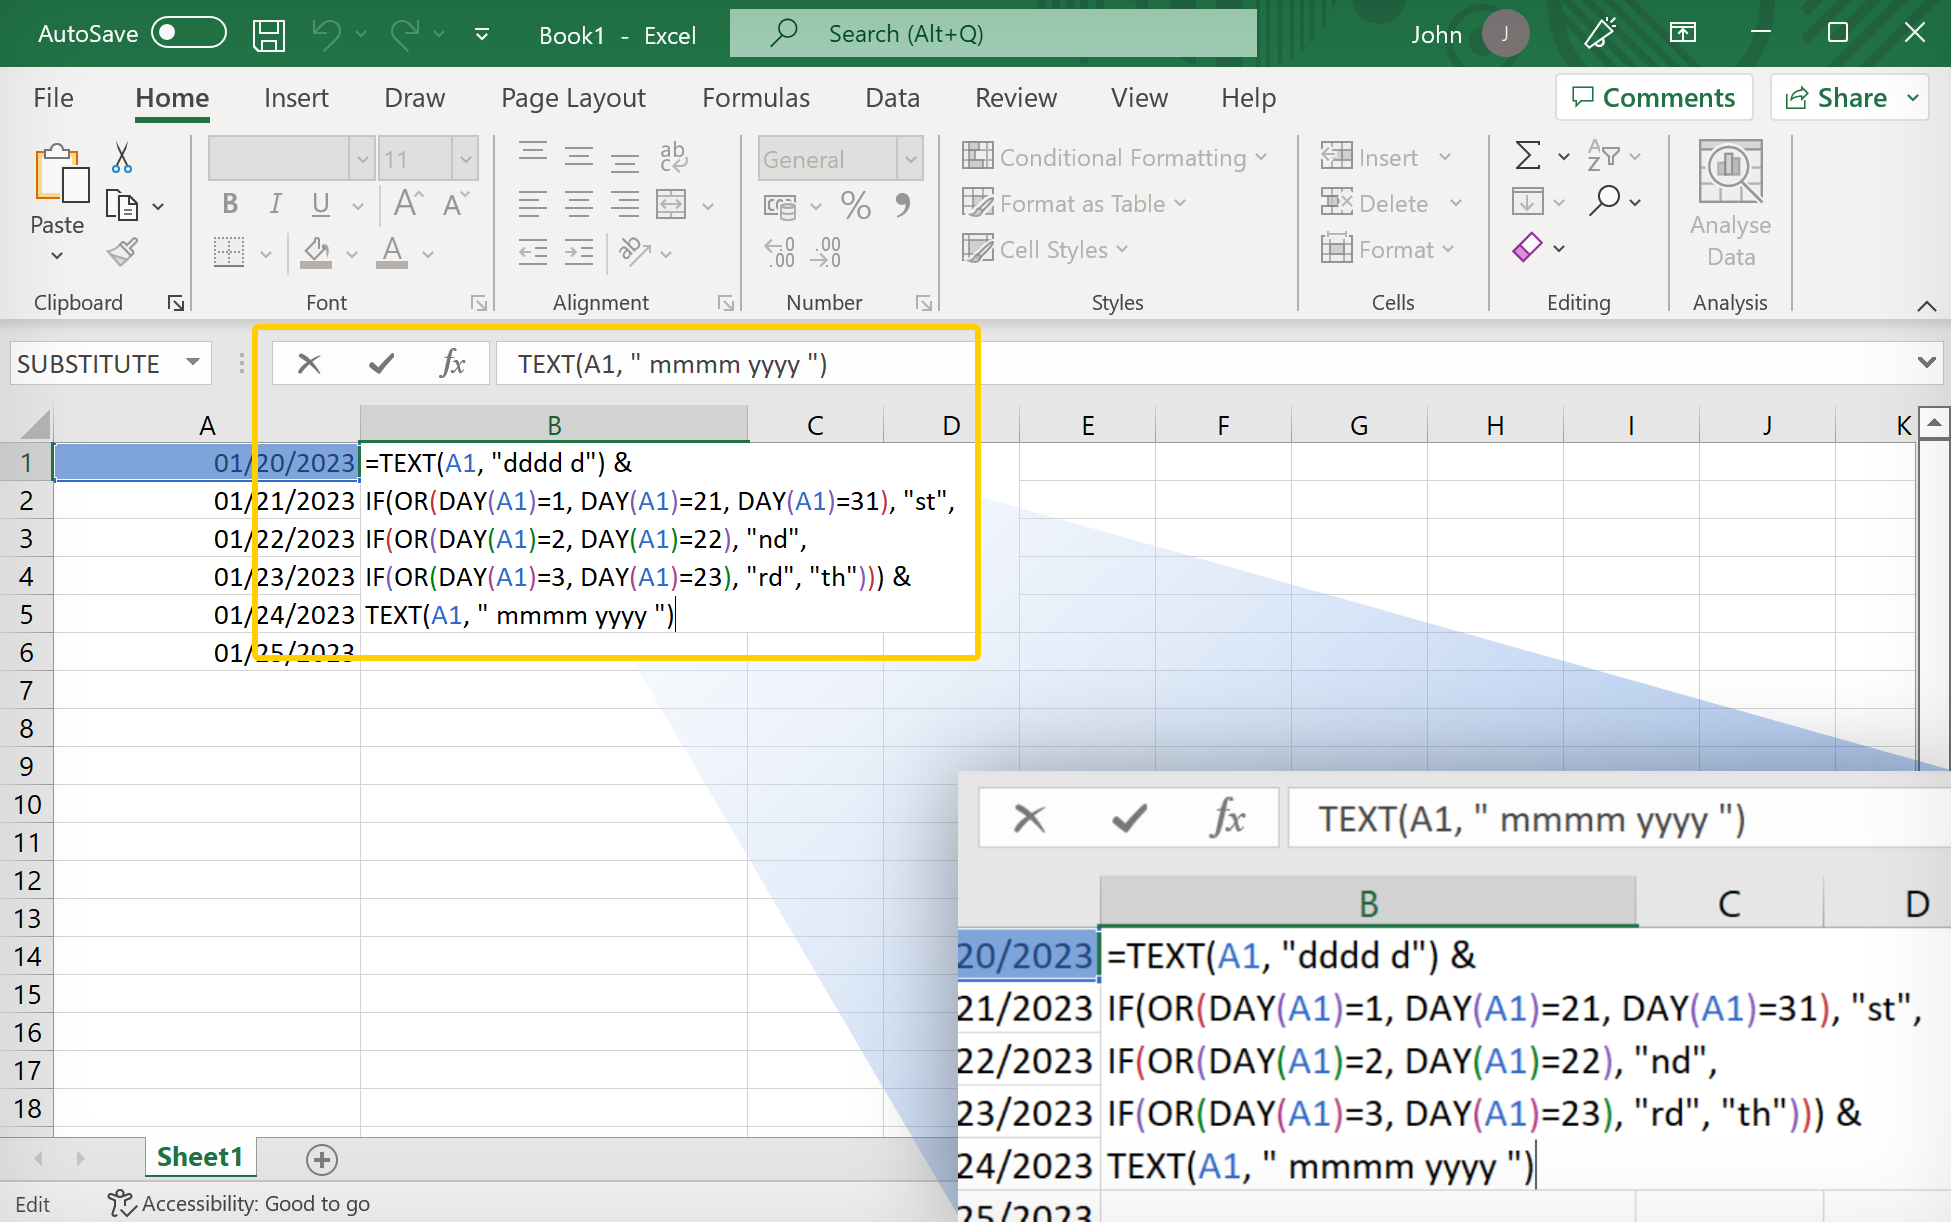
We’re going to turn “1/20/2023” into “Friday 20th January 2023.”
- First, go to office.com and open Excel, or open your Excel desktop application.
- Open your workbook and select an empty cell on the same row or adjacent to your date.
- Then, type the following formula into the cell:
=TEXT(CELL, "dddd d") &
IF(OR(DAY(CELL)=1, DAY(CELL)=21, DAY(CELL)=31), "st",
IF(OR(DAY(CELL)=2, DAY(CELL)=22), "nd",
IF(OR(DAY(CELL)=3, DAY(CELL)=23), "rd", "th"))) &
TEXT(CELL, " mmmm yyyy ")- Change “CELL” to the cell address (e.g., A1) where your first date is located.
- Then press the “Enter” key.
- Click the formula cell and hover over the corner until you see a black plus symbol.
- Then click and drag the function down next to all your dates.
 |
The dates in Column A will automatically appear in Column B with the format changed from the US standard to a long format, including st, nd, and rd for the days of the month.
Conclusion
The best way to format mm/dd dates into dd/mm dates in Excel is to use Method 1 or 2, depending on whether you are using the desktop or web version. It would be ideal if your dates were listed in a single column, as you can format the whole column into dd/mm. That way, whenever you add a new date to the column, it will automatically change to the correct format.
Method 3 is ideal if you want to keep both the US (mm/dd) and UK (dd/mm) date formats in separate columns. But if you’re looking for readability, Method 4 is perfect!
Thank you for reading our guide.