Display names provide users with the opportunity to present additional information, conceal their identity or promote their organization. This is achieved via a special name used in place of your actual name and will be present across the Office 365 suite.
Solution:
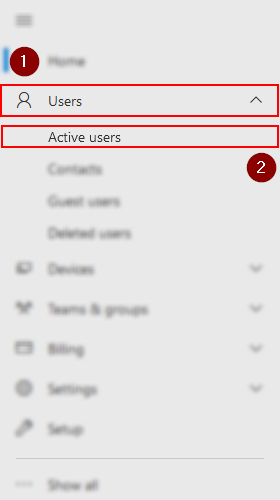
- Open the Office 365 Admin Center
- Open the Users dropdown
- Select Active users
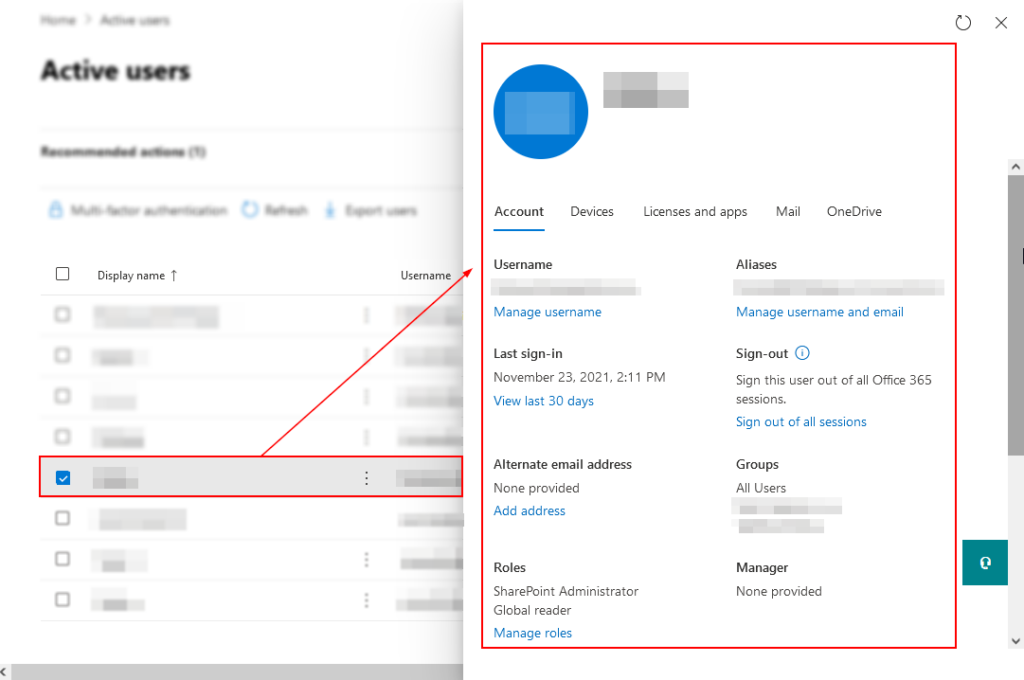
- Select a user by clicking their name
- Scroll to the bottom of the user card
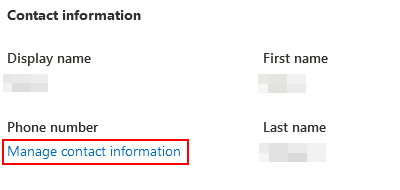
- Select Manage contact information
- Input a display name in the labelled box
- Click Save changes
Please note that the method above will change the user’s display name in all Microsoft 365 applications — not just Outlook.
In this post, we will be helping you learn all about display names in Office 365 — what they are, where they are, how to get them, and how soon the change will be reflected. If you need help, stick around for our image-guided step-by-step walkthrough.
Contents:
What you need to know about display names
What is a display name
A display name serves as the name presented to viewers of content posted by you, as well as the name presented to viewers of your account. This is particularly useful for work accounts where your name would otherwise be in use.
Where will people see my display name
Display name’s are associated with your account and thus appear wherever your account is viewed. This means your display name will not only appear within Outlook but other applications as well
Will my display name appear straight away?
Unfortunately no. When preparing the demo for this post we found that a change in display name (even if it’s your first one) can take several hours to take effect.

Setting an Office 365 display name for Outlook via the Microsoft 365 admin center
Please note that a change in the display name could take some time to update. Try checking your name in Outlook the following day. We found this out when creating the demo that we’re going to walk through now.
Step 1 – Access the Office 365 Admin Center
To begin, visit admin.micrososft.com to access the Office 365 Admin Center. we’ll need to access the admin center to update user display names. Be sure to use an account with Administrative privileges.
If you don’t have an account with admin privileges, the link above won’t work for you. Speak to your organization’s Microsoft 365 admin about getting the privileges, or send this blog post over to them and they can make the display name changes for you!

Step 2 – Open the Active users page
From the Admin center, locate the side panel on the left. Click Users to reveal its additional options. Select Active users.
Step 3 – Locate the user and click their name
Once you’re on the Active users page, locate the user you wish to change the display name for.
Please note that there is no easy way to change display names in bulk. You have to do this one user at a time.
Step 4 – Open the contact details menu
Scroll to the bottom of the user account card. You’ll be able to identify the Manage contact information option under the Phone number header.
Step 5 – Input your intended display name
Look to the textbox labeled Display name. The display name in the demo has been hidden for privacy purposes. Upon entering a display name, select Save Changes to finish.
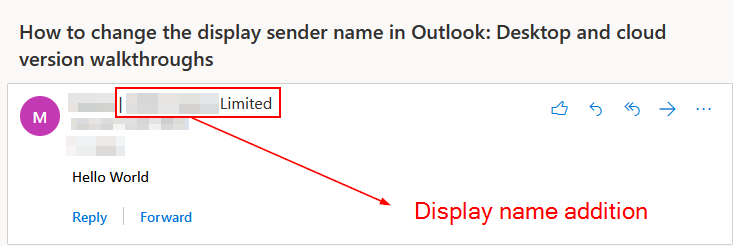
Step 6 – Send an email to test your display name
If you’ve only just updated your display name, we recommend waiting several hours before attempting the following step. However, if you’ve already finished waiting send an email and head to your Sent folder in Outlook. From there we can view your email and check the name displayed.
End note
Recap
A display name within Office can be applied (albeit with some delay) via the Office 365 Admin center. Although a change will not take effect immediately, the change is useful for promoting your organization or somewhat concealing your name.
Farewell
As usual, this section is dedicated to thanking readers for their support. We’d be pleased to know you found this post useful and/or informative. If you have any more Office 365 related queries, please consult our related articles (listed below). However, if you have other queries, consider looking at the rest of the site. We’re frequently posting new stuff each week and may just have the guide or troubleshooting tips you need. Regardless, we wish you a good day/night. Farewell readers.
Our related articles:
- Microsoft 365 Outlook: How to recall a sent email – Outlook in the list of M365 programs offers its users quite an extensive set of features to make the process of emailing a lot simpler. However, what you want to know today is can you recall a sent email in Outlook. Message recall allows you to retrieve a message you’ve sent from the mailboxes of recipients who haven’t yet opened it. You can also use a different message as a replacement
- Does deleting an email unsend it in Outlook – You have some advantages over standard Outlook account users if your company uses Microsoft Outlook on the collaborative communications server, Microsoft Exchange Server, such as the ability to search multiple mailboxes, increased security features, and the ability to recall or even replace an email message. You may “unsend” emails using the latter, which is useful if you forget to include essential information, make a mistake in a message, or accidentally press the dreaded “Reply All” button on a private email
- How to create a contact group in Outlook – Emails are great for digital communication. This is true even for group-communication when you take into account Outlook’s contact group functionality. Contact groups allow users to establish a group of addresses under a custom identifier which can be used to simultaneously deliver messages to each address in the group
- Outlook won’t let me add attachments: Troubleshooting tips – Stuck trying (and failing) to add attachments in Outlook? This blog has got you covered. An attachment can be any form of file attached to your email; as such, images, audio and documents would all be considered attachments. Similarly, OneDrive files also fall under this categorization. Here we will discuss potential reasons you may be unable to add attachments, as well as (if applicable) the solutions