Microsoft 365 policies allow you to enforce greater control over how your team uses Office applications and services. Employers consider enforcing policies to optimize productivity, promote efficient workflows and bolster security. Such is the topic of this post— more specifically regarding Microsoft Teams.
You can follow the following steps to set up a custom policy:
- Access the Microsoft 365 admin center via Office.
- Use the “Show all” button to reveal.
- Select “Teams.”
- Under “Teams,” select “Teams policies.”
- Click “Add” in the policy table.
- Name your policy (and optionally provide a description).
- Customize your policy with the available options.
- Click apply.
If you struggled with our initial answer, you’d be happy to hear our step-by-step guides aim to be as simple and comprehensive as possible. Creating a policy is easy enough, and you’ll be learning about it today. However, you may want to delete your policy should something go wrong. Hence, we’ll be discussing policy removal too.
Use the following links to access relevant content quickly:
- How to create a custom Teams policy
- How to delete a custom Teams policy
- Why should I use policies in Teams
- Blog post recap
How to create a custom Teams policy
Creating a Teams’ policy requires access to the Microsoft 365 admin center and the Teams admin center: you should seek global user admin permission before attempting the following step-by-step guide. Below, I will create a custom Teams policy allowing the use of private channels (for everyone).
Step 1 — Use the Office app launcher to open the 365 Admin center
You can observe a nine-square grid button in the top left of Office— click it to open the app launcher. In the app launcher, find and select “Admin,” this will lead you to the Microsft 365 Admin center.

Step 2 — Open the Teams admin center via the 365 admin center
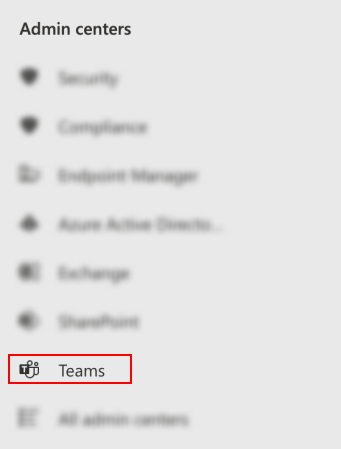
In the 365 Admin portal/center, you will be unable to select “Teams.” Initially, the “Teams” option is hidden. At the bottom of the left side panel, you can find “Show all,” click it followed by “Teams.”
Step 3 — Access the Teams policies page
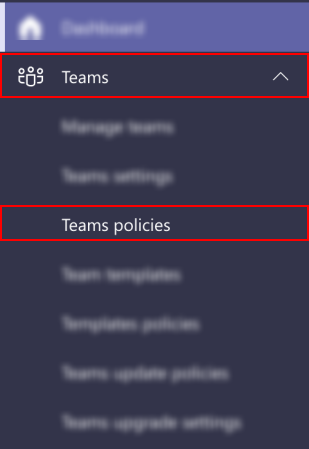
In the Teams admin center, you will notice a new side panel. The side panel in question contains a category labeled “Teams.” Click the category to open it, search for and click “Teams policies.”
Step 4 — Add a new policy
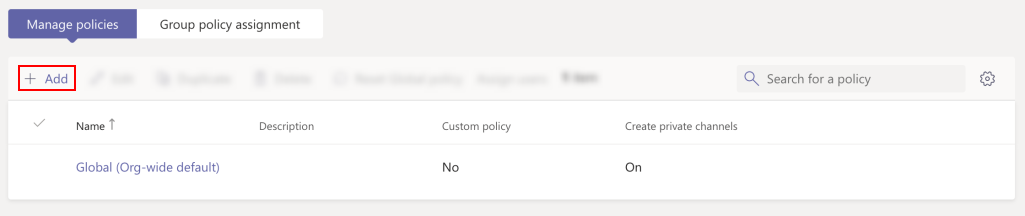
The Teams policies page contains a table detailing each of your added policies; clicking the table’s “Add” button will allow you to begin creating a new policy.
Step 5 — Configure your policy
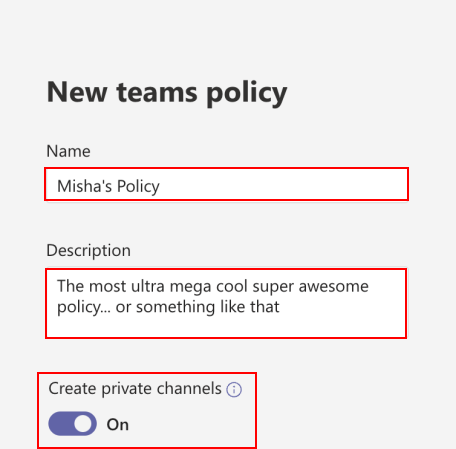
When creating a policy, you’ll find that names are mandatory— in case you need to know what it is later. Although a description would serve a similar purpose, adding one is not mandatory. After applying a name (and perhaps a description), you can proceed to enable (or disable) several Teams-related options.
Step 6 — Apply your policy
Please note that whatever you do means nothing if you don’t apply your changes. Do so via the “Apply” button at the bottom of the pop-out menu.


How to delete a custom Teams policy
Deleting a Teams’ policy requires access to the Microsoft 365 admin center and the Teams admin center: you should seek global user admin permission before attempting the following step-by-step guide.
Step 1 — Use the Office app launcher to open the 365 Admin center
You can observe a nine-square grid button in the top left of Office— click it to open the app launcher. In the app launcher, find and select “Admin,” this will lead you to the Microsft 365 Admin center.
Step 2 — Open the Teams admin center via the 365 admin center
In the 365 Admin portal/center, you will be unable to select “Teams.” Initially, the “Teams” option is hidden. At the bottom of the left side panel, you can find “Show all,” click it followed by “Teams.”
Step 3 — Access the Teams policies page
In the Teams admin center, you will notice a new side panel. The side panel in question contains a category labeled “Teams.” Click the category to open it, search for and click “Teams policies.”
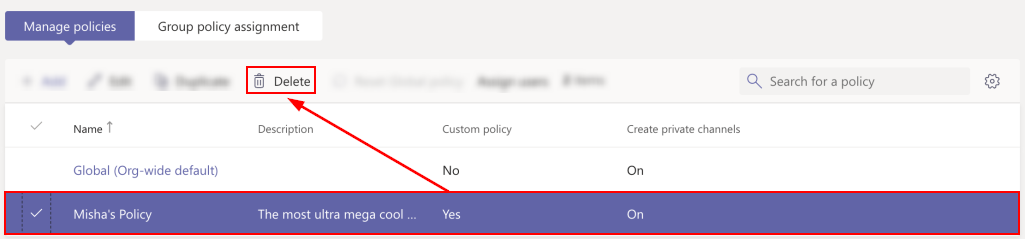
Step 4 — Select and delete your policy
Select your policy’s table and entry and look to the table’s action bar. You need to select the “Delete” option.
Why should I use policies in Teams
Policies allow us to customize our experience with Teams; everything from Team setup, user actions, and guest access is within your control.
Please note, I have not covered every configurable policy; I’ll only be discussing those I find to be most helpful.
Teams policies
Teams policies allow us to configure two options: they’re oriented around private teams and channels. Private channels, in particular, are beneficial. Say you’ve created a staff Team, and you’d like separated channels accessible to specific people— you can use private channels.
Take having a group of graphic designers in your team, for instance; those members could be assigned a private channel only visible to themselves and their respective managers.
- Discover private teams
- Private Teams can be found and joined without an invitation.
- You can create private channels within your Teams. Private channels can be created by members and joined by those they invite. However, they’re inaccessible to those not granted access.
Manage users
User configurations come in three forms. I’ll only be speaking about the more practical two: user access and guest user access. In short, the policies below allow us to control how users and guest users interact with user Teams.
- Meeting policy
- Configure how users engage with Teams meetings. Most notably, you can prevent users from recording meetings anonymously or restrict actions from anonymous meeting participants.
- Messaging policy
- Configure how users can message one another.
- Calling policy
- Allow or disallow user calls.
- Templates policy
- Configure how users interact with Team templates. A Team template serves as a reusable prefab that you can use to create a new Team— you can also use templates to backup existing Teams.
Guest access
Guest access policies are where Teams’ policies genuinely shine. If you have external members within your Team, you can better control how they interact with your team members and the Teams itself.
- Allow guest access in Teams
- Permit external contacts to join the Team as a guest. Guest access policies limit guest accounts.
- Calling
- Allow or disallow guest users to initiate private calls
- Meeting
- Meeting settings permit guest users to share a video feed in meetings, share their screen and utilize the “meet now” function.
- Messaging
- Messaging policies permit you to allow or disallow the following:
- Guest users editing their sent messages
- Guest users deleting their sent messages
- Guest users viewing or interacting with chats
- Guest users using Giphy
- Guest users’ allowed content rating for Ghipy content
- Guest users can distribute “memes” in conversation
- Guest users can use stickers
- Guest users can use the immersive reader for messages.
- Messaging policies permit you to allow or disallow the following:
Blog post recap
Custom Teams policies are created and deleted via the Teams section in the admin center. You will require access to the Teams admin center and 365 Admin portal to achieve either goal. Thus, readers are advised to attempt both goals with no less than a global user admin account.
You may be interested in the following related posts:
- The ultimate guide to Microsoft Teams shortcuts and tips — If you’re new to Teams or trying to streamline your application usage, you should consider learning its shortcuts. Shortcuts reduce the time you waste moving your cursor, clicking buttons, and traversing otherwise surplus menus. Get started with this post.
- How to mute notifications for one user in Microsoft Teams — Nobody minds a message or two while working. However, that’s not to say there’s no limit. If you’ve got a disruptive colleague or friend keeping you from your work, you should consider muting them. There’s a good chance it might boost their productivity too.
- How to turn reaction notifications off in Microsoft Teams — Message alerts are ideal for keeping track of what’s going on in your team; this contrasts with reaction alerts which serve little purpose outside of being tedious. If you’d like to silence them, follow this post.
- How to add apps to the sidebar in Microsoft Teams — Apps vastly enhance the Teams user experience by expanding its default functionality— this is achieved via the power of integration. If you’d like to make an integrated app more accessible, consider adding it to the sidebar.