If like me, you’re guilty of paying your emails little-to-no attention, you’ve probably built up a collection of cluttered inboxes. As a result, your mailbox may be somewhat overwhelming. Unfortunately, multi-lined message previews only complicate matters by adding more details to your window.
You can follow this short guide if you want to customize Outlook to show only one line per email in the reading pane. If anything is unclear, please refer to the more advanced and comprehensive guide later in the post.
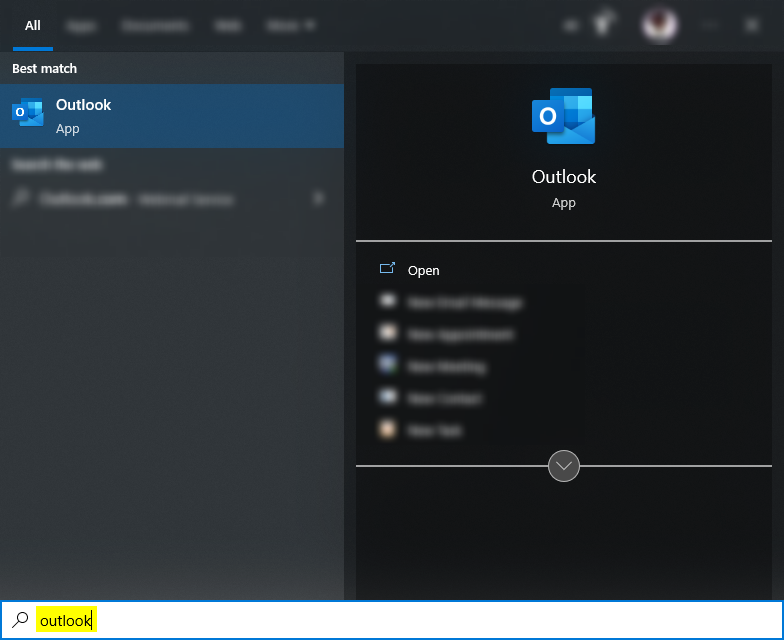
- Hit the “Start” key
- Type “Outlook”
- Press the “Enter” key
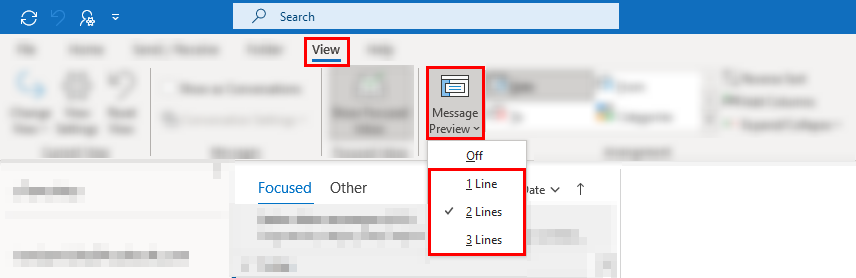
- Move to the “View” tab
- Open the “Message Preview” dropdown
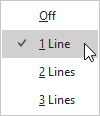
- Select “1 Line”
In this post, I will cover how you can limit the number of lines displayed in each Outlook message preview. I will additionally cover two cases wherein your effects may not be applied as expected.
The following post features a handful of sections, but I respect that you might not care about all of them. So, I have provided the following shortcuts that enable you to access the most relevant page quickly.
- How to limit lines for Outlook message previews (Desktop)
- How to limit lines for Outlook message previews (Web/PWA)
- Why message preview line limit won’t apply
- Blog post recap
How to limit lines for Outlook message previews (Desktop)
Limiting the size of a message preview is relatively straightforward. In the section below, you will find an in-depth, step-by-step guide. Please refer to the images provided if you get stuck or struggle with any steps. Should you still experience issues, you can leave a comment at the bottom of the post.
Step 1 — Launch the Outlook desktop client
First, start by hitting the “Start” key and typing “Outlook.” Then, under “Best match,” you can find and select the “Outlook” option. Or, in the results card (on the right), you can click “Open.”
Step 2 — Open your message preview settings
In Outlook, you’ll need to head to your “View” tab. Then, you can click “Message Preview” to reveal its dropdown.
Step 3 — Pick 1 line
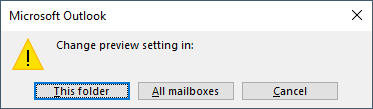
You will notice there are four options: “Off,” “1 Line,” “2 Lines,” and “3 Lines.” Ensure you select the “1 Line” option. Outlook will then ask you whether or not you would like to apply the change to each mailbox or just your (currently open) folder.

How to limit lines for Outlook message previews (Web/PWA)
Outlook is a desktop application, a web service, and a progressive web application (PWA). While the web service and PWA are almost identical, they differ significantly from the desktop version in terms of customization.
Versions of Outlook powered by web technologies such as HTML, CSS, and JavaScript (PWA) do not feature many reading-pane customizations. Hence, one cannot change the number of lines depicted in message previews.
Why the message preview line limit won’t apply
You may still find messages with lengthier previews despite limiting the number of lines in a message’s preview. However, this is not necessarily a mistake of the program in question, as it could result from human error.
Global versus local application
When applying settings, it’s essential to understand whether you’re doing so locally or globally— this is because Outlook will use a locally applied setting within your current mailbox folder, unlike a globally applied setting which will take effect across every folder. Therefore, if you want the effect to be present in every part of Outlook, I propose you select “All mailboxes” instead of “This folder.”
Old versions of Outlook
In older versions of Outlook, users experienced an issue where Outlook seemed to ignore the preview line limit. The problem is caused by the reader pane being too thin. You can fix the problem by clicking, holding, and dragging the side of the pane outward.
Blog post recap
Unless your inbox is empty, Outlook’s reading pane is responsible for detailing each of your received messages. A message preview will contain between one and three lines of its message by default. However, we can use Outlook’s “View” tab to alter this setting. Unfortunately, you cannot achieve this using Outlook’s web service or an Outlook PWA.
If you enjoyed this post or found the content helpful, please consider checking out some more of our Outlook-related posts. Each writer works incredibly hard to produce valuable and comprehensive content.