 Key Takeaways
 To enable Microsoft Loop for your organization, you will need admin permissions and Azure AD Premium P1 or P2 licensing. [More…]
 There are three steps to enabling Microsoft Loop:
1: Create a new security group here or here.
2: Create a new Cloud policy configuration here.
3: Access Loop here by using your Microsoft365 credentials.
[More…]

Microsoft Loop is a new co-creative tool from Microsoft as an addition to their 365 suite of applications. Loop is currently available in public preview. So in this guide, we’ll show you how to enable and access Microsoft Loop for your organization.
How to enable and access Microsoft Loop for your organization:
- Step 1: Create a new security group here (dynamic) or here (static).
- Step 2: Create a new Cloud policy configuration here.
- Step 3: Access Loop here by using your Microsoft365 credentials.
We’ve also created a video to guide you through the process of enabling Microsoft Loop for your organization:
Prerequisites to enable Microsoft Loop for your organization
IT admins can now enable Microsoft Loop for their organization. To do that, you will need ![]() Azure AD Premium P1 or P2 licensing. Additionally, users are required to have a Microsoft365 account with access to a Loop-enabled security group.
Azure AD Premium P1 or P2 licensing. Additionally, users are required to have a Microsoft365 account with access to a Loop-enabled security group.
You will need access to the ![]() Microsoft 365 Apps admin center where you will create a Cloud Policy configuration for the security group.
Microsoft 365 Apps admin center where you will create a Cloud Policy configuration for the security group.
The full process is detailed in the step-by-step guide in the next section.

How to enable and access Microsoft Loop for your organization (step-by-step guide):
This section will consist of three steps. First, you will create a security group. Then you will create a Cloud policy configuration for your security group. And finally, you will test Loop access by signing into Loop with your Microsoft365 credentials.
 Step 1: Create a new Security Group
The first step is to create a security group. There are two types of security group: static and dynamic. A dynamic group is ideal if you want to allow new users to gain access to Loop. Whereas a static group will only allow a specific, predefined set of users to gain access.
If you have an existing security group, you can head down to Step 2.
Create a Static Security Group
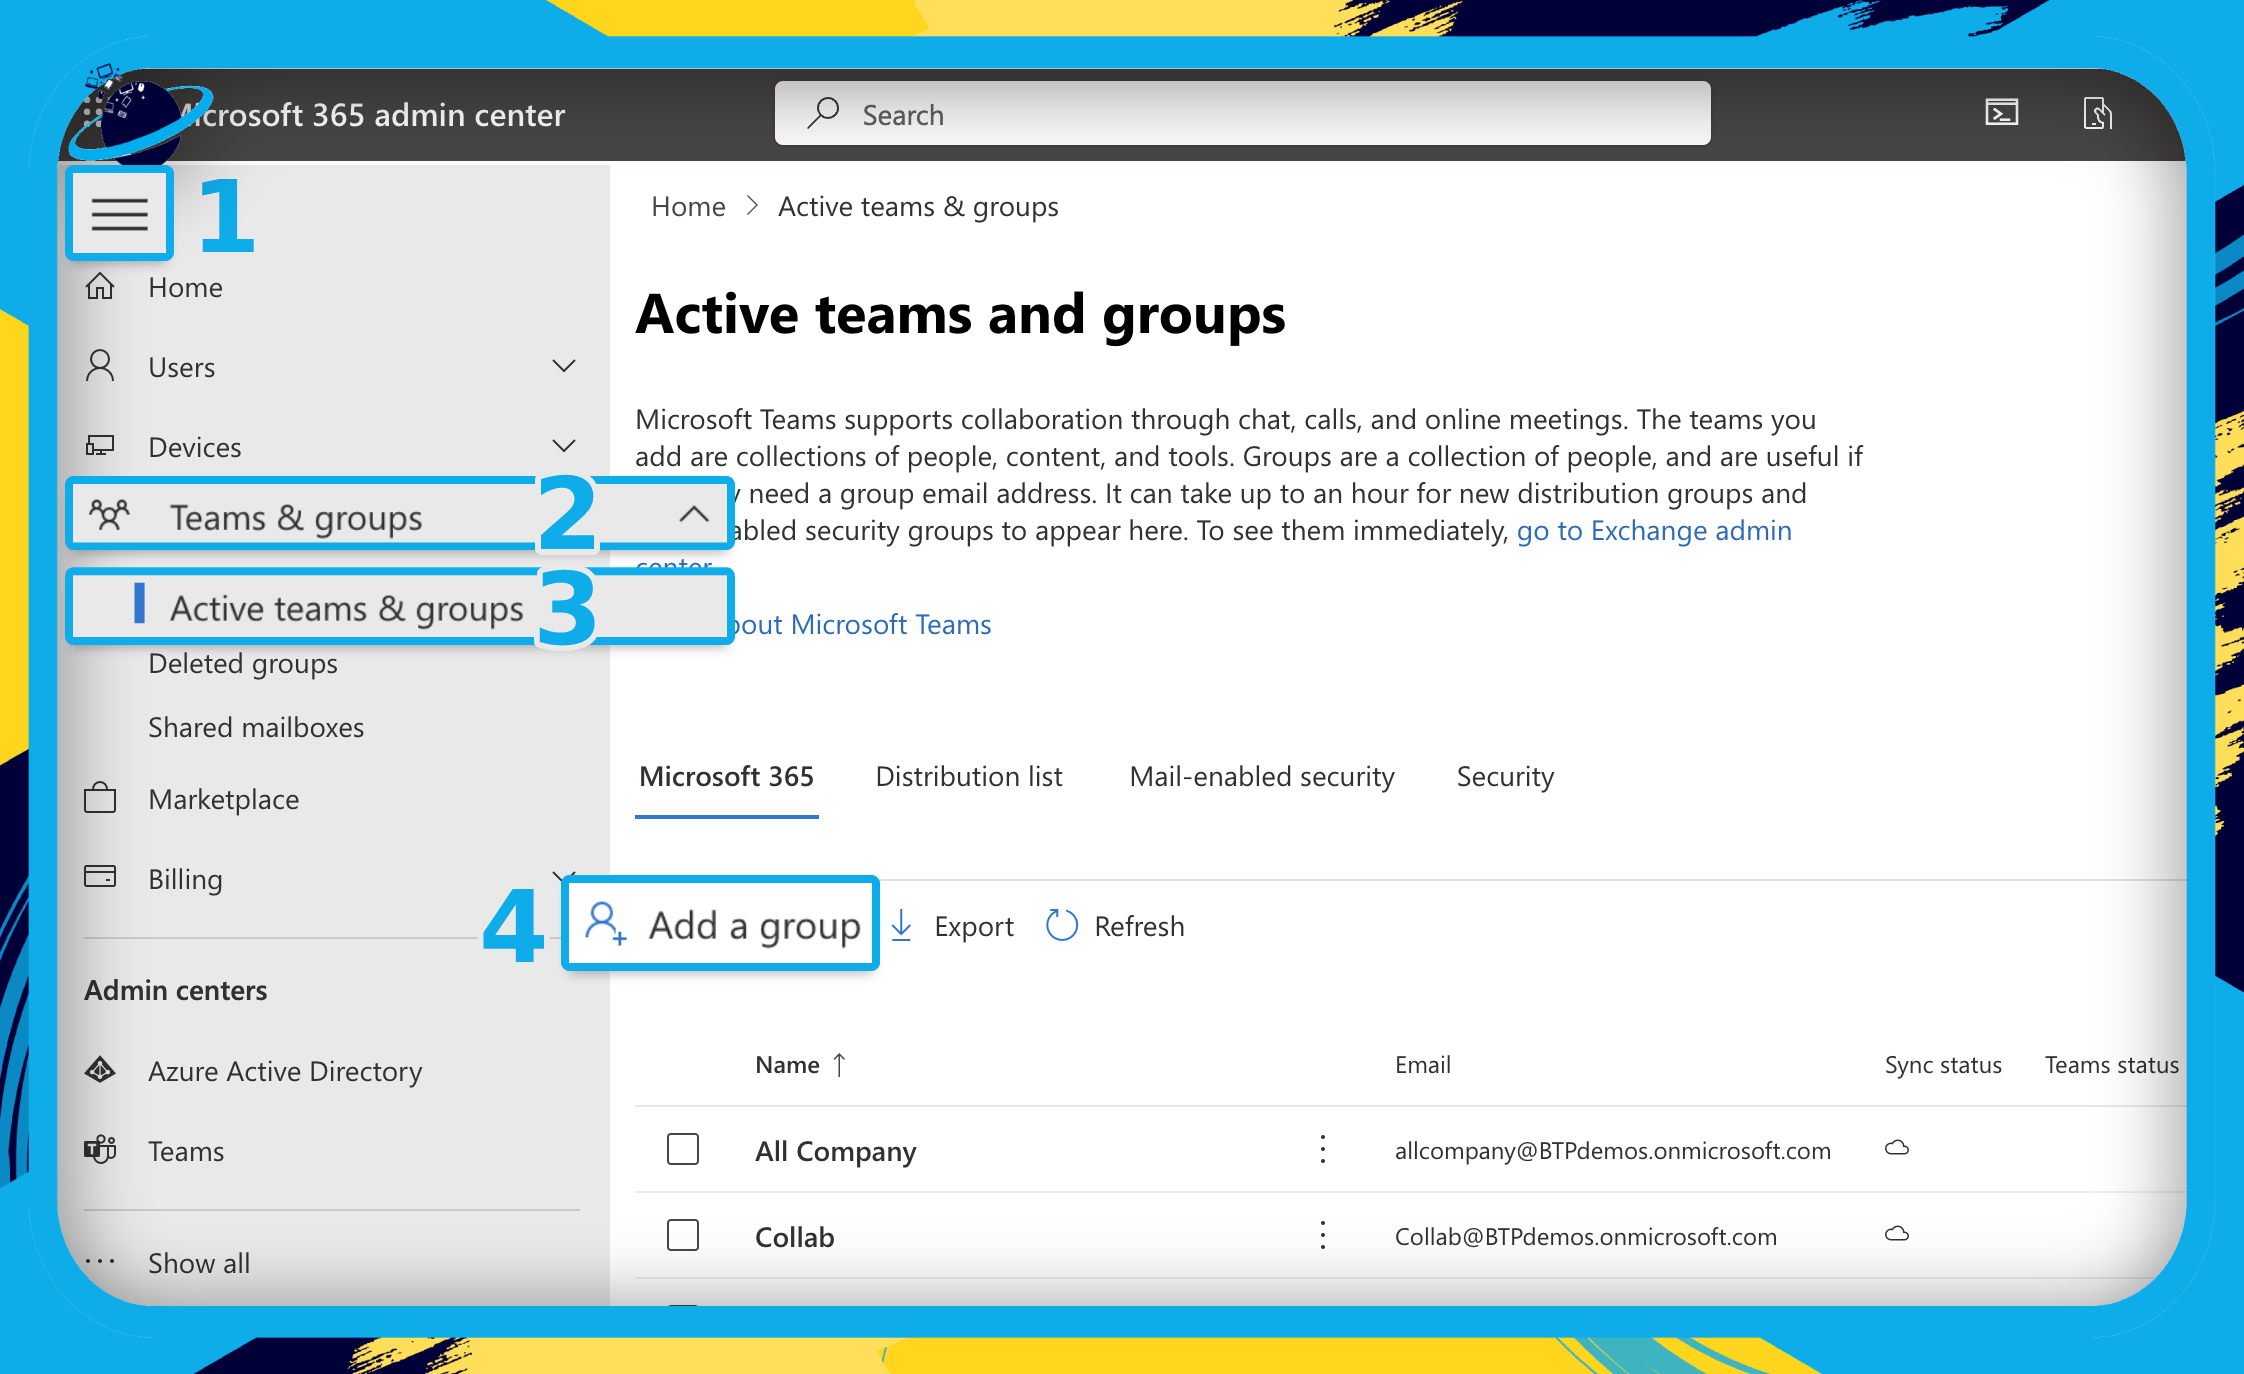
- To begin, please sign into your
 Microsoft admin center.
 - Click the
 menu icon in the top left. [1]
 - Then click
 “Teams & groups” in the left menu. [2]
 - Select “Active teams & groups” from the revealed options. [3]
- Next, click
 “Add a group.” [4]
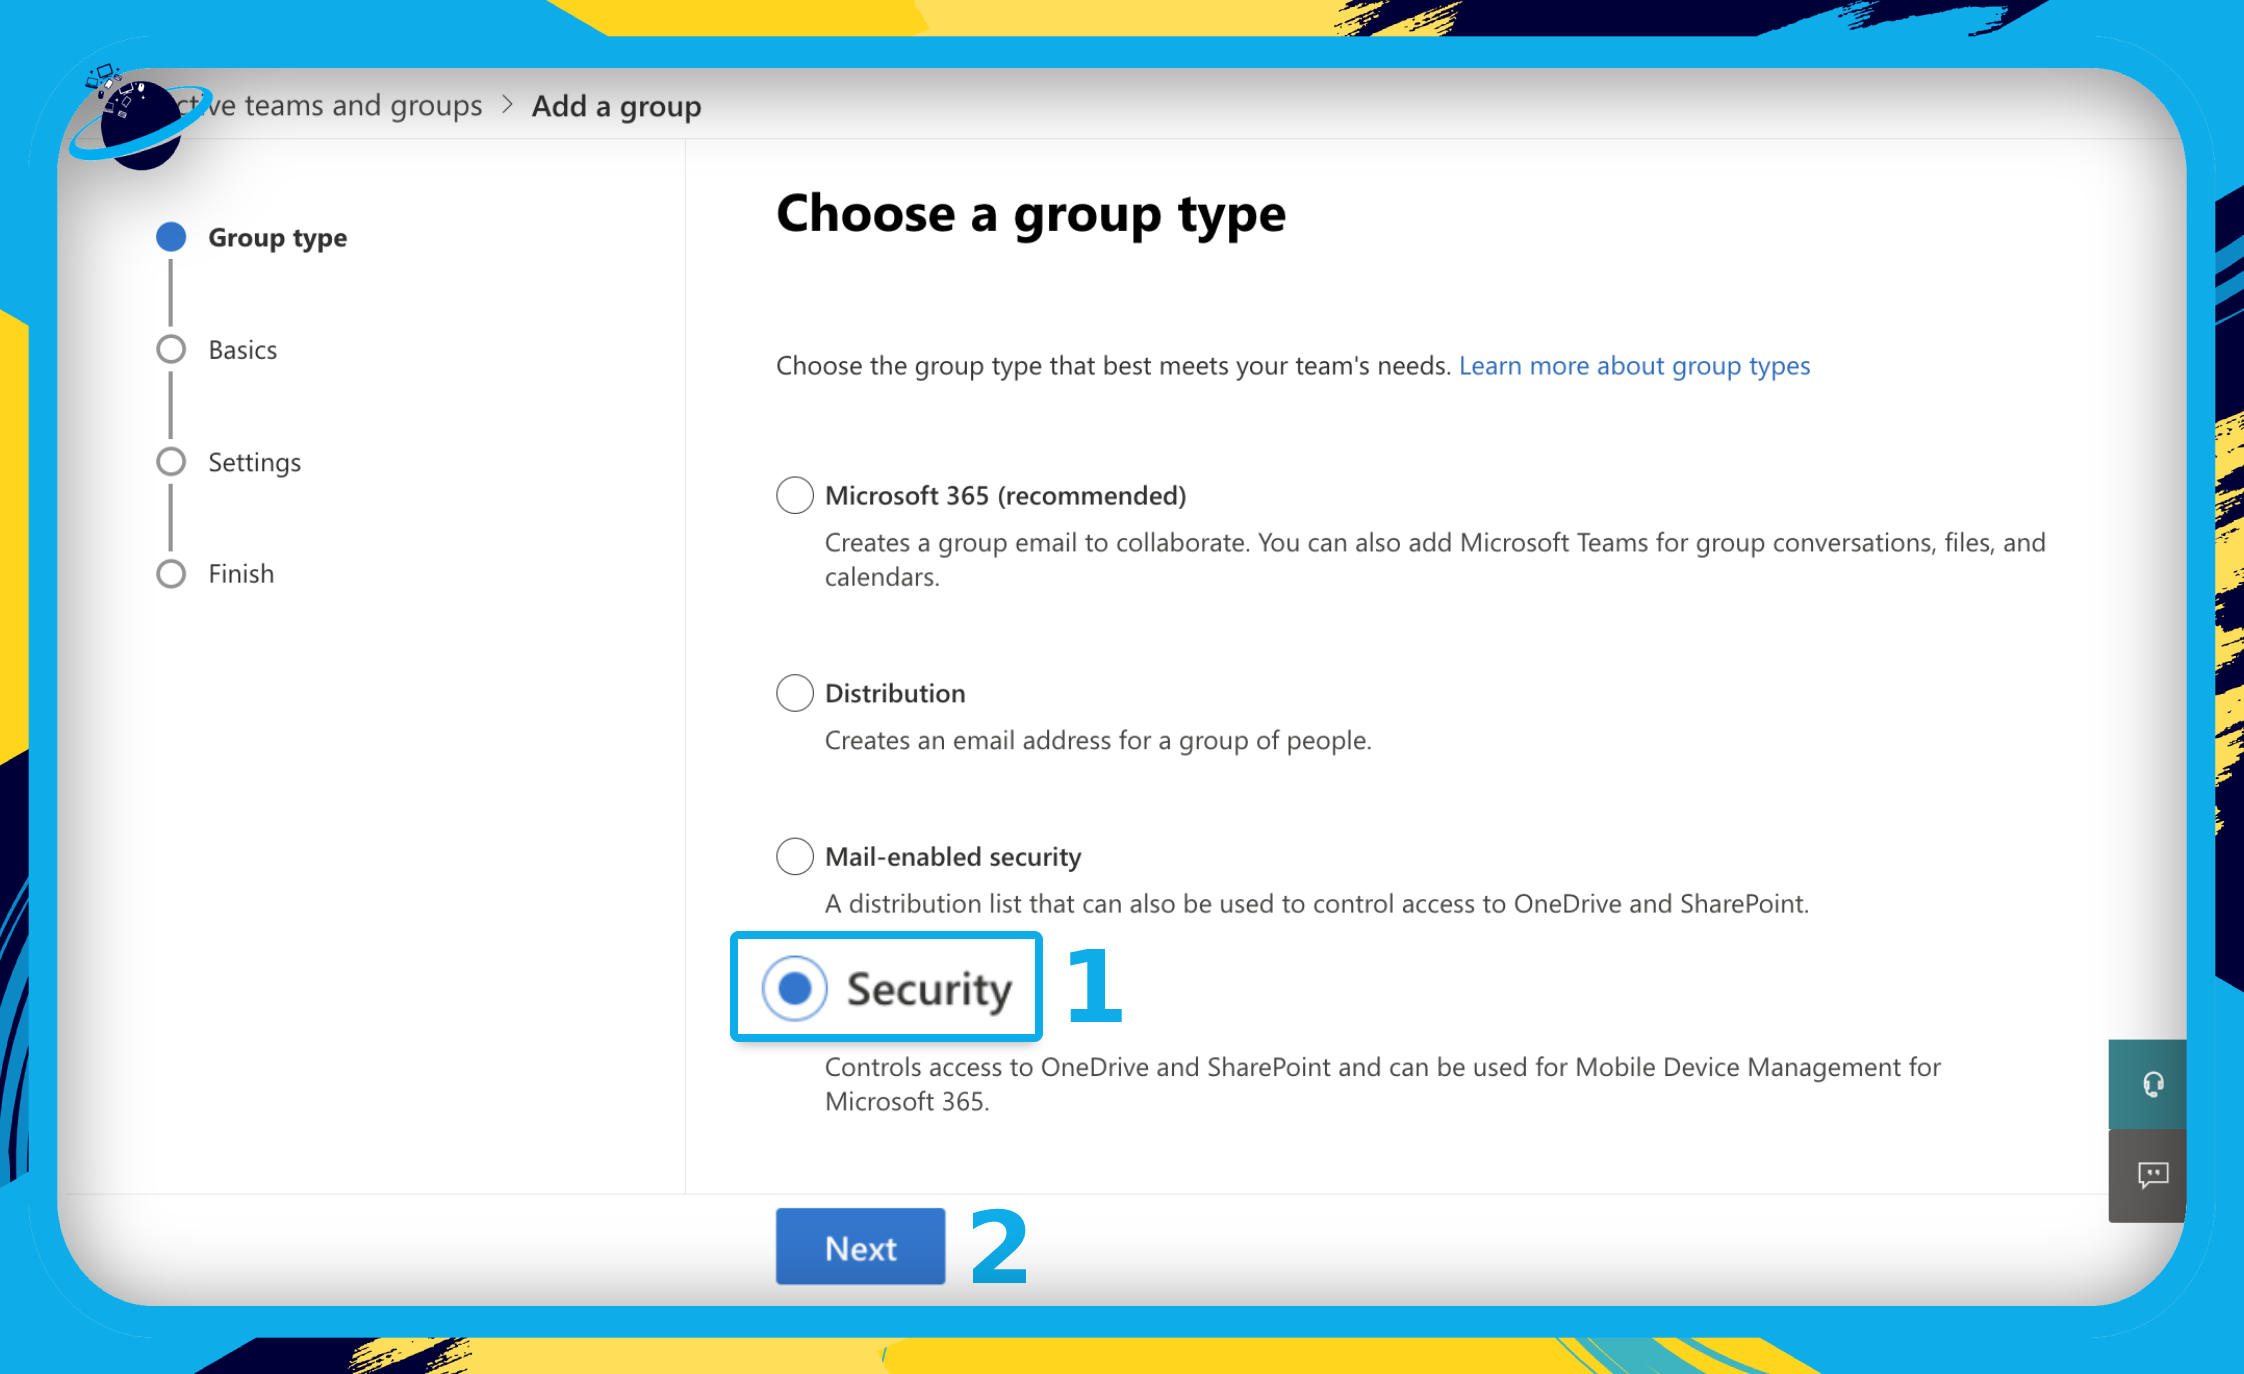
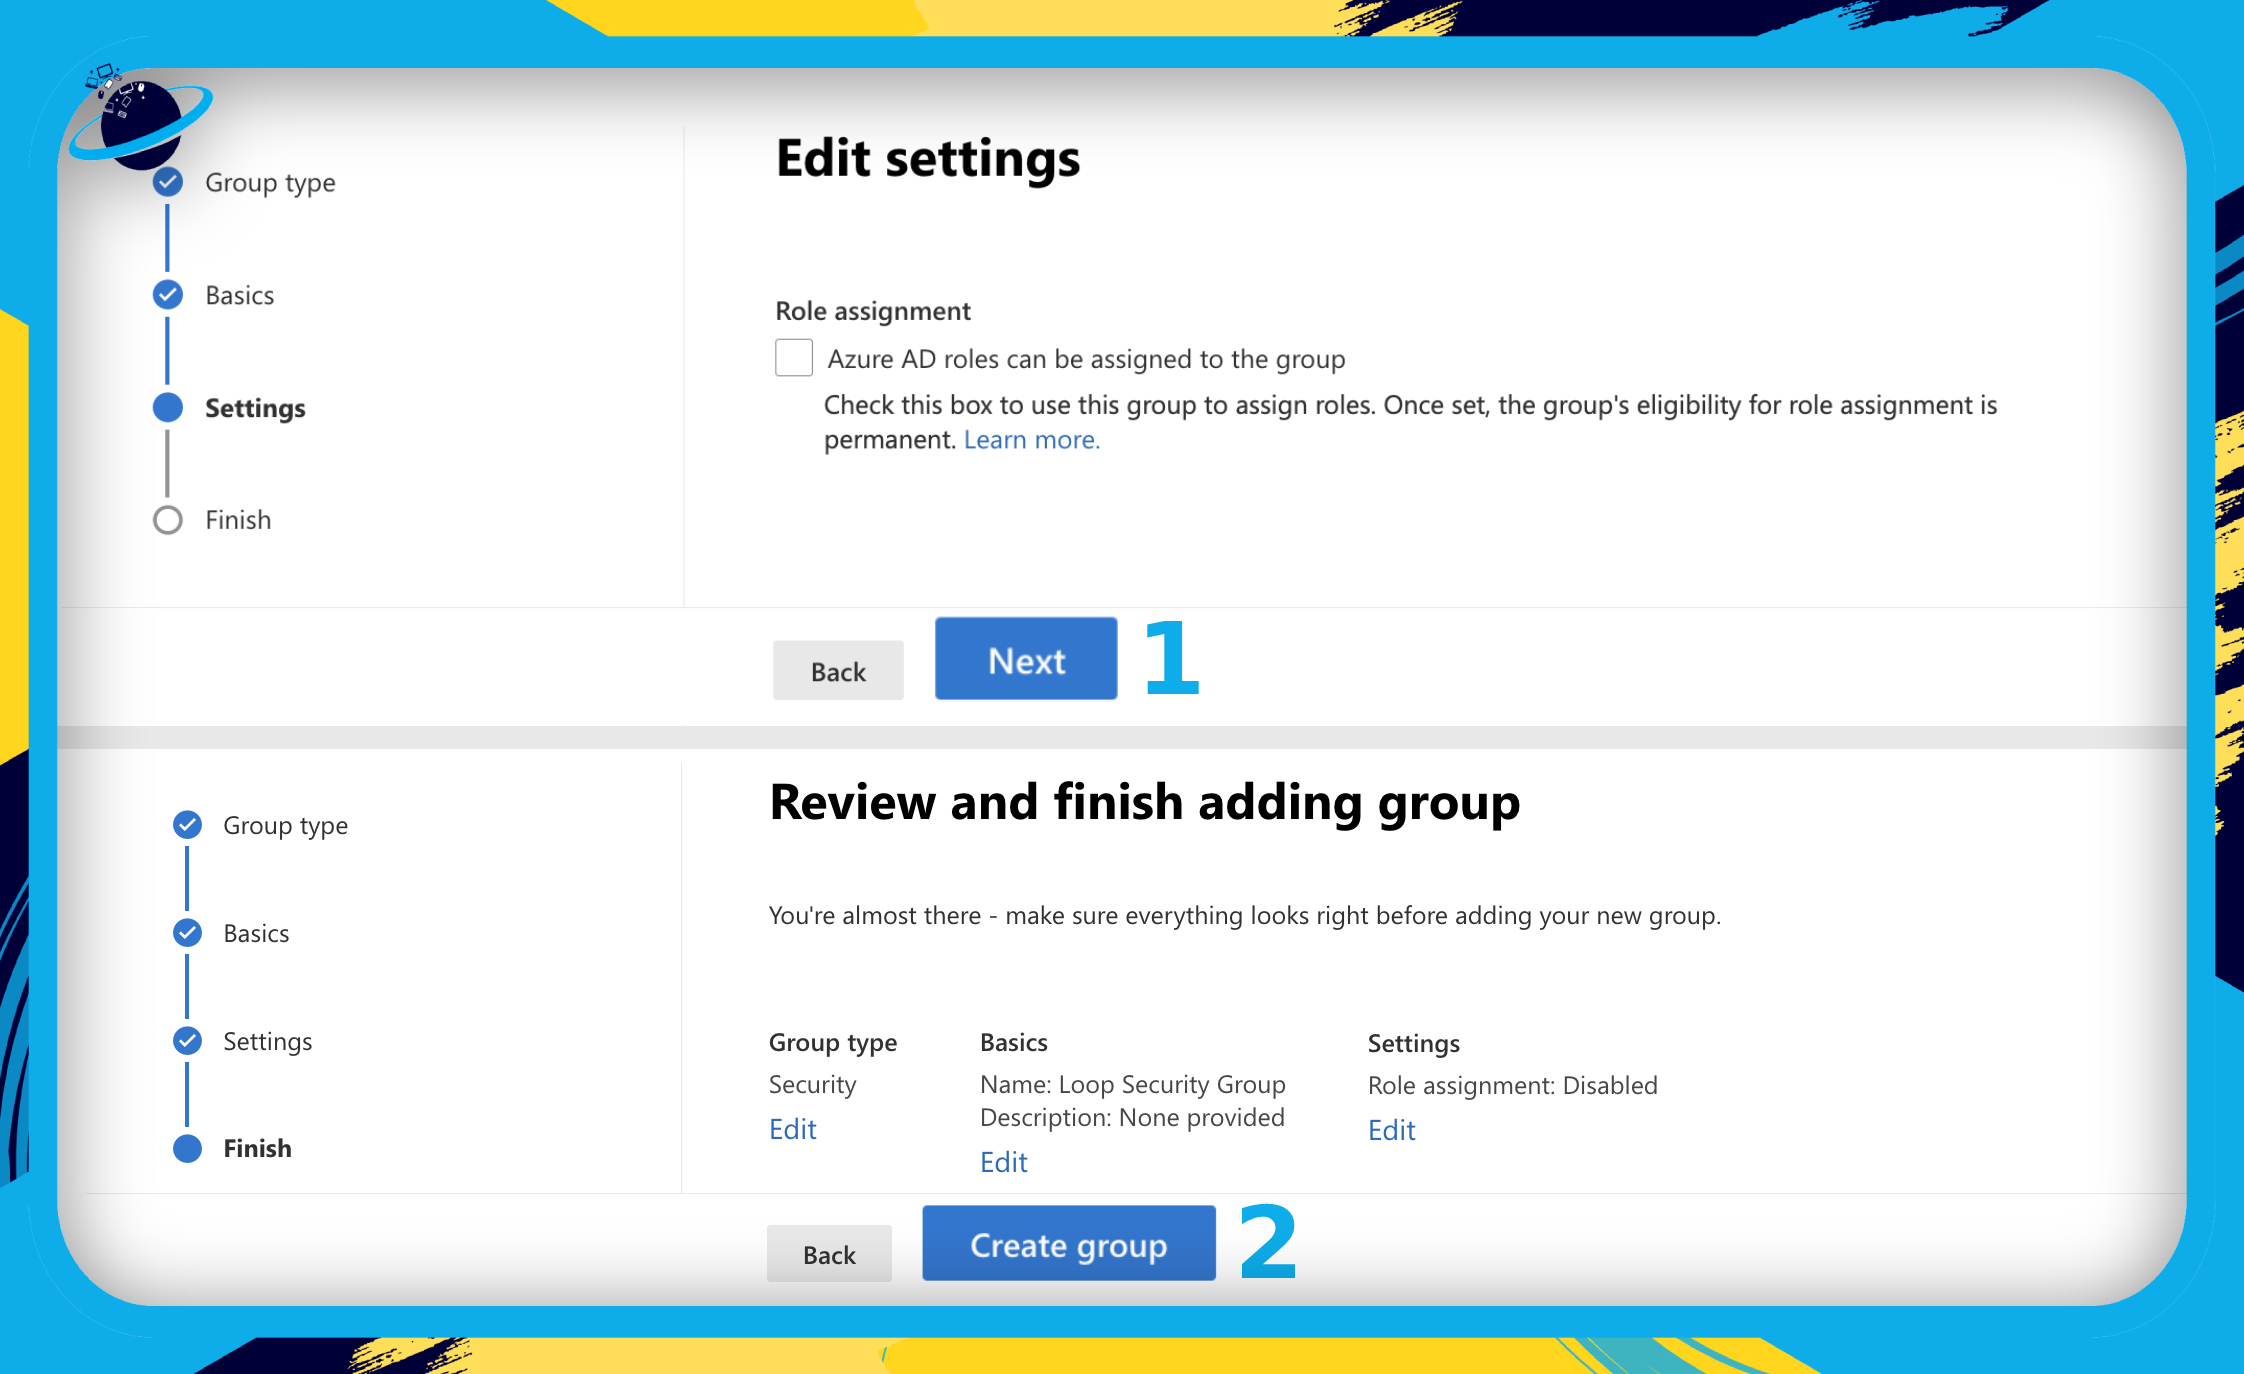
- Select “Security” as the group type. [1]
- Then click “Next.” [2]
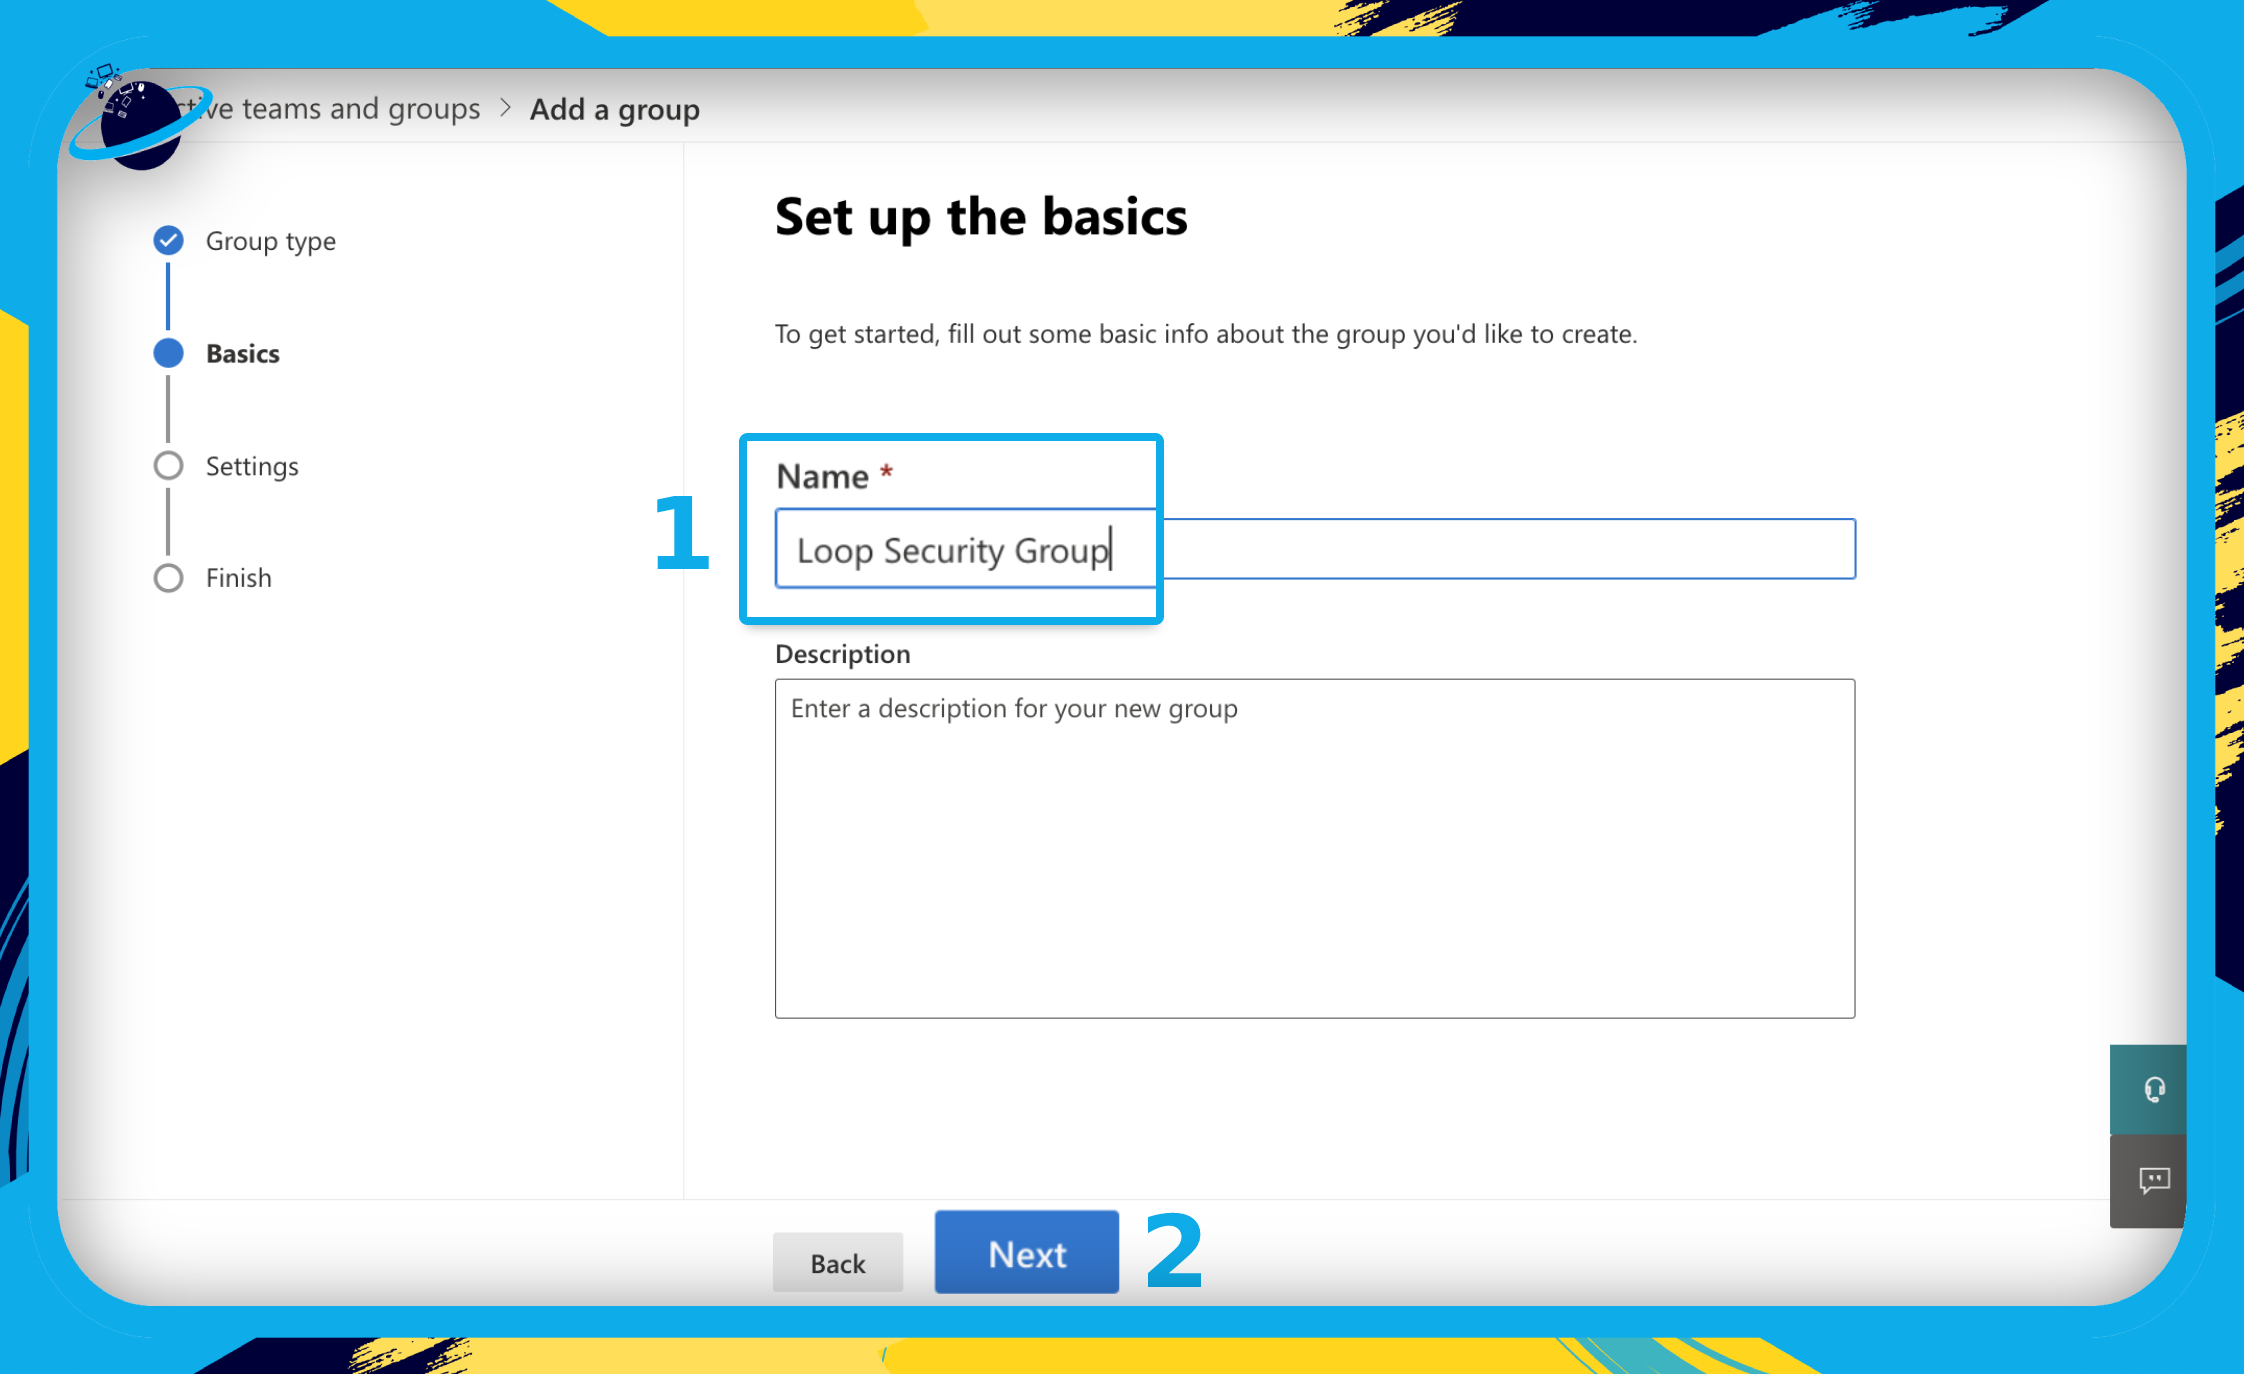
- Enter a name for the group, such as “Loop Security Group.” [1]
- Then click “Next.” [2]
- You can leave the “Role assignment” box unchecked.
- Then click “Next.” [1]
- Finally, click the “Create Group” button. [2]
Now add members to your static security group:
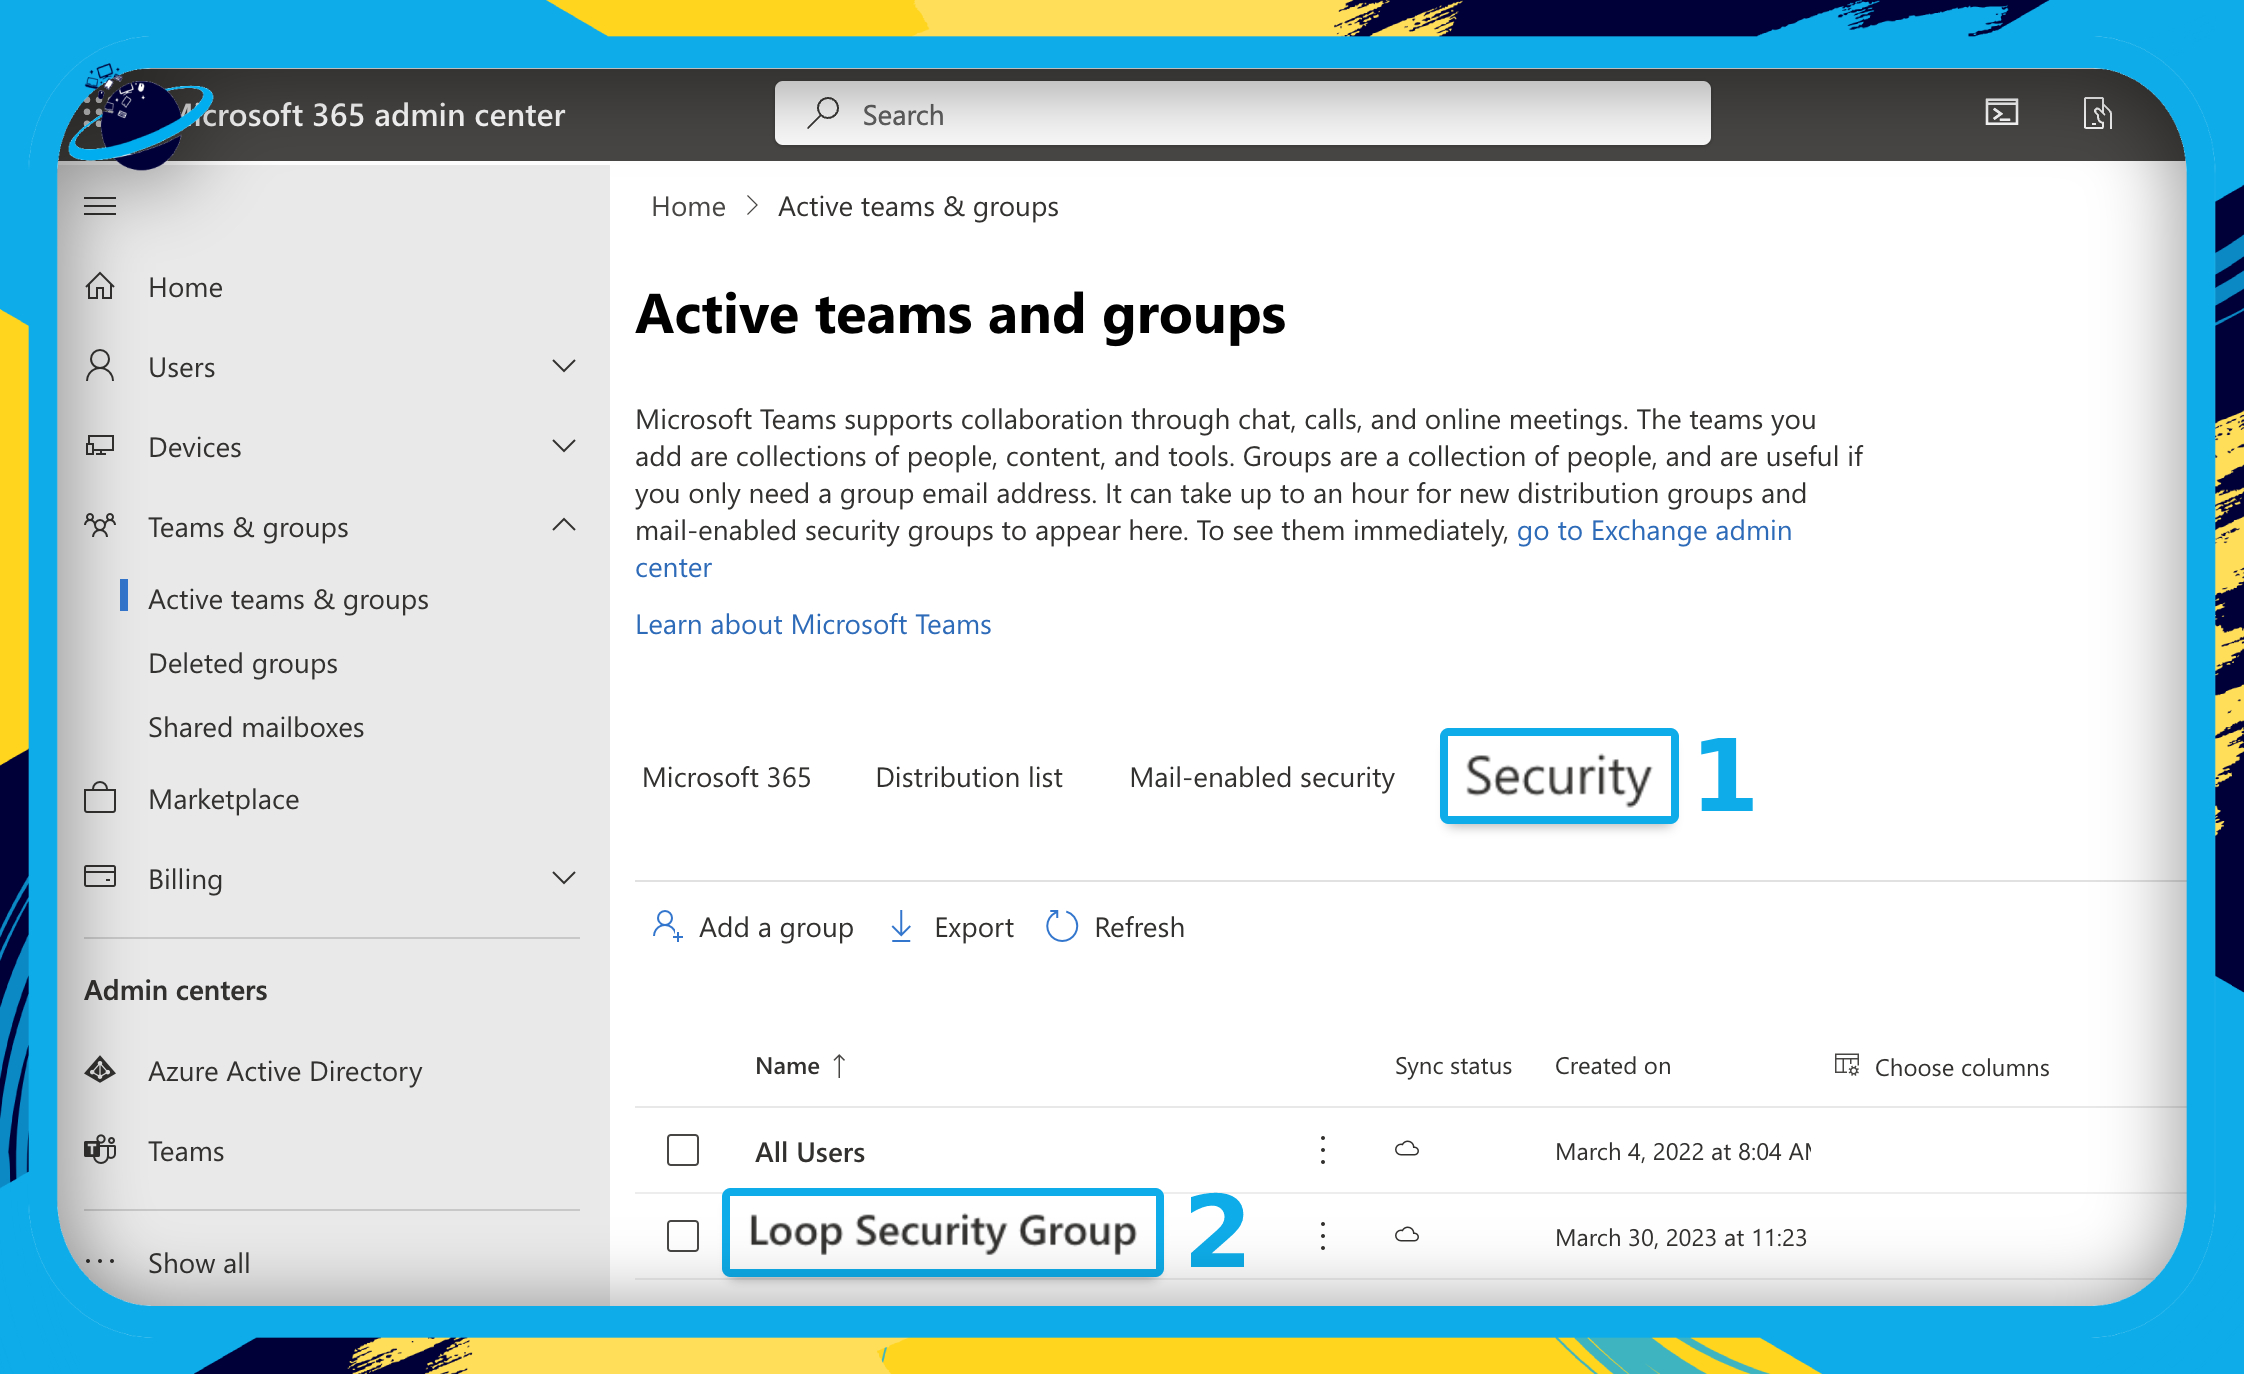
- Return to the “Active teams & groups” page.
- There, head to the “Security” tab at the top. [1]
- Select your Loop security group. [2]
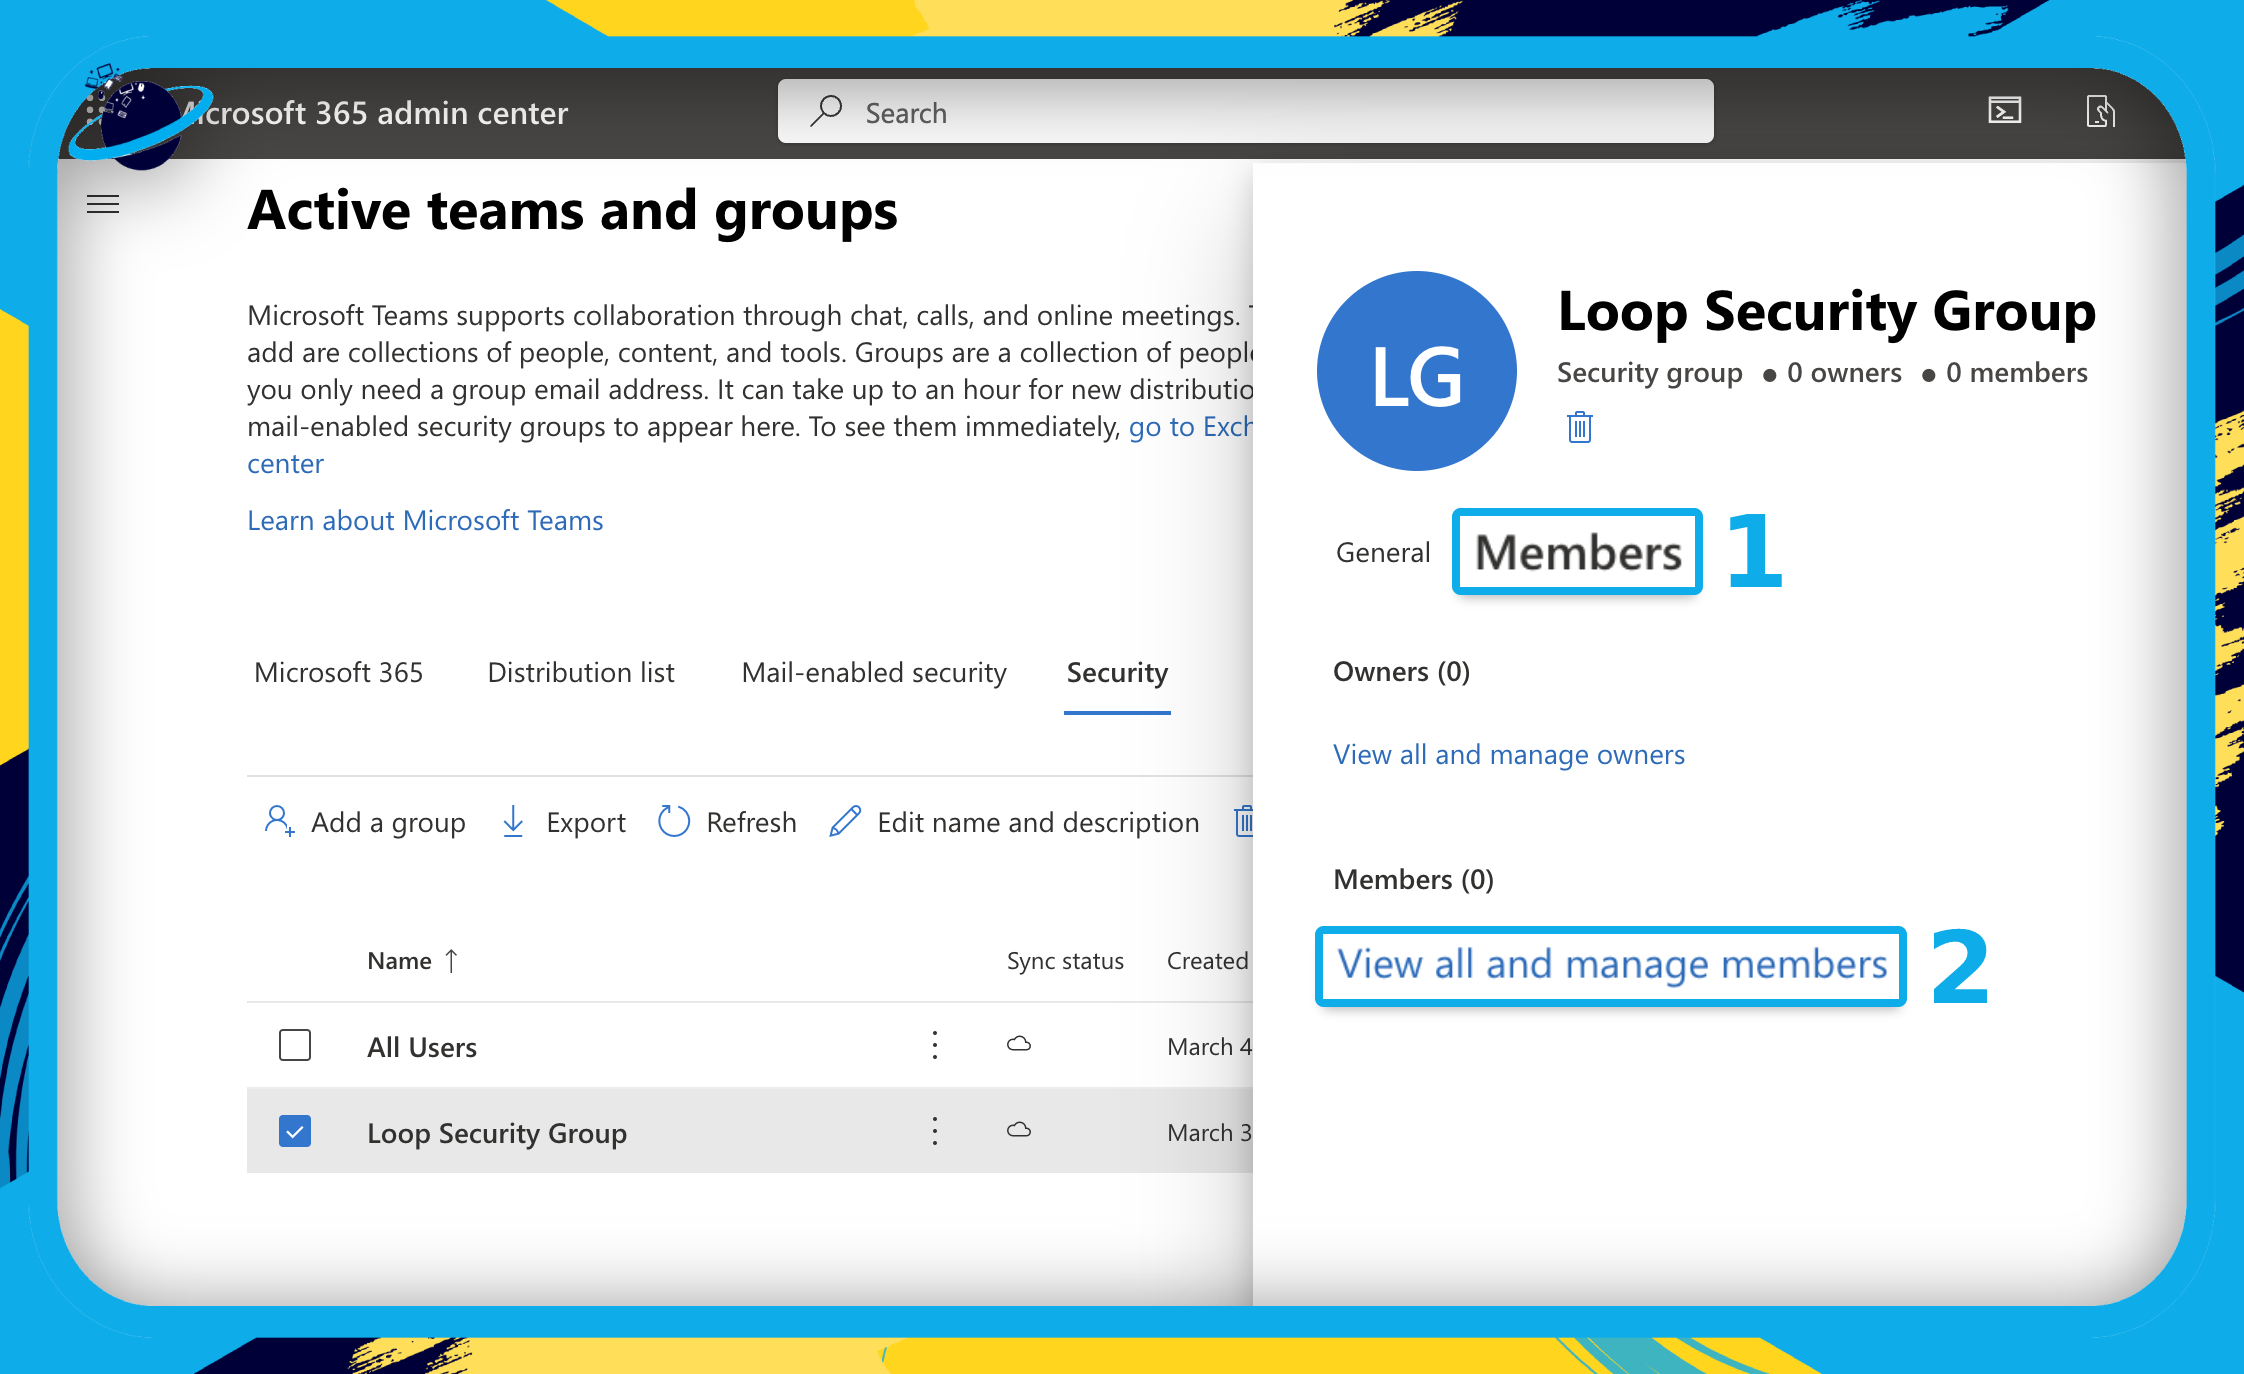
- A navigation pane should appear on the right side of the window.
- Go to the “Members” tab in the navigation pane. [1]
- Click “View all and manage members.” [2]
- Click on
 “Add members” at the top. [1]
 - Then check the box next to the members you want to add.
- And finally, click the “Add” button. [2]

- You can now move onto the next step: creating a Cloud Policy configuration.
Create a Dynamic Security Group
If you’ve created a static security group, you can head down to Step 2. Otherwise, please continue with the steps below to create a dynamic security group.
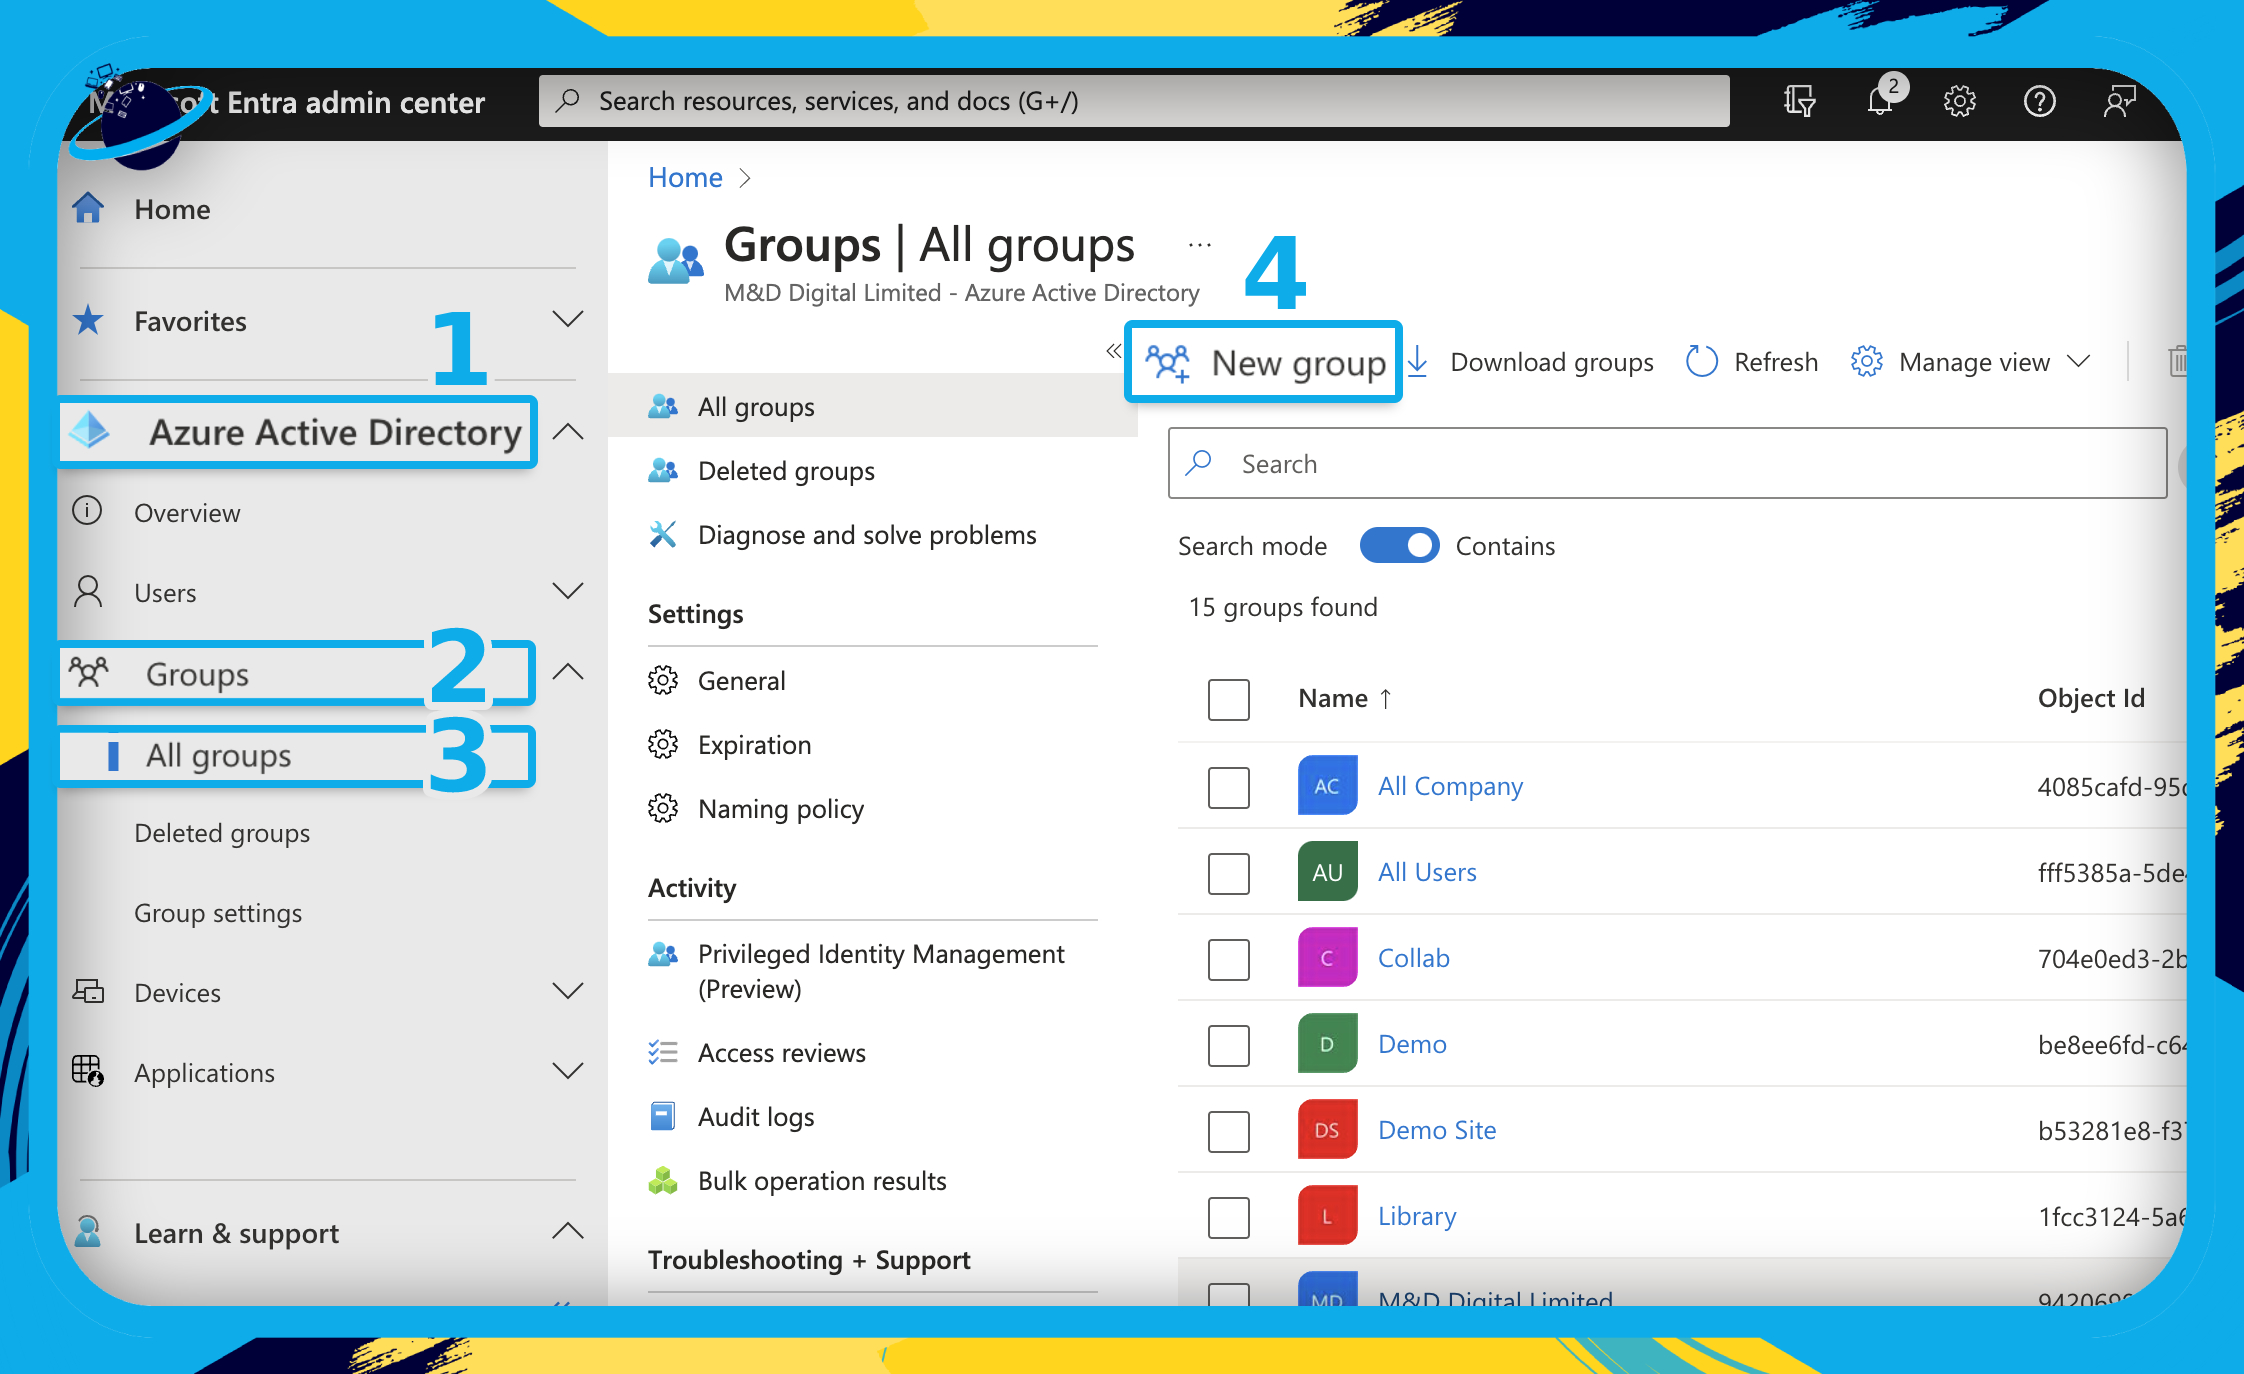
- To begin, please sign into your Microsoft Entra admin center.
- Go to
 “Azure Active Directory” in the left menu. [1]
 - Then go to “Groups.” [2]
- And select “All groups.” [3]
- Click
 “New group” at the top. [4]
- Ensure the “Group type” is set to “Security.” [1]
- Enter a name for the group, such as “Loop Security Group.” [2]
- Add an optional description.
- Click the select box under “Membership type” and select “Dynamic User.” [3]
- Then click “Add dynamic query” under “Dynamic user members.” [4]

- Click
 “Edit” on the right side of the “Dynamic membership rules” window. [1]
 - Enter one of the following expressions into the “Rule syntax” box: [2]
- To allow guest users: user.objectId -ne null
- To disallow guest users: (user.objectId -ne null) and (user.userType -eq “Member”)
- Click the “OK” button. [3]
- Then click
 “Save” at the top. [4]
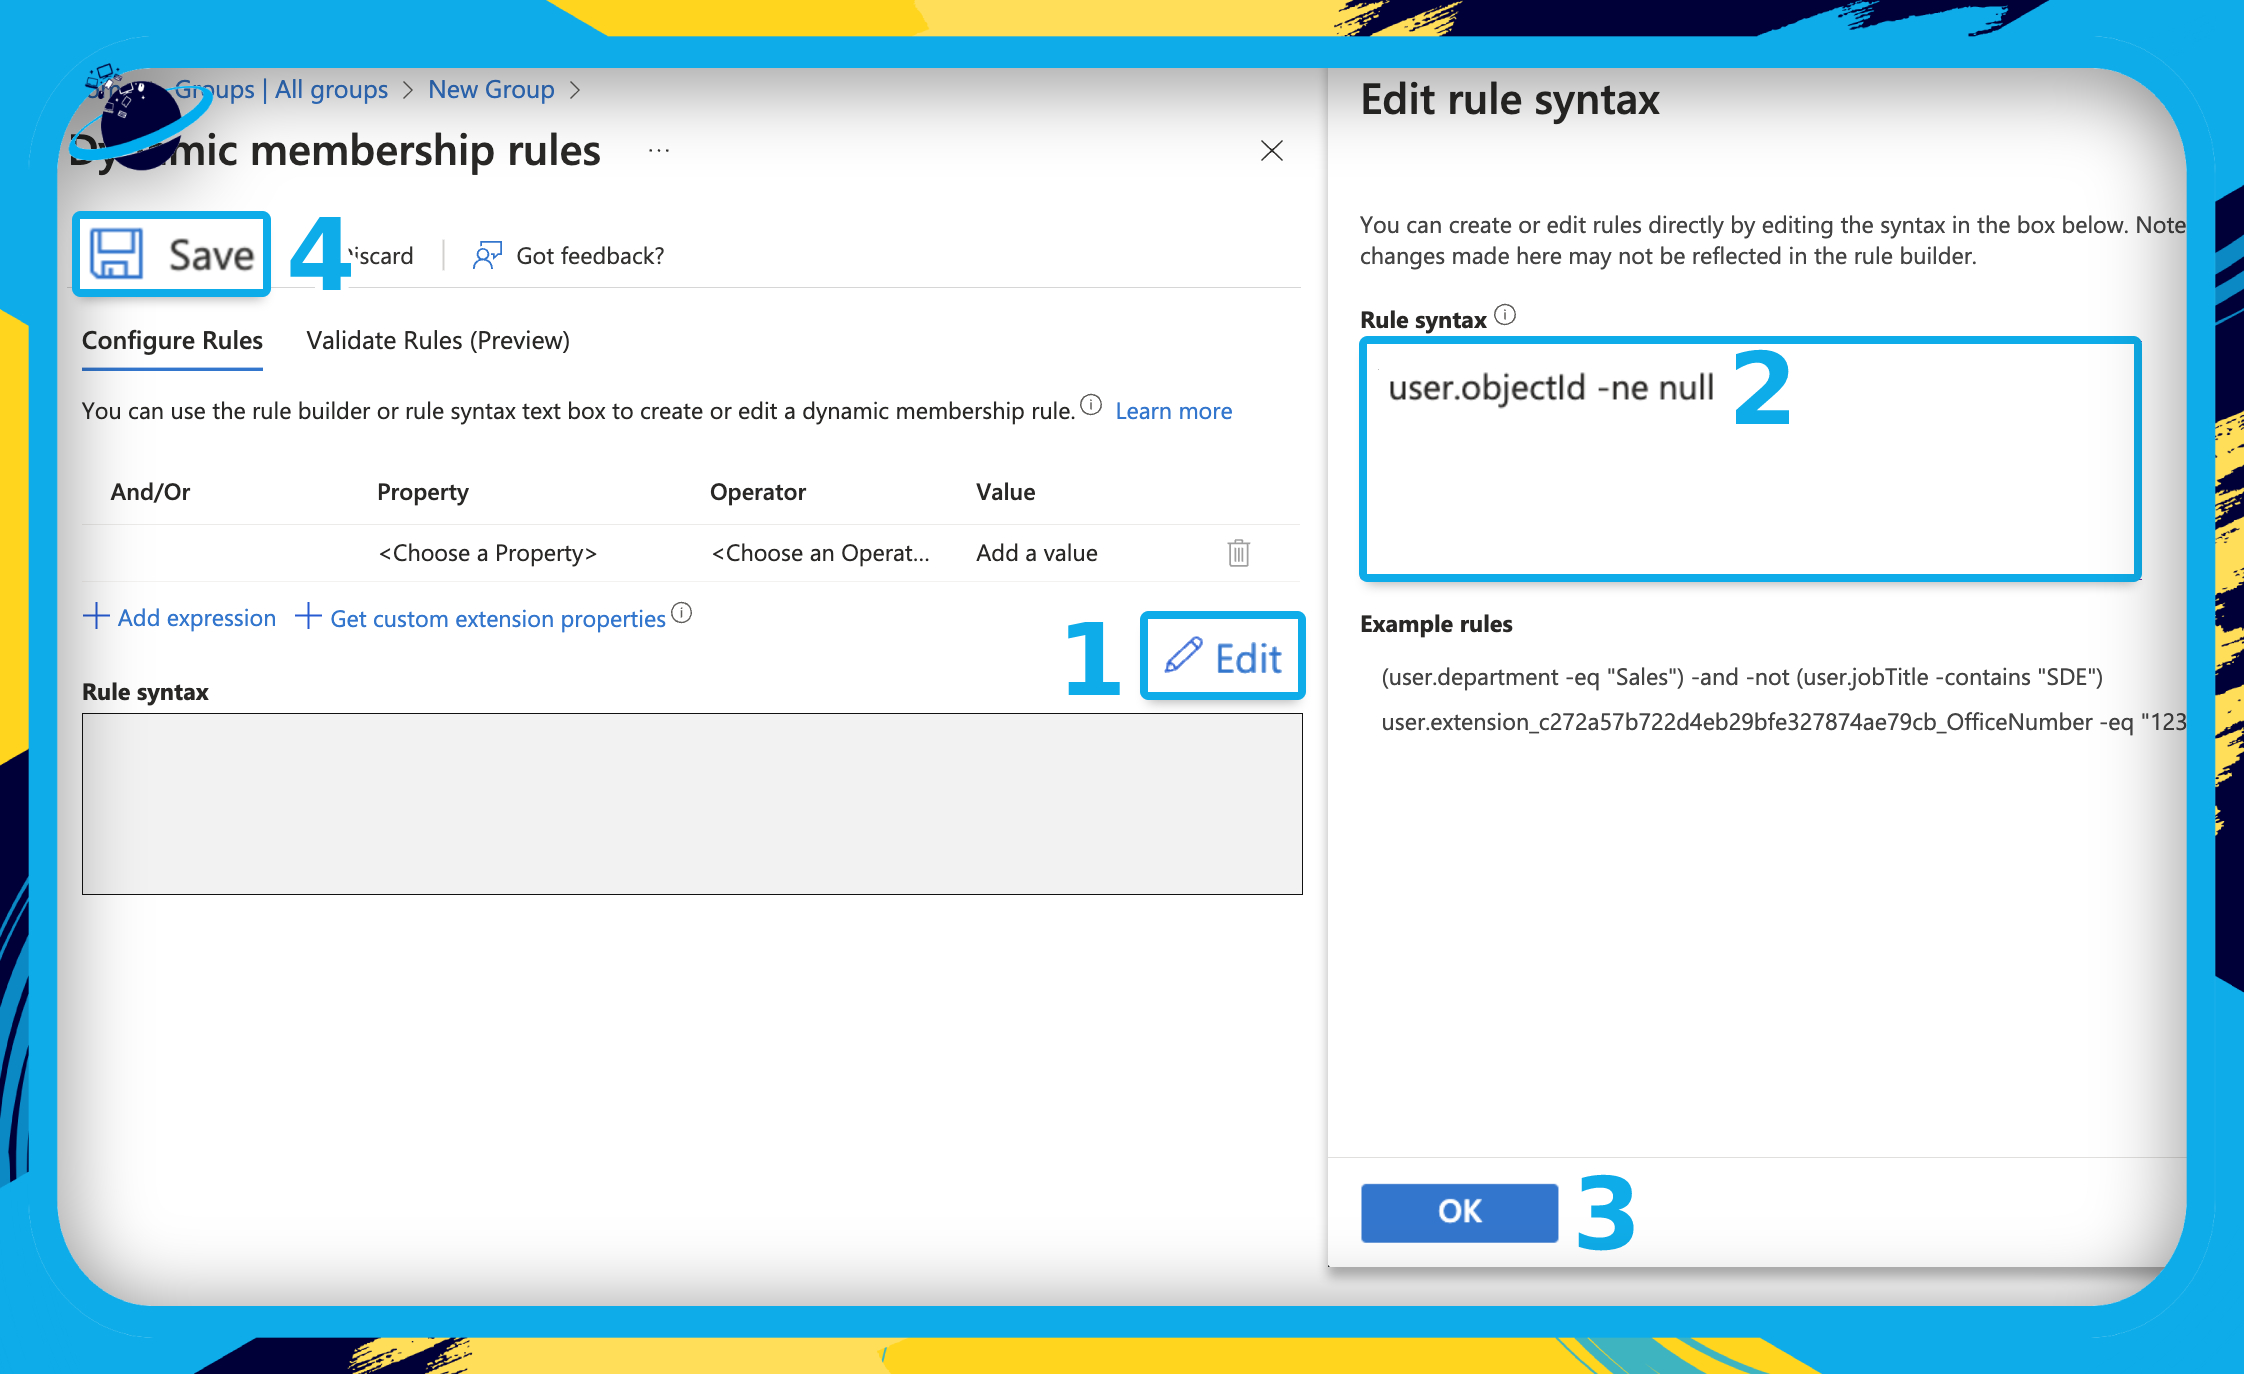
- Finally, click the “Create” button at the bottom.
- You can now move onto the next step: creating a Cloud Policy configuration.
Step 2: Create a Cloud Policy configuration
The next step in the process is to create a Cloud Policy configuration. The policy allows you to enable or disable a set of options for your security group, such as the ability to create and view Loop files.
- To begin, please sign into your Microsoft 365 Apps admin center.
- If you get stuck on “Loading” try and reset your internet router.
- You can also create an apps policy via your Intune admin center.
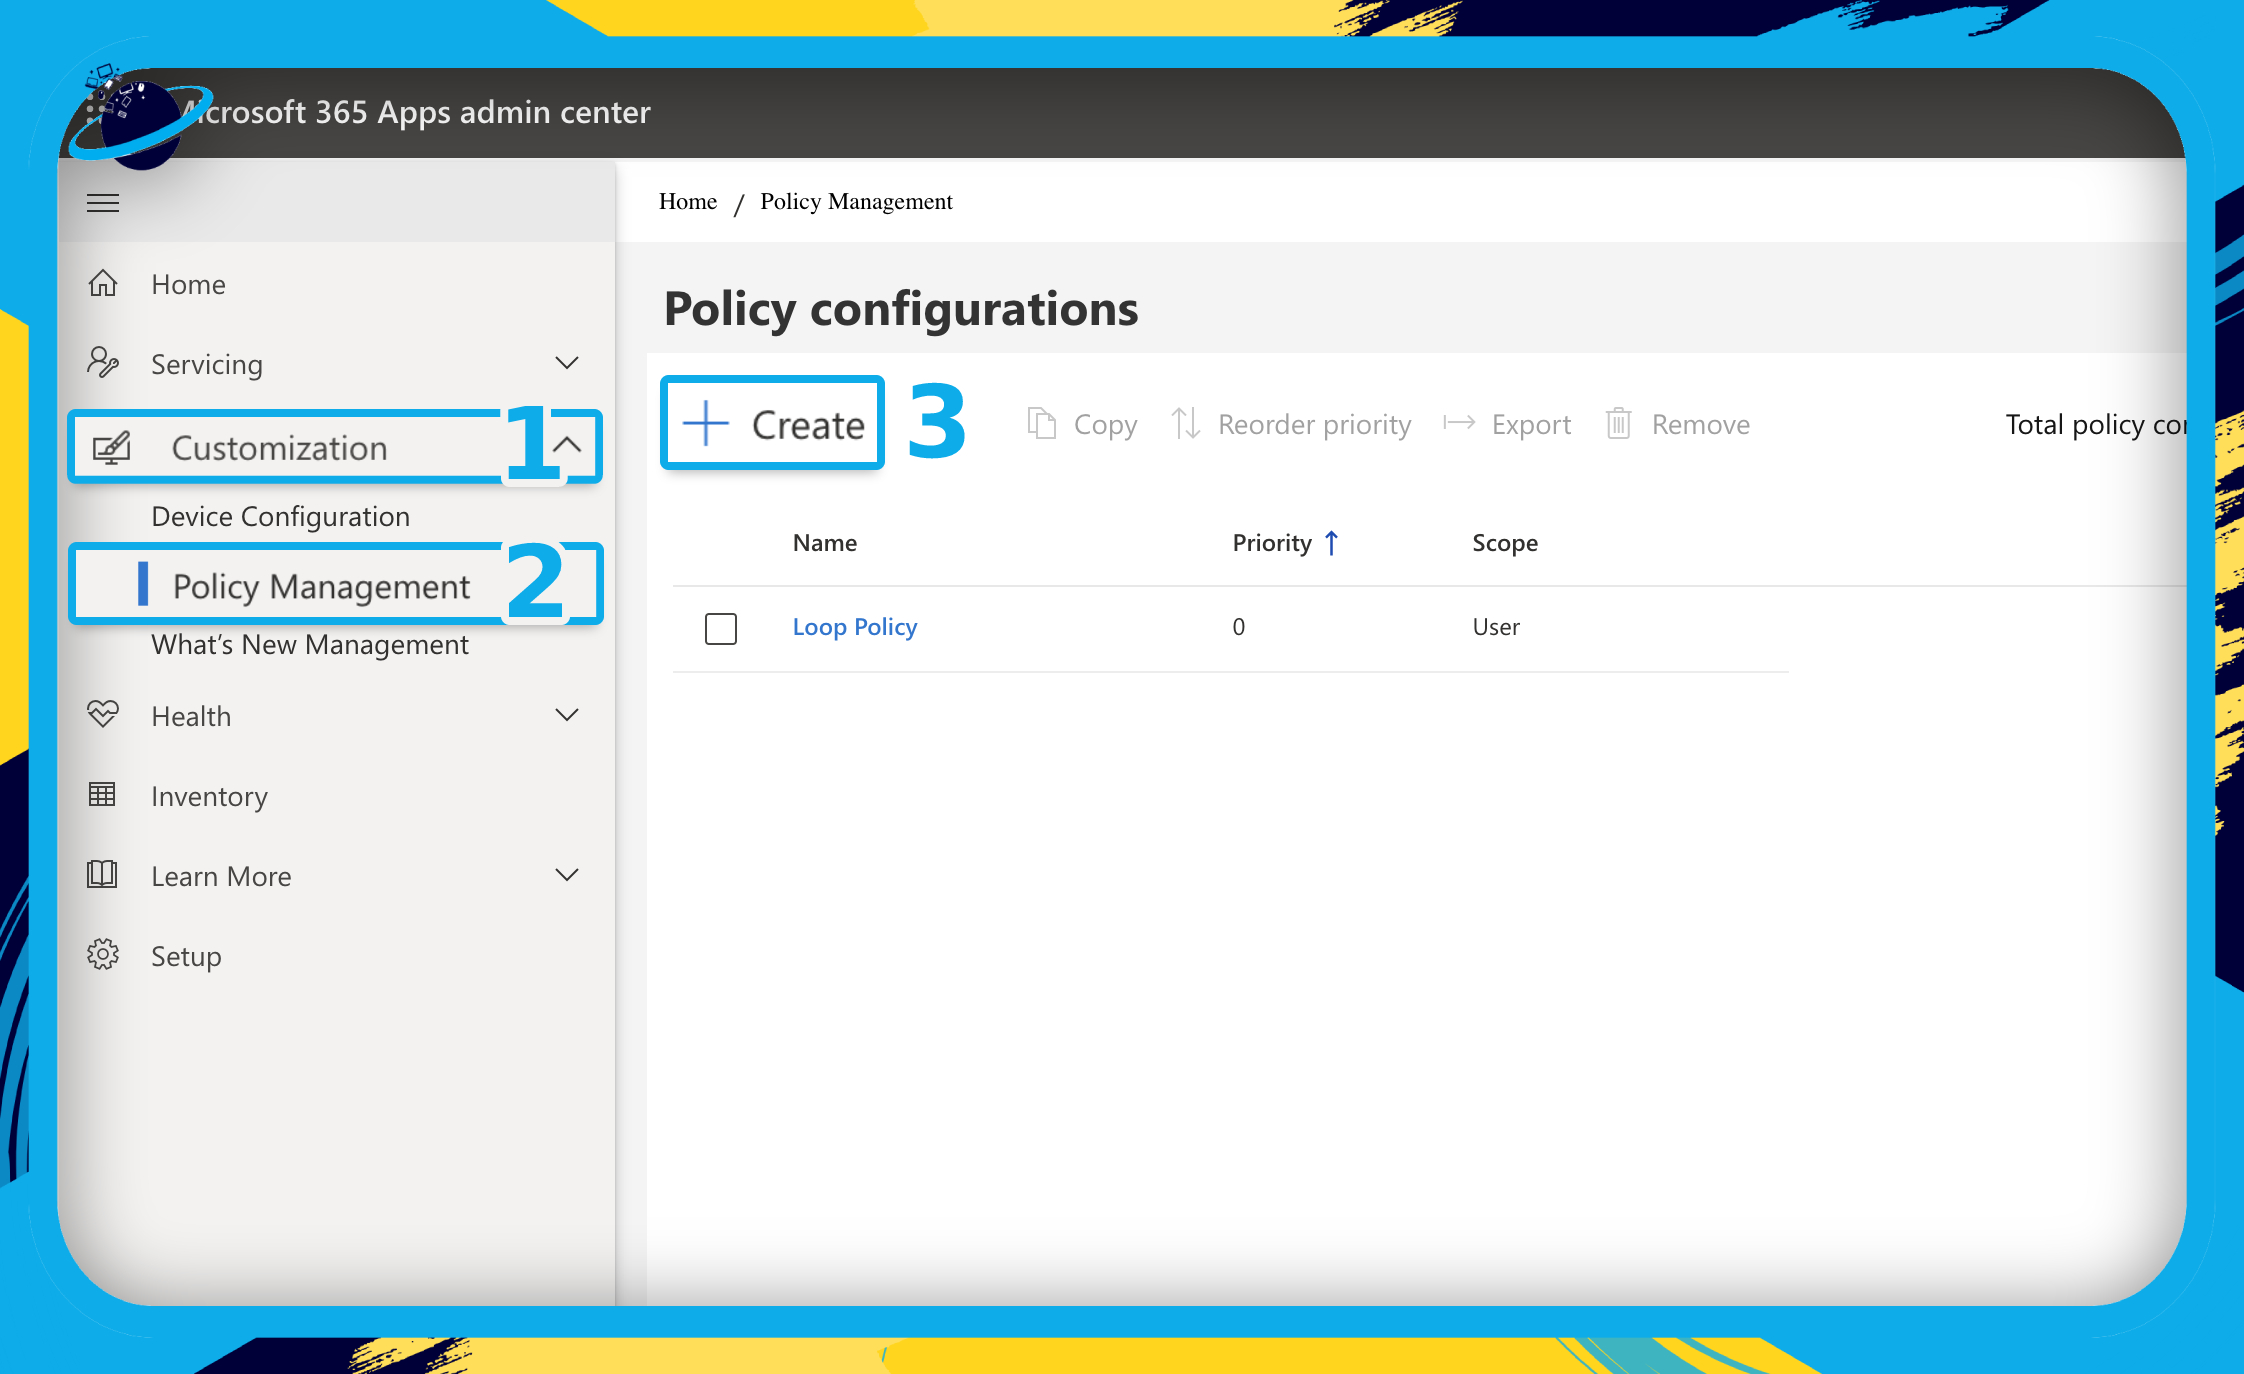
- In the Apps admin center, go to
 “Customization” in the left menu. [1]
 - Select “Policy Management” from the revealed options. [2]
- Now click “Create.” at the top, or the blue “Create” button. [3]
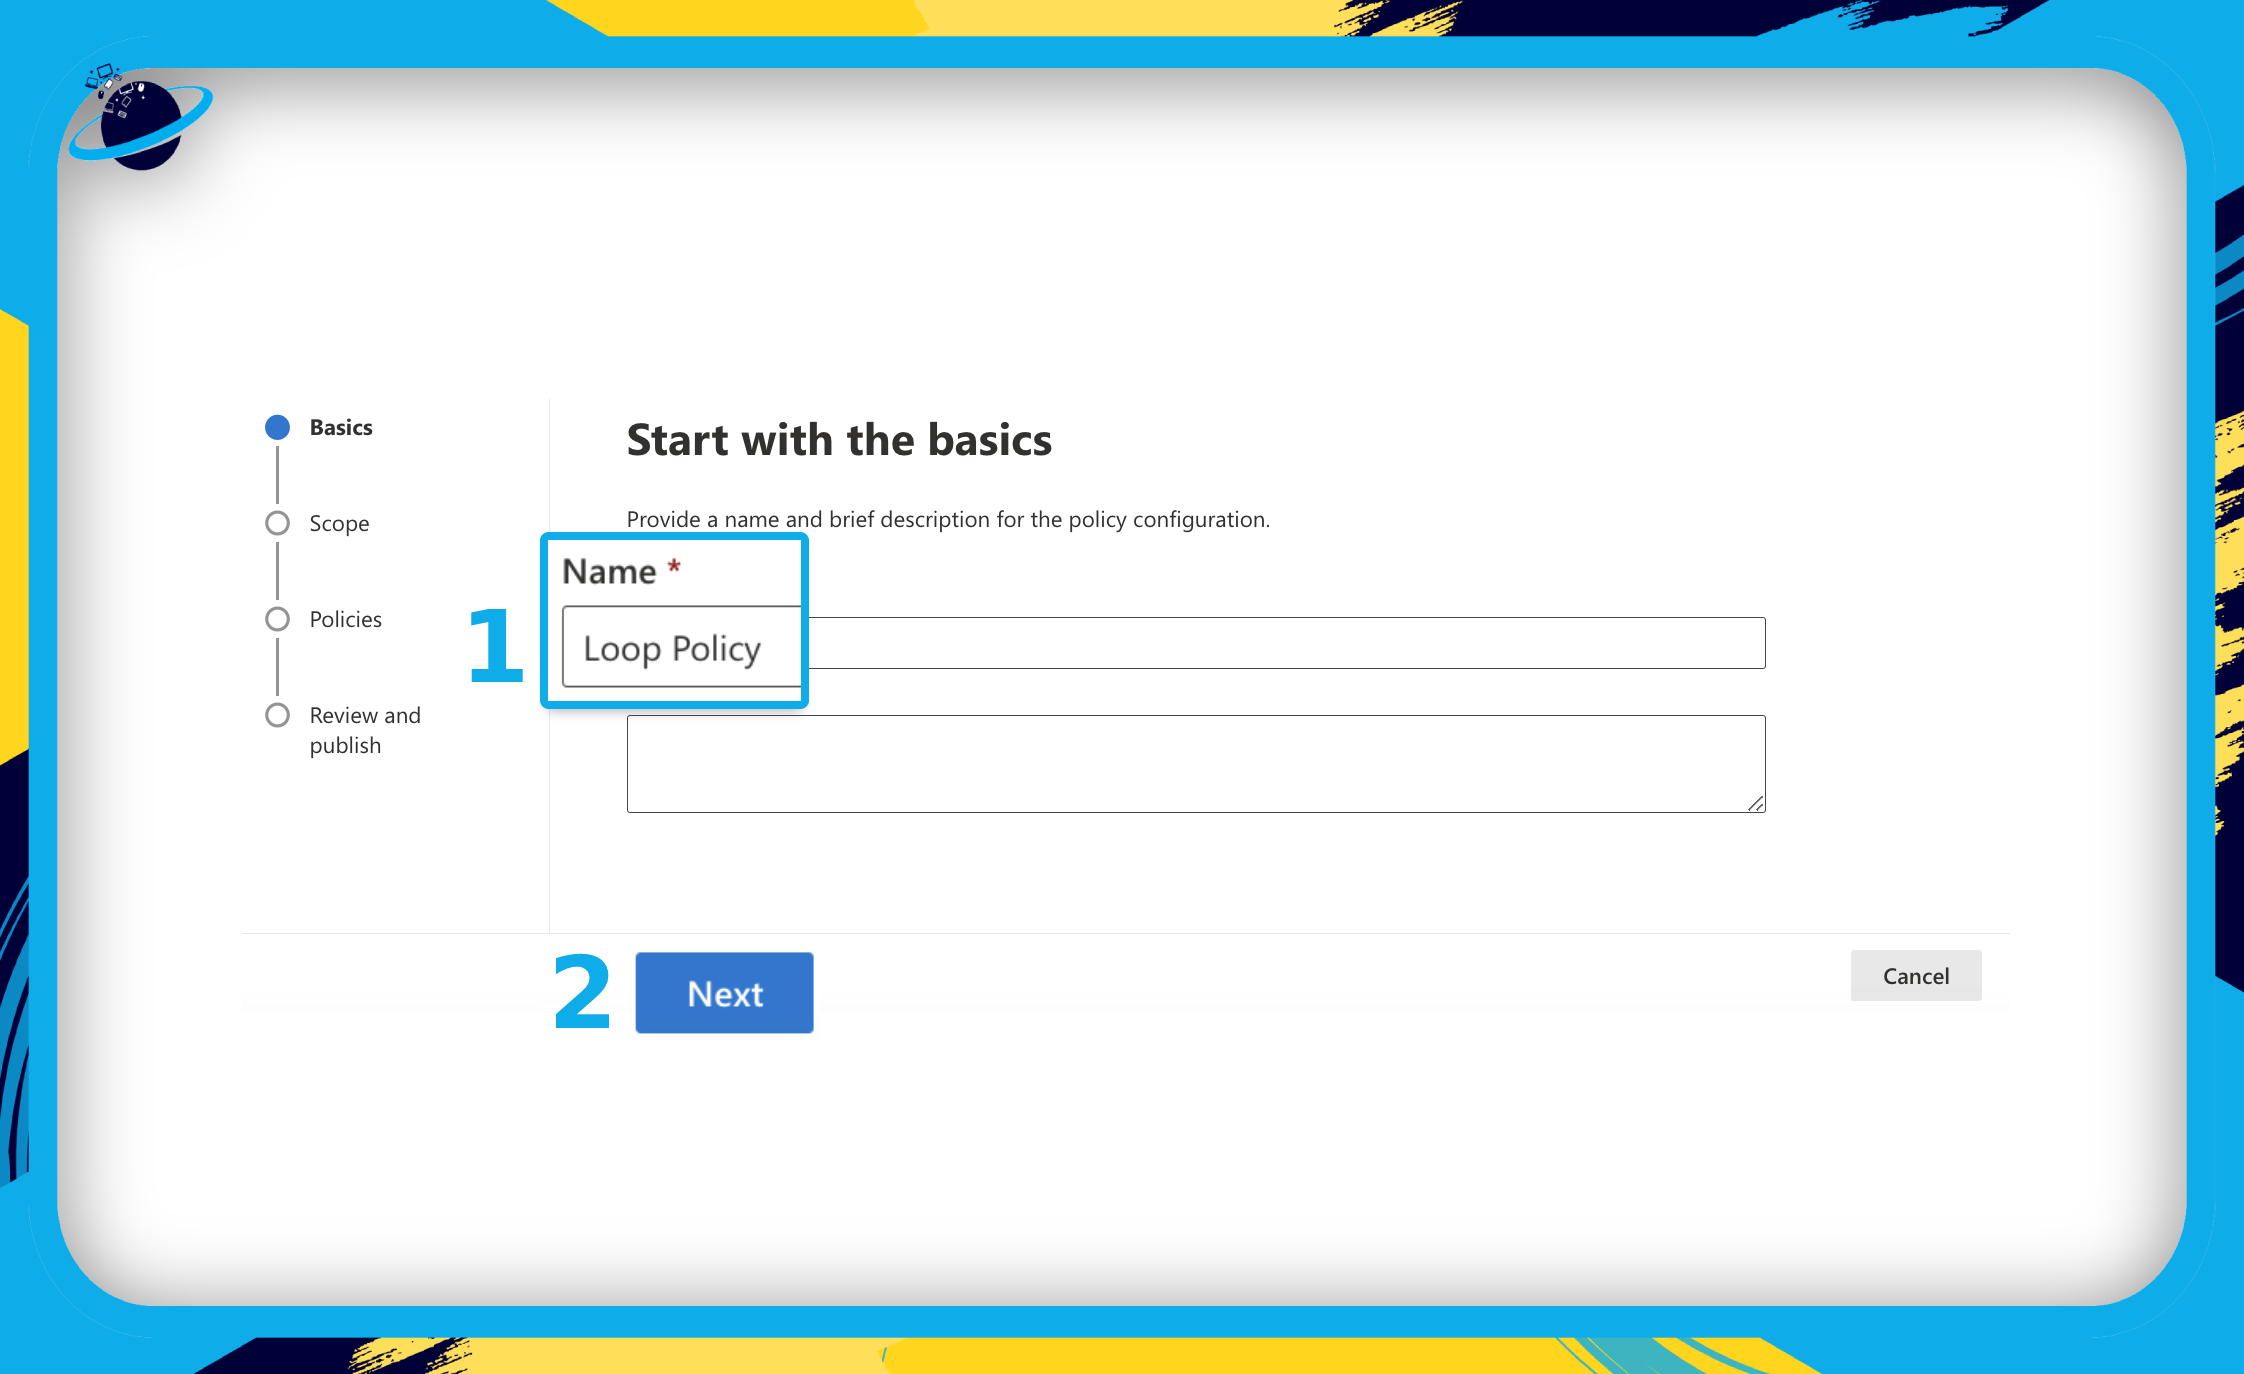
- Name and describe your new policy configuration — we named ours “Loop policy.” [1]
- Click “Next.” [2]
- The “scope” refers to which groups the policy will apply to.
- Select “This policy configuration applies to users in the specified group.” [1]
- Then click “Add group.” [2]
- Type your security group name into the search bar. [3]
- Then select the group from the dropdown. [4]
- Click “Save.” [5]
- Click “Next.” [6]
![]() Note: This policy configuration can only be applied to one security group.
Note: This policy configuration can only be applied to one security group.

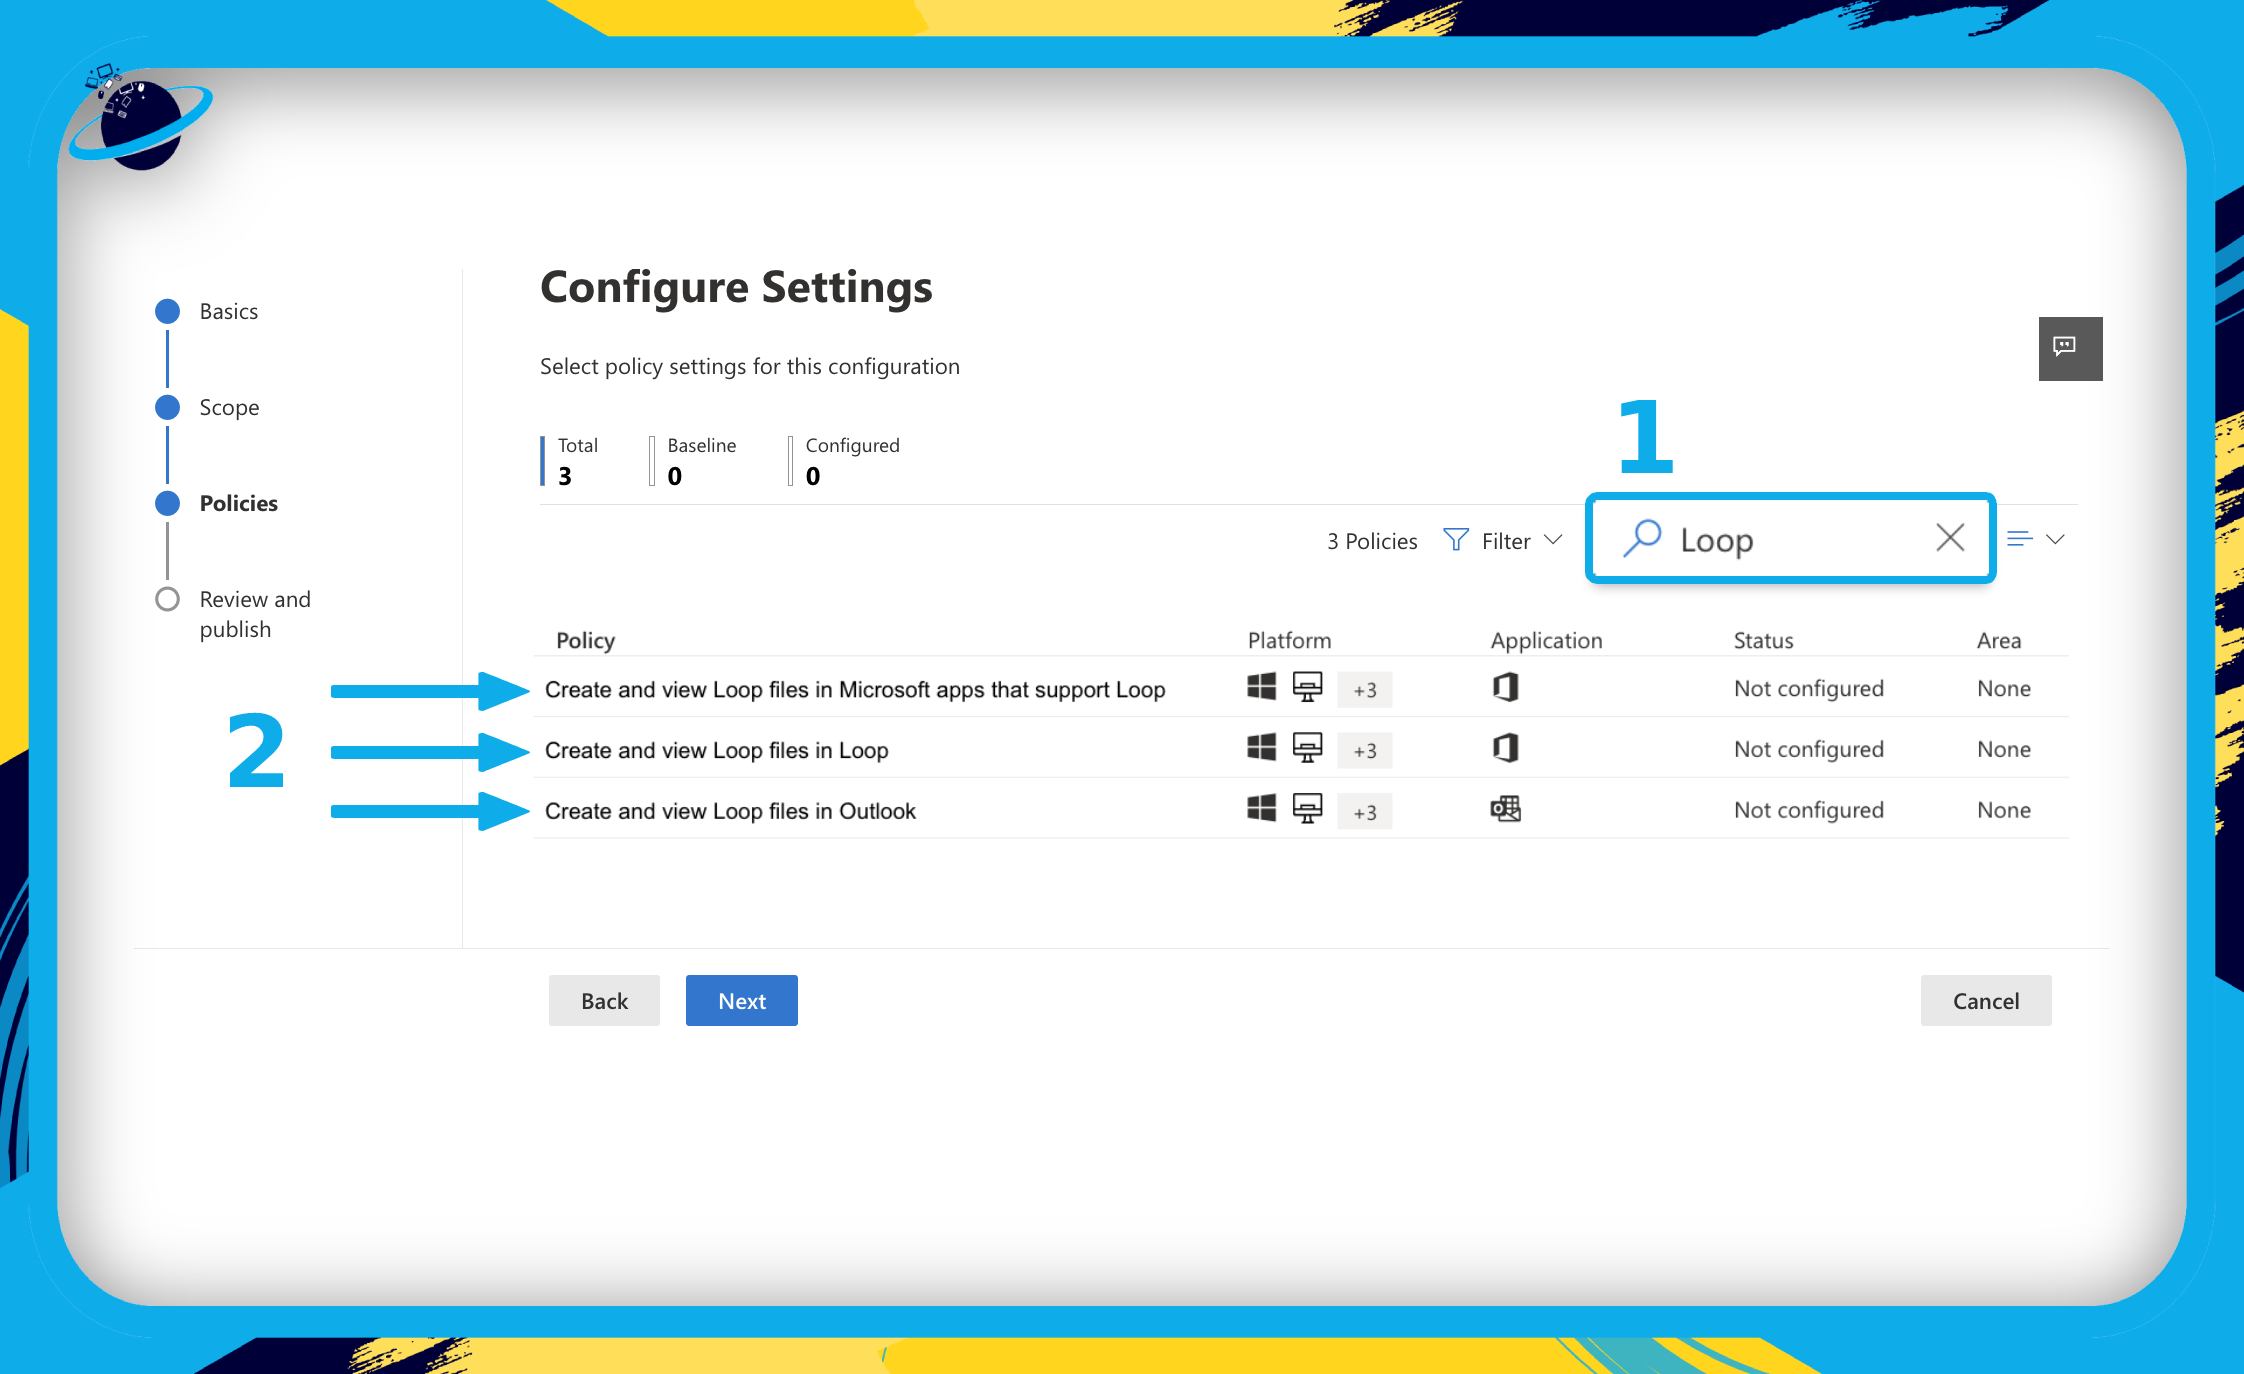
- Type “Loop” into the search bar on the right and hit Enter. [1]
- Click on each policy to enable them. [2]
- When you click on the policies, a navigation pane will open on the right.
- There, click the select box and choose “Enabled” from the dropdown. [1]
- Then click “Apply.” [2]
- And then click “Next.” [3]
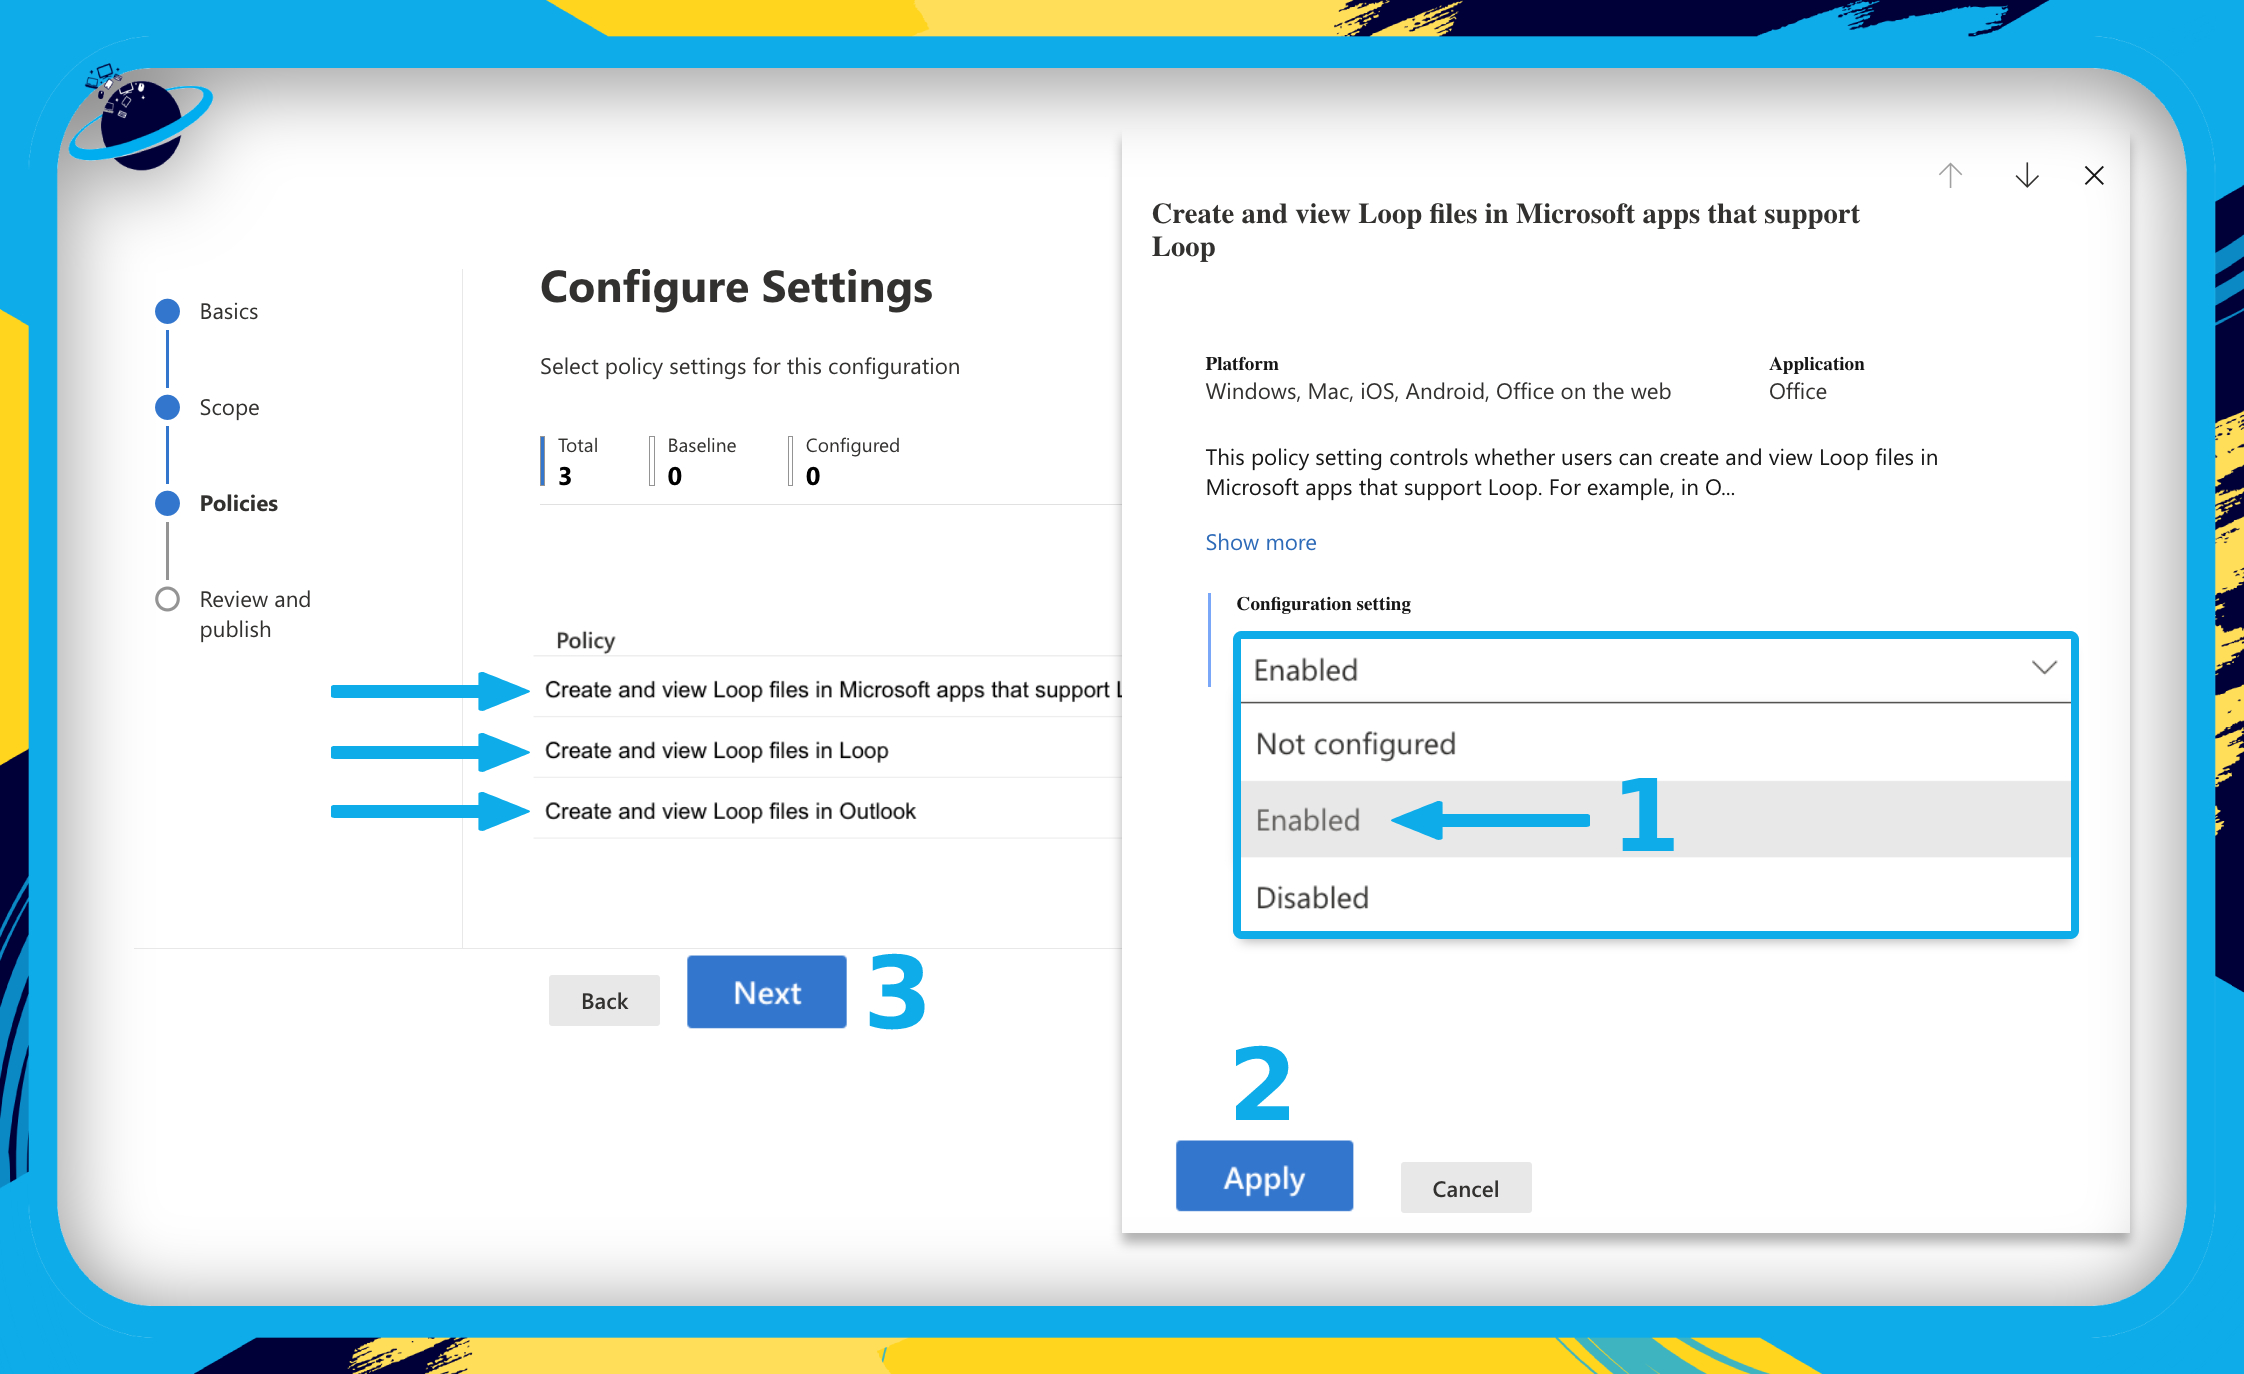
- Finally, click “Save.”
Step 3: Test user access to Loop
- Send a member of the Loop security group to loop.microsoft.com.
- There, click “Sign in” in the top right.
- Then sign in using your Microsoft365 credentials.
Troubleshoot: “The Loop app is not enabled in your organization”
- Ensure the user is accessing Loop using credentials for the organization tenant.
- Wait. The new policy can sometimes take 24 hours to become effective.
- Try to access Loop using an “Incognito” or “Private” tab.
- If a private tab works, there could be a caching error.
- To fix the problem, try clearing your cookies and site data.
- Ensure the user is a member of the Loop security group.
- Go over the steps again to ensure the correct security group has been assigned the “Create and view Loop files in Loop” policy.
Frequently Asked Questions (FAQ)
 Is Microsoft Loop available yet?
As of March 2023, Microsoft Loop is available for Public Preview. That means you can gain early access to the Loop app once your admins have enabled Loop for your organization.
How do I find Microsoft Loop?
Once your admins have enabled Microsoft Loop for your organization, you can gain early access by using the following link and signing in with your Microsoft 365 credentials:![]() loop.microsoft.com
loop.microsoft.com

Conclusion
If you decide to enable Microsoft Loop for your organization, there are a few things to bear in mind. Firstly, you must create a “security” group — other group types will not work. Once you’ve created a security group, you can then apply a policy configuration to that group.
You can apply a policy configuration in your ![]() Microsoft 365 Apps admin center by going to:
Microsoft 365 Apps admin center by going to:
Customization > Policy Management > Create.
Alternatively, you can use your ![]() Microsoft Intune admin center and go to:
Microsoft Intune admin center and go to:
Apps > Policies for Office apps > Create.
Once you’ve assigned your policy configuration to the security group, wait a few hours for the policy to come into effect. Then, members of your security group should be able to access the Loop app using the following link: ![]() loop.microsoft.com.
loop.microsoft.com.
Thanks for reading!