Within Microsoft OneDrive, it would be wrong to say errors are uncommon. It is the case with essentially any and every aspect of the online world; chances are, you will encounter some sort of error throughout your usage of the product. One such error in OneDrive is the message, “You now have two copies of a file/folder”.
Any error prompt can prove irritating, especially one such as this. Thankfully for us, this is an error with several resolutions, which we will be discussing in this article. Not only that, but after going through some resolutions, we will touch on how to avoid such an issue in the future.
So, as we said, there are several ways by which you can look to solve this error. In this article, we will be looking at two ways in particular. These ways are:
- Stopping the sync of a particular library.
- Unlinking and relinking your OneDrive account.
Now, as is the case with every piece we write, don’t worry if a simple list of solutions is not enough for you to work with, how could it be? So, in order to break the methods down, we will be doing two things for each.
First, we will break the steps down as a bullet pointed list, which may serve to be enough detail for some people. For others, they may need more to work with, which is completely understandable and something taken into account.
As such, following each step by step, the process as a whole will be broken down further, into a much more detailed and complete analysis of the method, with screenshots accompanying each of the steps in order to best bolster the aid of you, the reader.
So, first, stopping the sync of a particular library.
Step by step: How to fix the OneDrive “you now have two copies of a file/folder” error
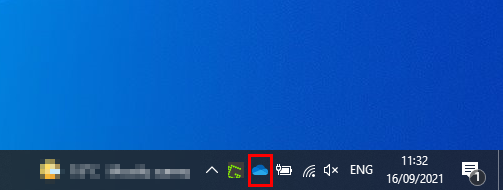
- Look towards the right hand side of your desktop taskbar.
- Next to the time and date should be a cloud, blue or white. This represents OneDrive.
- Right click on this cloud.
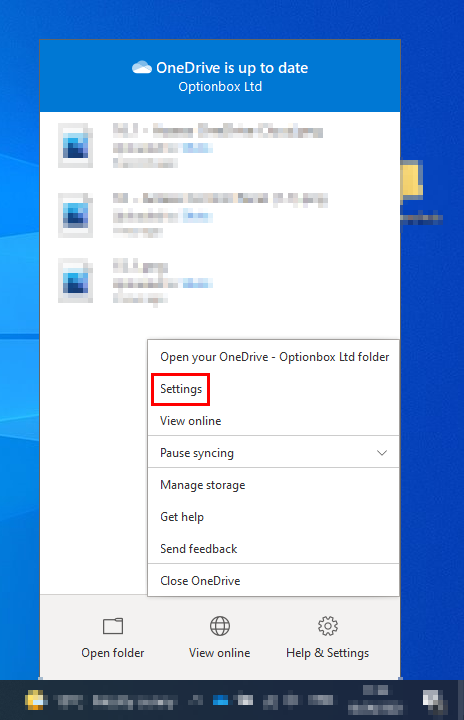
- On the menu that appears from the click, click ‘Settings’.
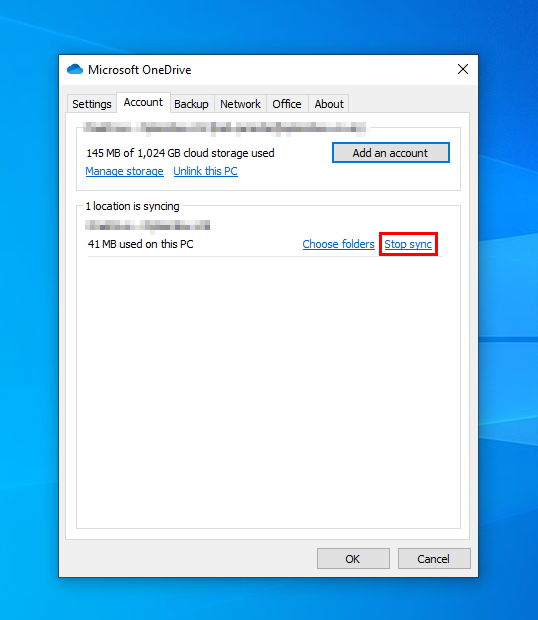
- Make sure that, on this settings menu, you are on the ‘Account’ subsection.
- Here, you will see your library(/ies).
- On the library causing issues, click the option that says ‘Stop Sync’.
- You will be asked if you want to do this, almost a double confirmation. Make sure to say yes.
So, you will first want to find the OneDrive prompt on your computer. In order to do this, at least on a Windows device, look to the desktop navigation bar at the bottom of your screen. At the right side of this, just shy of the date and time, will be a cloud. Whilst this cloud may be blue or white depending on your circumstance, that cloud represents OneDrive regardless.
Hover over this cloud, and right click it. Right clicking it should not only open the OneDrive, but open it to the specific section on which you need to be to progress with this particular tutorial. On the menu presented to you should be an option labelled ‘Settings’, and it is this option that you will want to click.
Clicking ‘Settings’ will open a fairly small, yet sizeably important, menu. On this menu, you should be on the ‘Account’ tab by default, which is the place you will want to be. On this tab, you should see a list of your running library, or libraries depending.
Find the library that is causing you issues. Just under this library, there should be a small option that states, ‘Stop Sync’. In case you need assistance finding it, it has been highlighted in the below screenshot.
After clicking this, you will be asked if you are sure you want to stop the syncing of this library. Again, click ‘Yes’, and that is all you need to do for this process.
If this works for you, great! If not though, again, do not worry. We will now look at unlinking and relinking your OneDrive account to see if that solves the OneDrive error you are having. Sometimes, the unlinking method may be the best way to fix your issue, as it is something of a reset for your account and, in turn, your file/folder issue.
As was the case with the above process, we will first offer you a step by step before delving deeper into the method.
STEP BY STEP: UNLINKING AND RELINKING YOUR ONEDRIVE ACCOUNT
- Right click the cloud that represents OneDrive within your navigation bar.
- Here, click ‘Settings’ on the menu that arises from doing this.
- You should be on the Account tab by default, which is where you will want to be.
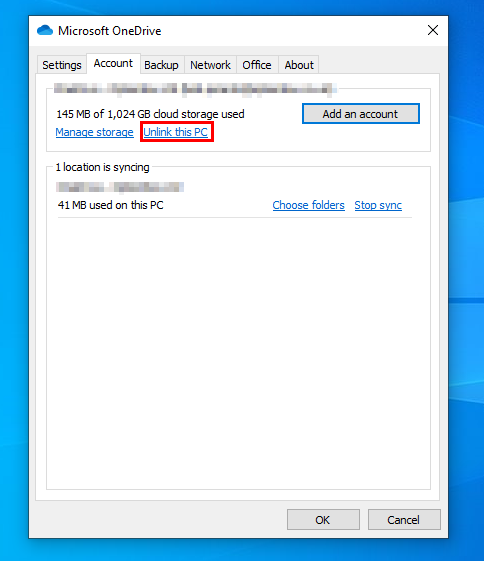
- There will be an option saying, ‘Unlink your PC’. Click this.
- Now, you will be asked if you want to unlink your account. Again, click yes.
- You will now want to log back in to OneDrive.
- Enter the email and password associated with your account.
- Proceed with the directions on screen.
- Access OneDrive after logging in and see if it made a difference.
So, your first step, similar to the first process of the article, will be to right click on the cloud in your desktop navigation bar, just next to the date and time.

The startings of this process are essentially identical to those of the one above. From here, you will again want to click ‘Settings’, and after that, you will want to make sure that you are on the ‘Account’ tab of the menu that pops up as a result of it.

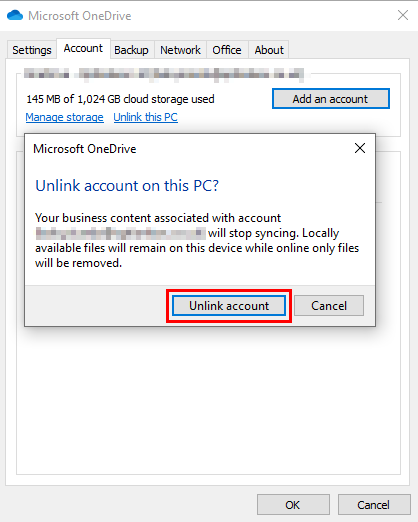
From the Account tab, you will want to look towards the top of the screen. Here, there should be a small blue passage of text that reads, ‘Unlink this PC’, and you will want to click this.
Opting to unlink the PC will prompt a small message to you, asking if you are sure of your decision and giving you the option to confirm your choice. It is here that you will want to click the option titled ‘Unlink account’, which should you need it, has been highlighted below.
After you have done this, you simply need to re-login to your OneDrive account. Upon entering the OneDrive, you should be able to see if this has made a difference.
The main way by which you can avoid this happening again in the future is by being more conscious of the size of the files that you are downloading to your OneDrive. OneDrive is a very useful feature of modern technology, however it can be crammed too tightly with your work. Being aware of this is your best way to avoid encountering this issue again.
Thank you for taking the time to read this blog, I hope you found it as helpful as you wanted it to be! As is the case with every article we publish, if you encounter any issues whatsoever when attempting to follow the walkthrough we have provided, or simply wish to share some thoughts you may have, please do not hesitate to get in contact with a member of our team.