 Key Takeaways
There are two common reasons why users might only be able to share free/busy information in your Outlook calendar: The calendar’s owner needs to grant additional permissions. [More…]
 Admins need to allow additional calendar permissions. [More…]

There are two common reasons why a shared Outlook calendar might only show availability information instead of the full details. Firstly, you may need to update the permissions in calendar properties. Or, secondly, you may need an admin to allow “Full Details” calendar sharing. The instructions below will guide you through the process.
To fix a shared Outlook calendar only showing basic free/busy information (Desktop):
- First, open your
 Outlook desktop application.
 - Click the
 calendar icon.
 - Go to the “Folder” tab.
- Click “Calendar Properties.”
- Go to the “Permissions” tab in Calendar Properties.
- Select a permission level, such as “Can view all details.”
- Then click “OK.”

To fix a shared Outlook calendar only showing basic free/busy information (Online):
- First, sign into your Microsoft Outlook account.
- Click on the
 calendar icon in the left menu.
 - Select the calendar you want to share and click the
 “Share” button.
 - Or right-click the calendar you want to share and select “Sharing and permissions.”
- Click the select box and choose your desired sharing permission.
- Then click the
 button to save and close.
To fix a shared Outlook calendar only showing basic free/busy information (Admin):
- First, sign into Office 365 using your login details.
- Click the
 app launcher and select “Admin” from the dropdown menu.
 - Click the
 menu icon in the admin panel.
 - Click “Show all” if you can’t see “Settings.”
- Go to “Settings” > “Org settings” in the menu.
- Select “Calendar” in the “Services” tab.
- Check the “Allow anyone to access calendars with an email invitation” checkbox.
- Three more permission options will appear — select your preferred option.
- Finally, click the “Save” button.
We’ve also created a video to help with the methods above. You can watch it here:
Please continue reading for an in-depth guide on all the steps provided above.

Calendly – Outlook Meeting scheduler
Add date ranges and buffer times to the schedule. Integrates with Zoom, MS Teams, Google Meet, and GoToMeeting!
Overview: What calendar information can you share in Outlook?
When you share your calendar in Outlook, the information that other people see (such as availability) can be limited by permissions set by your organization and permissions set by you. If your organization allows sharing your whole calendar, you will have all the following options:
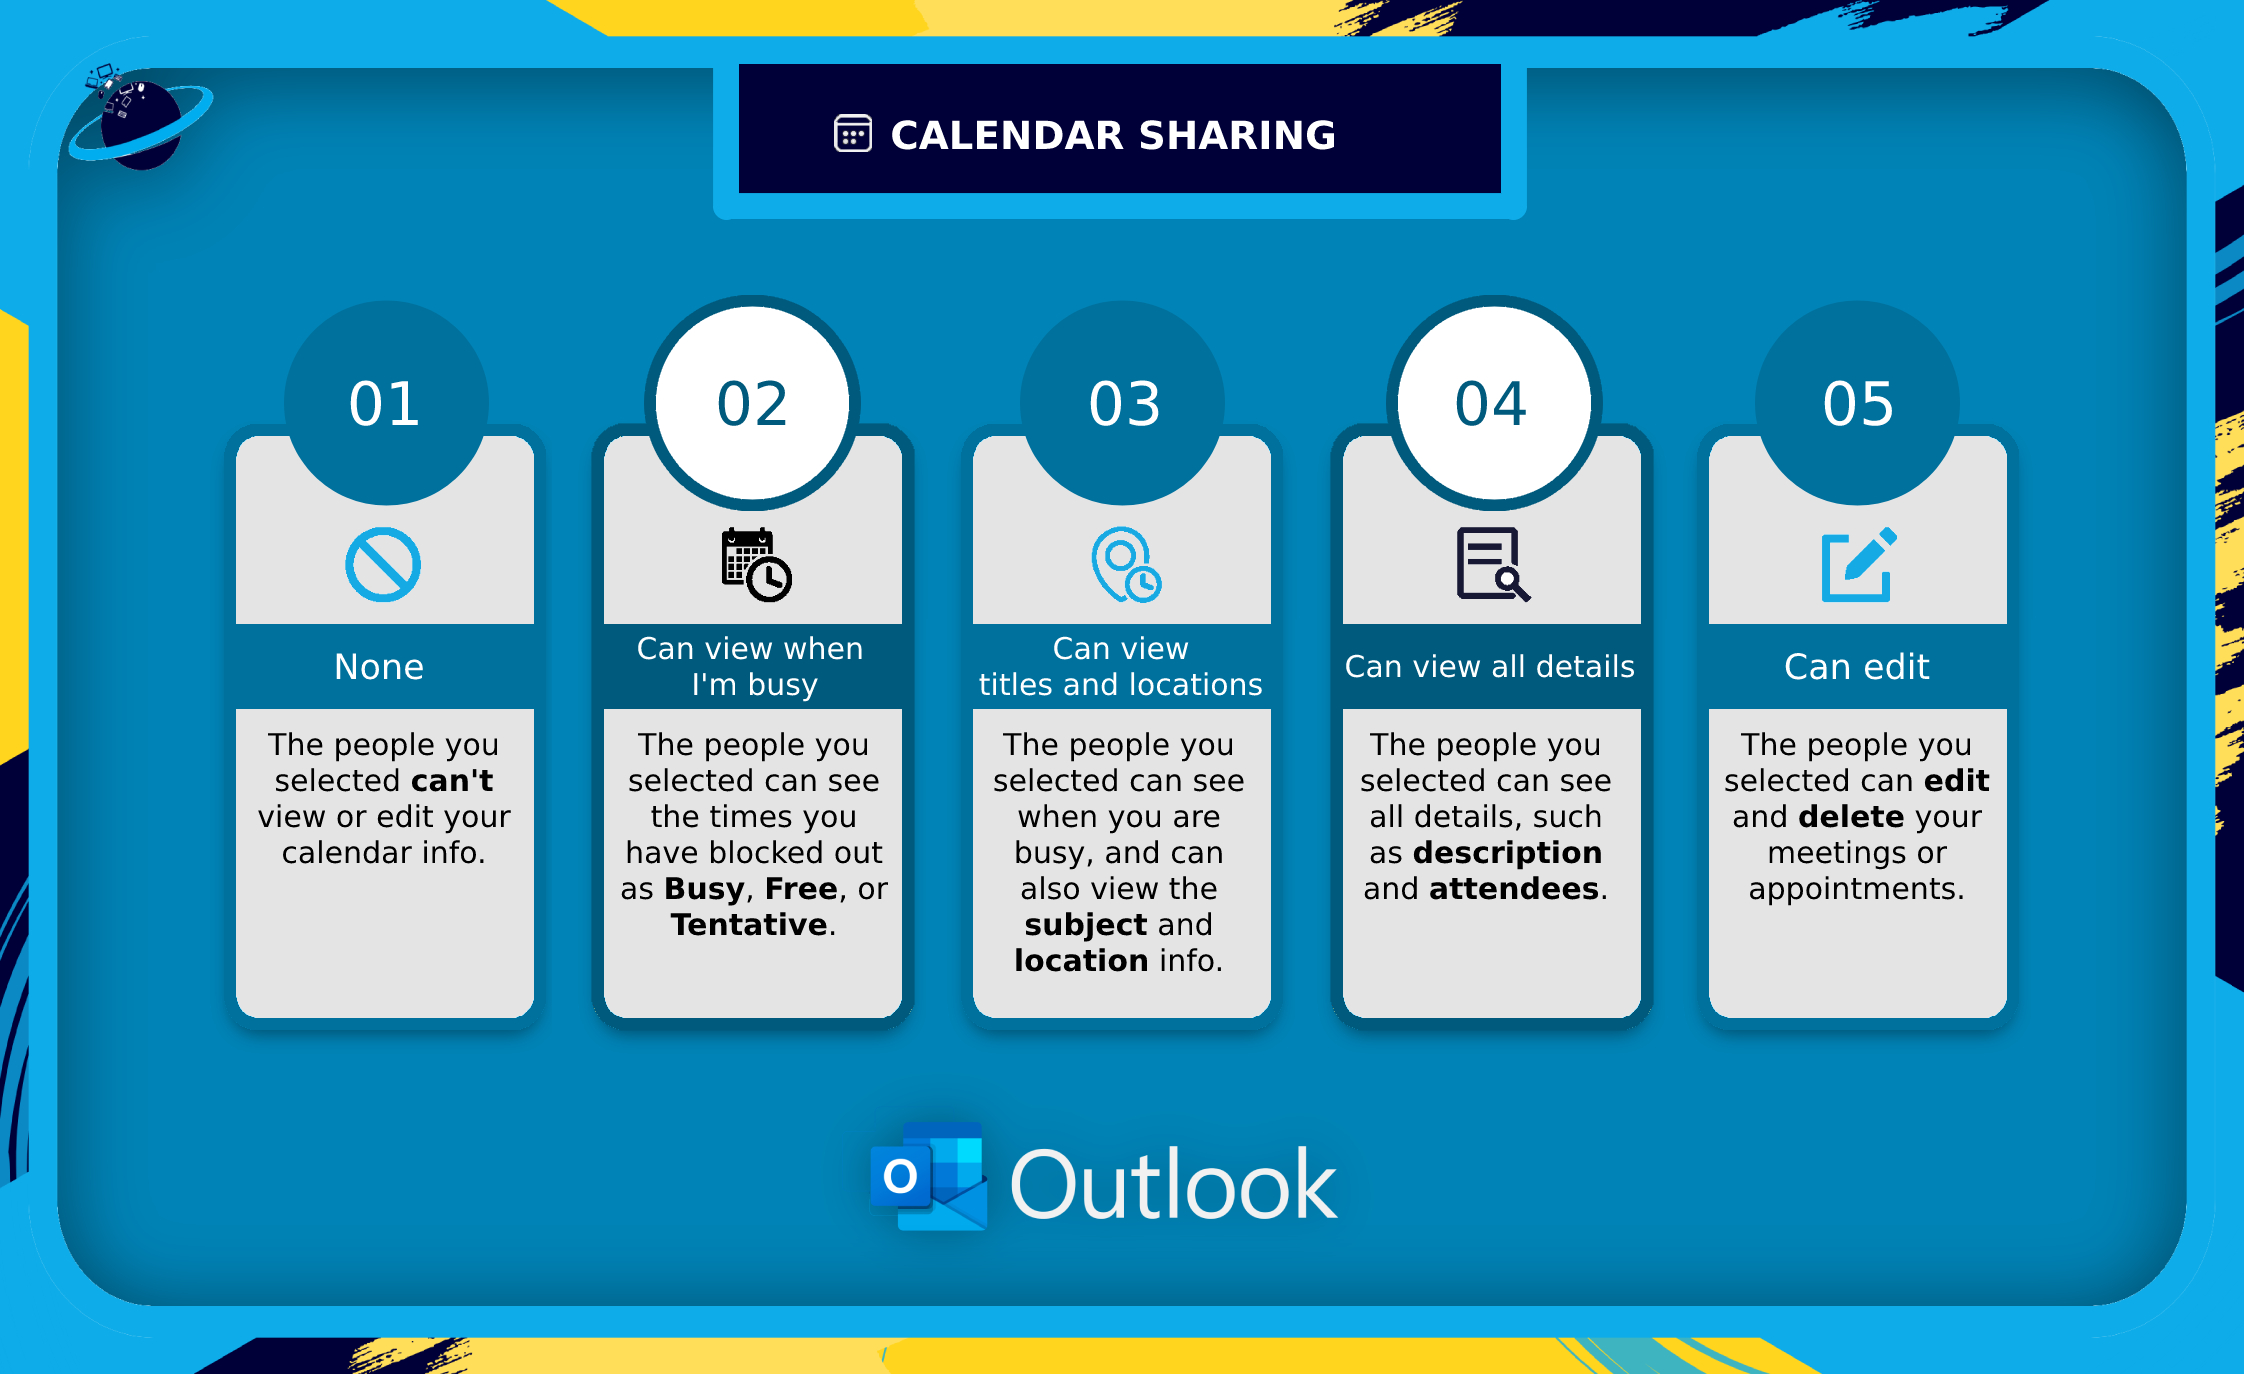
![]() Note: If you are sharing with an individual instead of your organization, the “None” option will be replaced with “Delegate.” Delegate access is like having a secretary who can edit, delete, and create a new meeting or respond to meeting requests on your behalf.
Note: If you are sharing with an individual instead of your organization, the “None” option will be replaced with “Delegate.” Delegate access is like having a secretary who can edit, delete, and create a new meeting or respond to meeting requests on your behalf.
If you can’t share your calendar, there could be three possible reasons:
- The email of the user you’re sharing with is invalid.
- The email of the user you’re sharing with is a Microsoft 365 Group
- The user you’re trying to share with is external to your organization.
How to fix a shared calendar only showing basic free/busy information
This section of the guide is an in-depth expansion of the steps provided at the top of this post. We will cover how to adjust the calendar sharing permissions for the Outlook app, OWA, and how admins can enable permissions.
![]() Note: If you can only see Free and Busy data in someone else’s calendar, they must grant you additional permissions, or the admins of their organization must allow external users to view additional information.
Note: If you can only see Free and Busy data in someone else’s calendar, they must grant you additional permissions, or the admins of their organization must allow external users to view additional information.
- Solution 1: For the Desktop App.
- Solution 2: For the Web version (OWA).
- Solution 3: For the Mobile App.
- Solution 4: Admin Center.
- Solution 5: Exchange.
 Desktop App: How to fix a shared calendar only showing basic free/busy information
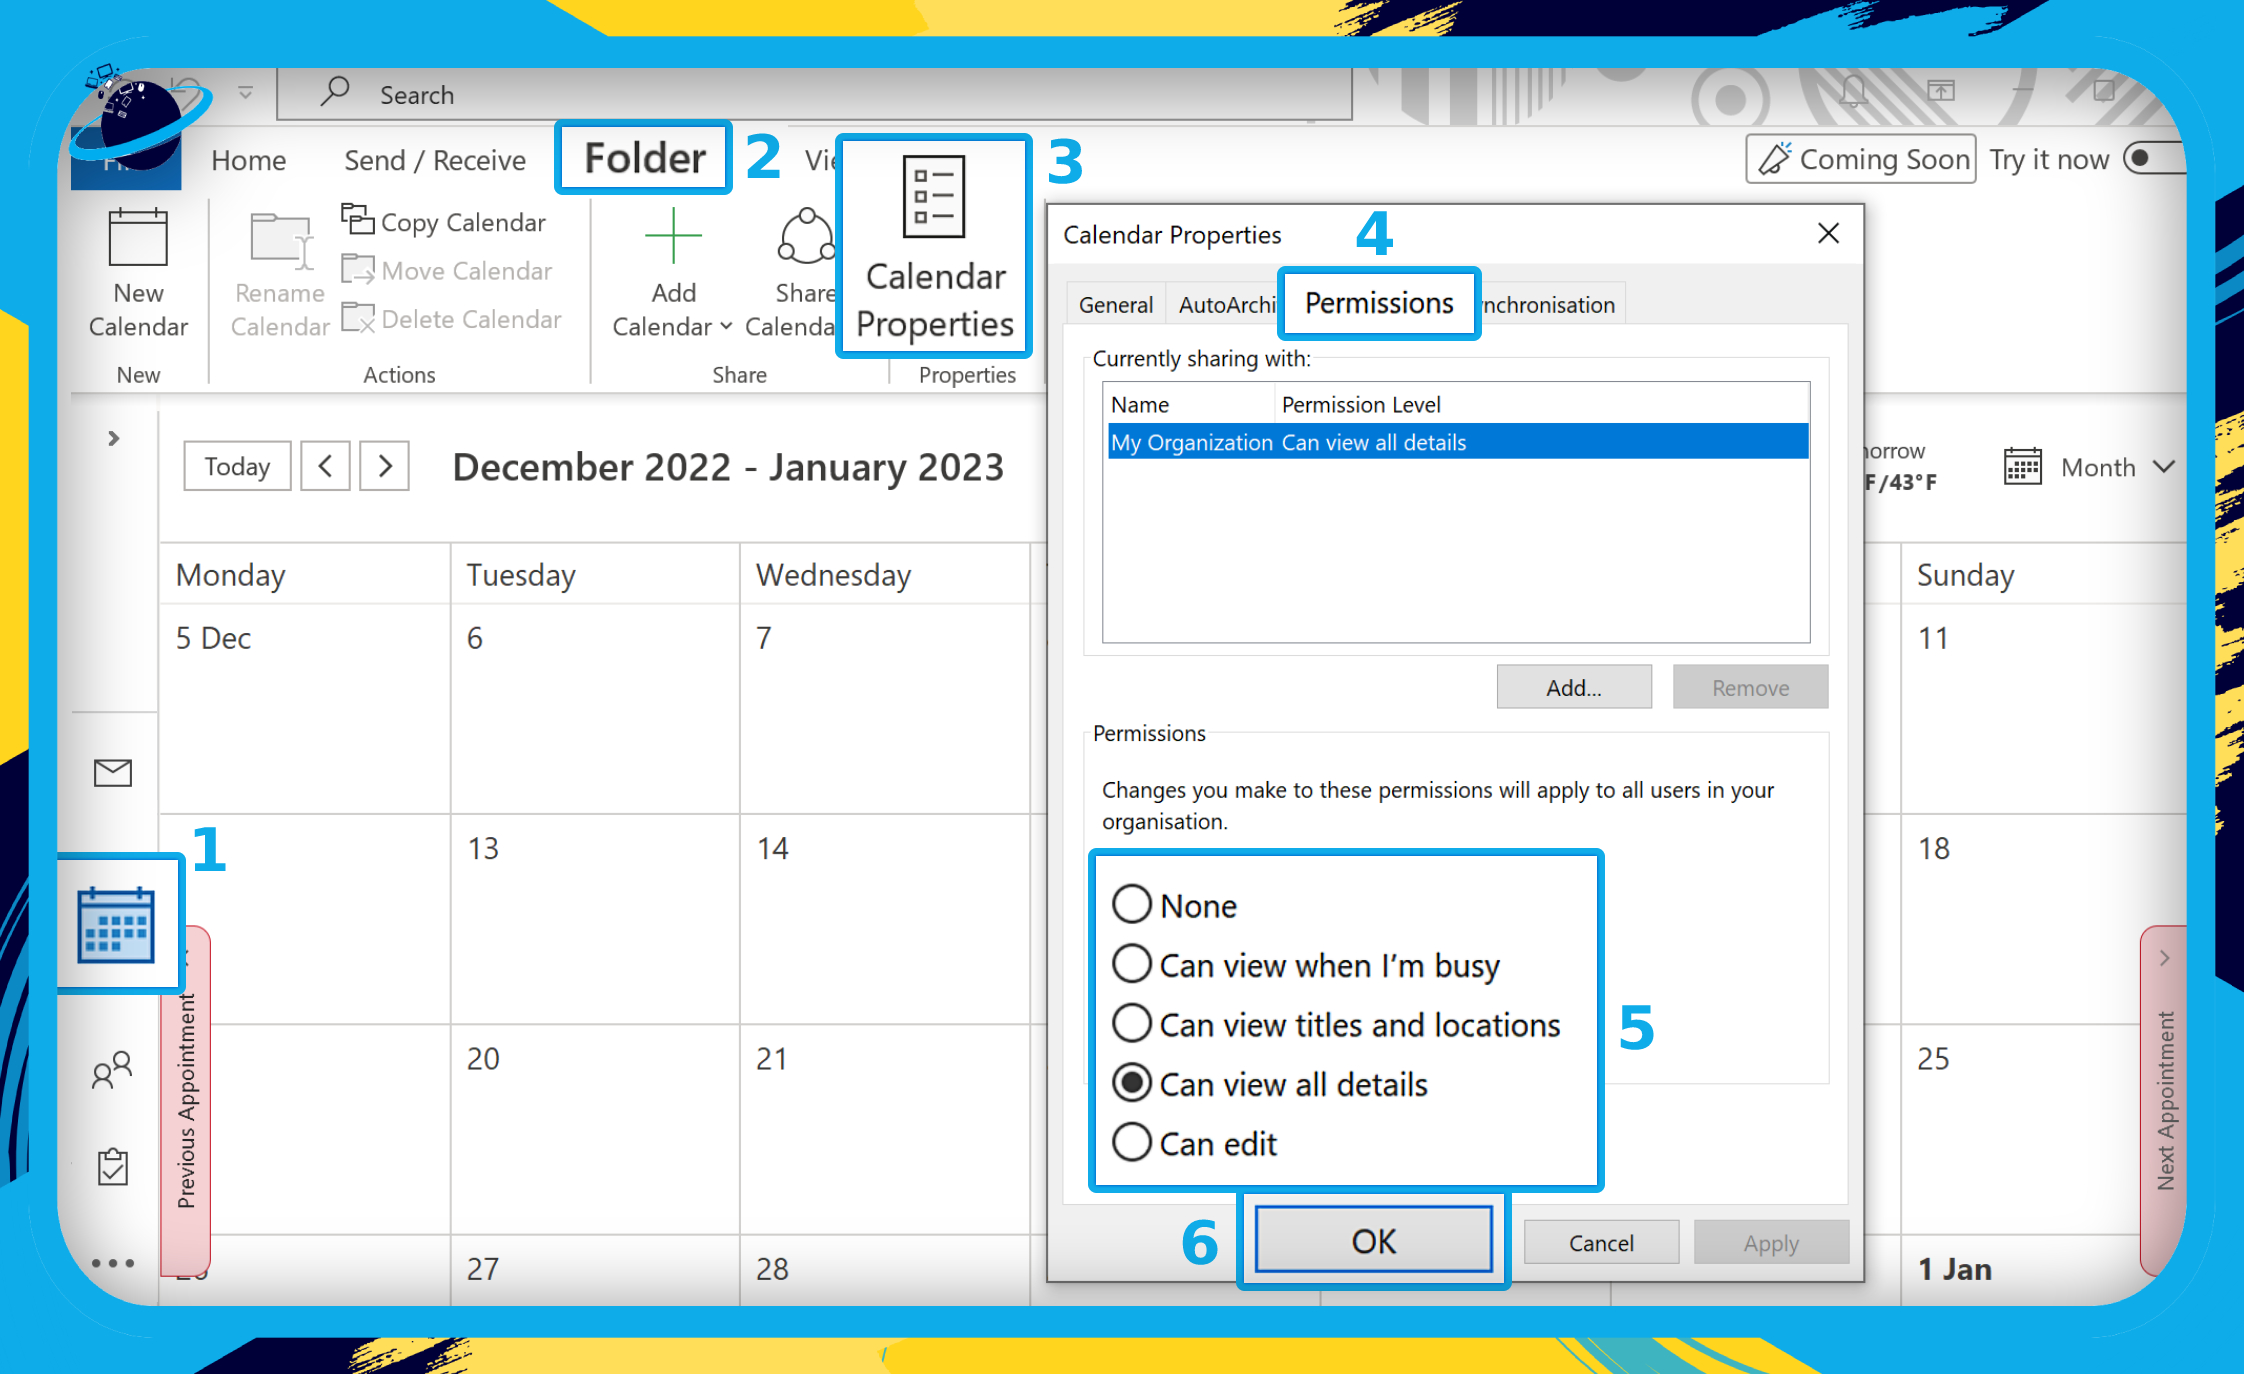
- First, open your Outlook desktop application.
- Click the calendar icon on the left menu. (1)
- Go to the “Folder” tab in the top menu bar. (2)
- Click “Calendar Properties.” (3)
- Alternatively, click on “Share Calendar” and choose your calendar.
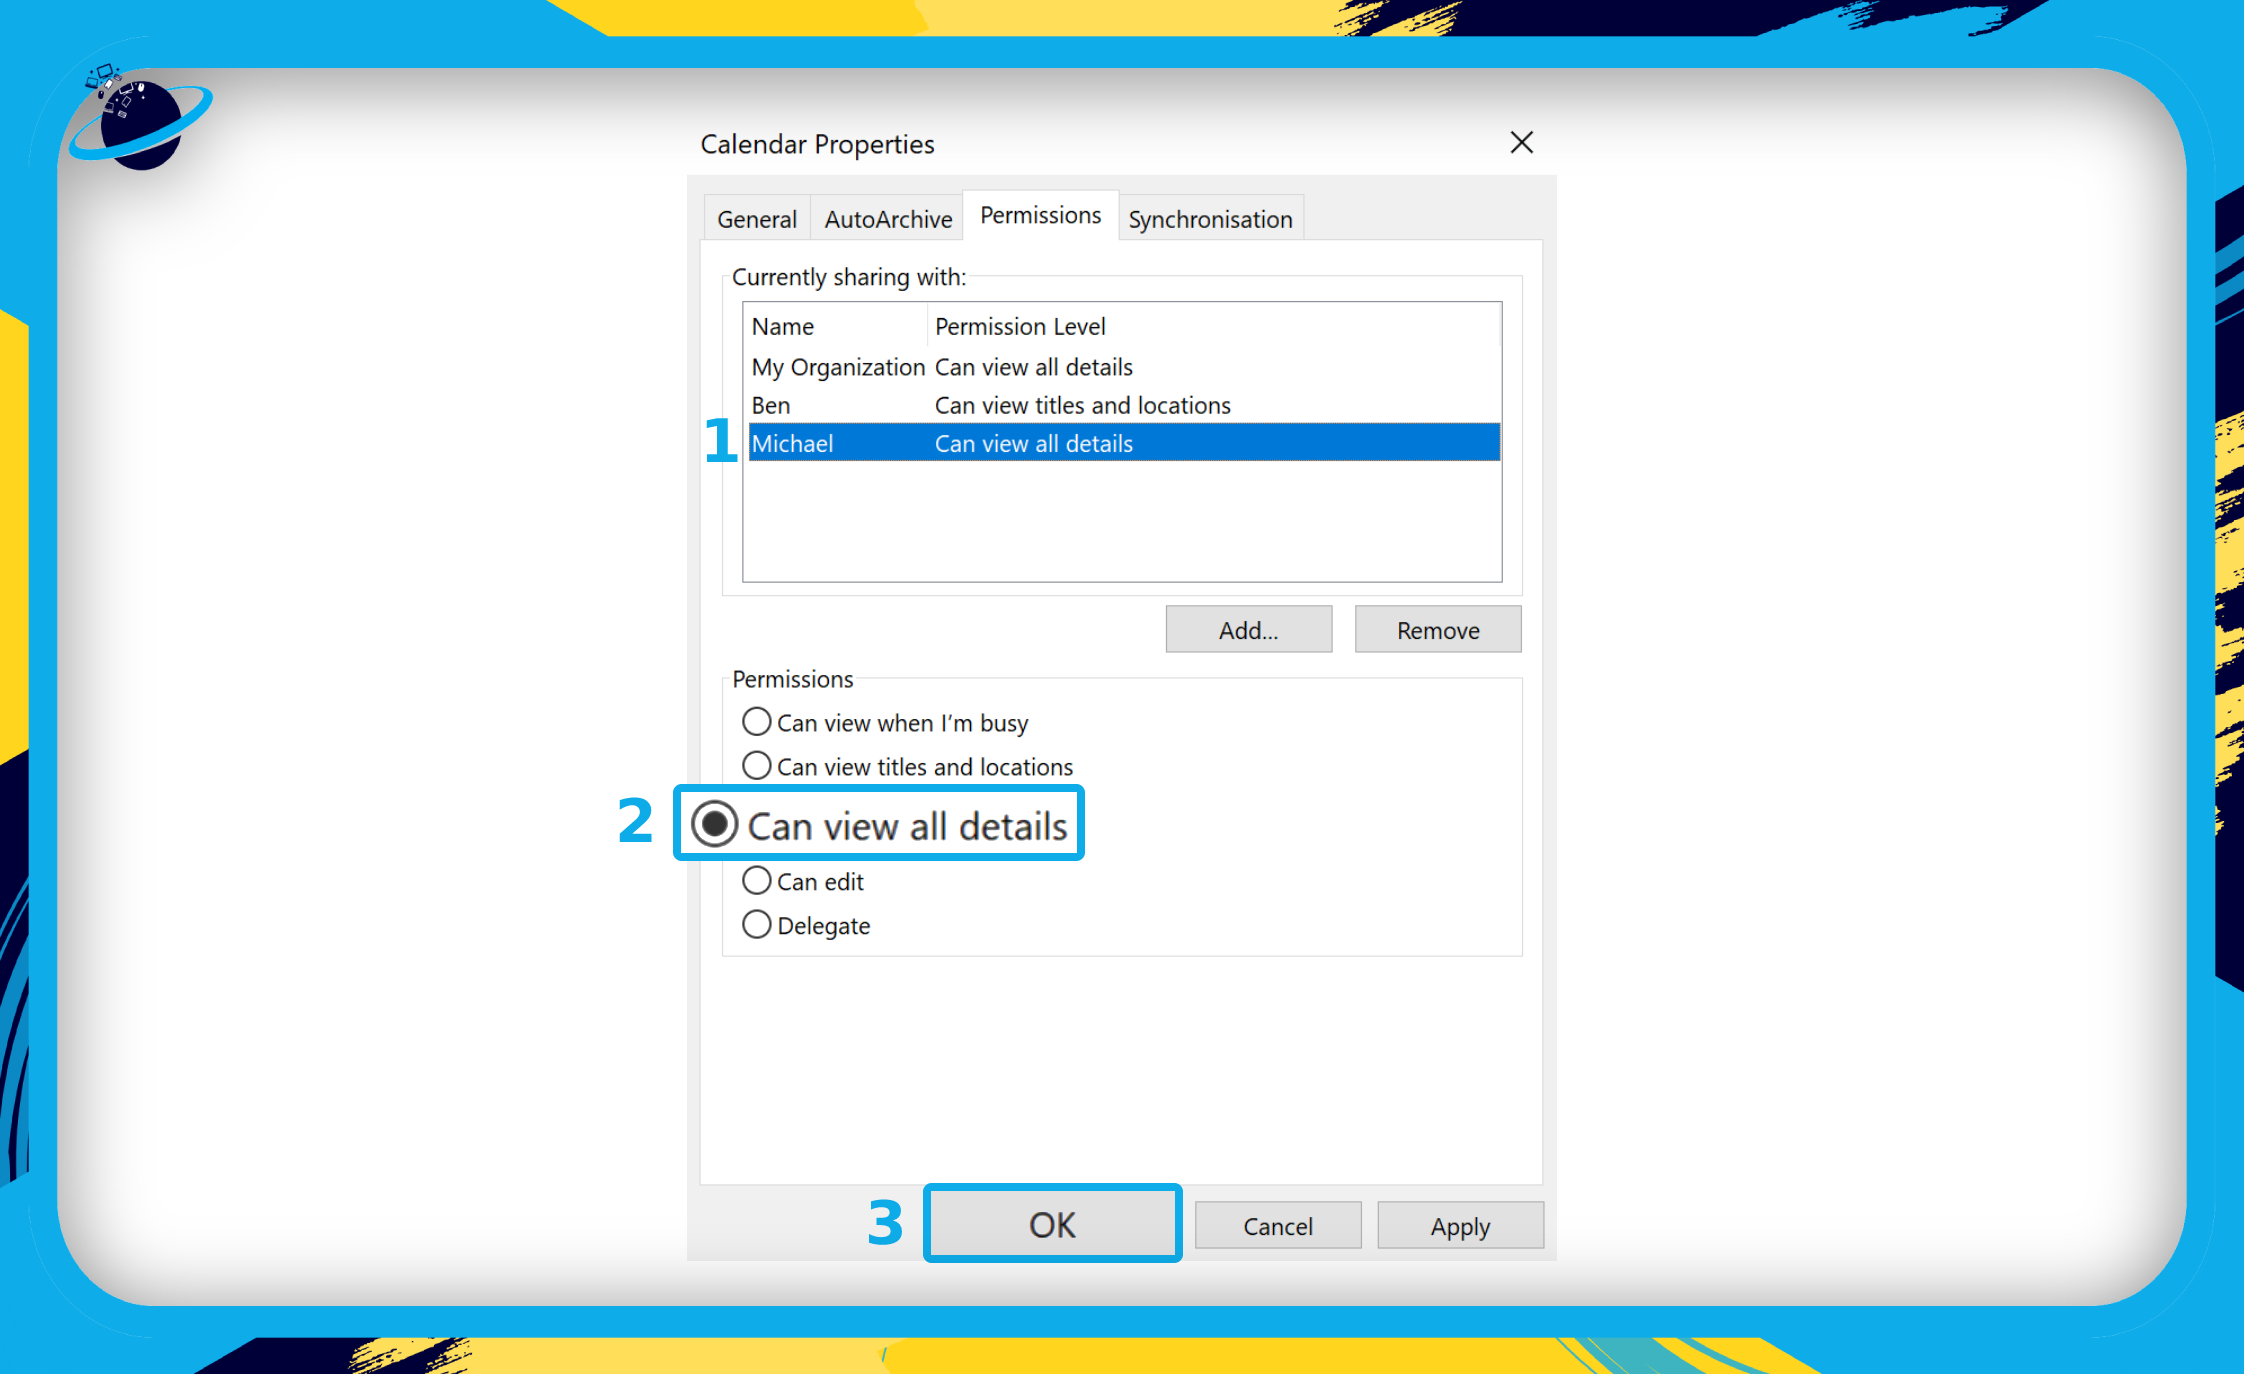
- Go to the “Permissions” tab in the Calendar Properties dialog box. (4)
- Select a permission level, such as “Can view all details.” (5)
- Then click the “OK” button. (6)
Outlook Web Access (OWA): How to fix a shared calendar only showing basic free/busy information
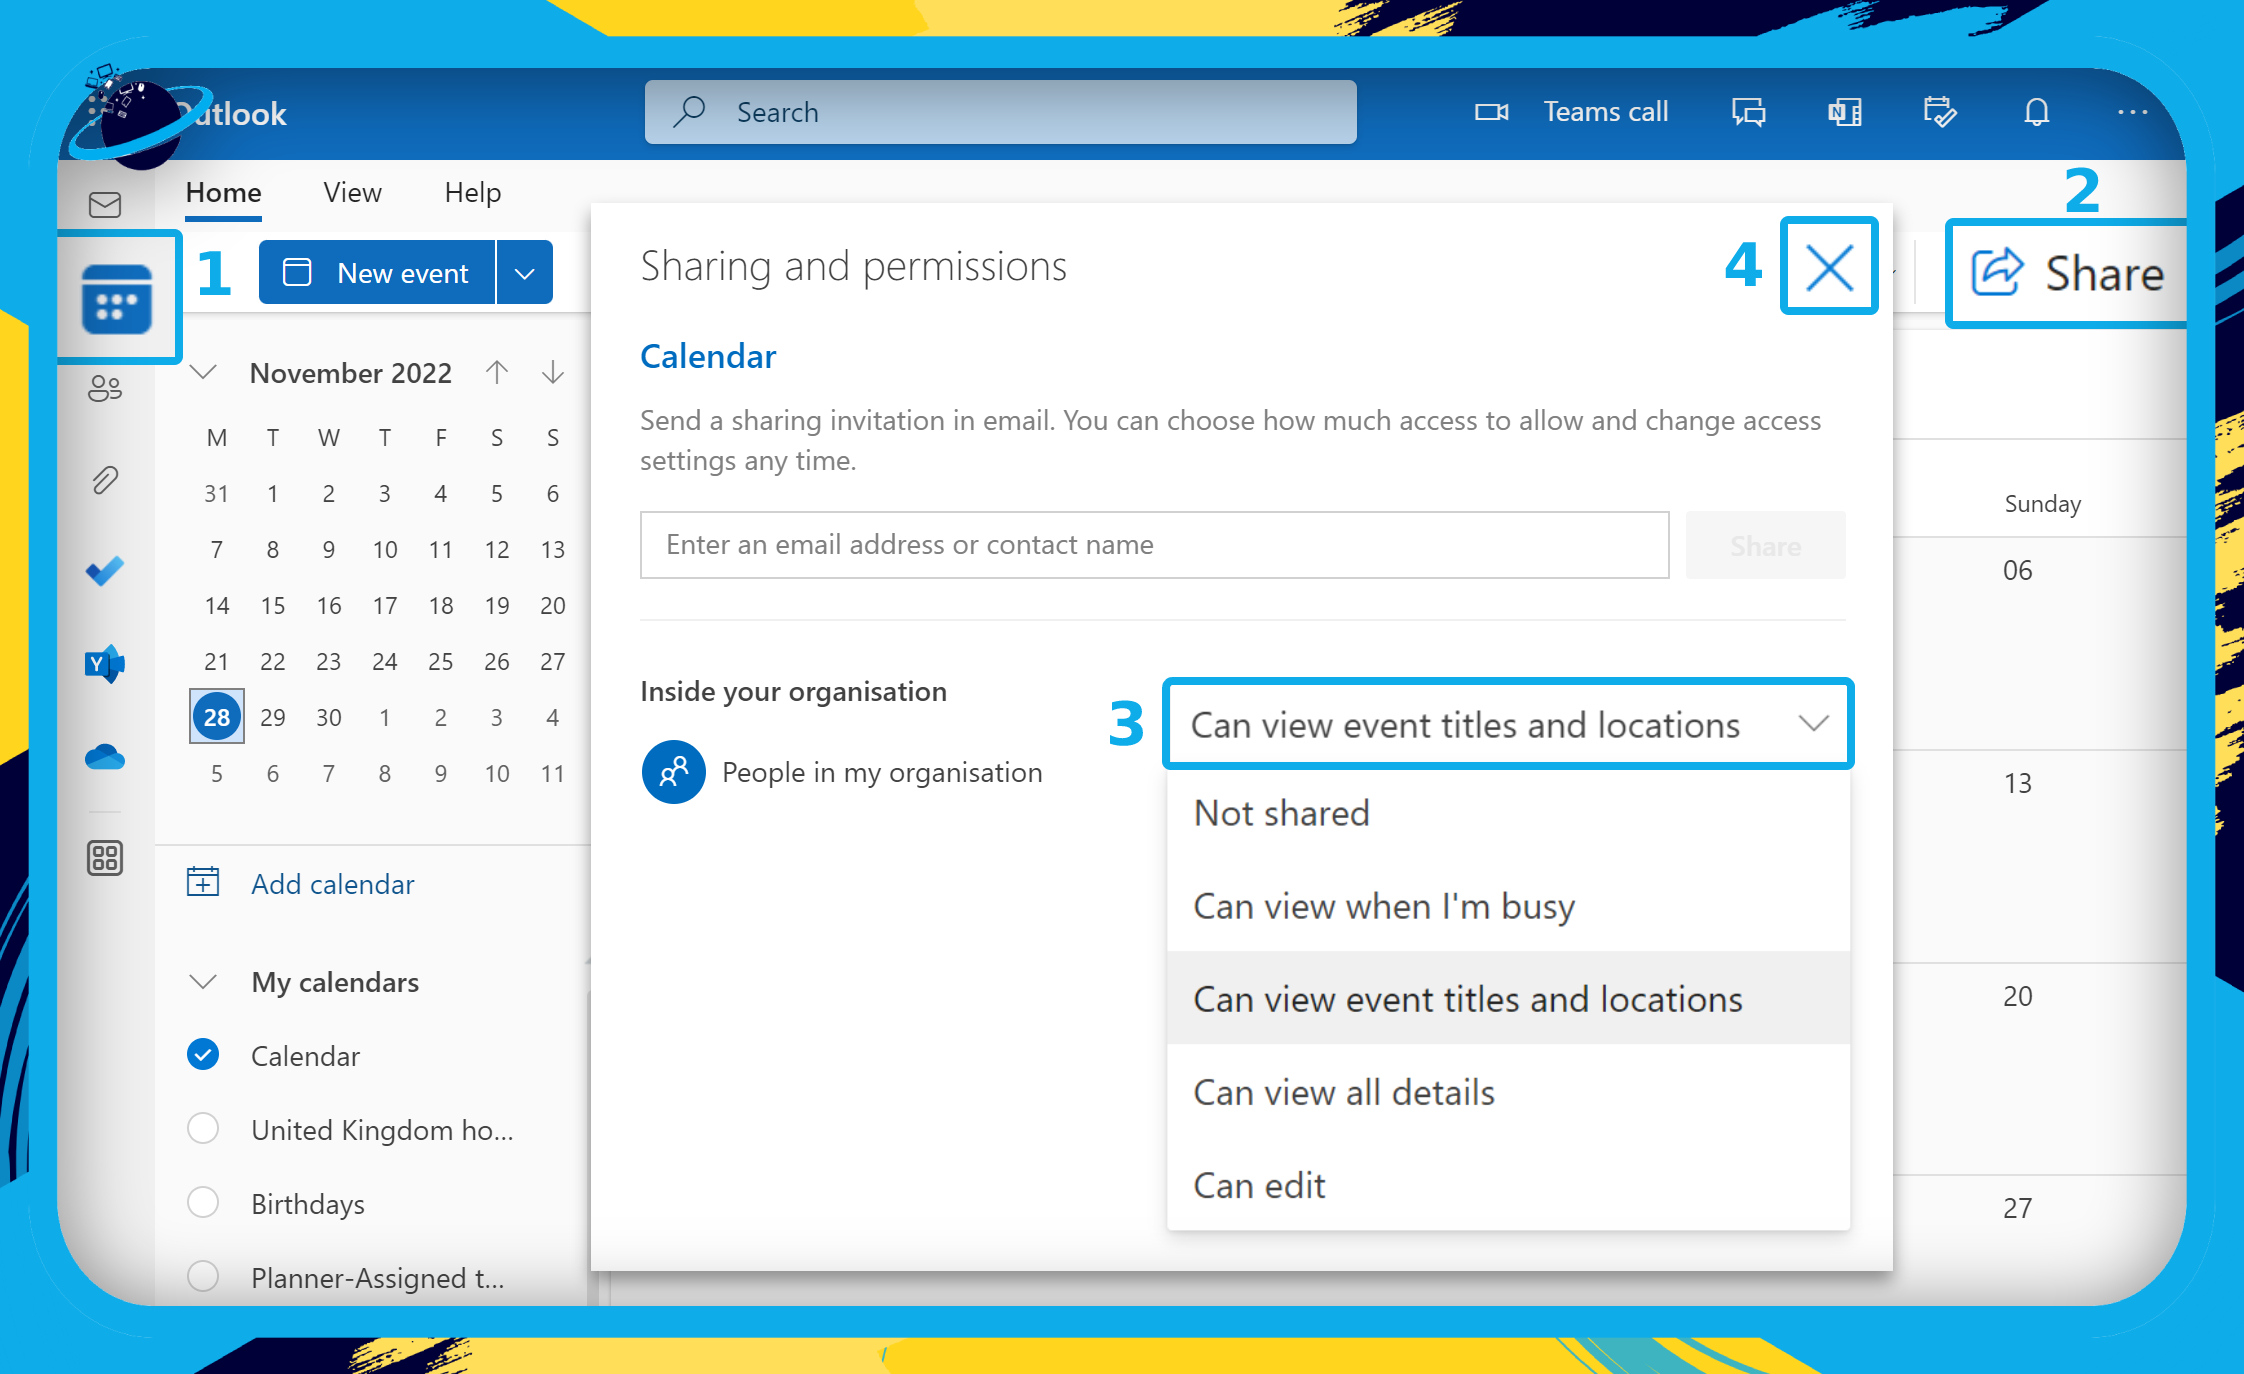
- First, sign into your Microsoft Outlook account.
- Click on the calendar icon in the left menu. (1)
- Select the calendar you want to share and click the “Share” button. (2)
- Or right-click the calendar you want to share and select “Sharing and permissions.”
- Click the select box and choose your desired sharing permission. (3)
- Then click the button to save and close. (4)
Mobile app: How to fix a shared calendar only showing basic free/busy information
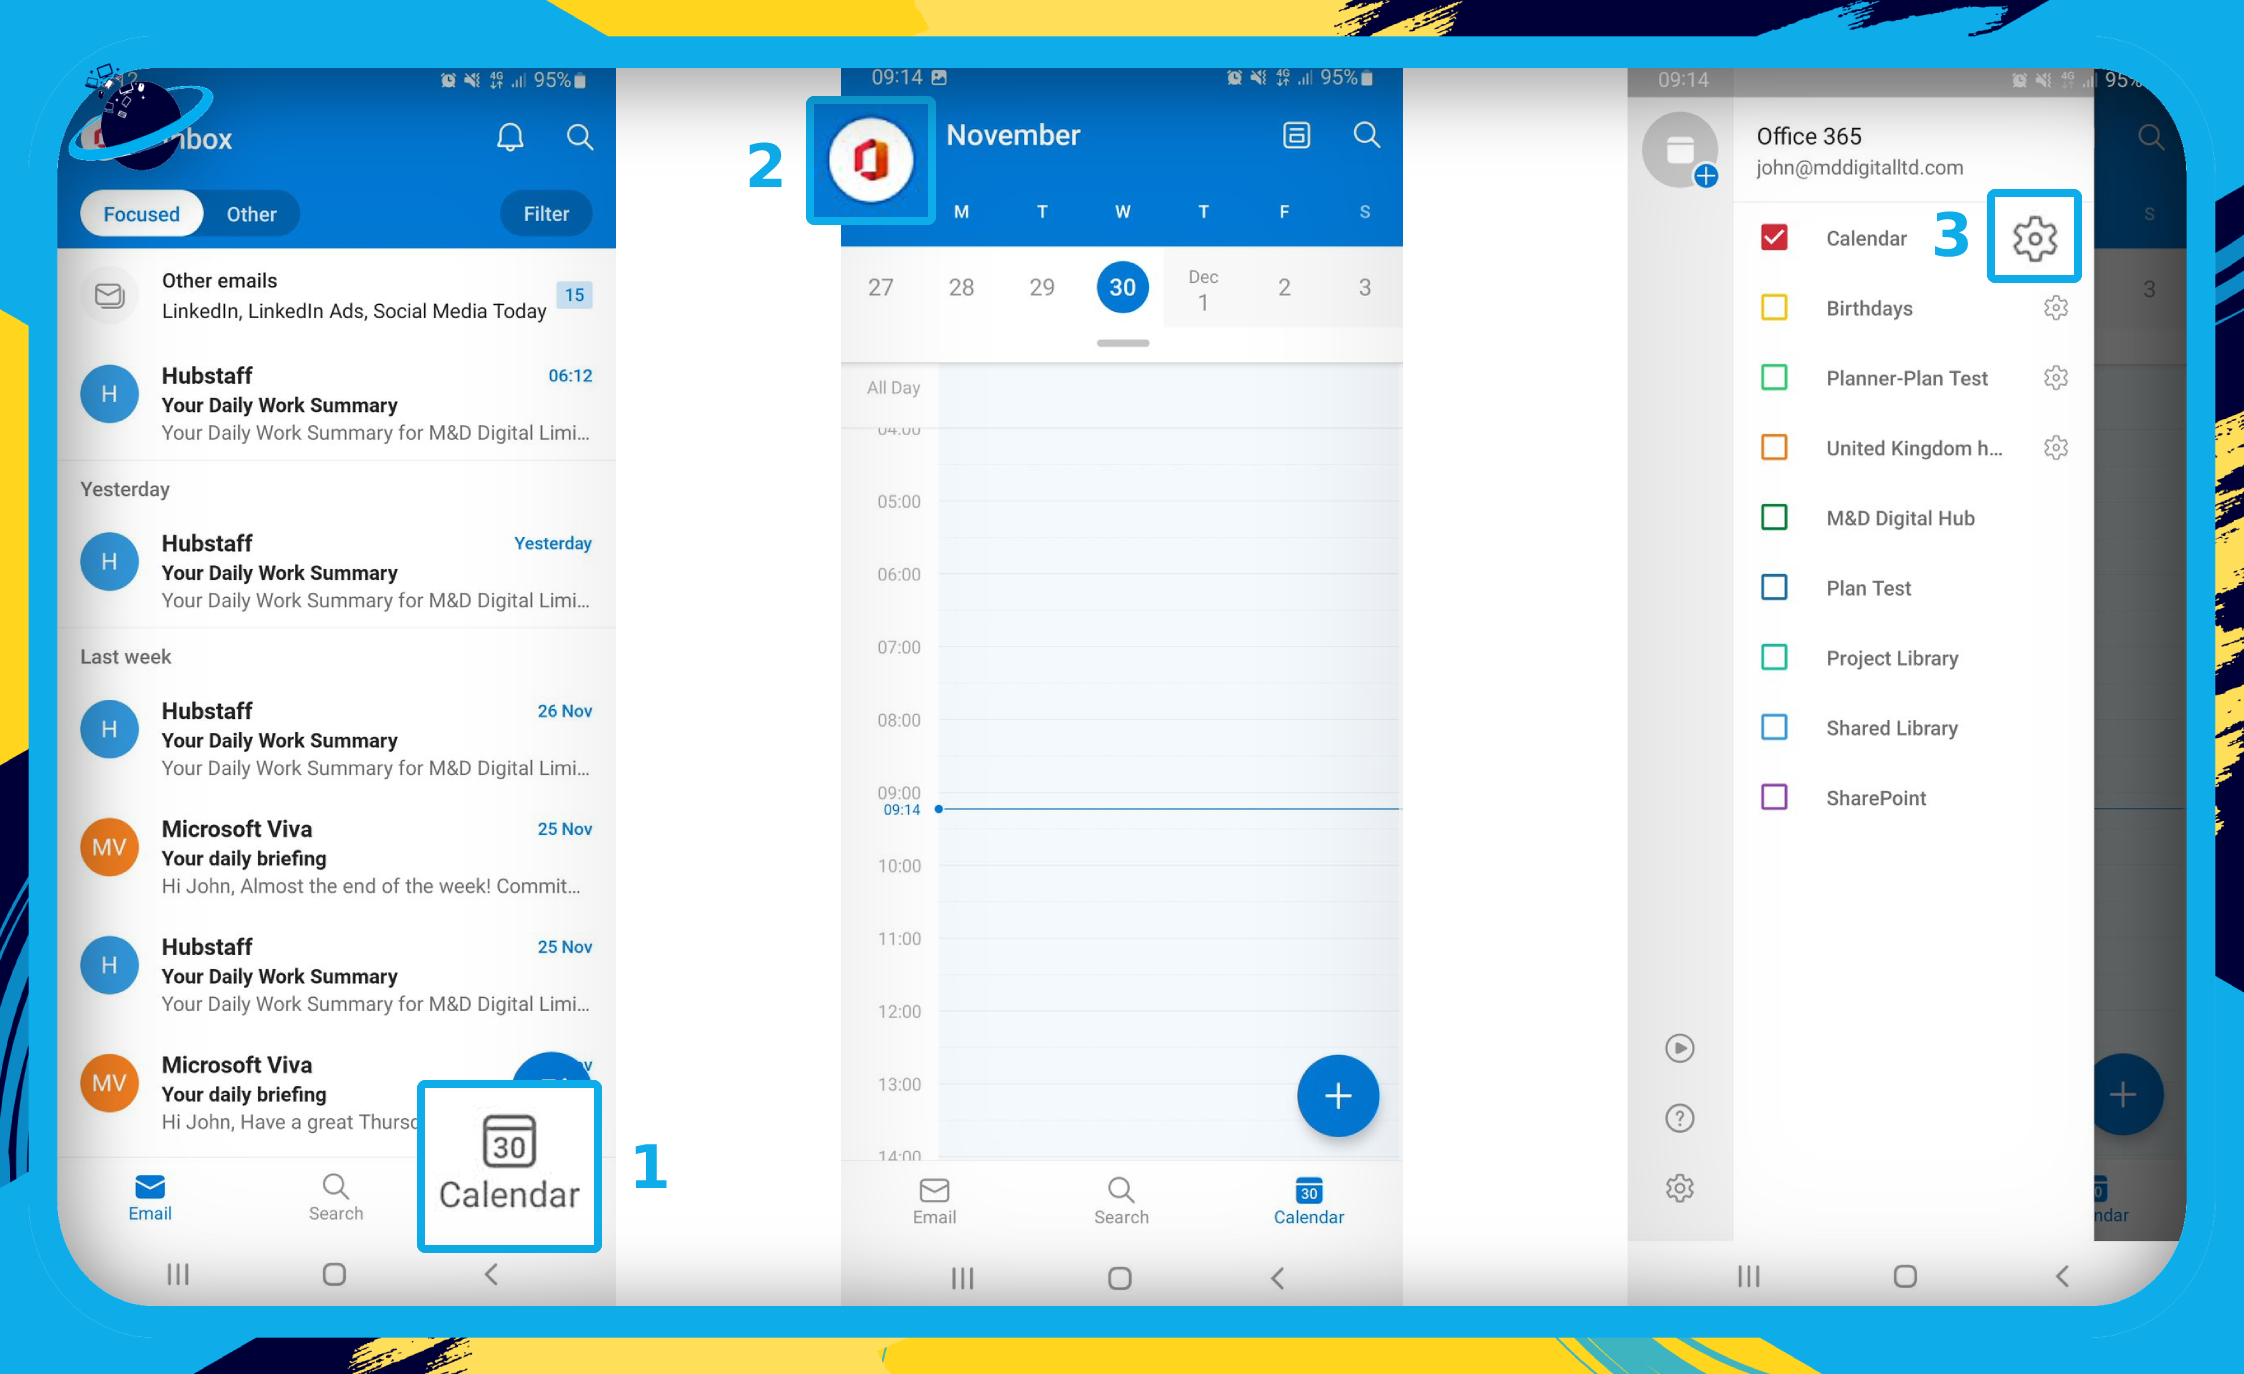
- First, open Outlook in the mobile app.
- Tap on “Calendar” in the bottom menu.
- Tap the
 Office icon in the top left.
 - Then tap the
 gear icon next to the calendar you want to share.
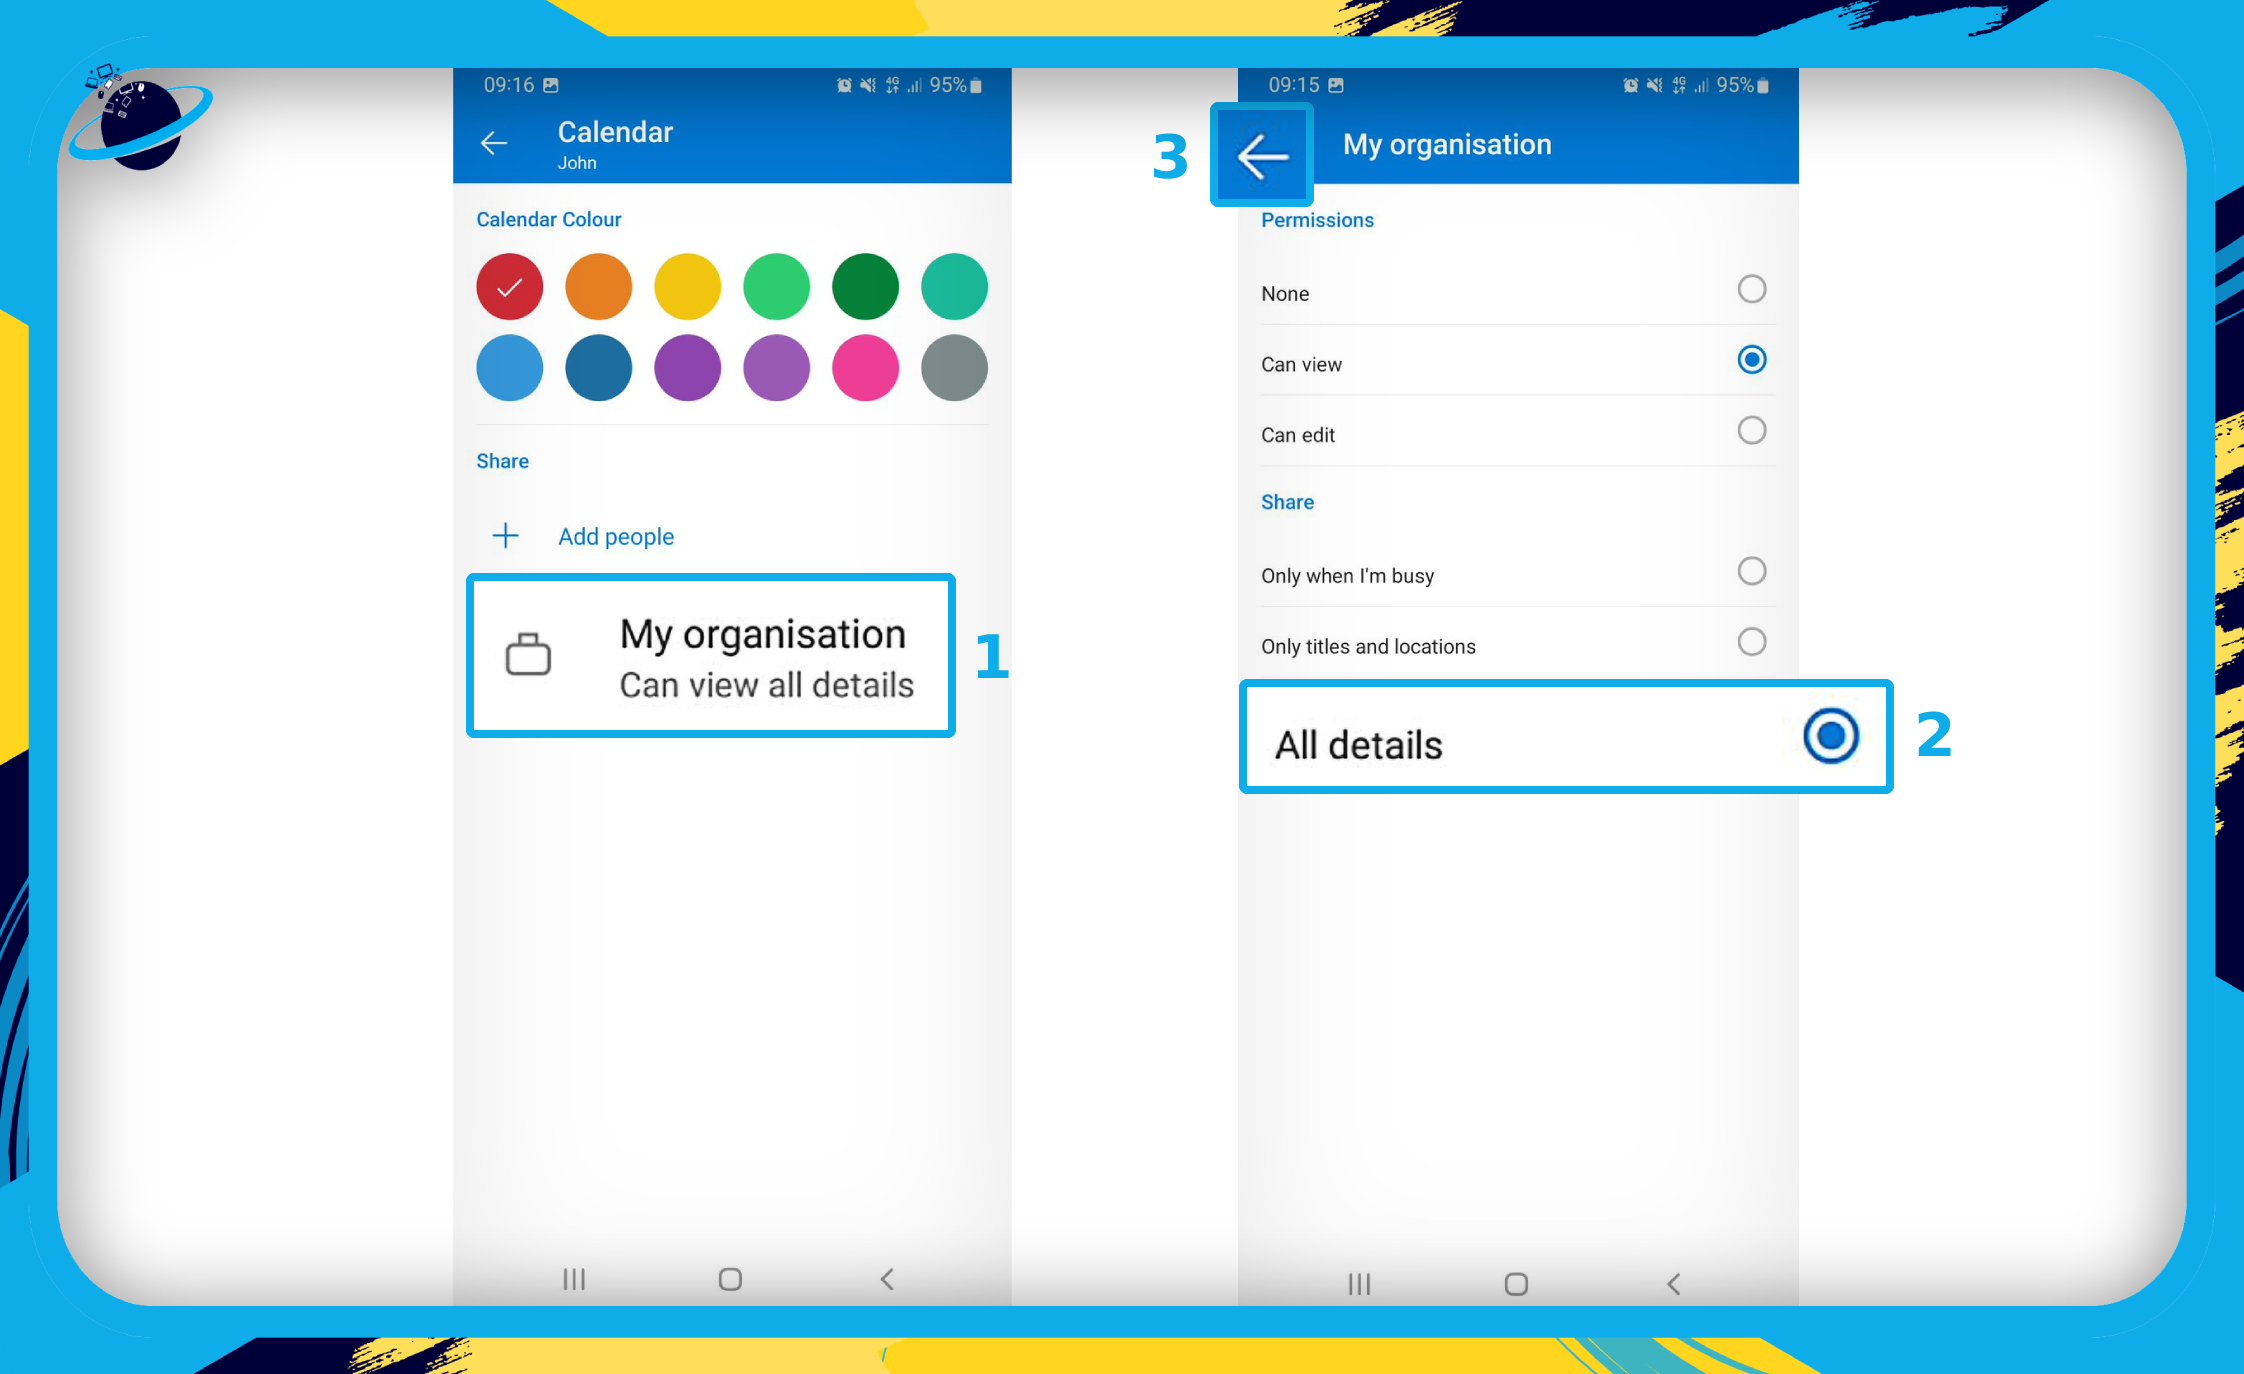
- Tap “My organization” or whichever group or individual you are sharing with. (1)
- Select “All details” or “Only titles and locations.” (2)
- Then tap the back arrow to save your changes. (3)
If you still have problems sharing your calendar details, talk to your admins, as there could be a problem with organization permissions. You can learn how to set up permissions in the Admin Center and Exchange in the following sections.
If you downloaded from Apple or Google, check the ![]() Apple app store or
Apple app store or ![]() Google Play in case the application requires an update.
Google Play in case the application requires an update.
Admin Center: How to fix a shared calendar only showing basic free/busy information
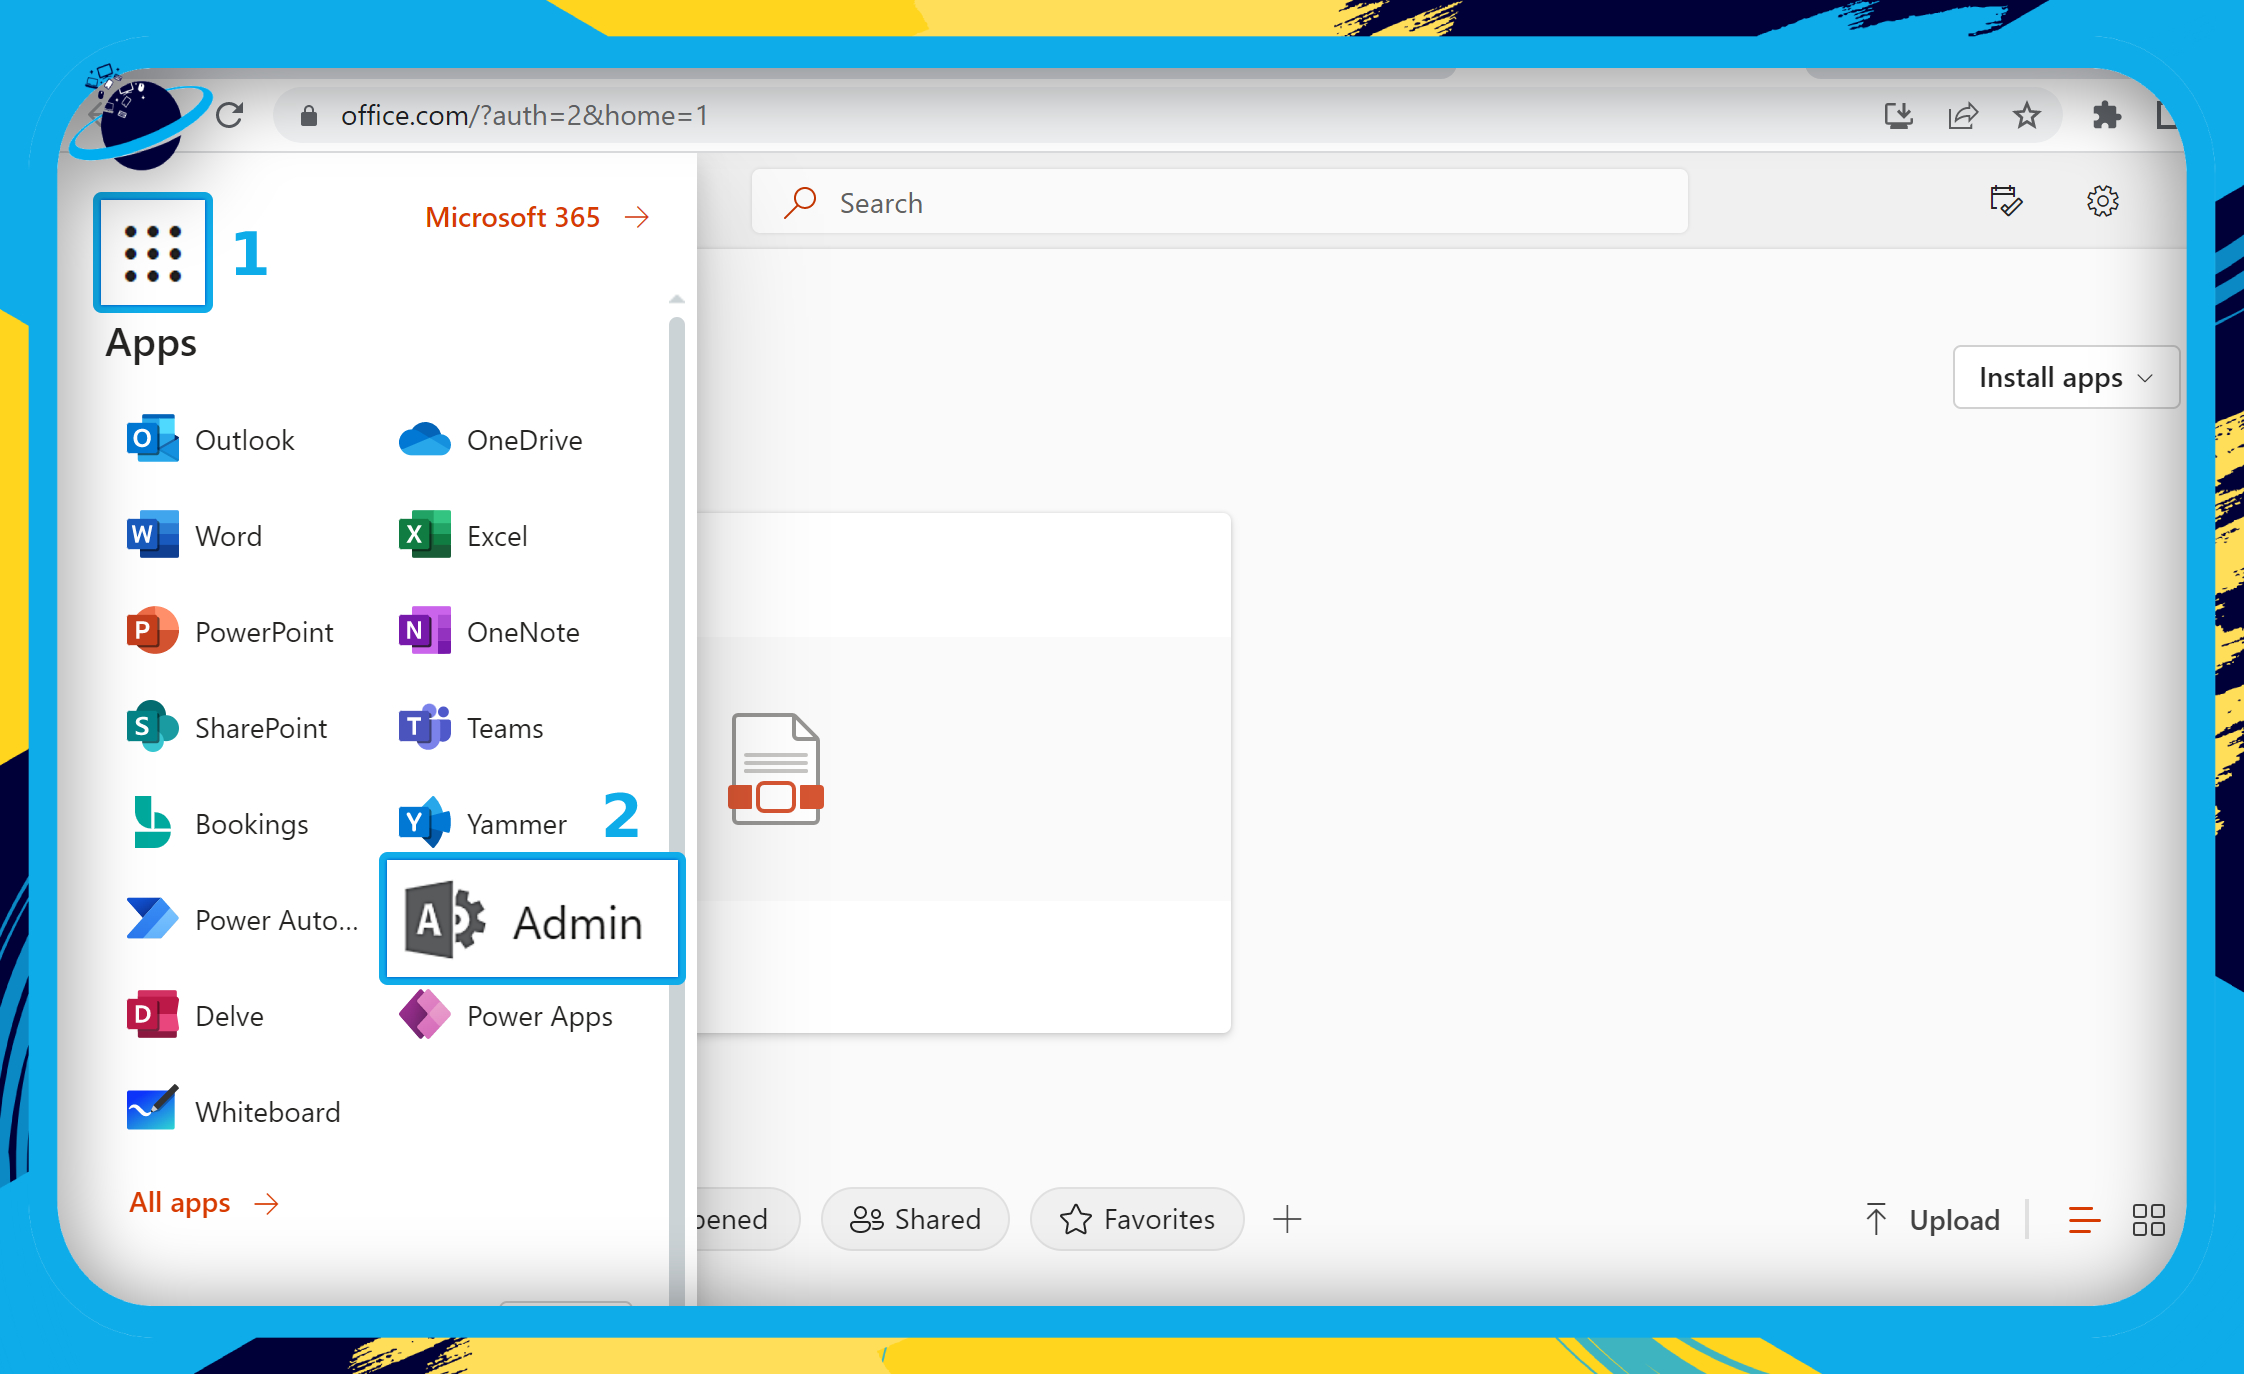
- First, sign into Office 365 using your login details.
- Click the app launcher. (1)
- Then select “Admin” from the dropdown menu. (2)
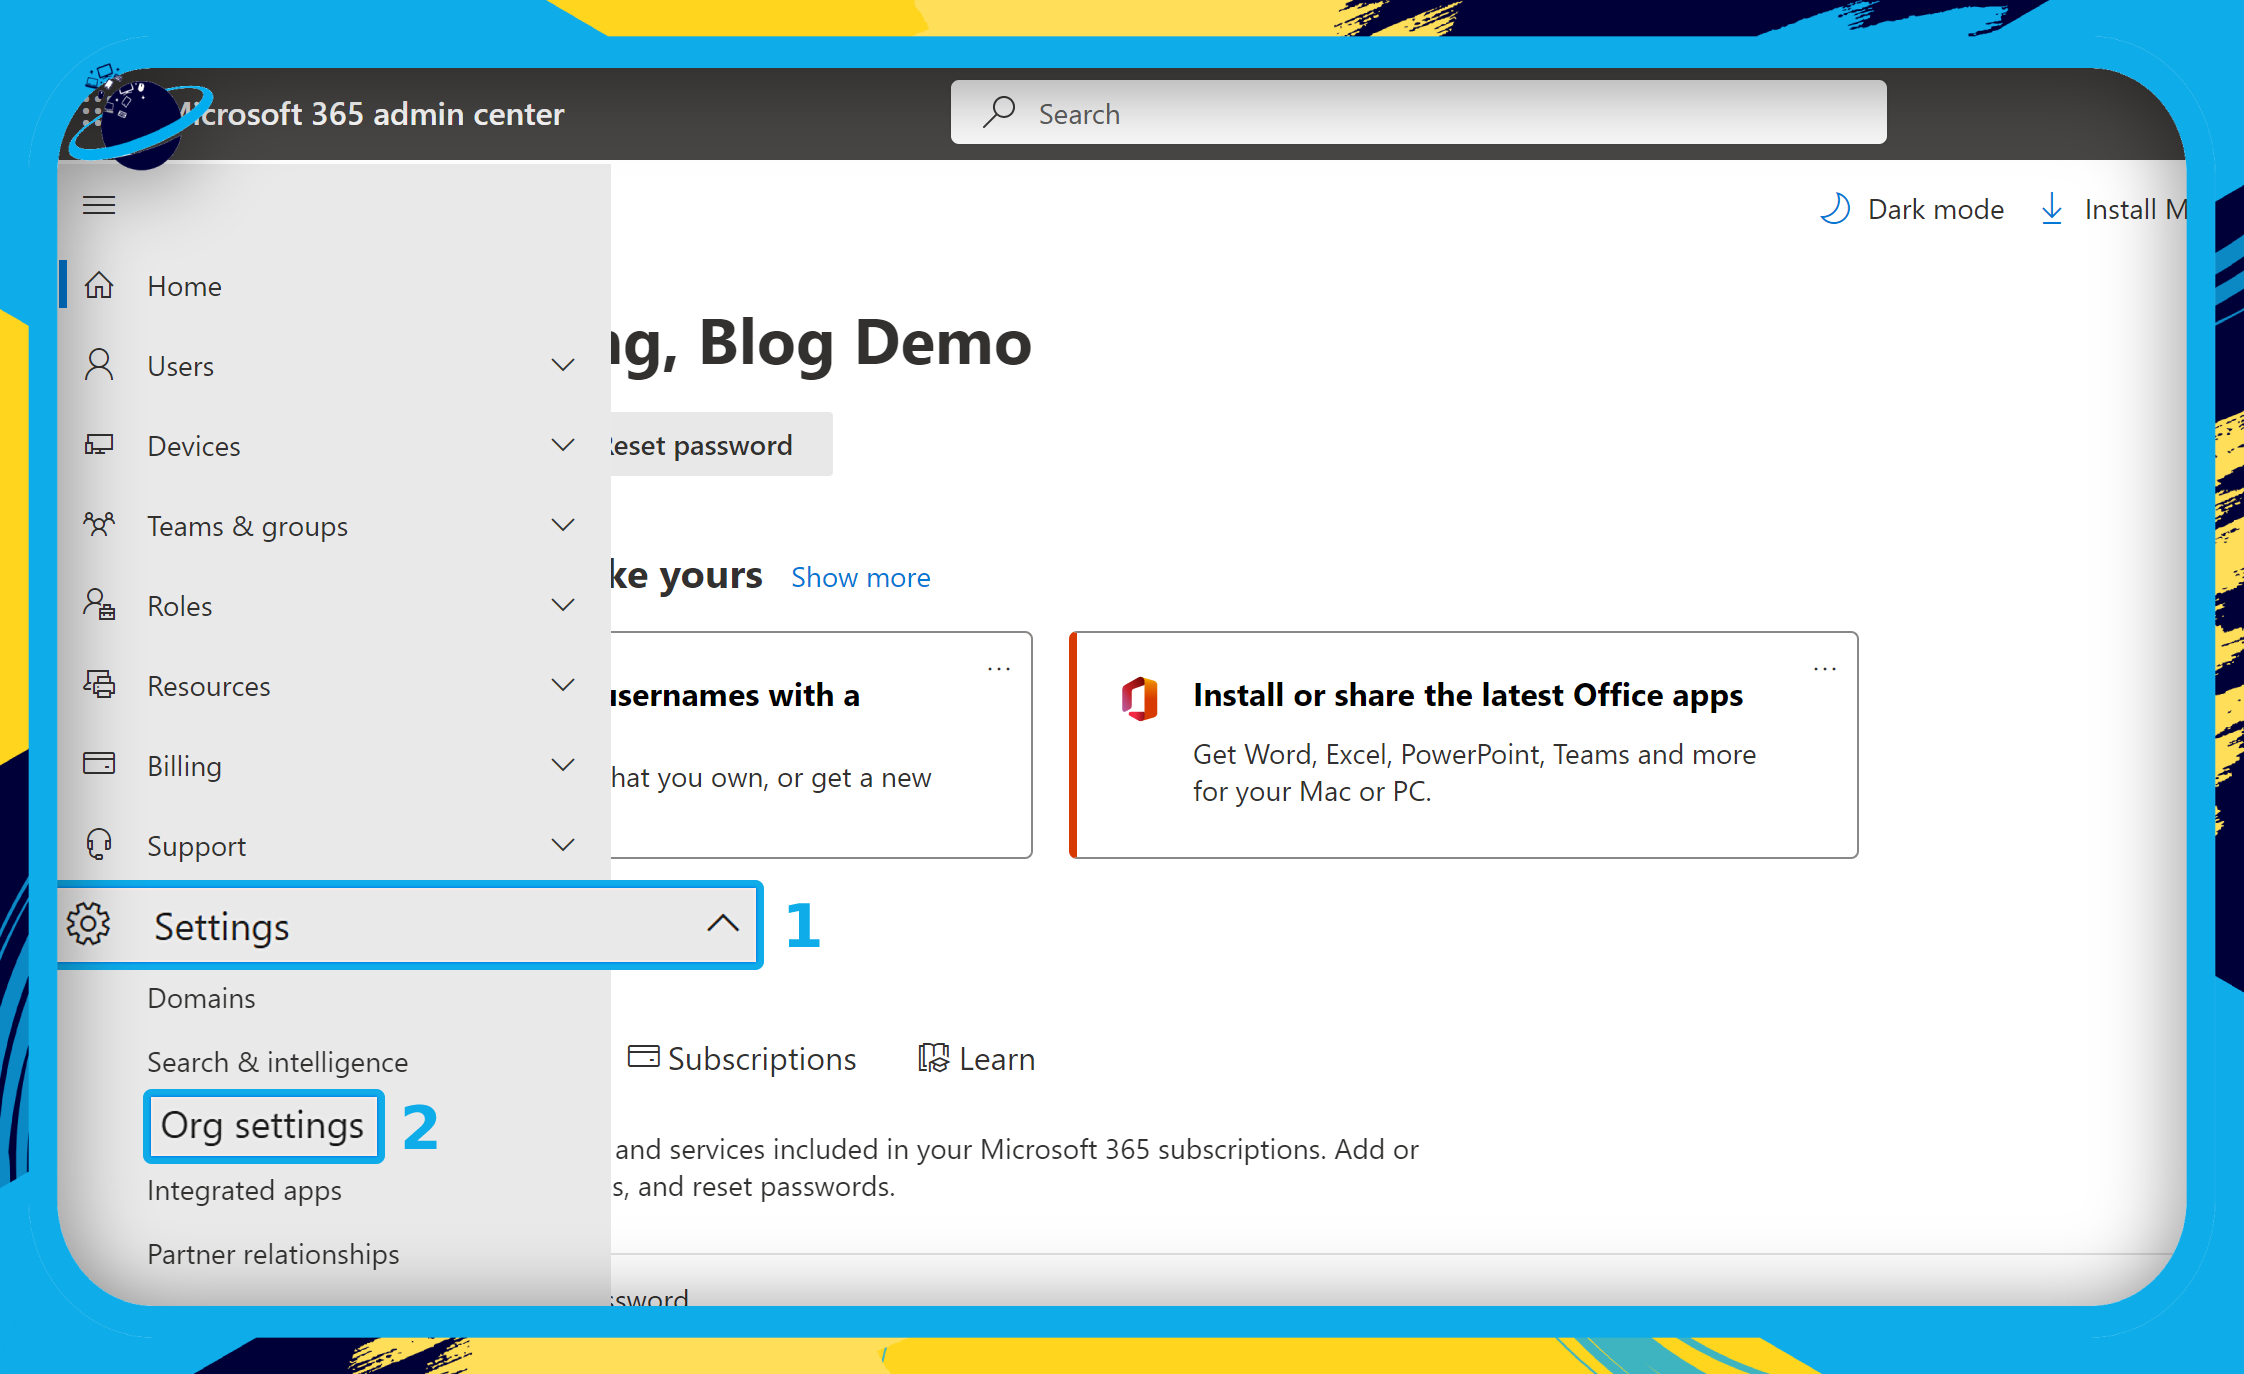
- Click the menu icon in the admin panel.
- Click “Show all” if you can’t see “Settings.”
- Go to “Settings” > “Org settings” in the menu.
- Select “Calendar” in the “Services” tab.
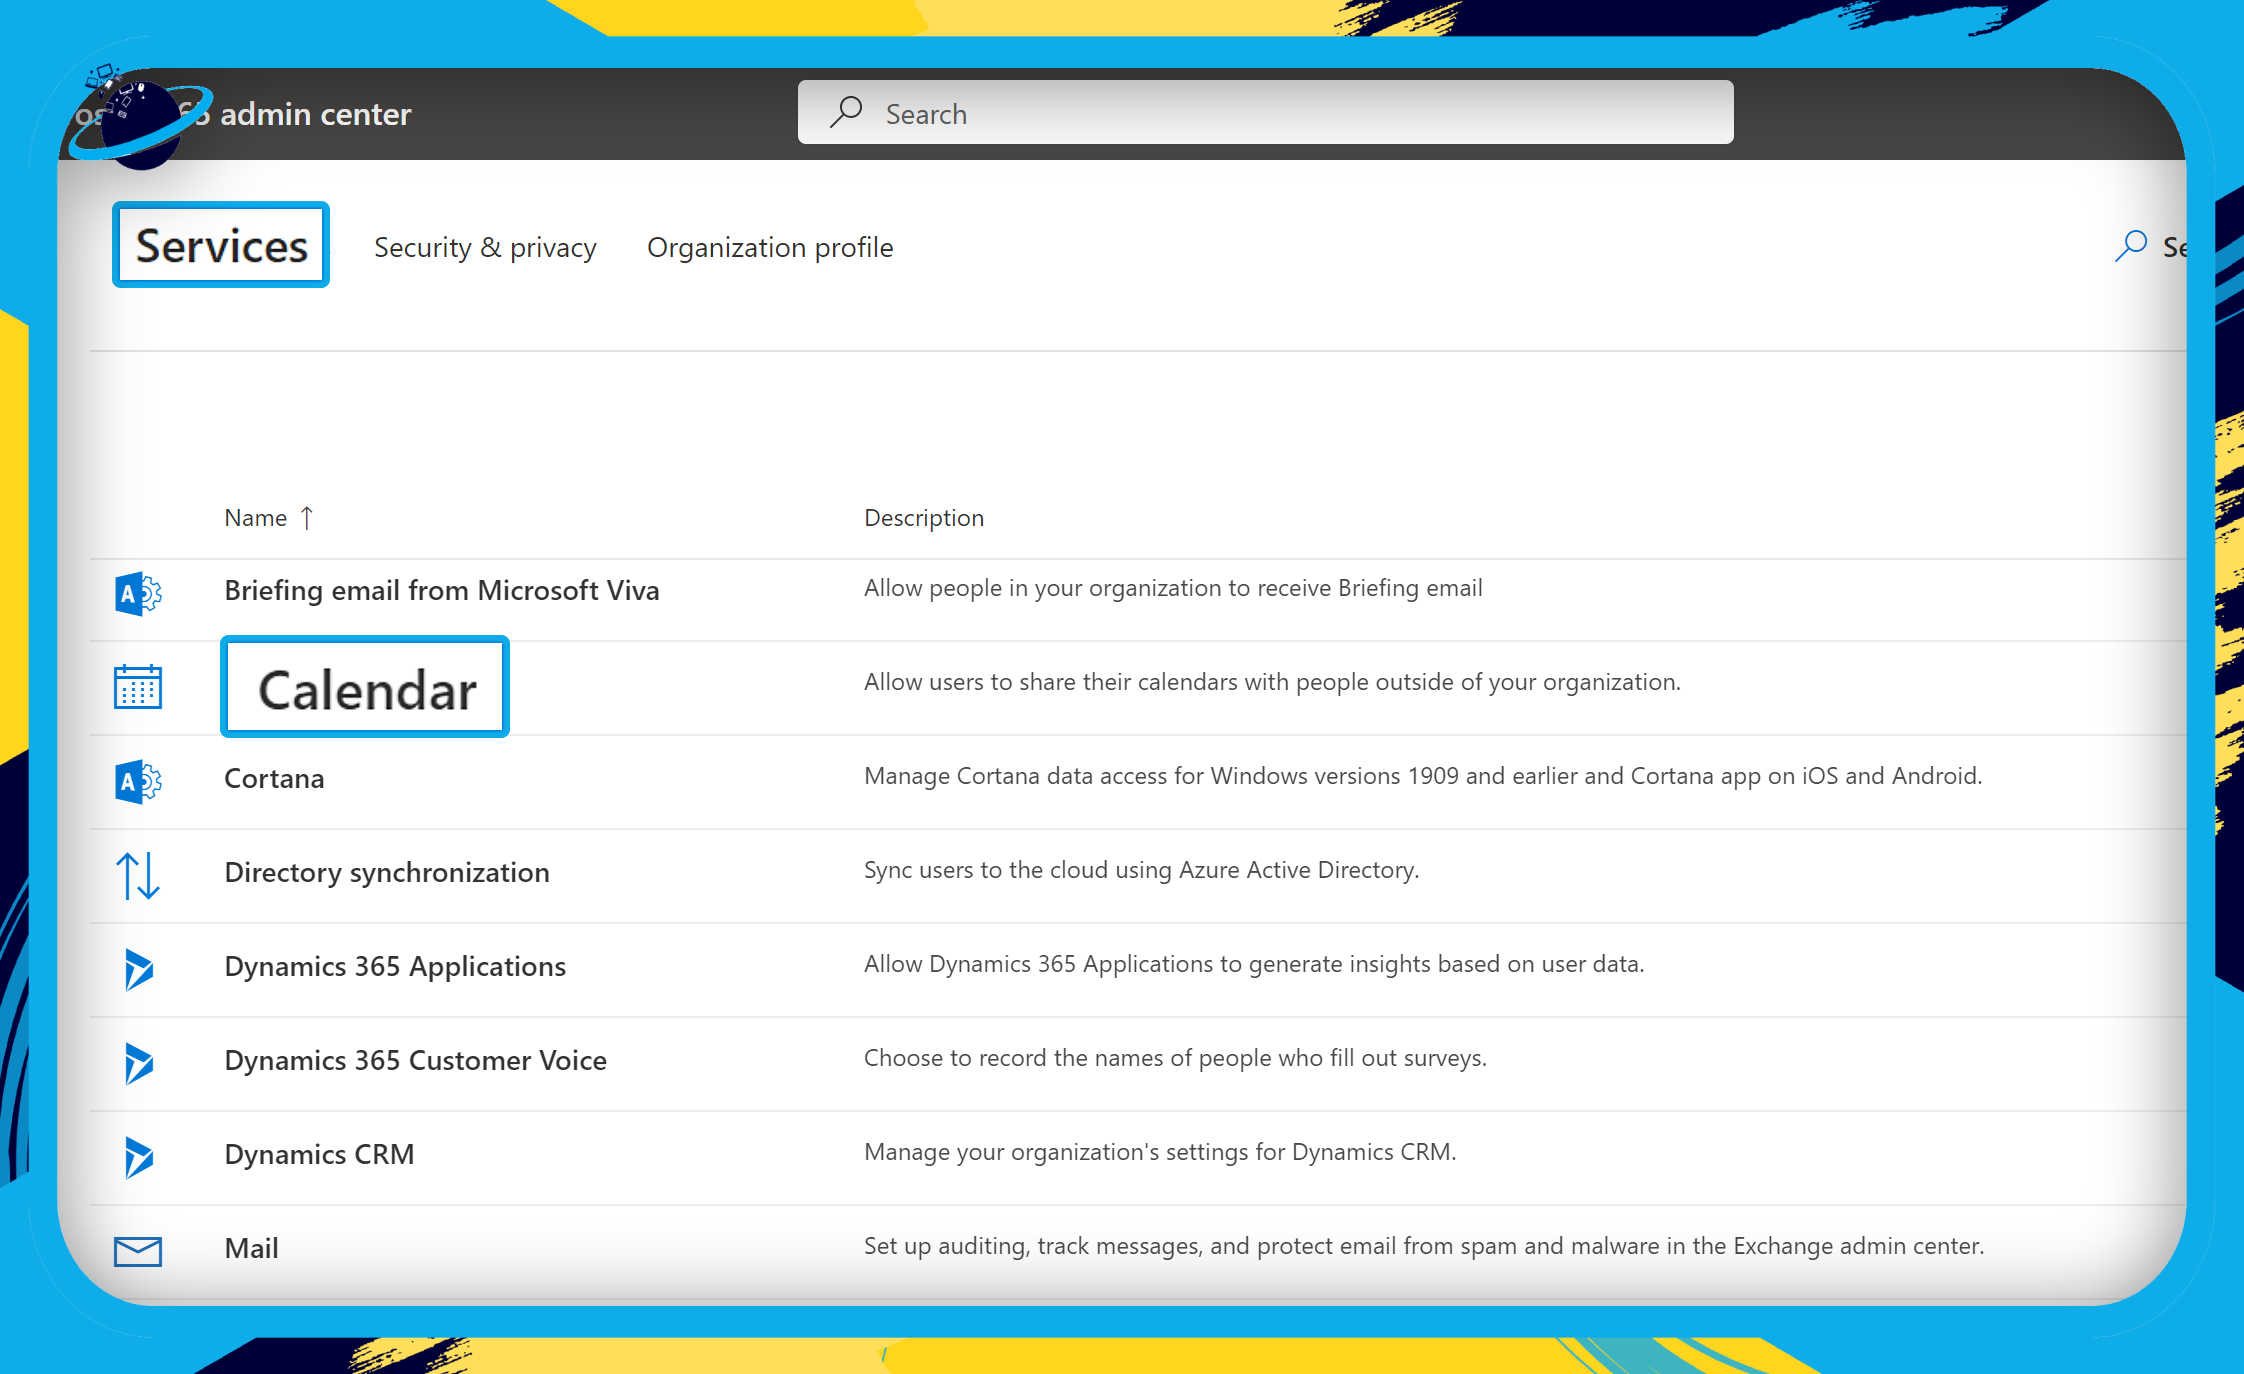
- A flyout pane will open on the right side of the window.
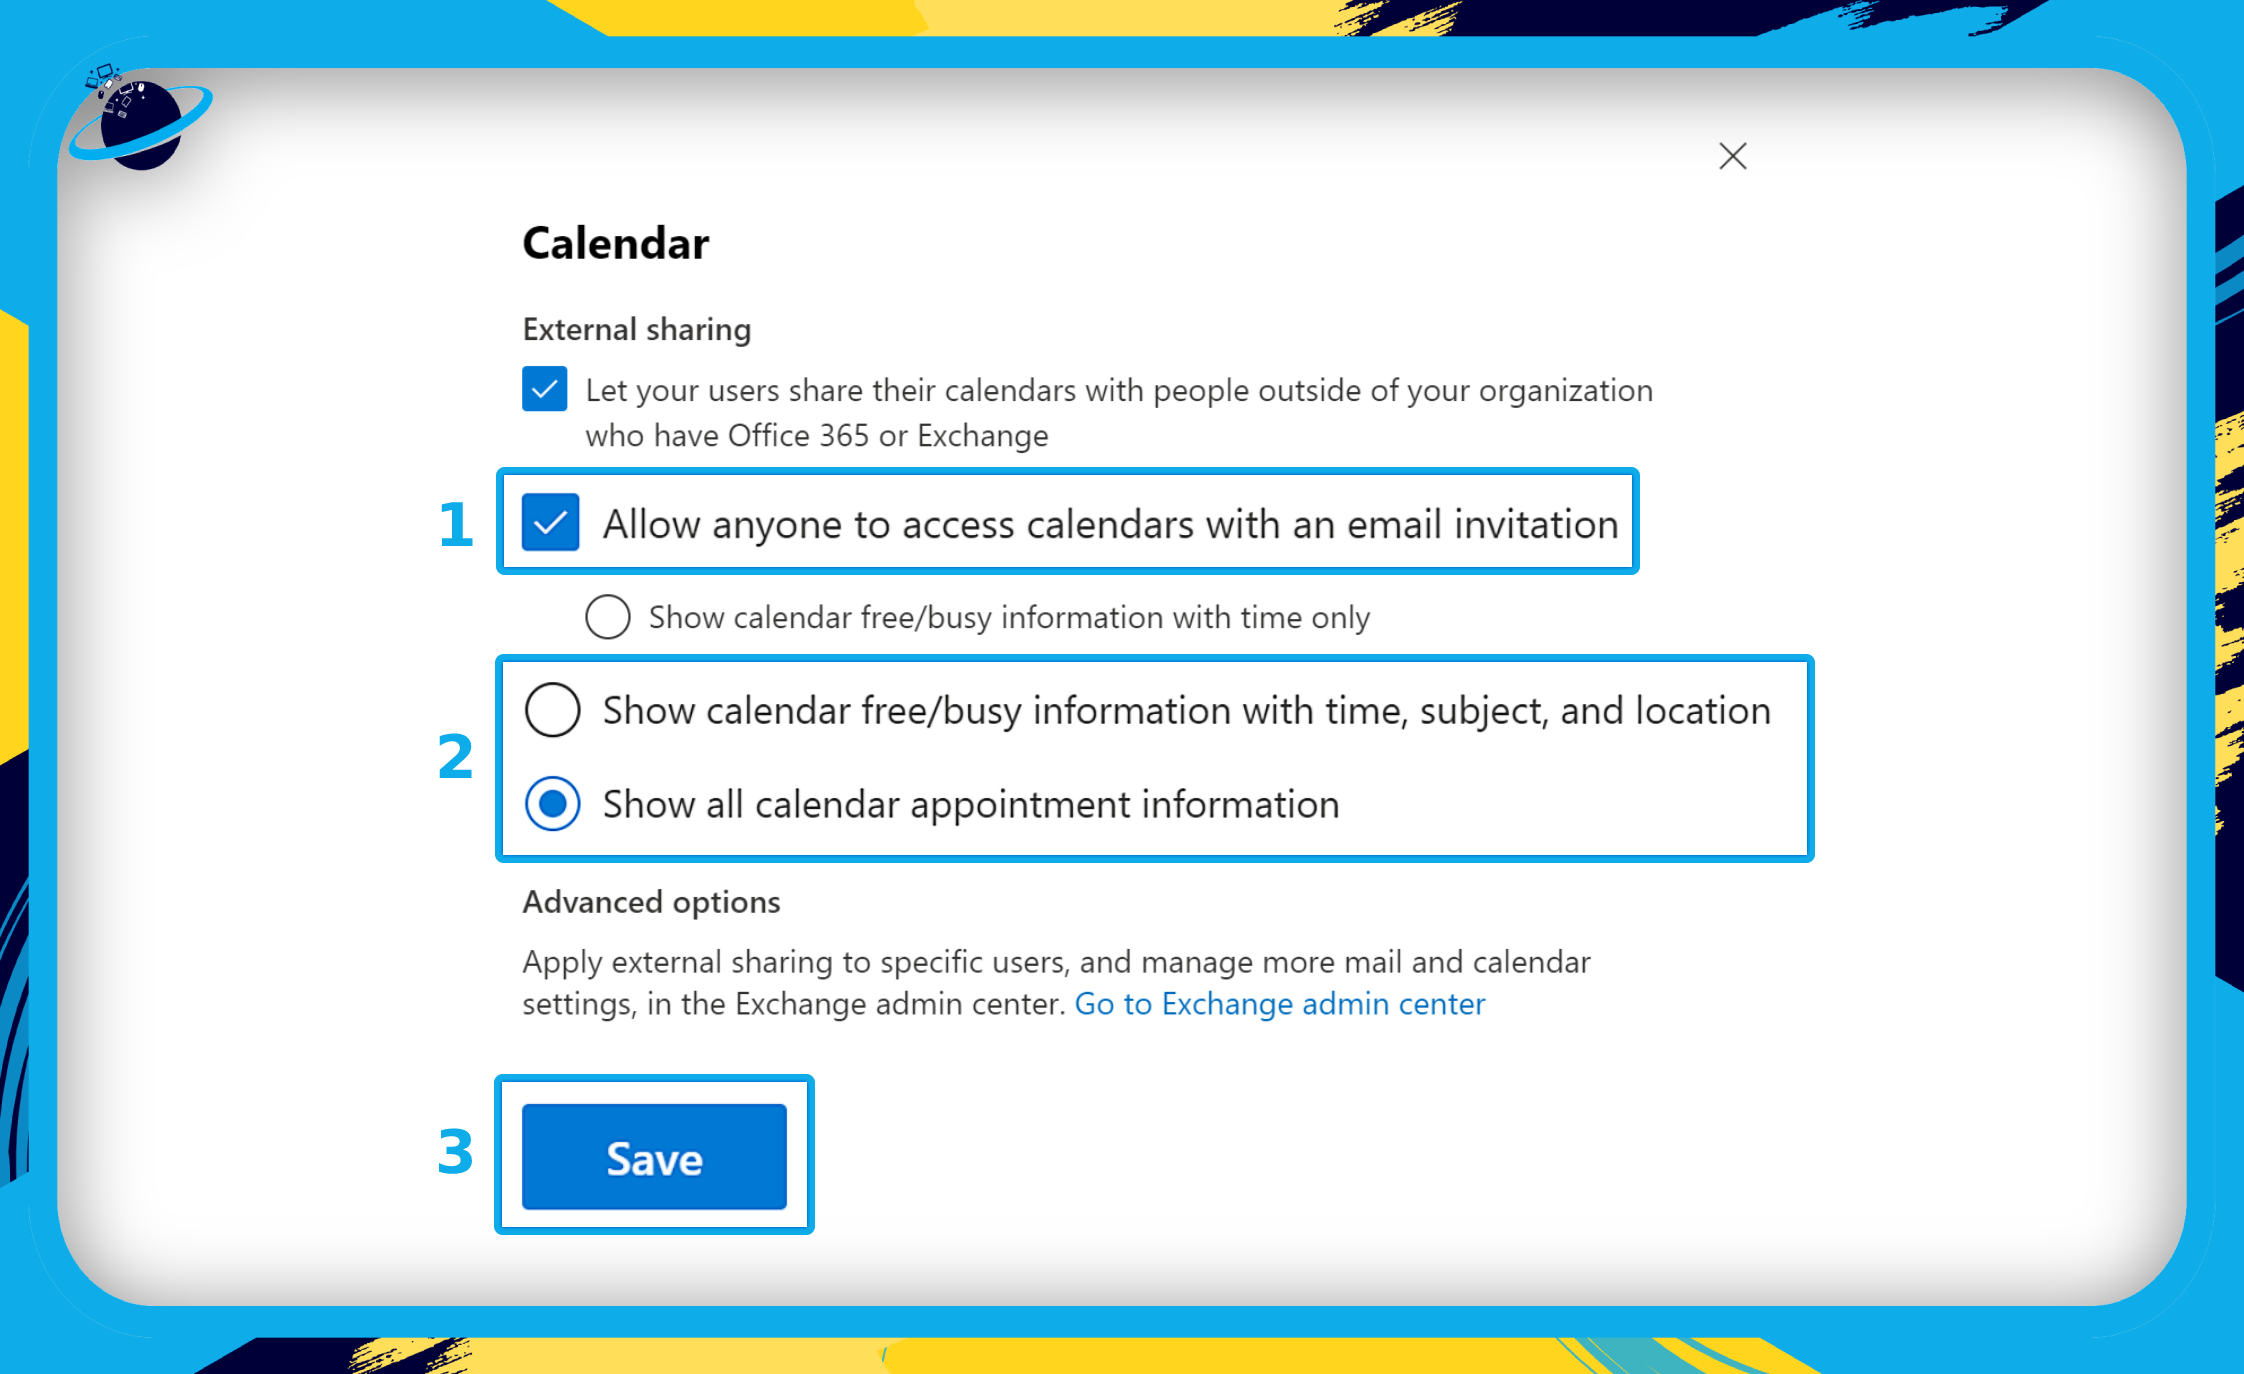
- Check the “Allow anyone to access calendars with an email invitation” checkbox. (1)
- Three more permission options will appear — select your preferred option. (2)
- Finally, click the “Save” button. (3)
Once complete, users in your organization can send invitation emails to external users, who can then access additional information from your calendar.
Exchange: How to fix a shared calendar only showing basic free/busy information
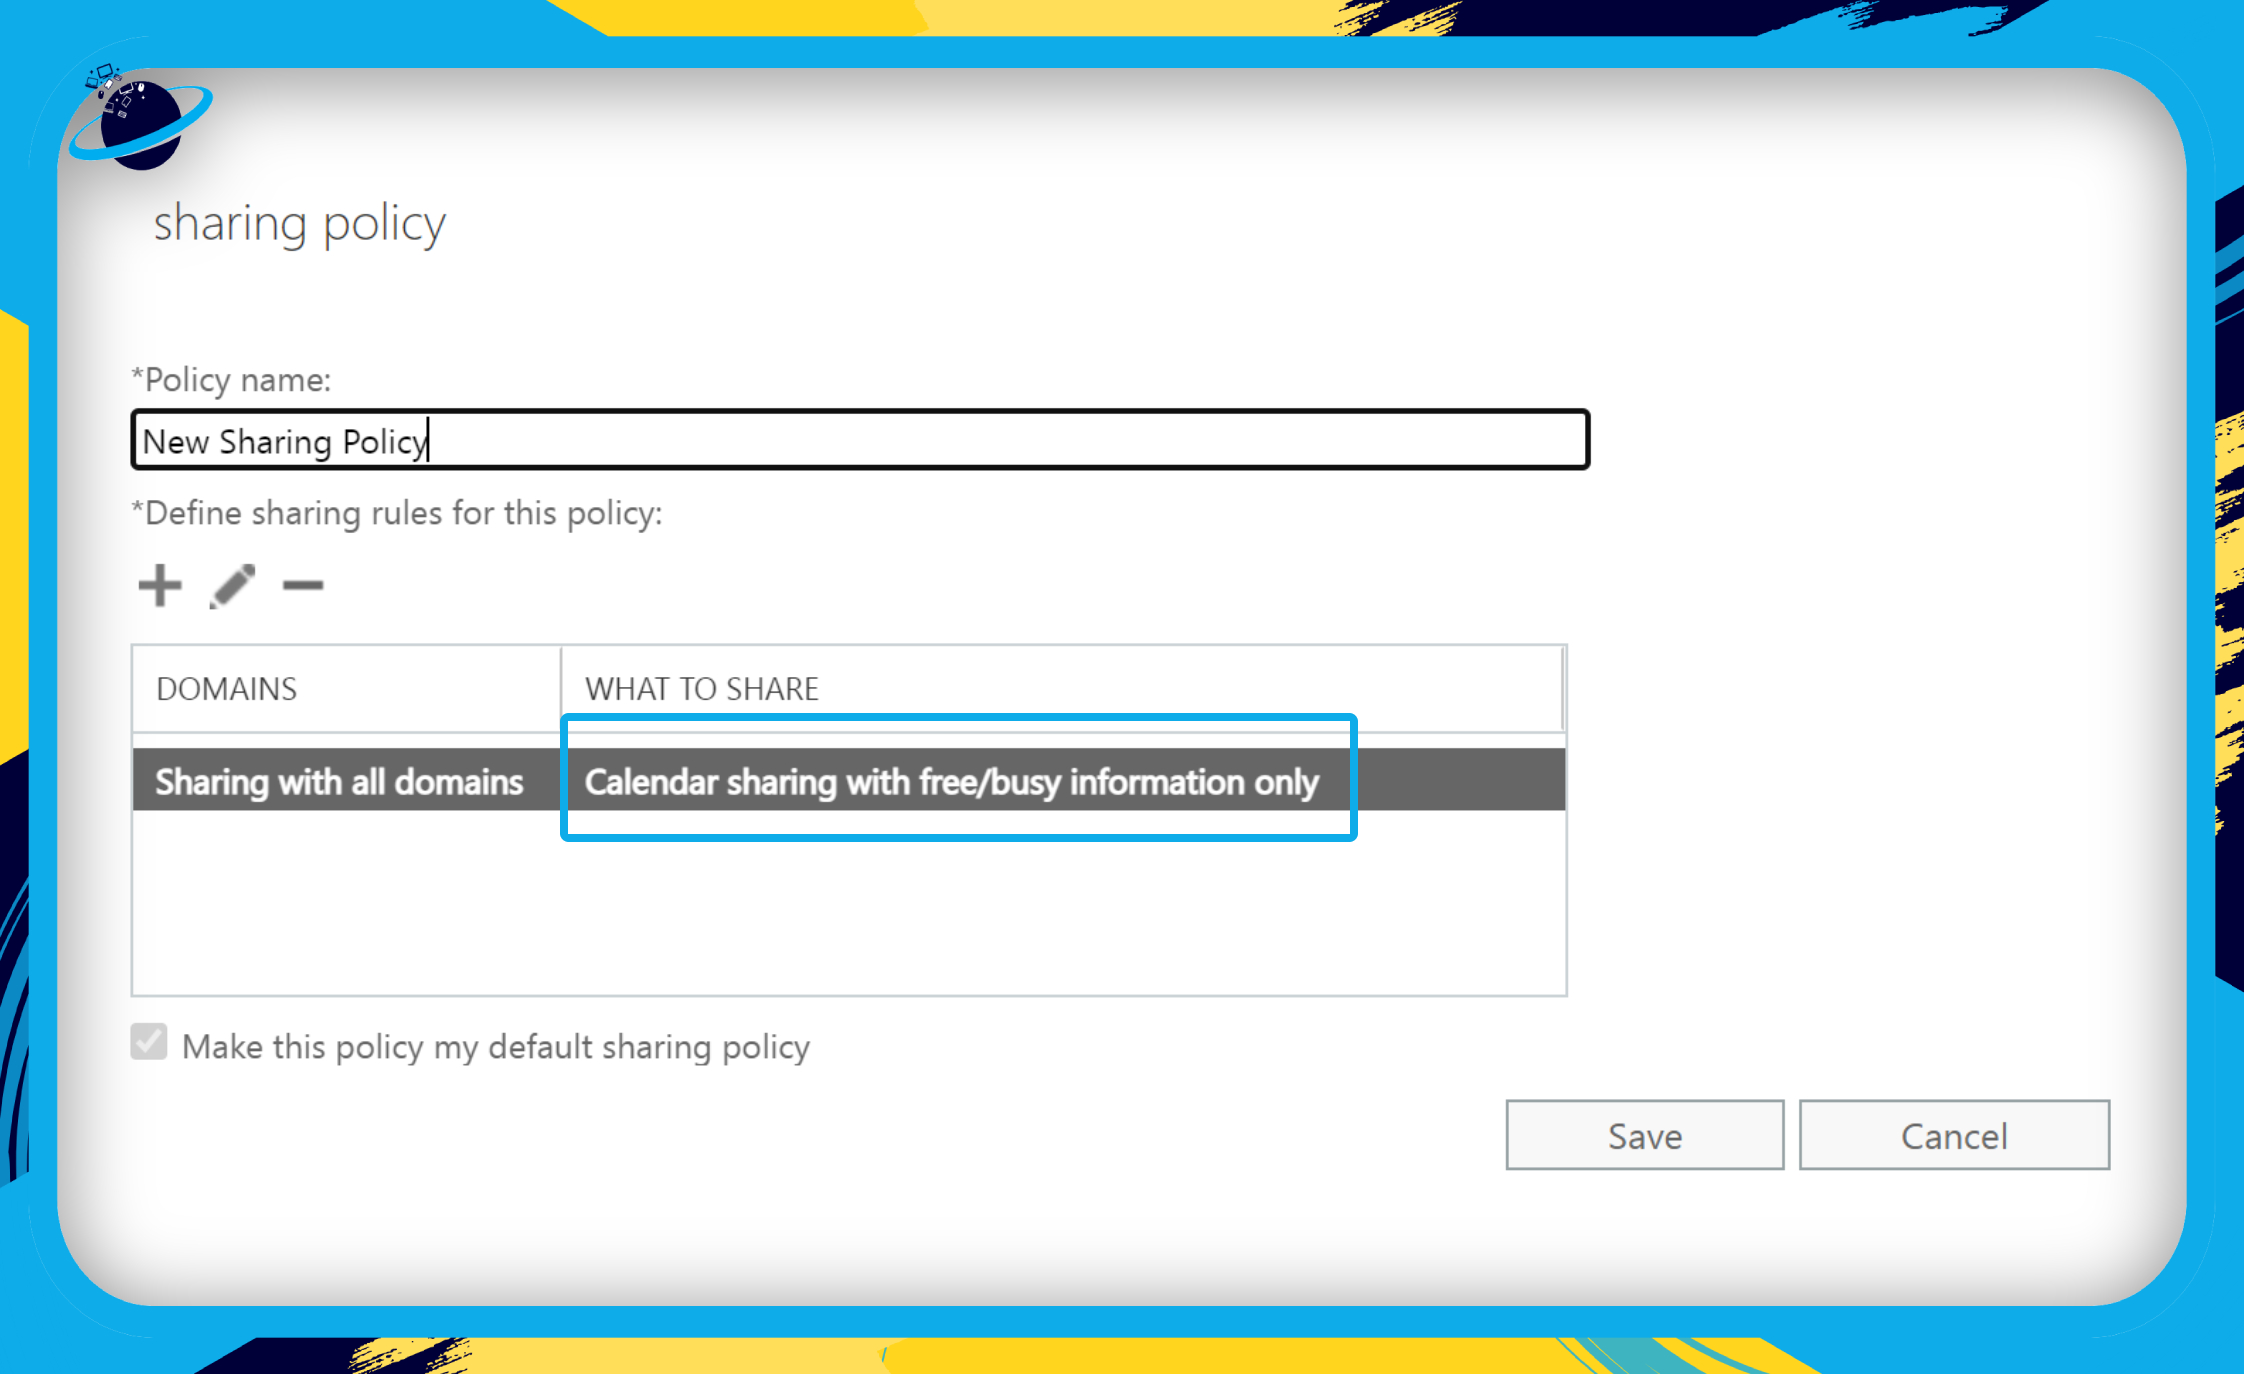
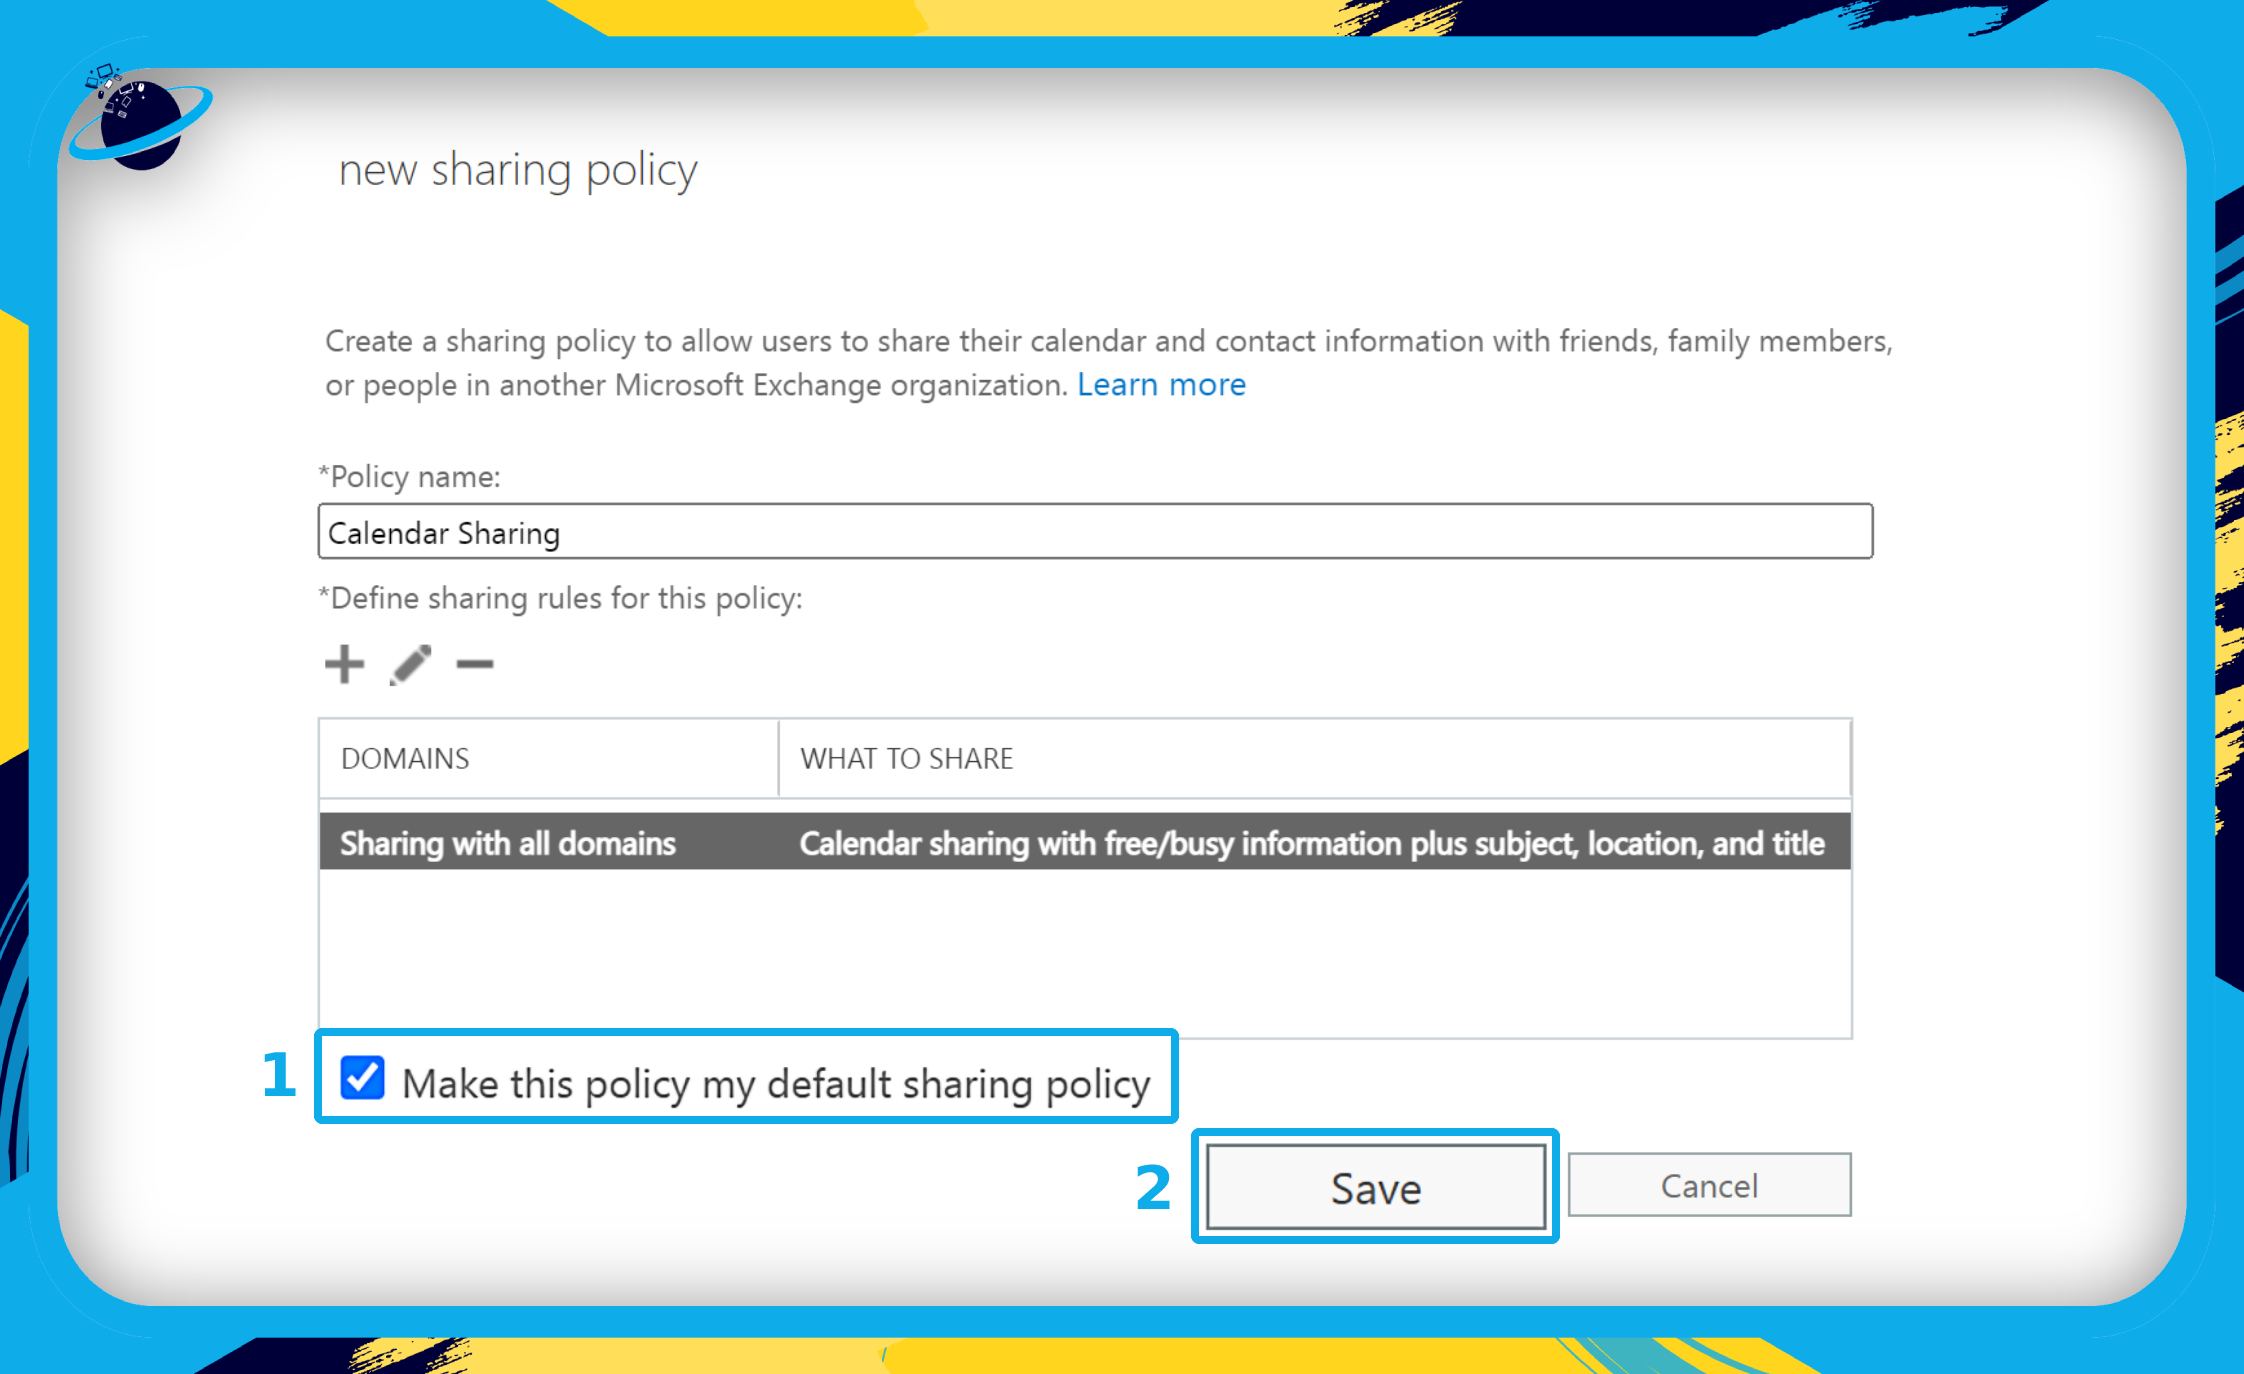
If your “individual” sharing policy is set to “Calendar sharing with free/busy information only,” as shown in the image below, you will need to create a new policy. To do that, you will need access to the Exchange Admin Center.
- Firstly, open your Exchange Admin Center.
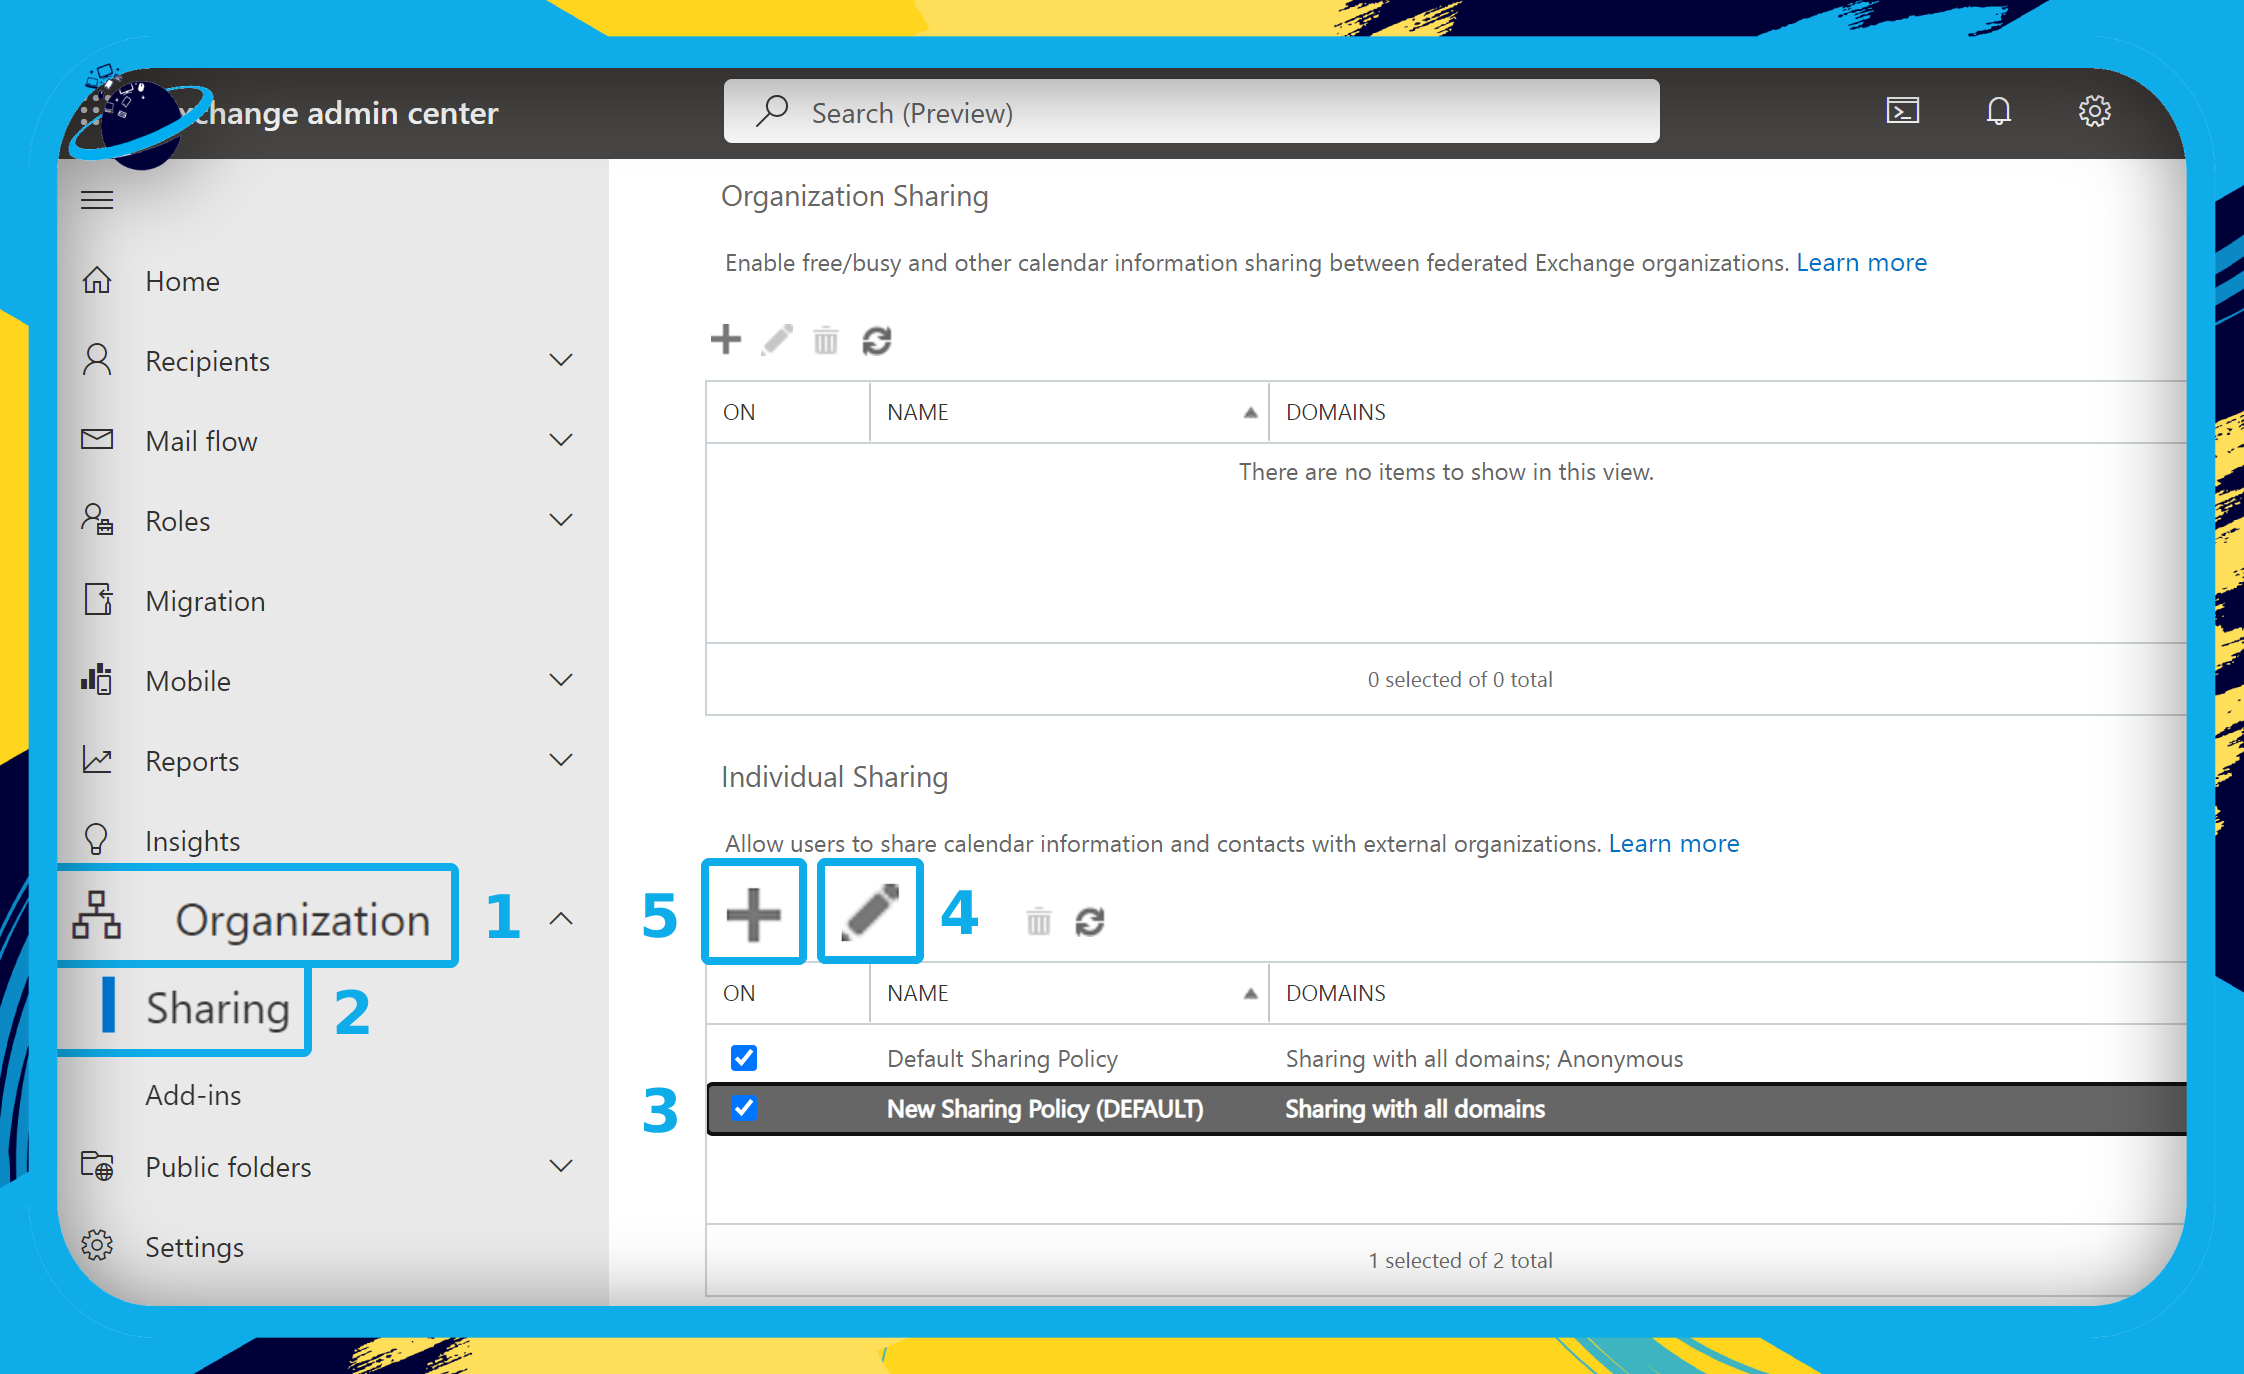
- Click “Organization” on the left menu to reveal more options. (1)
- Select “Sharing” from the revealed options. (2)
- Select a sharing policy under the “Individual Sharing” header. (3)
- Then click the
 pen icon to check the policy. (4)
 - If only “free/busy” information is being shared, click the “Cancel” button.
- Then click the
 plus icon to create a new policy. (5)
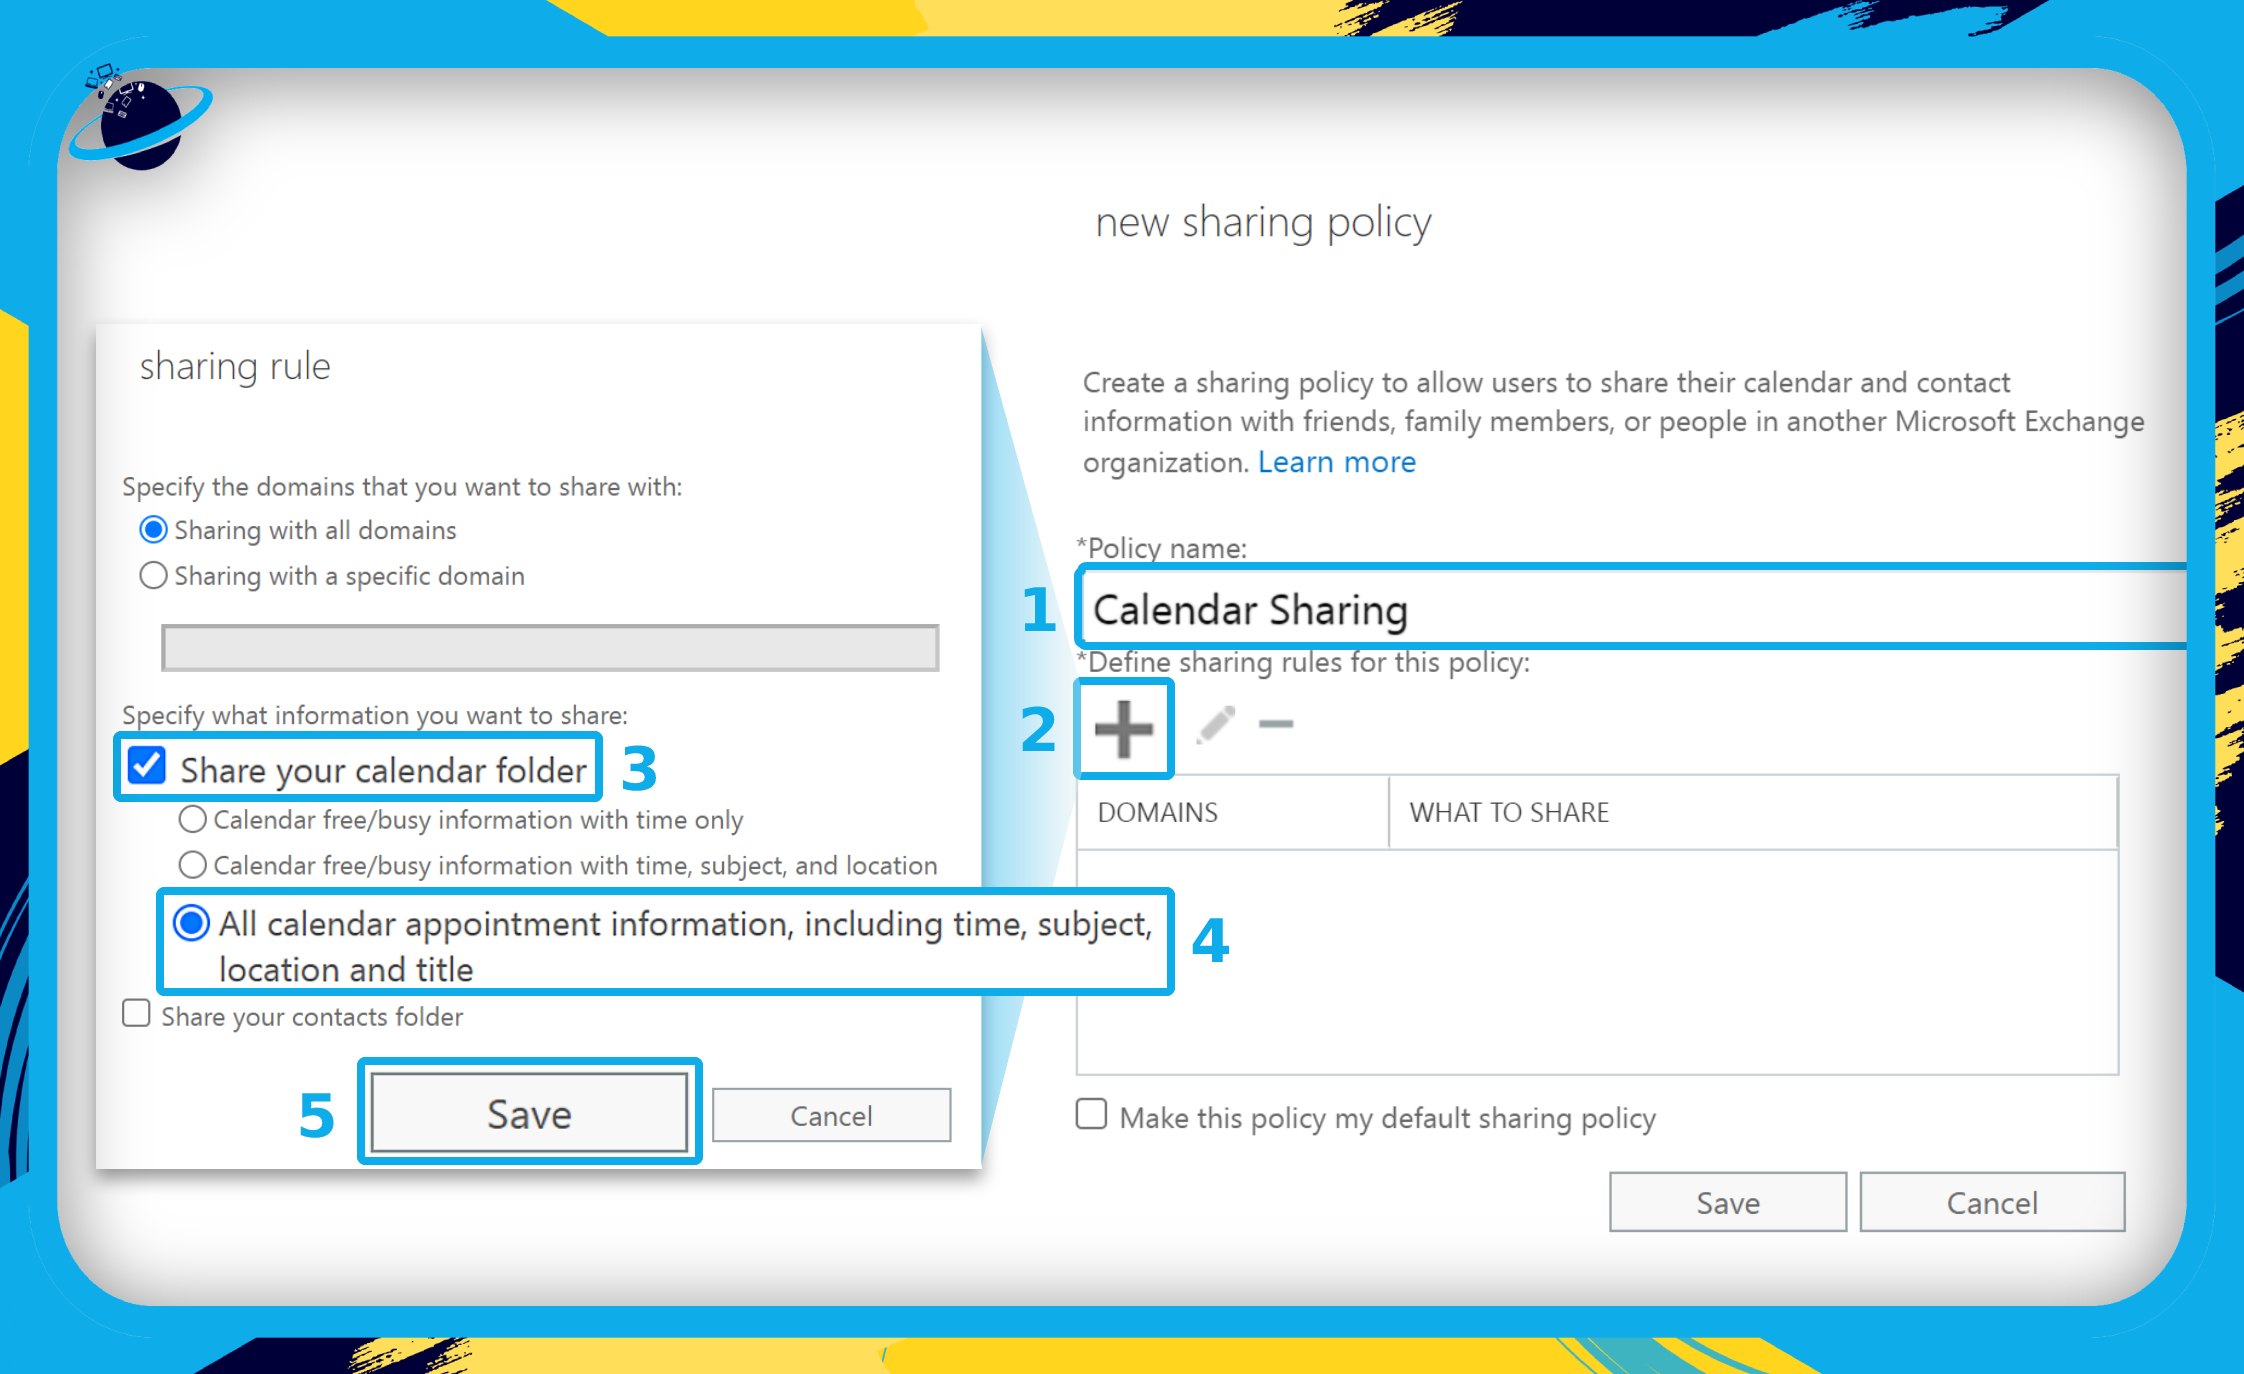
- Enter a “Policy name” in the text box that describes your new policy. (1)
- Click the plus icon to define sharing rules. (2)
- Check the box next to “Share your calendar folder.” (3)
- Select your preferred sharing option. (4)
- Then click the “Save” button. (5)
- Check the box next to “Make this policy my default sharing policy.” (1)
- Finally, click “Save.” (2)
To finish the process, click ![]() “OK,” and the new policy will be created and active.
“OK,” and the new policy will be created and active.
More ways to fix shared calendar information in Outlook
This section of the guide will look at different ways to fix and facilitate calendar sharing in Outlook. The methods include sharing the calendar events that are added to your calendar from email and sharing calendars with specific people using unique policies.
Unmark calendar events as private
Microsoft Outlook can automatically add events from your inbox mail to your calendar, and you can choose to share your events or make them private. Please follow the steps below to do that.
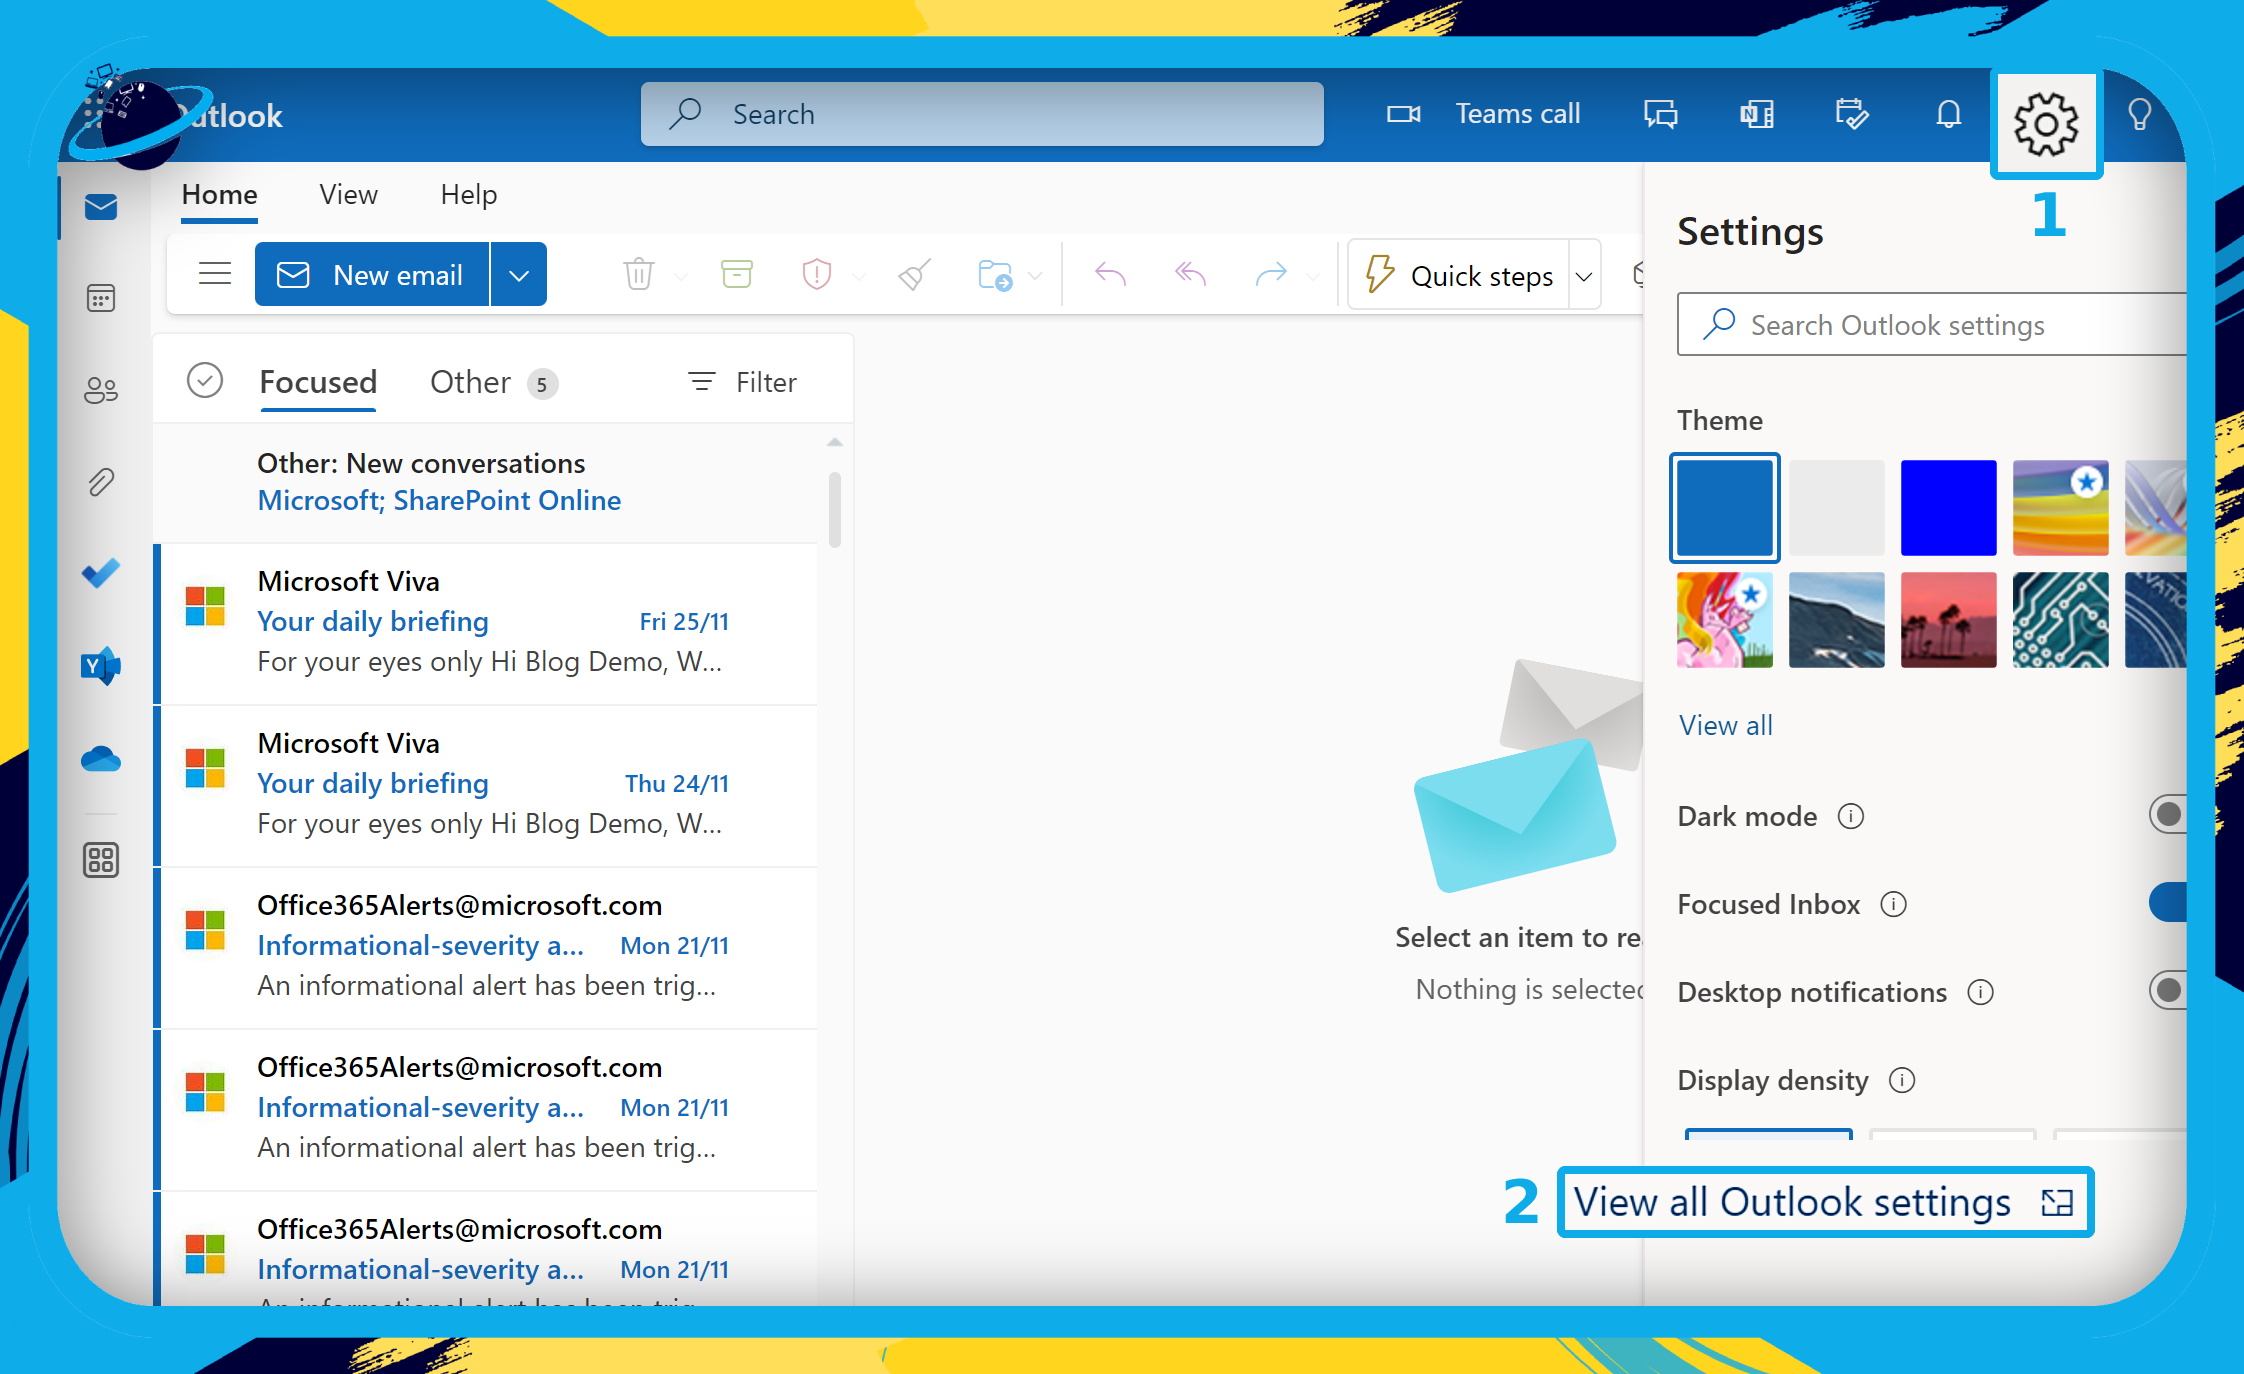
- First, sign into your Microsoft Outlook account.
- Click on the gear icon in the top right corner. (1)
- Then click “View all Outlook settings” at the bottom of the “Settings” navigation pane. (2)
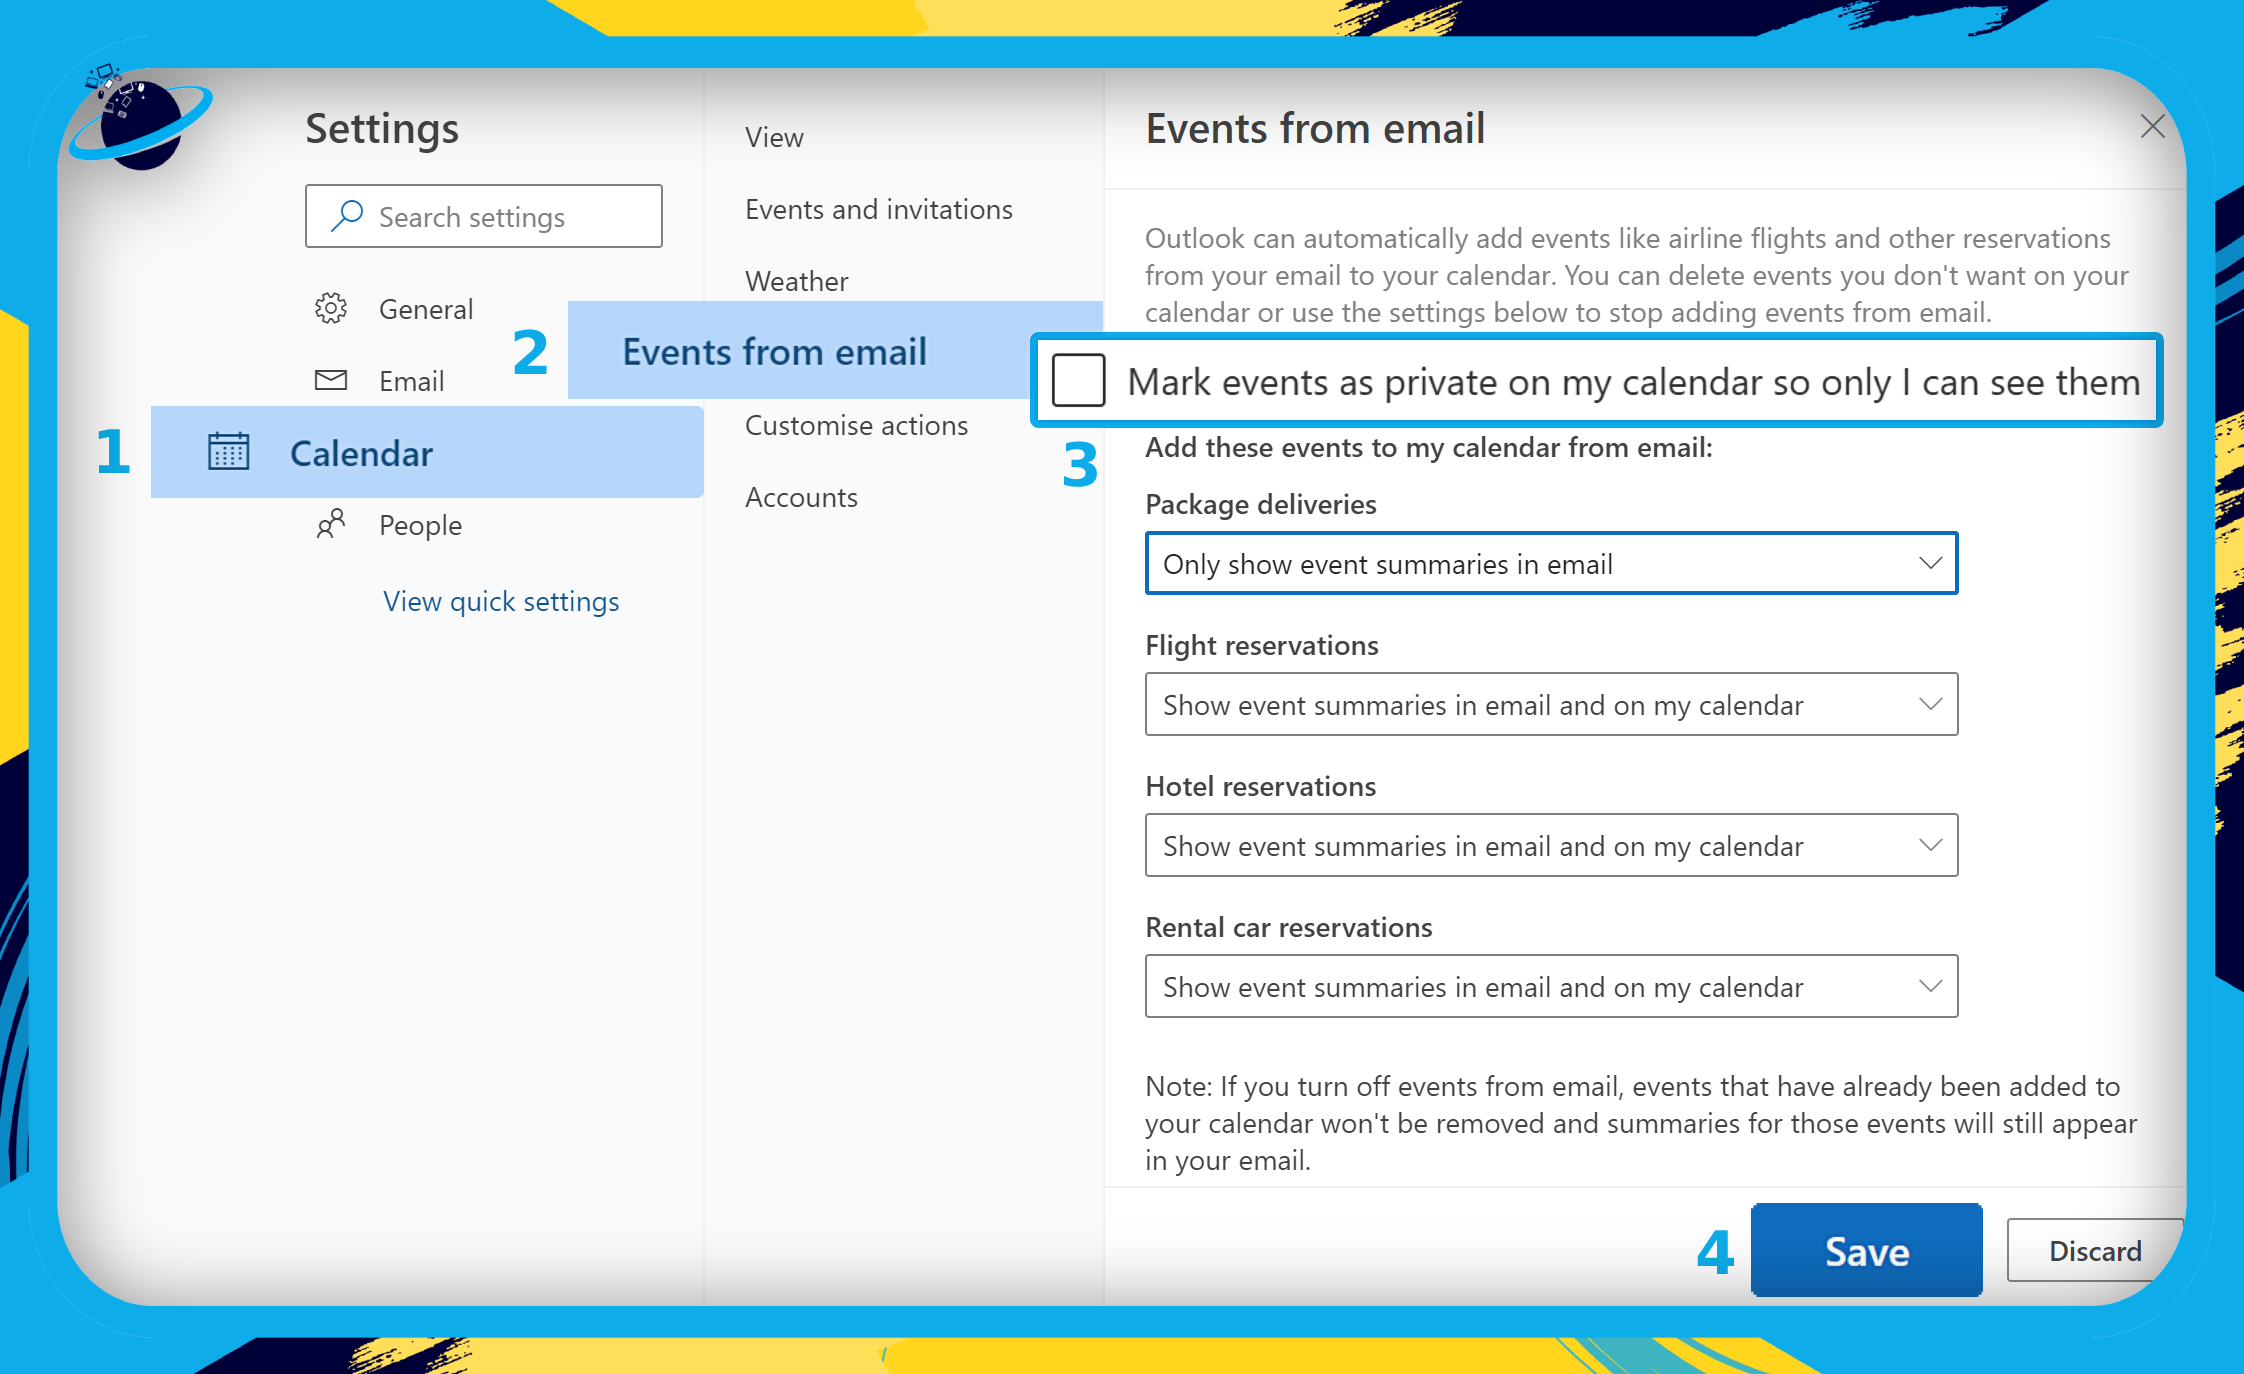
- Click on “Calendar” to view more calendar options in the settings menu. (1)
- Click on “Events from email.” (2)
- Uncheck the box next to “Mark events as private on my calendar…” (3)
- Then click “Save.” (4)
Share calendars with specific people using unique permissions
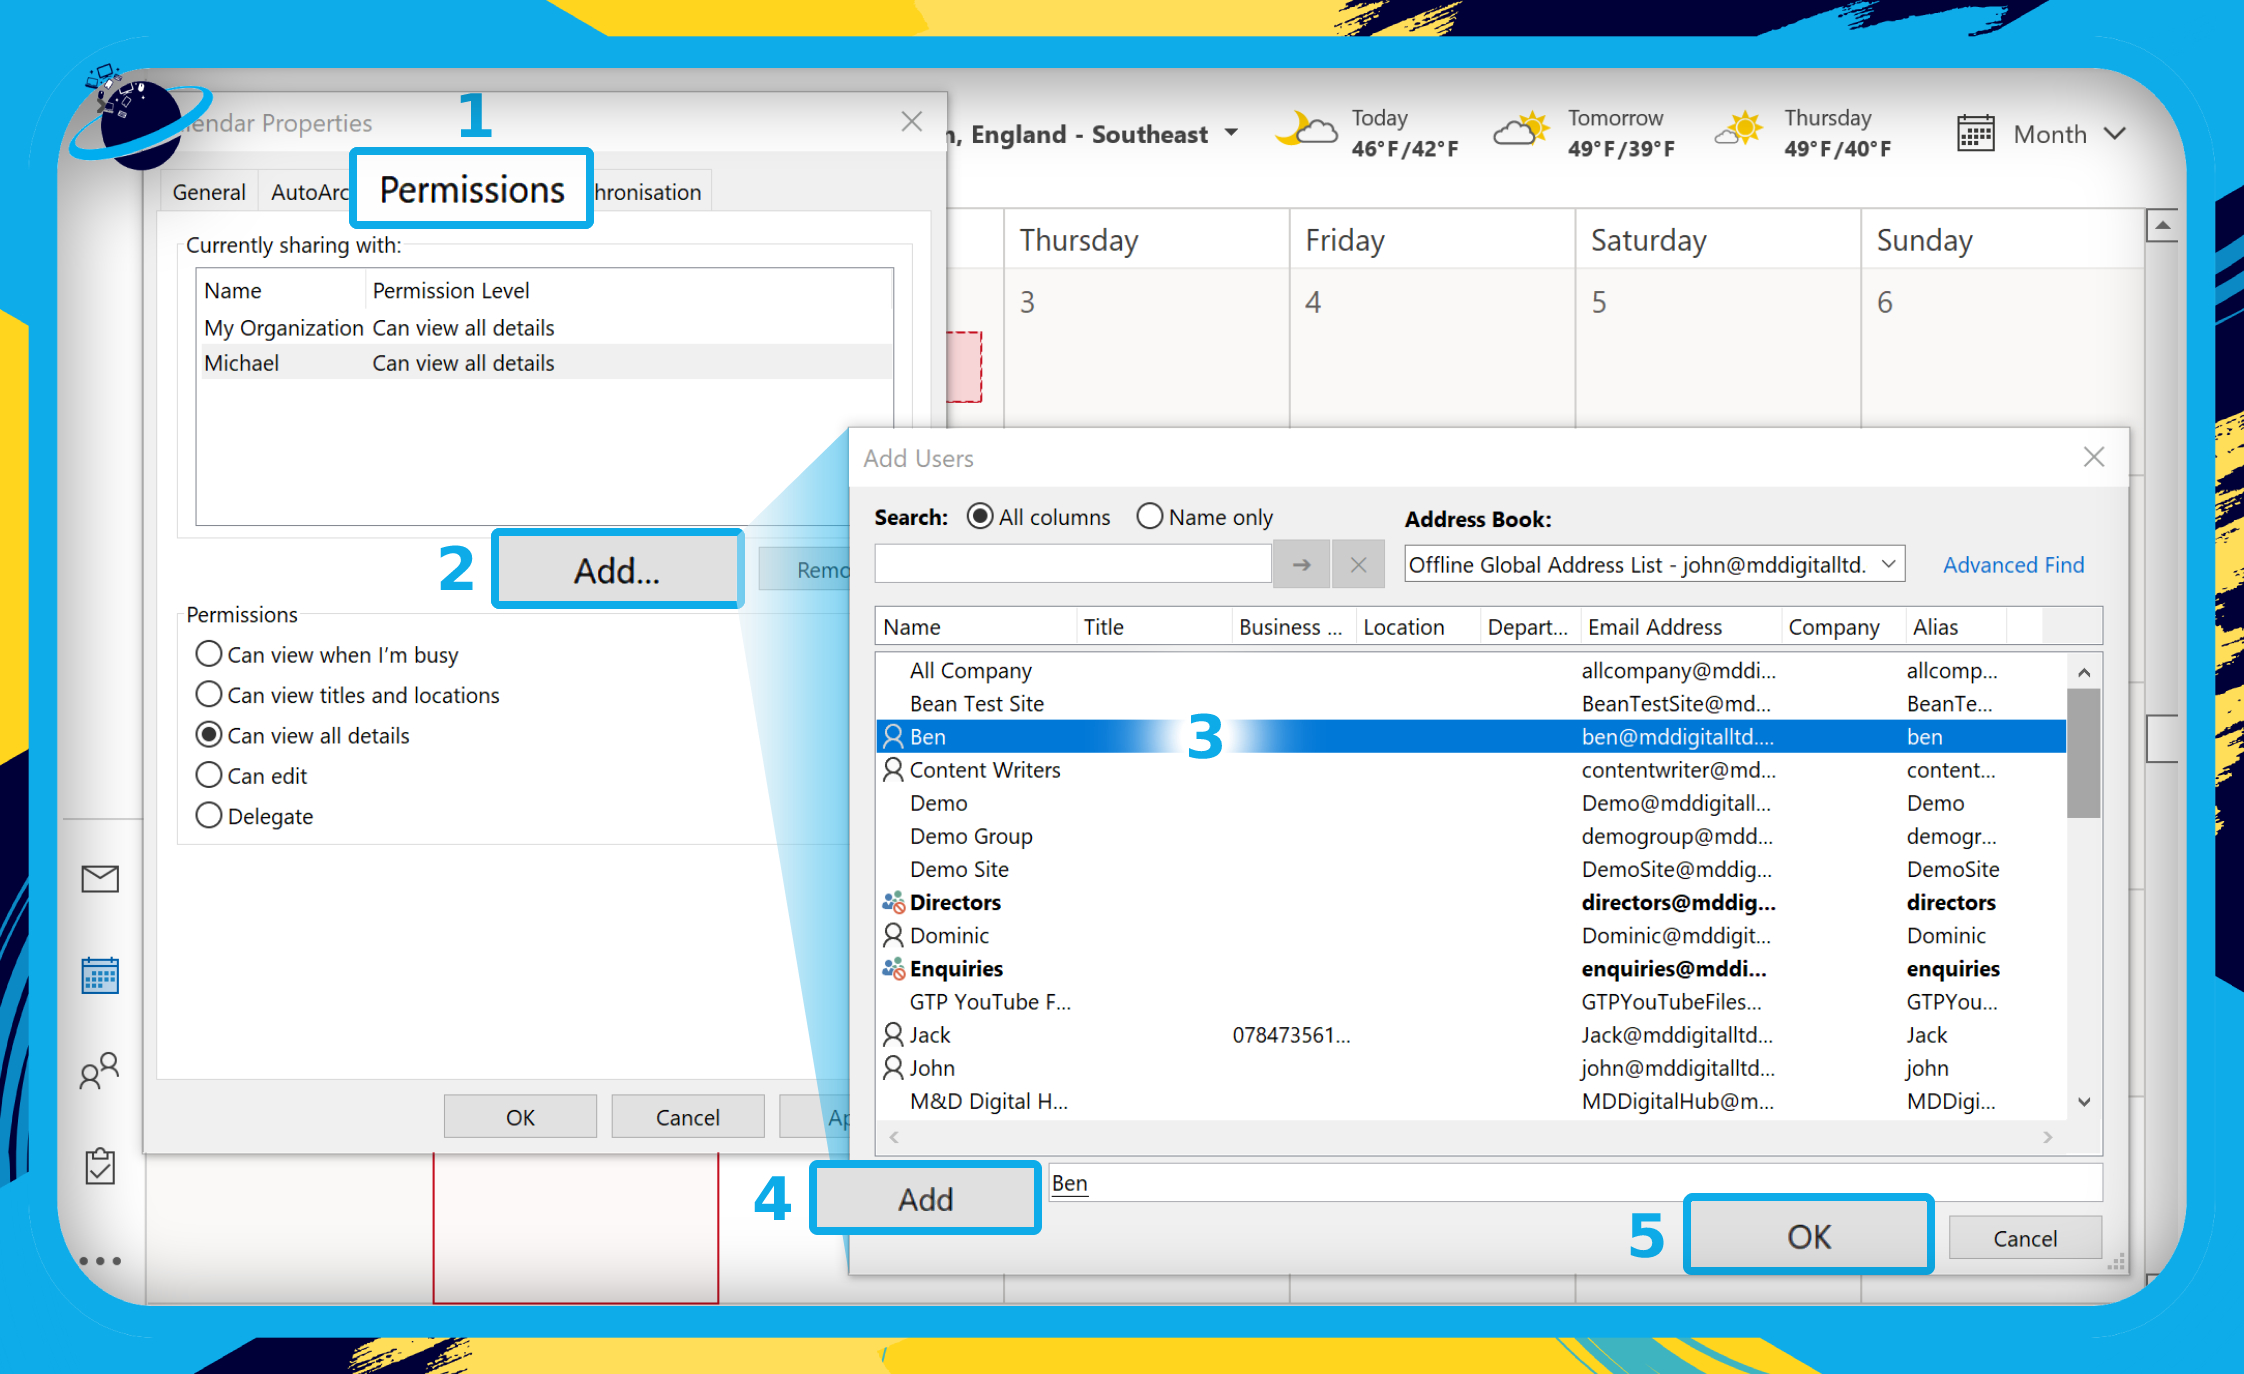
If you want Ben to view full details but Michael to see only the subject and location, you can do that by granting unique permissions in the desktop version of Outlook.
- First, open your Outlook desktop application.
- Click the calendar icon on the left menu. (1)
- Go to the “Folder” tab in the top menu. (2)
- Click “Calendar Properties.” (3)
- Alternatively, click on “Share Calendar” and choose your calendar.

- When the “Calendar Properties” dialog box opens, click the “Permissions” tab. (1)
- Click the “Add…” button. (2)
- The “Add Users” dialog box will open.
- Select a group or user to share your calendar with. (3)
- You can add multiple groups and users.
- Click the “Add” button. (4)
- Then click “OK.” (5)
- Select the user or group to set permissions for. (1)
- Choose the appropriate sharing permission. (2)
- Finally, click the “OK” button. (3)
Frequently Asked Questions (FAQ)
 How do I turn off free busy in Outlook?
- Open your Outlook desktop app.
- Click the calendar icon on the left menu.
- Click on “Folder” in the top menu.
- Click on “Calendar properties.”
- Go to the “Permissions” tab.
Turn off free/busy in Outlook for your organization:
- Select your organization.
- Set the sharing permission to “None.”
- Click “OK.”
Turn off free/busy in Outlook for individuals:
- Select the group or individual.
- Click the “Remove” button.
- Click “OK.”
What is the difference between shared and group calendars?
Shared calendars are owned by individuals and have been shared with other users. A group calendar is not owned by any single user but is stored in a public folder on the Exchange server and is accessible to those who are members of the group.

Conclusion
If you can only see “Free” or “Busy” information in another user’s calendar, they must grant you additional permissions. Alternatively, the admins of their organization must allow external users to view full details.
If other users can only see Free/Busy information in your calendar, you can upgrade their permissions to “Full details.” If that option is unavailable, your admins must allow full detail sharing in the Admin Center and/or Exchange Admin Center.
Thank you for reading.