Including transcription in your Teams meetings can be beneficial for many different reasons. The most common reason is that the Microsoft Teams transcription feature can be helpful to users with hearing impairments. That is because the transcription feature provides on-screen text, so you can read what is being said in the meeting.
The written text appears like a script in a column along the right-hand side of the screen. This allows attendees to see who is speaking while also showing them what the speaker is saying.
How to use live transcribing in Teams:
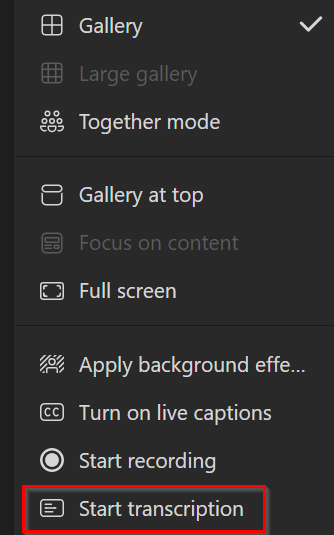
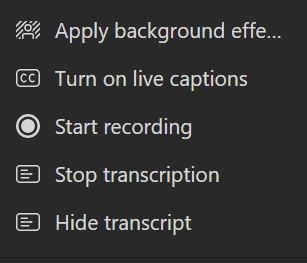
- From the top panel, click on the three dots.
- Select ‘Start transcription.’
- Select which language is being spoken in the meeting.
- If it applies to you, check the box to make this your default language for transcription.
- Click on ‘Confirm.’
- To stop or hide the transcript, select ‘Stop transcription’ or ‘Hide transcript.’
- To download the transcript, click on the chat for the meeting
- Select the three dots.
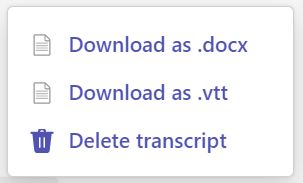
- Click on ‘Download as .docx.’
We’ve created a video that walks you through enabling live transcription, using it, and how you can download a copy following the meeting. You can watch it here:
This blog post will cover the following:
- Why is live transcription important?
- This difference between live transcription and live captions
- How to enable transcription for your organization
- How to turn on live transcription
- Conclusion
Why is live transcription important?
As part of Microsoft’s efforts to need the needs of hybrid work environments, they have created a feature for Microsoft Teams that allows live transcription in 28 different languages. This feature takes the voice data of your meeting and translates it into text that people can follow along. As explained previously, the text appears like a script in a column along the right-hand side of the screen. It also includes the name of the person speaking (as long as they haven’t turned this setting off), their speech, and a time stamp to track the time.
It’s good for recording and reusing the content of a meeting
One of the most valuable features of live transcription on Teams is that you can view and download the complete transcript once the meeting has finished. That makes it an excellent tool for managers who may want to repurpose the transcript later. It’s also a great tool to use if some colleagues don’t have flexible hours. If anyone needs to leave the meeting early or can’t attend, they can be sent the transcription to look over. This means they can catch up with the meeting and understand everything that was discussed in their own time.
It’s good for participants with hearing impairments or those who speak a foreign language
Another great feature is that it’s excellent for participants whose first language may not be the one being used in the meeting. That’s because it can be easier to follow along with written text if you are not completely fluent in a language. It’s also great for participants with impaired hearing and anyone who finds it easier to follow the on-screen text.

The difference between live transcription and live captions
As explained in the section above, turning on live transcriptions converts the speech from the meeting into on-screen text. You can view the text on the right-hand side of the screen, where the speaker’s name and a time stamp are displayed. You can also access and download the transcript after the meeting has ended.
Live captions are slightly different, as they are more like subtitles while watching a movie, where the text is displayed at the bottom of the screen. Captions won’t include the speaker’s name or the time stamp, and you can’t access or download them at the end of the meeting. That is why most organizations prefer to use live transcriptions instead. However, live captions can also be great as attendees can turn them on or off, unlike live transcriptions, which all participants can see.
How to enable live transcription for your organization
Before you turn on Live transcription during your Teams meetings, you must ensure this feature has enabled your organization. Follow the steps below to do this.
- First, go to your Teams Admin Center.
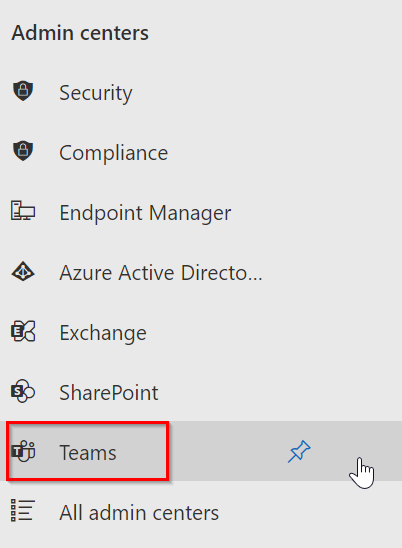
Sign in to Office.com and go to the ‘Admin‘ Center. Then, click on ‘Teams‘ or ‘Show All‘ > ‘Teams.’
- Click on ‘Meetings.’
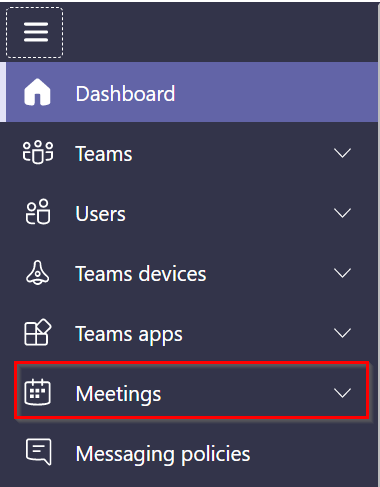
Go to ‘Meetings‘ from the options on the left-hand side.
- Select ‘Meeting policies.’
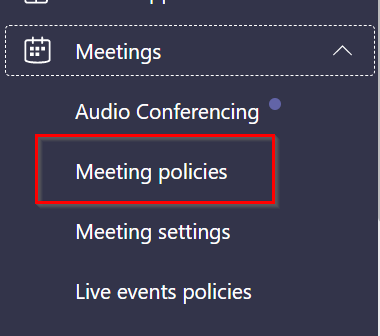
When the drop-down options appear, select ‘Meeting policies.’
- Click on ‘Global (Org-wide default).’
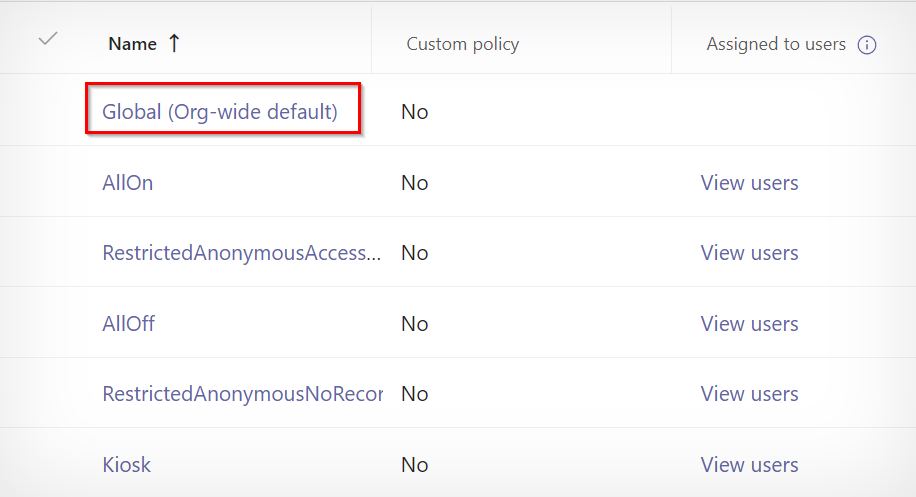
A list of your organization’s policies will appear. Click on ‘Global (Org-wide default).’
- Turn ‘Transcription‘ on.
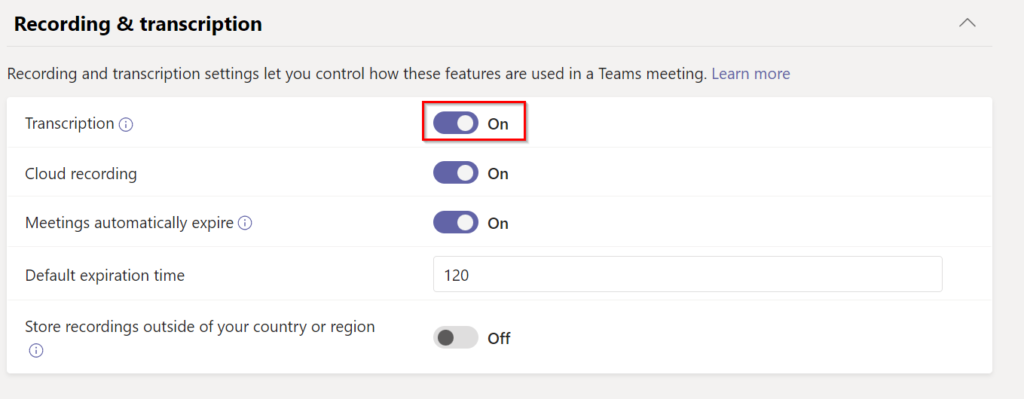
Scroll down to the Recording and transcription section and turn on the option for ‘Transcription.’
- To enable transcription for specific users, click on ‘+ Add‘ under ‘Meeting policies.’
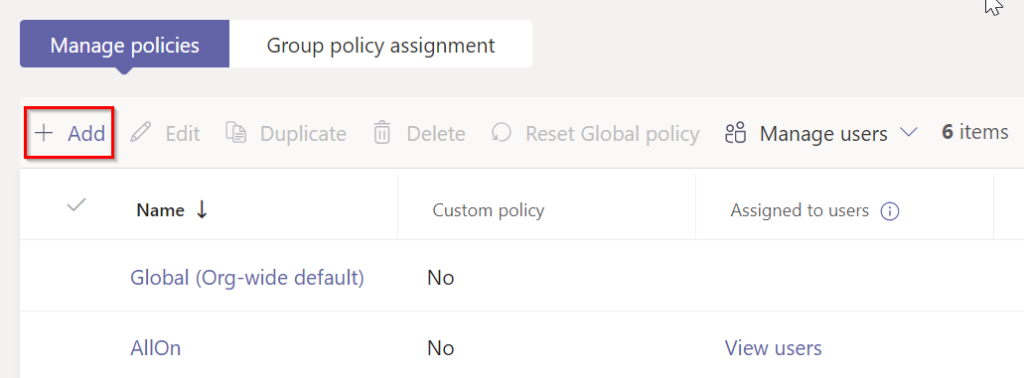
Alternatively, if you would like to enable selected users to have transcription on Teams, you can create a new policy by clicking on ‘+ Add‘ under ‘Meeting policies.’
- Name the policy and save it.
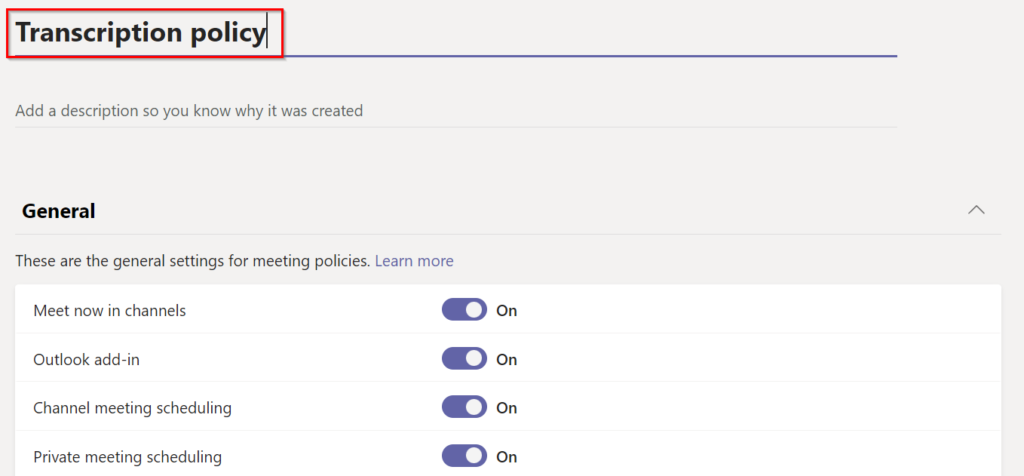
Give the policy a name, and again, turn on the transcription. Then scroll to the bottom of the page and click on ‘Save.’
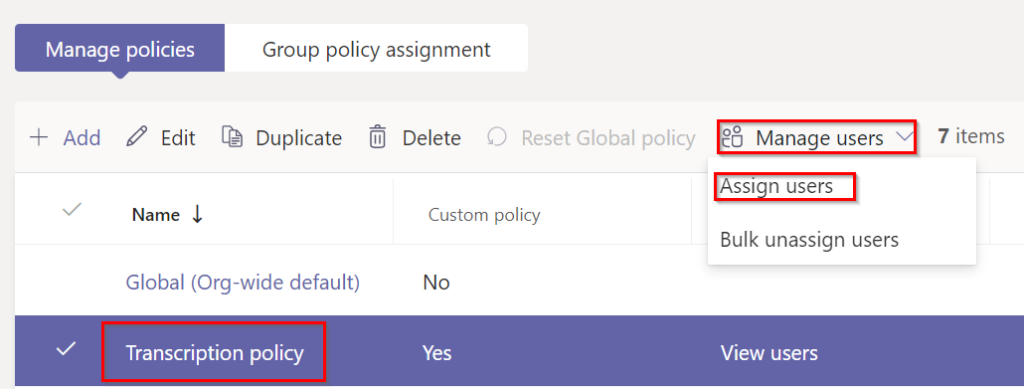
- Click on the policy, select ‘Manage users,’ then ‘Assign users.’
To assign the Transcription policy to users:
- Click on the policy.
- Click on ‘Manage users‘ from the options at the top.
- Select ‘Assign users‘ and add users to the policy before clicking on ‘Save.’
How to turn on live transcription
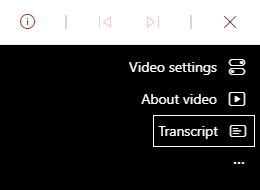
- From the top panel, click on the three dots or ‘More.’

From the panel at the top of the page, click on the three dots to see more options.
- Select ‘Start transcription.’
When the drop-down list appears, click on the option to ‘Start transcription.’
- Select which language is being spoken in the meeting.
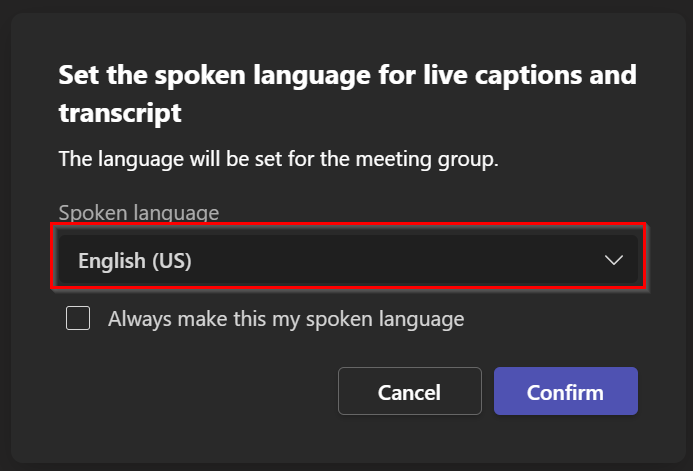
Choose the language spoken in the meeting by clicking on the down arrow and selecting the appropriate language.
- If it applies to you, check the box to always make this your language for transcription.
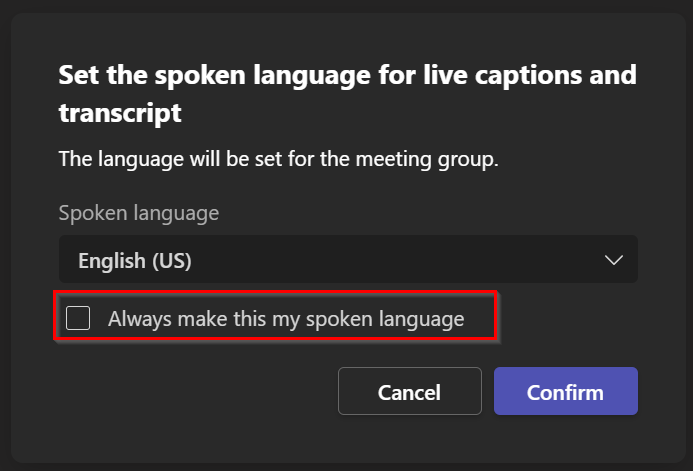
If you want to have the settings keep this language as your spoken language, click inside the small box. If not, you can skip this step.
- Click on ‘Confirm.’
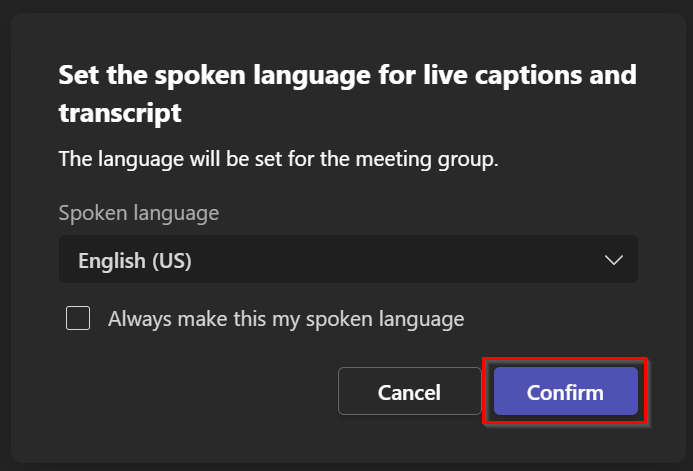
Click on the purple button to ‘Confirm‘ the changes you have made. You will then see the transcription appear on the right-hand side of the screen.
- To stop or hide the transcript, select ‘Stop transcription‘ or ‘Hide transcript.’
If you want to hide or stop the transcription, click on the three dots at the top of the screen again and select ‘Stop transcription‘ or ‘Hide transcript.’
- To download the transcript, click on the chat for the meeting.

How to access the meeting transcript
- Select the three dots.
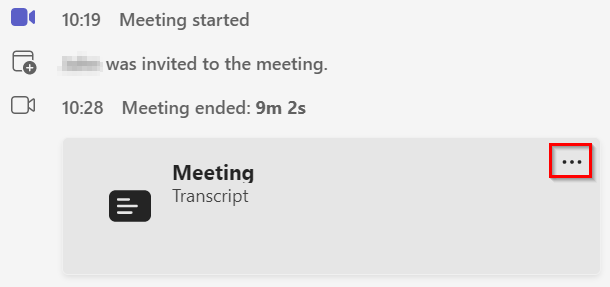
Then click on the three dots in the corner of the transcript file.
- Click on ‘Download as .docx.’
How to download the live transcript from your Teams meeting
Transcription refers to the act of transcribing, wherein one might record (in writing) a copy of (typically) spoken material. Microsoft Teams generates transcriptions using AI— producing a typewritten digital copy. Fortunately, that saves us some trouble.
Modern forms of artificial intelligence are visibly imperfect and still susceptible to errors and mistakes. As a result, you may find that you’re either accurately or inaccurately transcribed, depending on your voice, accent, and volume.
- First, Open your recording
Once the meeting concludes, you’ll find your recording uploading (or uploaded) to the channel you used. You will need to wait until the video has finished uploading— this could take some time. After the file uploads, select it. The video will likely open in your web browser.
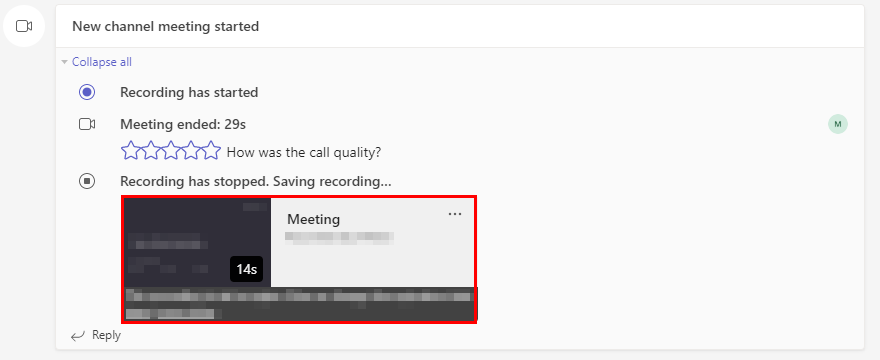
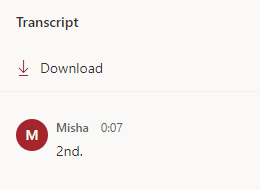
- Click “Transcript” and select “Download.”
Click the play button to start the recording. You can spot four buttons in the top right when hovering over the recording. Find and select the button labeled “Transcript.” A side panel will appear. Via the said panel, select “Download.”
Things I should know
Transcription relies on the audio you transmit, so if you mute yourself, transcription won’t acknowledge anything you say. Likewise, Microsoft Teams will not transcribe attendees if a meeting organizer prohibits microphone input from them. Additionally, while you can transcribe a meeting without recording it, you can’t download the transcription unless you recorded the meeting. Lastly, when recording or transcribing a meeting, you are responsible for informing attendees that they will be recorded and transcribed.
Conclusion
The live transcription feature on Teams has many different uses. Not only does it make meetings more accessible for participants with hearing impairments, but it can also be great for anyone who may not be fluent in the language being spoken. It’s also a great way to look back at the meeting, as transcriptions can be saved afterward. This blog post has outlined how to use the Teams transcription feature and download it after the meeting.
Thank you for reading this blog post. If you have any further questions about Microsoft Teams’ live transcript feature, feel free to comment, and we’ll gladly respond.