 Key Takeaways
 A simple way to grant access to a specific folder in SharePoint is to give someone “Direct access.”
![]() Hover over the folder you want to share.
Hover over the folder you want to share.![]() Click the
Click the ![]() circle button on the left.
circle button on the left.![]() Click the
Click the ![]() “Share” button at the top.
“Share” button at the top.![]() Select “Manage access” from the dropdown list.
Select “Manage access” from the dropdown list.![]() Click the
Click the ![]() plus icon.
plus icon.![]() Then add the user(s) you want to give direct access to.
Then add the user(s) you want to give direct access to.
[More…]
 If you can’t grant access to a folder in SharePoint, admins may have restricted permissions in the sharing policy. Admins can alter the sharing policy by going to “Policies” > “Sharing” in the SharePoint Admin Center. [More…]

If you want to grant access to a specific folder in SharePoint without giving access to the entire site, you must select and share the specific files or folders. This guide will show you how to do that securely and demonstrate the different sharing permissions.
How to give access to a specific folder in SharePoint:
- Open the SharePoint site where the folder is located.
- Click “Documents” or “Site Contents” and locate the folder.
- Click the Share icon next to the folder.
- Choose who to share with, then click “Send.”
We’ve also created a video that walks you through the steps of giving access to a specific folder in SharePoint. You can watch the video here:

Overview: What are SharePoint files and folders, and who can access them?
The files stored on a SharePoint site are typically accessible to anyone with site permissions, but you can also share specific files or folders with people who don’t have site access.
There are different sharing permissions you can grant to users outside your site. For example, you can allow other users to view or edit files. You can also see who has access to your files or folders and withdraw access at any time.
The information below will help you decide which sharing permissions are best for your SharePoint site.
| Can view: What users can do | Can view: What users can’t do |
|---|---|
| Download files and folders (note: files can then be sent) | Modify or delete files and folders |
| Copy files and folders (link only usable by people with existing access — i.e., site members) | Rename files and folders |
| Share files and folders (only sharable with people with existing access — i.e., site members) | Access anything else on the SharePoint site, including the same library |
| Access folders and view items | |
| Can sync folders and files to desktop |
Depending on the type of files you’re storing in the folder you’re sharing, it might concern you that even read-only users can download files and then send them to anyone. However, you can disable the ability to download files from SharePoint if that is a concern.
Please read: ![]() How To Disable Downloading Of Files In SharePoint Document Library for the step-by-step process for preventing the download of files.
How To Disable Downloading Of Files In SharePoint Document Library for the step-by-step process for preventing the download of files.
| Can edit: What users can do | Can edit: What users can’t do |
|---|---|
| Download files and folders (note: files can be sent) | Access anything else on the SharePoint site, including the same library |
| Upload files and create folders | |
| Modify or delete files and folders | |
| Move and copy files and folders | |
| Rename files and folders | |
| Share files and folders (only sharable with people with existing access — i.e., site members) |
 How to give access to a specific folder in SharePoint
This guide assumes that you have files or folders uploaded to a SharePoint site. If not, you will have to upload your files or folders to SharePoint before you can share them with other users. Please follow the instructions below to learn how to share a specific folder in SharePoint.
- First, go to
 Office.com and sign in using your Microsoft credentials.
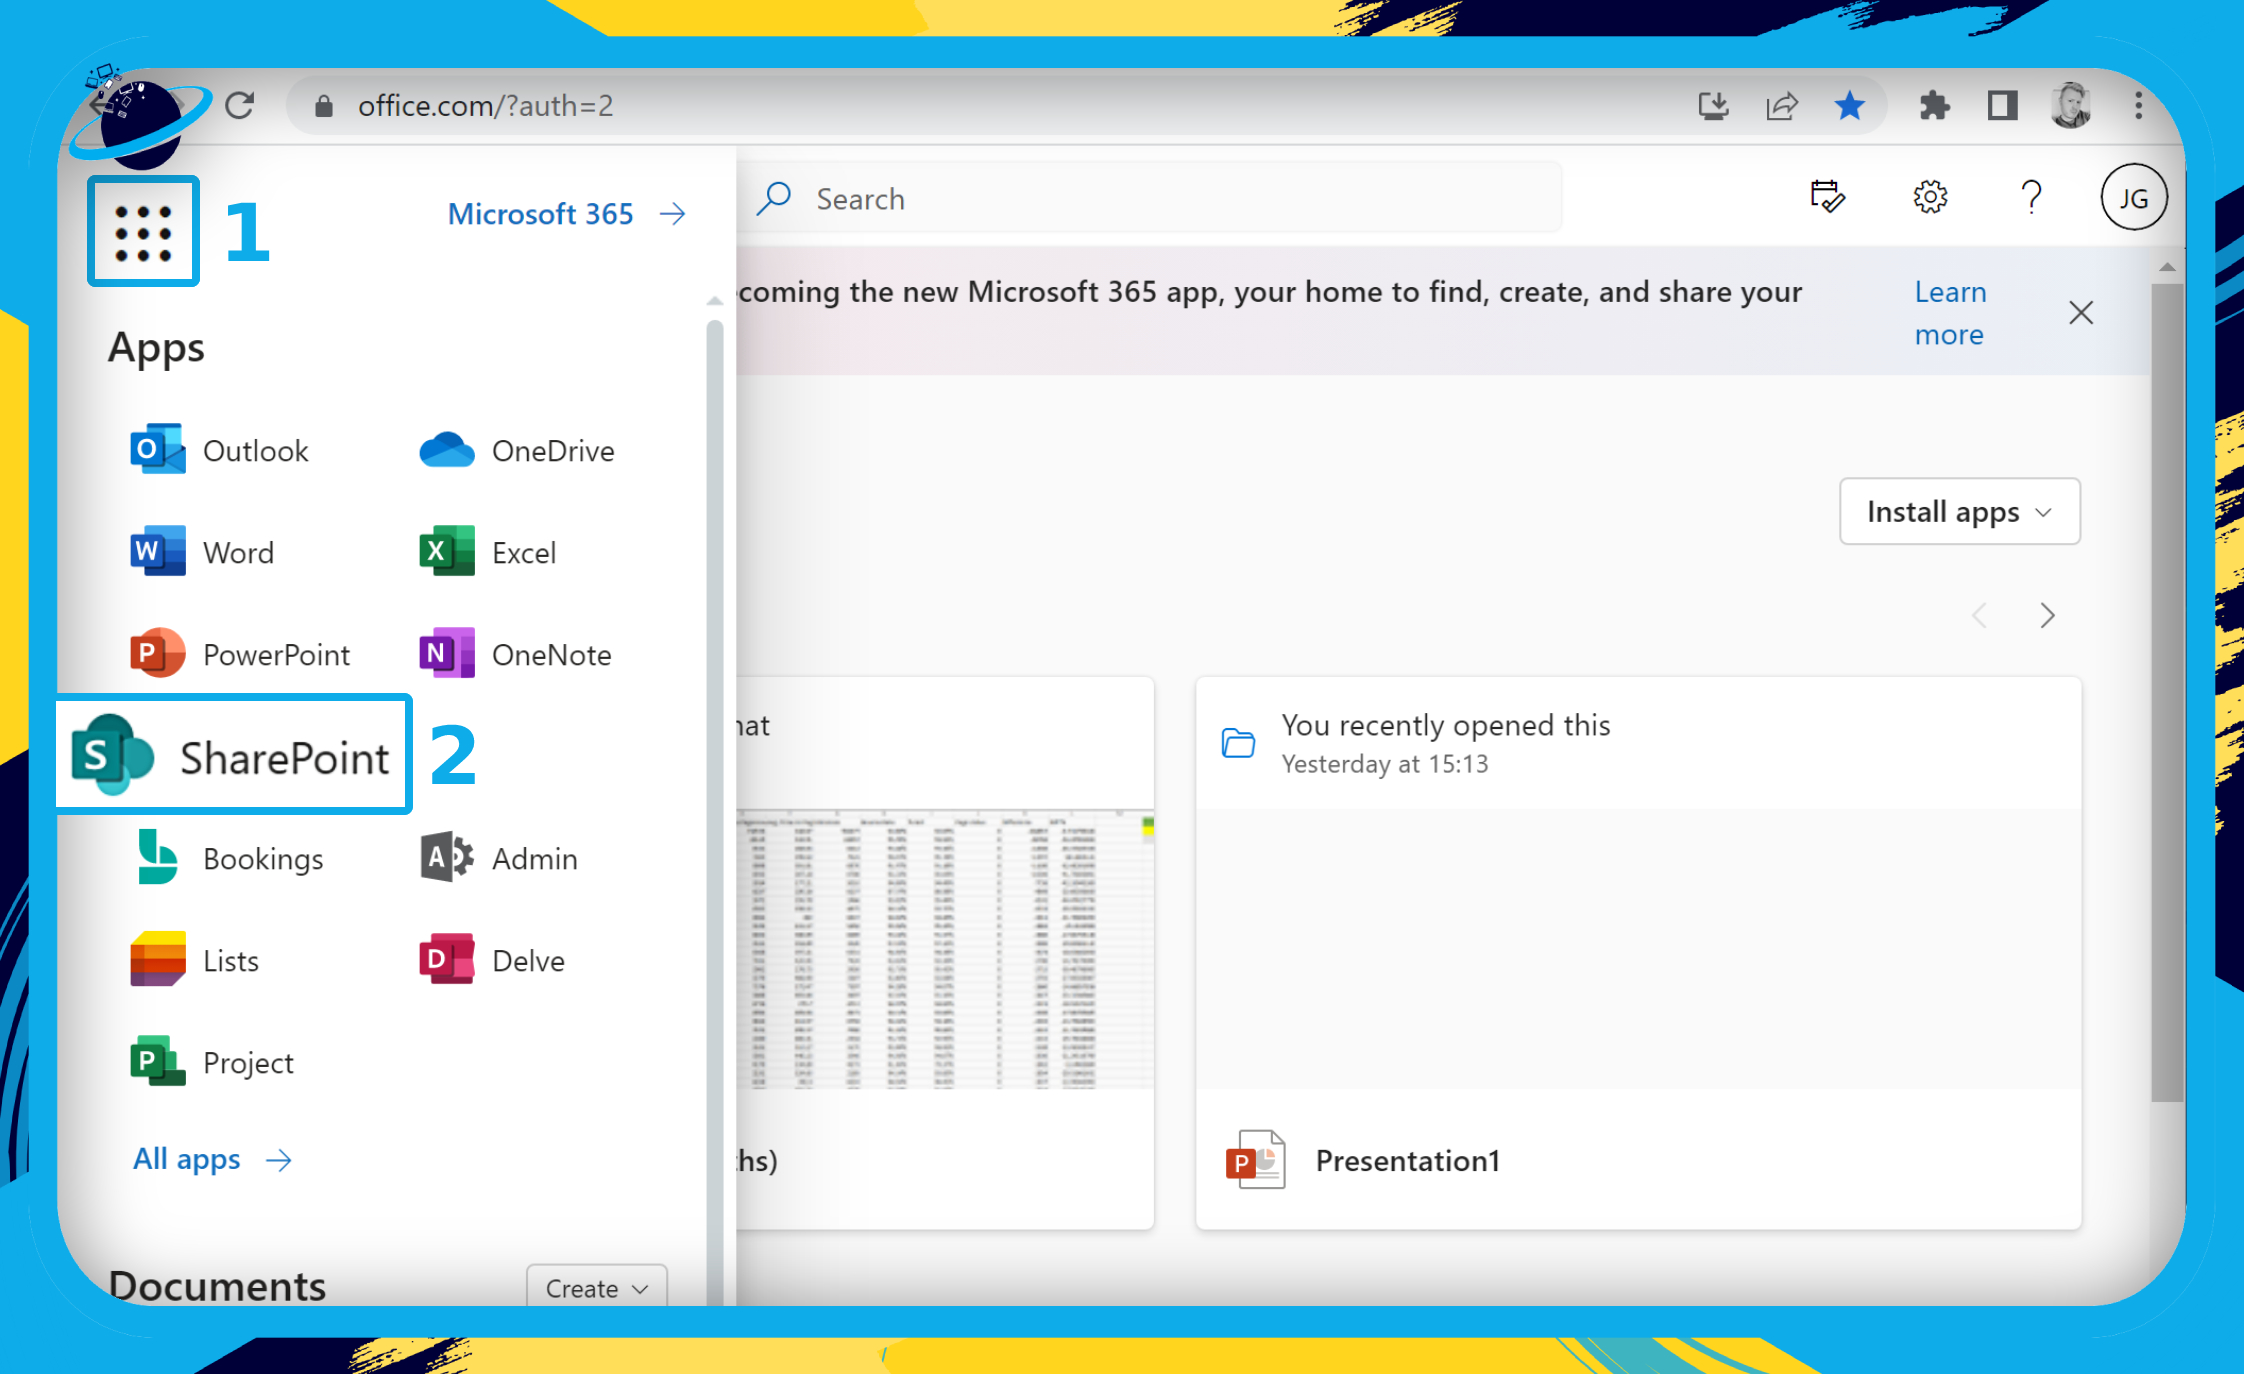
 - Click the
 app launcher in the top left corner.
 - Then select “SharePoint” from the dropdown menu.
- Open the site where your file or folder is located.
- We selected a site named “The Fabled Room.”
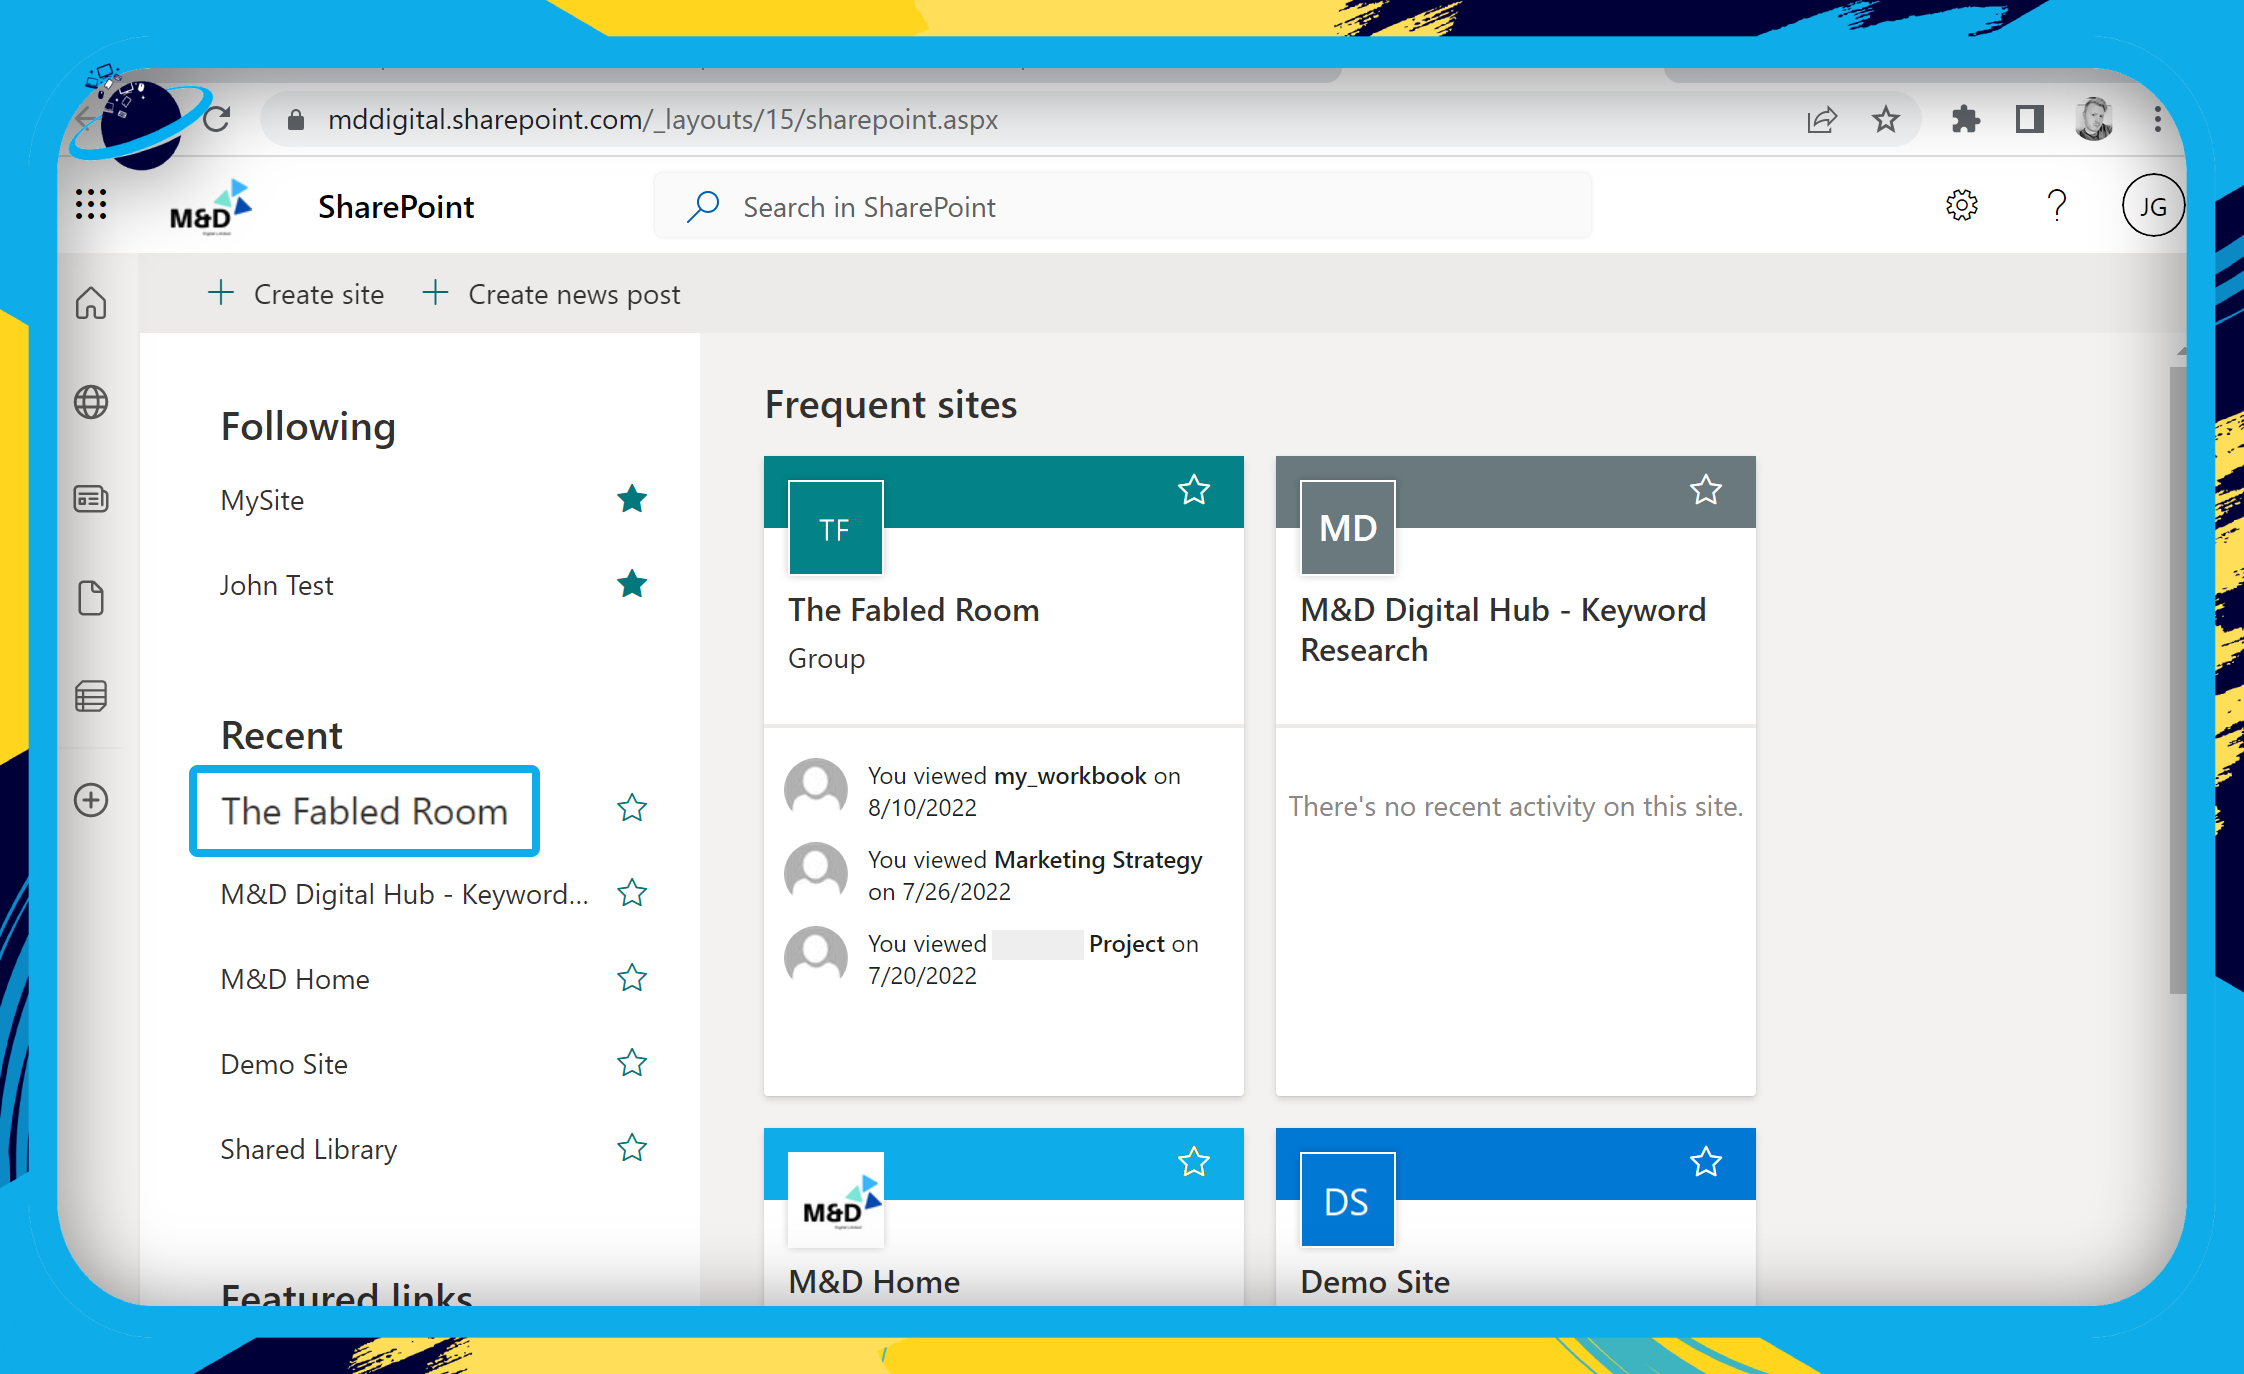
- Go to “Documents” or “Site contents” on the left navigation menu. (1)
- Locate and hover over the folder you want to share and click the circle check box. (2)
- A “Share” button will appear at the top — click the
 Share button. (3)
 - Then select “Manage access” from the dropdown list. (4)

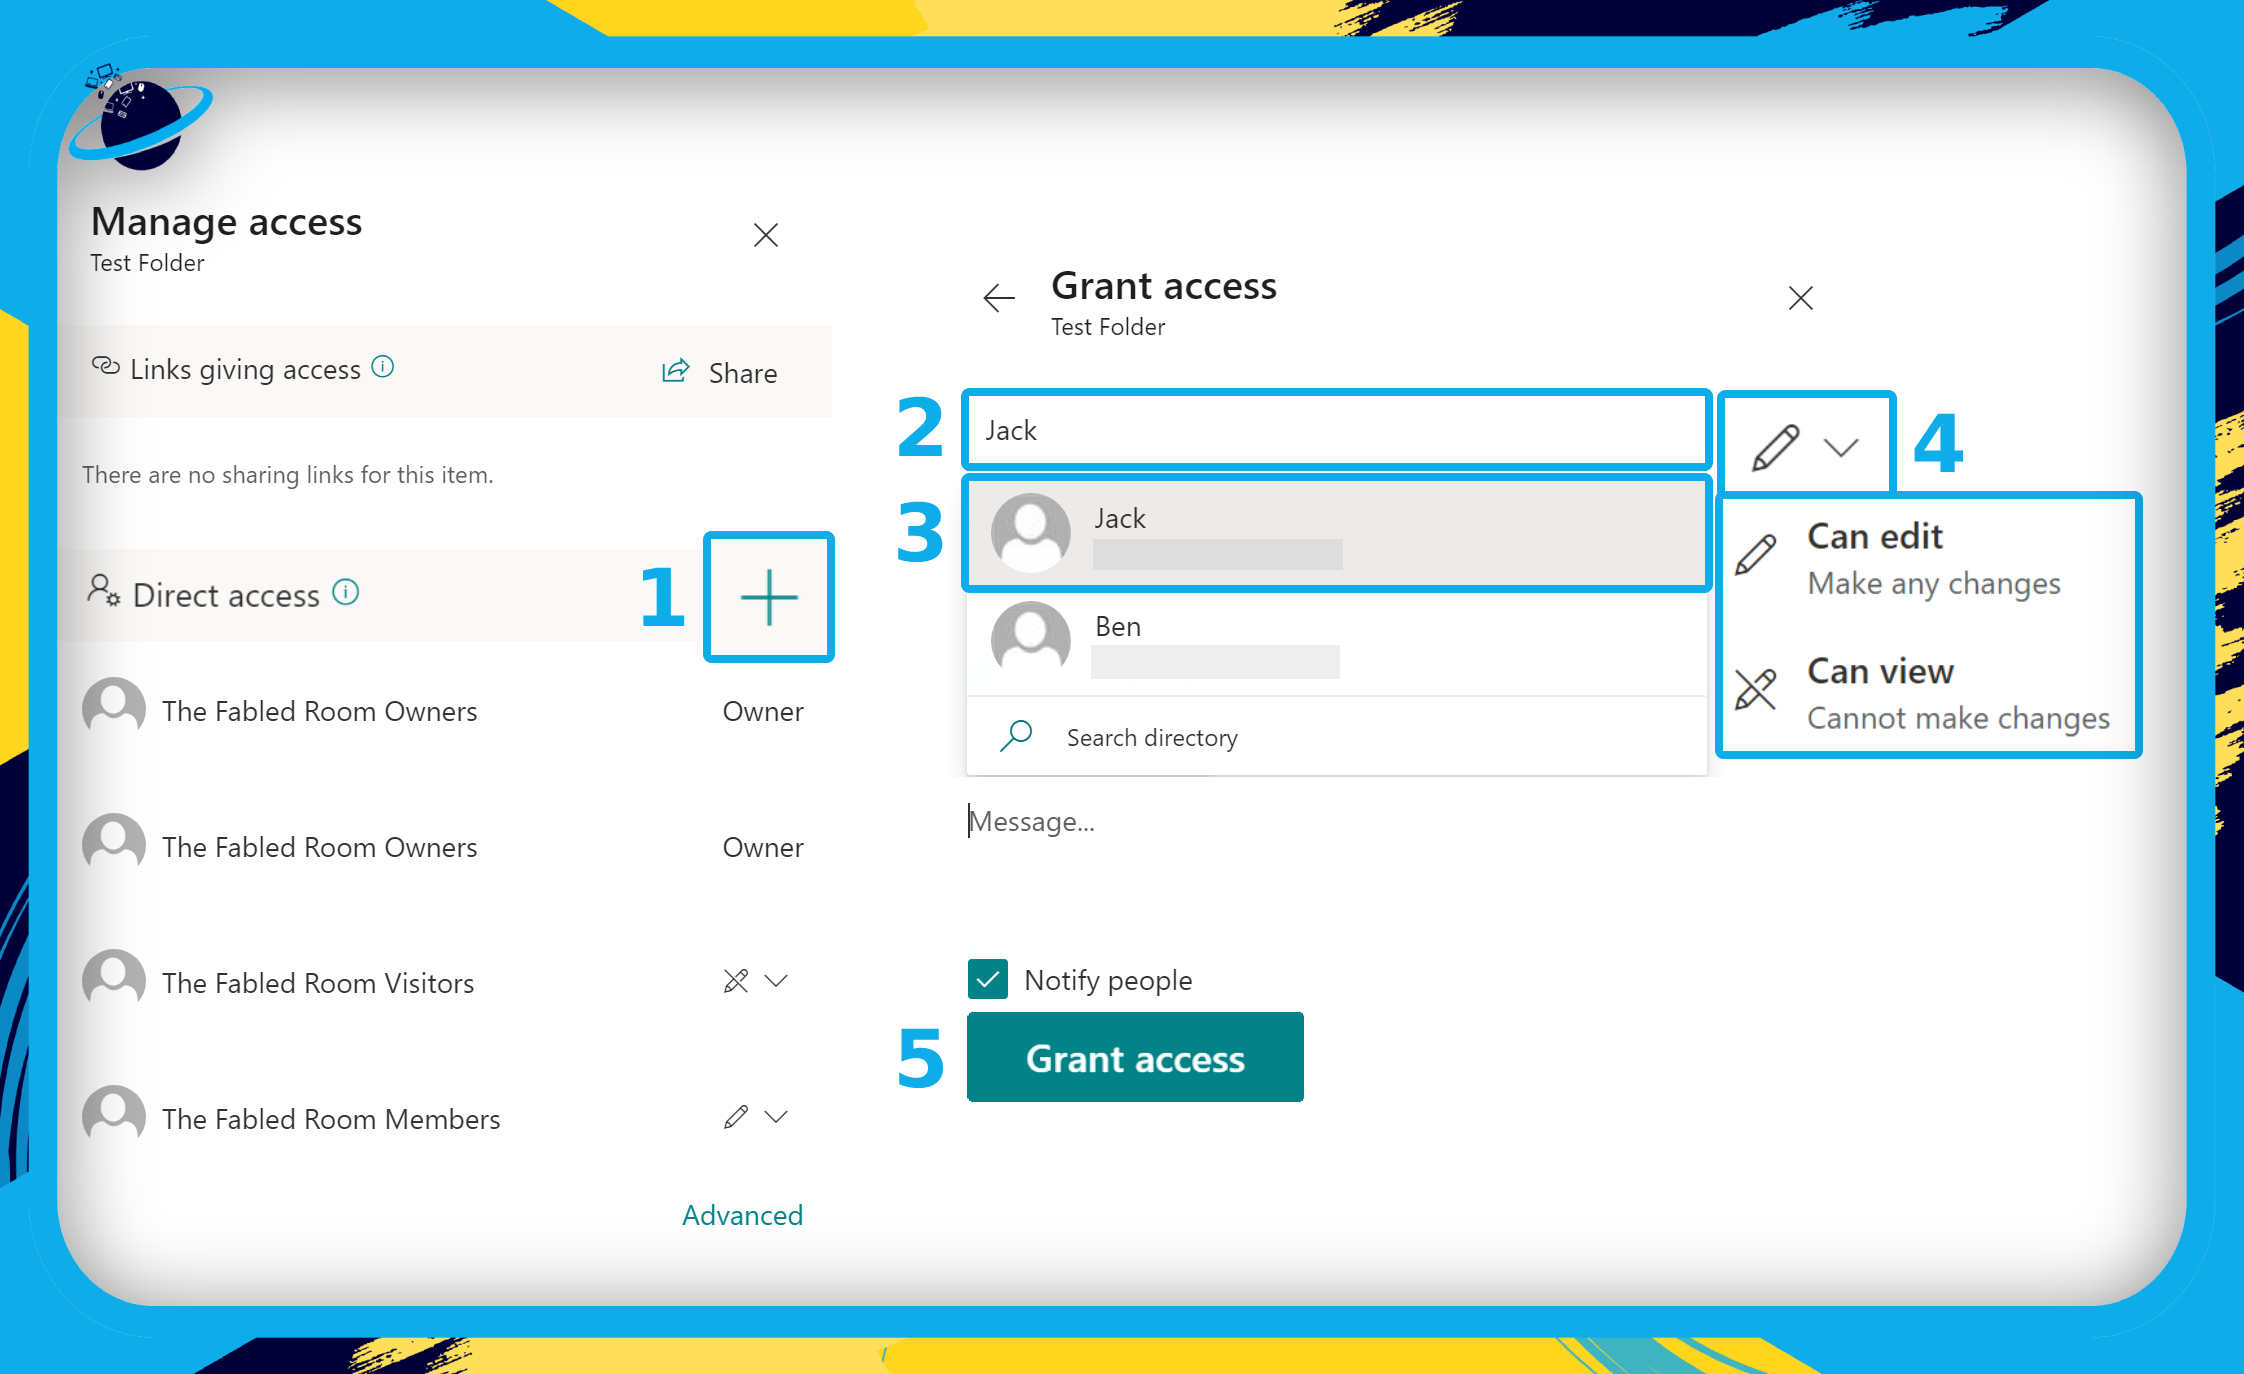
- Click the
 plus icon opposite “Direct access.” (1)
 - Enter the names of the users you want to grant access to. (2)
- Select the name(s) from the dropdown list. (3)
- Click the
 pen icon and select the permission — “Can edit” or “Can view.” (4)
 - Leave an optional message.
- Then click the “Grant access” button. (5)
Remove permissions and stop sharing with specific users in SharePoint
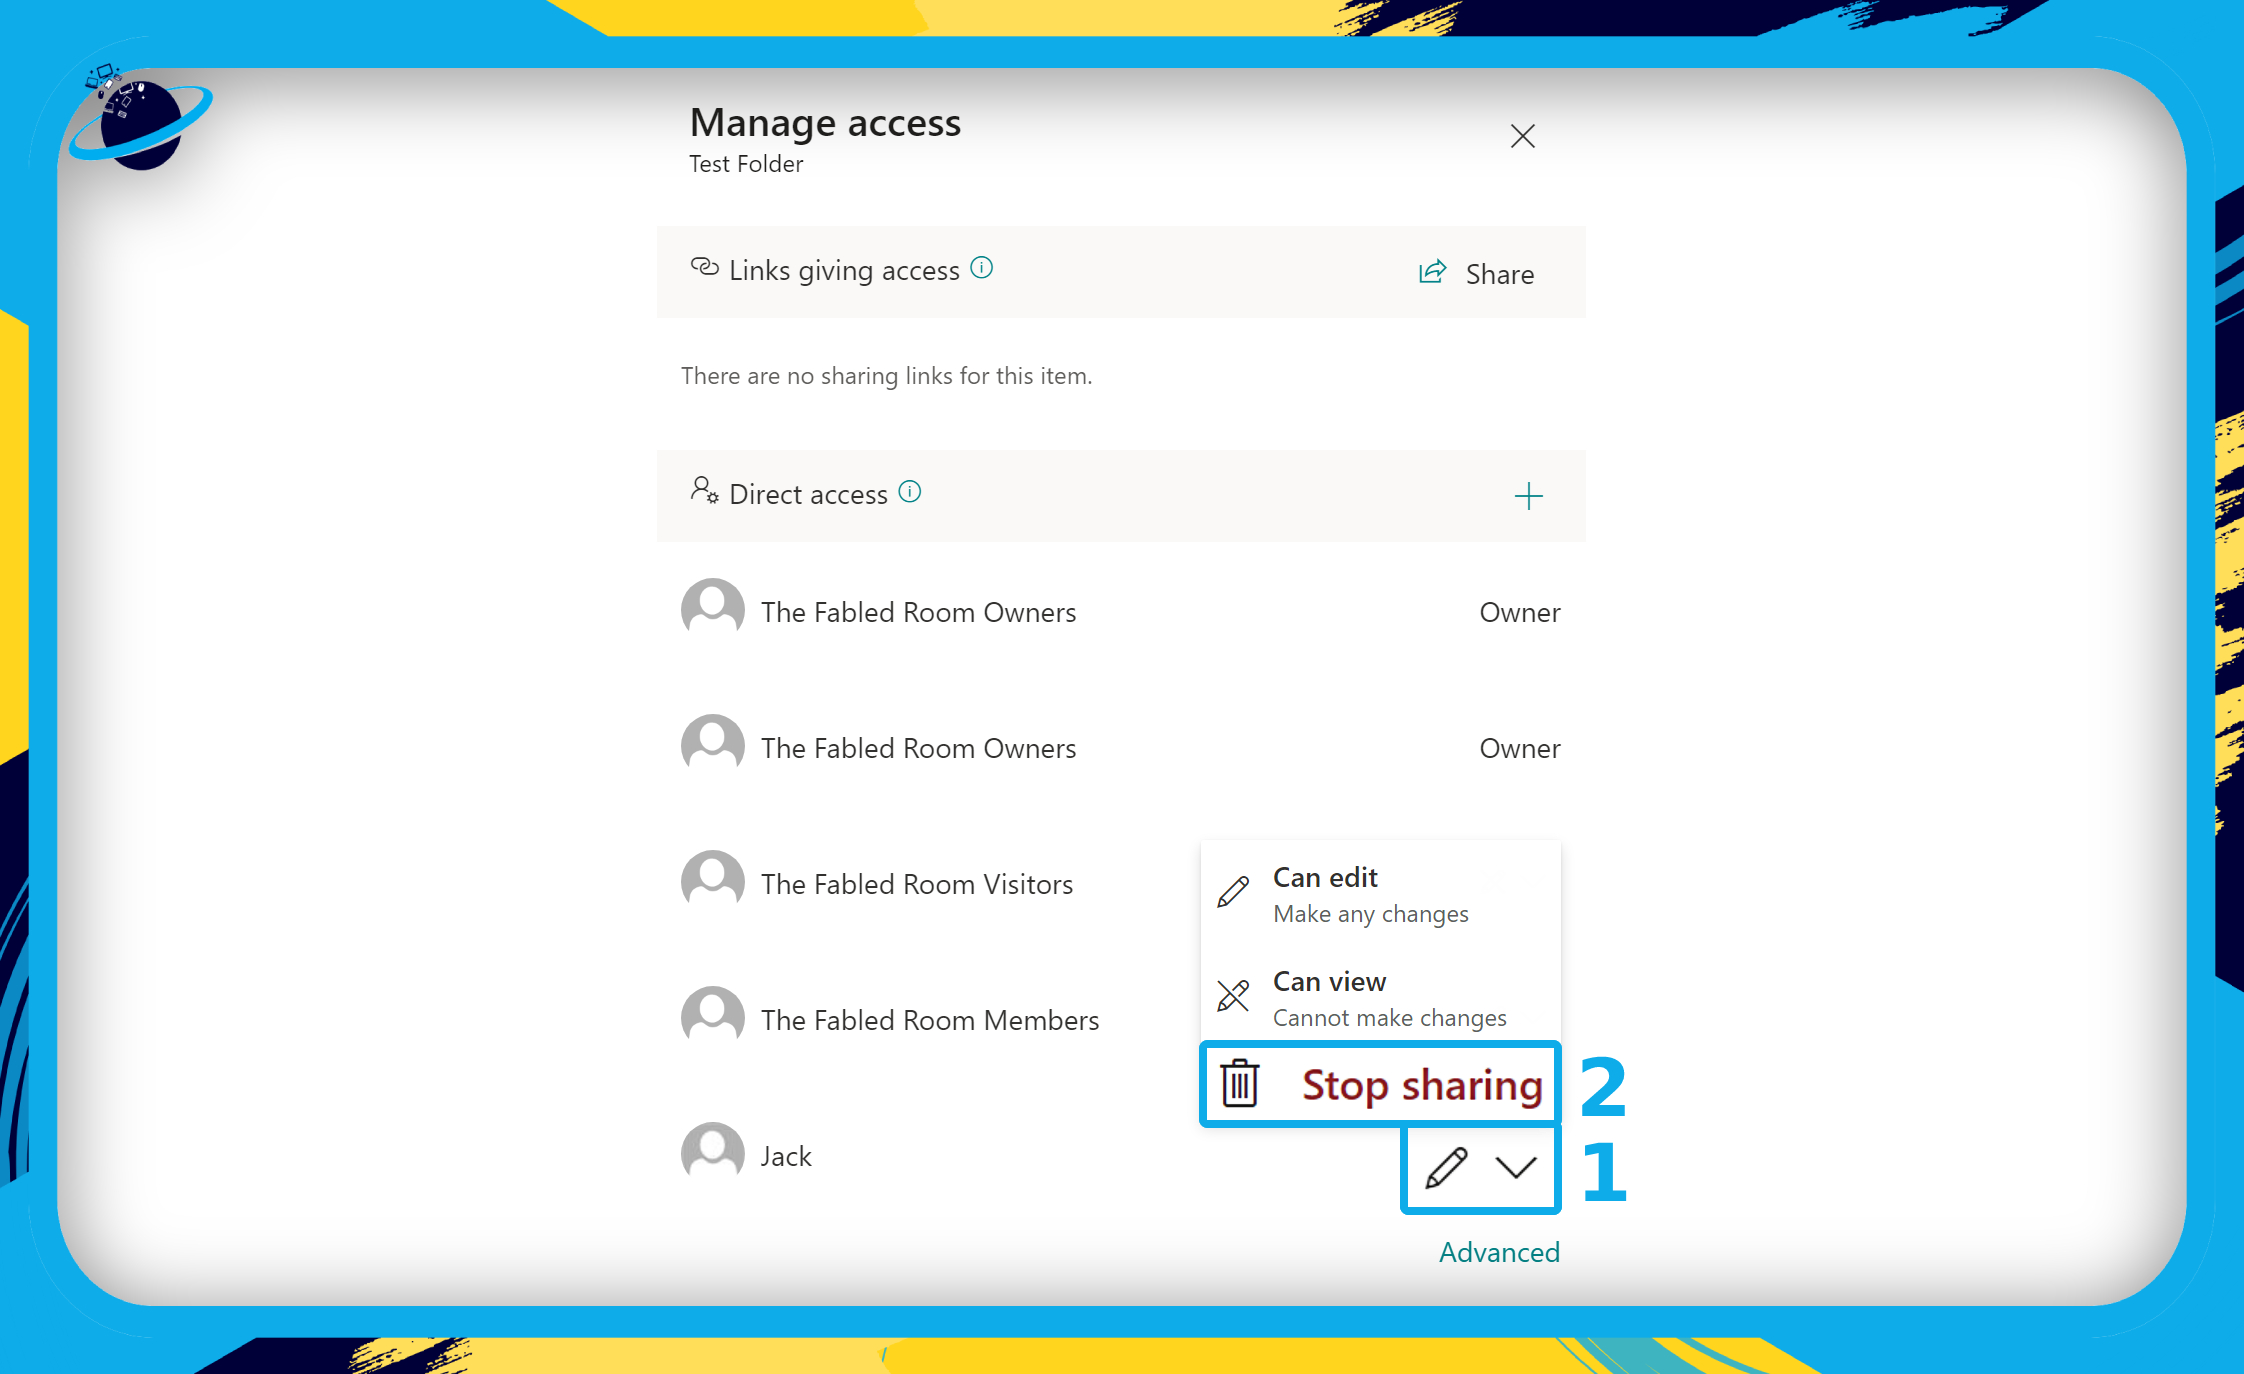
To stop sharing your folder with specific users, follow the steps above to locate your folder, click the “Share” button, and select “Manage access.”
- This time, click the pen icon next to the name(s) of the users you gave access to.
- Then select
 “Stop Sharing” at the bottom of the dropdown list.
![]() Read More:
Read More: ![]() How To Restrict Access To A Specific Folder In SharePoint.
How To Restrict Access To A Specific Folder In SharePoint.
How to grant access to the entire SharePoint site
If you want to grant access to more than just one folder, you might consider adding the user to the “Members” or “Visitors” groups. By default, members can view and edit files and folders, whereas visitors can only view files and folders. The “Owners” group can view, edit, create and delete files and folders — they can also add or remove subsites and pages or even delete the site.
Add members to your SharePoint site:
- First, open the site you want to add members to.
- Then click on
 “members” in the top right corner.

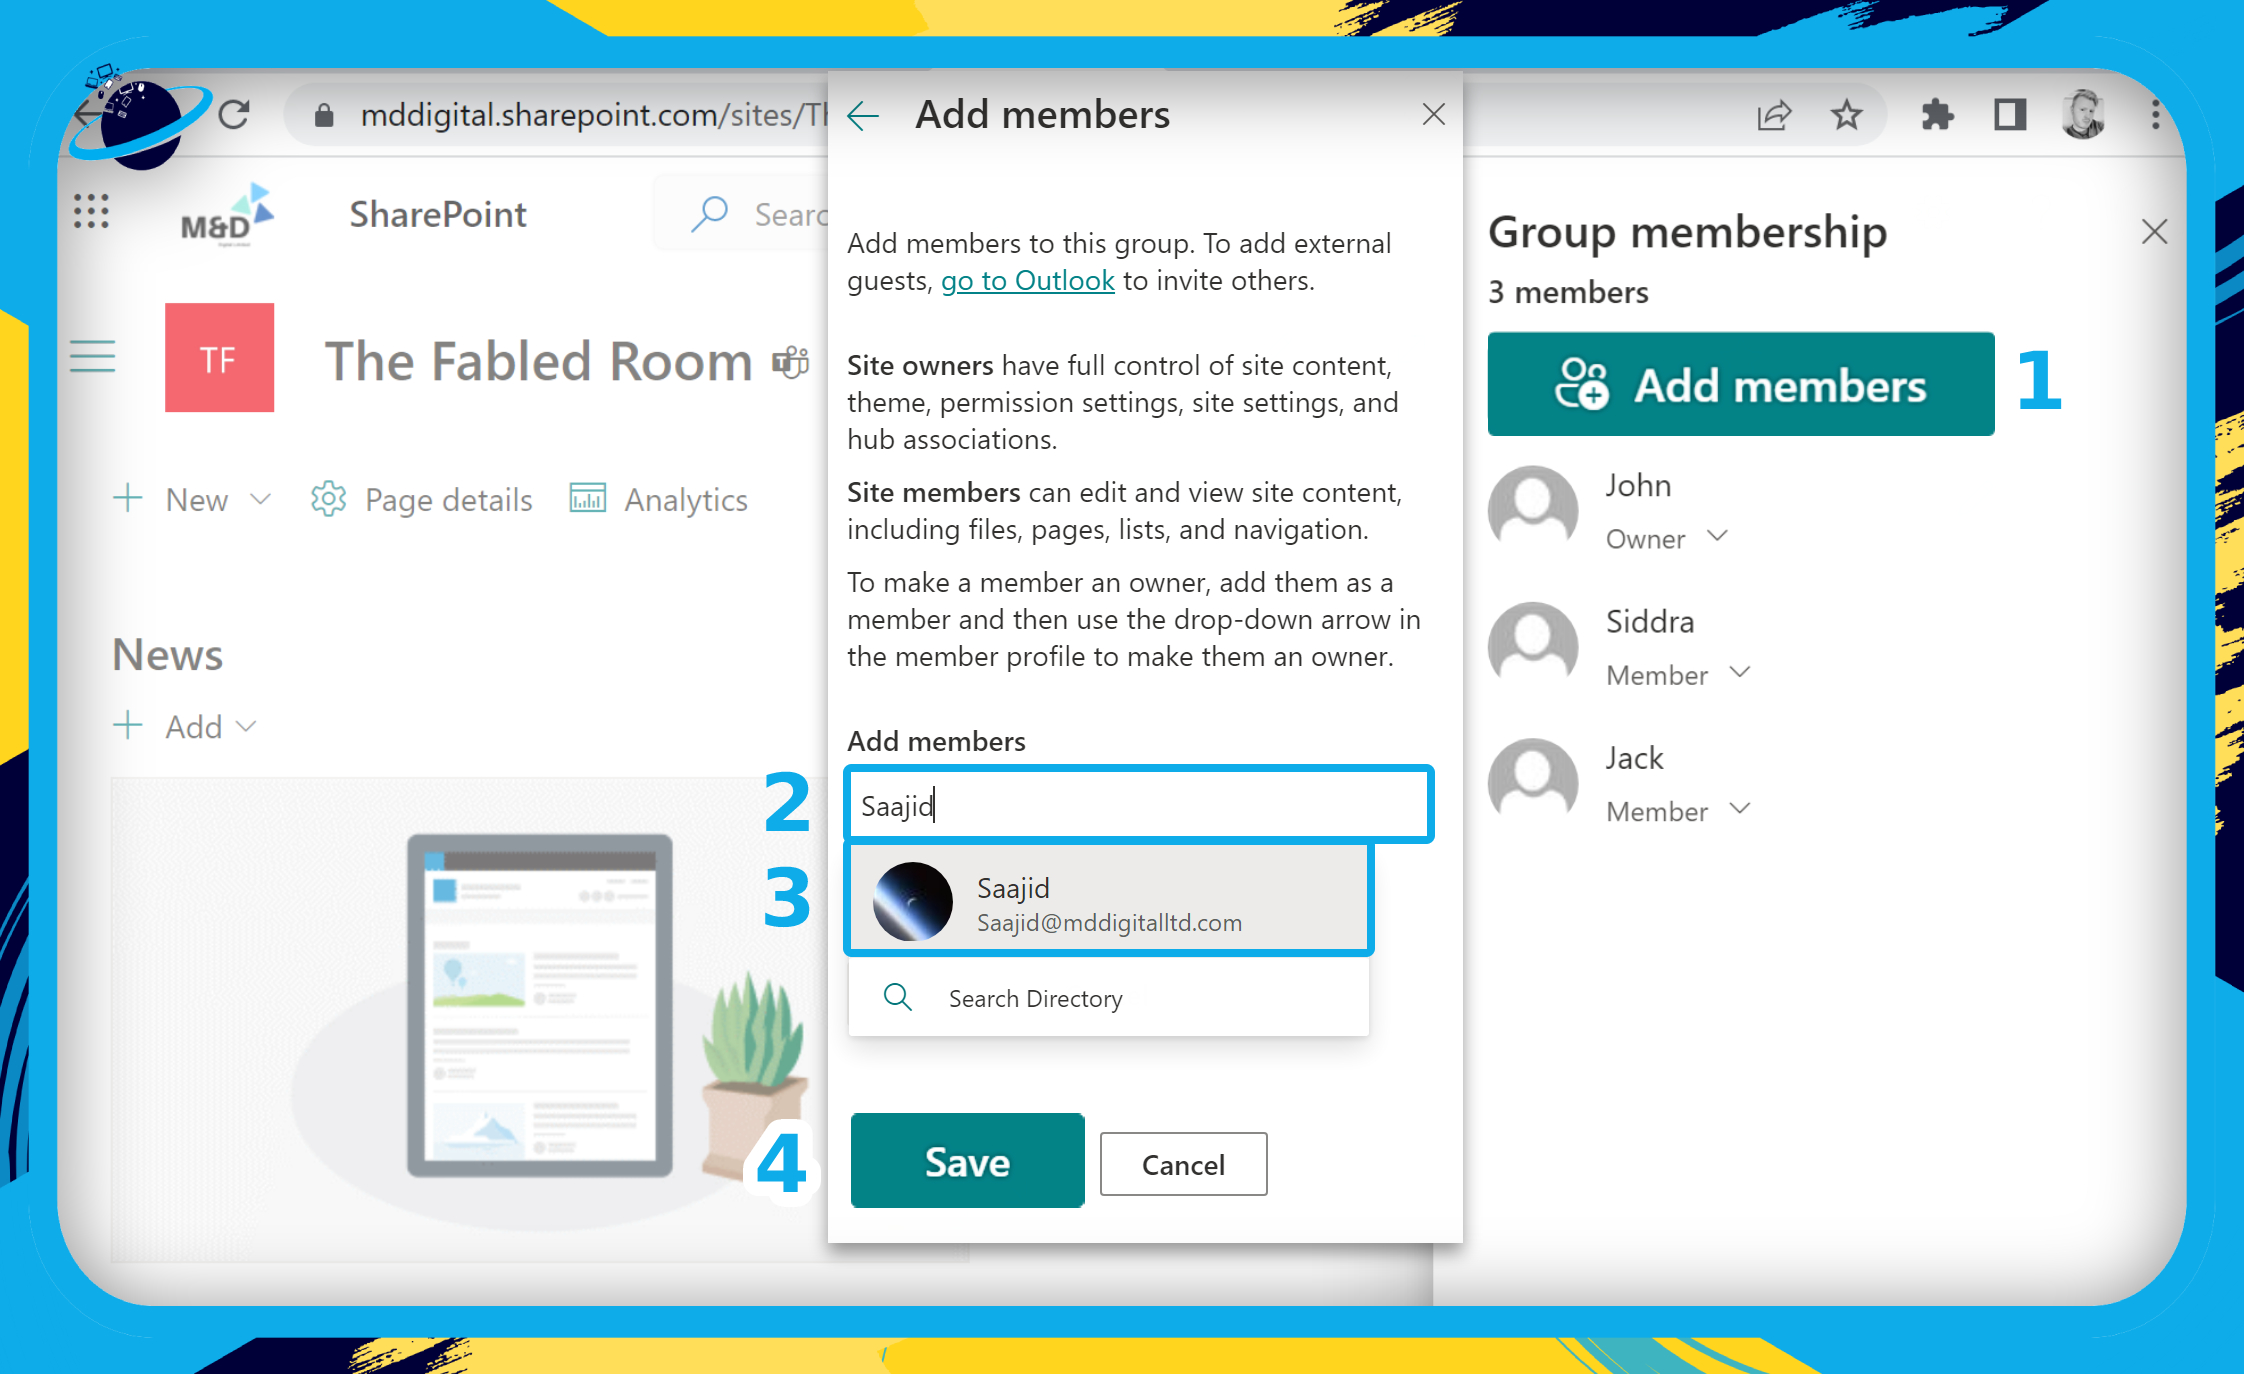
- Click the “Add members” button on the right-side flyout pane. (1)
- Enter the name(s) of users you want to add as members. (2)
- Select their name(s) from the dropdown list. (3)
- Then click the “Save” button. (4)
Add owners, visitors, or members to your SharePoint site:
- First, open the site you want to add owners, visitors, or members to.
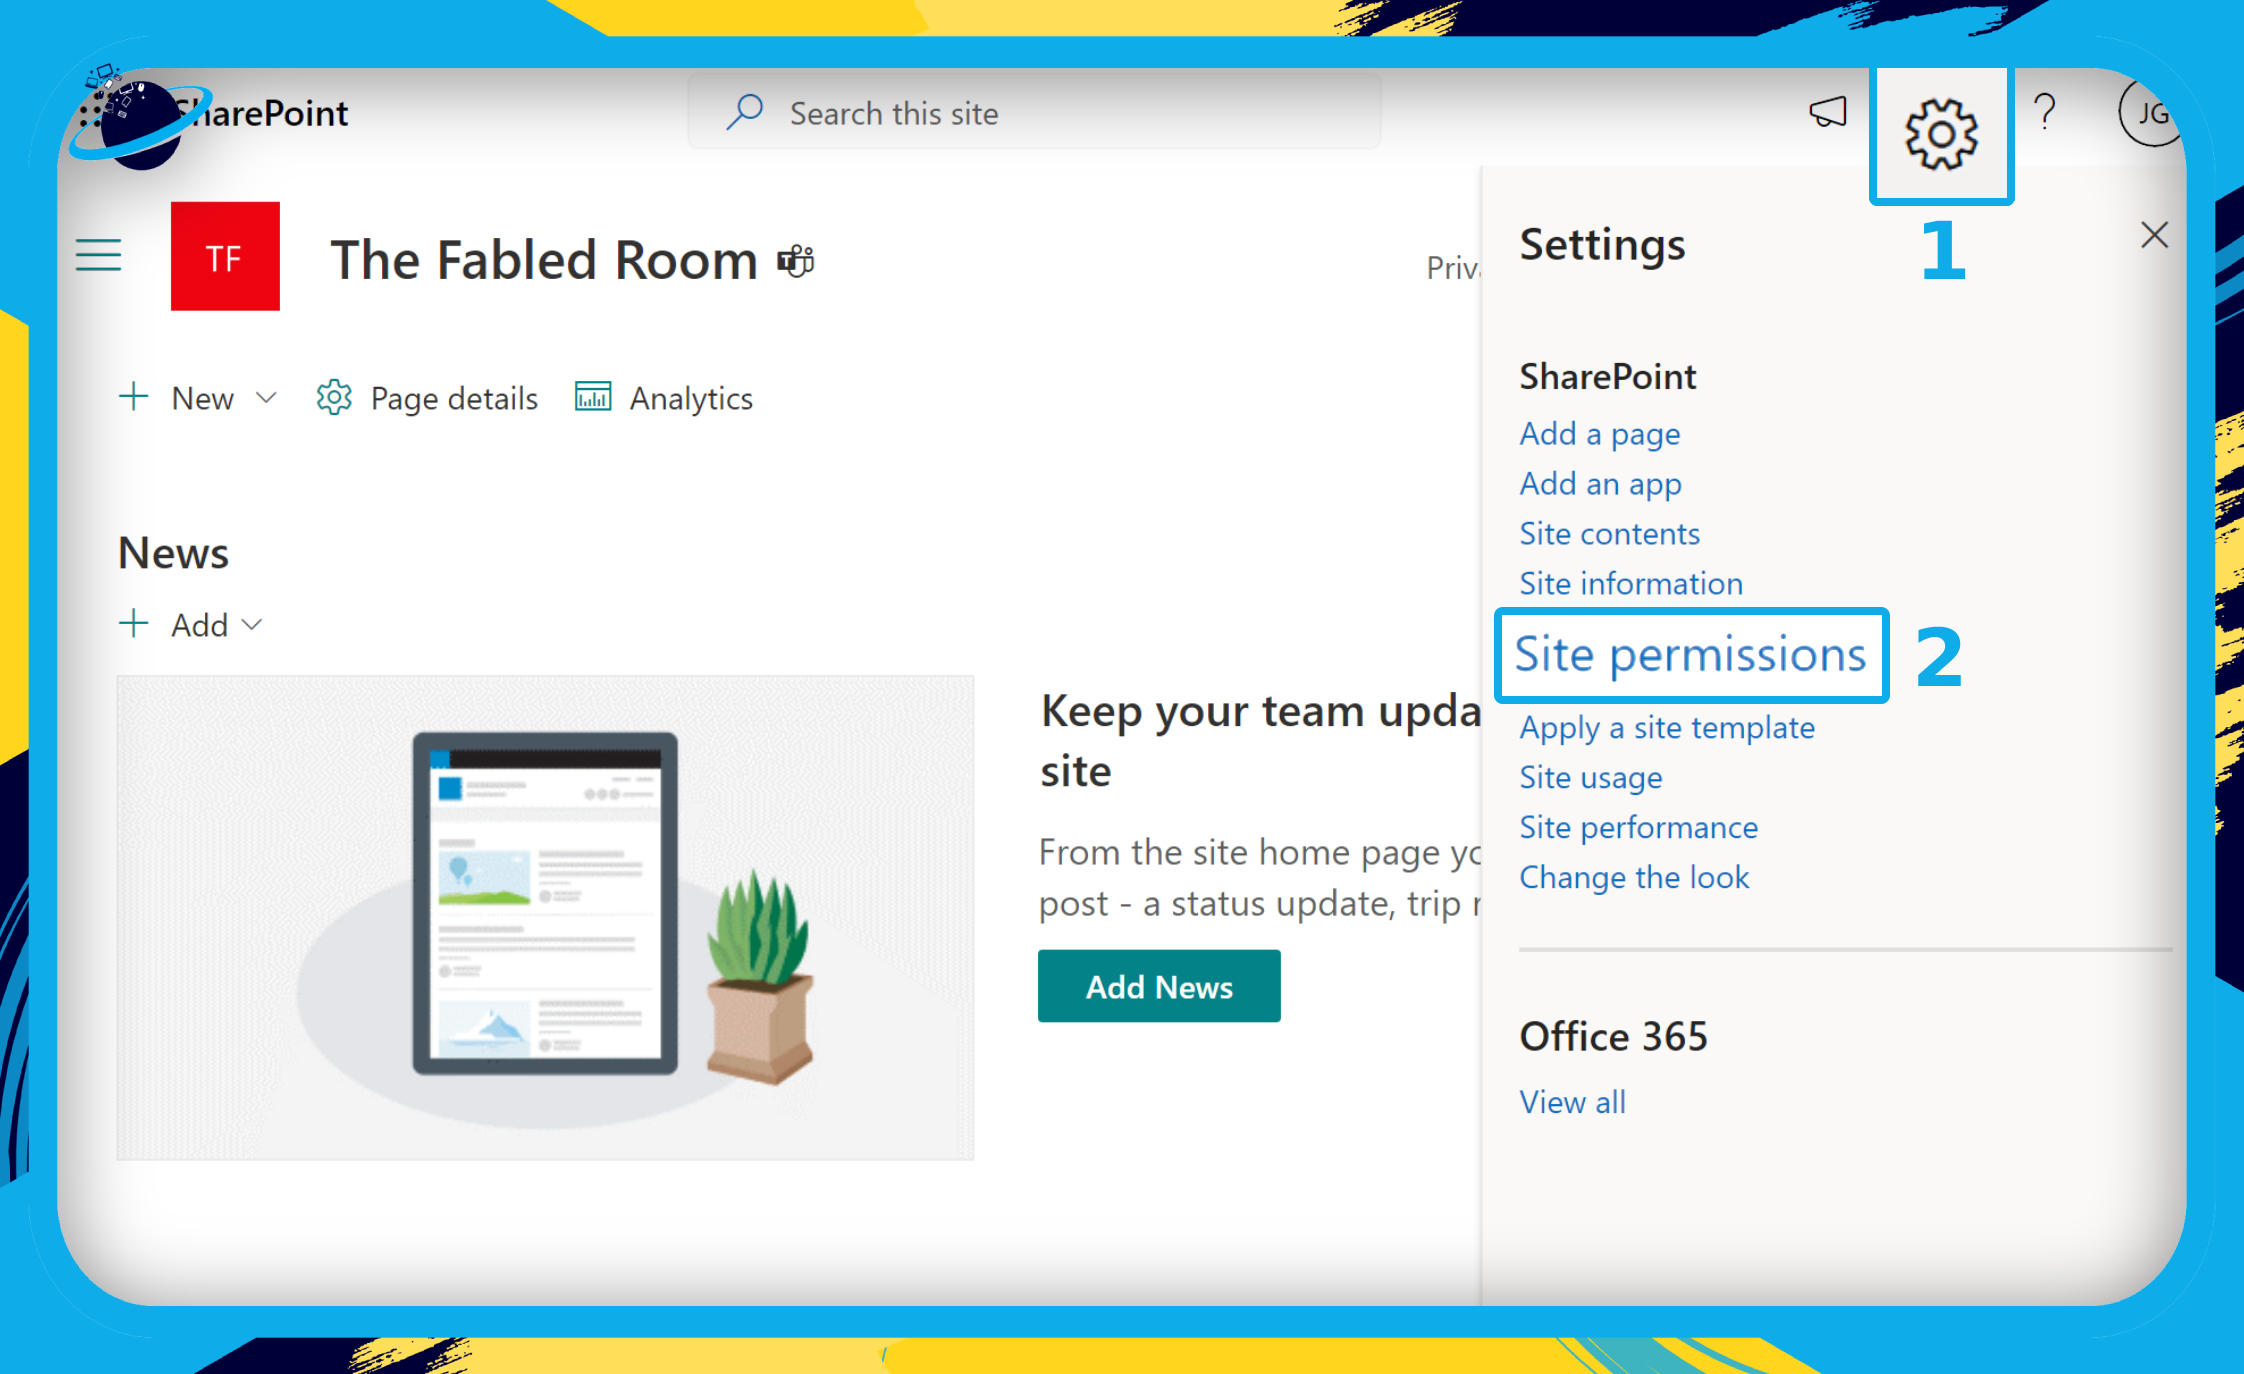
- Click the
 gear icon in the top right corner.
 - Then select “Site permissions” from the dropdown menu.
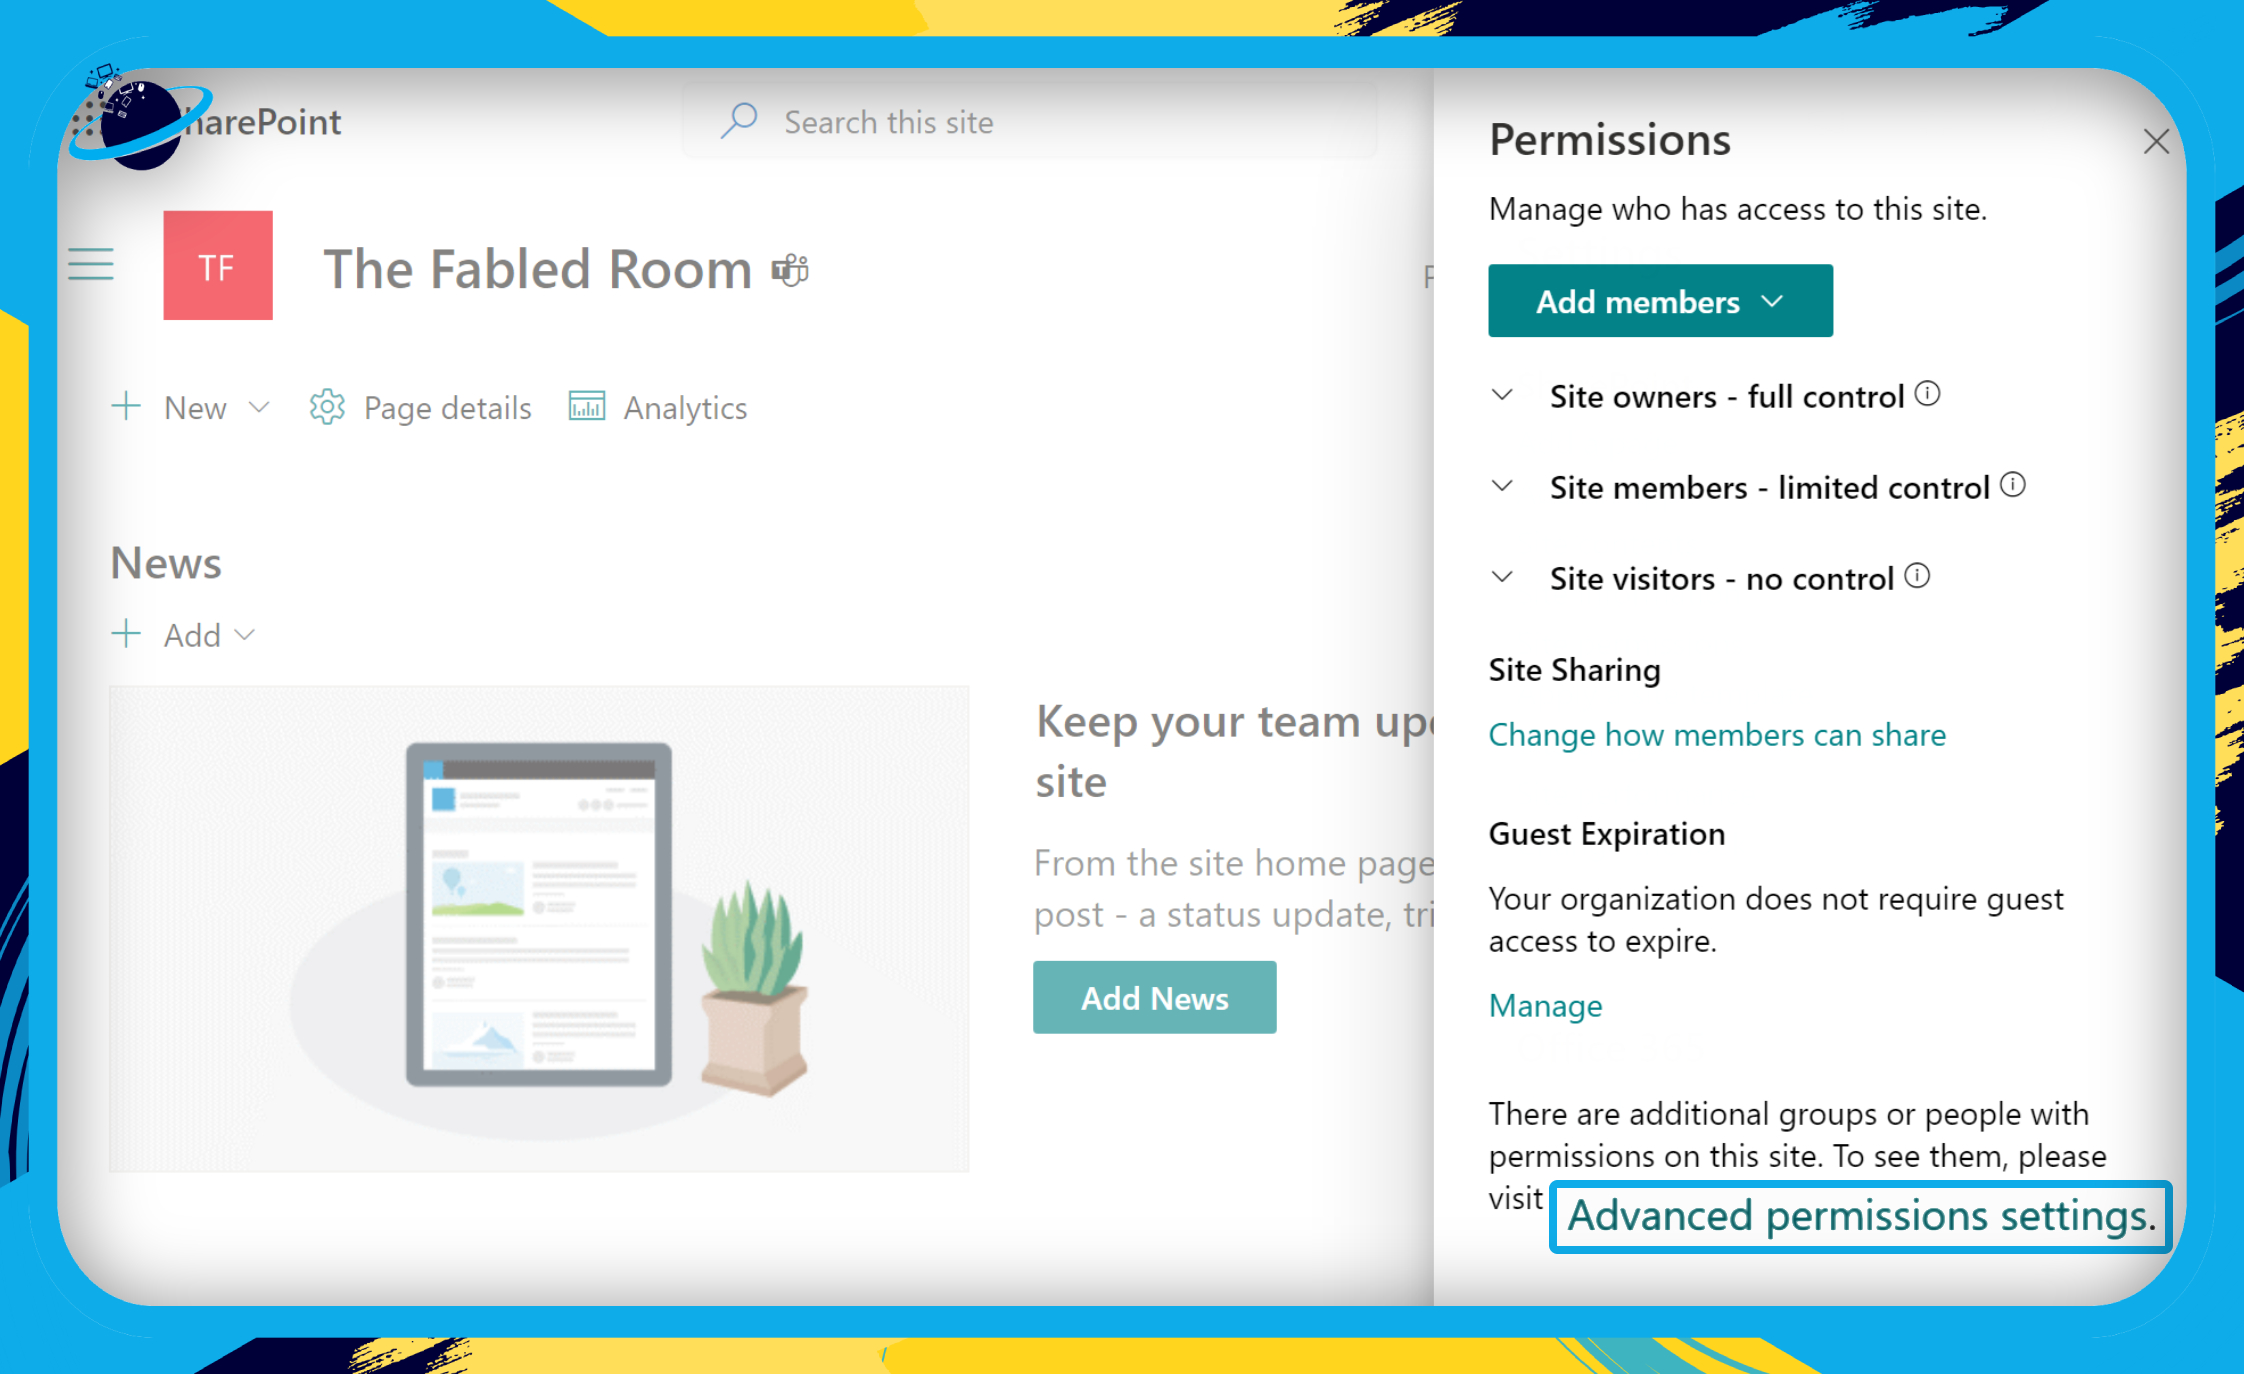
- The “Permissions” menu will open on the right side of the window.
- Select “Advanced permissions settings” at the bottom.
- You will be directed to a classic SharePoint page where you can add visitors.
- Click on “[your site name] Visitors.”
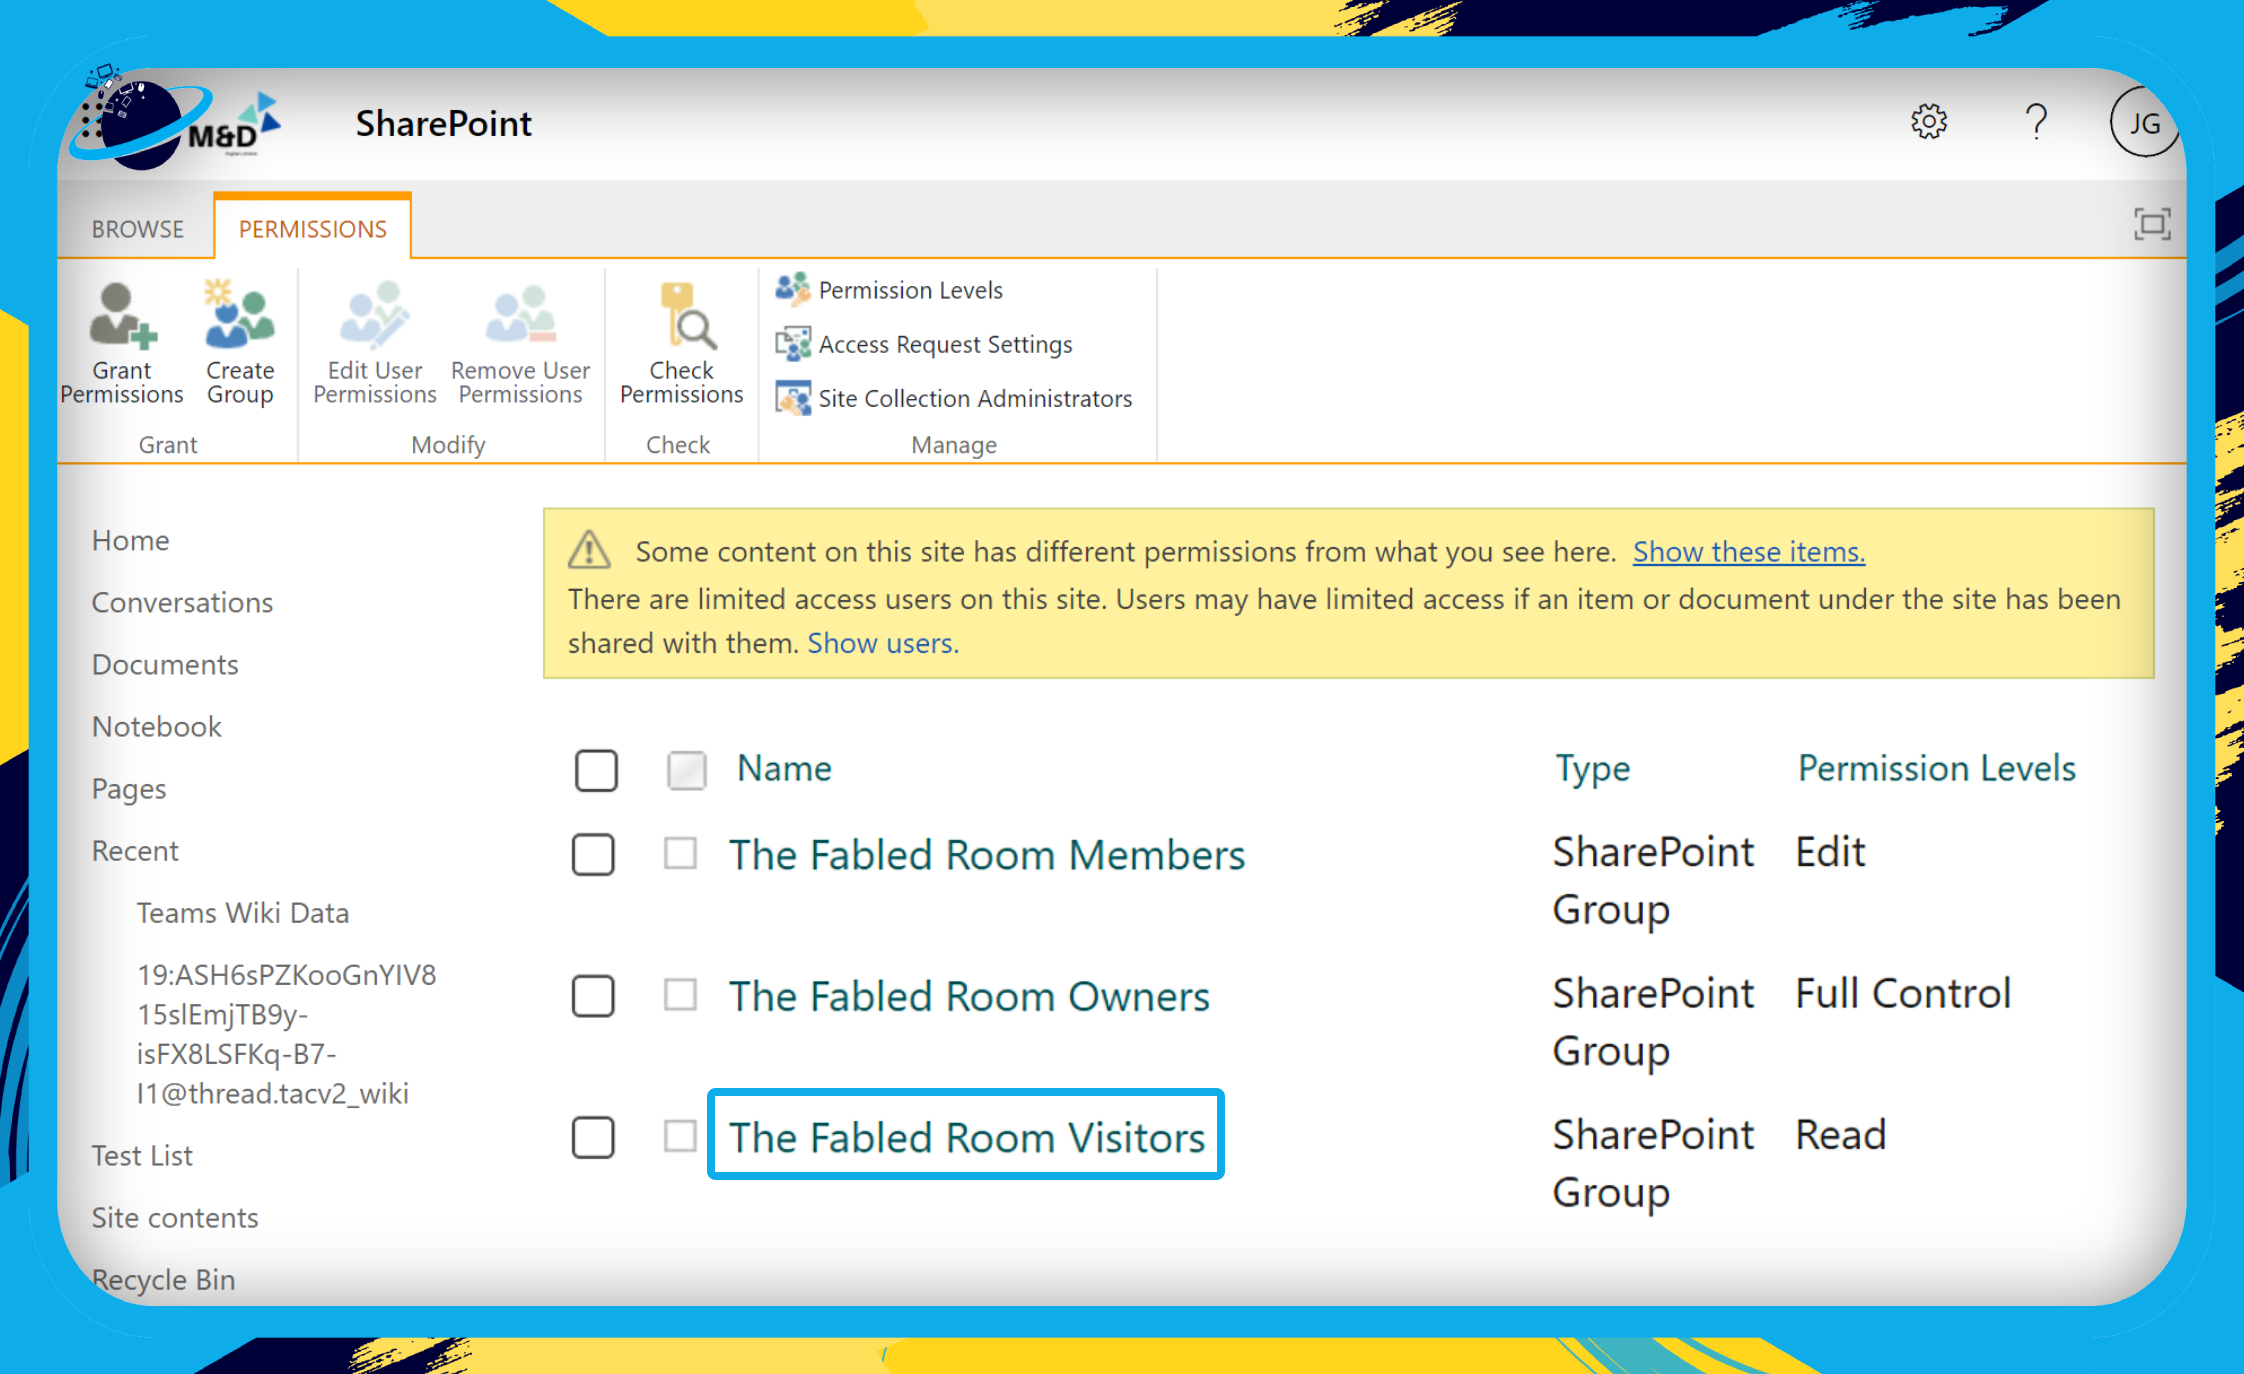
- Click “New” at the top. (1)
- A dialog box will open.
- Add the name(s) of the users to add in the “Invite people” tab. (2)
- Click the name(s) in the dropdown list. (3)
- Add an optional message.
- You can click “SHOW OPTIONS” to turn off email invitations.
- Then click the “Share” button. (4)

How to share folders in SharePoint with external users
If you are getting the message, “Your organization’s policies don’t allow you to share with these users. Please contact your IT department for help,” 99% of the time, that is because you’re trying to share the folder with an external user. In that case, you’ll need to check the external sharing settings at both site and organization levels.
If you have access to the SharePoint Admin Center, you can follow the steps below to add or limit sharing permissions with external users.
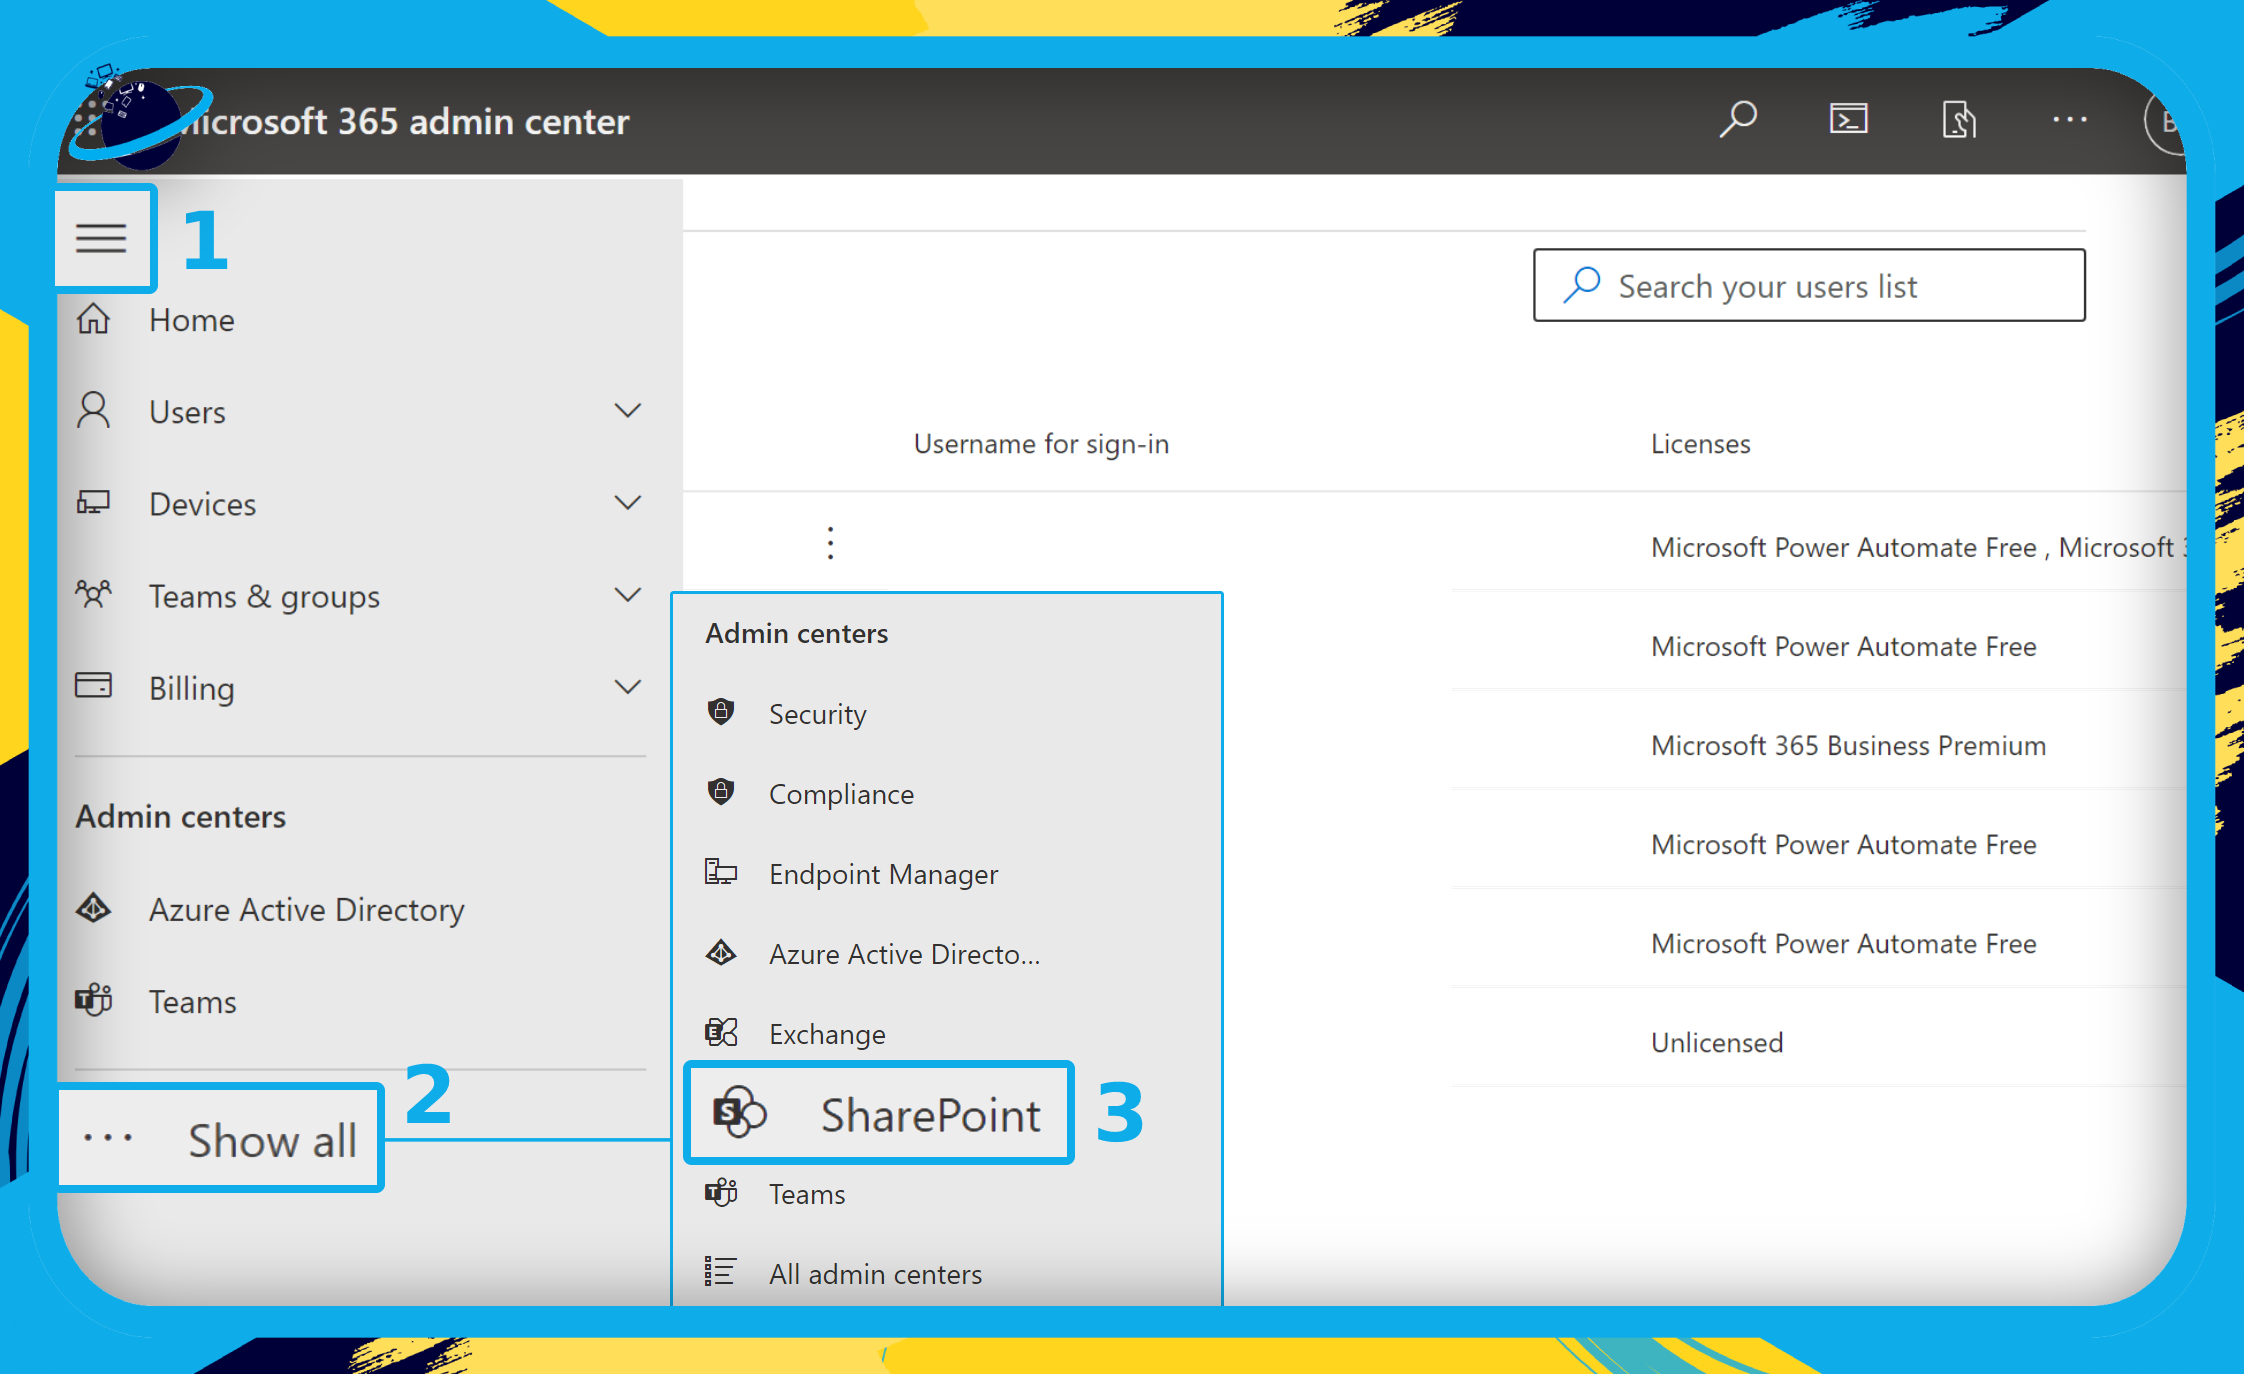
- First, go to your Admin Center.
- Click the
 menu icon in the top left.
 - Then click on “Show all” to reveal more options.
- Select “SharePoint” from the revealed options.
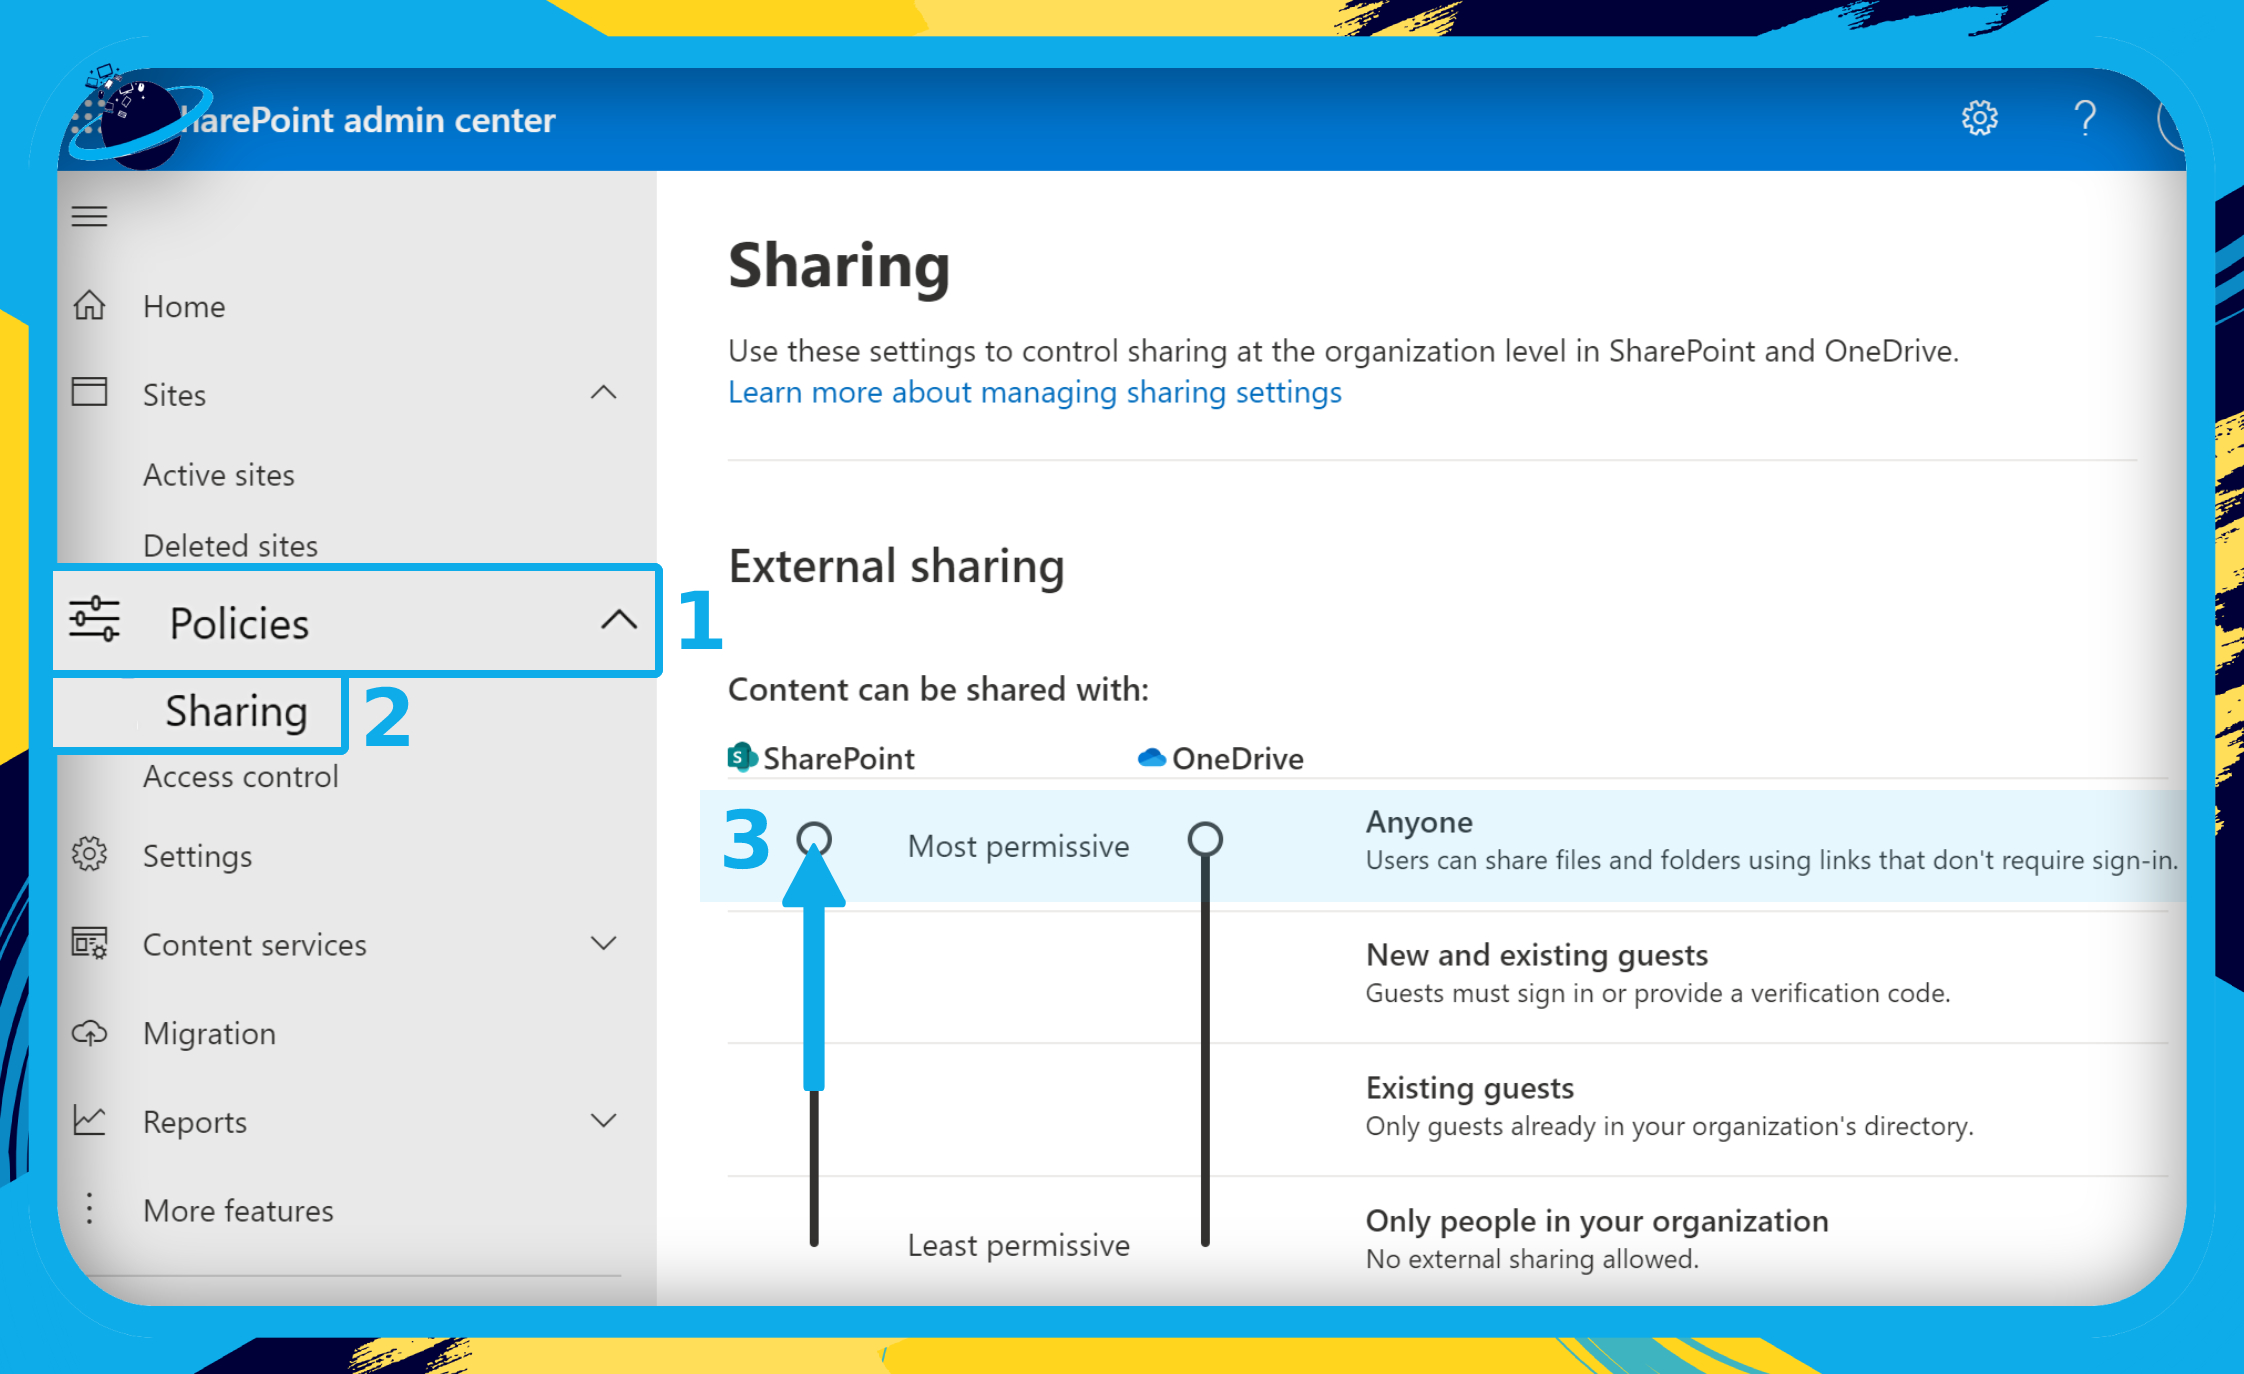
- Go to
 “Policies” on the left menu in your SharePoint Admin Center. (1)
 - Select “Sharing” from the expanded options. (2)
- Then, under “Content can be shared with,” drag the “SharePoint” circle to the top. (3)
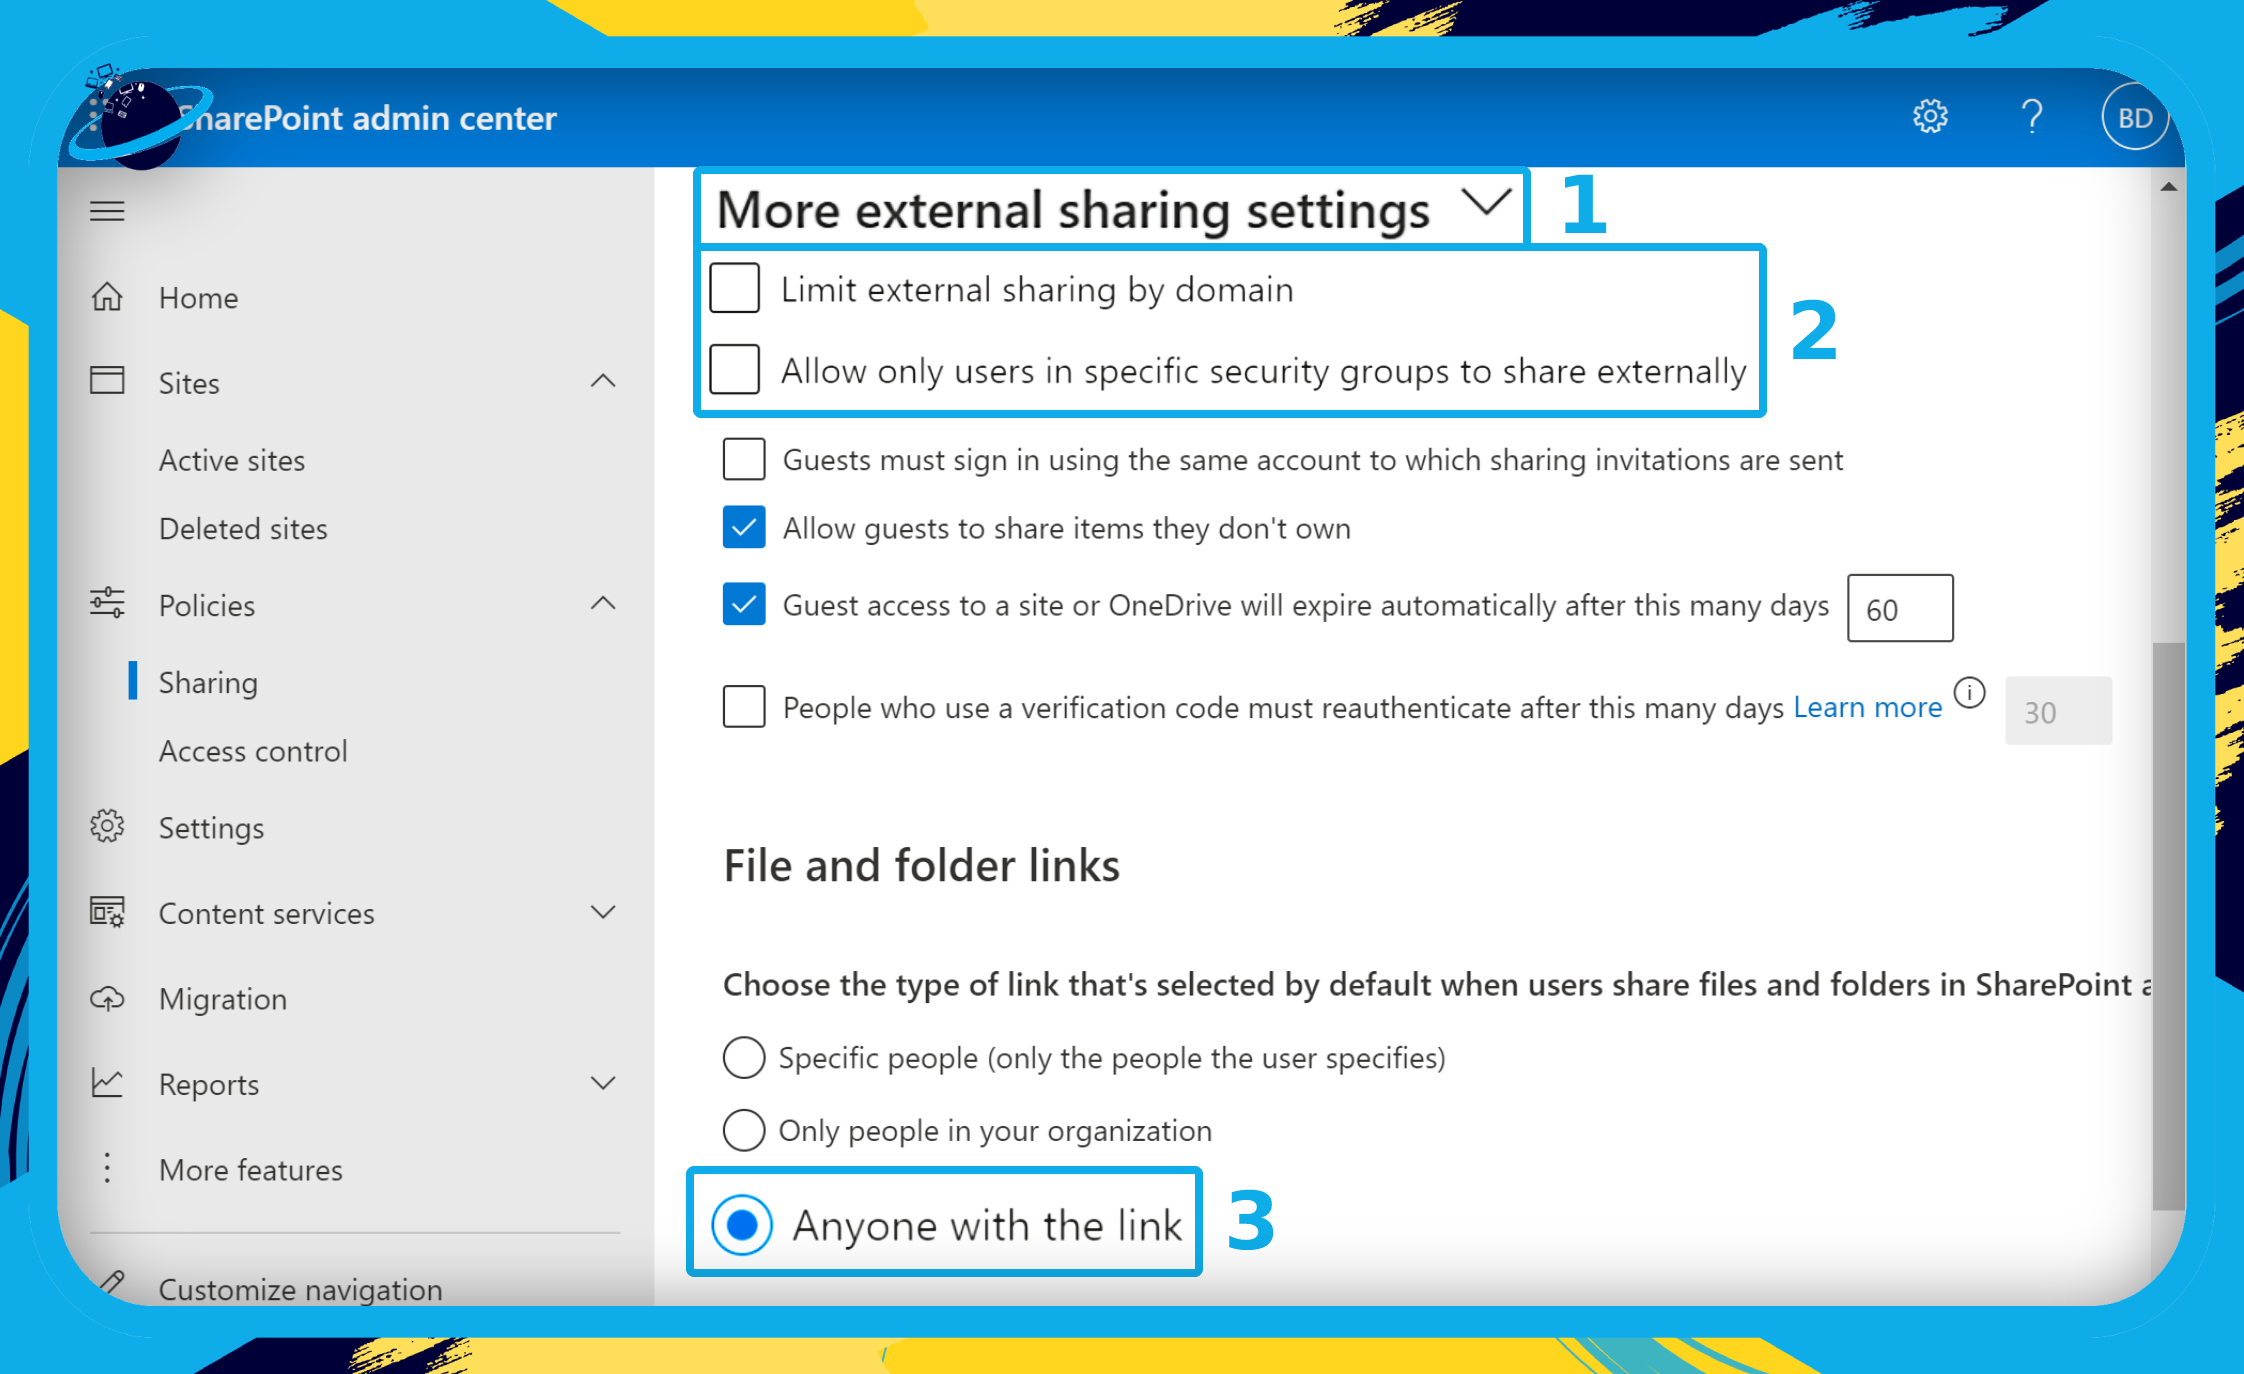
- Scroll down and click “More external sharing settings” to reveal more options. (1)
- Make sure the checkboxes next to the following options are unchecked, as they could limit your ability to share files and folders with external users: (2)
- Limit external sharing by domain.
- Allow only users in specific security groups to share externally.
- Then select “Anyone with the link” under the “File and folder links” header. (3)
![]() Important: for security reasons, it’s not advisable to allow external users to have editing permissions for important or confidential resources. Please ensure that the content you share is safe for sharing and that the users you share your resources with are trustworthy.
Important: for security reasons, it’s not advisable to allow external users to have editing permissions for important or confidential resources. Please ensure that the content you share is safe for sharing and that the users you share your resources with are trustworthy.
- Finally, head down to the bottom and click the
 “Save” button.
For more information, please read our guide on ![]() How to share files with external users in SharePoint.
How to share files with external users in SharePoint.
What if you can’t add permissions to the SharePoint library?
If you’re an admin and you still can’t add permissions to a SharePoint library, it could be because there are more than 100,000 items inside the folders.
By default, all sites inherit permissions from the site above them — a subsite will inherit permissions from the parent site. But you can usually break inherited permissions to create custom permissions for groups and users.
However, that is not true for libraries with more than 100,000 items. So, if you can’t add new permissions to a library, it’s probably because the contents exceed the limitation for permission breaking.
For more information, please read this ![]() Microsoft resource.
Microsoft resource.
Frequently Asked Questions (FAQ)
 What are the 3 permission groups available in SharePoint?
The three default permission groups available in SharePoint are Owners, Members, and Visitors.
| Group Name | Permissions |
|---|---|
| Owners | Full Control: Add to and modify all aspects of the SharePoint site, including site deletion. |
| Members | Edit: Add, edit, and delete lists. View, add, update, and delete list items and documents. |
| Visitors | Read: View pages and list items, and download documents. |
There are two additional permission groups: Design and Contribute. The Design group can view, add, update, delete, approve, and customize. The Contribute group can view, add, update, and delete list items and documents.
A comprehensive list of the default group permissions:
| Permission | Owner | Member | Visitor |
|---|---|---|---|
| Add and Customize Pages | |||
| Add Items | |||
| Add/Remove Personal Web Parts | |||
| Apply Themes and Borders | |||
| Approve Items | |||
| Browse Directories | |||
| Browse User Information | |||
| Create Alerts | |||
| Create Groups | |||
| Create Subsites | |||
| Delete Items | |||
| Delete Versions | |||
| Edit Items | |||
| Edit Personal User Information | |||
| Enumerate Permissions | |||
| Manage Alerts | |||
| Manage Lists | |||
| Manage Permissions | |||
| Manage Personal Views | |||
| Manage Web Site | |||
| Open Items | |||
| Open Sites, Lists, and Folders | |||
| Override List Behaviors | |||
| Update Personal Web Parts | |||
| Use Client Integration Features | |||
| Use Remote Interfaces | |||
| Use Self-Service Site Creation | |||
| View Application Pages | |||
| View Items | |||
| View Pages | |||
| View Versions | |||
| View Web Analytics Data |
What is limited access permission in SharePoint?
SharePoint grants limited access to users who have been given permission to read or edit a specific file or folder. That user cannot view or edit any other file or folder and therefore has limited access.

Conclusion
A simple way to grant access to a specific folder in SharePoint is to give someone “Direct access.” To do that, hover over the folder you want to share and click the ![]() circle button on the left. You should then notice a
circle button on the left. You should then notice a ![]() “Share” button at the top. Click the Share button and select “Manage access” from the dropdown list. Then, click the
“Share” button at the top. Click the Share button and select “Manage access” from the dropdown list. Then, click the ![]() plus icon and add the user(s) you want to give direct access to.
plus icon and add the user(s) you want to give direct access to.
If you can’t grant access to a folder in SharePoint, it could be because the admins have restricted permissions in the sharing policy. Admins can alter the sharing policy by going to “Policies” > “Sharing” in the SharePoint Admin Center.
Thank you for reading.