It can be really frustrating — particularly if you send big attachments on a regular basis — if your email prevents you from sending attachments over a certain size. Fortunately, the Exchange Admin Center lets you increase the maximum attachment size that you can send on an email.
Follow the steps outlined below to increase the maximum attachment size limit in Exchange Admin Center [Classic]:
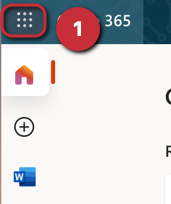
- Navigate to Microsoft 365
- Select Admin on the app launcher
- Navigate to the Exchange Admin Center by clicking Show all and then Exchange
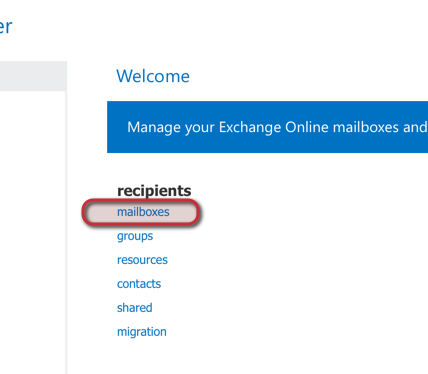
- Under recipients, click mailboxes
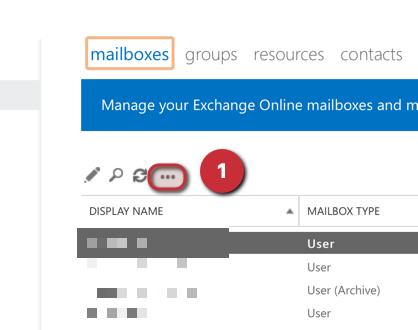
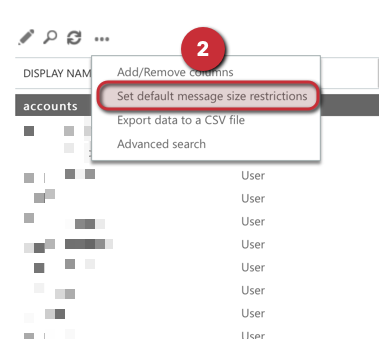
- Click the 3 horizontal dots and click Set default message size restrictions
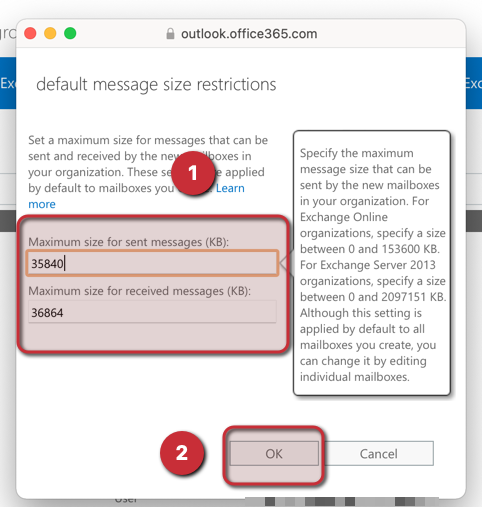
- Choose your message size restriction and then click OK
The process differs slightly if you are using the new Exchange Admin Center. If you followed the process outlined above and couldn’t follow each step because sections seemed to be missing, you’re probably using the new EAC. In that case, follow the steps outlined below.
- Navigate to Microsoft 365
- Select Admin on the app launcher
- Navigate to the Exchange Admin Center by clicking Show all and then Exchange
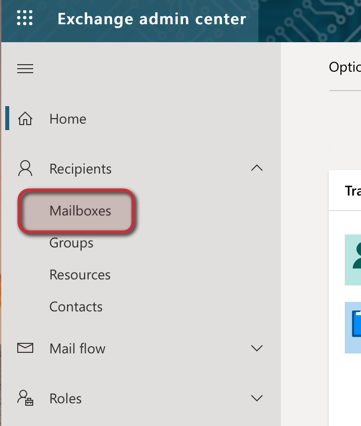
- Under recipients, click Mailboxes
- Click Set default message size restrictions
- Choose your message size restriction and then click Save
Remember, this changes the default message size restriction for your entire organization. You can also modify these settings on a mailbox-by-mailbox basis, should you wish. I’ll demonstrate how you can do that later in the blog post too.
Step-By-Step Process [With Screenshots]: Increase Maximum Message Size Limit In Exchange Admin Center [Classic]
If you are using the classic version of the Exchange Admin Center, you can follow the steps outlined below to increase the maximum message size limit.
- Navigate to Microsoft 365
- Select Admin on the app launcher
- Navigate to the Exchange Admin Center by clicking Show all and then Exchange
- Under recipients, click mailboxes
- Click the 3 horizontal dots and click Set default message size restrictions
- Choose your message size restriction and then click OK
Here’s a walkthrough complete with screenshots to make the process as easy as possible.
- Navigate to Microsoft 365
First things first, you need to navigate to Microsoft 365. There are numerous ways that you can do this using a variety of URLs. Some of the URLs you can use include:
- Microsoft365.com
- Microsoft.com
- Portal.office.com
- Office.com
All of these links will bring you to the Microsoft 365 home screen, which is where you need to be to begin the next step.
Once you’ve followed one of the URLs above, ensure you have your Microsoft 365 credentials to hand and sign in.
- Select Admin on the app launcher
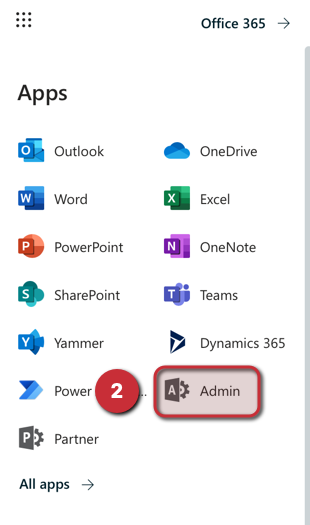
Once you’re logged into Microsoft 365, use the app launcher to open up the Microsoft 365 Admin center.
To access and use the Admin section of Microsoft 365, you must have the appropriate permissions. If you’re not an administrator within Microsoft 365, you’ll be unable to complete the process outlined here.
If you’re not a M365 admin — if you can’t see the Admin application indicated in the second screenshot above — you need to speak to whoever set up your Microsoft 365, or the person/company that manages it for you. They can grant you admin permissions or, alternatively, complete this process for you.
- Navigate to the Exchange Admin Center by clicking Show all and then Exchange
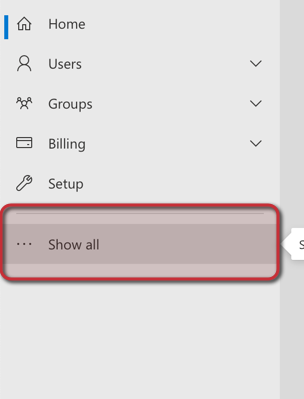
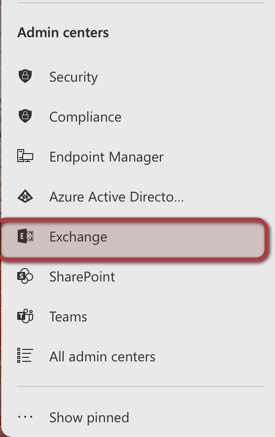
Again, you must have the correct permissions to access and use the Exchange admin center. Once you have clicked Exchange in the list above, you should see a screen similar to one of the two screenshots below.
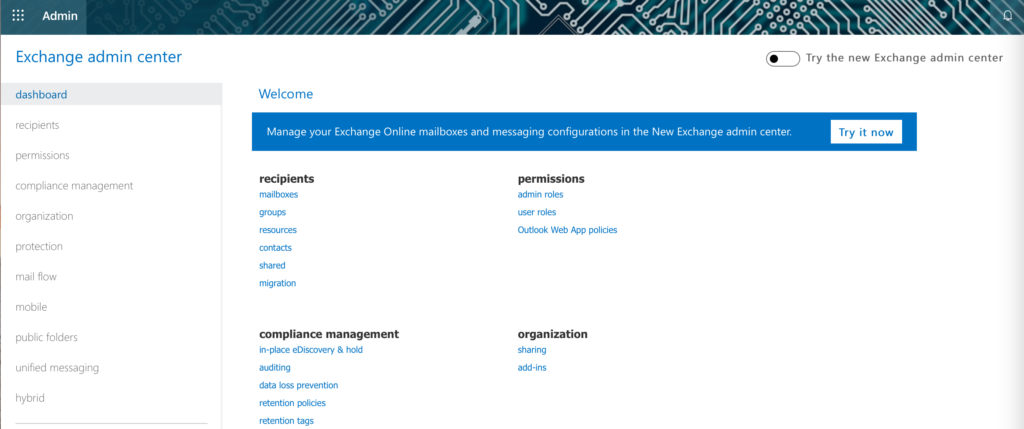
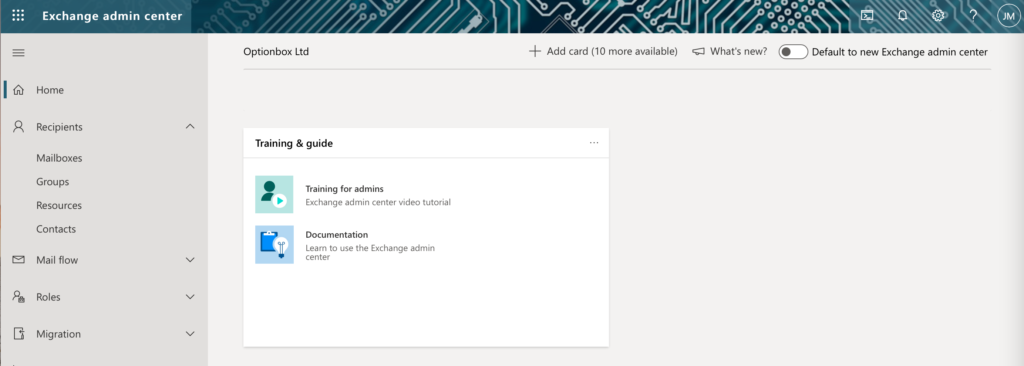
The screenshot on the left is the classic Exchange admin center, whereas the screenshot on the right is the new Exchange admin center. If your screen looks like the one on the right — the new Exchange admin center — click here to jump to the step-by-step process for increasing message size limit in the new EAC.
- Under recipients, click mailboxes
- Click the 3 horizontal dots and click Set default message size restrictions
- Choose your message size restriction and then click OK
Following the process outlined above, the default message size restriction will be changed for all of your mailboxes.
As you may have seen in the screenshot above, you can change the message size restriction for individual mailboxes. If that’s something you want to do, click here to be taken to instructions on how to increase maximum message size limit — for individual mailboxes — in the Exchange admin center.

Step-By-Step Process [With Screenshots]: Increase Maximum Message Size Limit In Exchange Admin Center [New]
If you are using the new version of the Exchange Admin Center, you can follow the steps outlined below to increase the maximum message size limit.
- Navigate to Microsoft 365
- Select Admin on the app launcher
- Navigate to the Exchange Admin Center by clicking Show all and then Exchange
- Under recipients, click Mailboxes
- Click Set default message size restrictions
- Choose your message size restriction and then click Save
Here’s a walkthrough complete with screenshots to make the process as easy as possible.
- Navigate to Microsoft 365
First things first, you need to navigate to Microsoft 365. There are numerous ways that you can do this using a variety of URLs. Some of the URLs you can use include:
- Microsoft365.com
- Microsoft.com
- Portal.office.com
- Office.com
All of these links will bring you to the Microsoft 365 home screen, which is where you need to be to begin the next step.
Once you’ve followed one of the URLs above, ensure you have your Microsoft 365 credentials to hand and sign in.
- Select Admin on the app launcher
Once you’re logged into Microsoft 365, use the app launcher to open up the Microsoft 365 Admin center.
To access and use the Admin section of Microsoft 365, you must have the appropriate permissions. If you’re not an administrator within Microsoft 365, you’ll be unable to complete the process outlined here.
If you’re not a M365 admin — if you can’t see the Admin application indicated in the second screenshot above — you need to speak to whoever set up your Microsoft 365, or the person/company that manages it for you. They can grant you admin permissions or, alternatively, complete this process for you.
- Navigate to the Exchange Admin Center by clicking Show all and then Exchange
- Under recipients, click Mailboxes
- Click Set default message size restrictions
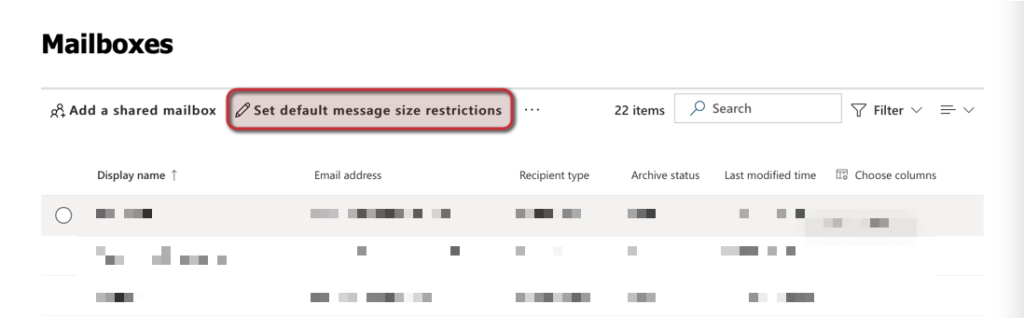
For me, Set default message size restrictions appears as soon as I come onto the Mailboxes page.
If it isn’t appearing for you, try refreshing your page and clearing your cache for the Exchange admin center and it should appear.
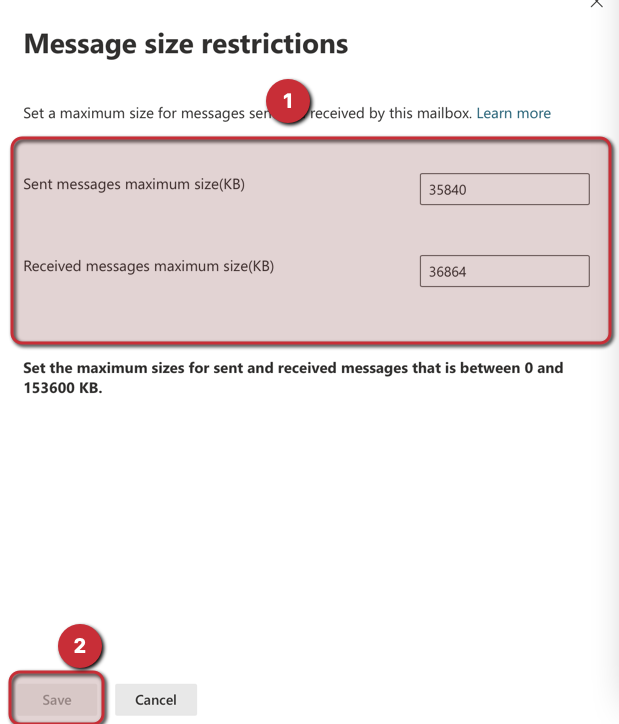
- Choose your message size restriction and then click Save
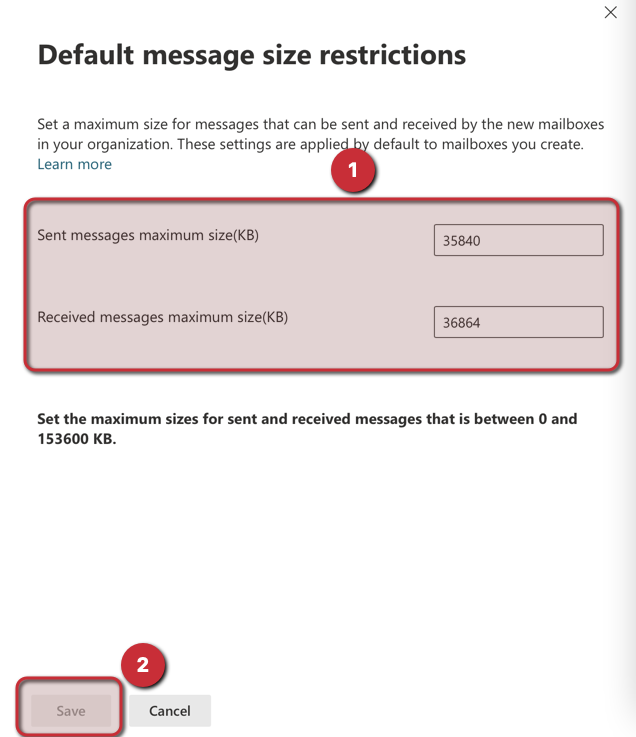
Choose maximum size [up to 153600 KB [roughly 153MB] which is Microsoft’s restriction] and then click Save.
This change will be applied to all new mailboxes that you create for your organization.
If you’d rather change maximum message size limit for a few individual mailboxes, follow the step-by-step process outlined in the next section of this blog post.
Step-By-Step Process [With Screenshots]: Increase Maximum Message Size Limit In Exchange Admin Center [For Individual Mailboxes]
If you want to change message size limits for individual mailboxes rather than your entire organization, you can follow the steps outlined below.
- Navigate to Microsoft 365
- Select Admin on the app launcher
- Navigate to the Exchange Admin Center by clicking Show all and then Exchange
- Under recipients, click Mailboxes
- Select a mailbox from the list
- Click Manage mail flow settings
- Click Edit next to Message Size Restriction
- Set the limits and then click Save
I’ve included screenshots below to give you a comprehensive walkthrough of the entire process.
- Navigate to Microsoft 365
First things first, you need to navigate to Microsoft 365. There are numerous ways that you can do this using a variety of URLs. Some of the URLs you can use include:
- Microsoft365.com
- Microsoft.com
- Portal.office.com
- Office.com
All of these links will bring you to the Microsoft 365 home screen, which is where you need to be to begin the next step.
Once you’ve followed one of the URLs above, ensure you have your Microsoft 365 credentials to hand and sign in.
- Select Admin on the app launcher
Once you’re logged into Microsoft 365, use the app launcher to open up the Microsoft 365 Admin center.
To access and use the Admin section of Microsoft 365, you must have the appropriate permissions. If you’re not an administrator within Microsoft 365, you’ll be unable to complete the process outlined here.
If you’re not a M365 admin — if you can’t see the Admin application indicated in the second screenshot above — you need to speak to whoever set up your Microsoft 365, or the person/company that manages it for you. They can grant you admin permissions or, alternatively, complete this process for you.
- Navigate to the Exchange Admin Center by clicking Show all and then Exchange
- Under recipients, click Mailboxes
- Select a mailbox from the list
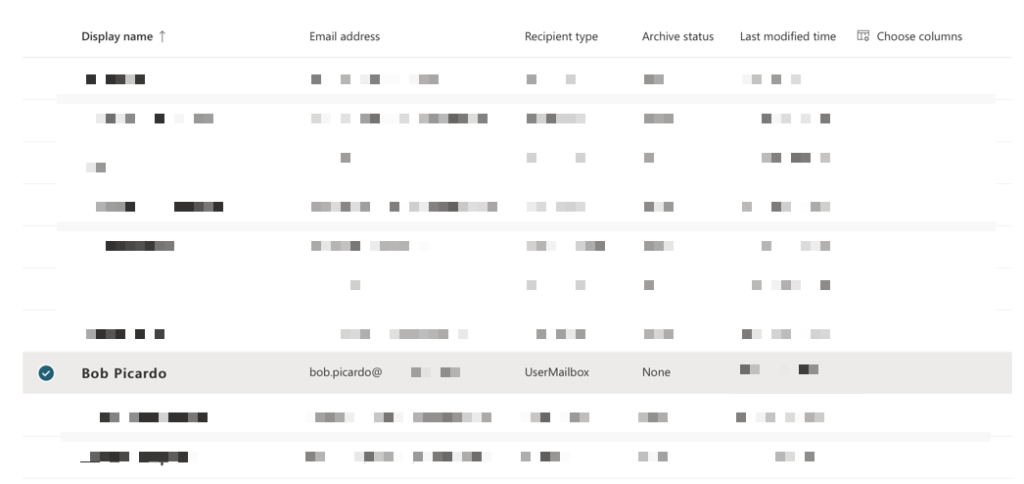
Choose the mailbox from the list that you want to edit message size restrictions for. In this example, we’re going to edit the maximum message size for Bob’s inbox.
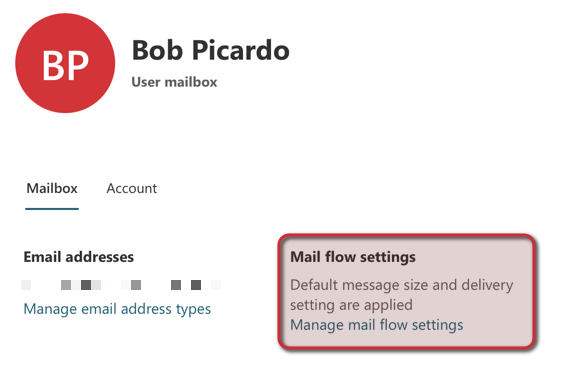
- Click Manage mail flow settings
- Click Edit next to Message Size Restriction
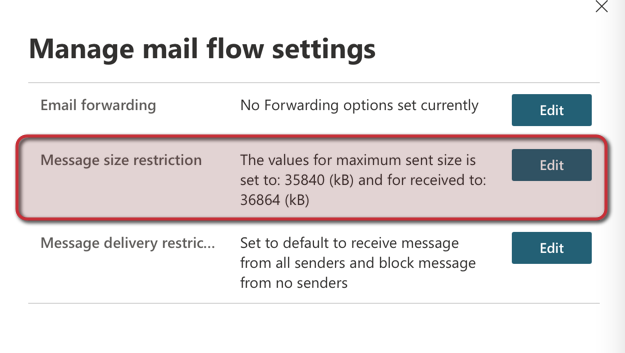
- Set the limits and then click Save
And voila! The process is now complete. The mailbox you’ve edited will have the higher maximum message size that you set here almost instantly, although you might need to relaunch Outlook to encourage the changes to synchronise quickly.
I hope you’ve found this blog post helpful! If you have any questions, please feel free to leave a comment below and we’ll try to help out!