 Key Takeaways
 In your Teams mobile app, go to “Teams” and tap the video icon at the top, and then join a new meeting. There, click the three dots and select “Lock the meeting.” [More…]
 In the web or desktop version of Teams, create a private team. Then start a new meeting. Next, open Teams on your mobile app and join the meeting. You can then test your video and audio settings privately. [More…]

If you want to avoid any unwanted visual or audio backgrounds, you may want to create a test call in Microsoft Teams before you enter a meeting. In this guide, we’ll show you how to do that on the Teams mobile app. We’ll also show you a workaround that involves using your laptop or PC.
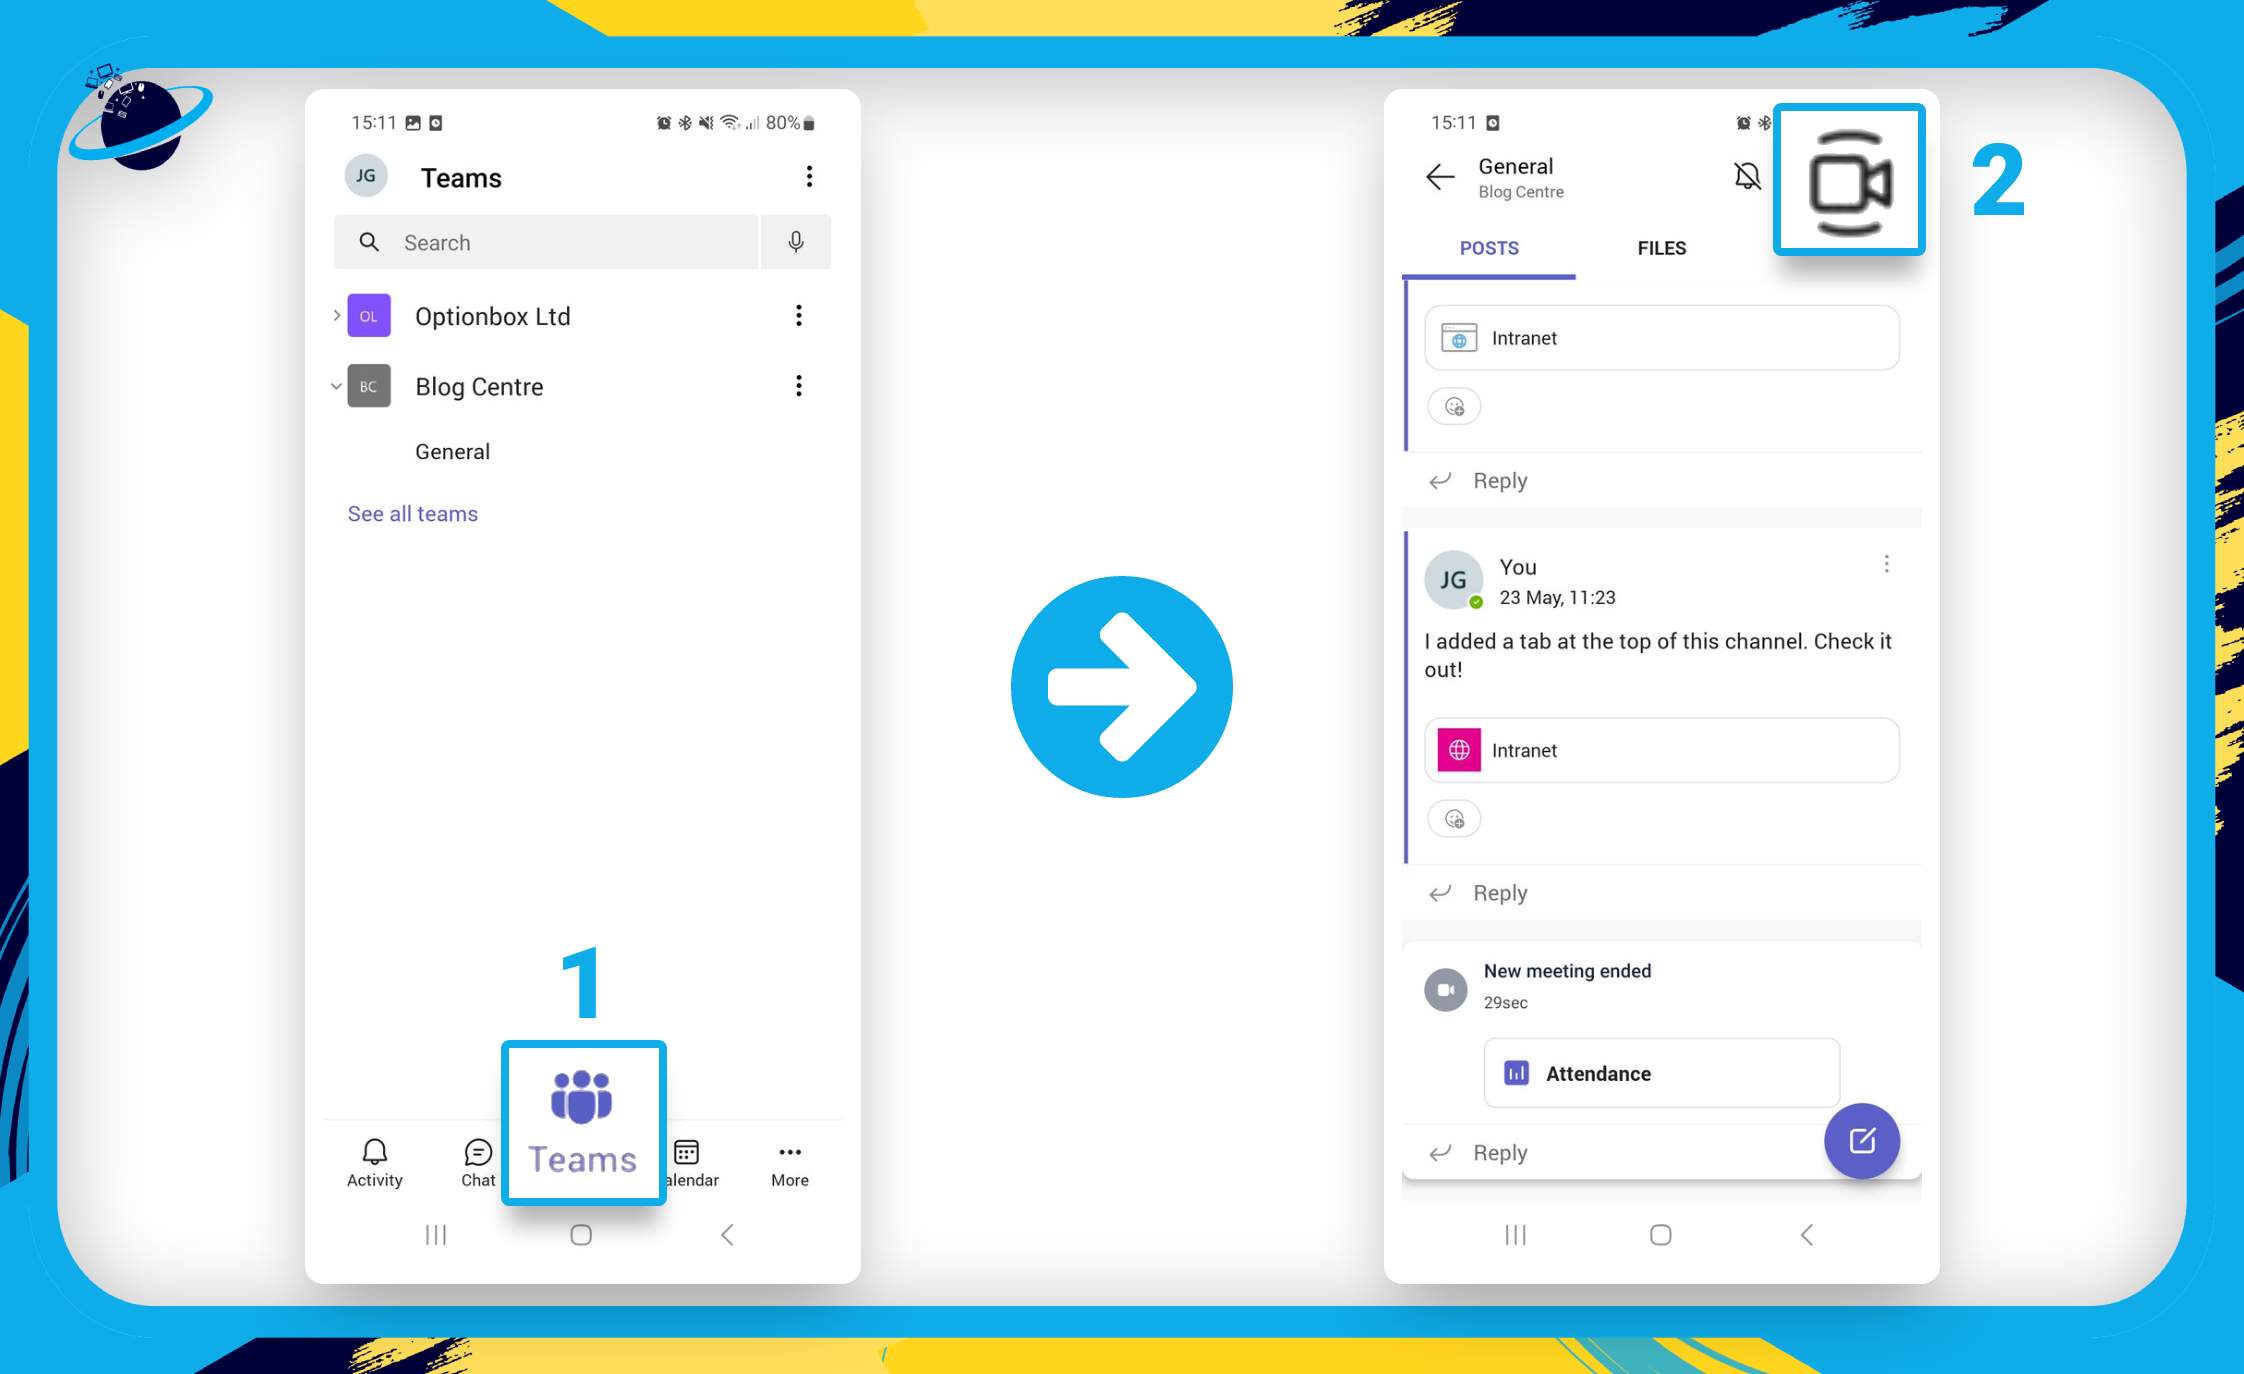
How to make a test call in the Microsoft Teams mobile app:
- Open Microsoft Teams on your mobile device.
- Head to
 “Teams” at the bottom.
 - Tap the
 video icon at the top.
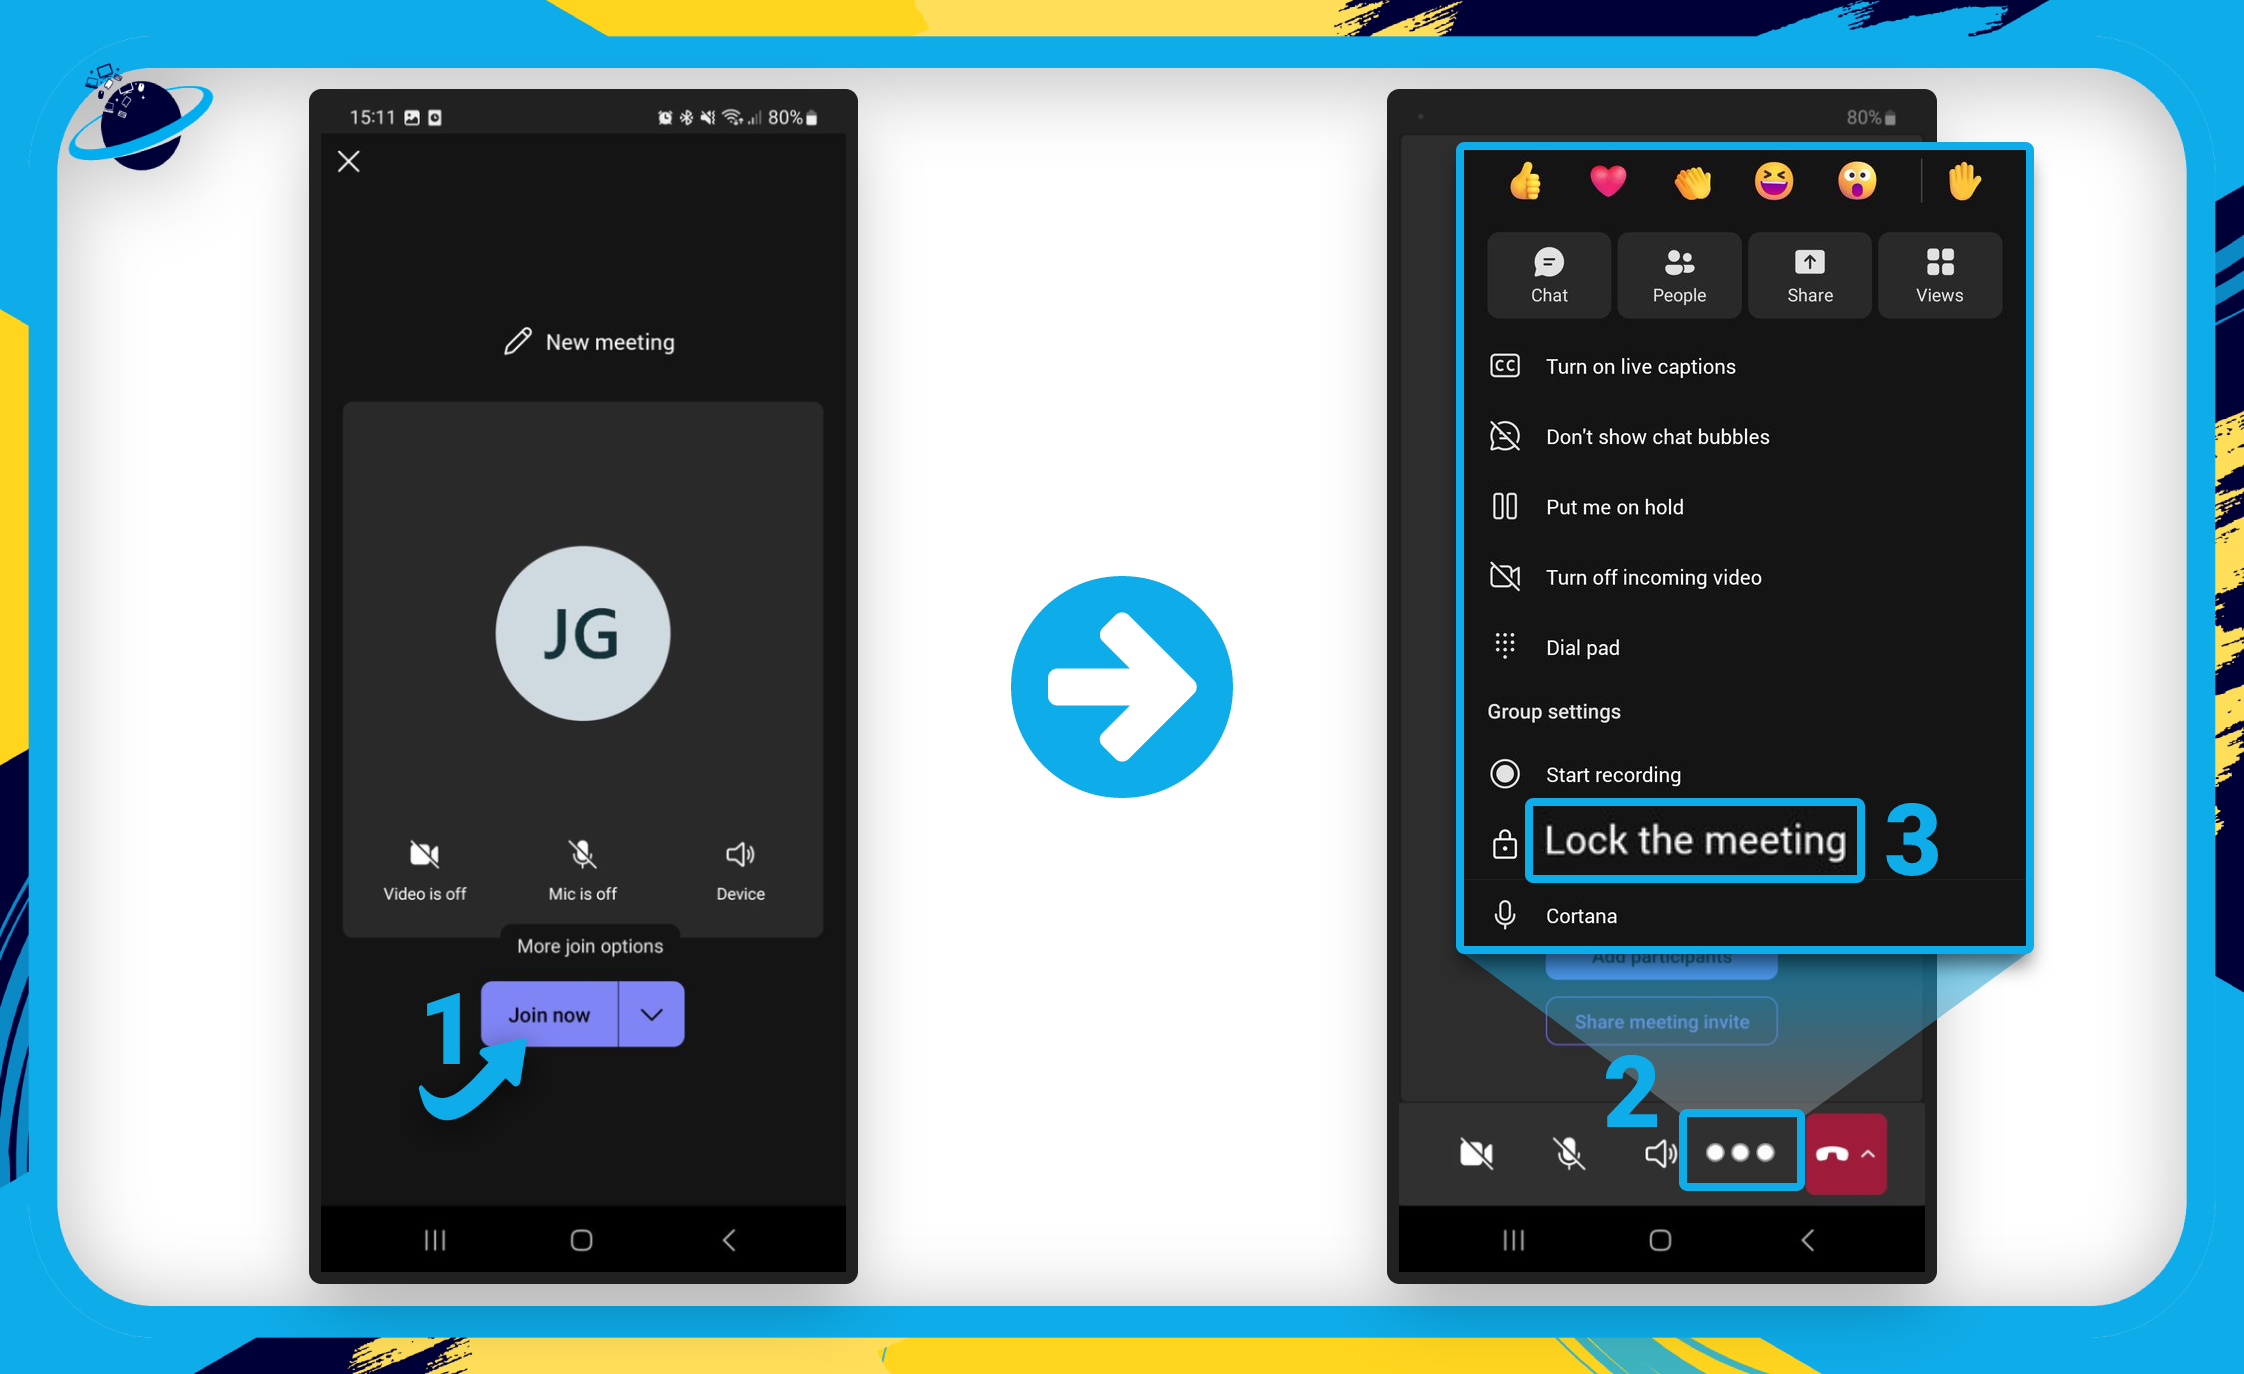
 - Tap the “Join now” button.
- In the meeting, tap the
 three dots.
 - Then select
 “Lock the meeting” and proceed to test your video and audio settings.
We’ve also create a video to help guide you through the process:
 Overview: Update to the mobile app
We previously published a guide explaining that test calls were not possible in the Teams mobile app. However, subsequent updates have given users the ability to do that, and we’ll show you how in this guide. If you don’t have the mobile app, please use the links below that contains all versions of Microsoft Teams:
 Microsoft Teams
  Mobile application
- Microsoft Teams Desktop application
- Microsoft Teams web application
To ensure you achieve the best quality video, consider upgrading your system with our suggested hardware solutions:
   |

 How to make a test call in the Microsoft Teams mobile app
- To make a test call in the Teams mobile app, start by heading to “Teams” at the bottom. [1]
- Then, tap the video icon in the top right. [2]
- Tap “Join now” to enter the test call. [1]
- Tap the three dots at the bottom of the meeting window. [2]
- Then select “Lock the meeting.” [3]
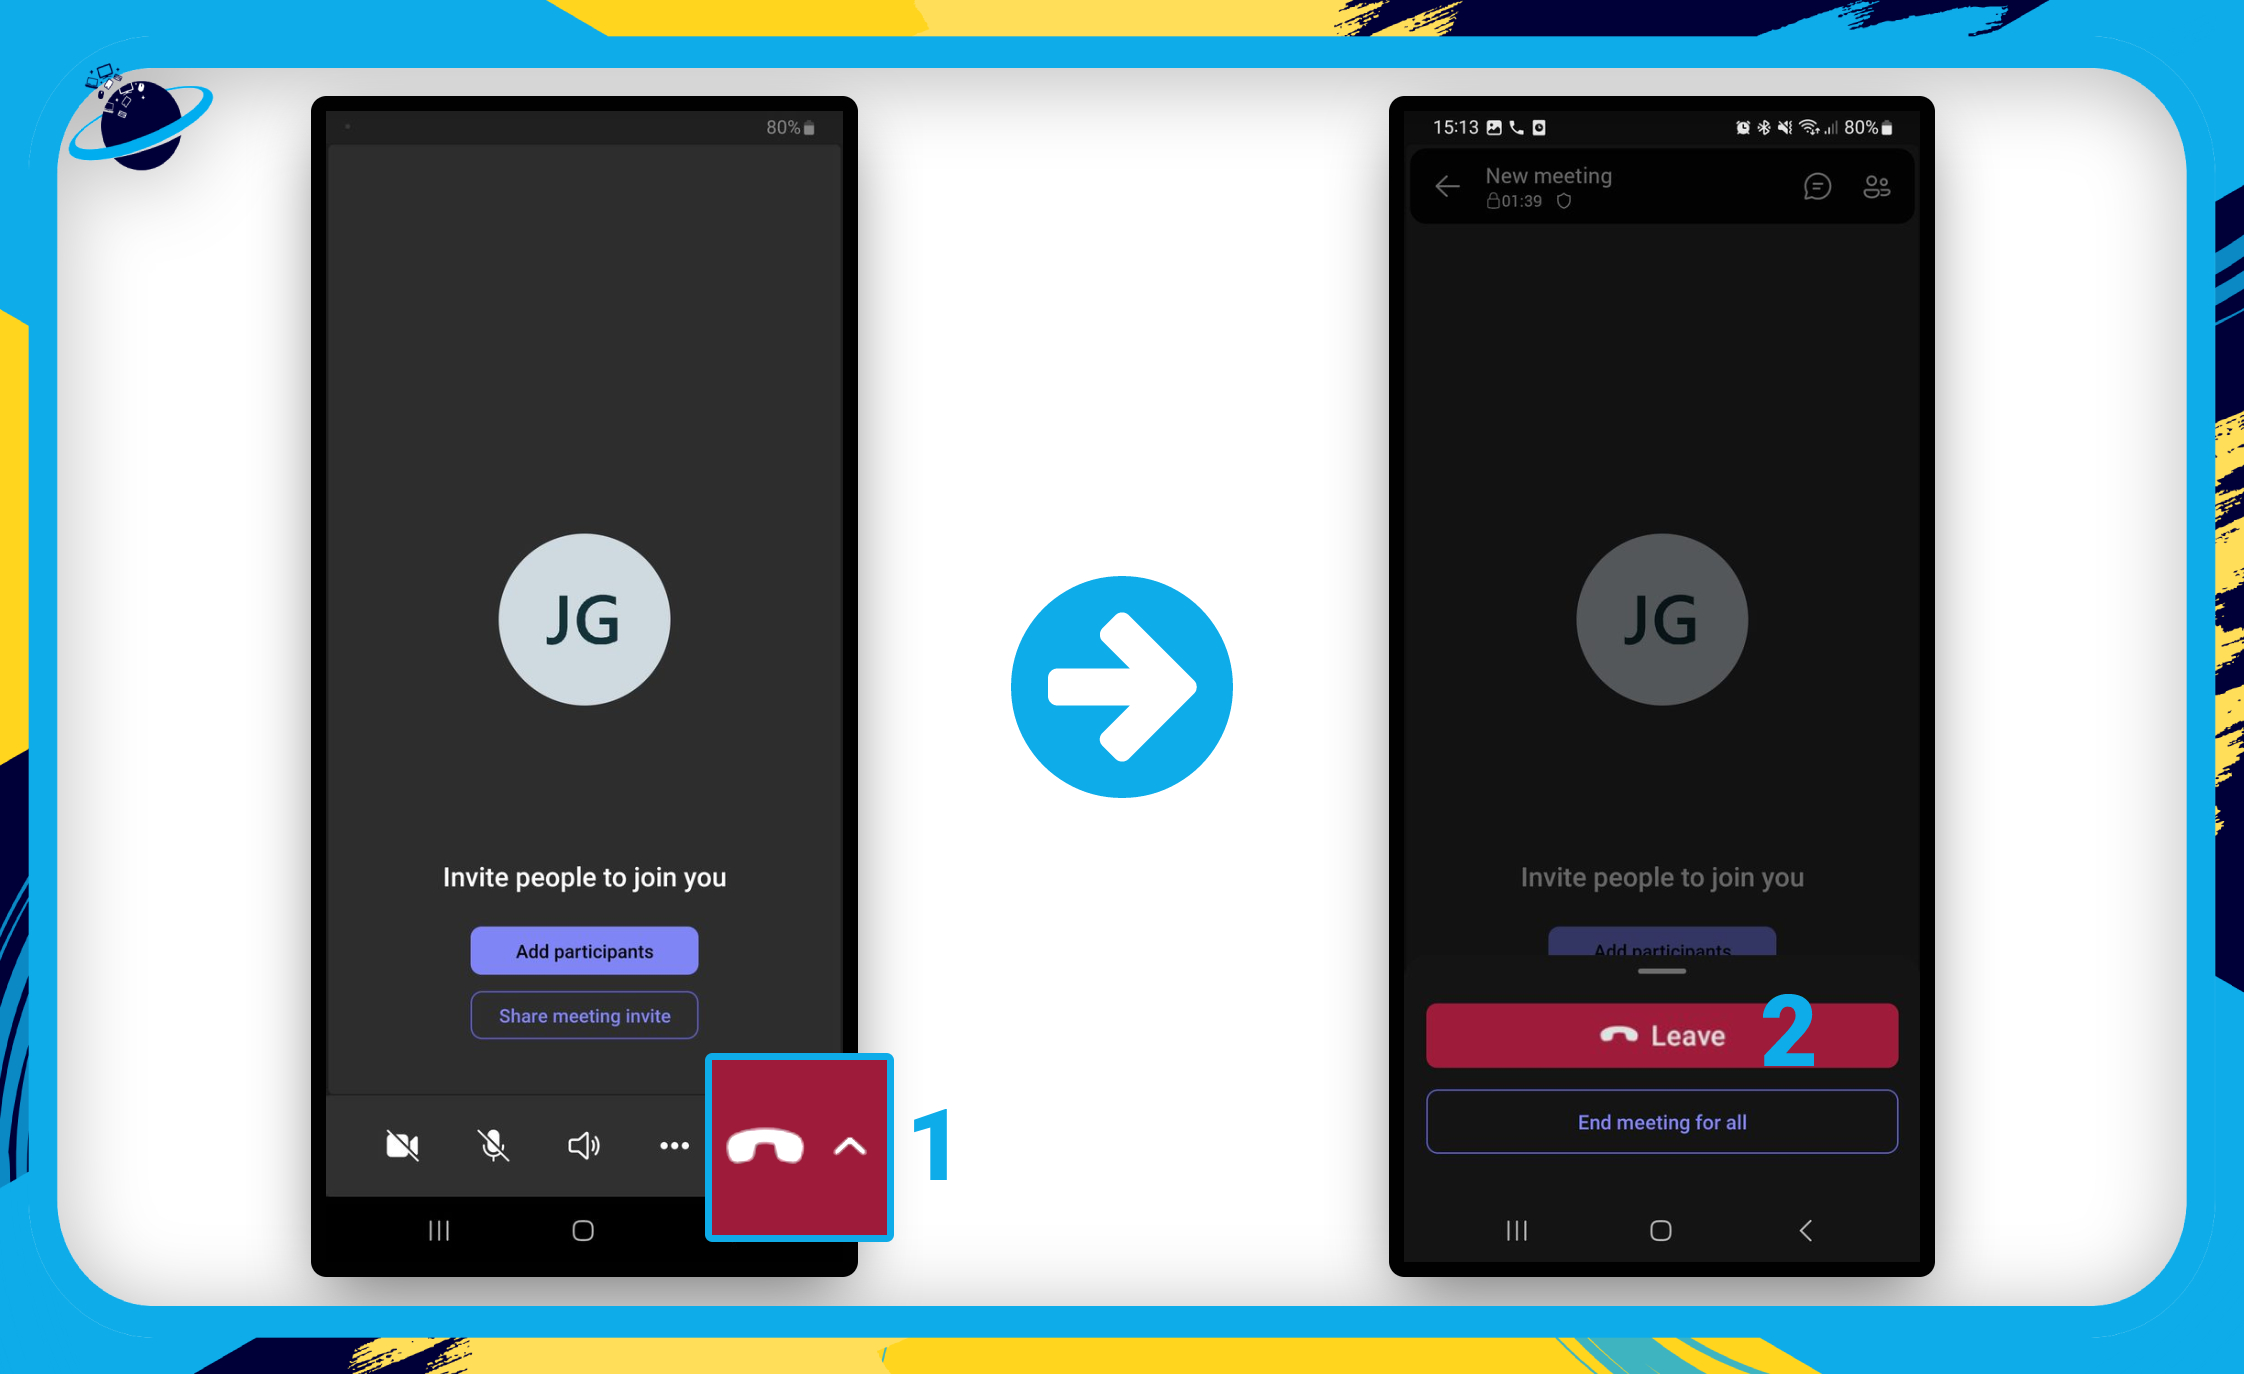
- Once you’ve tested your video, tap the red phone button. [1]
- Then press the “Leave” button. [2]
Host a test call in the Microsoft Teams web or desktop app
In this section, we’ll give you a quick guide on how to make a test call in the Microsoft Teams web or desktop application. However, for a more detailed guide, please refer to our dedicated resources, which you can find in the list below:
![]() A complete guide to doing a test call or meeting in Microsoft Teams
A complete guide to doing a test call or meeting in Microsoft Teams![]() A complete guide to testing your audio before a Teams meeting
A complete guide to testing your audio before a Teams meeting![]() How to test your camera in Teams without joining a meeting
How to test your camera in Teams without joining a meeting
![]() Note: Some readers may find they cannot create a private team. This issue may result from policies created by your organization’s appointed administrators.
Note: Some readers may find they cannot create a private team. This issue may result from policies created by your organization’s appointed administrators.

Create a private team
In this section, we’ll show you how to create a private team that we will use to host our test call.
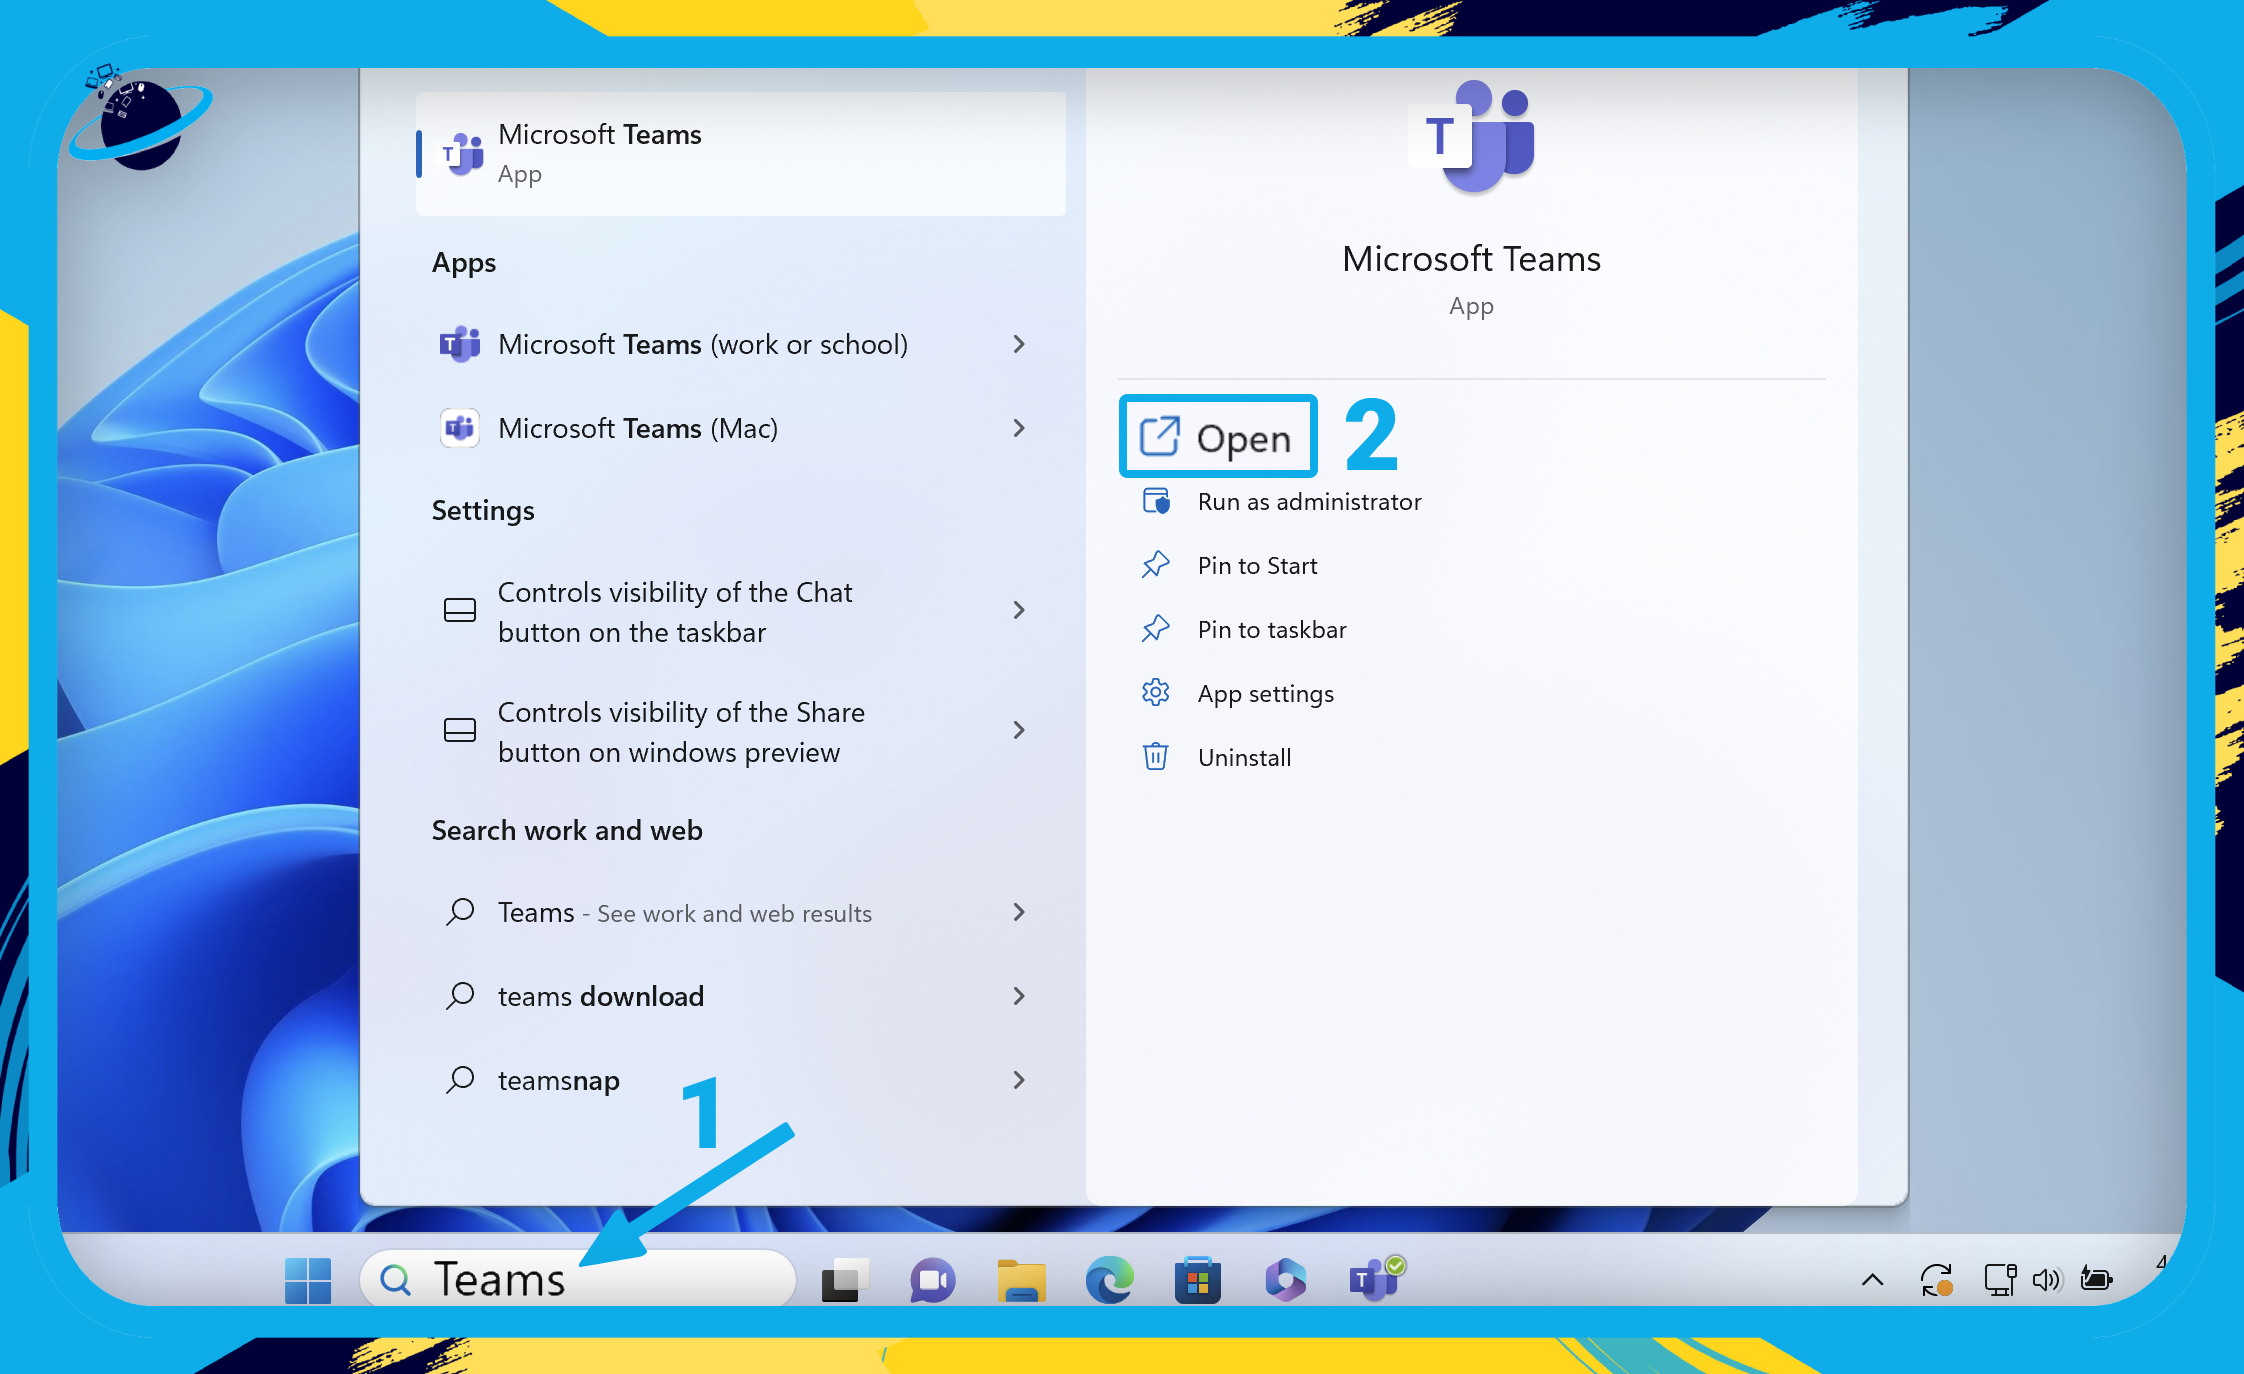
To start, launch Microsoft Teams. If you’re using the desktop client, search for “Teams” [1] and click “Open.” [2] Users of the web client can access Teams here or via Office.
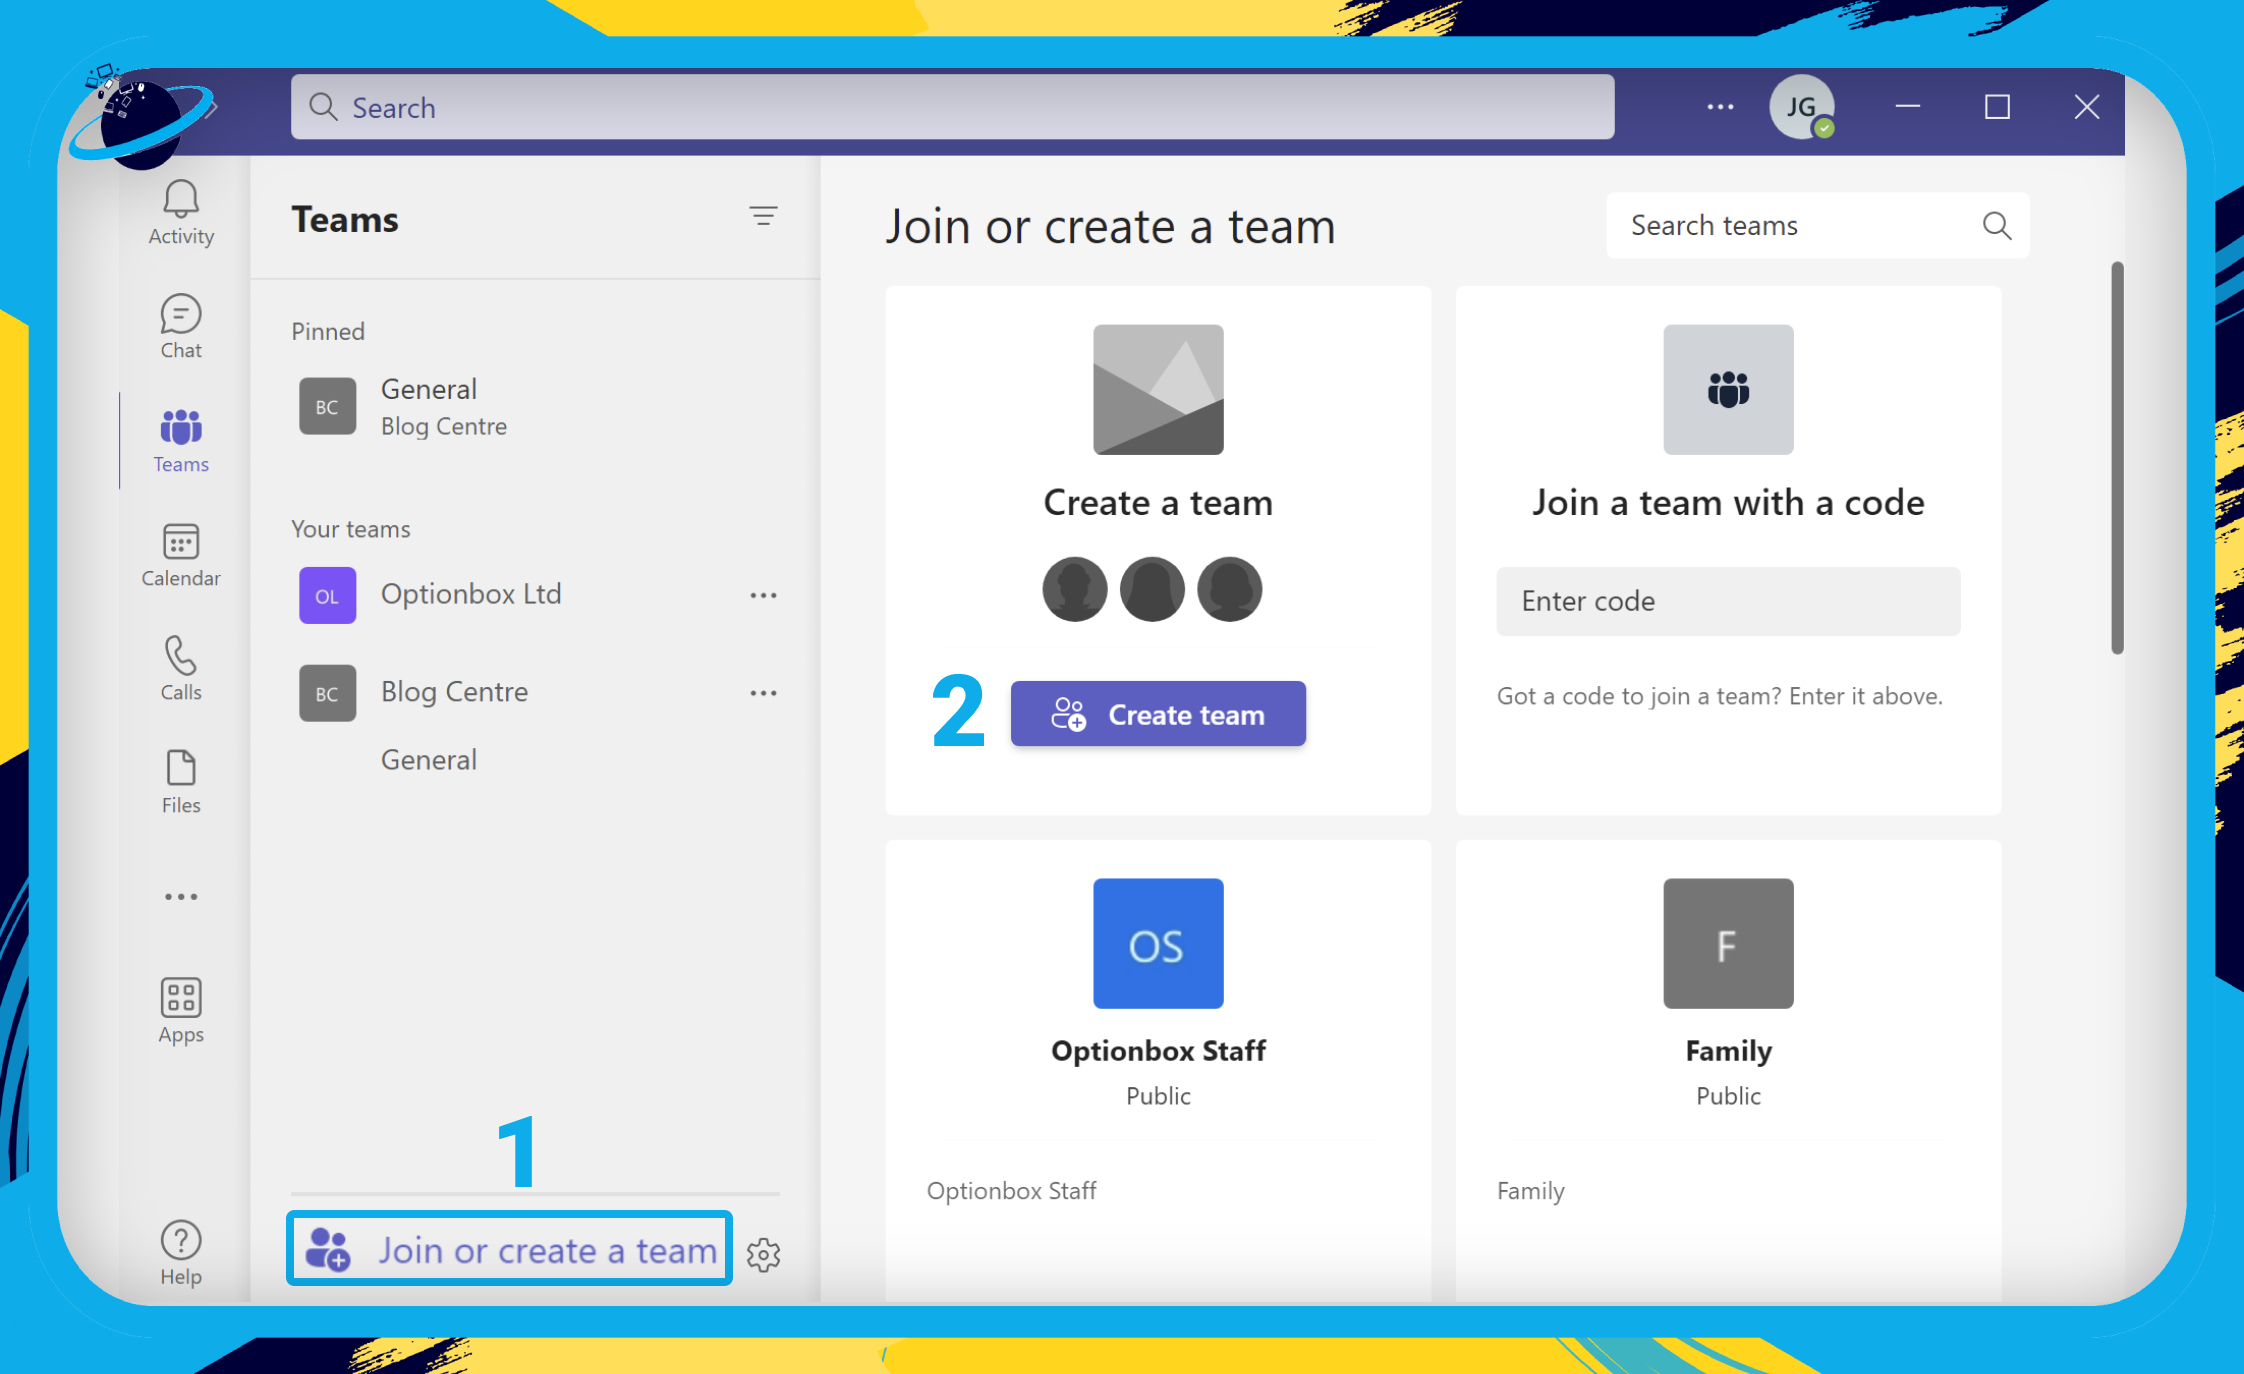
- Click “Join or create a team.” [1]
- Then hit the “Create team” button. [2]
With Teams open, we can begin the creation process. Use the sidebar on the left side of the screen to access the “Teams” page. Once there, redirect your attention to the bottom left of the said page. Select “Join or create a team.” A new menu will appear.
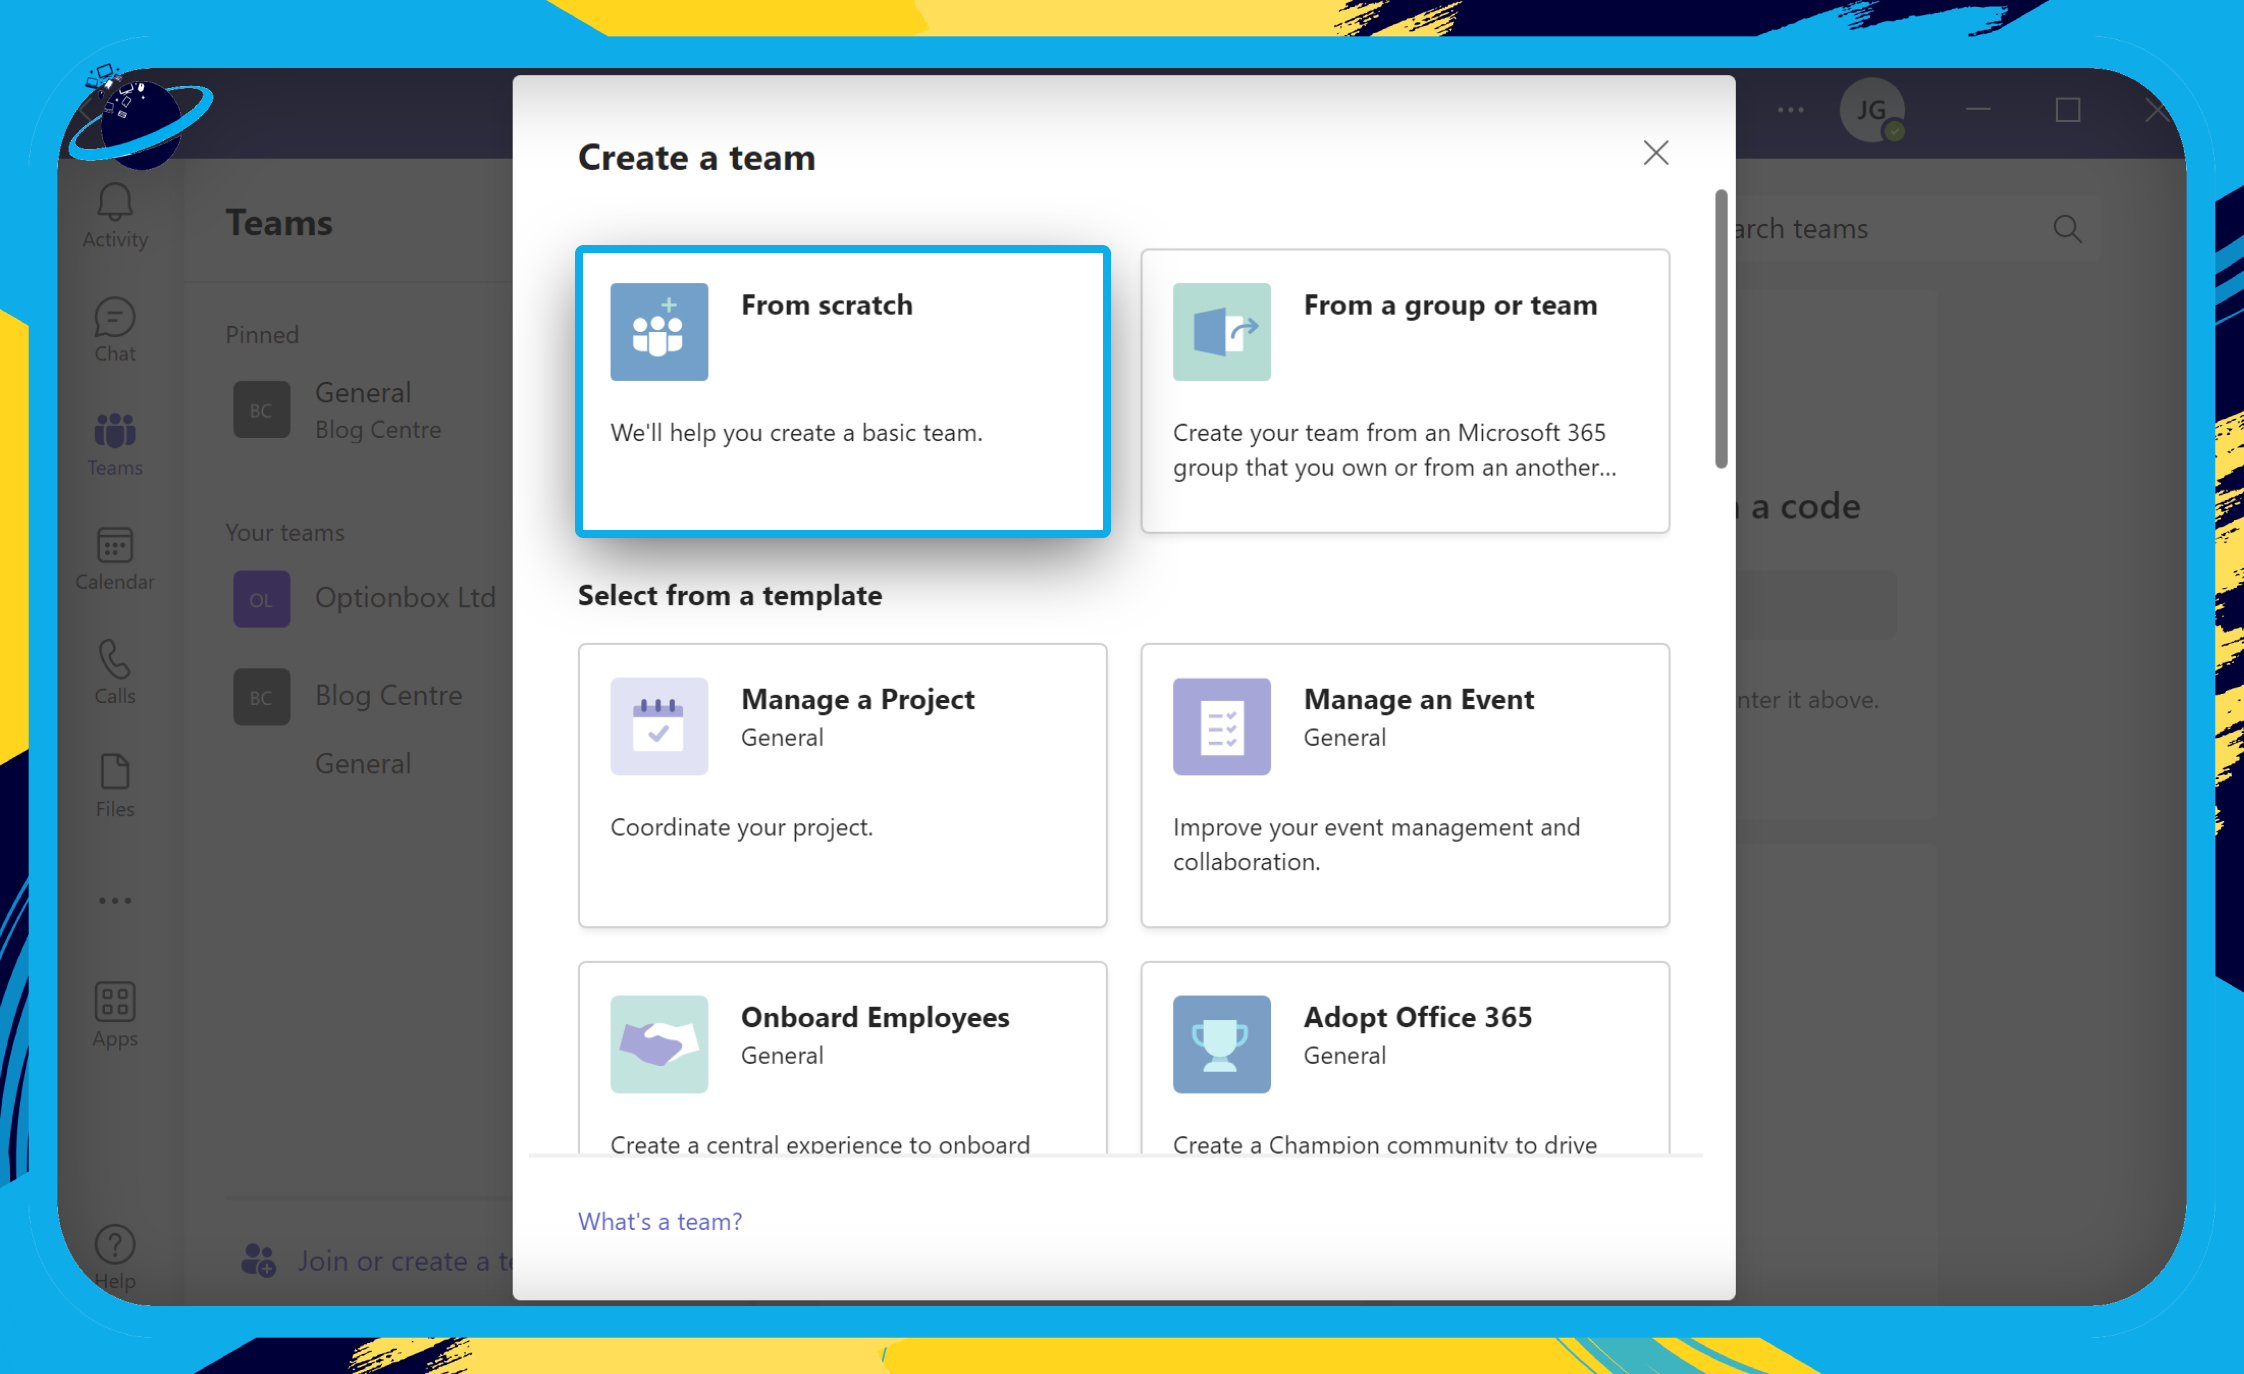
- Select “From scratch” in the dialog box.
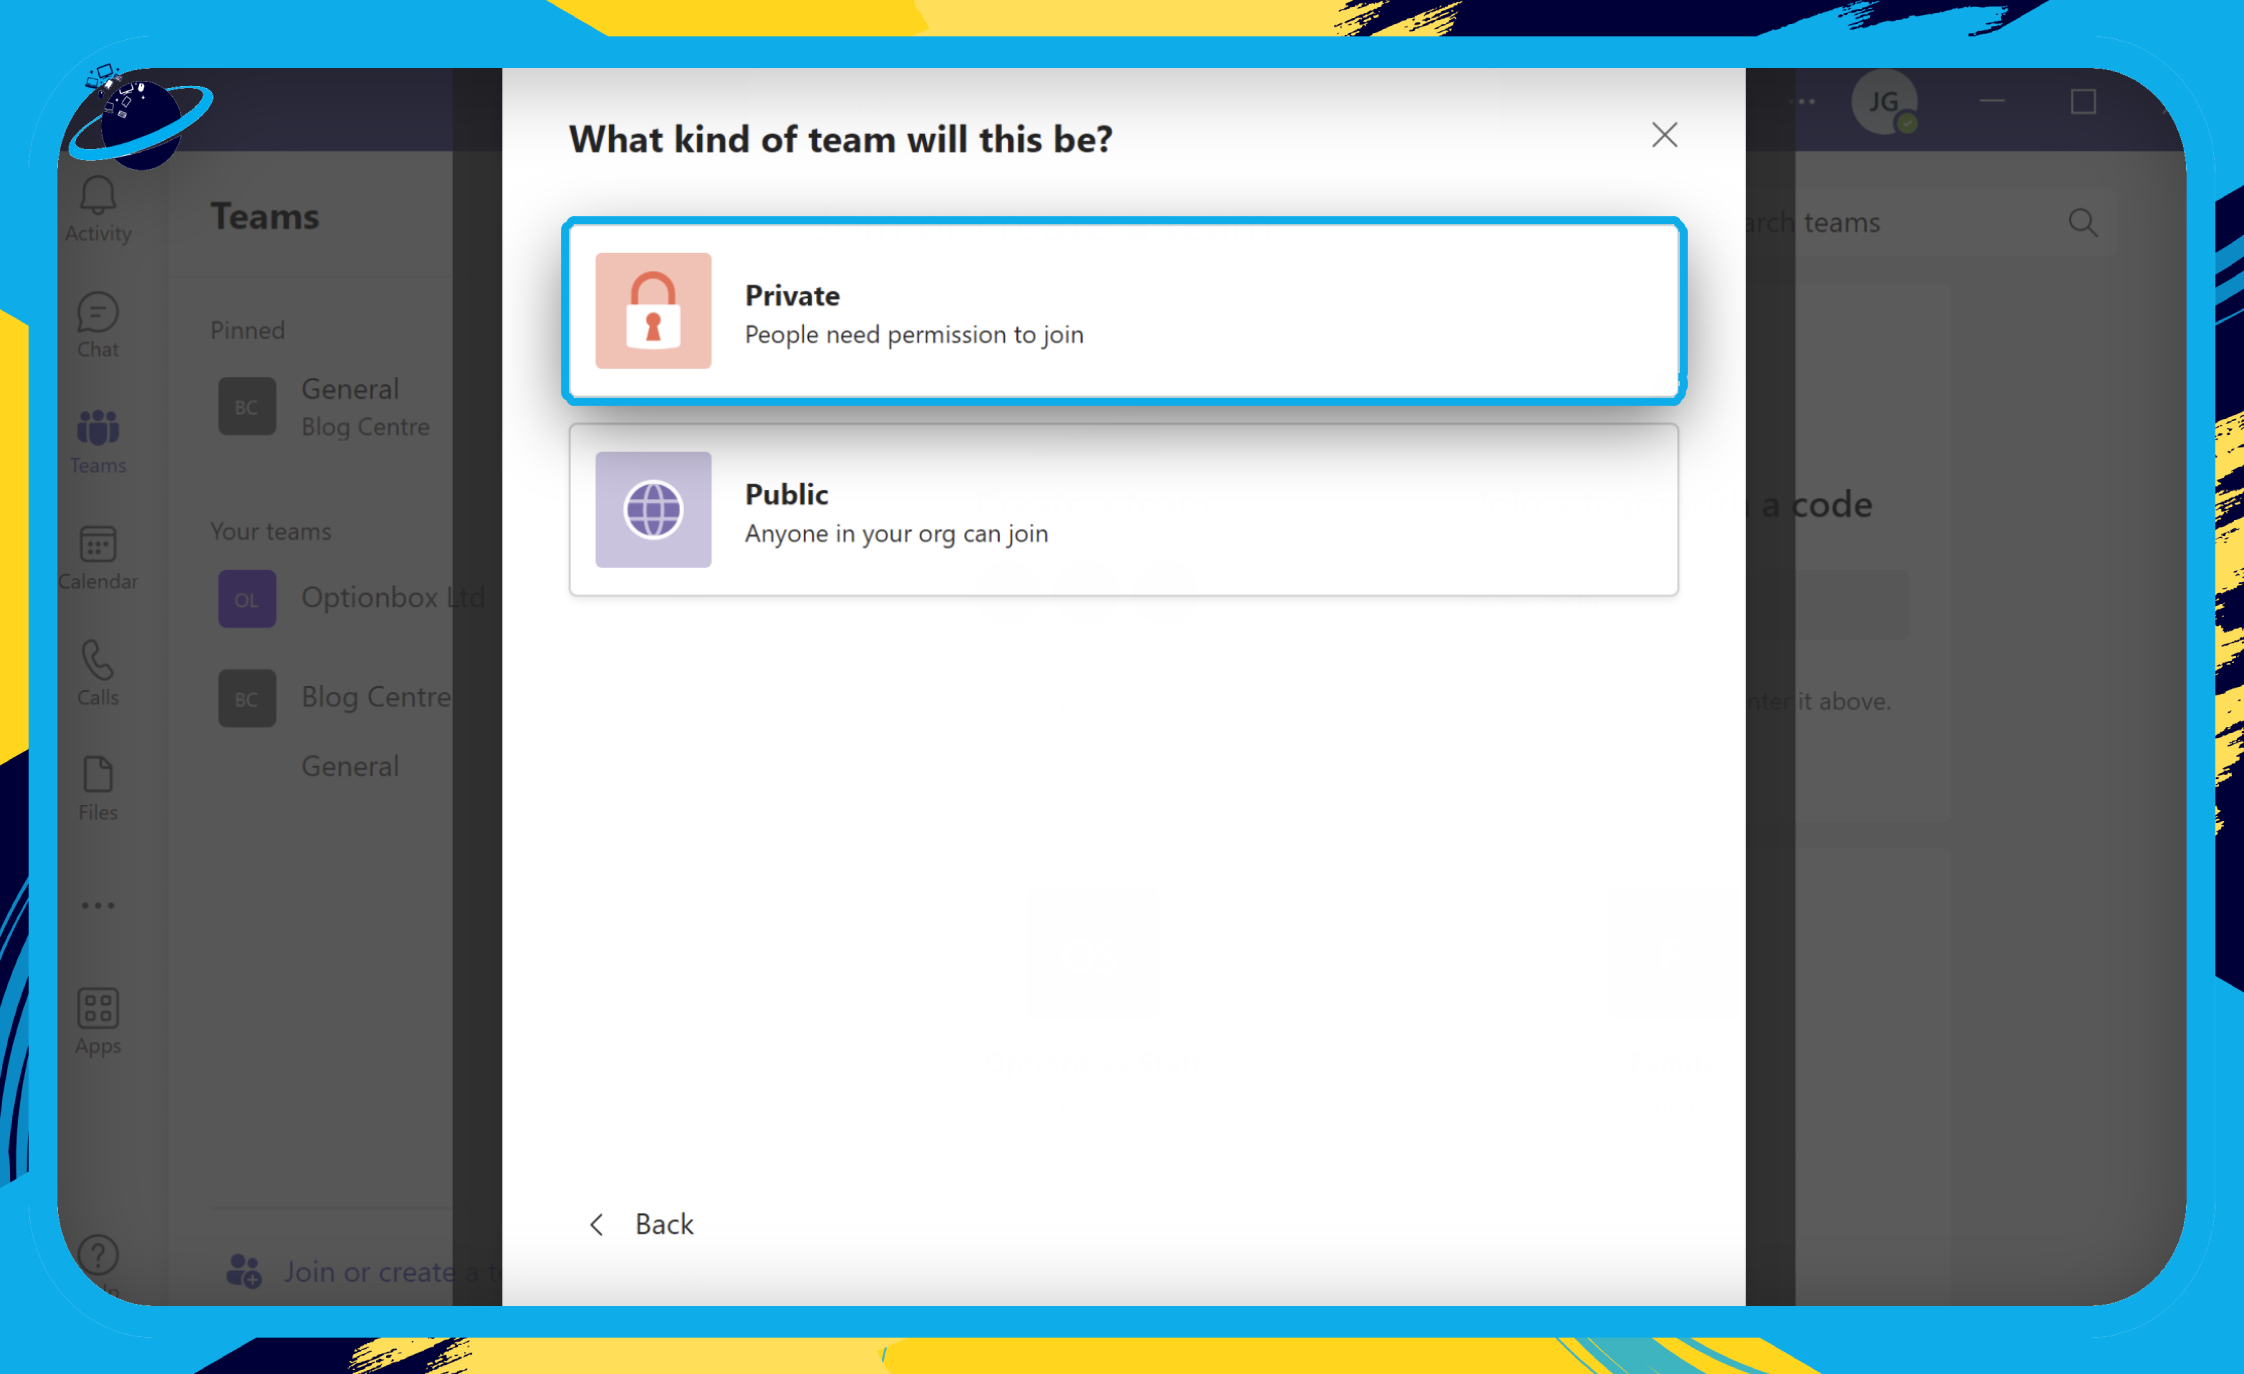
- Ensure that you set the team to “Private.”
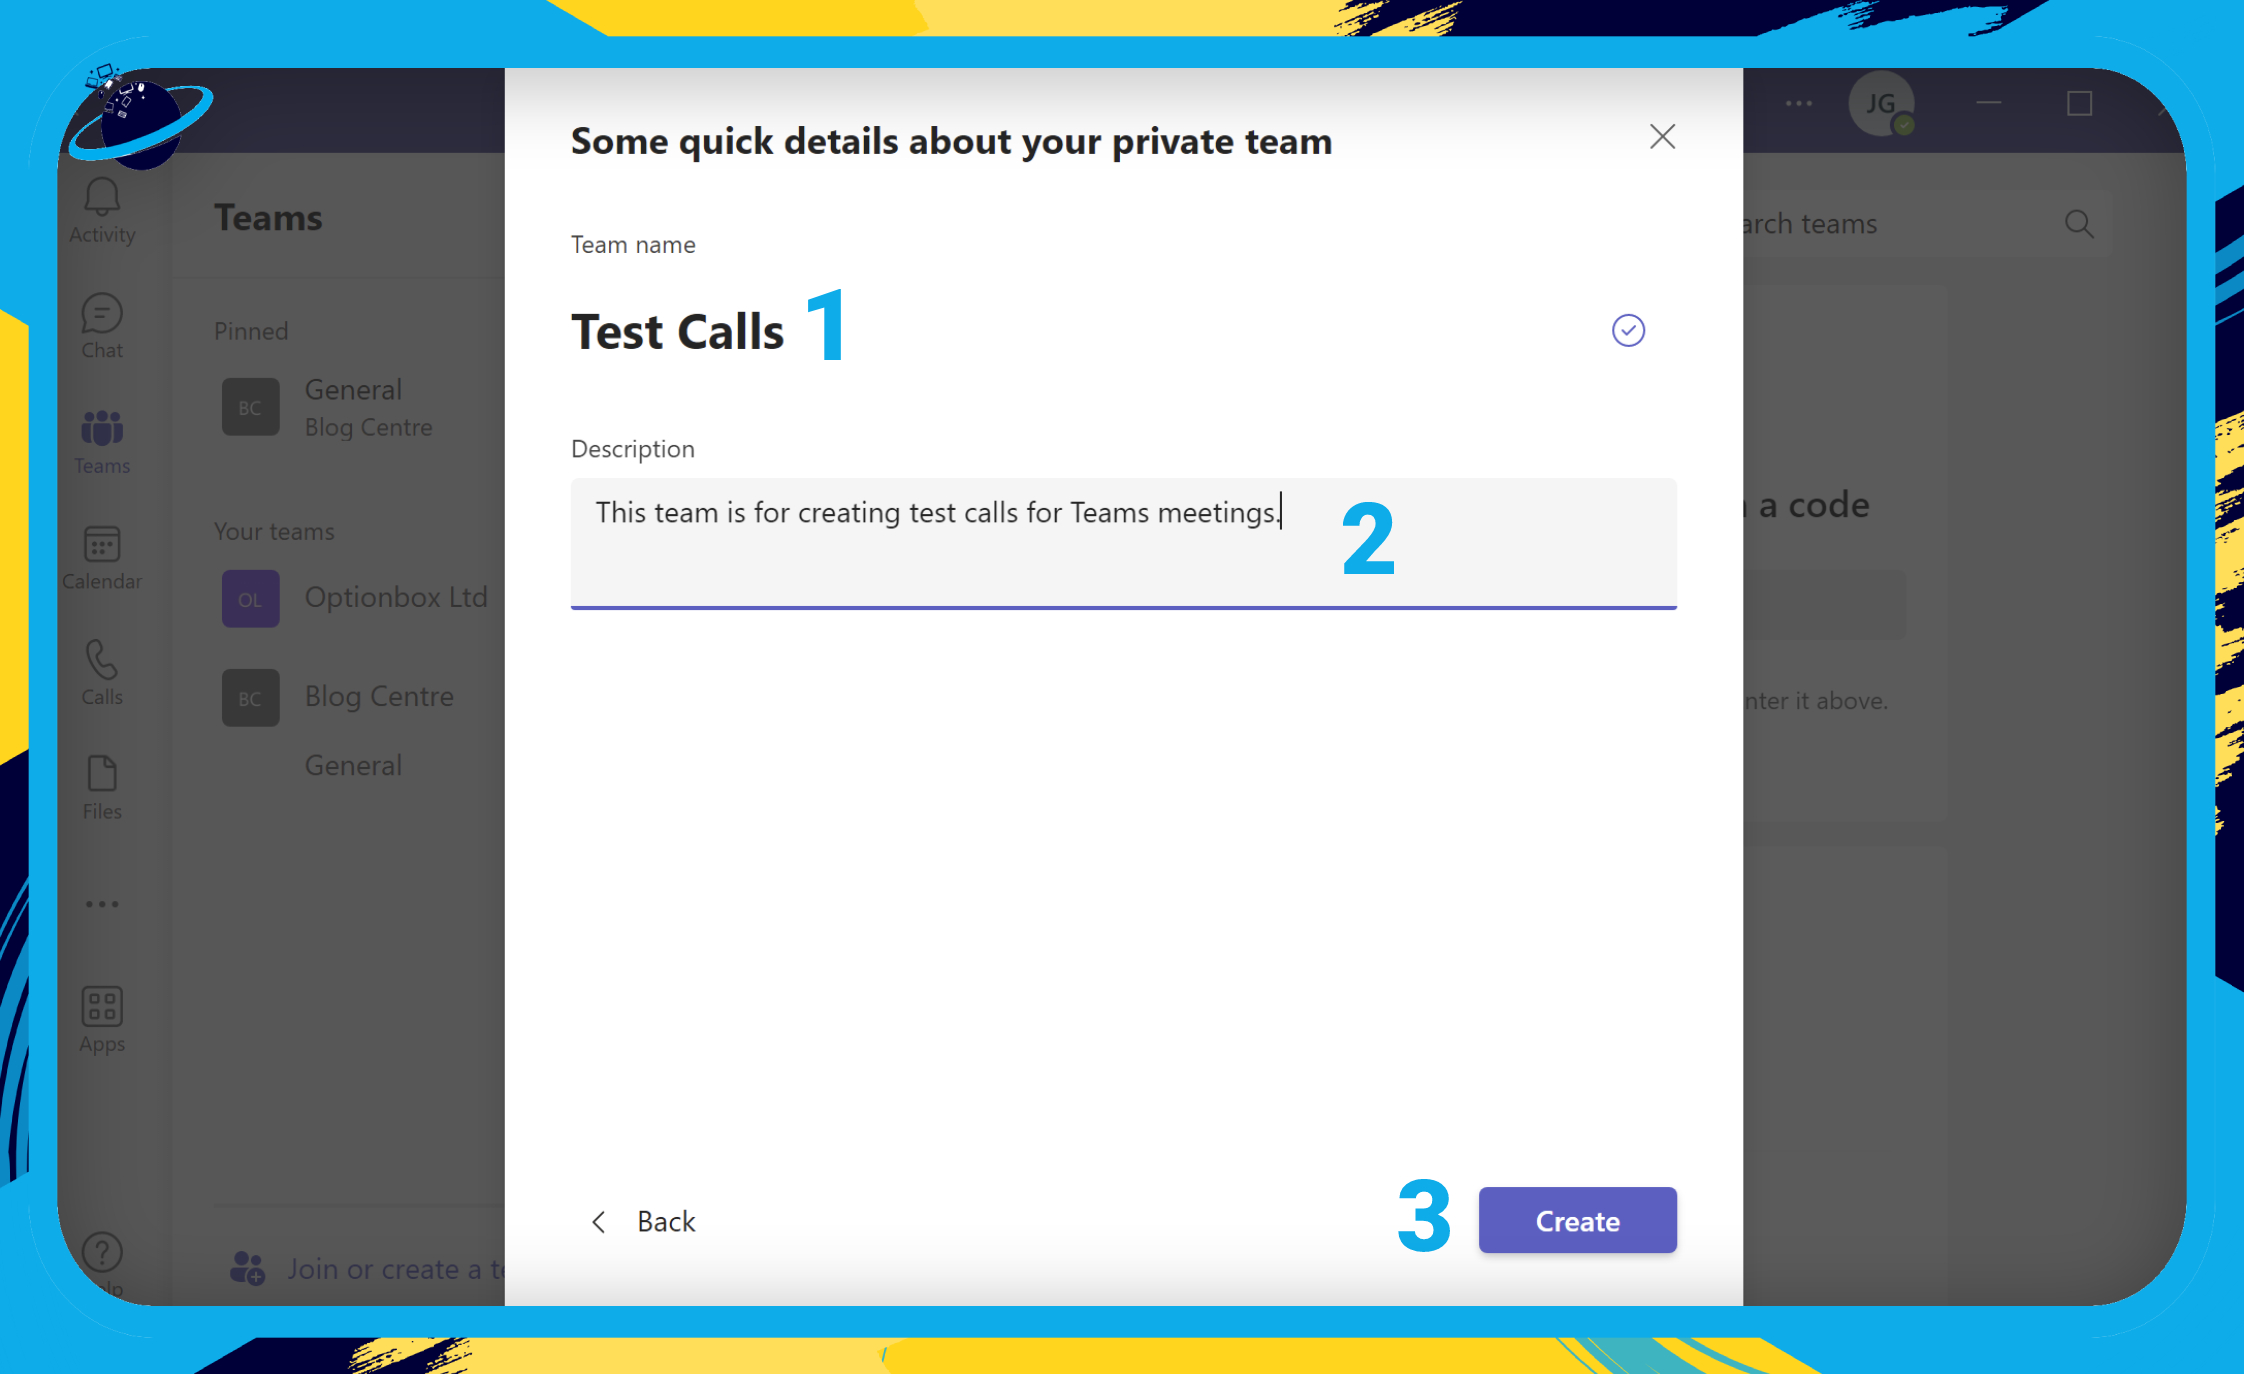
- Now name your team — we called ours “Test Calls.” [1]
- Write an optional description, informing people what the team is for. [2]
- When you’re finished, hit the “Create” button. [3]
When you’re asked to add members to your team, hit “Skip” at the bottom. You can now host a test meeting, which we’ll guide you through in the next section.

Host a private meeting in Microsoft Teams
In this section, we’ll show you how to host a meeting that you can join using your mobile app.
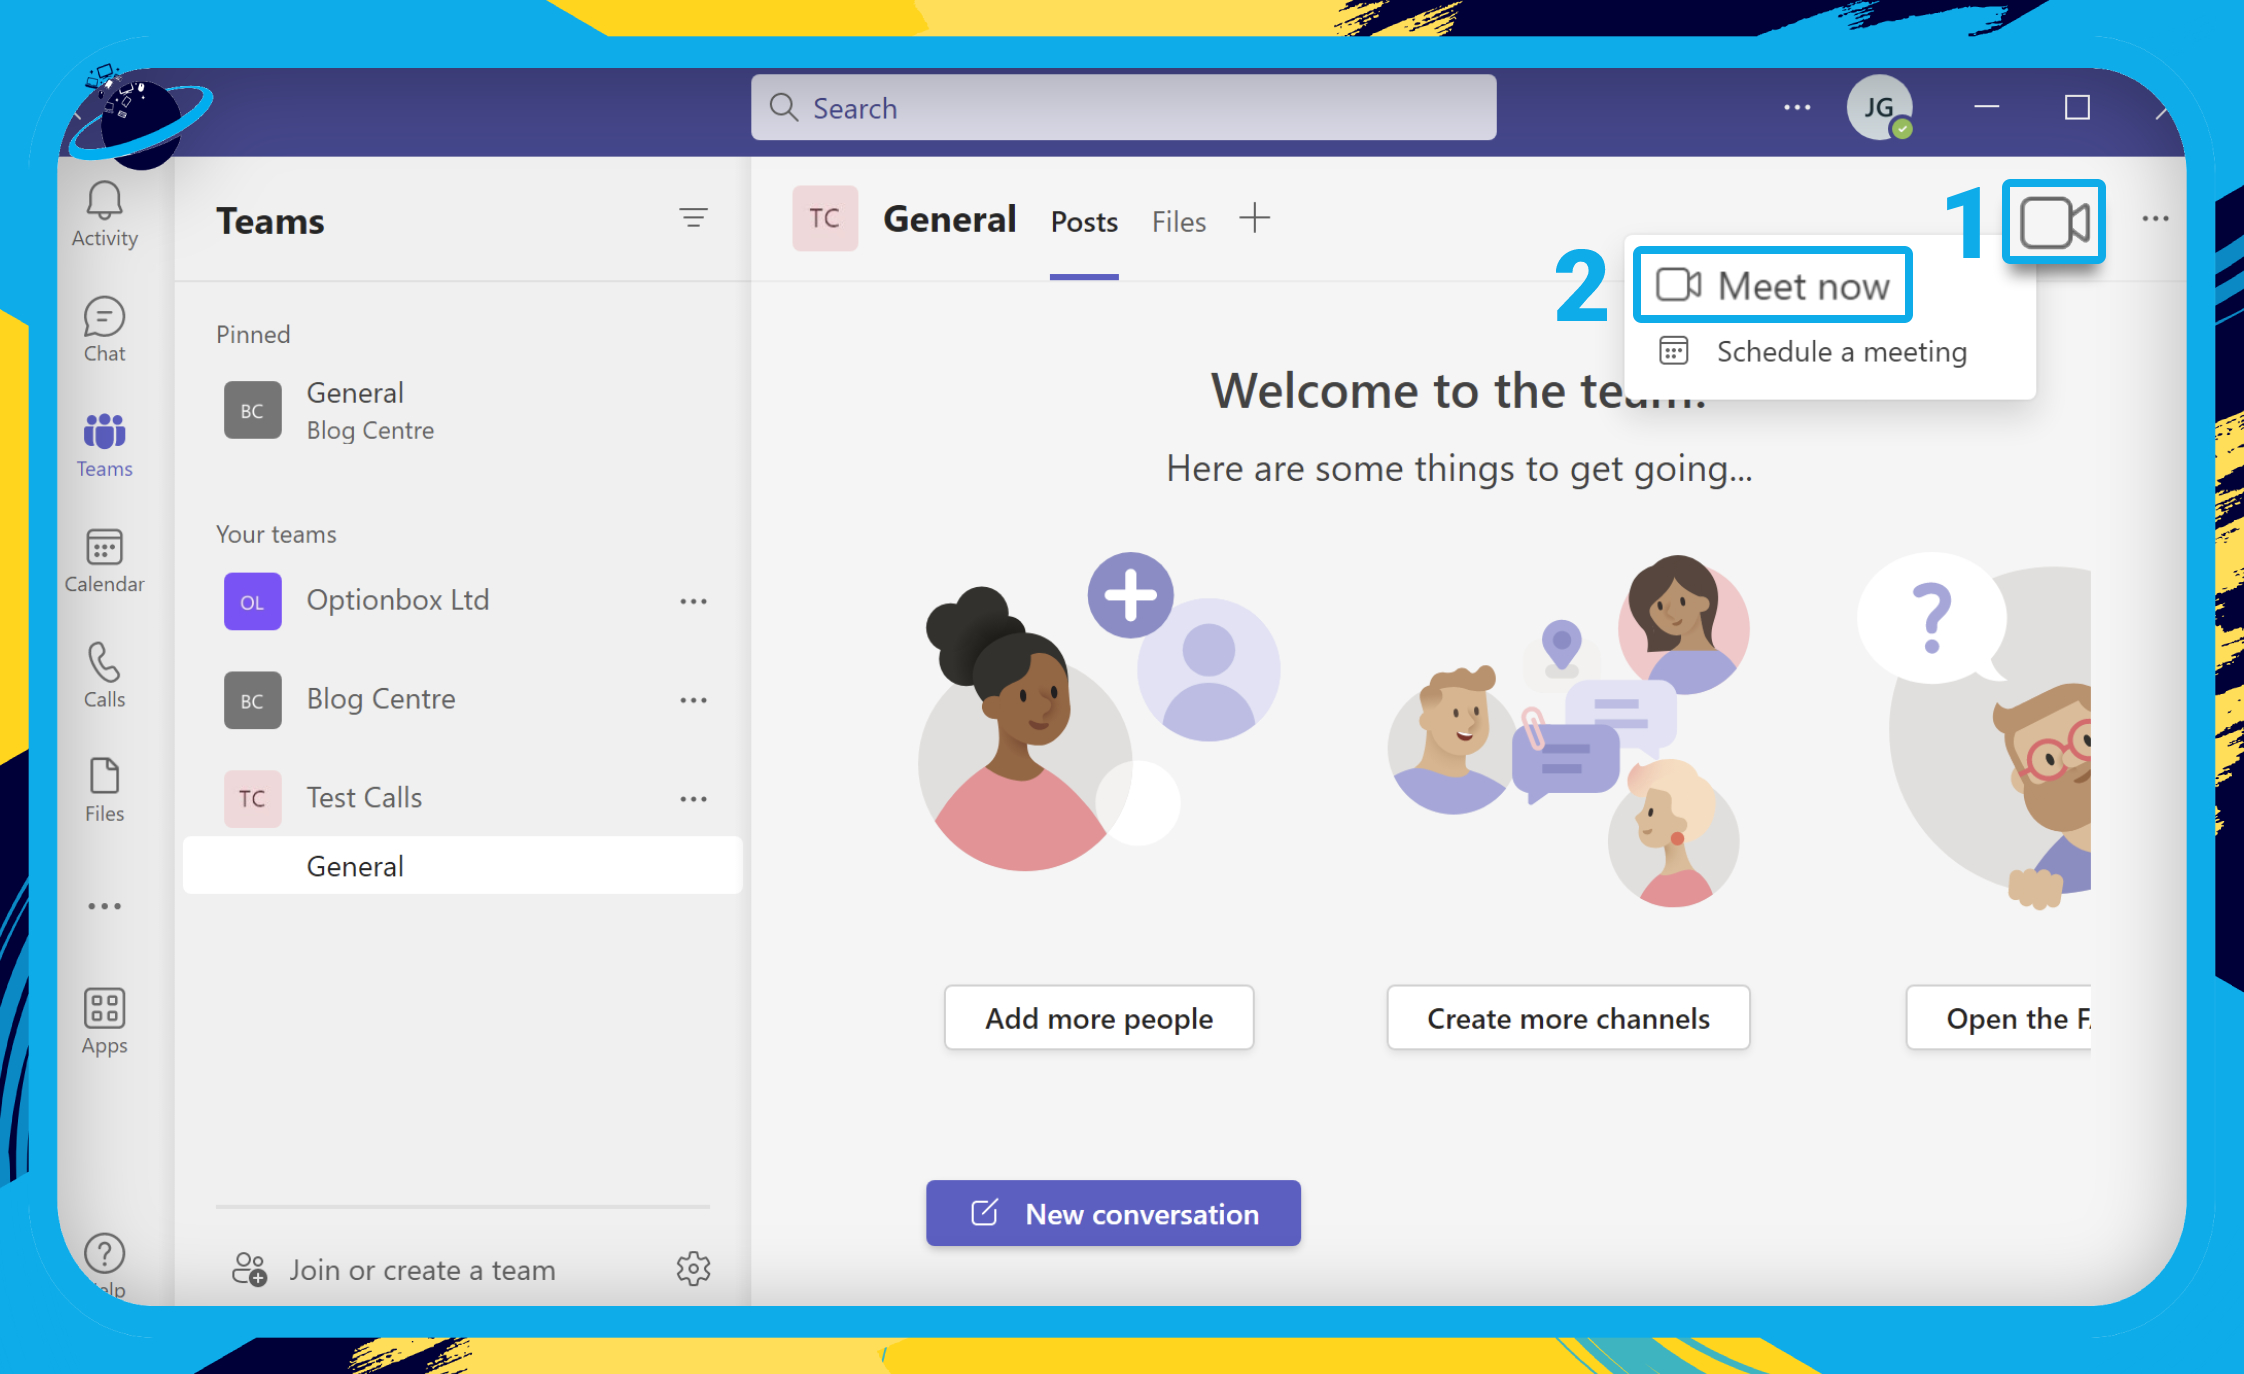
- To begin, click the
 video icon in the top right of your new private team. [1]
 - Then select “Meet now” from the dropdown. [2]
- Alternatively, click “ Meet” in the expanded view.
Expanded view? The layout of your Teams window changes depending on the size of the window. If the width is small, you’ll see the ![]() video icon, if the width is large, you’ll see “
video icon, if the width is large, you’ll see “![]() Meet.”
Meet.”
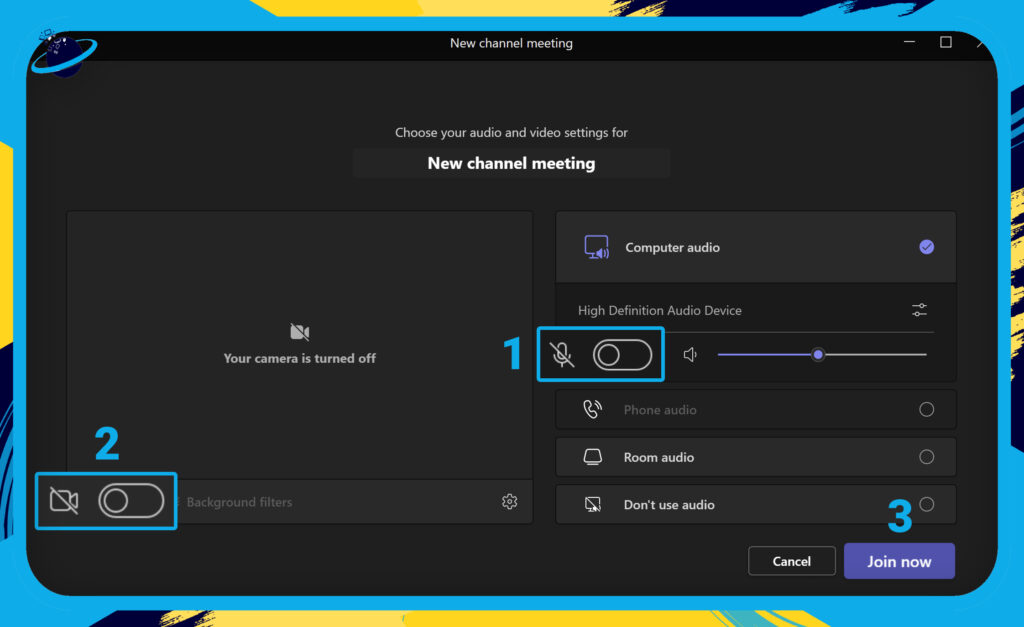
- Toggle off your
 audio. [1]
 - Toggle off your
 video. [2]
 - Then hit the “Join now” button to enter the meeting. [3]
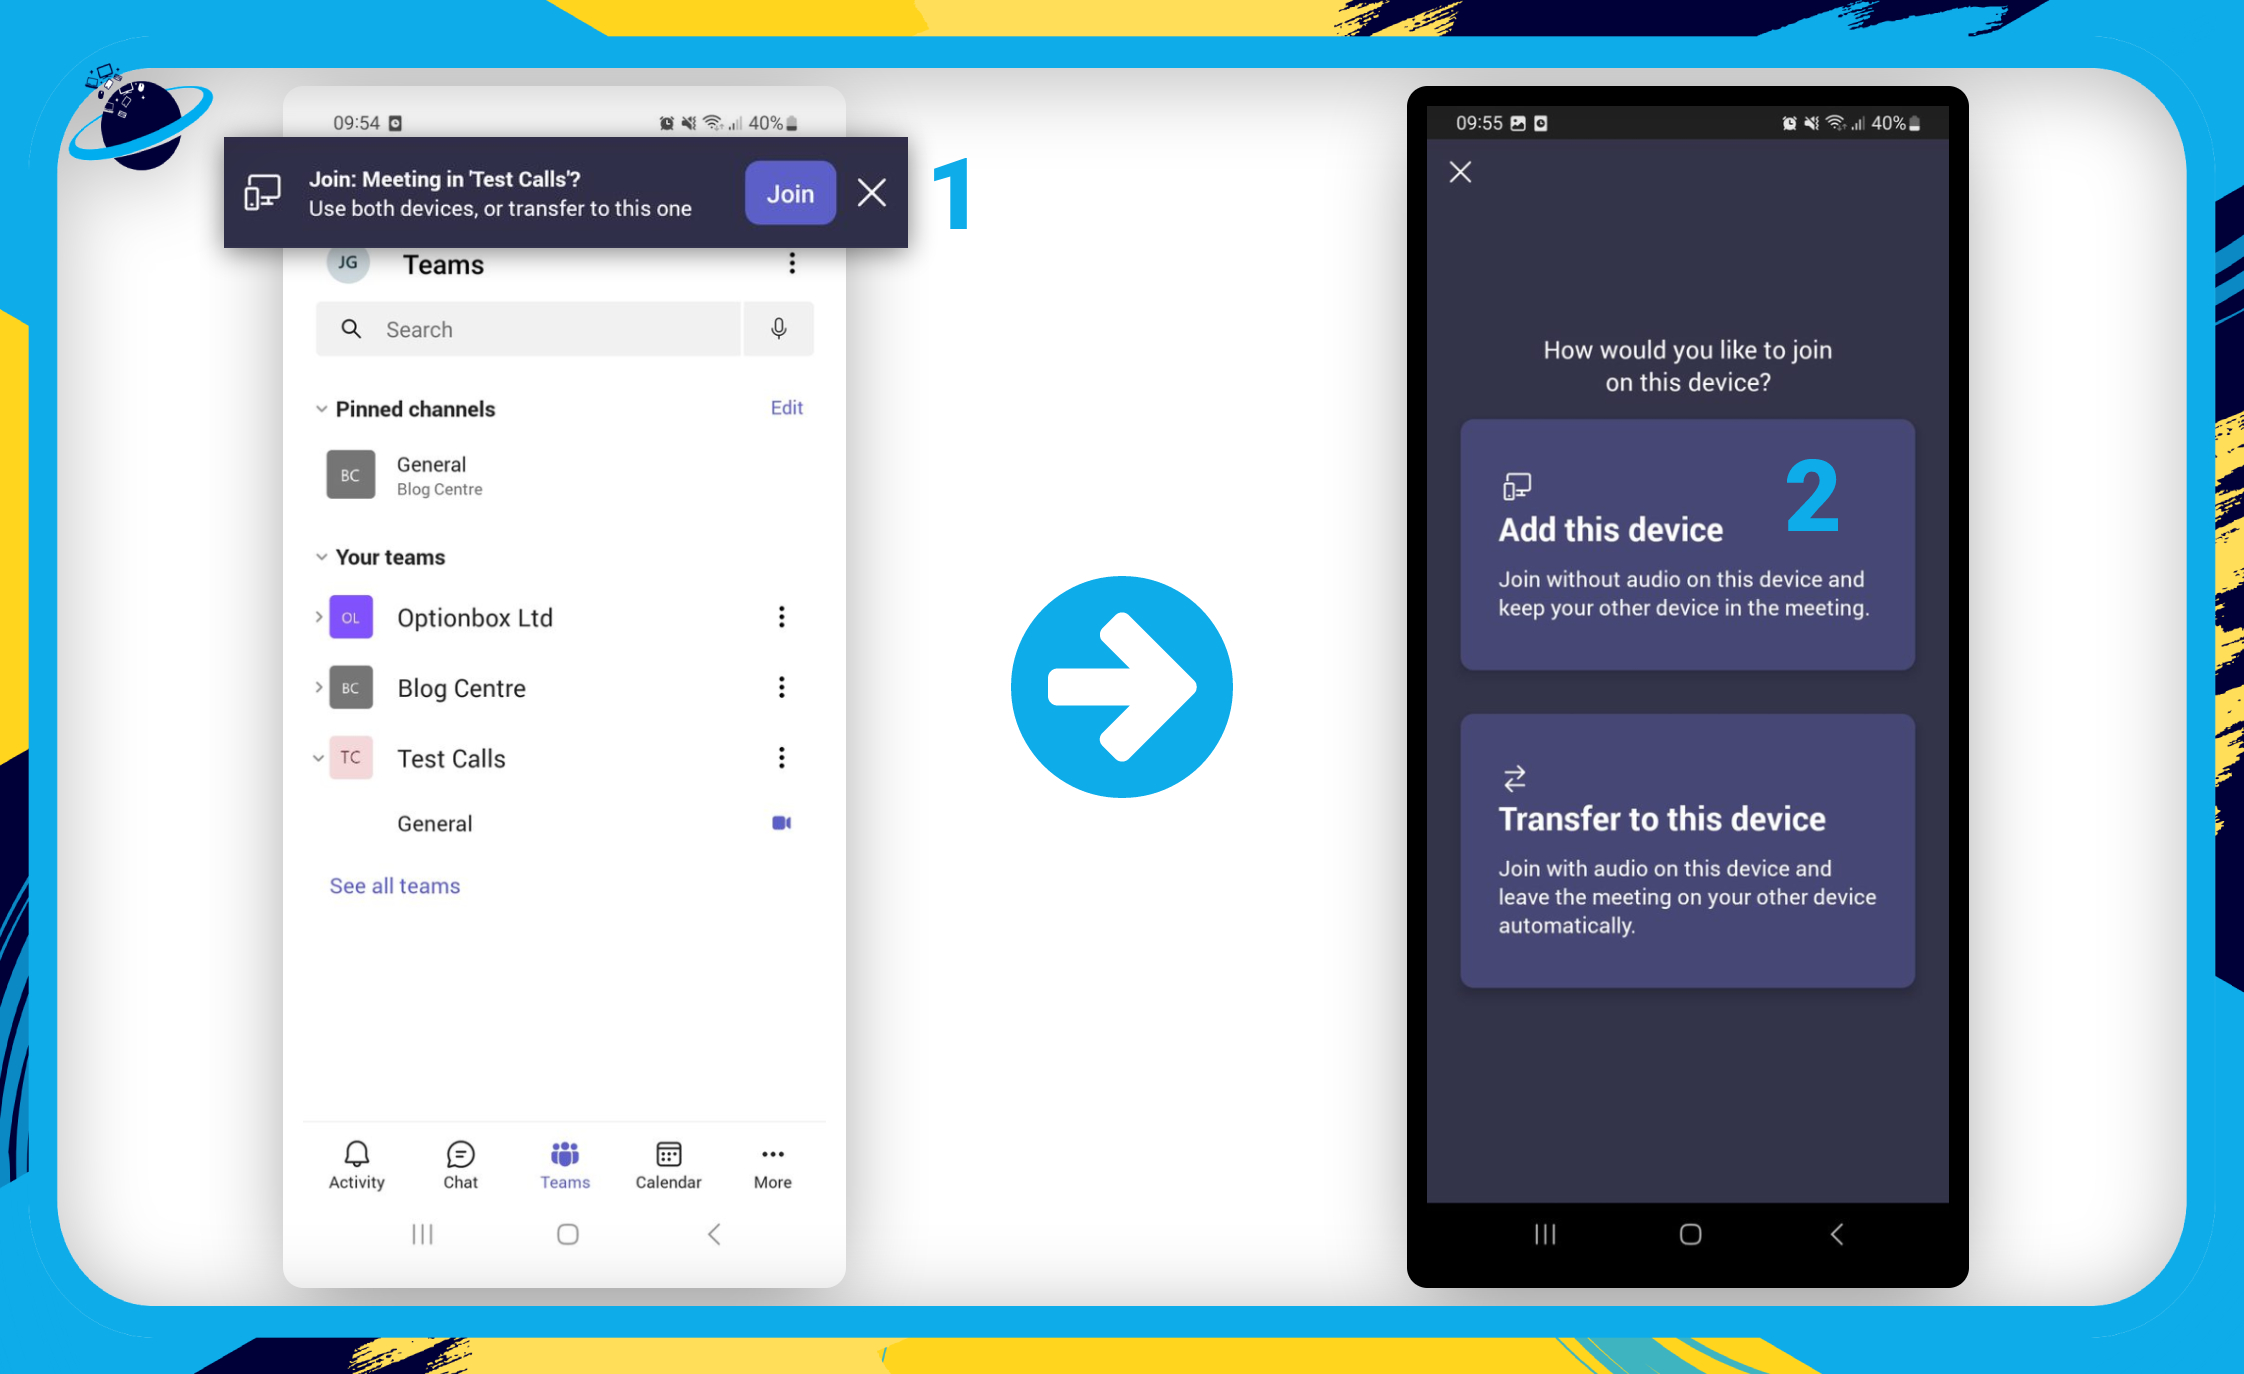
Next, open Microsoft Teams on your mobile device, and you’ll notice an alert informing you that you can join your meeting.
- Tap “Join” at the top. [1]
- Then choose to “Add this device.” [2]
Once you’ve joined the meeting, you can then toggle on your audio and video and test any aspect of the call in the privacy of your own Teams meeting.
![]() Note: Admins can use eDiscovery to access audio, video, and messages from private team meetings.
Note: Admins can use eDiscovery to access audio, video, and messages from private team meetings.
Frequently Asked Questions (FAQ)
 Can you do a Teams call on a mobile?
Yes, you can make a Teams call on your mobile device. To do that, simply open a chat with someone, then tap the ![]() video or
video or ![]() phone icon at the top.
phone icon at the top.
How do I test audio on Microsoft Teams?
- Open your Microsoft Teams app.
- Press the three dots next to your profile picture.
- Go to “Settings.”
- Go to “Devices.”
- Select “Make a test call.”
- Then record a voice clip.
Read more: ![]() A complete guide to testing your audio before a Teams meeting
A complete guide to testing your audio before a Teams meeting

Conclusion
The simplest way to test a Teams call on your mobile device is to start a new meeting and lock it. But you can also host a private meeting from the web or desktop version of Teams by creating a private channel and starting a meeting from there. You can then open Teams on your mobile device and join the meeting, allowing you to test all aspects of the call in (almost) complete privacy.
Remember that admins can access data from all teams meetings using eDiscovery, including messages that you send — even ones that you edited or deleted. To learn more about eDiscovery, read our guides below:
![]() Are meeting messages kept in Teams?
Are meeting messages kept in Teams?![]() How to download the chat history in Microsoft Teams (2023)
How to download the chat history in Microsoft Teams (2023)