In Excel, did you know you can lock the cells on your Excel worksheet and then safeguard it with a password to prevent other users from modifying, moving, or deleting data in it by accident or on purpose? Assume you control the team status report worksheet, and you want team members to only be allowed to input data to certain cells and not change anything else. You may make just specific areas of a sheet editable using worksheet protection, and users won’t be able to change data in any other part of the page.
It is not possible to protect a worksheet in Excel Online. You must open the document online, open in the desktop app, protect the sheet, then return to the online file.
Here’s how to protect a worksheet in Excel:
- Firstly, open Office 365.
- After that, navigate to your Excel document using either SharePoint or Excel.
- Open that document.
- After that click on “Viewing.”
- Then click on “Open in Desktop App.”
- Click the “Review” tab.
- Click “Protect Sheet” on the “Review” tab.
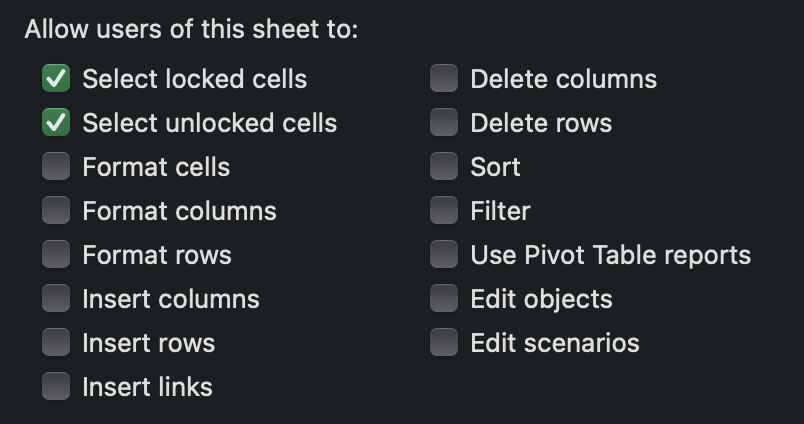
- Select the elements you want people to be allowed to modify in the “Allow all users of this worksheet to list.”
- Finally, to save the changes, click “OK.”
Following the steps above will allow you to protect a worksheet to prevent any unnecessary deletion of data and/or editing of that data. You may choose which operations users are authorized to do on the sheet, like inserting or deleting columns or rows, editing objects, sorting, and using AutoFilter, to mention a few. You may also add a password to your worksheet to make it secure. Changes made here will reflect on the Online version and your worksheet will be protected online. Just make sure that you open the document via the browser then proceed with the changes on the desktop.
Options to protect a worksheet
| Option | Description of that option |
| Select unlocked cells | Select unlocked cells by dragging the pointer to cells on the Format Cells dialogue box’s Protection tab when the Locked checkbox is unchecked. Users may pick unlocked cells by default, and they can use the TAB key to traverse between unlocked cells on a protected worksheet. |
| Format cells | Any of the choices in the Format Cells or Conditional Formatting dialogue boxes can be changed in the Format Cells or Conditional Formatting dialogue boxes. If you protected the worksheet before applying conditional formats, the formatting will continue to change when a user inserts a value that meets a different condition. |
| Format columns | Changing column width or concealing columns using any of the column formatting instructions |
| Format rows | Row formatting commands, such as adjusting row height and concealing rows, can be used to format rows. |
| Select locked cells | Moving the cursor to cells on the Format Cells dialogue box’s Protection tab that has the Locked checkbox selected. Users are able to pick locked cells by default. |
| Insert columns | Columns to be inserted |
| Insert rows | Rows to be inserted |
| Insert hyperlinks | Even in unlocked cells, you may insert new hyperlinks. |
| Delete rows | Rows can be deleted if this option is selected, make sure you are aware of this and members of a group who can delete sheet content |
| Sort | Use the commands to sort data |
Important information to note
- Worksheet level protection isn’t meant to be a safety feature. It merely prohibits users from making changes to the worksheet’s locked cells.
- A password-protected worksheet is not the same as a password-protected Excel file or workbook. For further information, see the links below:
- See Protect an Excel file for instructions on how to lock your file so that other users can’t open it.
- Protect a workbook to restrict users from adding, changing, moving, copying, or hiding/unhiding sheets within it.
- See Protection and security in Excel for further information on the differences between securing an Excel file, workbook, or worksheet.

Native online feature to protect Excel worksheet
There is a native online workbook protection feature that allows users to protect their workbooks directly from the browser. The desktop isn’t required for these steps, follow through for more information on how to protect a workbook from the browser.
How to protect a worksheet from the browser
- Fistly open your Excel browser document.
- After that click on “File”.
- Now click on “Info”.
- From there click on “Protect Workbook”.
This method will protect the workbook from initial changes and will allow for documents to remain secure when the file is opened. However, a user can switch to editor mode and make changes with or without your consent. This needs to be kept in mind when choosing how you want to protect your worksheets as the wrong method could lead to unnecessary changes or even worse a data breach.
More information about sheet protection
There is a technique for Excel to assist users who have this precise request if they have a very specific range of cells that need to be modified and some that can’t be edited. Let’s imagine that in the example below, the editable cells can be altered but the others can’t.
How can we ensure that the cells labeled “No edit” are not altered while the cells labeled “edit” in red are? Well, following the step-by-step guide is straightforward for the cells designated edit, but only for the cells marked edit, not for the ones marked no edit. After that, you can go on to the next stages.
At this point, all cells may be altered in detail, including locked and unlocked cells; however, we’ll teach you how to modify the cells in such a manner that only the modified ones can be picked. To do so, follow the step-by-step instructions below.
Step by step process – how to protect cells that are locked
- Firstly, open Office 365.
- After that, navigate to your Excel document using either SharePoint or Excel.
- Open that document.
- After that click on “Viewing”.
- Than click on “Open in Desktop App”.
- To begin, select “Review.
- Then select “Protect Sheet” from the drop-down menu.
- Both “Select locked cells” and “Select unlocked cells” are chosen by default.
- “Select locked cells” should be unchecked.
- Finally, press “OK.”
Another straightforward method, but this time with greater outcomes since users now have more control over which cells in the sheet may be updated; users can only modify cells that are designated as unlocked. The edit permissions for any locked cells will be disabled. You may even consider encrypting the page with a password that only you know. Yes, as unusual as it may appear, it may be beneficial if you are particularly worried about information not contained in that spreadsheet.
Password is a feature that may be turned on or off to offer an extra degree of protection to sheets. If you want to increase the level of protection, you may add a password to the document.
Remove the password protection from a spreadsheet
- Whether or whether you use a password to safeguard your sheet, unprotecting it when you need to change the protected cells is straightforward.
- Under the Review tab, you’ll find the Unprotect Sheet.
- If you don’t specify a password, the sheet will immediately become unprotected. If a password is requested, enter it and click OK.
In-depth – Step by step process – How to protect worksheet in Excel Online
Step by step breakdown
- Click the “Review” tab.

- Click “Protect Sheet” on the “Review” tab.

- Select the elements you want people to be allowed to modify in the “Allow all users of this worksheet to list.”
- Finally, to save the changes, click “OK.”

That’s it for this Blog thank you for taking time out to read our content, please feel free to email our team about how it went if you followed the steps or if you need more help with the questions we answered in this Blog.