Security is something that is very important particularly if you’re sharing your SharePoint site with external users. That is why it makes sense to remove the “modified by” column when using SharePoint.
Removing the “modified by” is a fairly simple process. The steps below will show you how to remove the “modified by” column in SharePoint online.
- Navigate to Office.com and log in using your Microsoft 365 credentials
- Click SharePoint in the app launcher
- Navigate to your SharePoint site
- Click on Documents
- Click add column > Click show/hide columns
- Unselect Modified and Modified By > Click apply
Please note that you must have the appropriate permissions to change the columns in a SharePoint site. You have to be a site owner.
Here is a step-by-step demonstration of the process outlined above — including screenshots — so you can easily follow along.
Step-by-step: How to remove the “modified by” column on a SharePoint site
Removing the modified by column in SharePoint online is a relatively simple process. Follow the steps below to remove the column:
- Navigate to Office.com and log in using your Microsoft 365 credentials
- Click SharePoint in the app launcher
- Navigate to your SharePoint site
- Click on Documents
- Click add column > Click show/hide columns
- Unselect Modified and Modified By > Click apply
In this blog post, I’m going to walk through the entire process with screenshots so you can easily follow along.
1. Navigate to Office.com and log in using your Microsoft 365 credentials
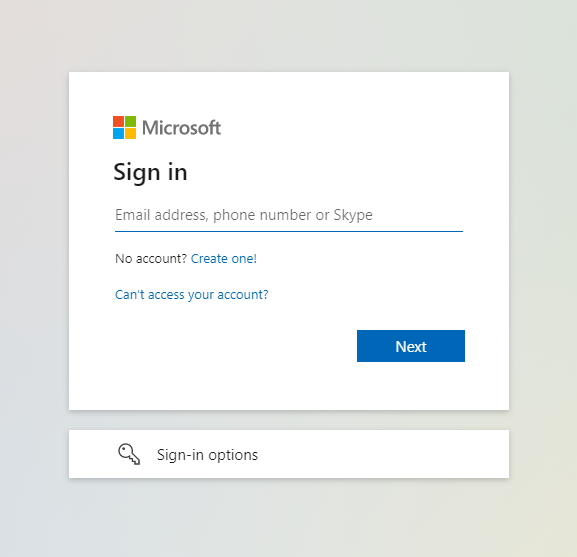
Use any browser to navigate to Office.com. Once you’re there, sign in using your Microsoft 365 credentials.
2. Click SharePoint in the app launcher
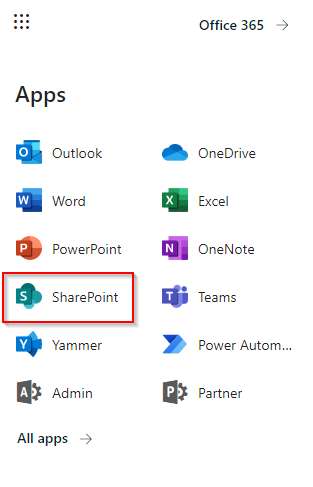
Once you are logged in, click the SharePoint icon on the app launcher and navigate to your SharePoint site. You can also search for it by using the search bar at the top of the Microsoft 365 portal.
3. Navigate to your SharePoint site
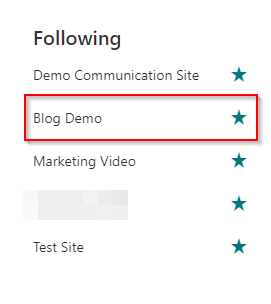
Navigate to the SharePoint site that you want to change the columns for. In our case, we’re opening our Blog Demo site.
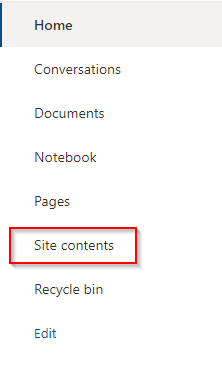
4. Click on Documents
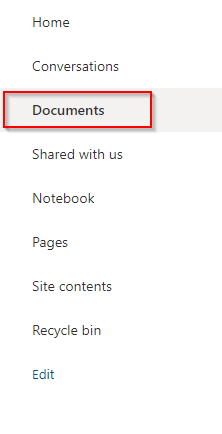
This will appear on the left-hand side when you first log in to the site. If you have more than one document repository open site contents and select the correct library from there.
After clicking on site contents, you’ll have a list of your document libraries. Click the library that you want to change the columns for.
5. Click add column > Click show/hide columns
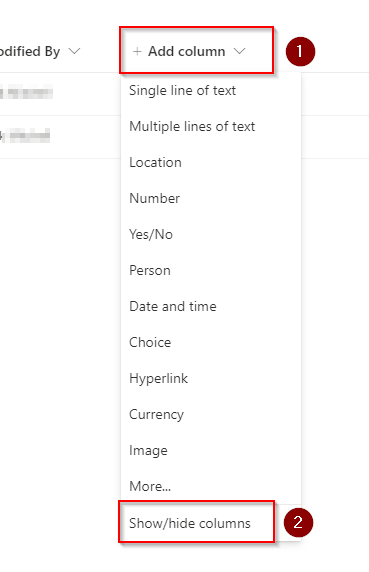
When you click add column, a drop-down menu will appear which will give you the option to click show/hide columns. We can see this option at the very bottom of the drop-down menu.
6. Unselect Modified and Modified By > Click apply
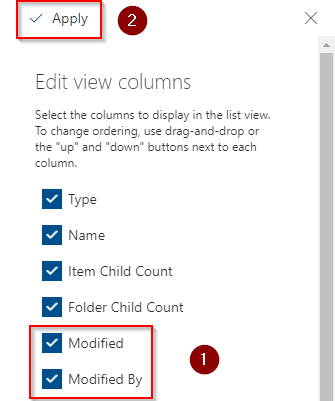
Unselect Modified and Modified By, then click apply.
Depending on the number of columns you have “modified” and “modified by” will appear at the top of the list. Some of the other columns you can add which might be useful are:
- Description
- File size
- Item child count
- Folder child count
- Retention label
- Sensitivity
After completing the steps above, the modified and modified by columns will now be removed. They’re not just removed for you; they are removed for all users.
A screenshot below shows what our SharePoint site looks like now:
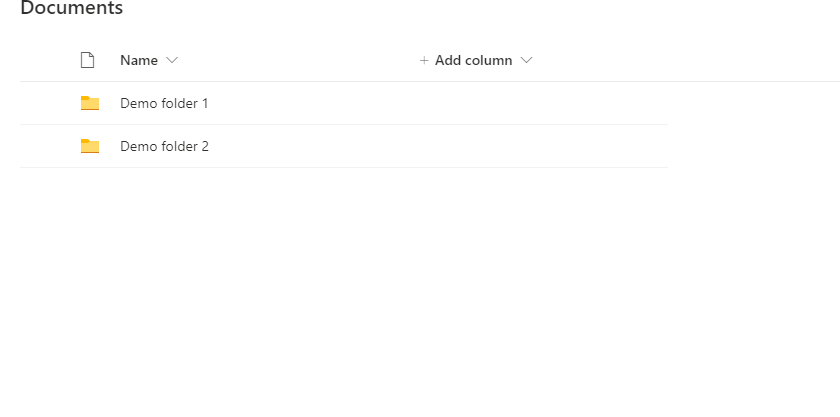
Obviously yours may look slightly different depending on whether you have another other columns selected.
The simple process is now complete, as the changes you’ve made will be reflected for everyone.
If you’d like to learn more about SharePoint, here are some blog posts I think you’ll find helpful:
- How To Disable Downloading Of Files In SharePoint Document Library: In this blog post, I go through the process of disabling downloading of files for all users — other than site owners — in the SharePoint document library. This is quite handy for protecting confidential documents that you’re storing in a SharePoint library.
- How To Give Unique Permissions To A Folder In SharePoint Online: If you want to set unique permissions for a particular folder in your SharePoint document repository, this blog post walks you through the process of breaking permission inheritance and creating new permissions for folders. You can follow this process for both files and folders.
- Step-by-step: How to enable external sharing in SharePoint Online: If you want to store folders and files in SharePoint that you want to share with external users, you need to enable external sharing in SharePoint Online. In this blog post, I explain how you can enable external sharing at site and organization level.
- How To Create A New Group In SharePoint: With default settings, SharePoint sites come with a limited number of groups. If you need to create additional groups, this blog post walks you through the entire process. I’ll explain the entire process of setting up a group, from creating the group to assigning permissions and adding users to it.
- How To Give Access To A Specific Folder In SharePoint: If you want to give someone access to a specific folder on your SharePoint site without giving them access to the rest of the site, this blog post walks you through the process and explains what the person can do depending on the sharing option you choose.
Thanks for reading this blog post! I hope you’ve found it useful. Please feel free to leave a comment below if you have any questions.