Microsoft Teams now has a feature that allows users to automatically record meetings. Meeting hosts may now activate automatic recording directly in the app settings, thanks to this new functionality. When this feature is activated, Microsoft Teams will begin recording as soon as the meeting begins. However, you cannot access the settings from the usual settings panel; instead, this must be configured directly from the planned meeting invite; see-through for additional information on how to do so.
Below is a step-by-step guide on how you can automatically record a Teams meeting in Teams, so follow through for more information on how you can achieve this. The guide is from the point a user has set a scheduled meeting in Teams, click here to see how you can schedule meetings in Teams, otherwise continue to follow through.
- Firstly, open the
 web version or desktop version of Microsoft Teams.
 - From there go to your “Calendar”.
- Find the scheduled meeting and click on it.
- Now click on “Edit”.
- Then click on “Meeting Options” followed by “Meeting Options”.
- From the options, select “Record automatically”.
- Finally, click on “Save”.
- Get Microsoft Teams from just $4.00 per month with Microsoft Teams Essentials.
That’s it, once the method above has been implemented, you can then proceed to edit the meeting settings to ensure that the recording automatically happens without any requirement from setting it during a meeting. You will, however, need to inform all users that the meeting is being recorded for privacy reasons, if a member refuses to be recorded an alternative step can be taken to ensure the members who aren’t willing to be recorded can be resolved.
We’ve also created a video to help guide you through the process:

In-depth guide – How to set Microsoft Teams to automatically record meetings
Below is a more in-depth guide on how to automatically record meetings in Teams. While the steps illustrated above are good at outlining the method, a more in-depth approach with screenshots will allow the user to get a better understanding of how the steps will work. The accompanying screenshots will help to get visual context on the steps illustrated above.
Setting Microsoft Teams to automatically record meetings – Step by step breakdown [with screenshots]
- Firstly, open the web version or desktop version of Microsoft Teams.
Unfortunately, as stated above this method only works on scheduled meetings in the desktop client of Teams, the recording and device functionality can only be edited in the Teams application again for both privacy and security related reasons so therefore the process of enabling the Teams auto-record feature can only be used within the application.
- From there go to your “Calendar”.

The calendar is located in the sidebar of Teams, when you find it click on it, and it will open the Calendar portion of Teams, here you can both schedule meetings and edit the meetings premade on Outlook. You can even edit the meeting’s direct settings such as meeting preferences, the members of the meeting, and of course the auto-recording functionality.
The Teams calendar can draw Outlook calendar data, allowing employees to work solely within Teams rather than moving between several calendars to identify events and plan meetings. As a result, productivity has increased and cooperation has become more efficient.
- Find the scheduled meeting and click on it.

I have this meeting scheduled for Wednesday the 9th at 12:00, I want to edit the meeting settings to allow for the meeting to be recorded automatically. This will allow me to focus on other elements of the meeting without having to show concern about the recording. I will, however, need to clearly inform the members of the Team that the meeting is being recorded. While they will receive an in-meeting notification of the recording, a clear message will need to be sent across to allow users to depart if they don’t want the conversation to be recorded.
- Now click on “Edit”.

Right-click and then click on “Edit”, here you will be able to edit the meeting preferences followed by the scheduled times as well as the meeting features and recording capabilities.
- Then click on “Meeting Options” followed by “Meeting Options”.
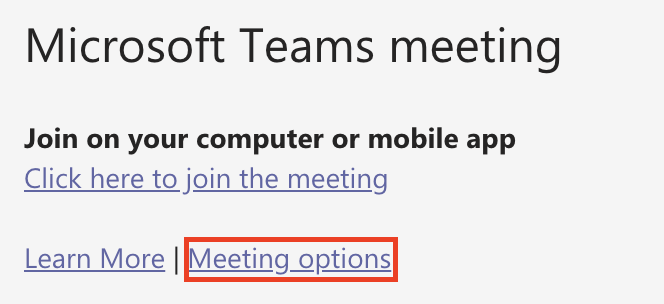
Meeting options are followed by the slip at the bottom of the page, once you click on the “Meeting options” you will be able to proceed with automatically recording a meeting in Teams.
- From the options, select “Record automatically”.

- Finally, click on “Save”.

That’s all there is to it; after the above approach has been done, you can proceed to adjust the meeting settings to guarantee that the recording occurs automatically without the need to establish it during a meeting. You must, however, warn all users that the meeting is being recorded for privacy concerns; if a member refuses to be recorded, an alternate procedure can be taken to guarantee the individuals who are unwilling to be recorded are resolved.
The ability to record meetings has been available in the desktop version of Teams for some time, but this new feature in the app allows organizers to decide whether or not the meeting should be recorded automatically. The recording will begin automatically when the first participant enters the meeting, and it will be up to the organizers to enable this function for a single meeting or a series of meetings. The recorded file will be posted to OneDrive (for private meetings) or SharePoint/Stream (for public meetings) (for channel meetings).
When this option is activated, all Teams meetings will be automatically recorded until the organizer decides to disable it. It’s one of the much-anticipated features that should be especially useful for folks who frequently neglect to record key meetings.
   |

Conclusion
This Blog has come to an end; thank you for reading our resources; please email our team to let us know how it went if you followed the directions or if you have any further concerns concerning the problems discussed in this Blog. If you discover that the difficulties are not fixed by utilizing the procedures outlined above, please contact our devoted staff at any time and we will assist you in resolving the persistent mistake that is causing problems in your workplace. Contact our staff by leaving a comment, and we will fix this issue. This will also allow other users who are experiencing similar problems to have their concerns handled.