Microsoft Teams offers a whole selection of different features to communicate with members of a team, colleagues, or students as effectively as possible. Features such as allowing you to share your screen, camera feed, and the ability to send chats to increase engagements, which allow Microsoft Teams to be a fantastic hosting platform for calls and meetings. However, is there an effective process for sharing computer audio within the program? Many users fail to effectively share audio on Teams, resorting to disconnecting mics or headsets to share audio from an external source. In this blog, we will cover an effective method to share your computer’s audio in a Teams meeting.
Microsoft Teams offers its users the ability to change settings to allow audio shares within the program. You need to edit those settings to ensure the audio feed from a computer device can be relayed to the audience. The process can be done from the meeting itself, simply access the share content section and switch on a toggle. All audio inputs from a computer can be relayed effectively to an audience.
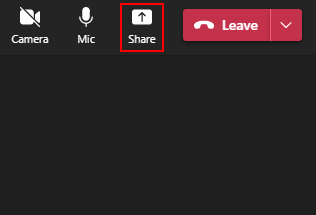
- Firstly, join your Microsoft Teams meeting as a host.
- Now click on “Share.”
- Ensure the toggle for “Include computer sound” is on.
- Close the share panel by clicking the main meeting screen.
- Finally, proceed with sharing your audio as you would normally.
You will have successfully shared your computer’s audio in a Teams meeting. Your guests and team members in the meeting will be able to listen to the audio, and you won’t have to disconnect any media devices such as headsets to proceed using computer audio shares. If your screen shares a video in Microsoft Teams, it is a common occurrence for a video to play without audio. The meeting host often needs to remove headsets and other connected devices to allow computer audio to play. An ineffective method can be made easy with the steps illustrated here.
In-depth step by step guide – How to share your computer’s audio in a Teams meeting [with screenshots]
If you find that the steps outlined above are not helping you to share your computer’s audio in a Teams meeting, you can use the in-depth guide to help. The guide includes the visual context in the form of screenshots to give you a better understanding of how to share your computer’s audio in a Teams meeting. The guide also includes an in-depth analysis of some of the more complex steps; you can use those points to help you navigate across the UI and eventually complete the process of being able to share your computer’s audio in a Teams meeting.
- Firstly, join your Microsoft Teams meeting as a host.

You need to be a host of a meeting to allow for the process to work, and host settings to share content allow for the computer audio toggle to show within the section.
- Now click on “Share.”
In this section, you can share content, for instance, a PowerPoint you have set or just your desktop screen. The toggle for you to provide computer audio sharing for your audience is hidden within this section.
- Ensure the toggle for “Include computer sound” is on.
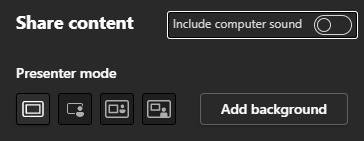
The toggle, by default, will be turned off as it will adjust your audio output; however, you can turn this toggle on. Once the toggle is on, you will be able to make sure you can share your audio.
- Close the share panel by clicking the main meeting screen.
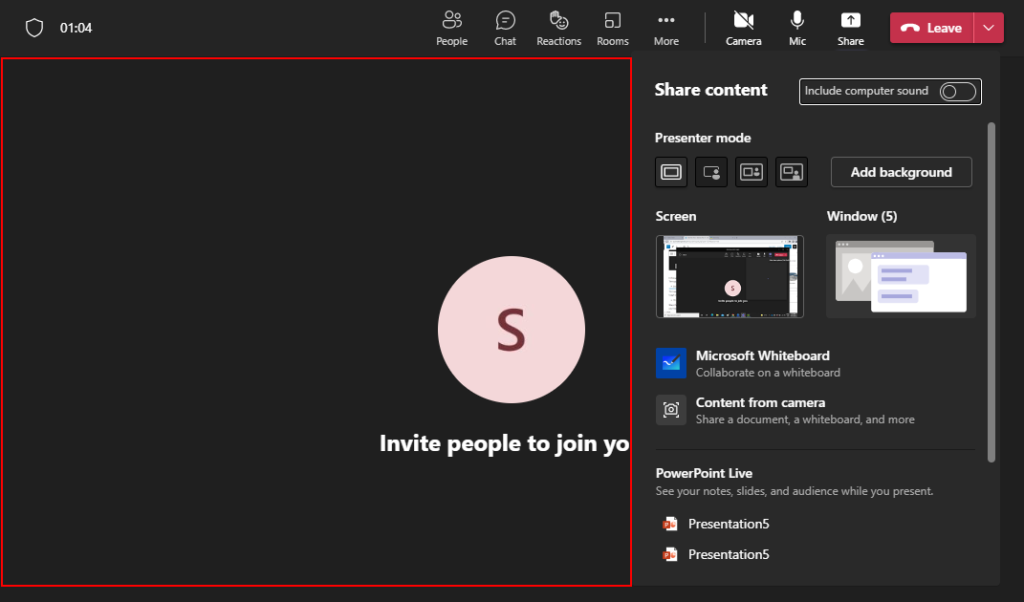
When those settings have been implemented, you can now close the settings panel and proceed with your meeting normally.
- Finally, proceed with sharing your audio as you would normally.
Every time you share audio or content with audio, the output for that piece of audio will be relayed from your computer rather than an external source.
Assuming you are the host of the meeting, the process illustrated above will help you share your computer audio in a Microsoft Teams meeting. Your meeting attendees will have the ability to hear the audio, and you will not need to detach any media devices such as headsets to use computer audio sharing. It’s not uncommon for a video to play without audio when you screen share it in Microsoft Teams. To allow computer audio to play, the meeting host frequently has to remove headphones and other connected devices. With the techniques outlined here, you can simplify the method of sharing your computer audio.

Computer audio share is still not working in Microsoft Teams
You have followed the steps shown above and have turned on the toggle for computer audio share; however, the process still isn’t working for you. You still need to disconnect devices to share the audio in a meeting which still works; however, it negates that the steps still didn’t give the required results. If you are in that situation, simply use the section here to help resolve those issues.
- Firstly, open Microsoft Teams.

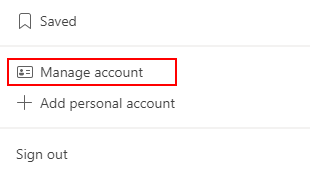
- Now click on your profile picture.
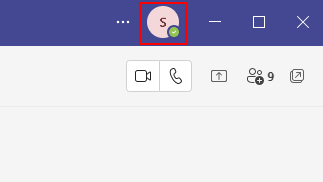
- From there, click on “Manage accounts.”
- After that, click on “Devices.”
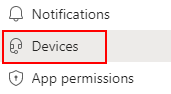
- Make sure “Speaker” is set to the correct output.

- Finally, close the panel and proceed with the meeting.

What the process above will accomplish is the ability for you to set your audio output to be at the correct source. If the audio output is set for the computer default speaks, then the audio output for your audience will not be available. You can now continue with your meeting and have the ability to share your computer’s audio in a Teams meeting.
Conclusion
With the process complete, you will be able to now share your computer’s audio in a Teams meeting. The steps show the process of how you share your computer’s audio in a Teams meeting; the in-depth guide gives more context on those steps as well as some in-depth points to help you understand what the step accomplishes. We have also included a process if you cannot share your computer’s audio in a Teams meeting. If you still struggle to share your computer’s audio in a Teams meeting, simply leave a comment, and we will help you.