Setting up a presentation or gathering your meeting notes can take some time. Hence, inadvertently telling your participants it’s time to start (long before you’re ready) is reasonably annoying. While there are no ideal ways to get around this issue, there are methods nonetheless— hopefully, they’ll suffice until Microsoft releases a simple toggle.
You can bypass the meeting initiation alert by joining the meeting on an account different from the one that created the said meeting. Alternatively, you could refrain from stating the meeting’s participants until it’s time for the meeting to start.
Method 1: Use an alternate account
- Launch Teams in an incognito tab
- Sign into an alternate account
- Open your Team
- Select “Schedule a meeting” under “Meet”
- Join the meeting via your typical account
Method 2: Add participants later
- Launch Microsoft Teams
- Open your Team
- Select “Schedule a meeting” under “Meet”
- Don’t add participants
- Wait until it’s time to start
- Edit the meeting and add participants
- Join the meeting
In the following post, I will walk you through some methods you can use to work around Teams’ habit of alerting participants a meeting has begun when you join. The first method is to join the meeting on an account that differs from the account that organized the meeting. The second method is about when you specify your meeting’s participants. If you get stuck at any point, refer to the visual aids below each step. Otherwise, leave a comment below.
Don’t waste time scrolling if you’re here for something specific. Use our shortcuts instead. You can click the links below to access relevant content quickly:
- How to join a Teams meeting from another account
- How to set participants for a pre-made meeting in Teams
- Blog post recap
How to join a Teams meeting from another account
When a meeting’s organizer joins their meeting in advance, their stated participants are informed. Hence, the most obvious workaround would be to join the meeting on an account that differs from your organizer account. I recommend you create the meeting with an alternate account and participate with your main account.
If you don’t have a second device for an alternate account, you can use an incognito tab or an alternate web browser, such as Firefox, Brave, Opera GX, or Edge.
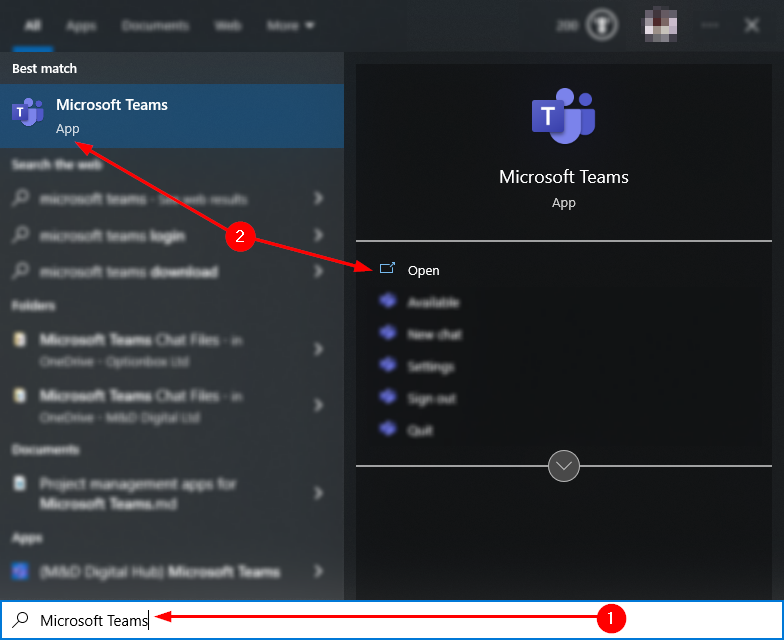
Step 1 — Launch the Microsoft Teams web/desktop client
We’ll start by launching Microsoft Teams. First, press the “Start” key and type “Microsoft Teams.” Then, tap the “Enter” key or click “Microsoft Teams” under the “Best match” section. If you’d like to access Teams via the browser, you can use the following link.
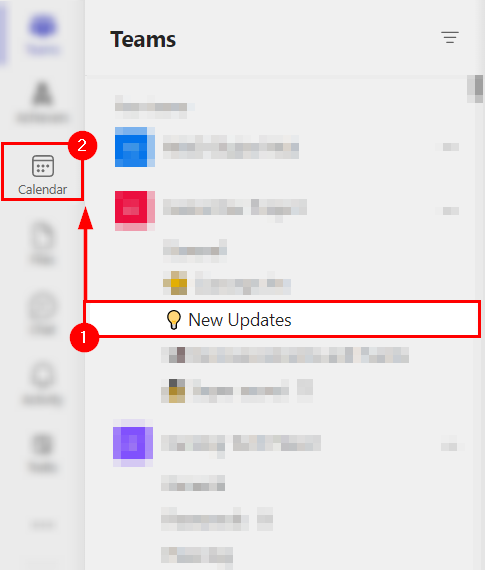
Step 2 — Open the calendar page via the sidebar
Once you’ve launched Teams, you’ll need to open the Teams/Outlook calendar. To do this, refer to the sidebar on the left. There, you will find several buttons. Identify and select the button resembling a traditional calendar— its label should state “Calendar.”
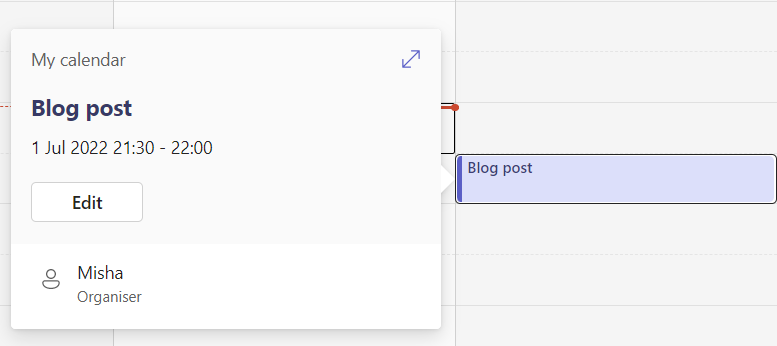
Step 3 — Join the meeting via your calendar
Take a look at your calendar. You need to find your meeting. Once you have found your meeting, hover your cursor over it and click “Join.”


How to set participants for a pre-made meeting to avoid sending notifications
If you don’t want to keep switching between accounts, you may prefer my alternate solution. When you create a meeting, you can invite participants— but that’s not a requirement. Hence, we can delay inviting our participants until it’s time for the meeting to start.
The guide below assumes you have already created a meeting without participants. If you have not done so, you can follow the brief preparation guide.
- Launch Teams
- Open your Team
- Expand the “Meet” dropdown
- Select “Schedule a meeting”
- Fill essential fields (meeting title, date, and optionally the description)
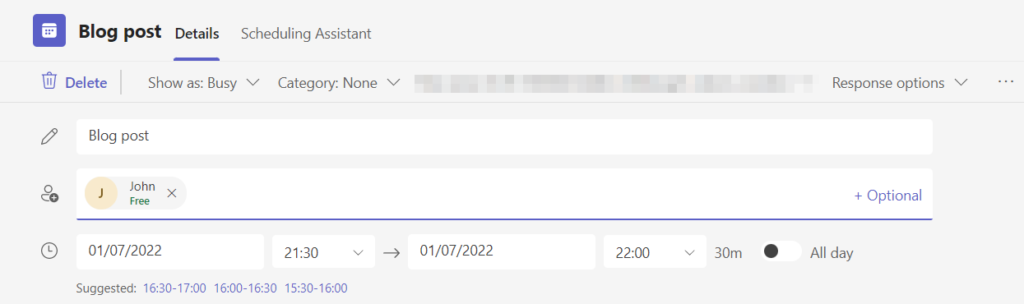
Step 1 — Open your Teams meeting’s editing page
Within Microsoft Teams, open the Teams/Outlook calendar and locate your previously created meeting. When you click the meeting, Teams will spawn a popout menu, wherein you should select “Edit.”
Step 2 — Add your Teams meeting’s attendants via the editing page
Now you’re on the editing page where you can append the participants we neglected to add initially (assuming it’s time to start the meeting). In the example below, I add one additional participant.
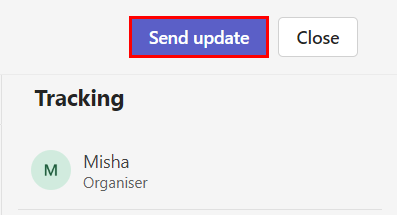
Step 3 — Distribute invitations among your stated participants
Lastly, once you’re ready, refer to the top right of the page. You’ll spot a purple button labeled “Send update—” click it. Your appended participants will receive an email inviting them to participate in the meeting.
Blog post recap
Microsoft Teams meeting organizers have experienced recent frustration regarding starting their meetings. For example, suppose you schedule a meeting for 11:00 am but join at 10:30 am to get everything set up. Unfortunately, in the background, Teams will notify everyone you have started the meeting— prompting them to join before you’re ready. Fortunately, we can resolve this predicament by applying one of two solutions: hosting meetings via an alternate account or adding participants to your meeting once you’re ready to start.
Thank you for engaging with this post. If you enjoyed it or you found the content helpful, please consider reading the posts below. Our writers work hard to ensure you have a reliable resource concerning Microsoft 365— they’re made for you.
- How to set up and customize reminders for Teams meetings — In the following post, you will learn to produce reminders for your scheduled Teams meetings. These reminders can be received via the Teams and Outlook desktop clients, as well as their mobile app counterparts.
- How to view your own image larger during a Teams meeting — In the following post, you will learn how to observe your own image layer during a Teams meeting. As a result, you can observe what you’re showing everyone and ensure nothing is going wrong.
- How does Microsoft Teams determine Teams status? — In the following post, you will learn how Teams determine a user’s status. By the end, you’ll likely understand why you’re stated as “away” despite working.
- The ultimate guide to Microsoft Teams’ presence icons — In the following post, you will learn about Teams presence icons: what they are, what they mean, and why you should care.