Within Microsoft OneDrive, there may be some instances in which you want to immediately cease the sharing of your files. Whilst it is not for me to say what instances may befall you, your organisation, or general circumstance, chances are that something has, and that is why you are here, reading this blog post today.
Whilst the process for doing this is not exactly the quickest one, it is both doable and effective when done. To carry out the process, though, you will have to access SharePoint, rather than OneDrive. In order to stop sharing all shared OneDrive files immediately, you must do so via the ‘Request Settings’ section of the Microsoft SharePoint options.
Now, if this is not enough detail for you to work with, then do not worry. As is the case with every blog post we publish, we will not only offer you a step by step guide of the process, but we will then look at the entire walkthrough with far more depth and analysis.
Step by step: How to stop sharing all shared OneDrive files immediately
- Open Microsoft SharePoint.
- From here, click the folder you wish to edit the permissions of.
- Once you have entered this, you will want to click ‘Site Contents’ in the left sided menu.
- Here, look to the top of your menu and click ‘Site Settings’.
- After this, navigate to the option titled ‘Style Libraries and Lists’.
- From here, you will want to click ‘Customise Style Library’.
- Now opt to click ‘Permissions for [COMPLETE TITLE]’.
- Look to the top of your screen, and click ‘Check Parent’ to enter the main screen of settings for your Microsoft SharePoint.
- Now, look yet again towards the top of your display, where you should find an option titled ‘Access Request Settings’.
- Within this subsection, make sure the two boxes at the top of the list are unticked.
- Click ‘OK’ to save your changes.
Again, fear not if this is not enough detail for you to utilise within this process. We will now delve into the process further, with the walkthrough encompassing detail and being accompanied by screenshots to best assist you throughout the process.
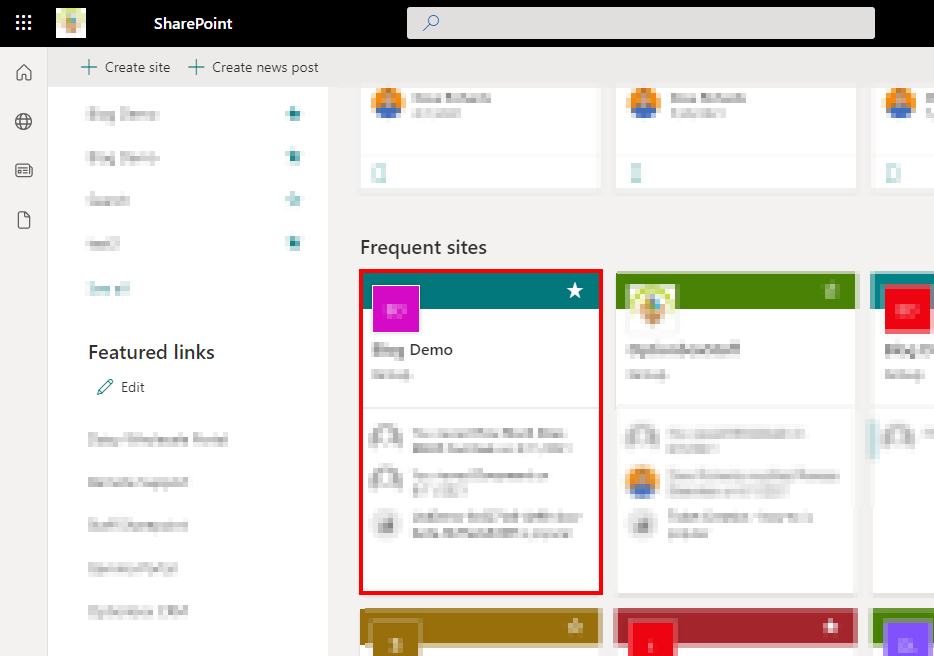
Your first step in this process is to open Microsoft SharePoint. Of course, you can do this manually, or if you would rather, you can open it via the application launcher of another Outlook application that you may be able to better access, such as Outlook. Simply click the logo in the top left corner, and opt to click SharePoint.

After accessing the main menu of SharePoint, you will be greeted by every site you are part of. In order to edit the sharing of your files, you will first have to access the site you wish to change the settings of.
After opening the site you wish to edit, you should look to the left of your screen, where a listing menu should sit. Look towards the bottom of this list, and there should be an option titled ‘Site Contents’, which is what you will want to click.

After clicking ‘Site Contents’, you will be brought to a new screen on which you will want to click the option named ‘Site Settings’. This should be found towards the top right side of your menu.

‘Site Settings’ will bring you, funnily enough, to a menu listing the site settings you can access in relation to your initial site. Amongst the many settings to your offering, you should look at the heading titled ‘Site Administration’. Under this heading will be an option named ‘Site Libraries and Lists’, and it is this that you will want to click.

After entering the ‘Site Libraries and Lists’ subsection of options, you will be offered several tabs, all prefixed with the word ‘Customise’. Of all of these options, it is ‘Customise Style Library’ that you will want to click, which has been highlighted in the screenshot that follows this paragraph.

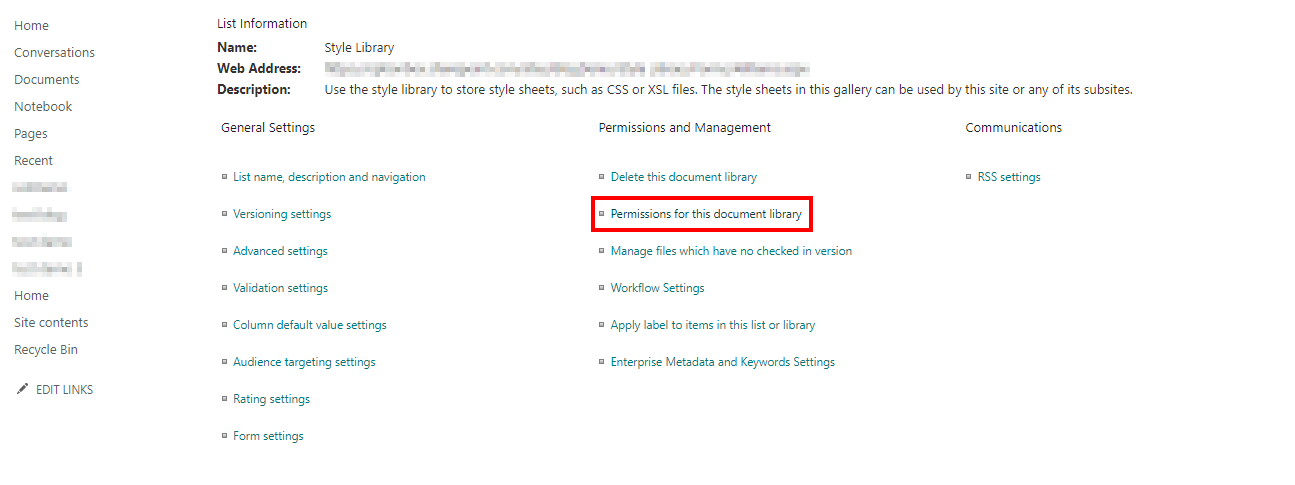
After clicking this, look to the second heading of the three, if you are reading the list from left to right. Titled ‘Permissions and Management’, under this heading will be an option with the name, ‘Permissions for this document library’, which is the thing you will want to click.
Opening this will bring you to a menu of SharePoint groups you have access to. These will not be of importance now, though, as you will want to look to the top left of this menu. It is there that there should be an option named ‘Manage Parent’, which is what you want to click.

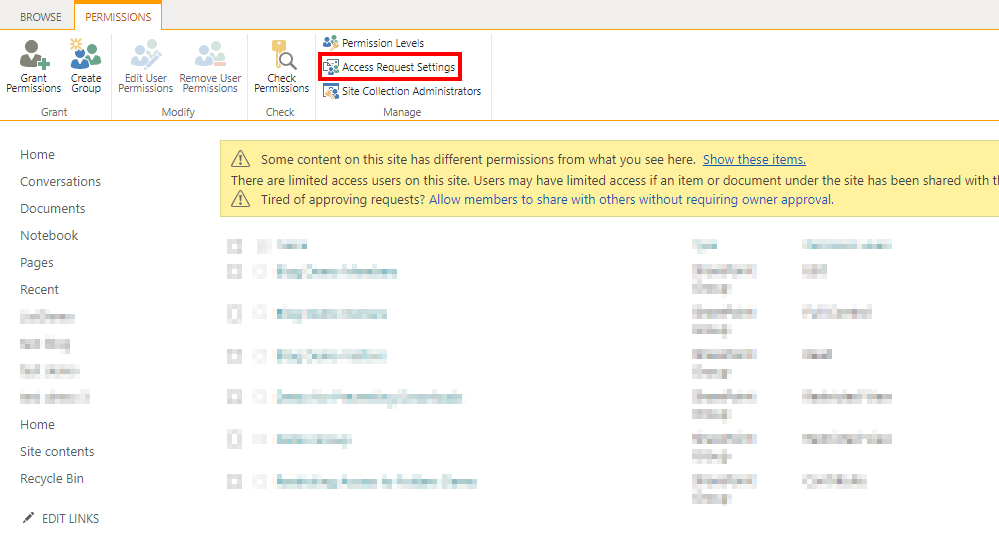
Clicking this will bring you to the main dashboard of permissions. I appreciate that this method has been somewhat long-winded, however it is necessary in order to edit the specifics of the OneDrive files.
Here, you will want to click ‘Access Request Settings’. It has, again, been highlighted in the screenshot below.
This will bring up a menu on which you can prevent all files being shared. The two top boxes, which have been shown to you in the image below, will by default may be checked. Unticking them will prevent the sharing of shared files within your OneDrive.
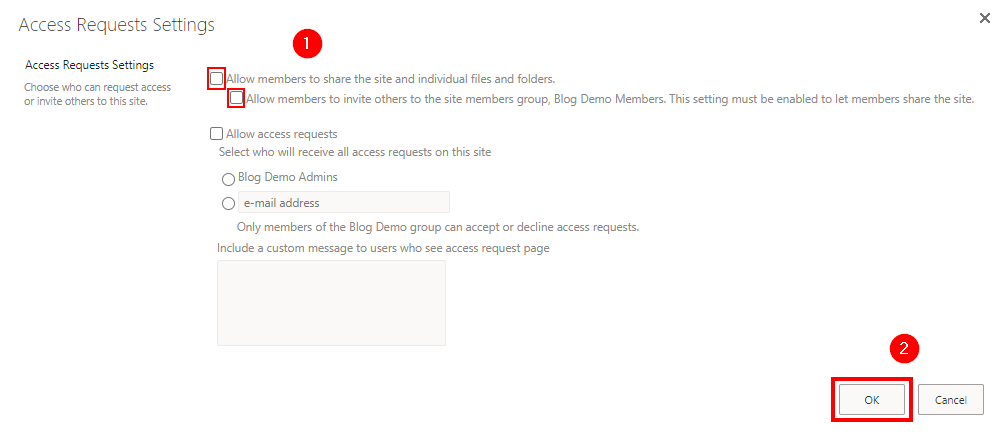
Click ‘OK’ in order to save these changes, and then the process is (finally) complete! All files that are currently sharing
Thank you for taking the time to read this blog, I hope you found it as helpful as you wanted it to be! As is the case with every blog post we publish, if you run into any issues following the tutorial, or simply wish to let us know your thoughts on it, then please don’t hesitate to get in touch with a member of our team.