Error warnings in Outlook for Mac are a common complaint among Mac users. The user receives error messages if Outlook for Mac is not synced with the server. The cause of the issue is determined by the application’s utilities, settings, and network. You may manually erase these faults by using some simple procedures that aid in the speedy resuscitation of data and the resolution of the Outlook for Mac synchronization problem. Below is a guide on stopping sync errors in Outlook on Mac OS devices. Follow for more information on how you can achieve this.
Below I have illustrated two different methods to stop sync-related issues in Outlook for Mac. Both methods include screenshots of each of the processes; you can use these to understand better each of the steps illustrated.
Clear cached data on Mac device to stop sync errors
Mac OS devices are prone to a malfunction in cached data, which is used to help store bits of information that your computer can repeatedly use; this includes login information to information in regards to Outlook preferences; you must these cleared to make sure Outlook works if there are any present issues. Below I will give a more in-depth analysis of how you can clear cached data on Mac OS devices.
In-depth guide [with screenshots] – Clear cached data on Mac device
Here is an In-depth guide with screenshots to help you understand the steps much more effectively; screenshots will give you more visual context on how you proceed with the guide in question; look through and follow along for more information.
- Firstly, click on “Go.”

The go tab is at the top of your desktop; make sure you have no other tabs open otherwise; the option will not show in your menu bar at the top.
- Now click on “Got to Folder.”

You need to click on “Go to Folder”, which is right at the bottom of the dropdown box, click on it to access the navigation page.
- From there, type out “/library.”

Type out the path; this is essentially just the navigation route you can use to get to a specific folder that’s not in your main finder folder section. As the necessary folders are not in the finder section, we need to navigate to them.
- After that, find and open the “Caches” folder.
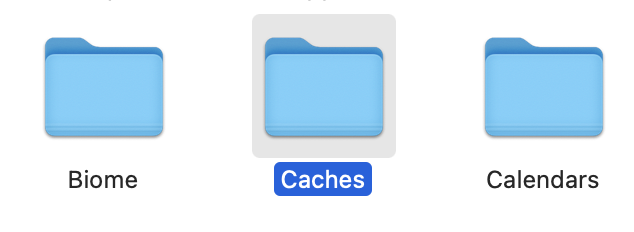
Find the “Caches” folder in the library section, here you will be able to locate the necessary cached files to delete.
- You can now locate the “Microsoft” folder.

- Move that folder into the trash bin.
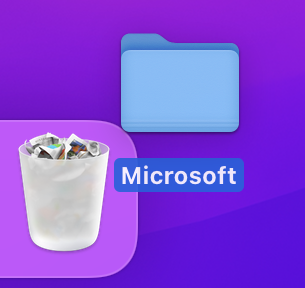
When the Microsoft folder has been selected, move it into the trash; this will then effetely remove its path from the caches folder.
- Open the bin and empty it to finish the deletion process.

The final step is to altogether remove the folder by emptying the trash; once emptied, you will have now effectively cleared the cached data. Once the steps above have been completed, you will have effectively cleared the cached data and reset the patch, ready for new data to be added when you open Outlook. You may be wondering why Outlook doesn’t have a dedicated folder in the cached section of the library page like OneDrive.
OneDrive cached data is managed on the cloud and therefore needs to be actively cleared within the app; however, Outlook is managed locally. You need to travel into your local folder and delete the cached data from the Microsoft folder. Just note cached data deletion can also adversely affect performance when opening the app. If you find some inconsistent lags upon opening the app, that’s just the cached data being processed; wait for some time, then the cached files will automatically be downloaded, which will reduce lag times.

Ensure Mac software is updated to stop sync errors
It’s easy to check for updates on your Mac OS devices. Sync-related issues can also be impacted by software not being updated regularly; if there are any sync issues, the chances are that there are some sync issues with Outlook, and there may be some restrictions imposed by the lack of software updates on your desktop. Use the method below to proceed with software updates.
In-depth guide [with screenshots] – Ensure Mac software is updated
Here’s an in-depth tutorial with images to help you understand the steps much better; screenshots will provide more visual context on how to proceed with the guide in question; go through and follow through for additional information.
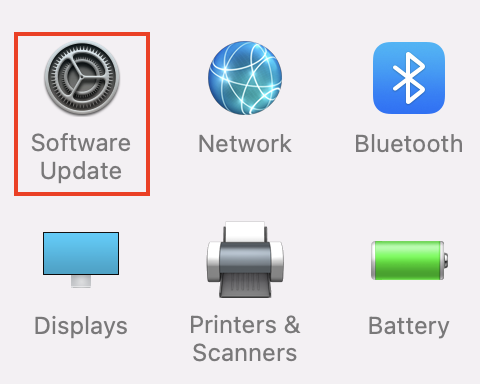
- Firstly, open “System Preferences”.

- From there click on “Software update”.
- Finally, click on “Update Now”.

By upgrading your programs and operating system with new features, performance enhancements, and bug fixes, you can frequently defend yourself against possible risks. You should maintain your software up to date for all of these reasons. In most circumstances, at least. If you don’t do the updates, it won’t make a difference. If you’re worried, you shouldn’t do them. It’s just an issue of losing out on new features that they add or correct.
There are occasions when significant changes are included in updates. The following central operating system, for example, will be launched after 10. Computers no longer support 32-bit software. To put it another way, even if you don’t use your Mac for business, there are likely to be several programs that won’t operate. Because many games are known for not being updated, you may anticipate them to stop operating soon. Regularly upgrading your Mac’s software will ensure that its security measures operate correctly. You could notice a performance gain if you upgrade macOS. Because Apple develops its software regularly, you should always be able to acquire an update that speeds up your Mac.
That’s it for this blog; we hope the solutions above have aided in helping you to resolve the issue of Outlook sync issues; if there are any prominent issues that you come across after the usage of the steps above, please let our team know and we will be happy to help resolve those issues you may have.