Humans, much like our computers, possess finite memory. As a result, it’s not easy keeping track of five marketing campaigns, four topics’ keyword research, and every business meeting. Fortunately, Teams can tackle one of those problems for us— Microsoft Teams achieves this with meeting reminders that keep us aware of our meetings.
If you’re not receiving notifications or reminders concerning your Teams meetings, I propose you attempt to amend your predicament with one of the following tested solutions:
- Enable reminders for your meeting via Outlook
- Configure your Teams account’s notification settings
- Disable focus assist (Windows)
- Disable do not disturb (iOS)
- Allows Teams to send notifications (iOS)
The following post concerns scheduling meetings via Outlook (to add reminders), setting up notifications for your Teams account, disabling focus assist (and DND on iOS), and permitting iOS notifications for Teams. If you get stuck along the way, try using the visual aids below each step. Otherwise, leave a comment below.
How to schedule a Teams meeting with reminders
The guide below will walk you through using Outlook to schedule a meeting with reminders. Please follow each step carefully and refer to the visual aids if you need support— otherwise, leave a comment below.
Step 1 — Launch the Outlook web client
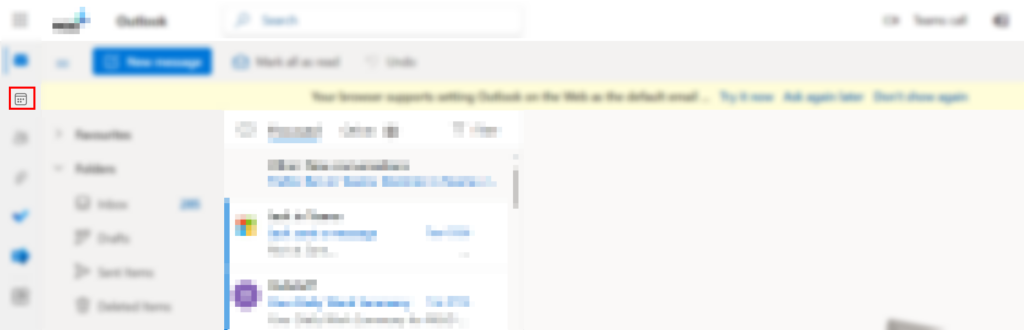
To start, you should open the Microsoft 365 home page, wherein you can access the Microsoft 365 app launcher. If you need help getting there, consider using the following link. Then, look to the top left for a quadrilateral consisting of nine dots. Clicking the shape will reveal the app launcher. In the app launcher, find and select “Outlook.”

Step 2 — Open the calendar page
Toward the center of your window, you should see your inbox. While large, it is not our objective today. Instead, divert your attention to the sidebar on the left side of the screen— you’re looking for a traditional calendar icon labeled “Calendar.” Ensure you select the icon, then proceed to the next step.
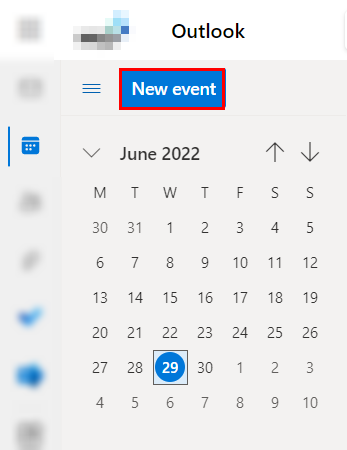
Step 3 — Create a new event
Keeping your attention toward the left of the window, identify the blue “New event” button and select it. Yes, I understand you want to create a meeting— this is what you’re supposed to do. Outlook treats Teams meetings as a special type of event.
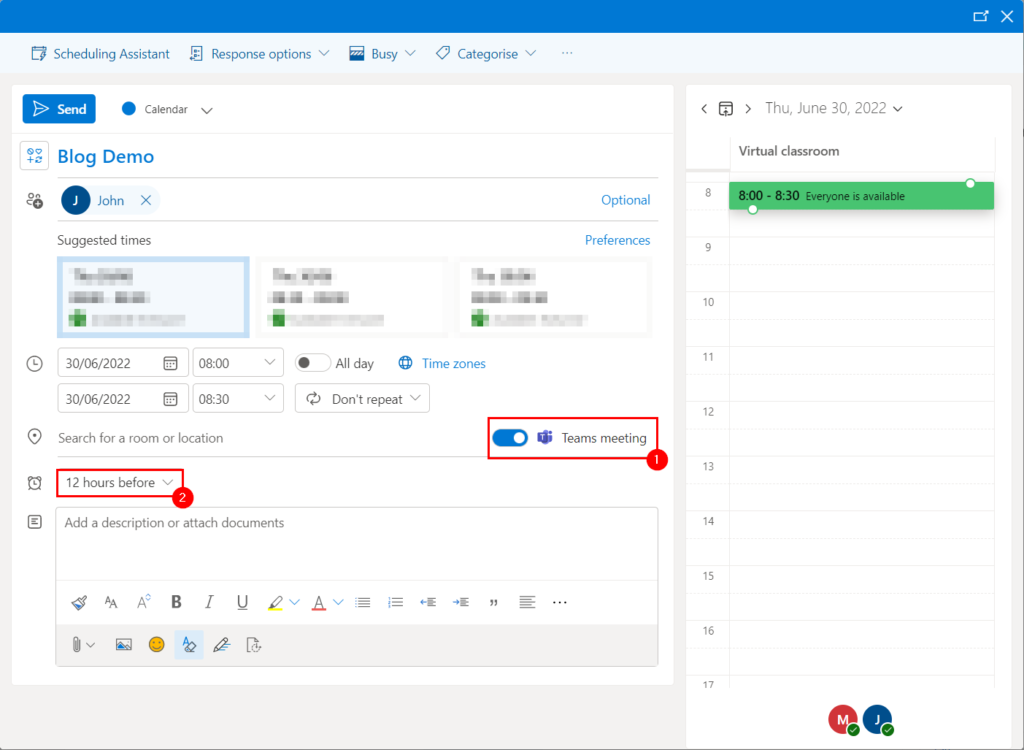
Step 4 — Convert to a meeting and add a reminder
Use the event handler to customize your Teams meeting. Here, you can add its name, participants, and date. Additionally, you can use this page to mark your event as a Teams meeting by ensuring the “Teams meeting” toggle is enabled. Below the prompt and prefixed with an alarm-clock icon, you will find the reminder field— use it to determine when your participants should receive a reminder concerning your meeting. Finally, you can click “Send” to distribute your meeting invitation.

How to enable reminders for your Teams account
If you can’t receive reminders, there’s a good chance you’re using restrictive notification settings. We can use the Teams app to customize our experience with notifications; thus, our alerts and reminders become more accessible.
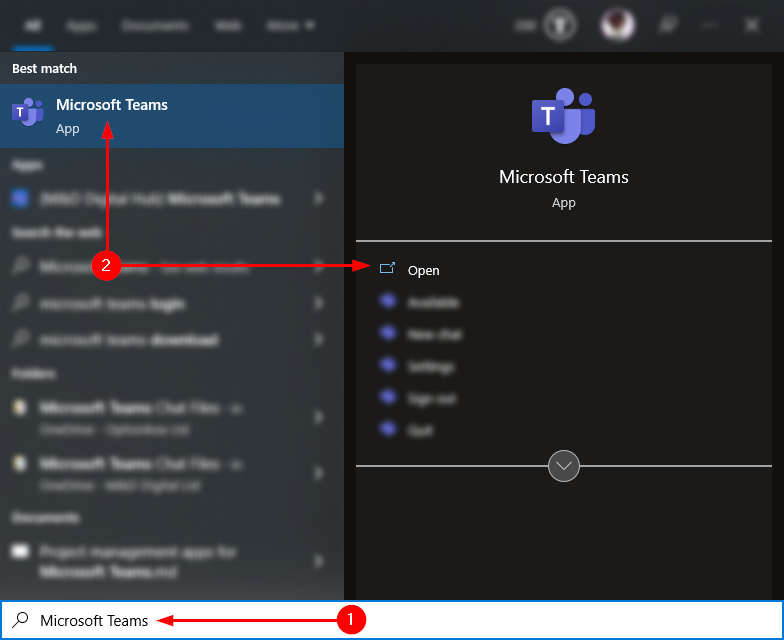
Step 1 — Launch the Microsoft Teams desktop/web client
To start, tap the “Start” key. Then, type “Microsoft Teams.” Finally, hit the “Enter” key or select “Microsoft Teams” under “Best match.” If you would prefer to use the web client, head to the Microsoft 365 home page (linked here) and open “Teams” via the app launcher.
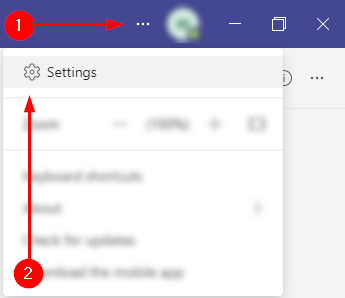
Step 2 — Open your account settings
Ignore the window’s main content; instead, focus on the top right side of the screen. Then, look for the options menu (...) next to your profile and select it— this will allow you to reveal a menu, wherein you should click “Settings.”
Step 3 — Adjust your notifications accordingly
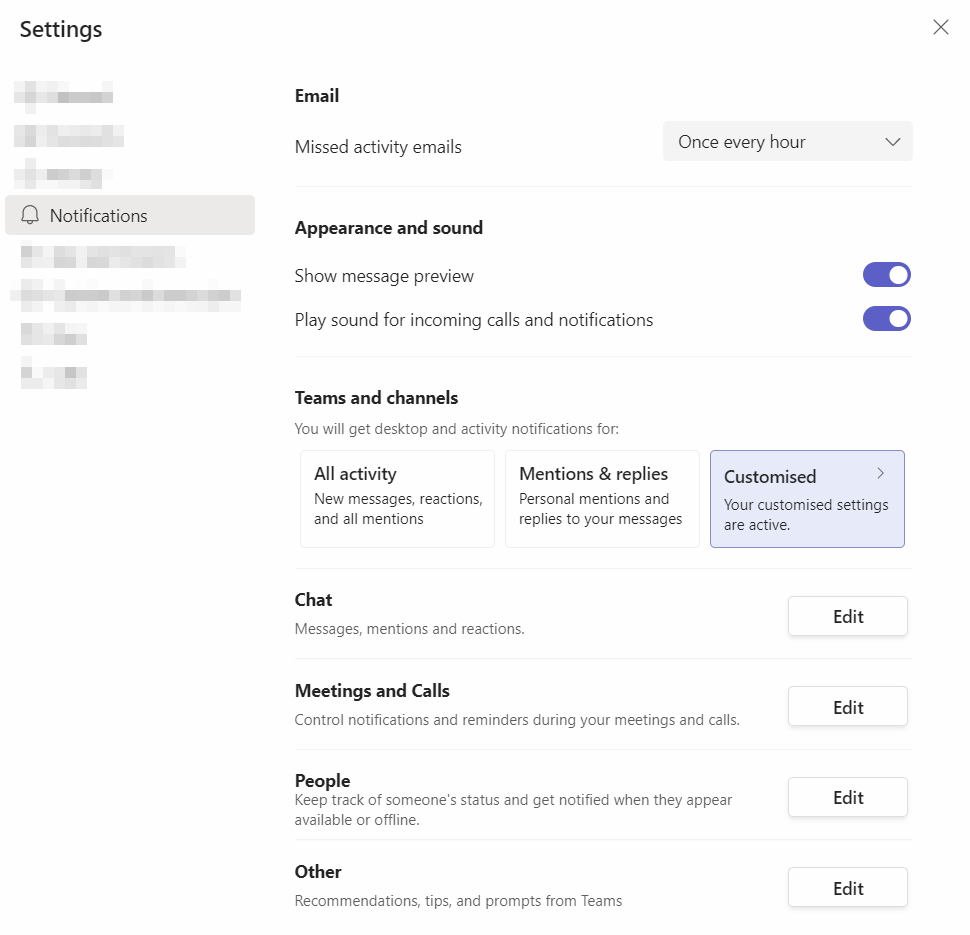
The settings window features a sidebar detailing Microsoft Teams’ setting categories. Next, head to the “Notifications” page. Here you can adjust and set your options concerning notifications in Microsoft Teams.
- The “Email” category contains one field concerning email notifications detailing Teams’ activity you could not witness.
- The “Appearance and sound” category features fields wherein you can personalize the aesthetic of your alerts.
- The “Teams and channels” category contains notification presets concerning activity within Teams and their respective channels.
- The “People” category allows you to customize your experience with notifications concerning specific individuals
- The “Other” category concerns Microsoft Teams’ tips and tricks notifications/prompts.
How to disable Windows focus assist
Windows focus mode assists users by suppressing notifications as your device receives them. So, although your device will receive the alert, it will not inform you.
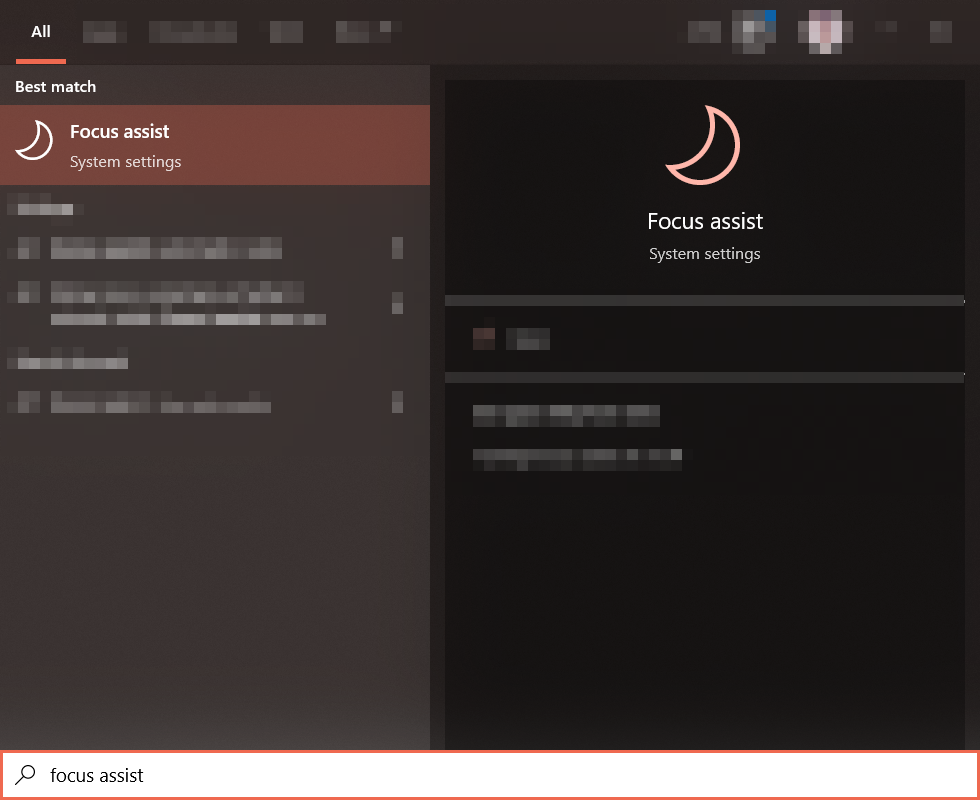
Step 1 — Launch the relevant system settings window
We can control focus assist via a system setting toggle— this toggle is easily accessible via the system settings window. Hit the “Start” key, type “Focus assist,” and tap the “Enter” key. Alternatively, you can select “Focus assist” under your result’s “Best match.”
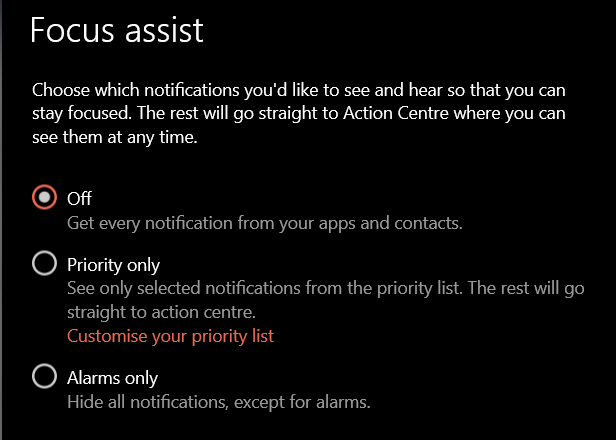
Step 2 — Deactivate focus assist
Your current window contains three toggles: “Off,” “Priority only,” and “Alarms only.” I recommend enabling the “Off” toggle. The latter two are known to suppress numerous alerts.
How to disable iOS do not disturb
iOS users may be aware of do not disturb. Do not disturb (DnD) is comparable to Window’s focus assist, being that it suppresses/hides notifications as your device receives them.
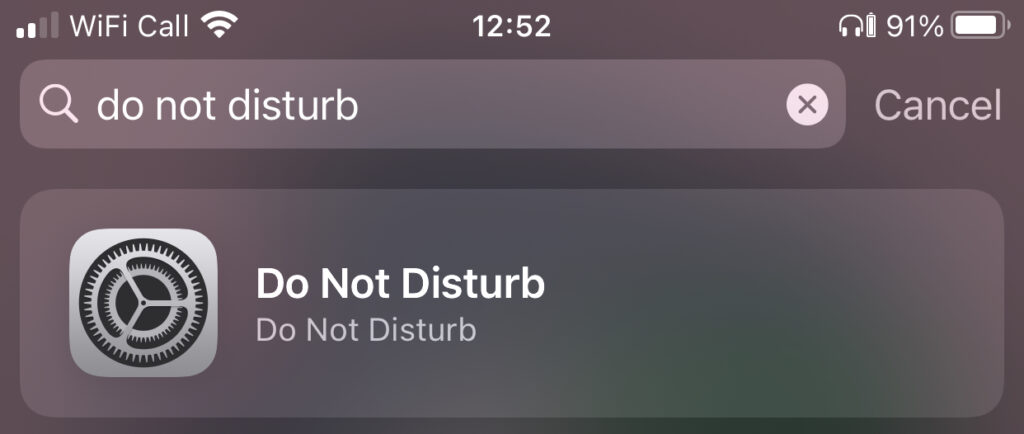
Step 1 — Search for do not disturb via spotlight search
Swipe up from the home screen to reveal the Spotlight search. Type “do not disturb” and tap “Enter.”
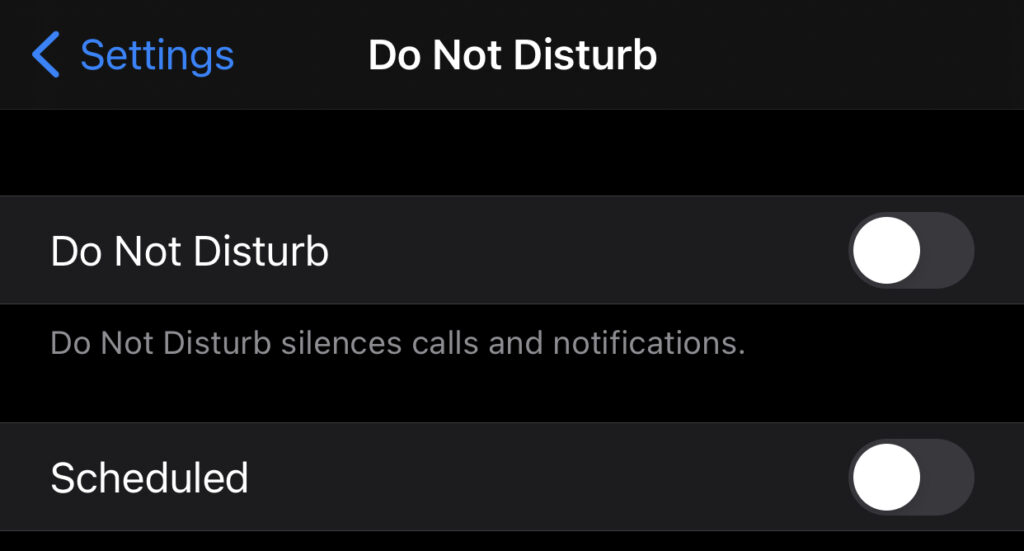
Step 2 — Disable the toggle
Identify the toggle labeled “Do Not Disturb” and disable it.
How to enable Teams notifications on iOS
iOS performs several security measures you likely don’t appreciate enough. The most notable is that an app must request permission (from you) to perform specific tasks on your device. One such task could be delivering notifications.
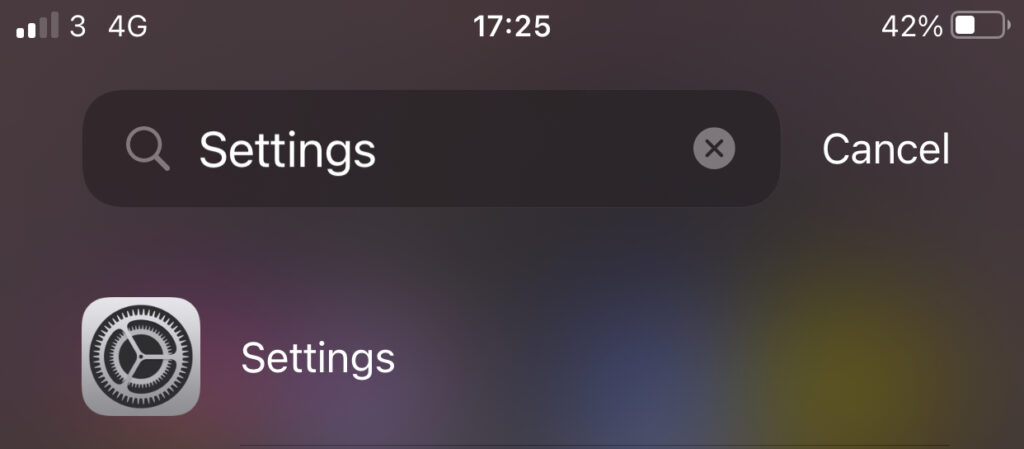
Step 1 — Launch the pre-installed settings app
Swipe your way to the app library. Then, swipe up to access the search bar and search for “Settings.” Select the default “Settings” app when it appears in your results.
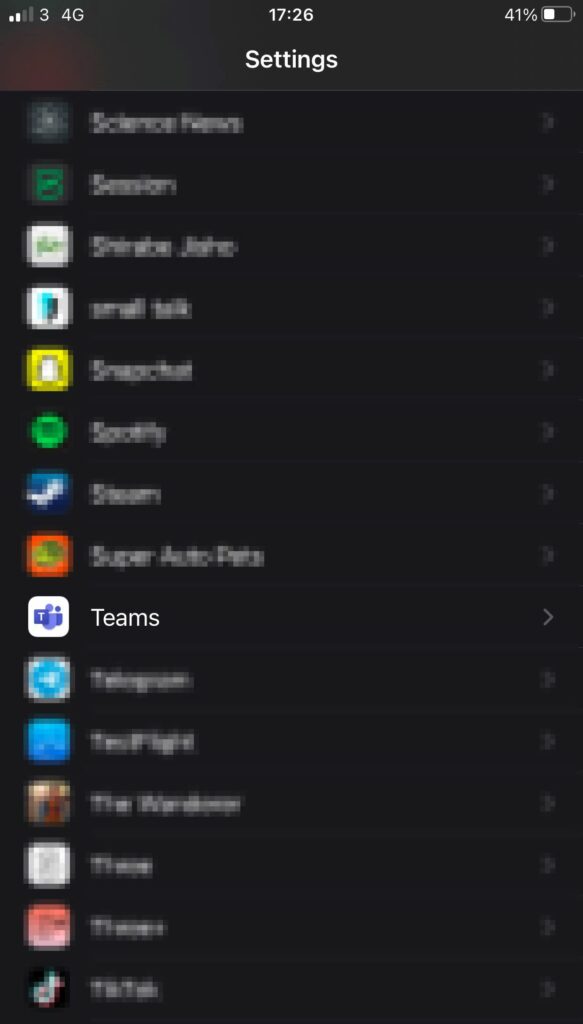
Step 2 — Open the Teams app’s settings
Scroll through the settings app. Find and select “Teams.”
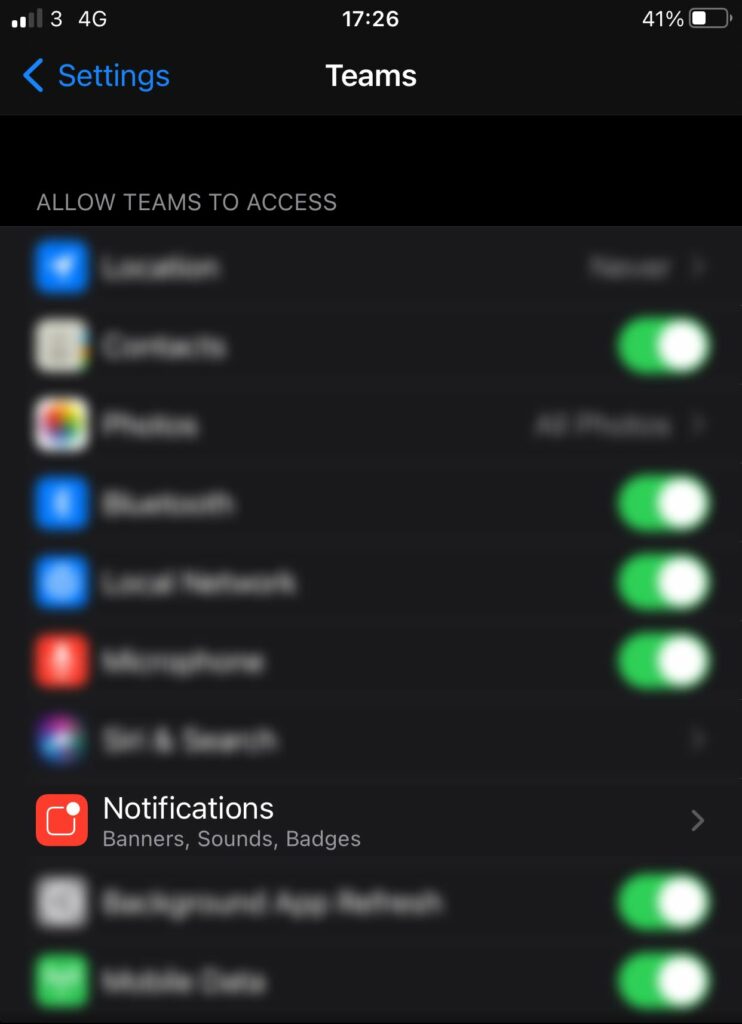
Step 3 — Open the Notifications page
Although the teams’ settings page features several options, we only need to concern ourselves with one. Tap the section labeled “Notifications.”
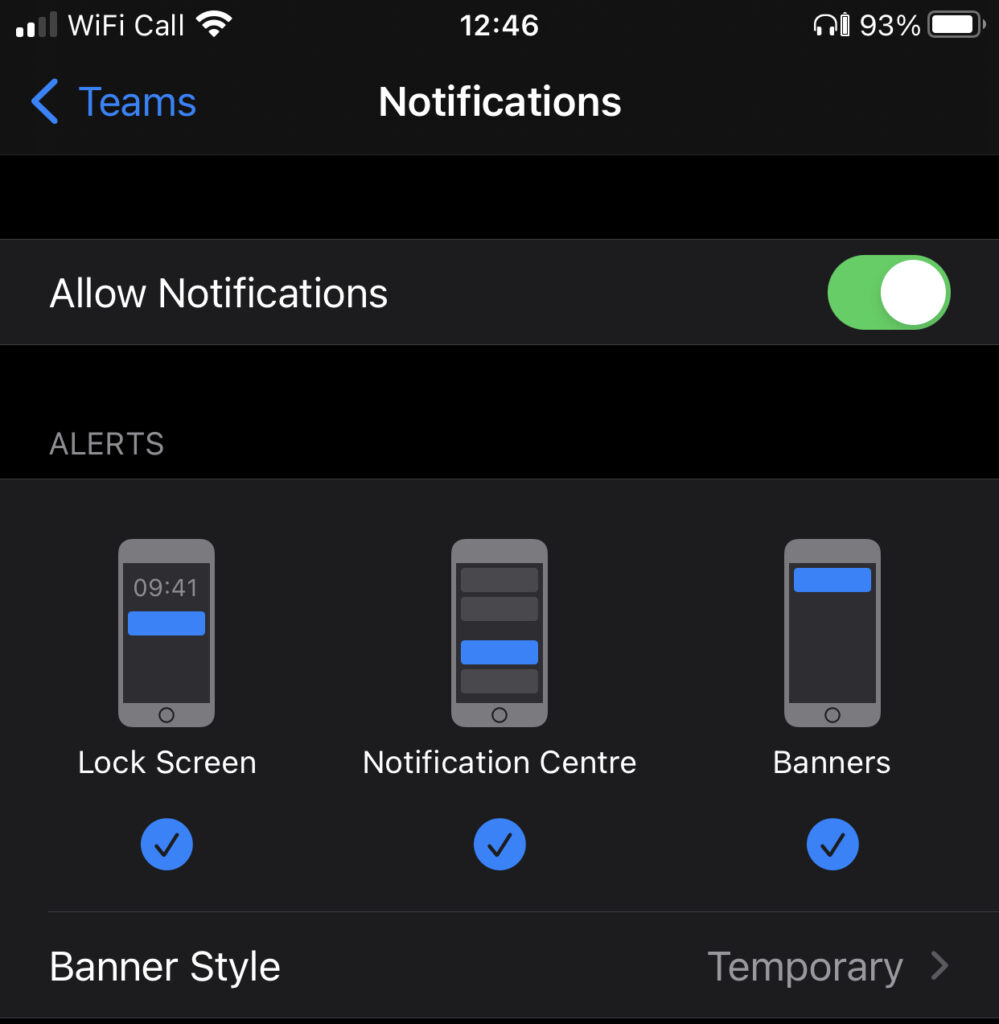
Step 4 — Permit Teams to send notifications
We can use the notification page to customize and configure our mobile notifications. Ensure you have enabled the “Allow Notifications” toggle. Similarly, enabling iOS’ alert styles will allow you to see notifications in more places.
Blog post recap
If your Teams meeting reminders are failing, you can consider enabling a scheduled meeting via Outlook, configuring your Teams account’s settings, deactivating “do no dist disturb” modes,” and permitting Teams to distribute notifications on your device.
I sincerely thank you for reading this far. If you enjoyed the post or otherwise found it helpful, please consider looking into the related posts I have linked below. Each writer works hard to produce informative, tested, and dependable resources for your work concerning Microsoft 365.