 Key Takeaways
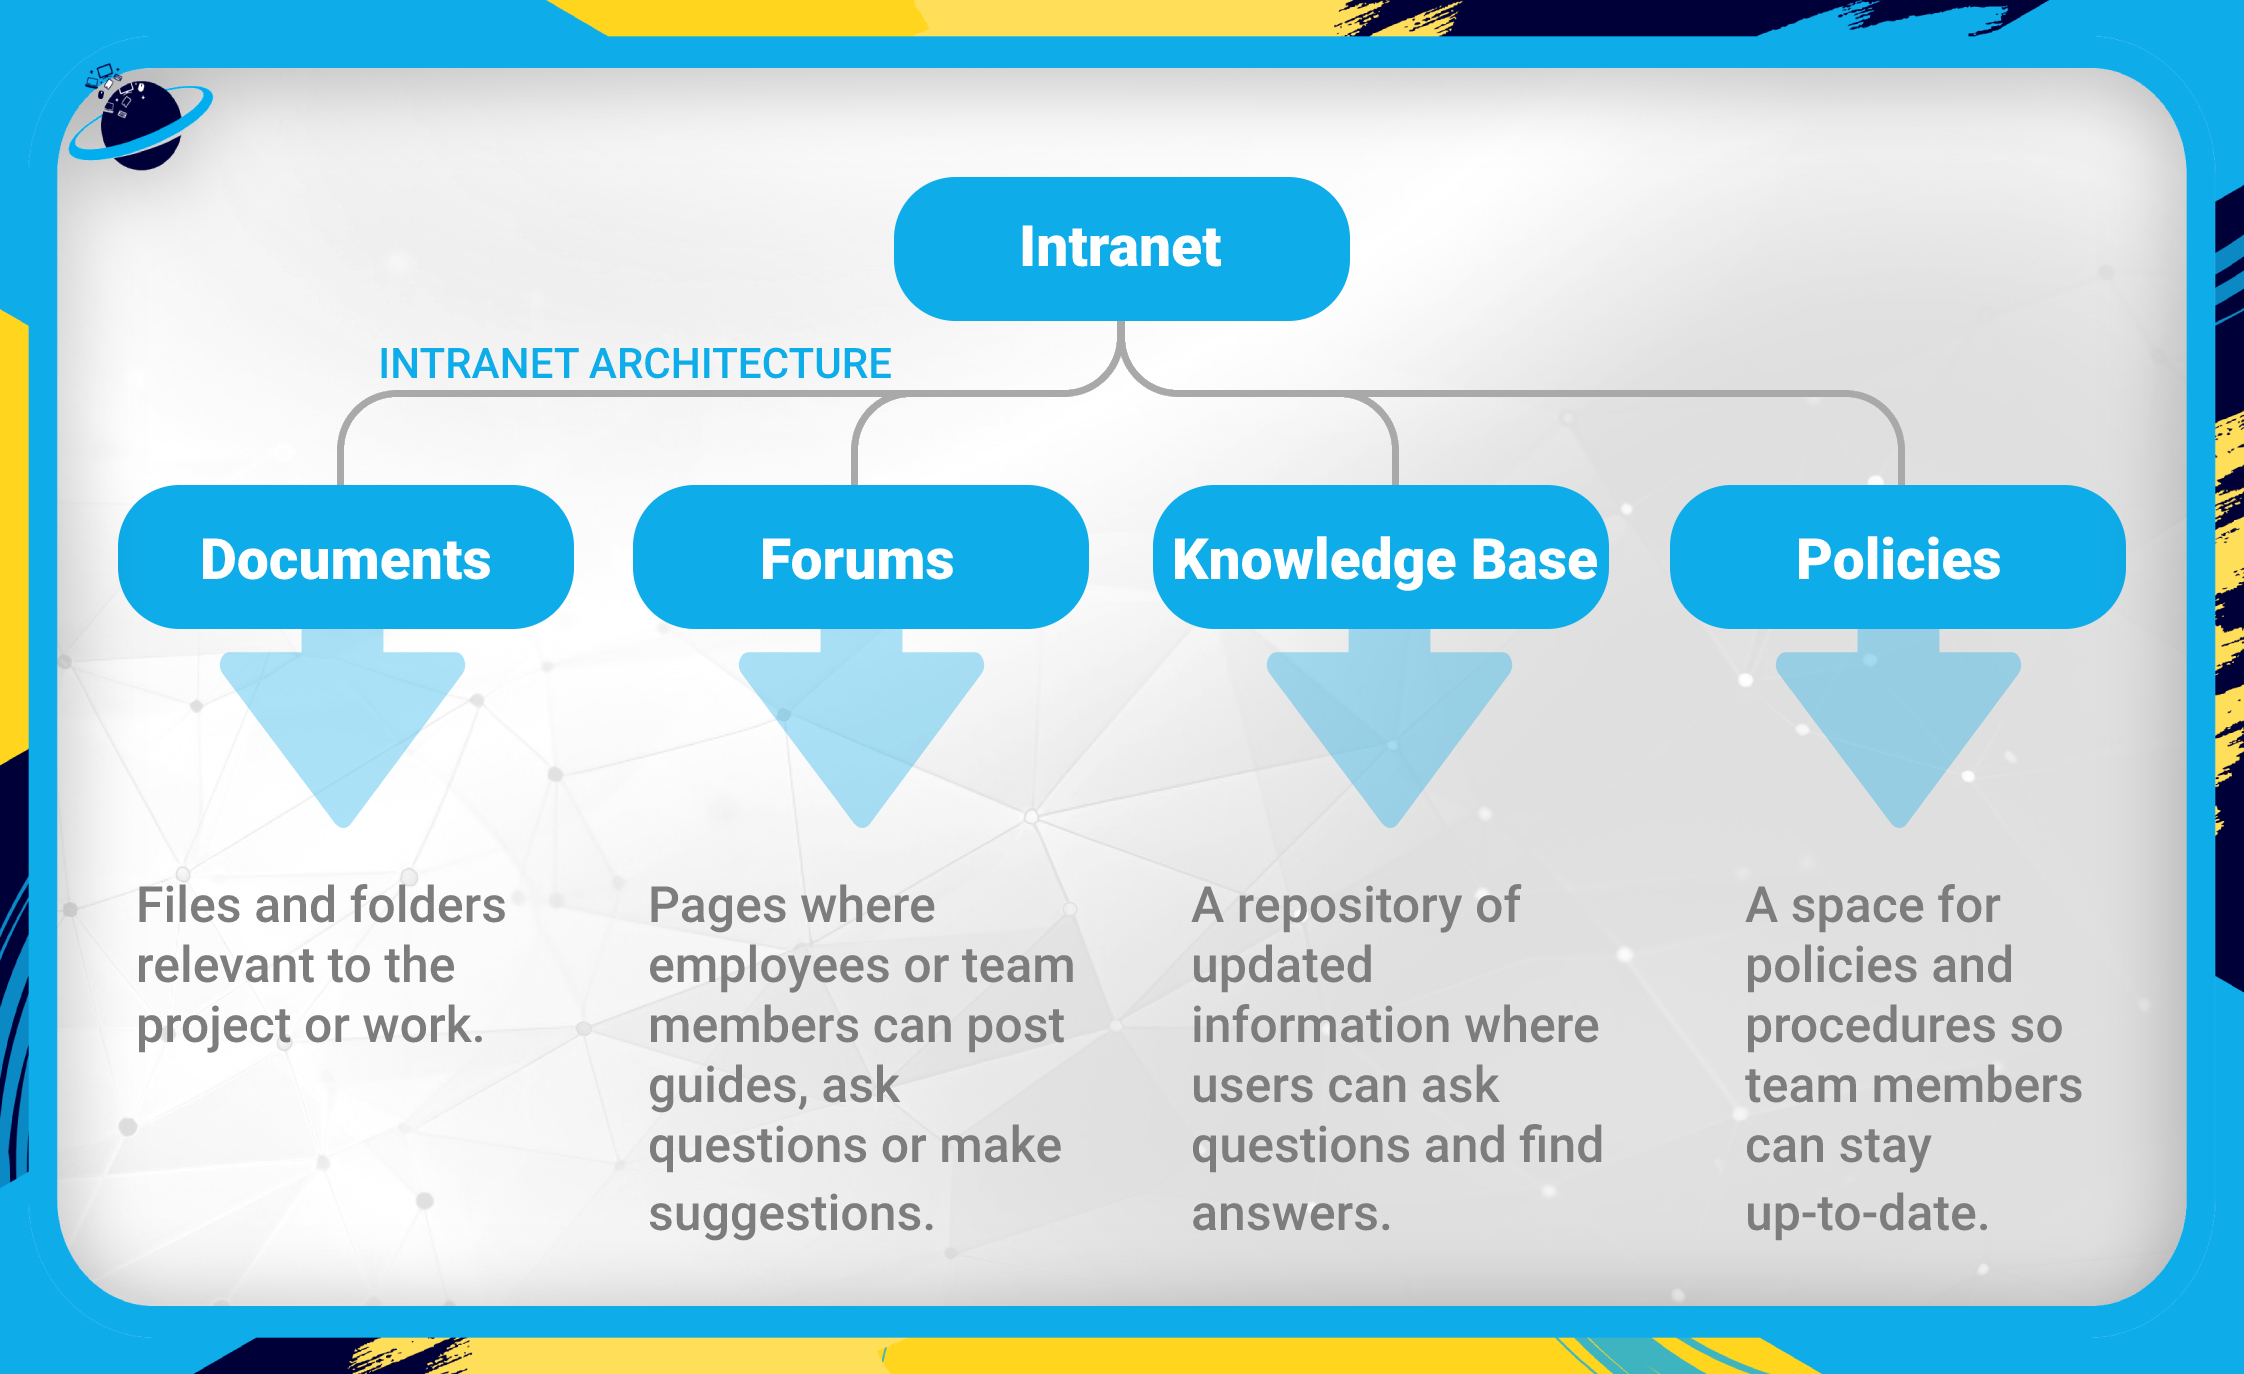
 Some of the most important elements of an intranet are a knowledge base, policies, forums, and shared files. [More…]
 To create a page for shared files, link to your OneDrive folders or folders in your Teams channel. [More…]
To create a knowledge base, build a table where users can ask questions and store all your essential guides and information in subpages. [More…]

An intranet is a popular solution for companies needing to collaborate and share information securely. In today’s article, we’ll discuss using Microsoft Loop to build an intranet with a forum, folder system, meeting room, and knowledge base.
How to use Microsoft Loop as a company intranet:
- Step 1: Create an intranet workspace.
- Step 2: Create a documents page.
- Step 3: Create a forum.
- Step 4: Create a knowledge base.
- Step 5: Create a meeting room.
We’ve also create a video to help guide you through the process:
 Overview: What is an Intranet?
An intranet is an internal network of computers where employees or team members can connect, collaborate, and share resources securely. The internet is also a network of connected computers, but intranets are not open to the public and are structured specifically to meet the needs of the team, group, or company.
You can also try our top 3 Intranet applications:


 How to use Microsoft Loop as a company intranet
If you have a Microsoft 365 license, then you already have access to the World’s most popular intranet service: SharePoint. But if you want to make use of Loop’s hyper-collaborative functionality, then you could build an intranet structure there by using some of our suggestions in this guide.
![]() Note: Microsoft Loop is currently in Public Preview. If you want to use Loop, you need to enable the app for your organization. Please refer to our complete guide on enabling Loop:
Note: Microsoft Loop is currently in Public Preview. If you want to use Loop, you need to enable the app for your organization. Please refer to our complete guide on enabling Loop:![]() How to enable and access Microsoft Loop for your organization
How to enable and access Microsoft Loop for your organization

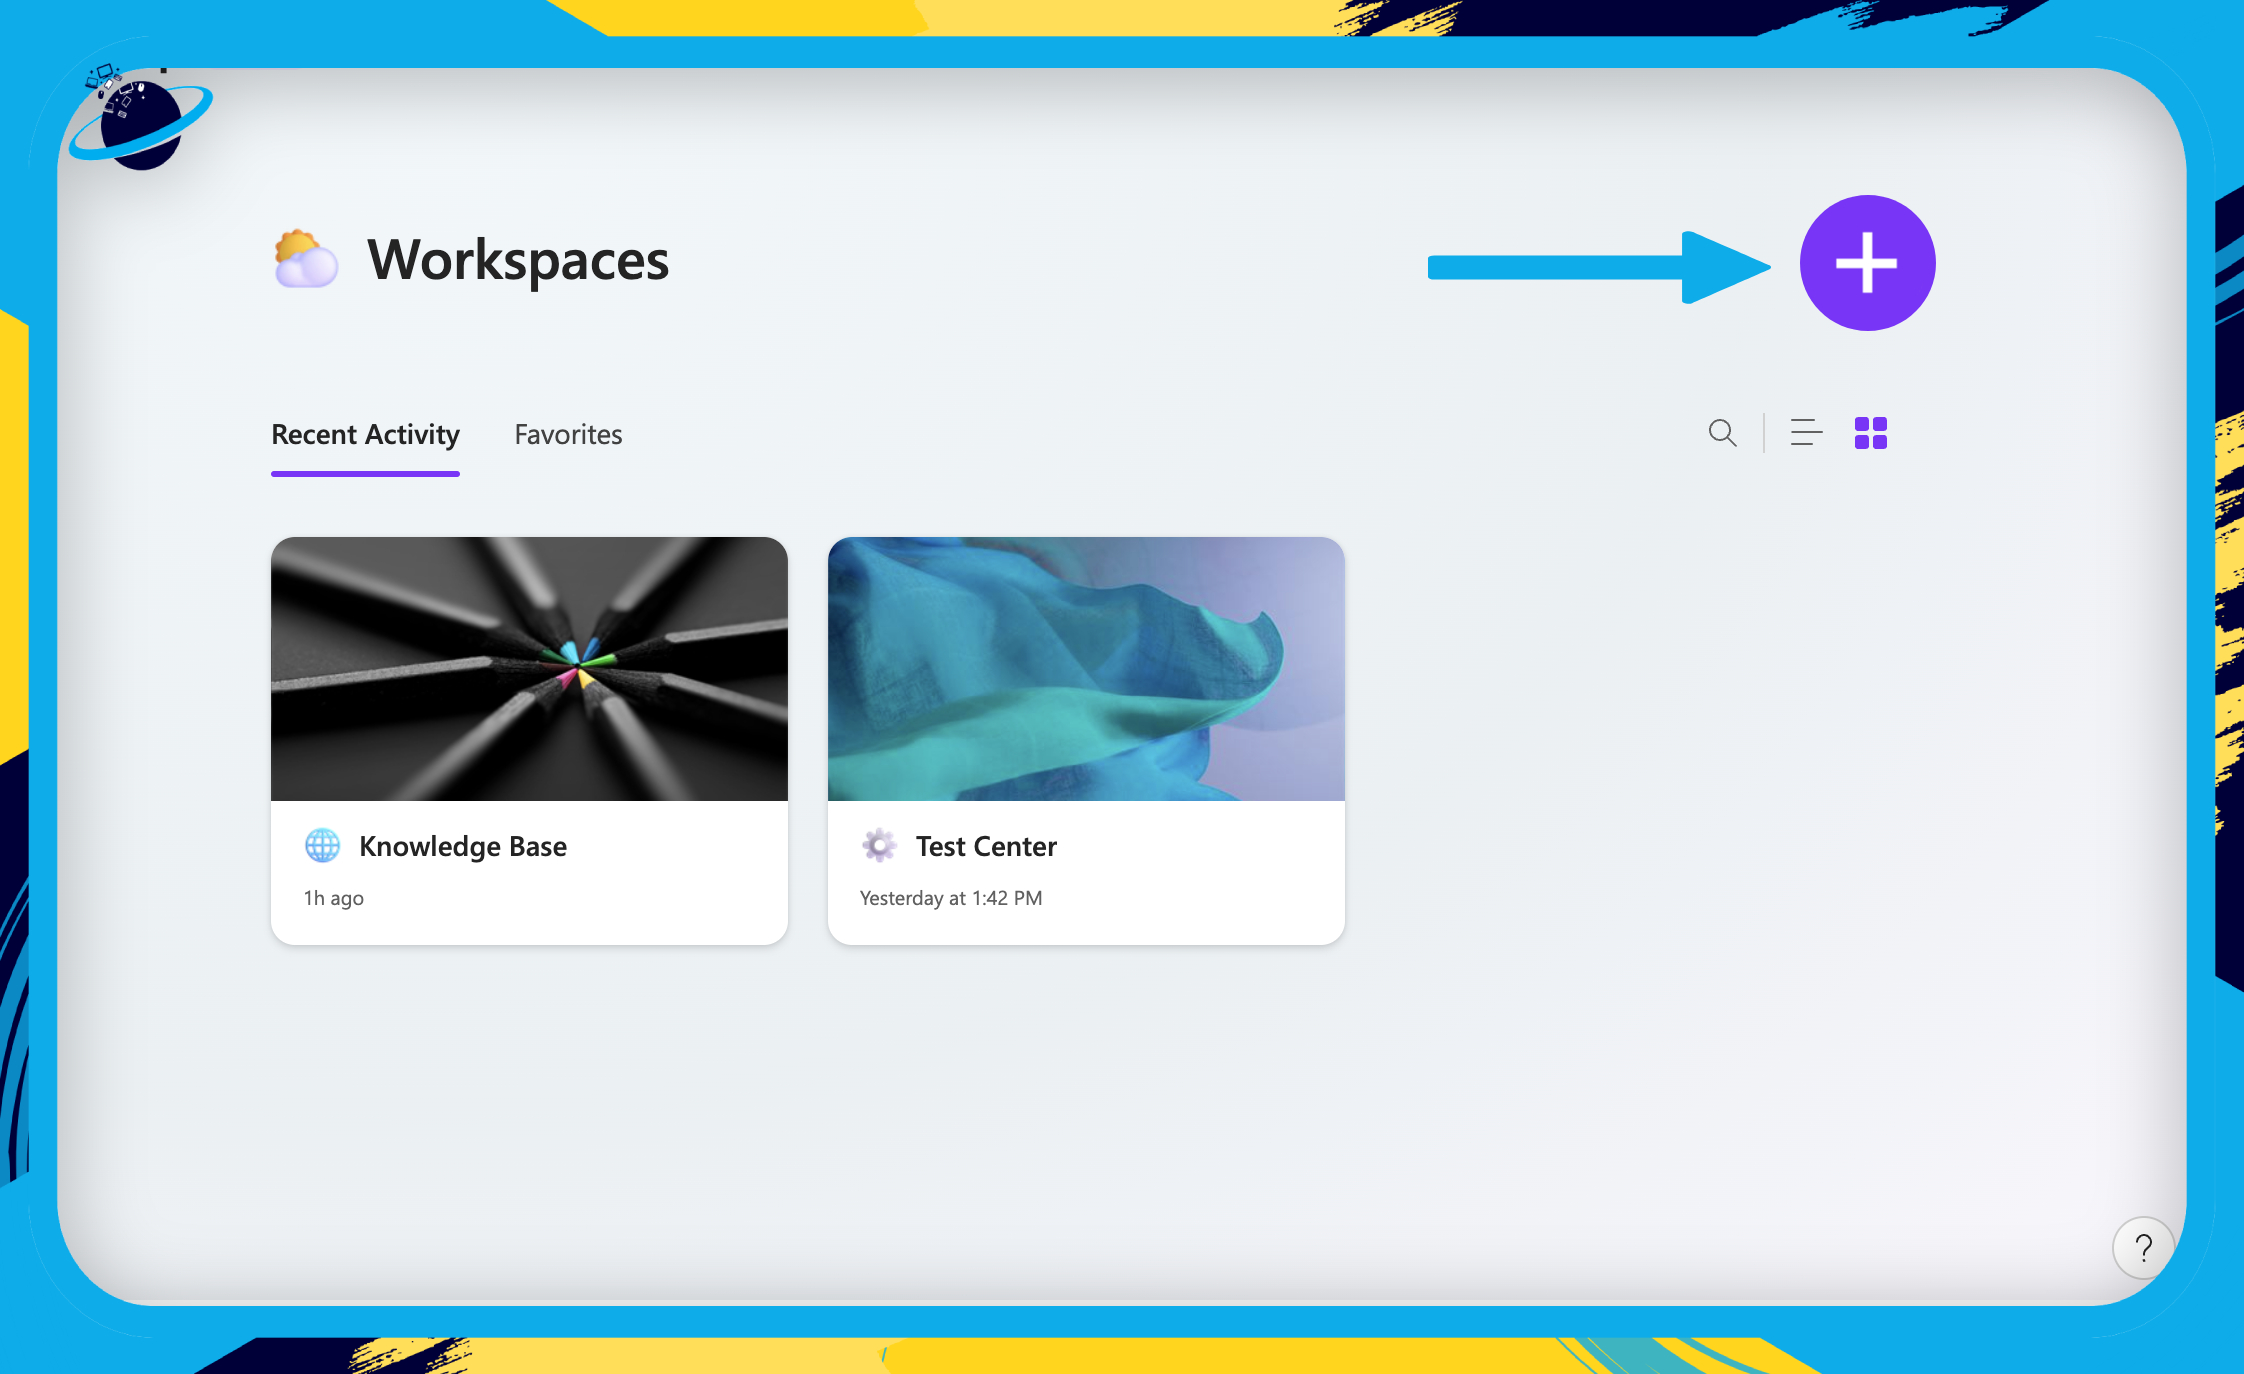
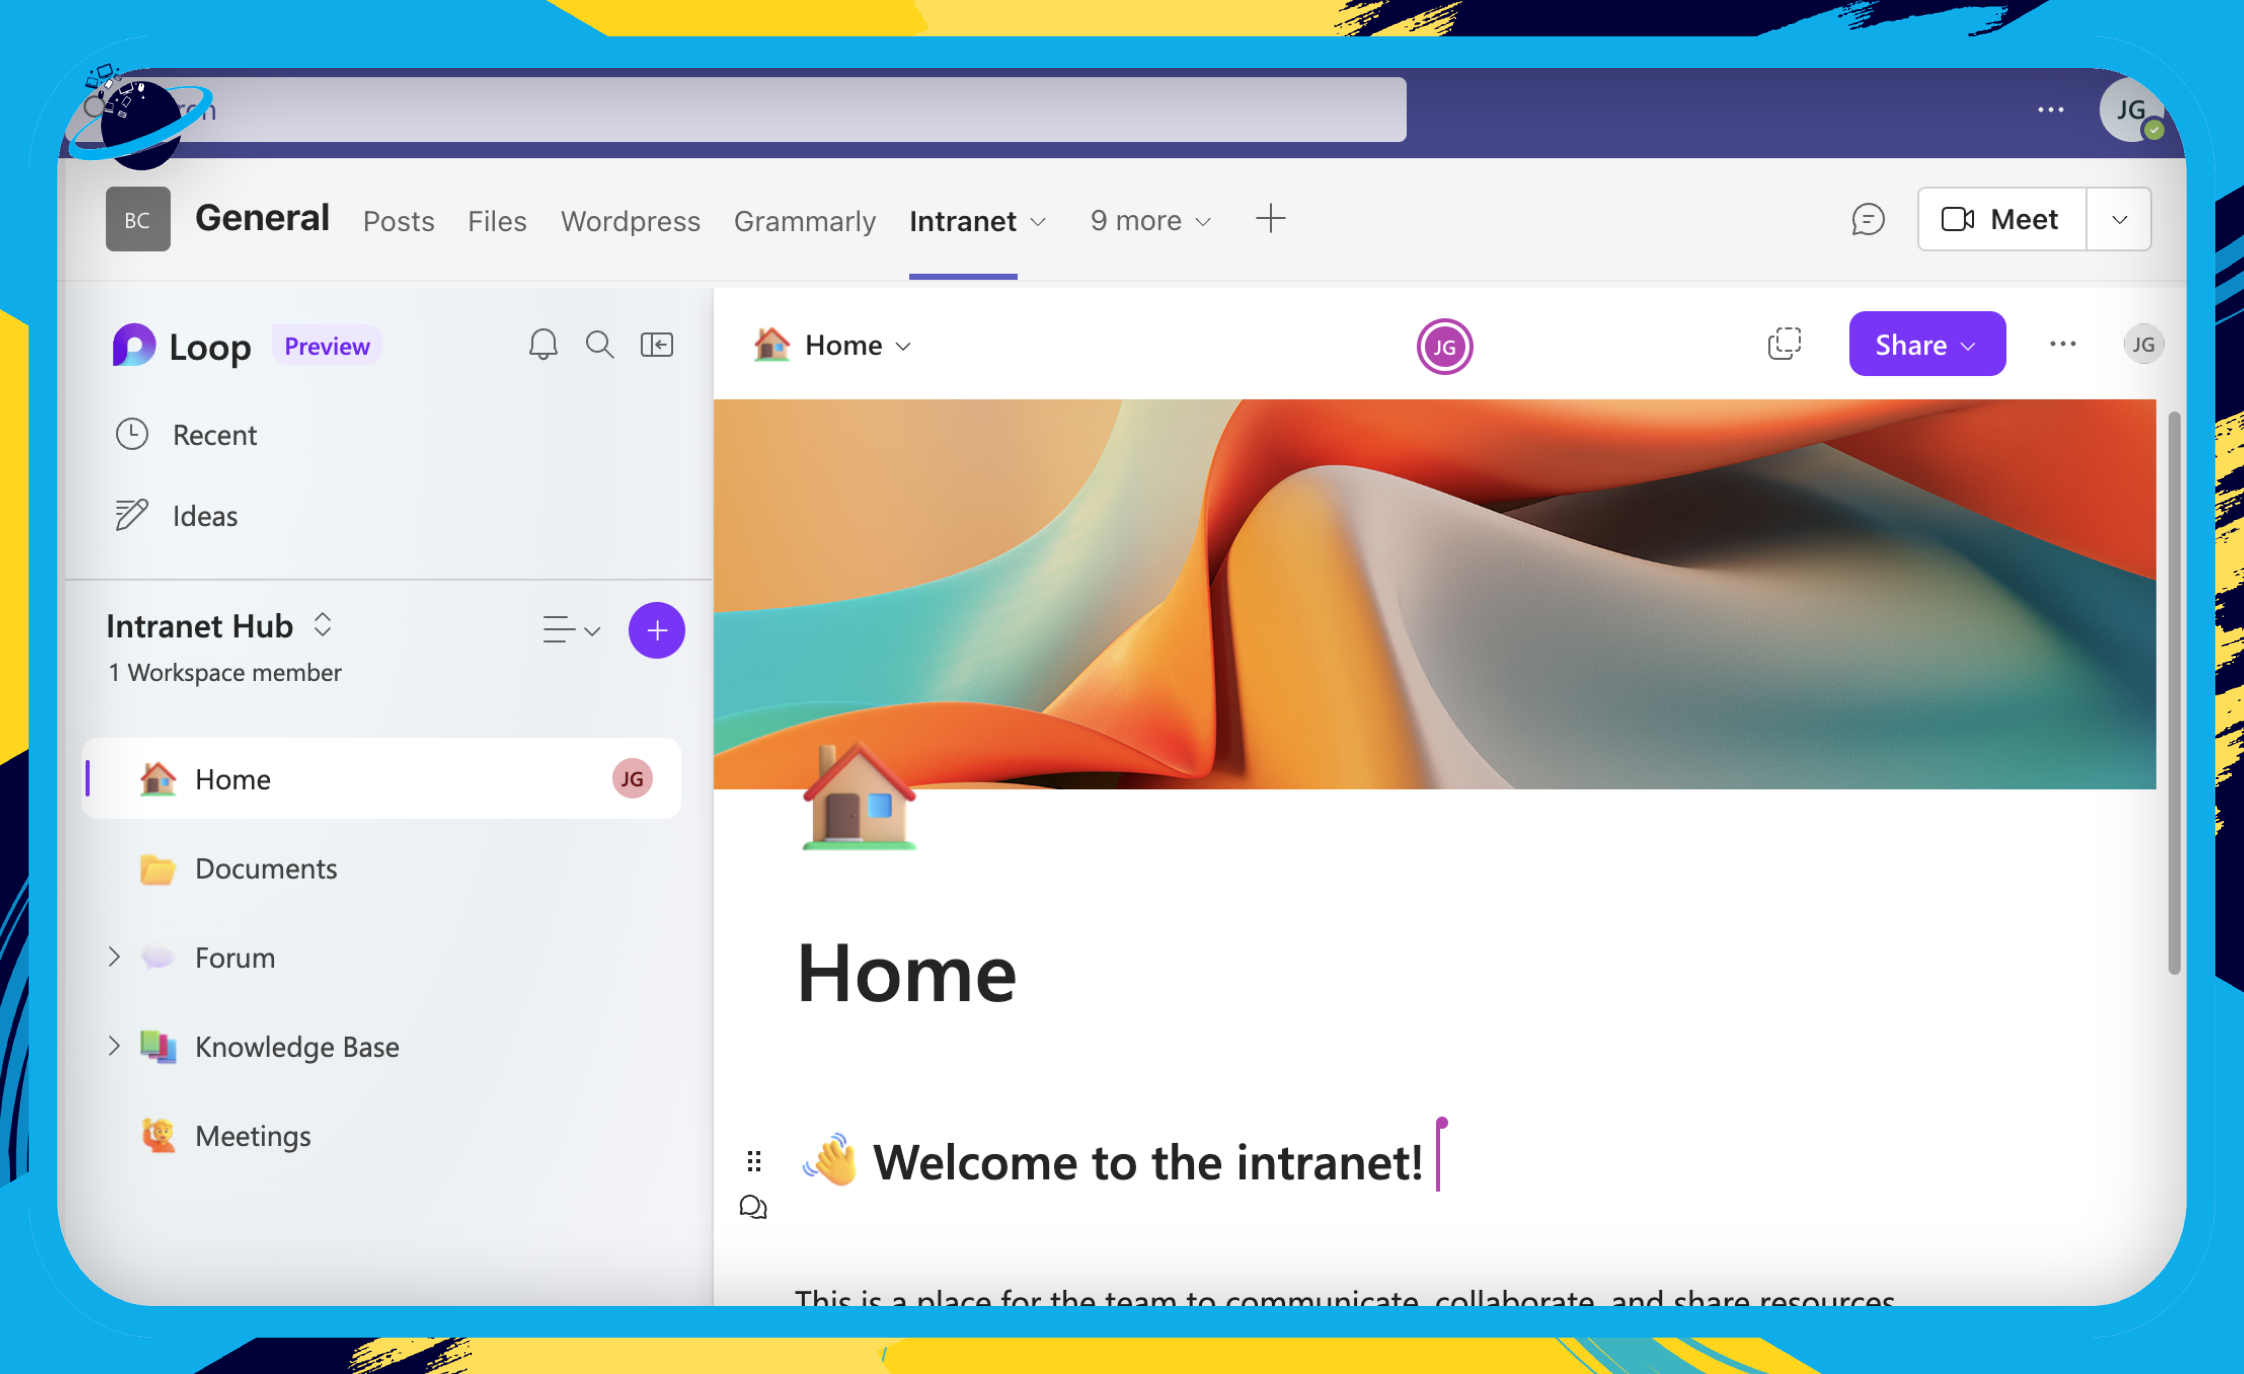
Build the Intranet Hub
In this section, we’ll show you how to create the Hub for your Intranet.
- Start by opening and signing into
 Microsoft Loop.
 - The first task it to build a workspace — click the
 circular plus icon.
- Hover over the image at the top and click
 “Update cover.” [1]
- There, select a cover image and click “Update.”
- Click the
 plus icon to select an icon. [2]
 - Name your workspace “Intranet.” [3]
- Add team members to the workspace. [4]
- This option is available if you have Jumpstart enabled.
- Type their names into the “Invite” box and select them from the popup.
- Click “Continue” or “Create.” [5]
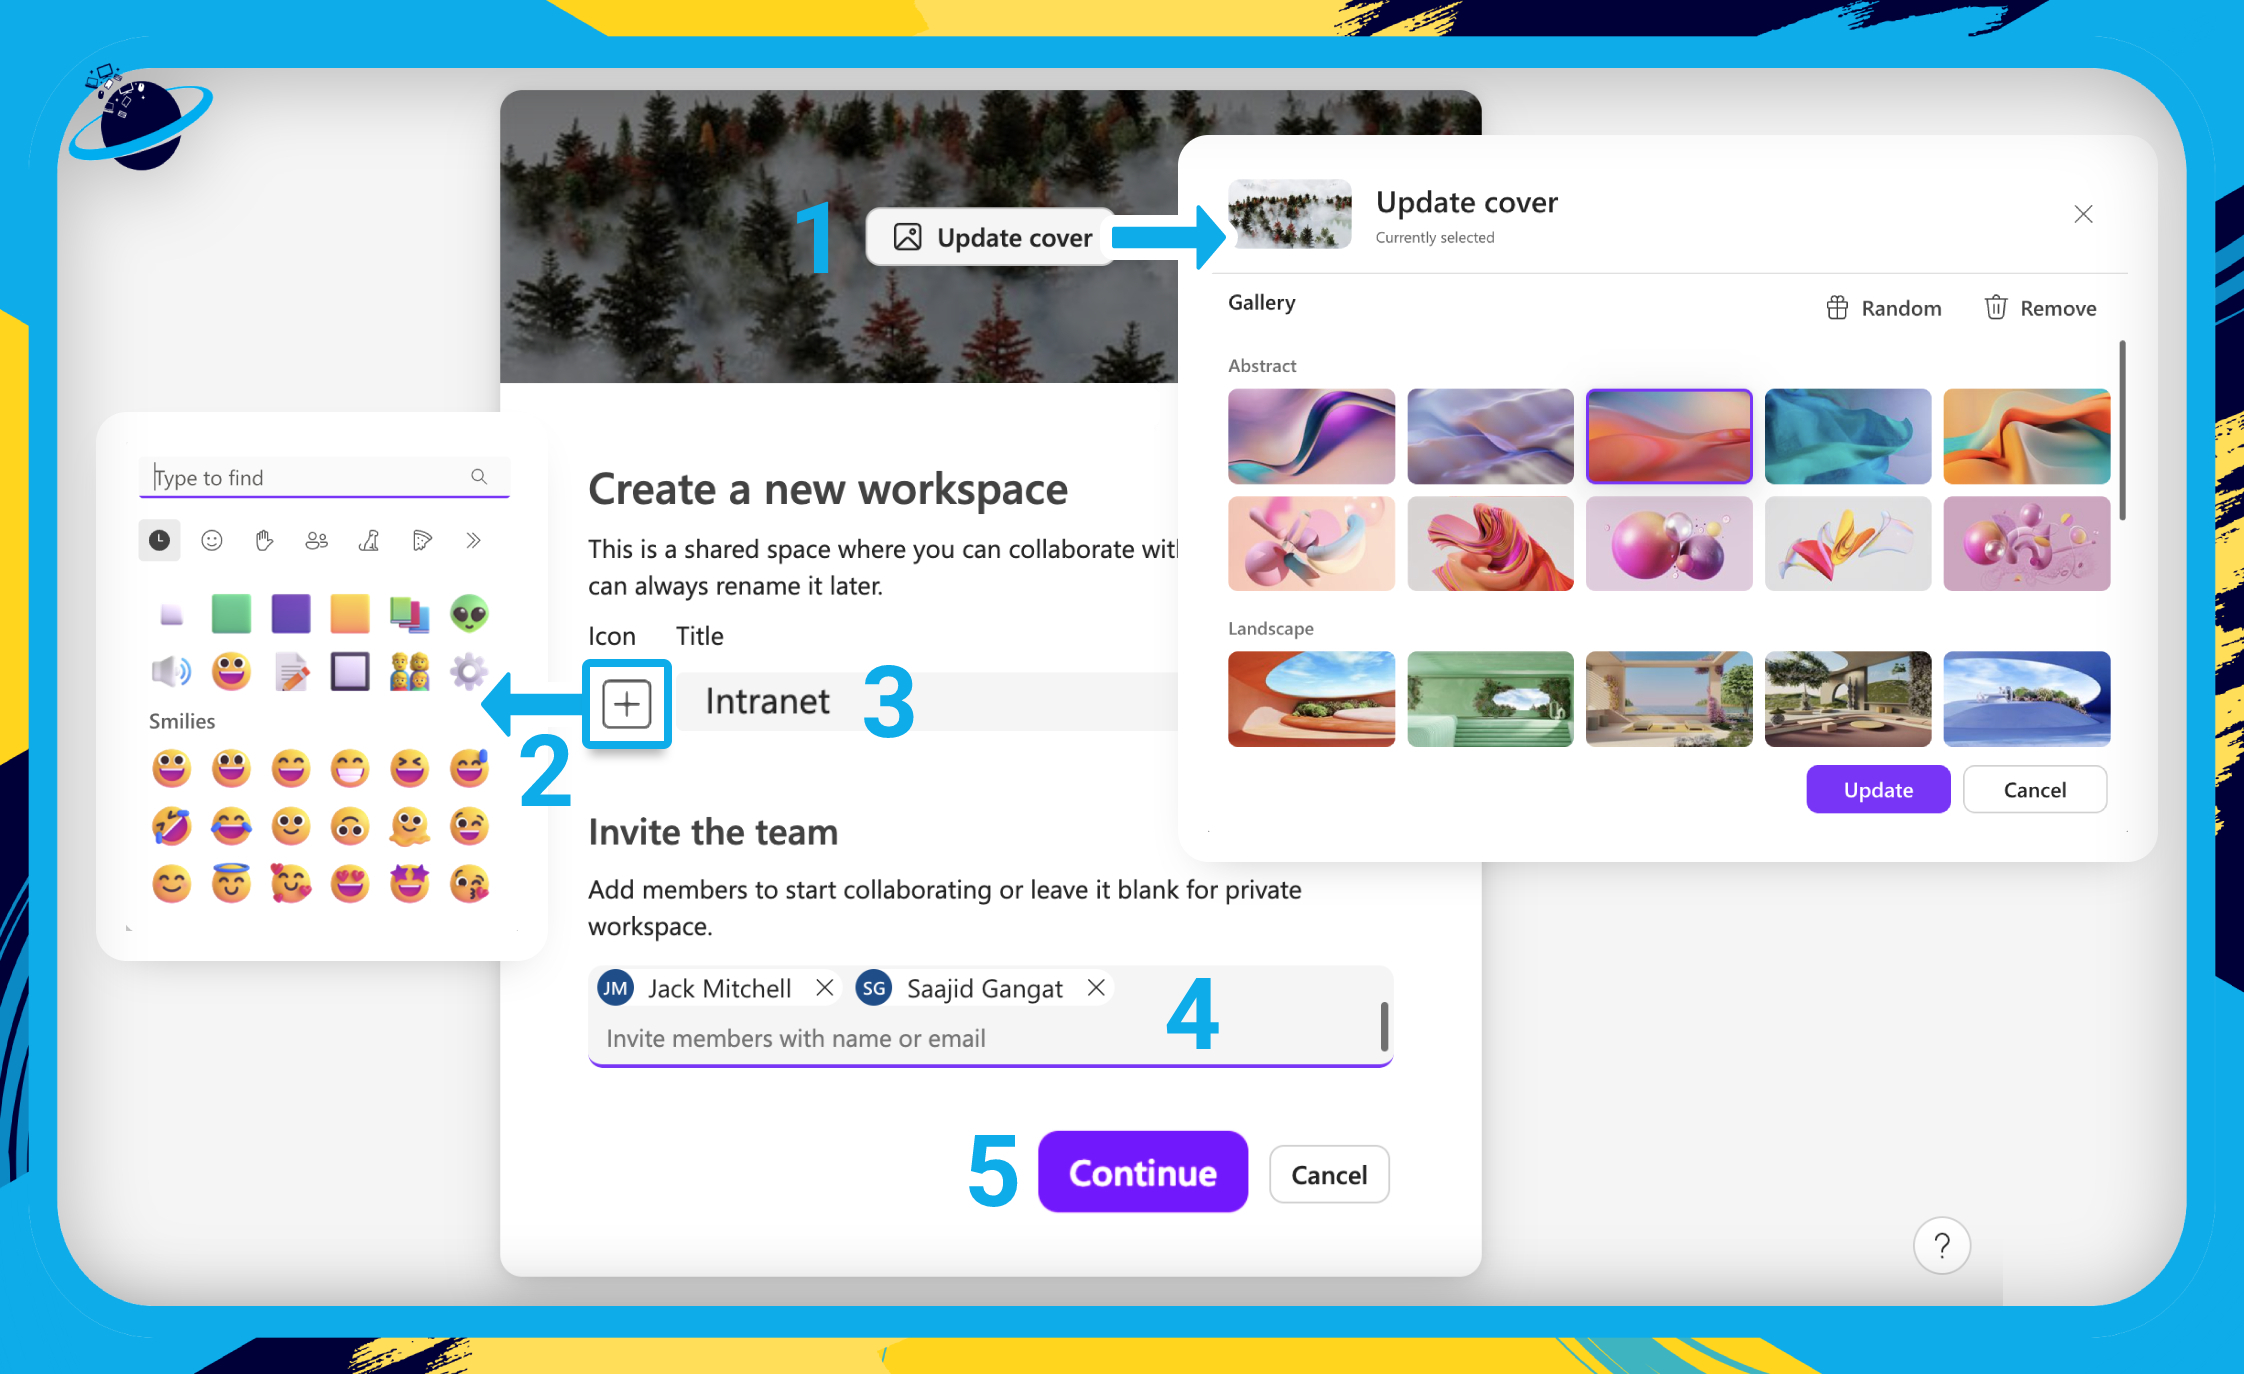
If you have Jumpstart enabled and you clicked “Continue,” simply hit “Create” on the next page. Then continue down to the next section.
![]() Note: For more information on how to use Workspaces, please read our dedicated guide:
Note: For more information on how to use Workspaces, please read our dedicated guide:![]() What are Microsoft Loop Workspaces?
What are Microsoft Loop Workspaces?

Intranet Documents
In this section, we’ll show you link up a documents page to your shared folders in a Teams channel.
A crucial element of the intranet structure is a file-sharing system. To use one in Microsoft Loop, you’ll have to build your own. But though it takes a little more effort, it also means you can create a highly customized experience.
- Type “Documents” where it says “Untitled page” at the top.
- Then click
 “Add icon.” [1]
 - Type “folder” into the search bar in the popup box. [2]
- Select a
 folder icon. [3]
- Click
 “Add cover” and select any design to add to the page.
 - Now type “/table” and hit ⏎ Enter on your keyboard.
The table will provide links to the folders within your file system. The table is not strictly necessary, as users can navigate to the folders using the left menu. However, if you plan on having a large folder structure, it may be helpful to create some quick links.
In this guide, we’ll use a single column for the quick links. But you could also create additional columns for descriptions or labels to help your team members identify the folder they’re looking for.
- To delete a column, click the
 six dots above it, then hit the
  bin icon.
 - Alternatively, right-click the column header and select “Delete” from the popup.
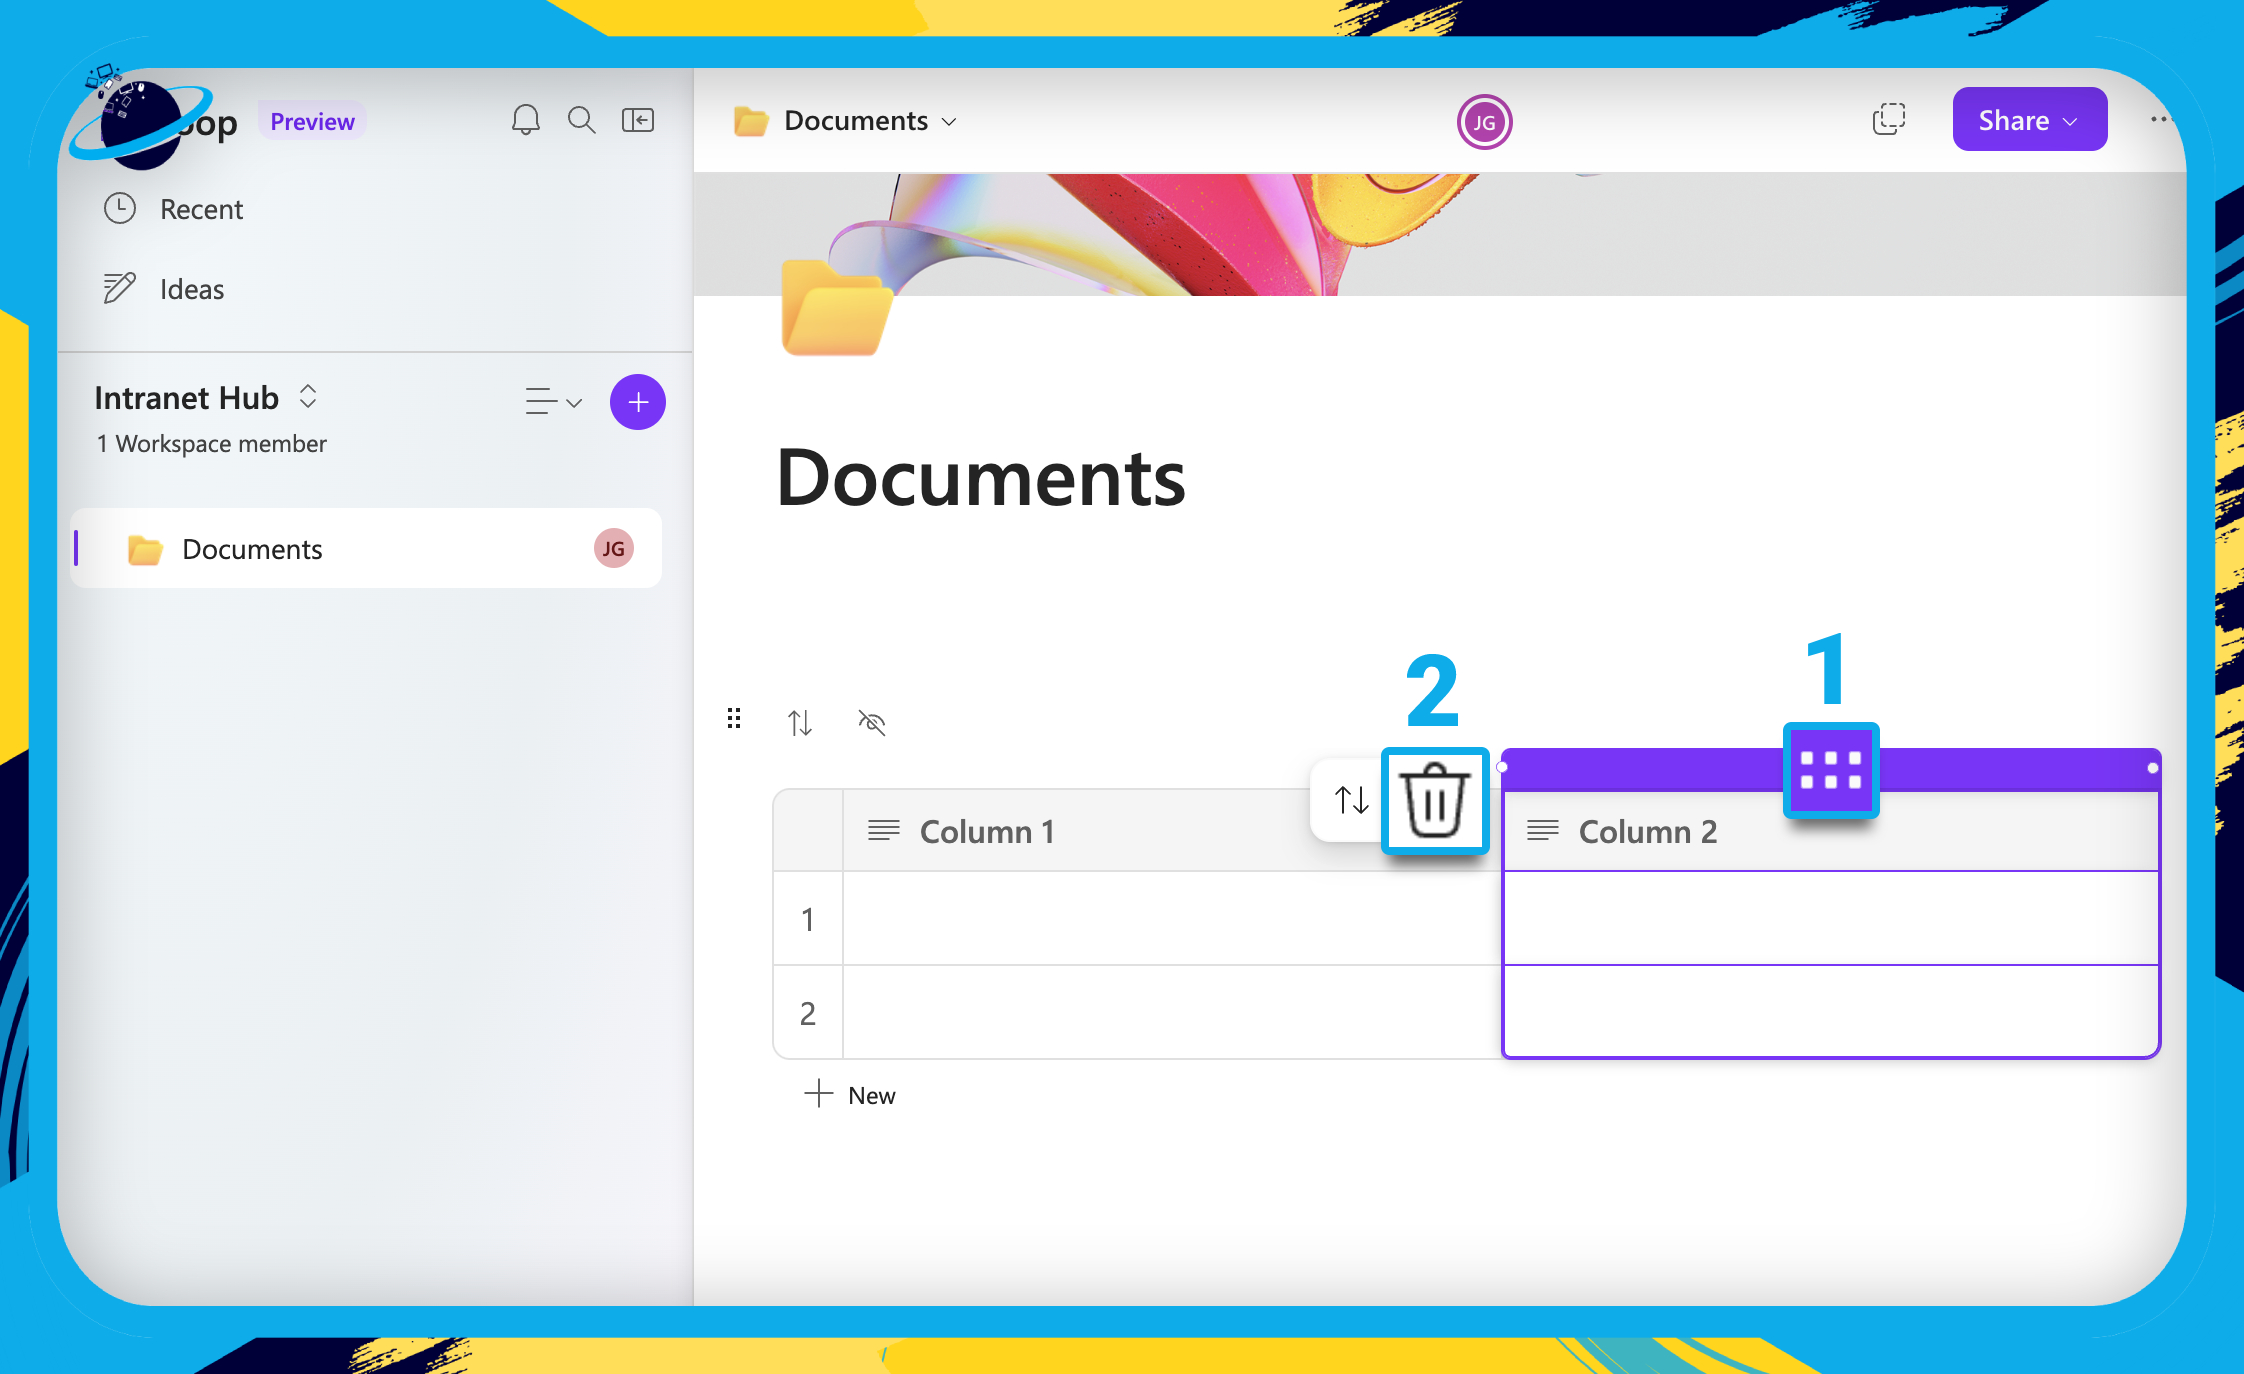
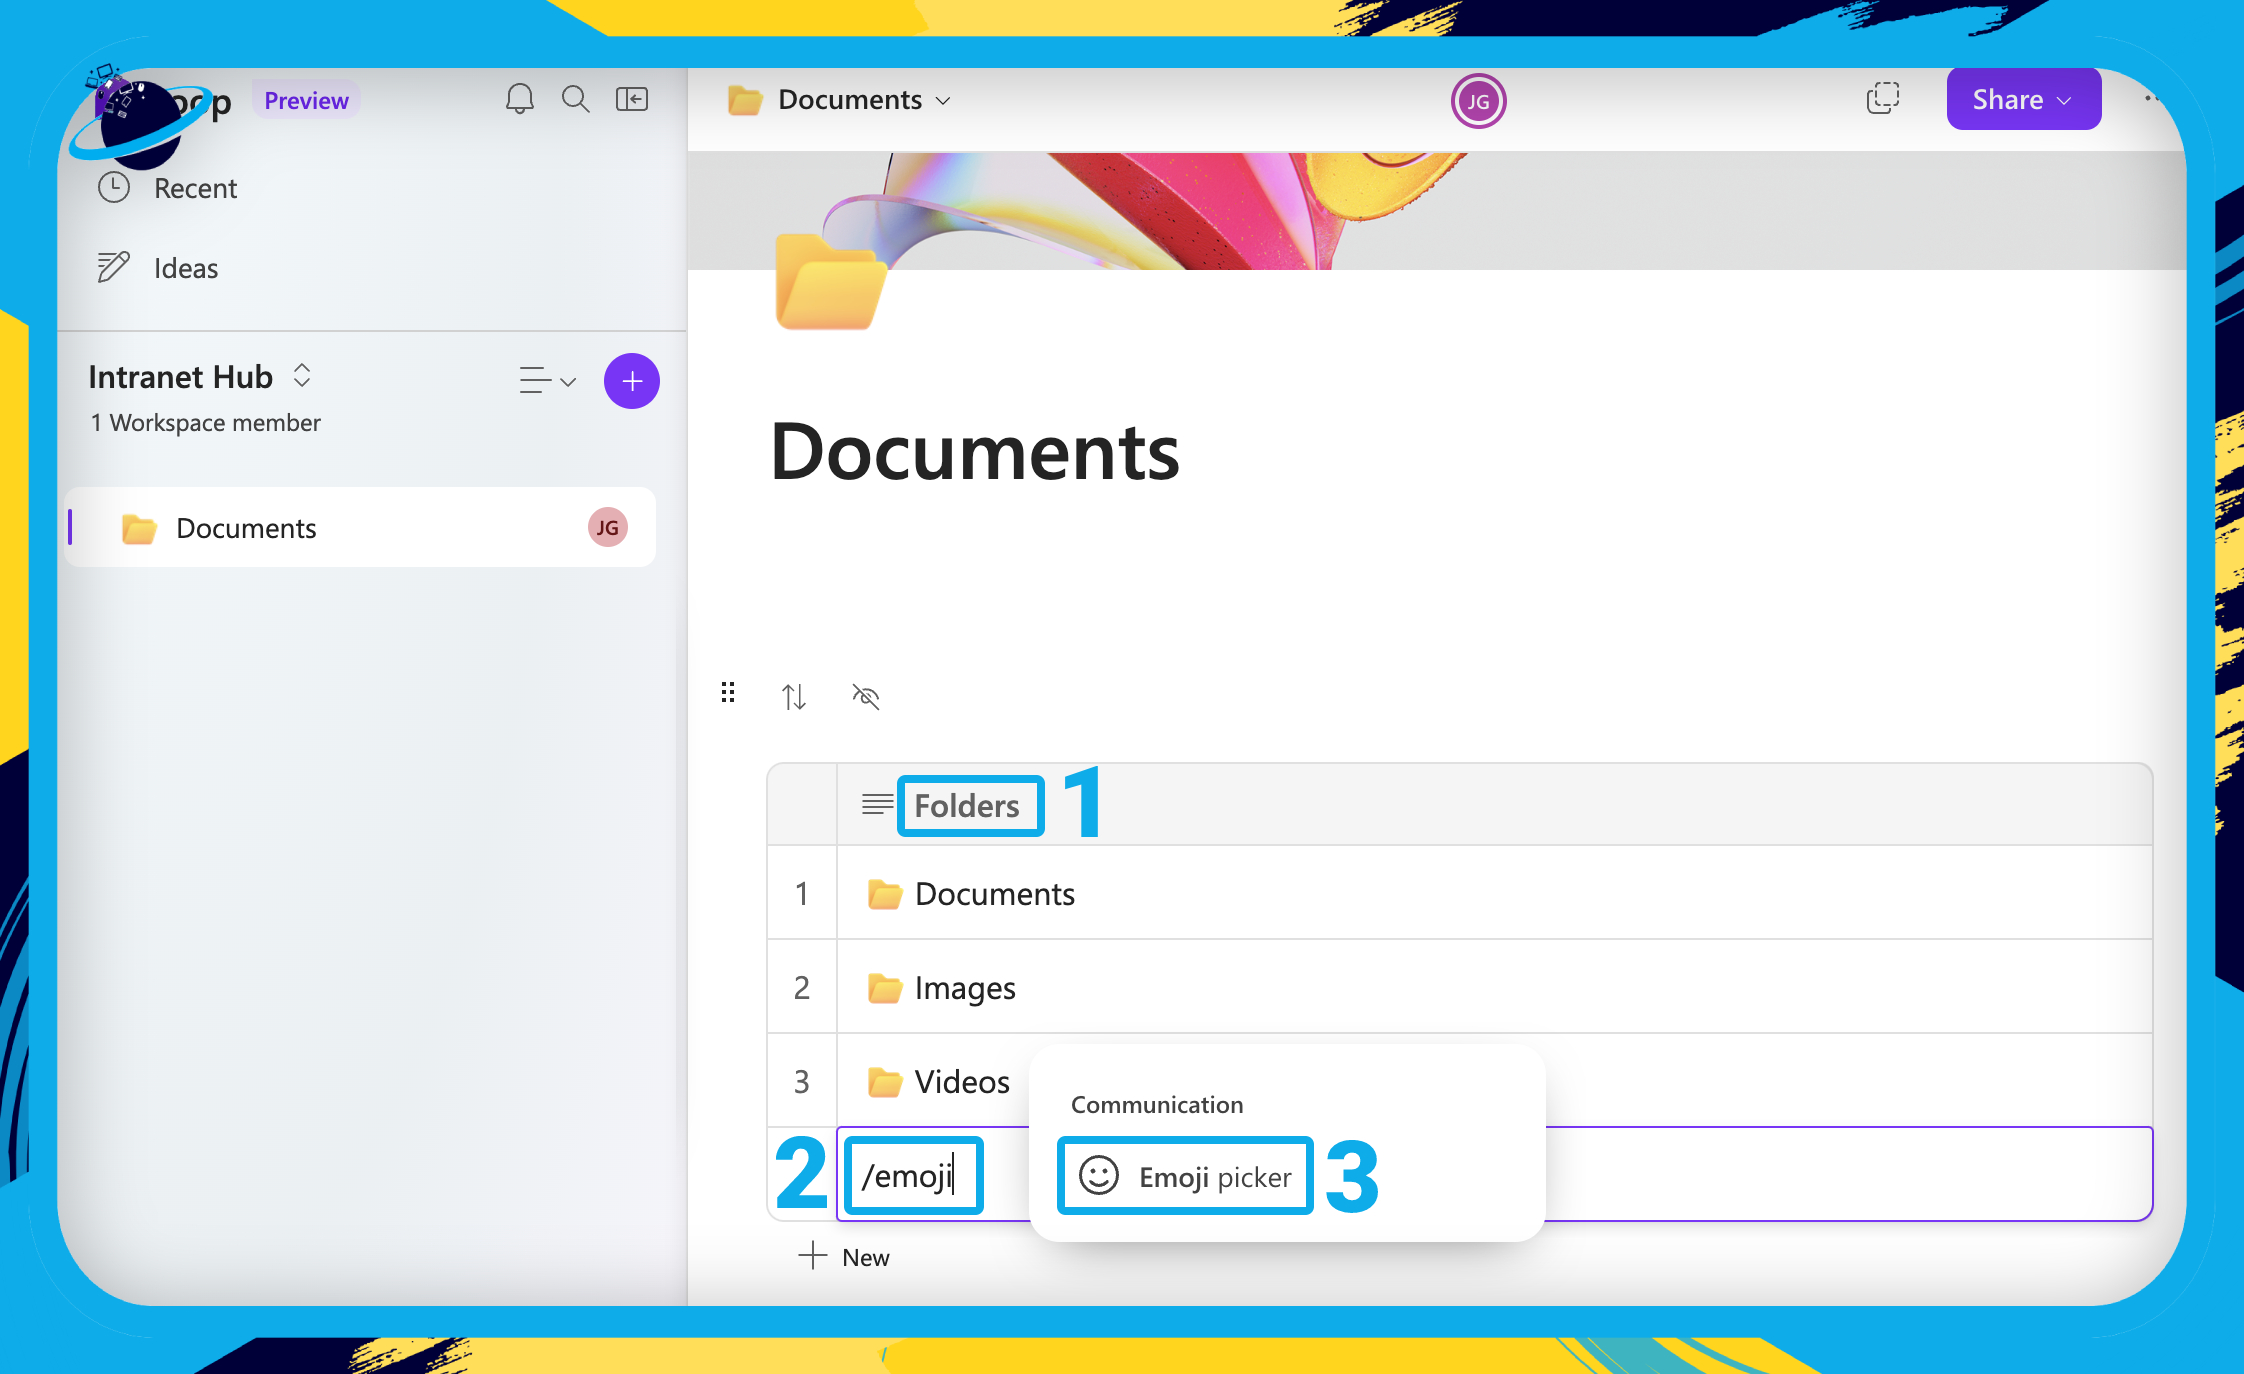
- Double-click the column header and type “Folders.” [1]
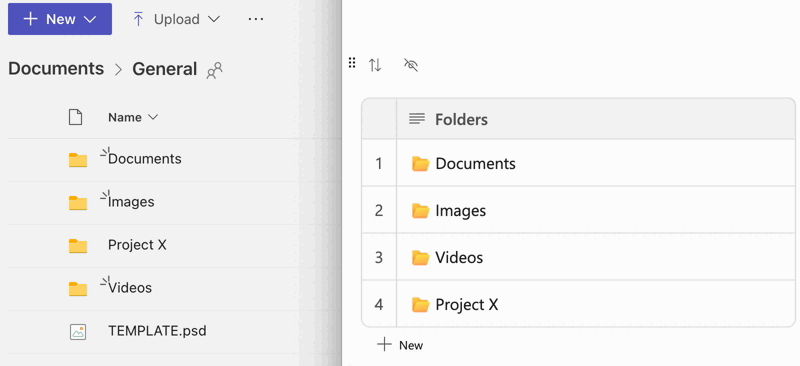
- Enter your folders in the rows below.
- To add a folder icon, type “/emoji” [2] and select “Emoji picker.” [3]
The next step is to create or link to an existing folder. That could be a shared folder in OneDrive or in a Teams channel. In this demonstration, we’ll be linking to folders in a Teams channel in the “Files” tab.
- To create a folder, click
 “New” [1] at the top and select
  “Folder.” [2]
 - To get the link, right-click the folder or click the
 three dots. [3]
 - Then select “Copy link” from the dropdown list. [4]
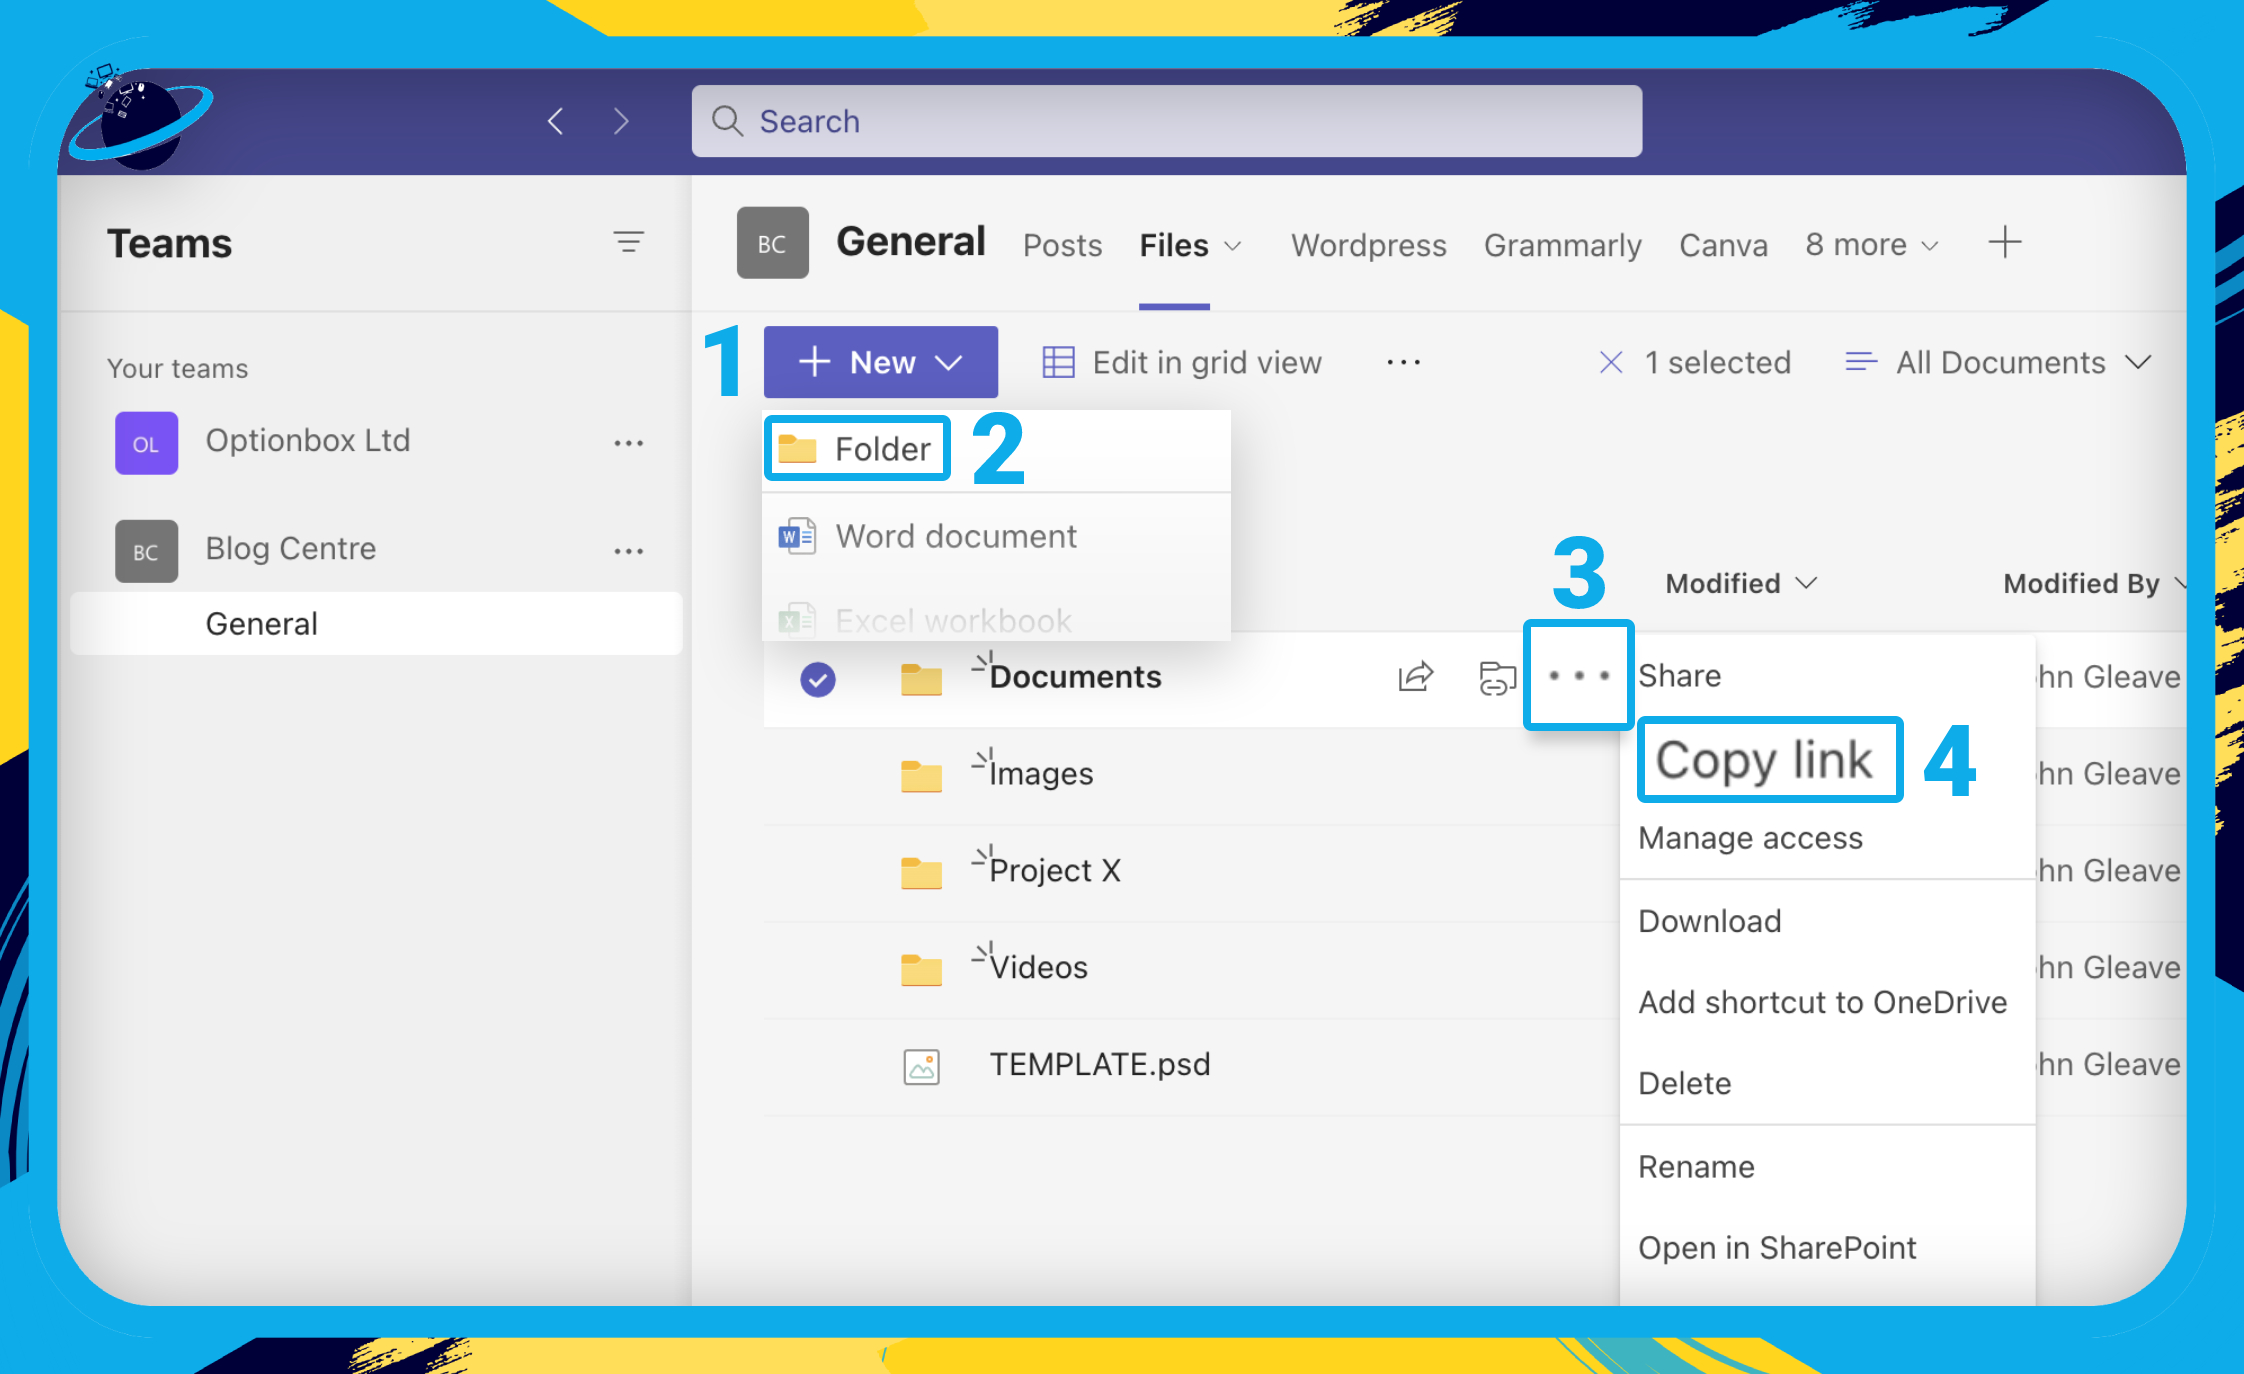
- Head back to Loop and highlight the text in the “Folders” table.
- Then press Ctrl or command + V to paste your link.
- To use the link, press Ctrl or command on your keyboard and click.

Intranet Forums
In this section, we’ll show you how to create a forum for your intranet using pages and subpages.
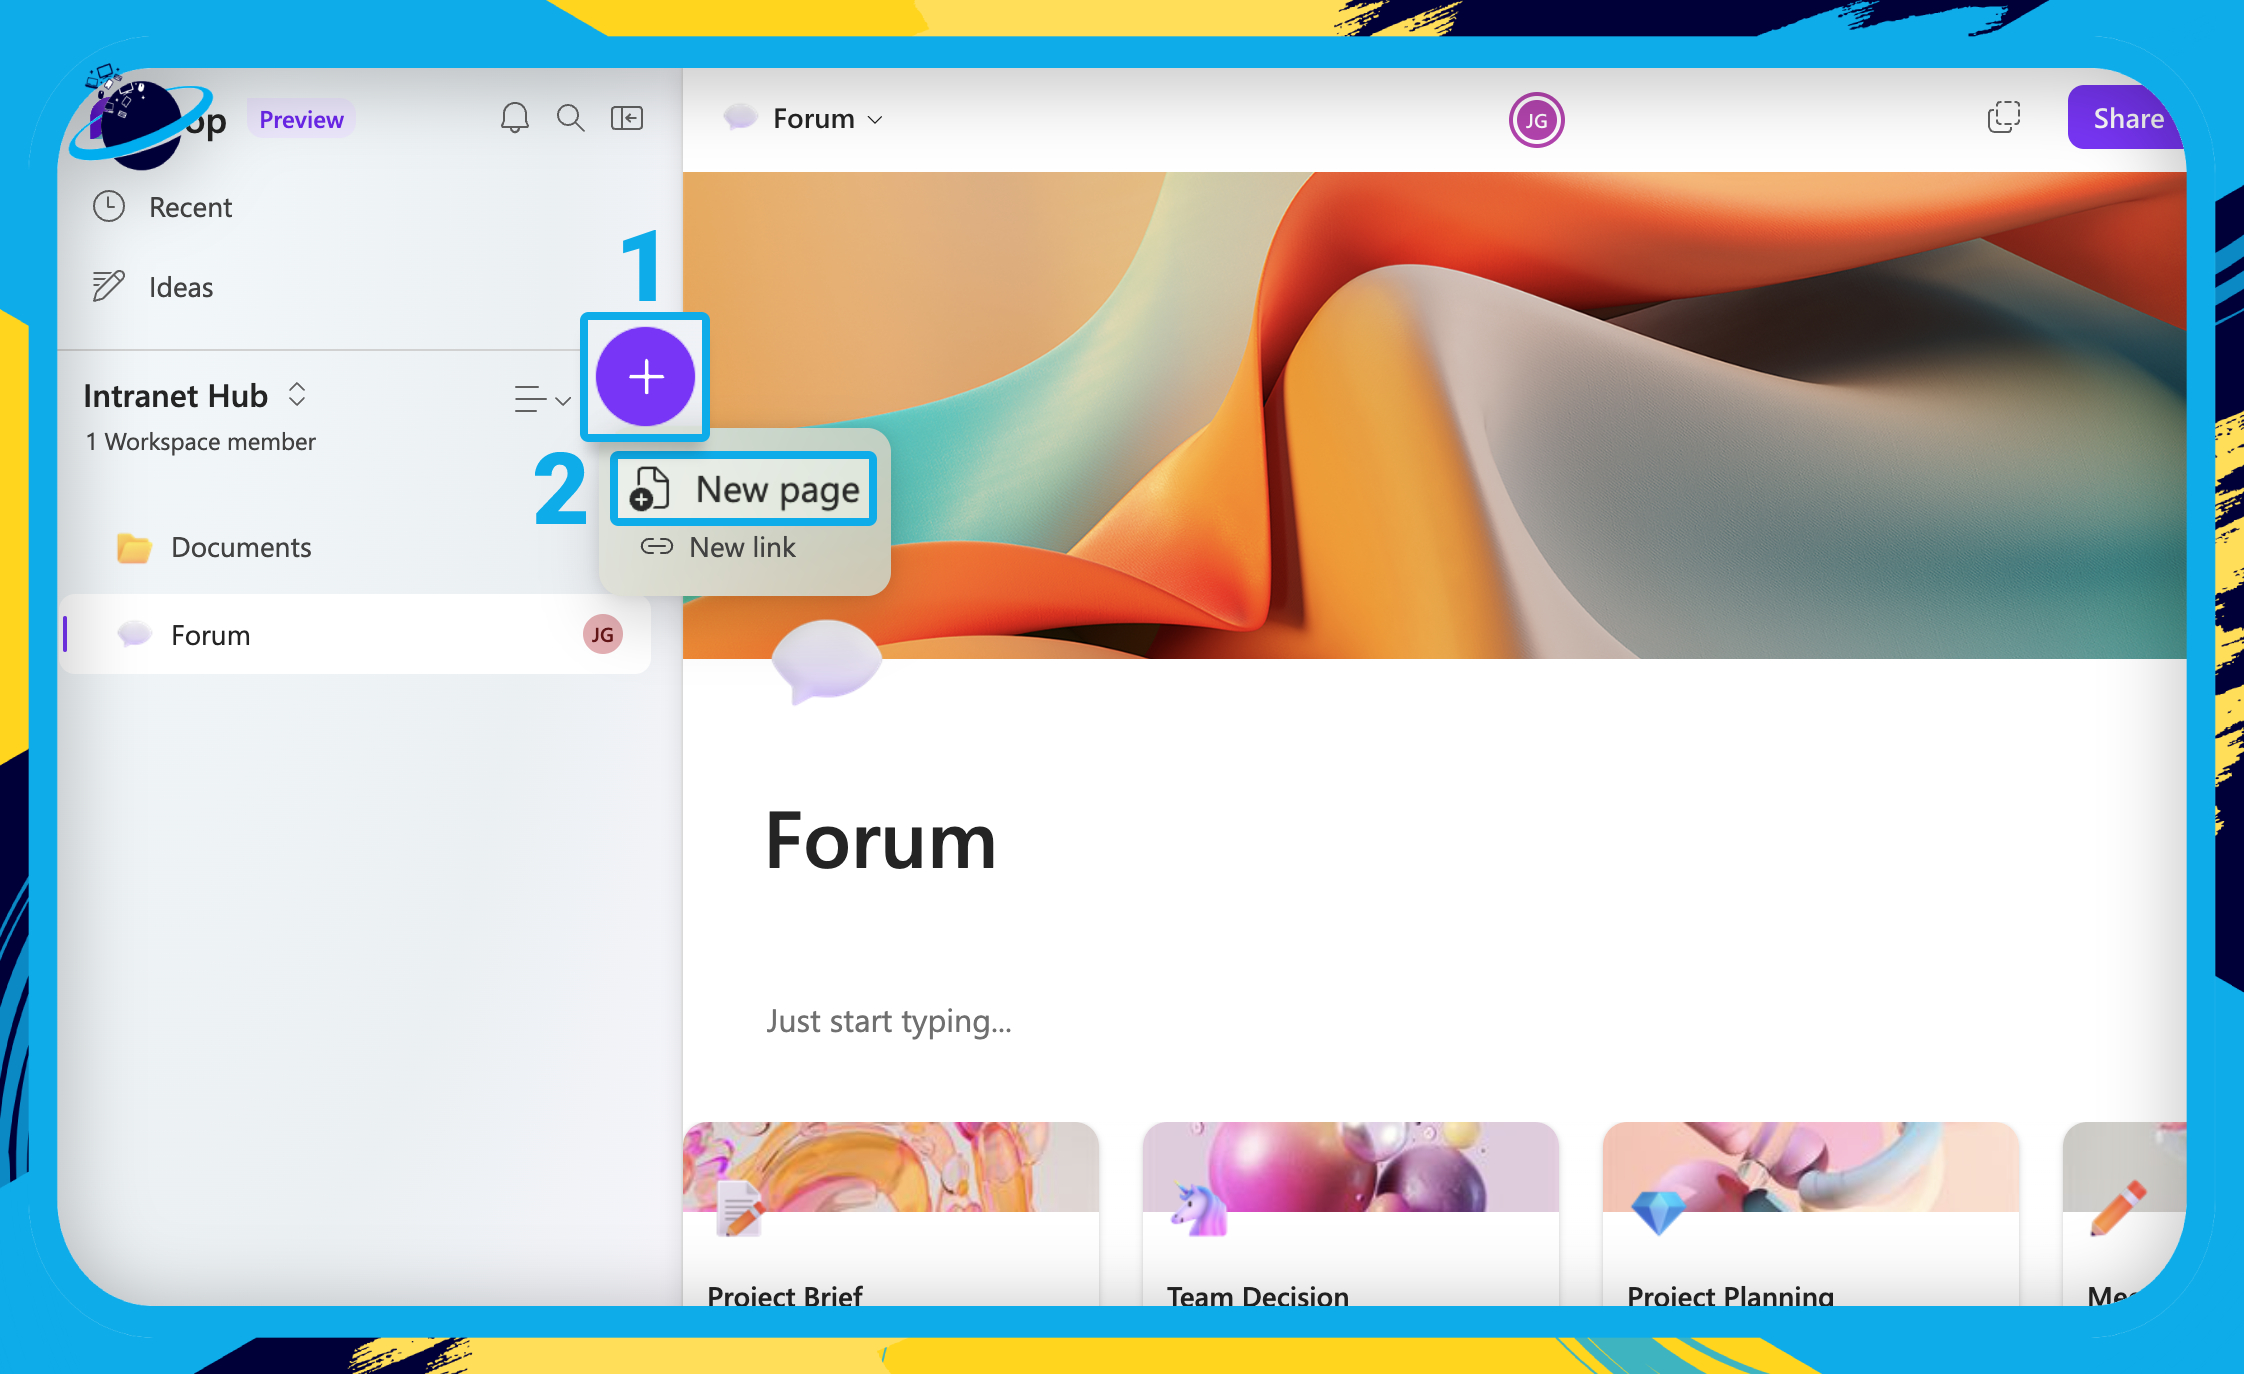
- Click the circular plus icon on the left menu. [1]
- Then select
 “New page” in the popup. [2]
 - Enter “Forum” as the page title and select your preferred icon and cover.
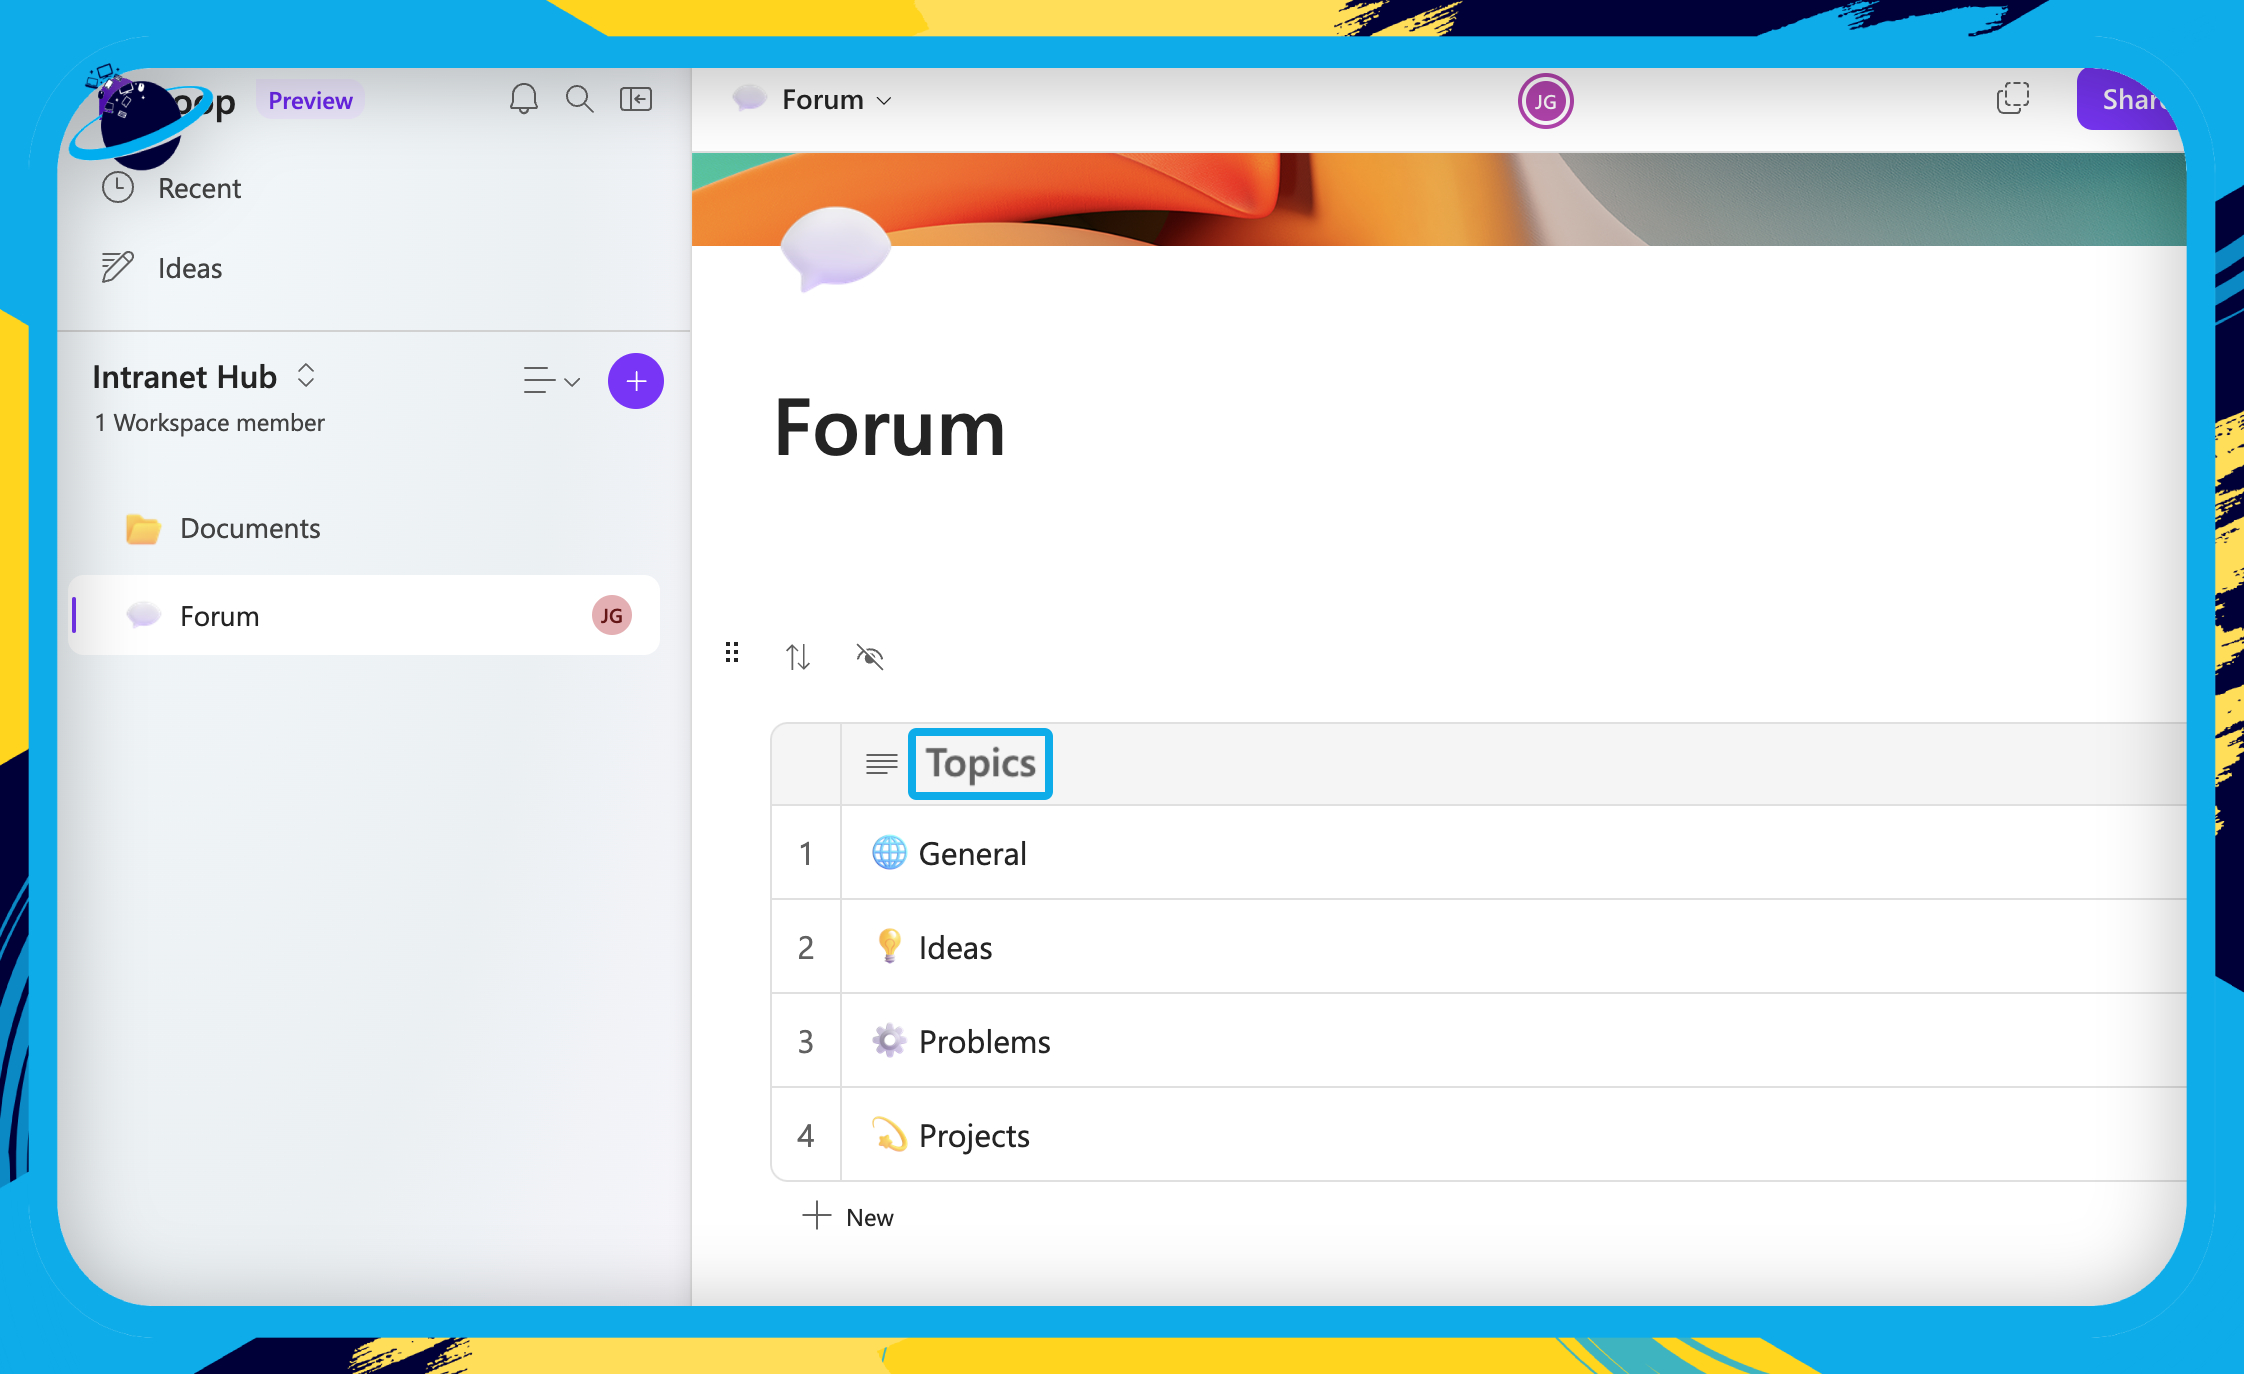
You can leave the forum page blank, but we’re going to create a table with a list of topics. You don’t need a forum for questions, as we’ll be creating a questions page in the knowledge base.
- Type “/table” and hit ⏎ Enter on your keyboard.
- Delete the second column.
- Double-click “Column 1” and type “Topics.”
- Then create a list of topics for your forum — we made:
- General
- Ideas
- Problems
- Projects
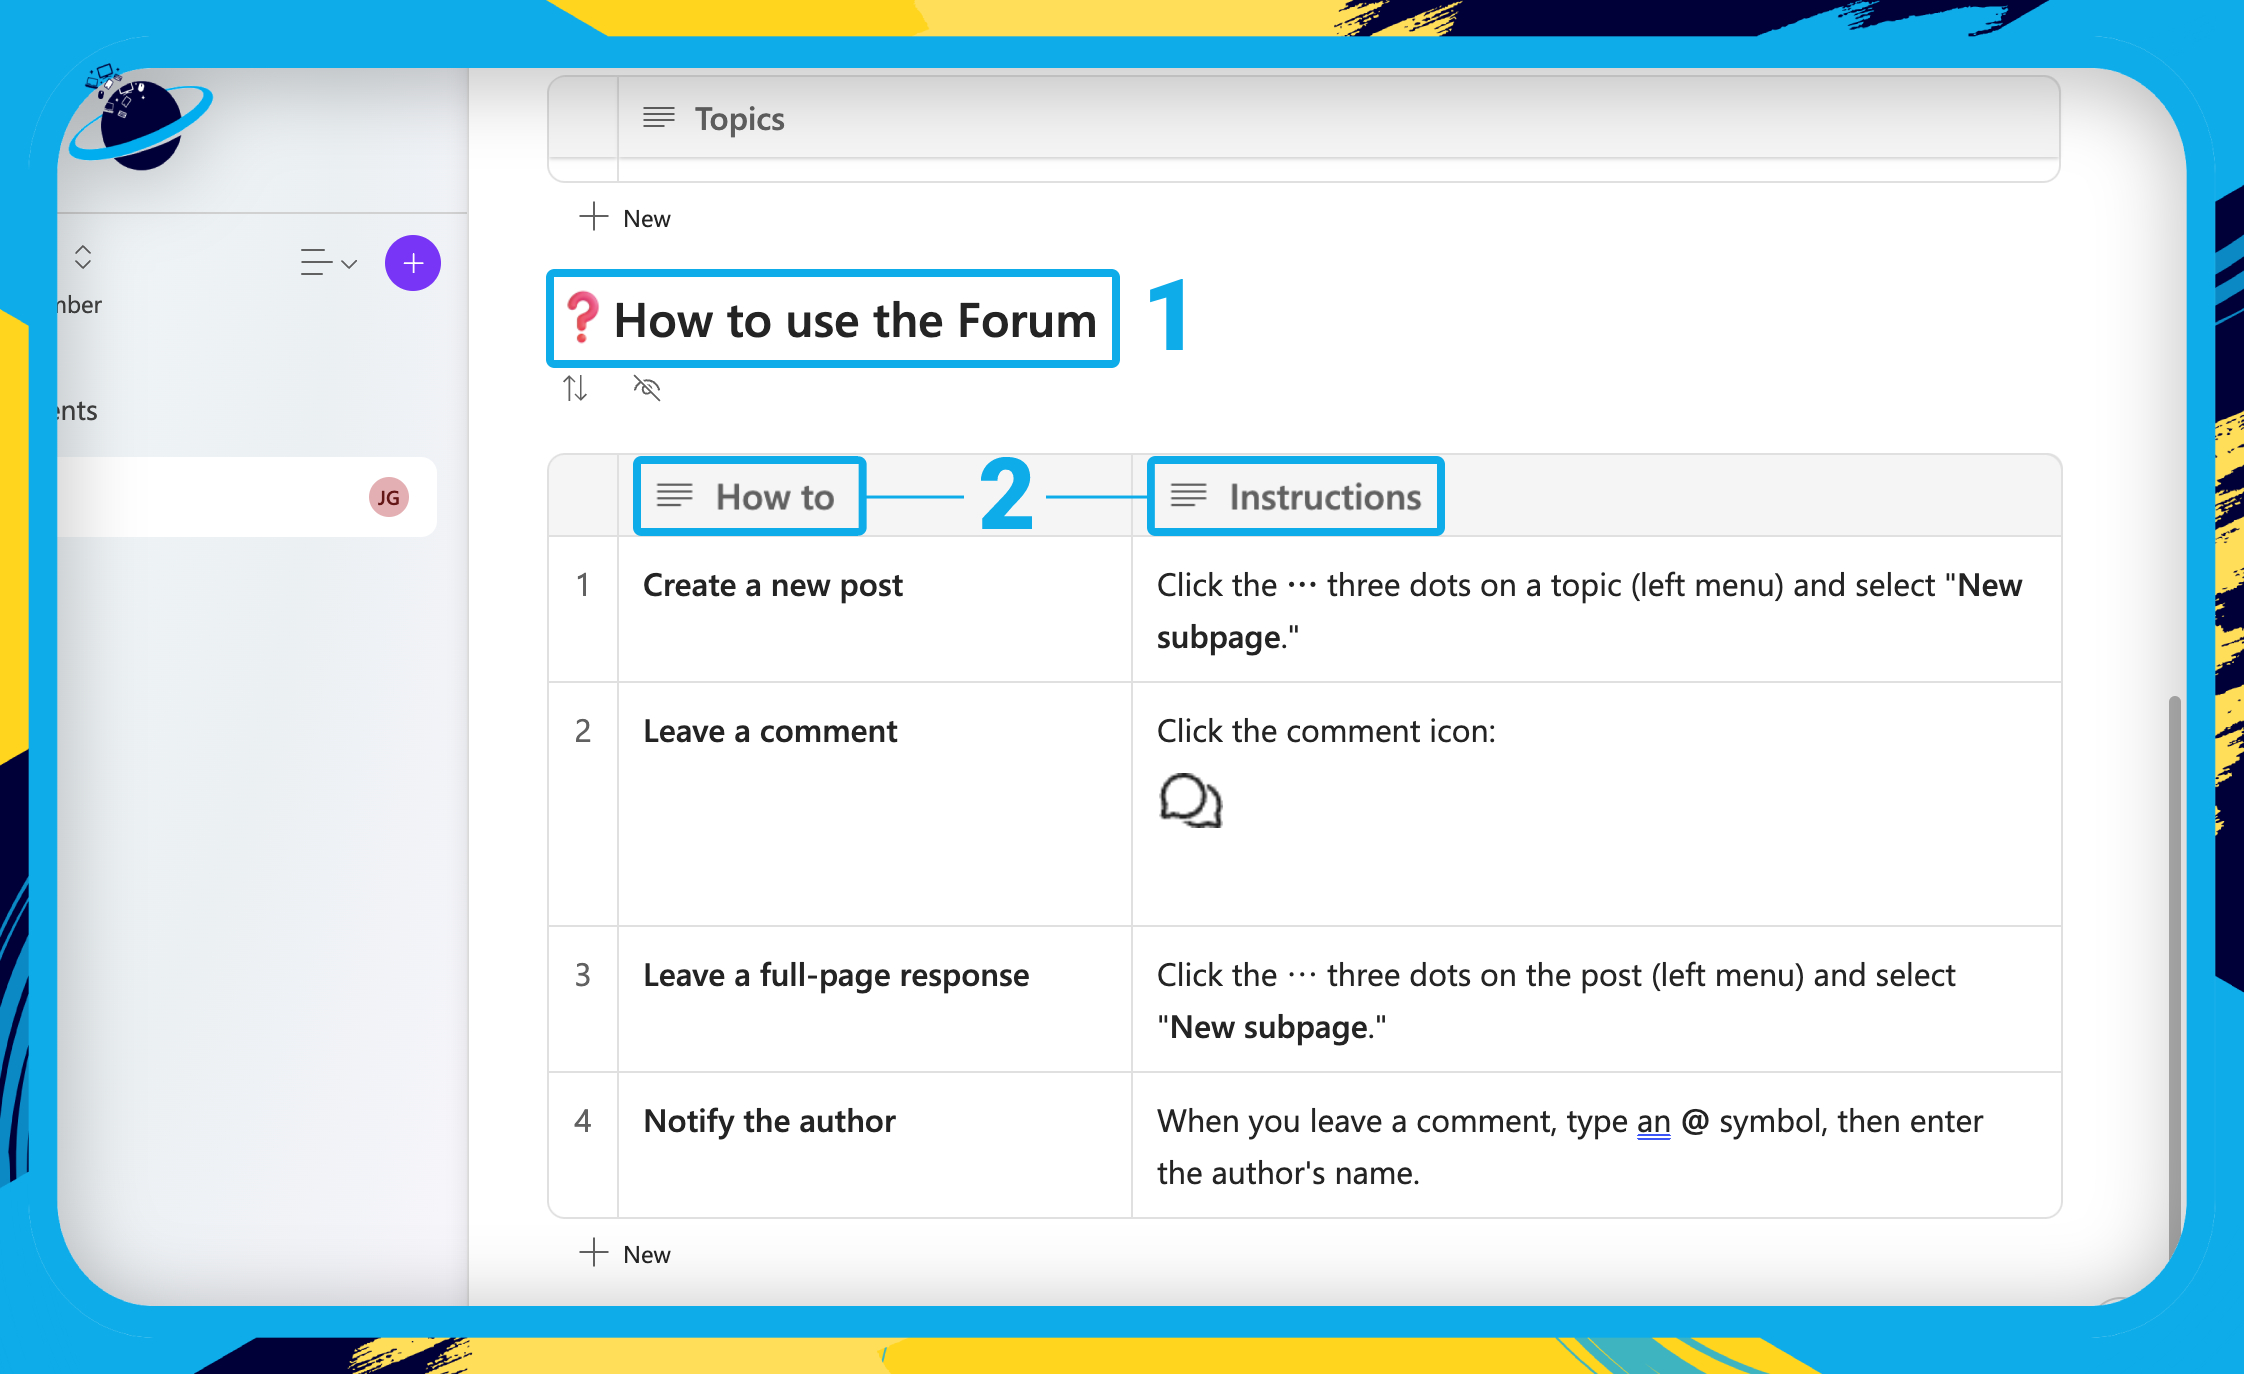
- After the topics table, create an H2 header and type “How to use the Forum.” [1]
- Then create a new table and name the columns “How to” and “Instructions.” [2]
- Copy the table contents below and paste them into your “How to” table:
| How To | Instructions |
|---|---|
| Create a new post | Click the ⋯ three dots on a topic (left menu) and select “New subpage.” |
| Leave a comment | Click the comment icon: |
| Create a full-page response | Click the ⋯ three dots on the post (left menu) and select “New subpage.” |
| Notify the author | When you leave a comment, type an @ symbol, then enter the author’s name. |
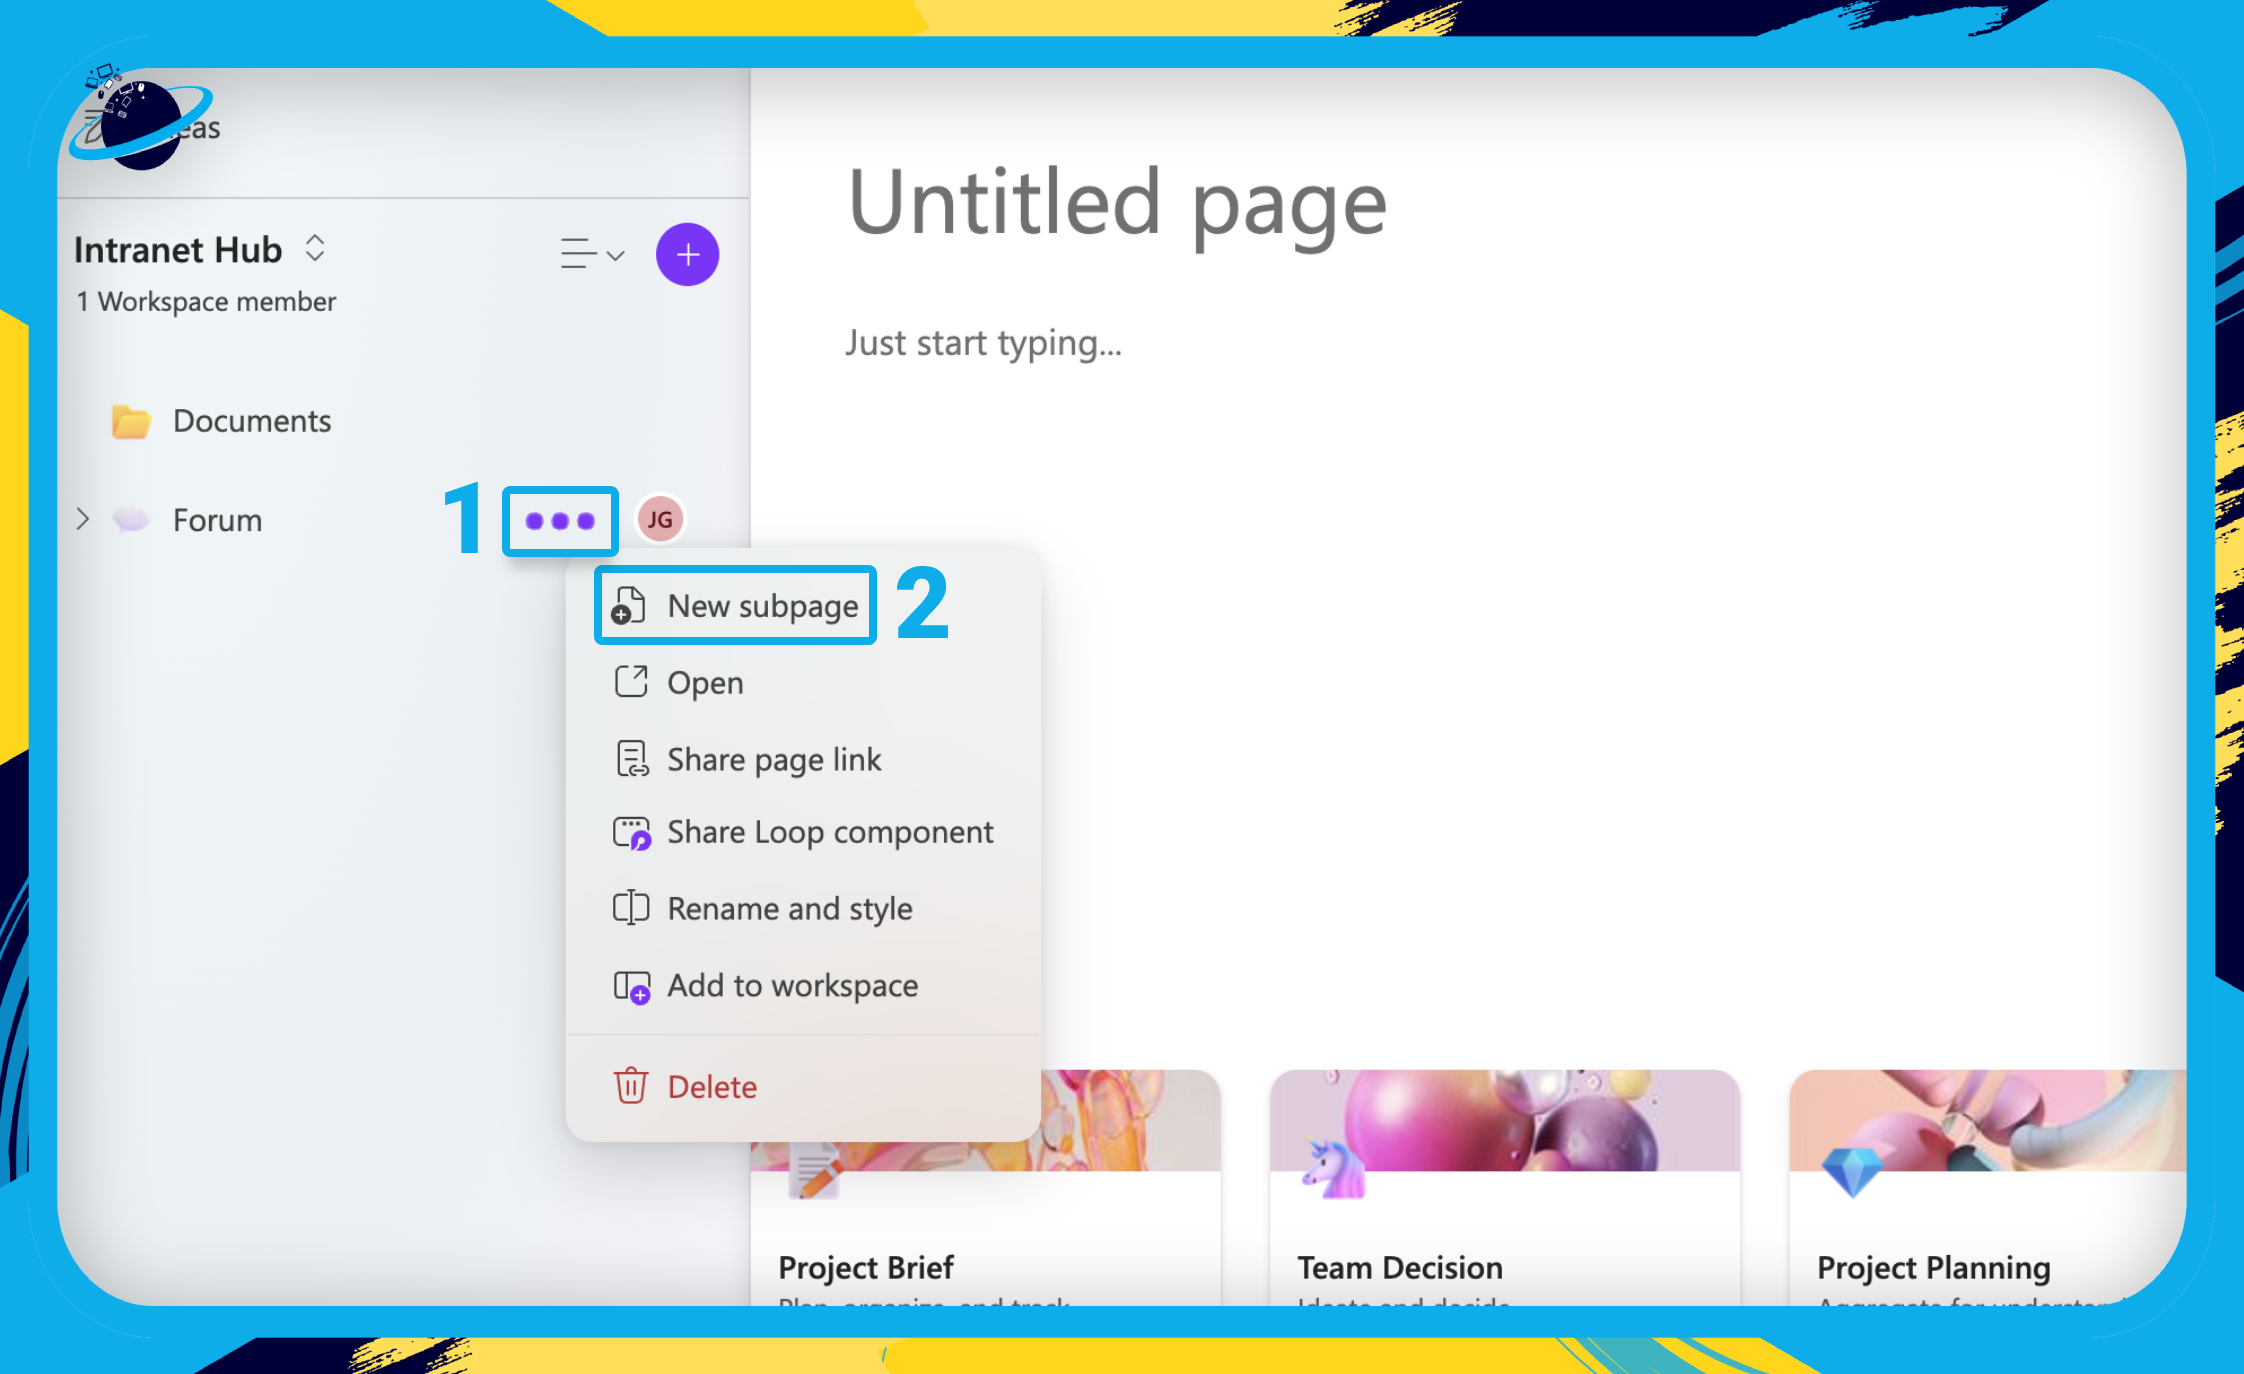
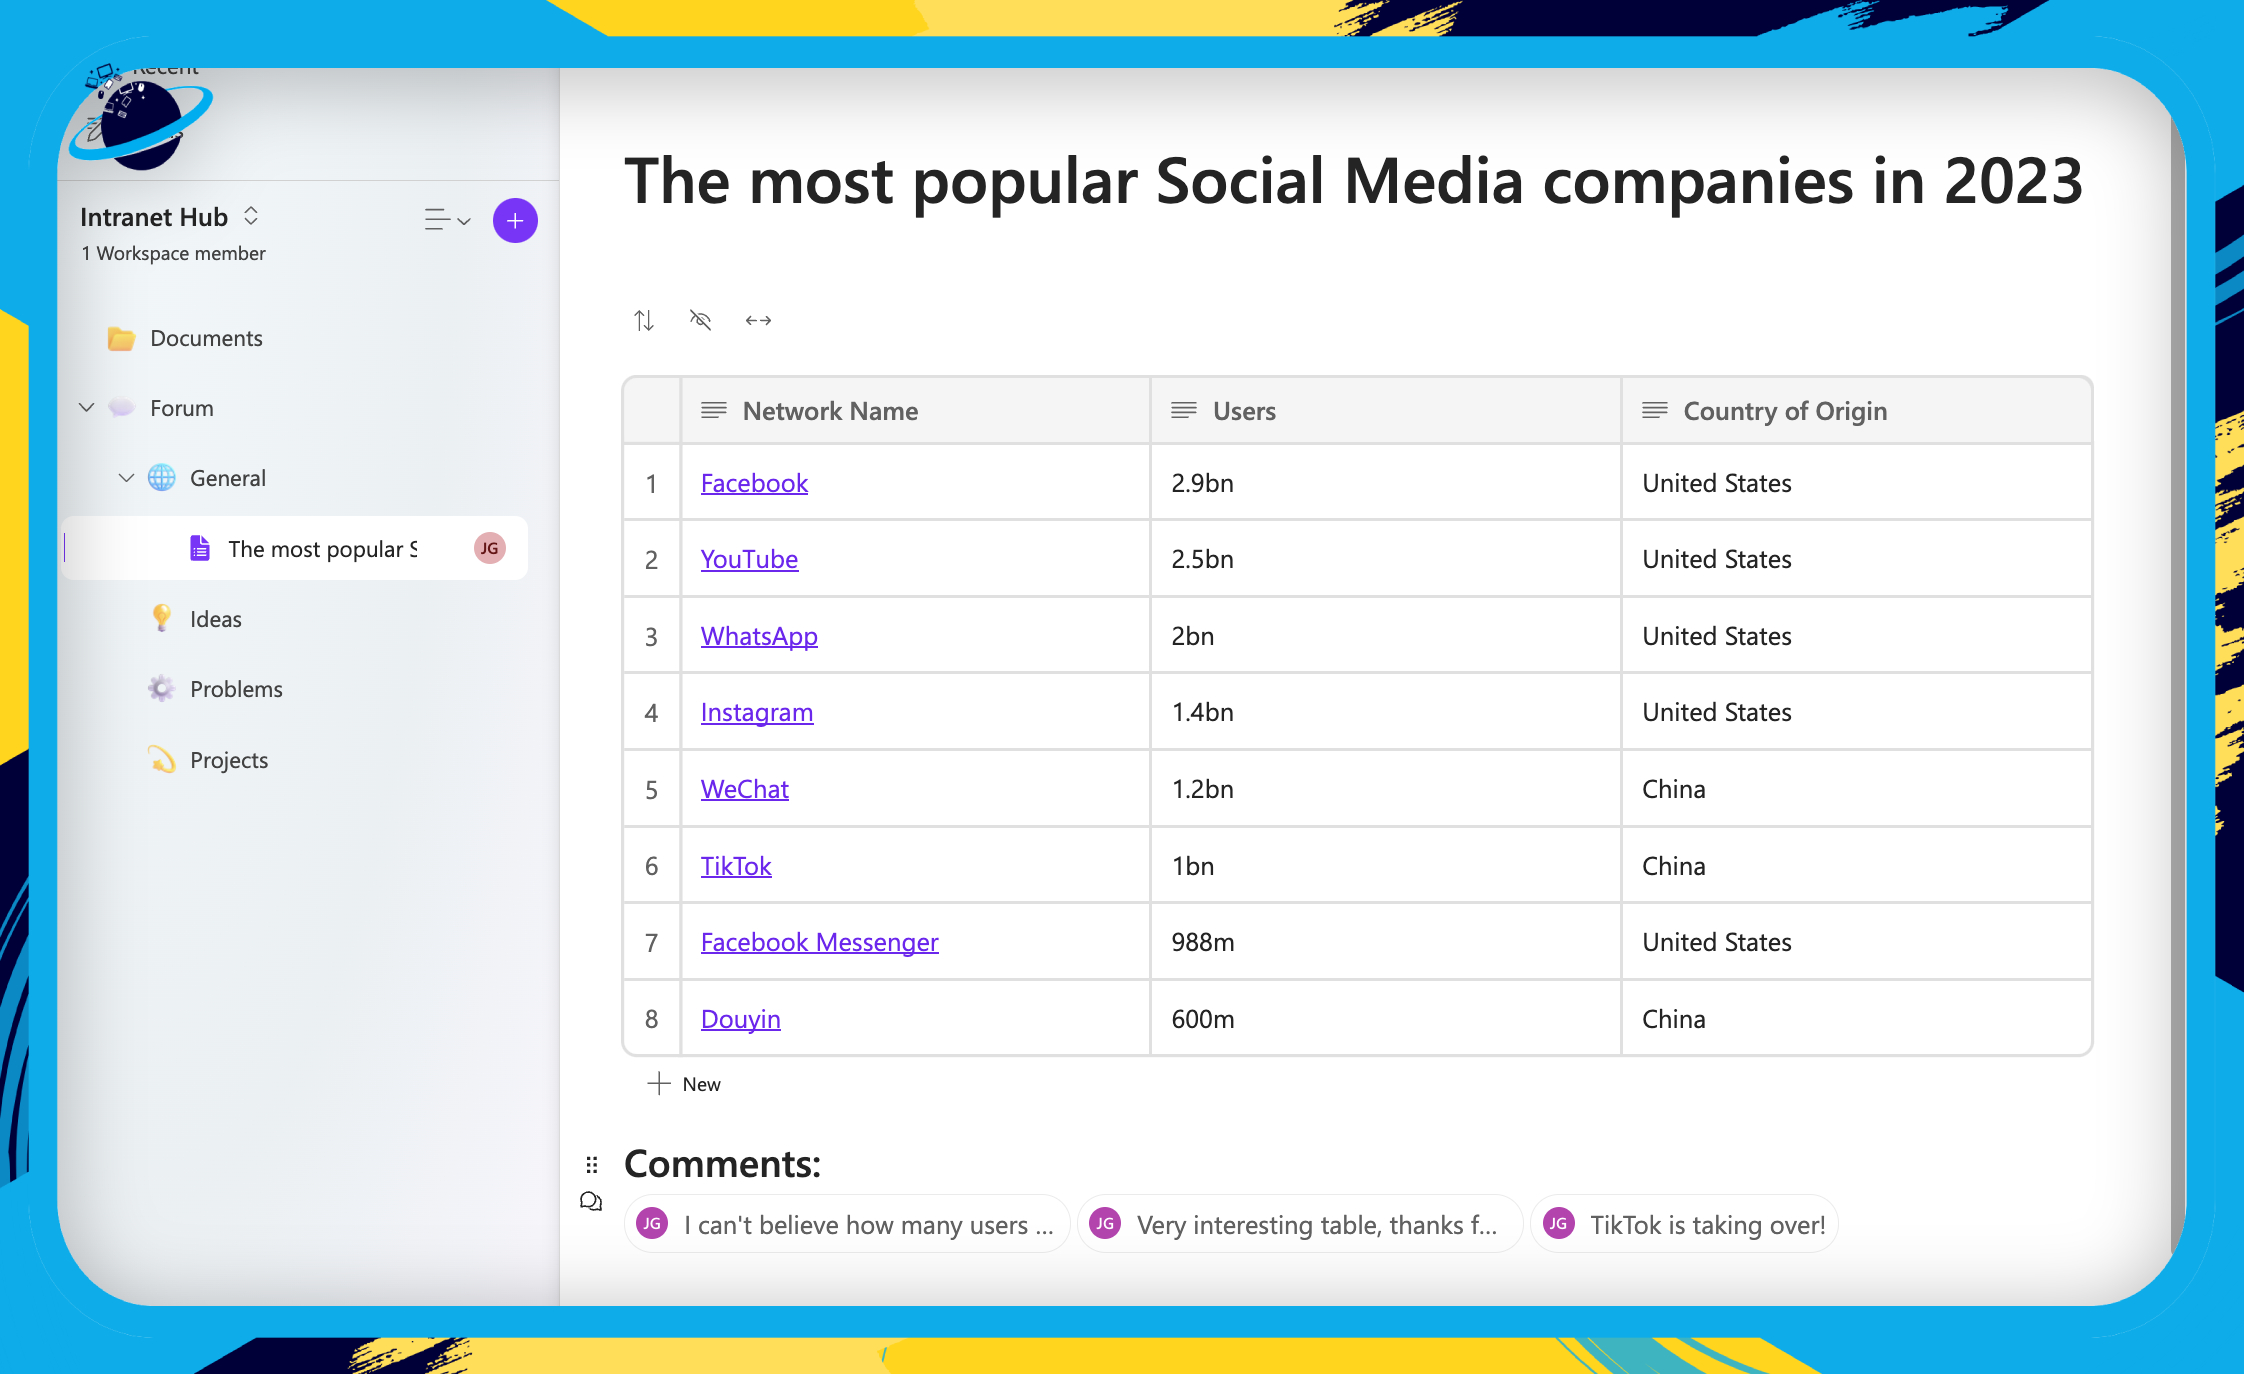
- Now create a corresponding subpage for each of your topics:
- Hover over the “Forum” page in the left menu and click the three dots. [1]
- Select “New subpage” from the popup list. [2]
- Enter your topic title where it says “Untitled page,” then add an icon and cover.
At the top of the page, you can write in some instructions on how you want your team members to use the topic page — what kind of subjects can they discuss within this topic page?
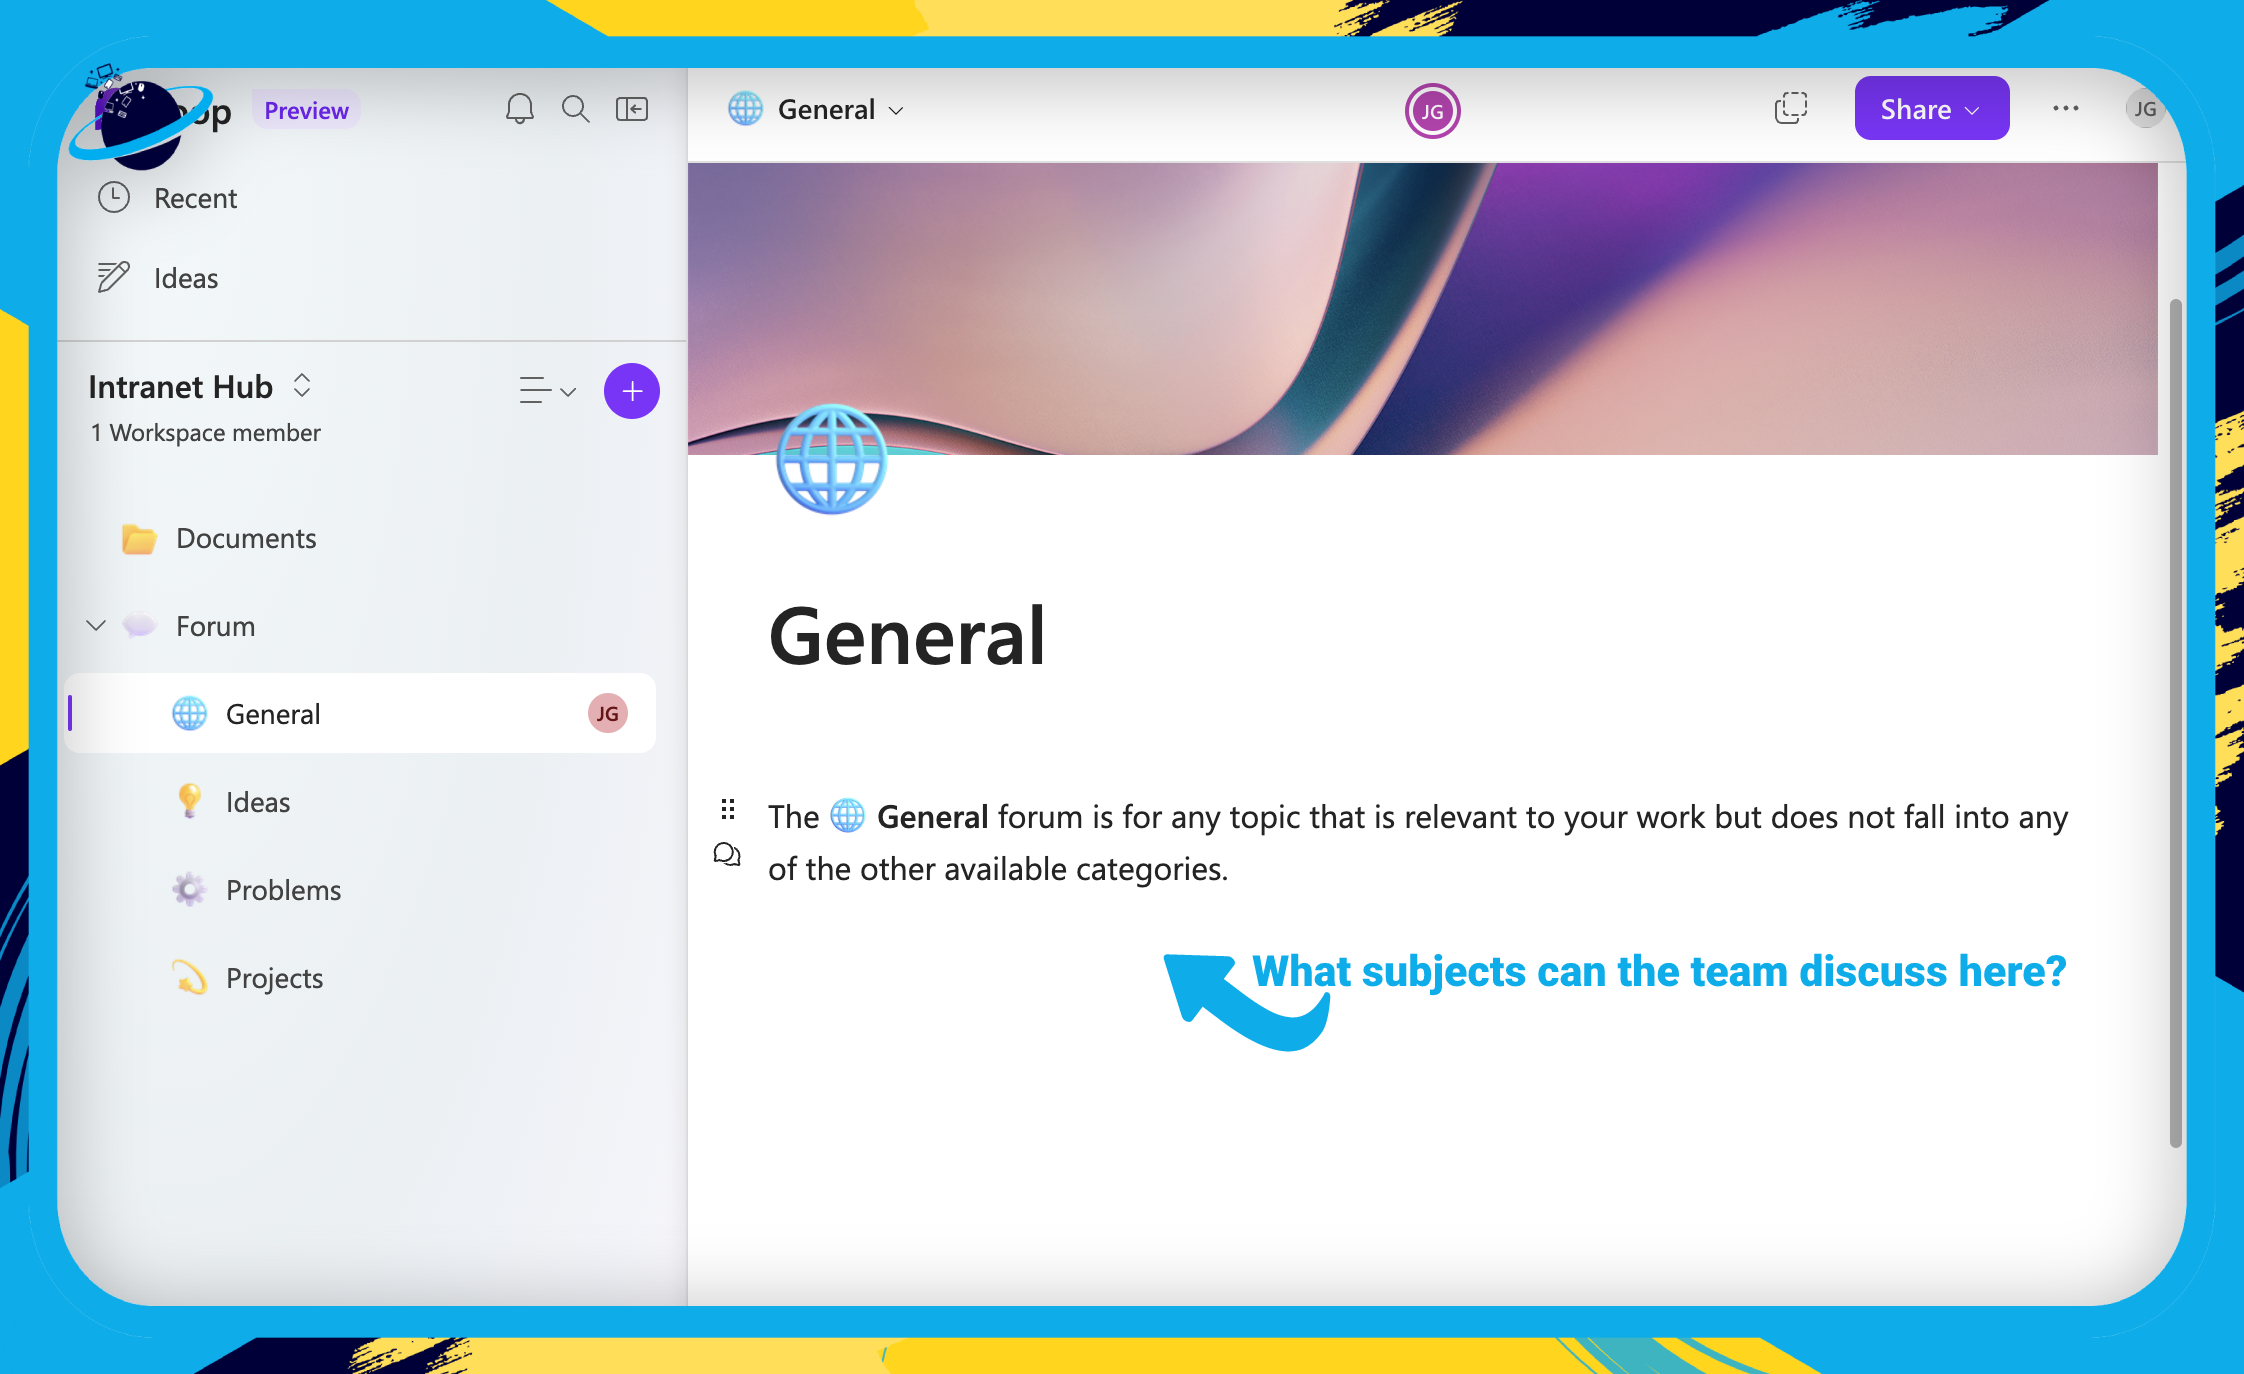
Here is an example of what a post might look like, with a comments section at the bottom. The comments section is simply an H2 Header. To leave a comment, users can click “Comments” and then hit the ![]() comment icon.
comment icon.

Intranet Knowledge Base
In this section, we’ll show you how to create a knowledge base where important documents are stored, and questions are asked.
The knowledge base will act as a repository for all your important information and serve as a place where team members can ask questions. Any important forum posts can also be copied to the knowledge base to keep the best information organized in one location.
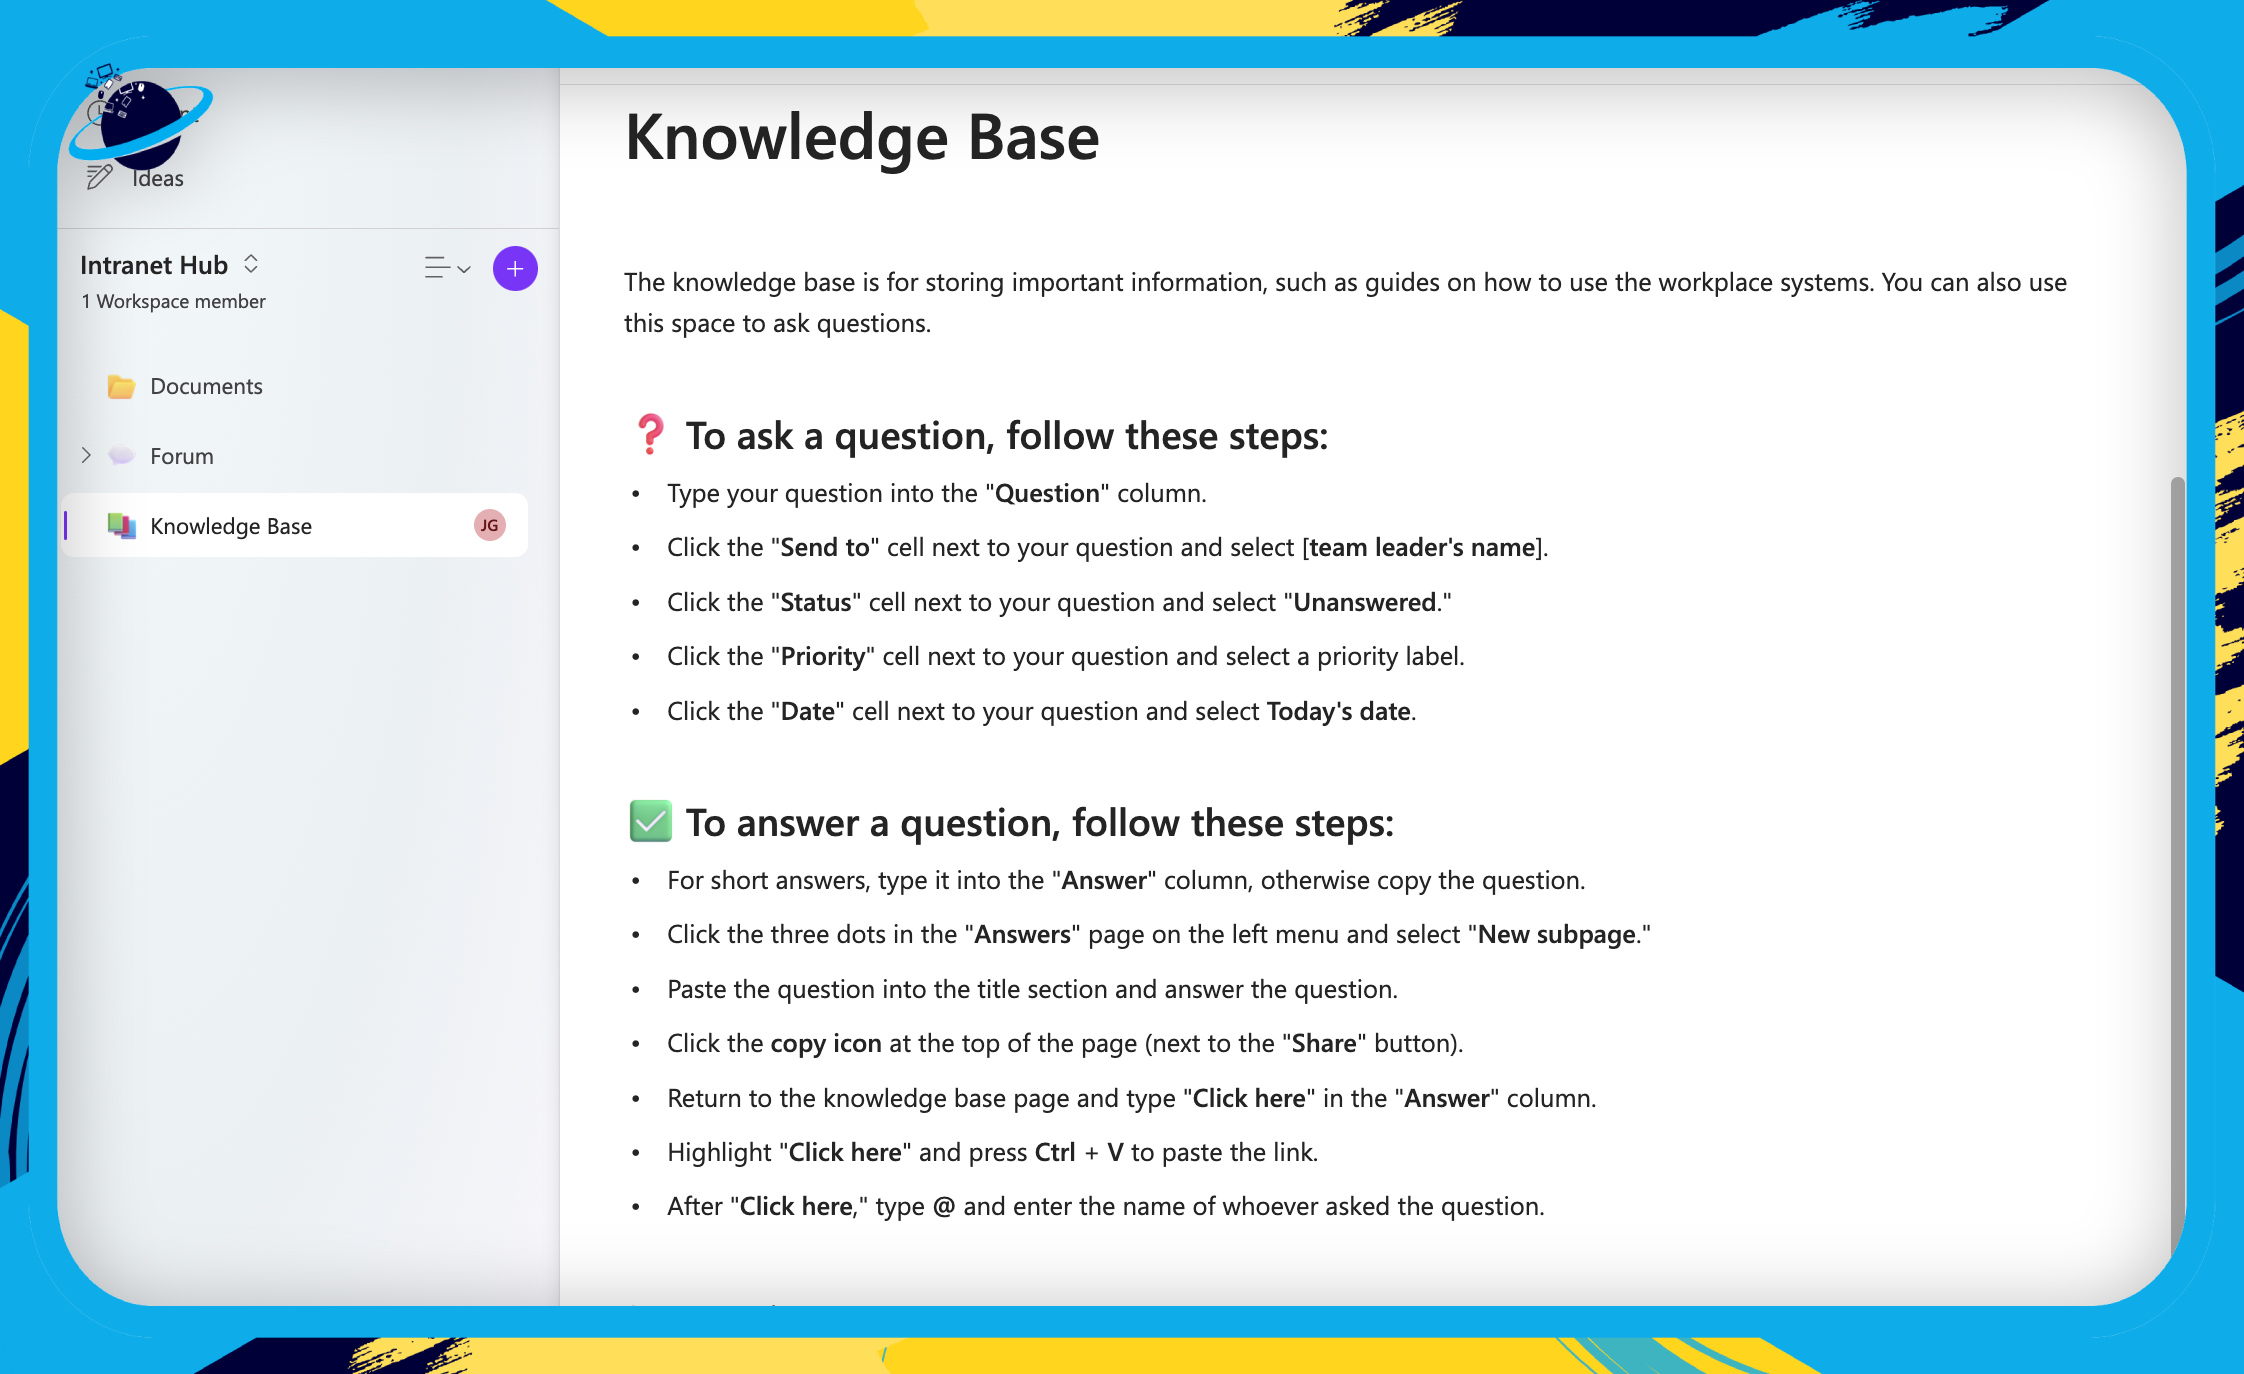
- Start by making a new page called “Knowledge Base.”
- Then copy and paste the following text into the top of the page:
The knowledge base is for storing important information, such as guides on how to use workplace systems. You can also use this space to ask questions.
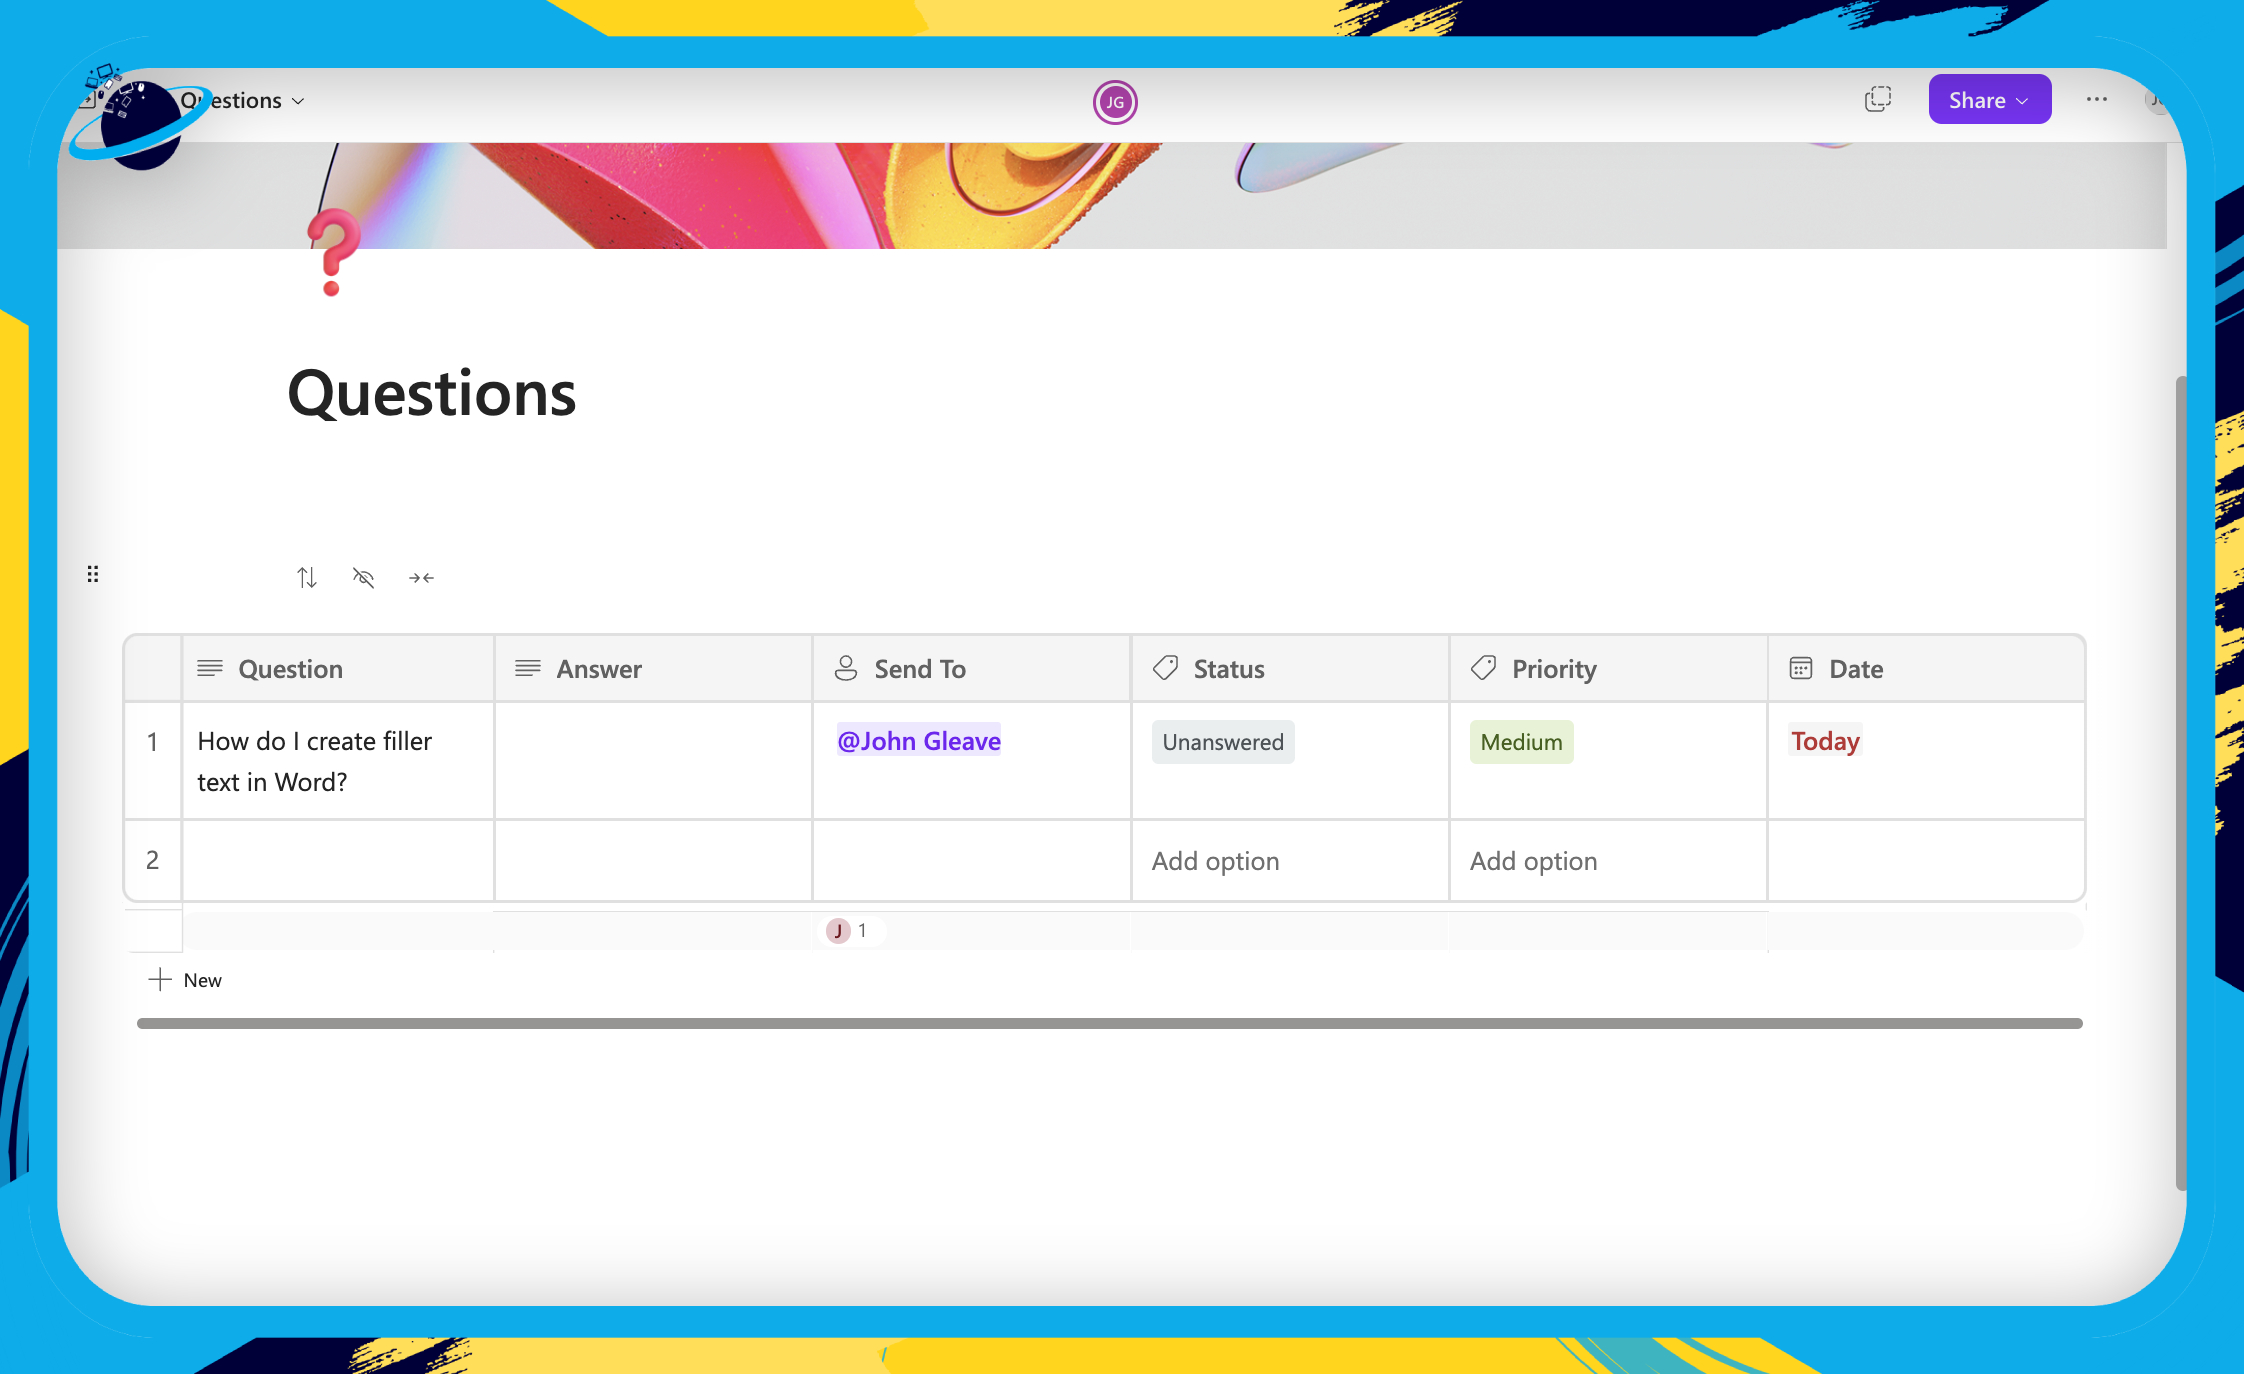
❓ To ask a question, follow these steps:
- Type your question into the “Question” column.
- Click the “Send to” cell next to your question and select [team leader’s name].
- Click the “Status” cell next to your question and select “Unanswered.”
- Click the “Priority” cell next to your question and select a priority label.
- Click the “Date” cell next to your question and select Today’s date.
✅ To answer a question, follow these steps:
- For short answers, type them into the “Answer” column. Otherwise, copy the question.
- Click the ⋯ three dots in the “Answers” page on the left menu and select “New subpage.”
- Paste the question into the title section and answer the question.
- Click the copy icon at the top of the page (next to the “Share” button).
- Return to the knowledge base page and type “Click here” in the “Answer” column.
- Highlight “Click here” and press Ctrl + V to paste the link.
- After “Click here,” type @ and enter the name of whoever asked the question.
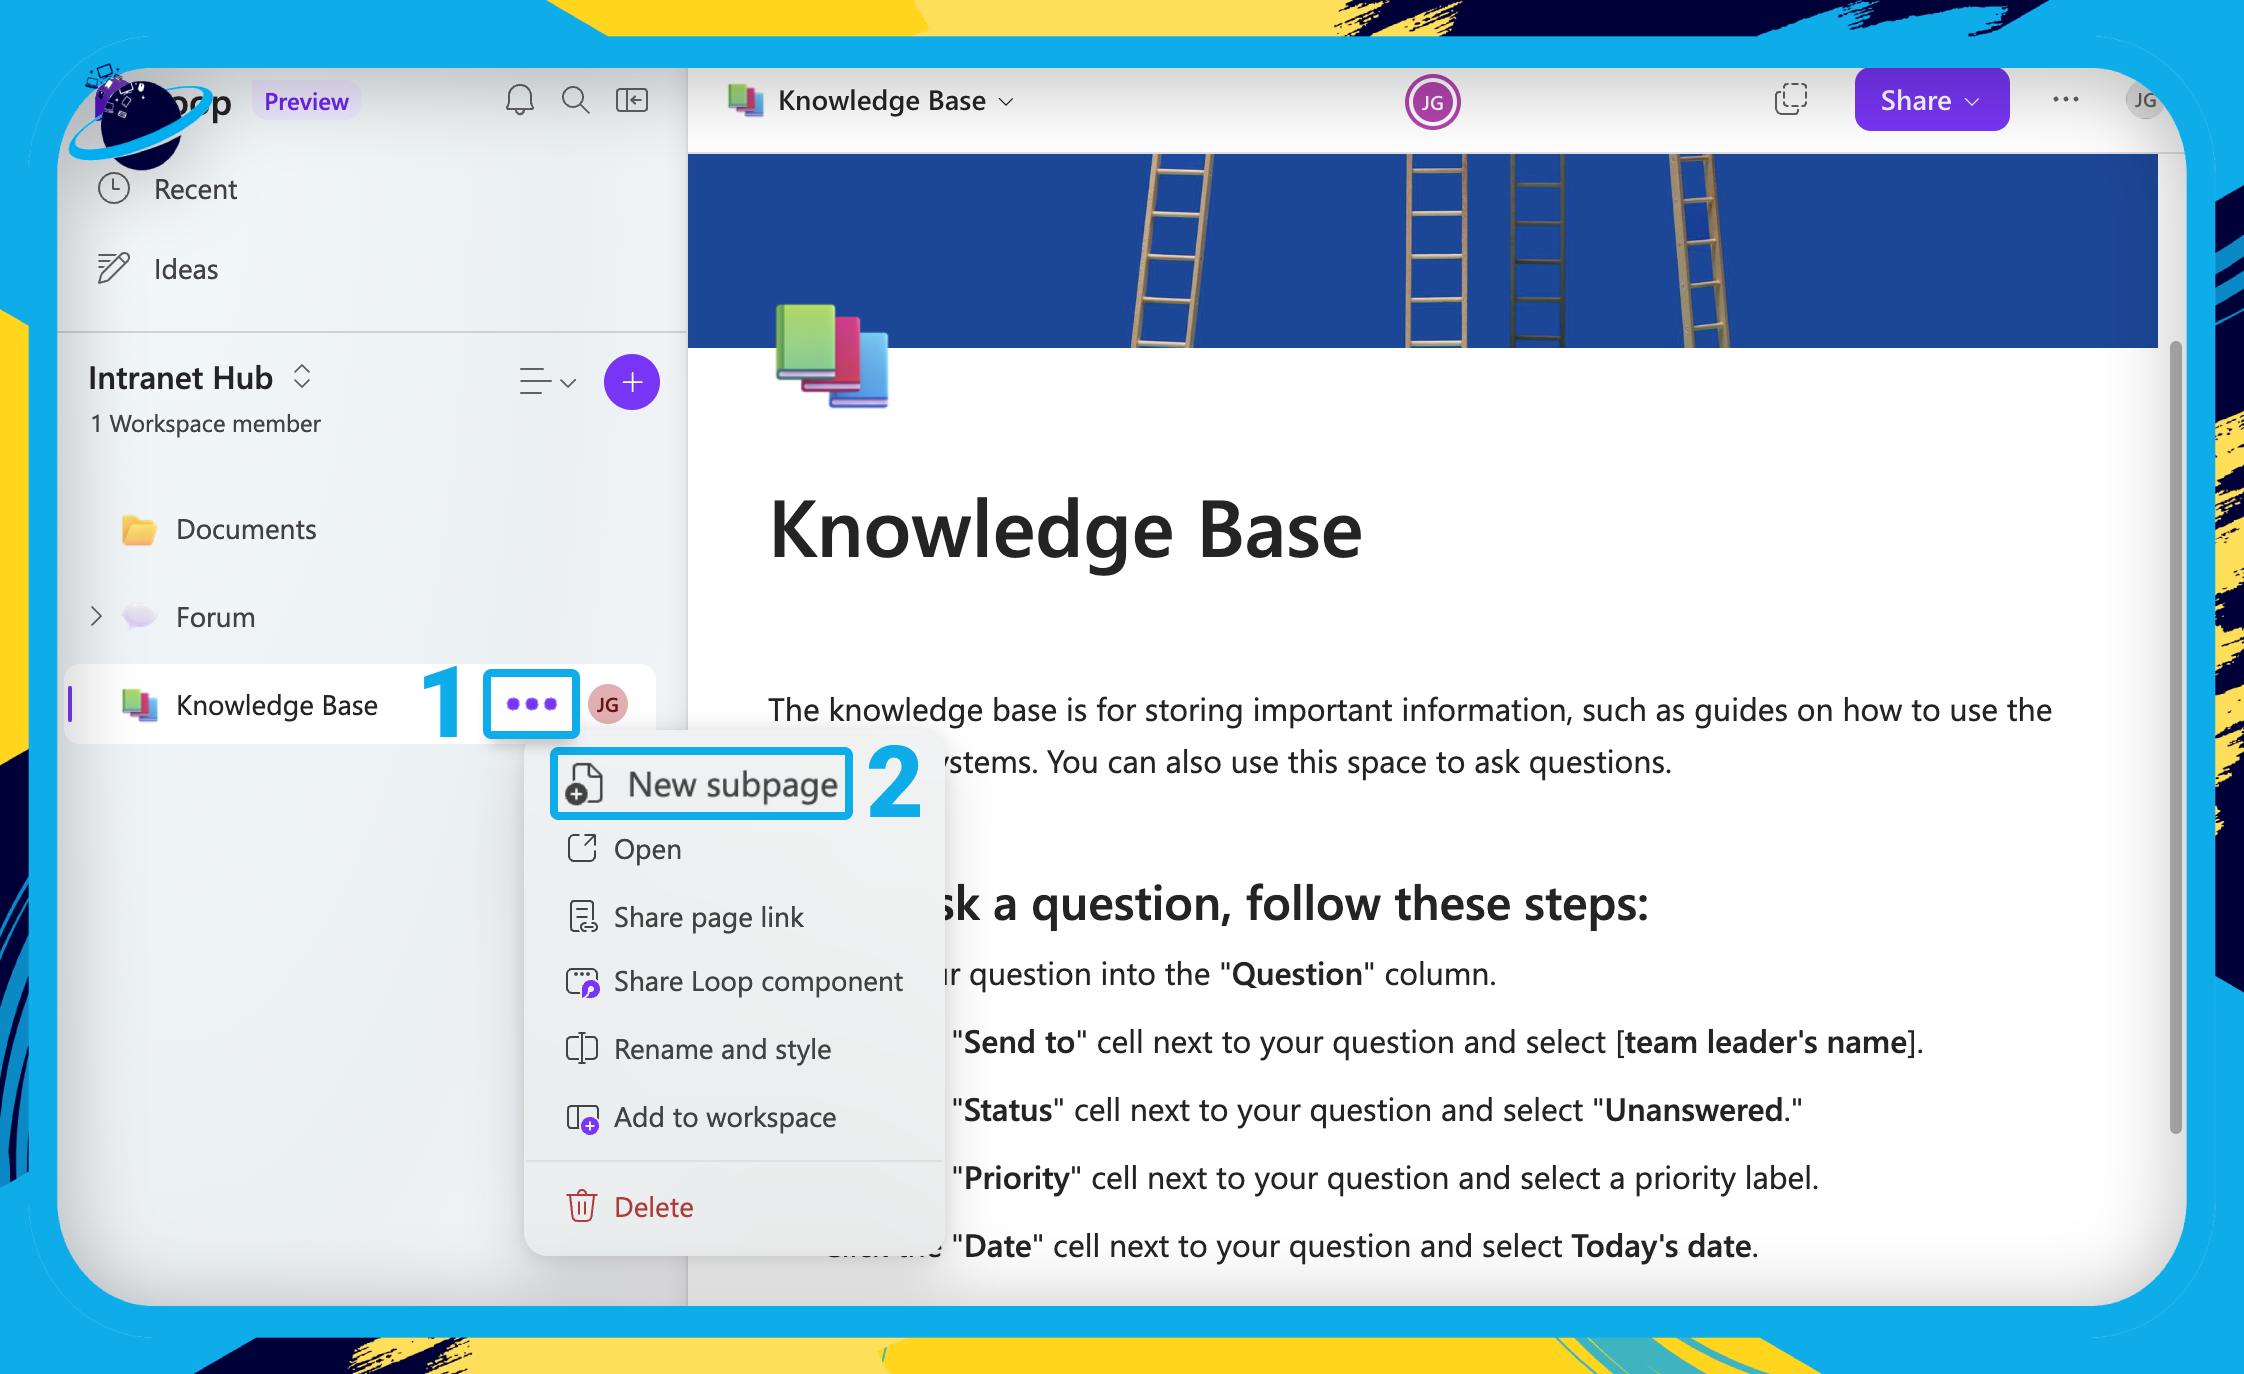
- Click the three dots in the “Knowledge Base” tab. [1]
- Make three new subpages: [2]
- ❓ Questions
- ✅ Answers
- 📋 Guides
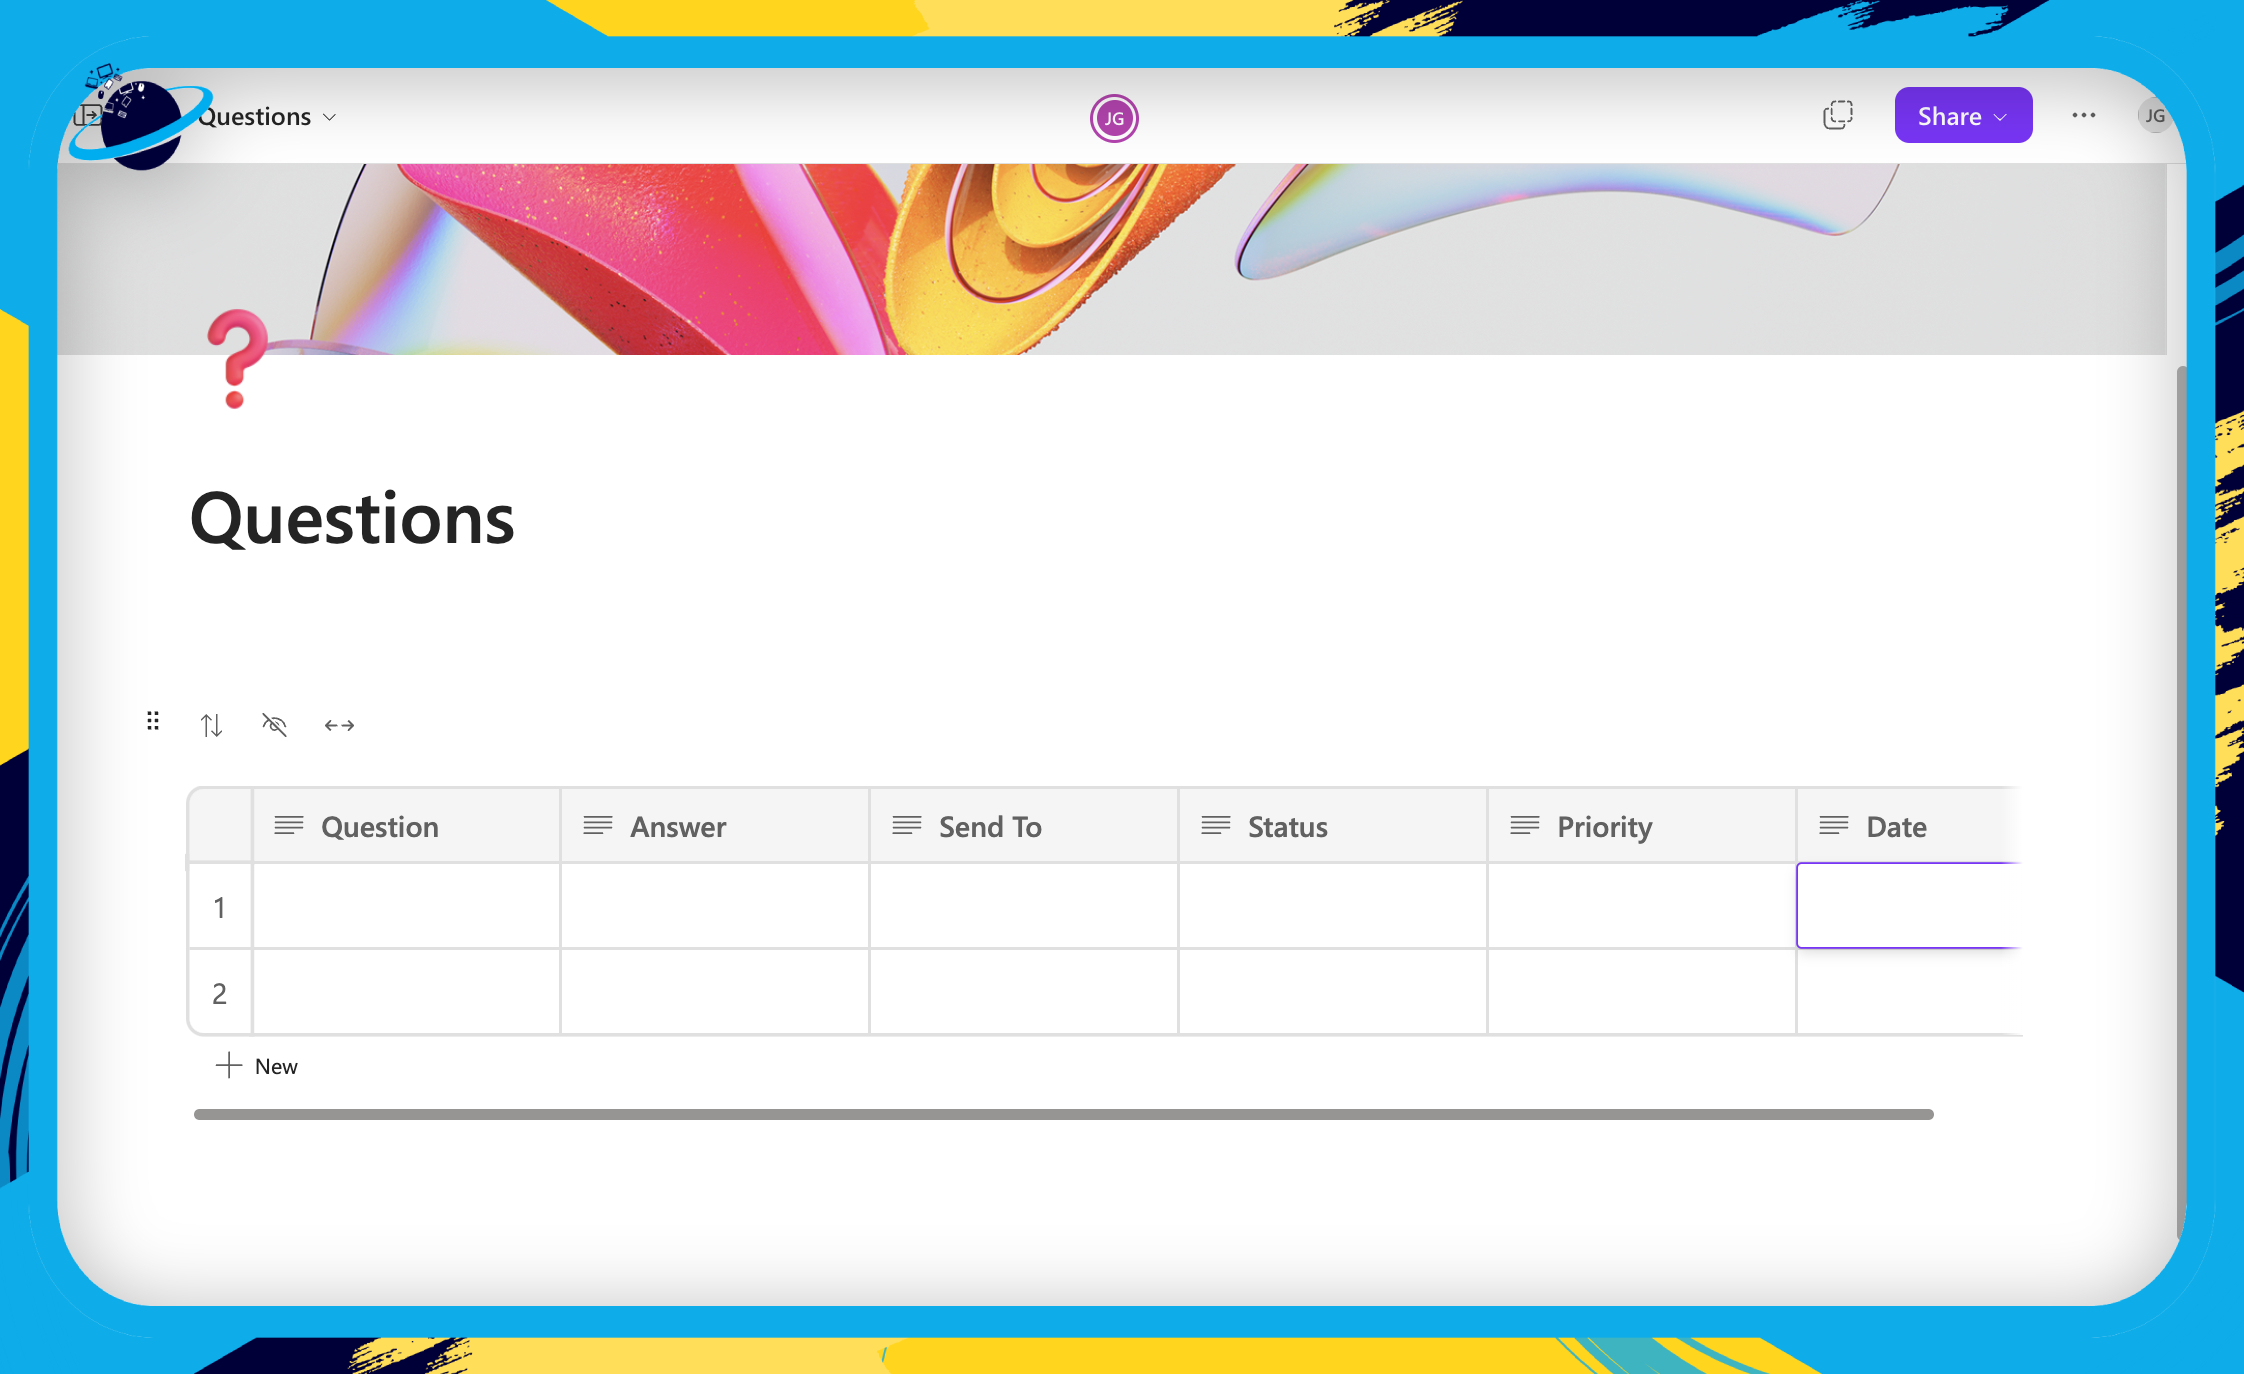
- Create a table in the “Questions” page — type “/table” and hit ⏎ Enter.
- Hover over any of the borders between the column headers and click the
 plus icon. [3]
 - Add more columns until you have six in total.
- Name the columns from left to right:
- Question
- Answer
- Send to
- Status
- Priority
- Date — The Date column is an addition to our original Knowledge base guide that will allow you to order the questions by date.
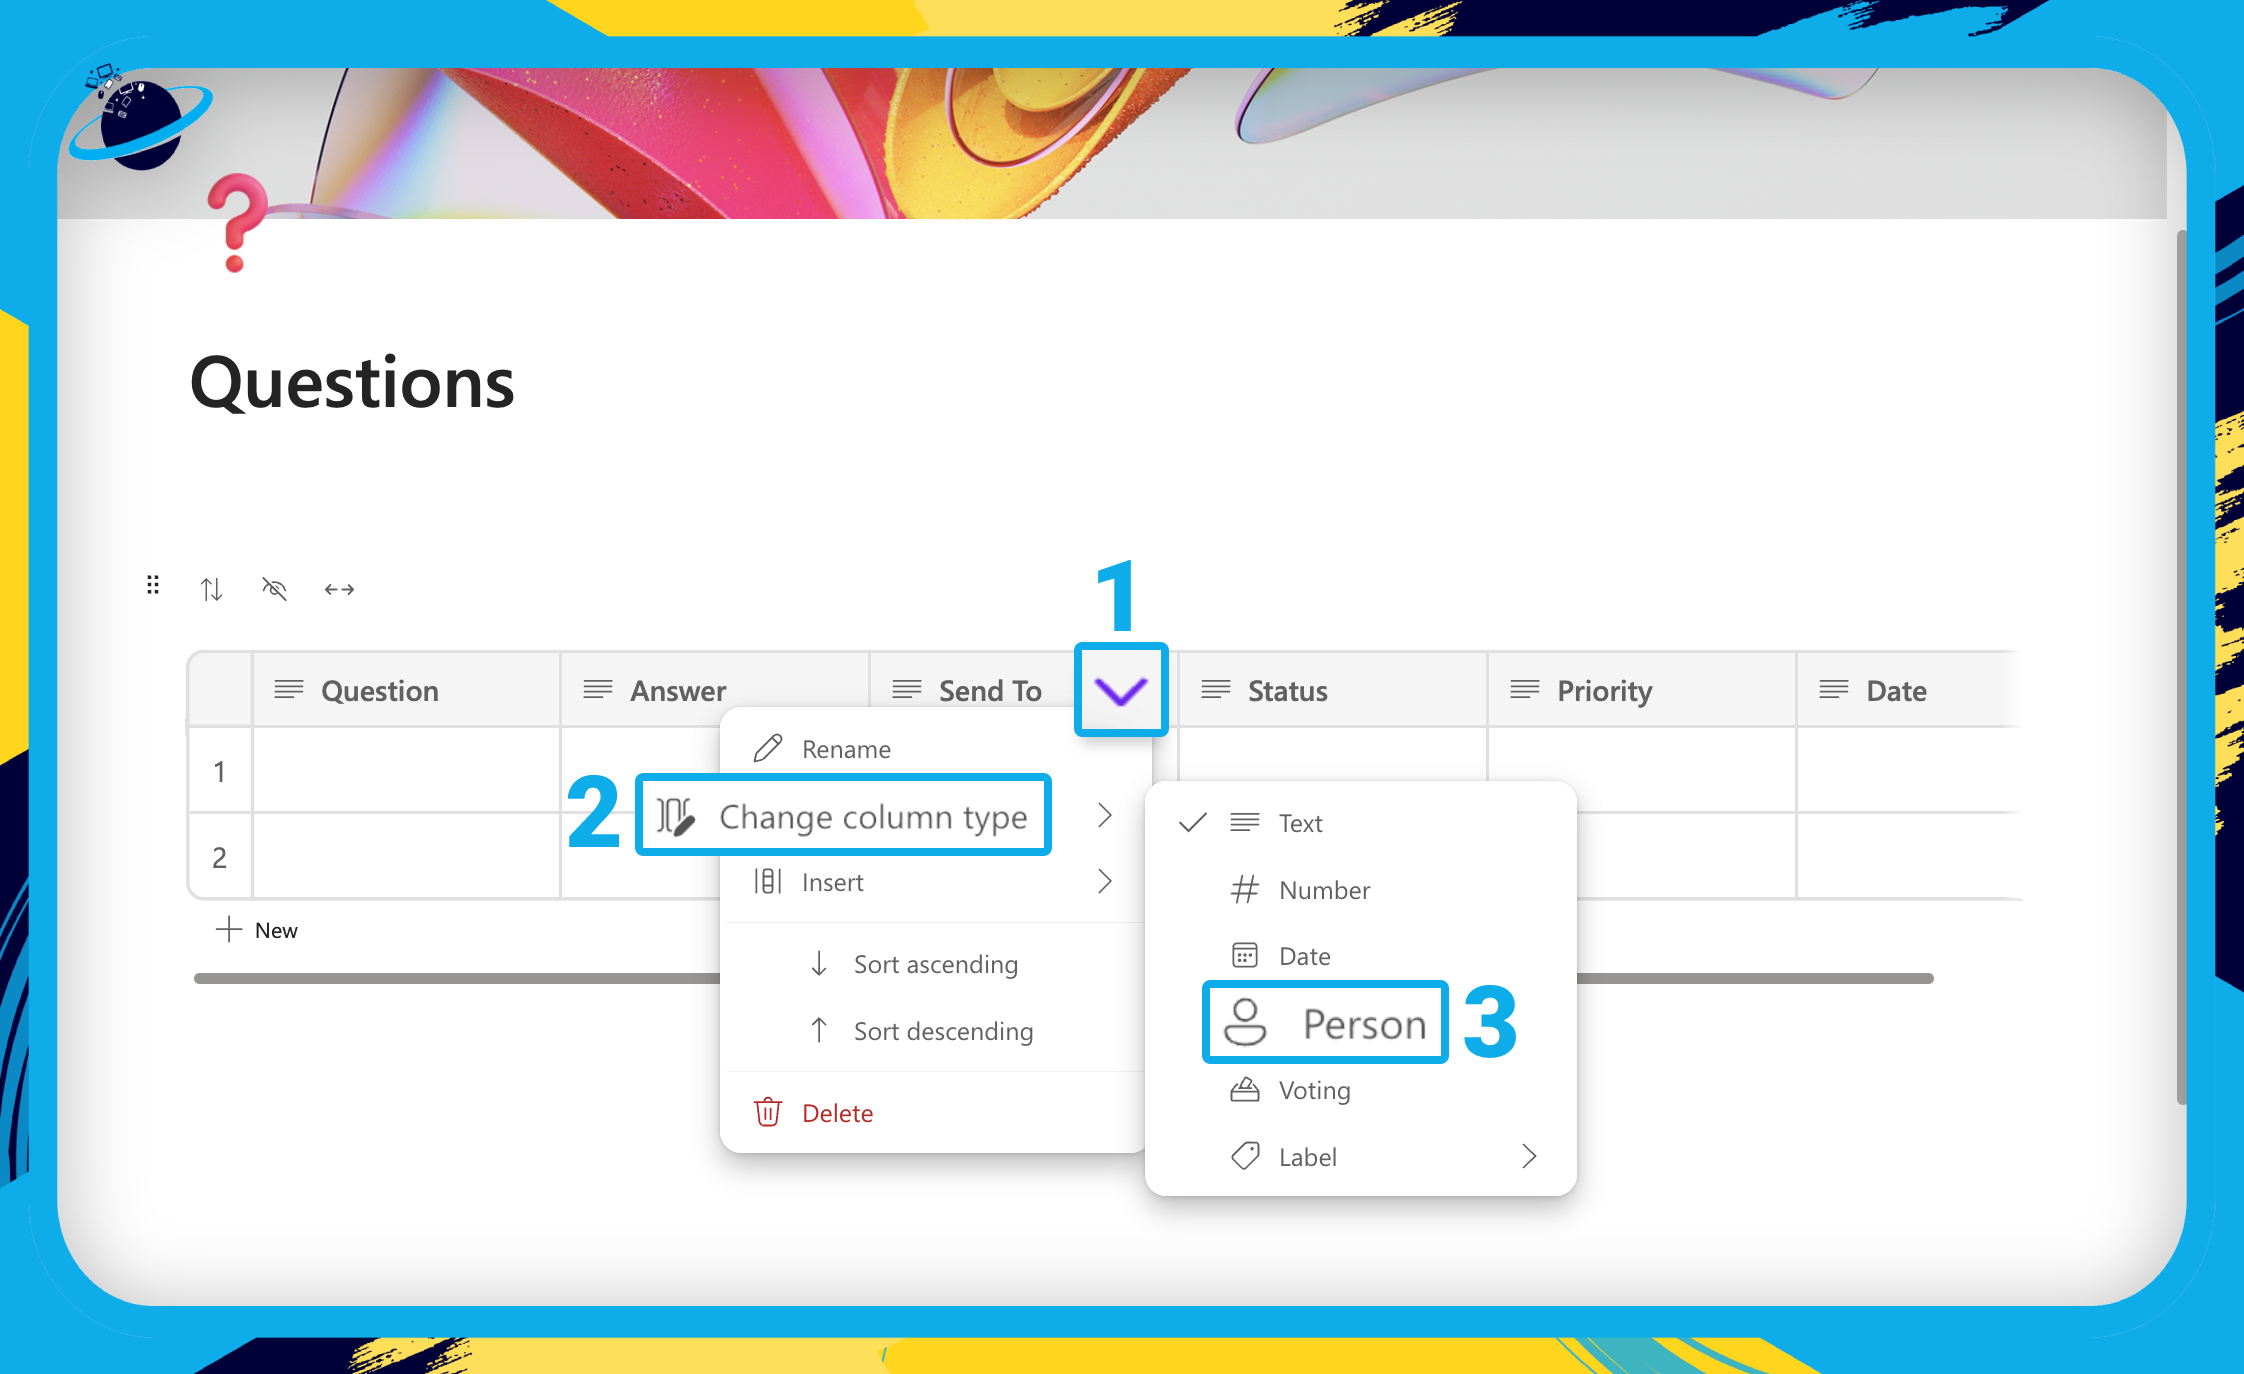
- Hover over the “Send To” header and click the
 down arrow. [1]
 - Click
 “Change column type” in the dropdown menu. [2]
 - Then select
 “Person.” [3]
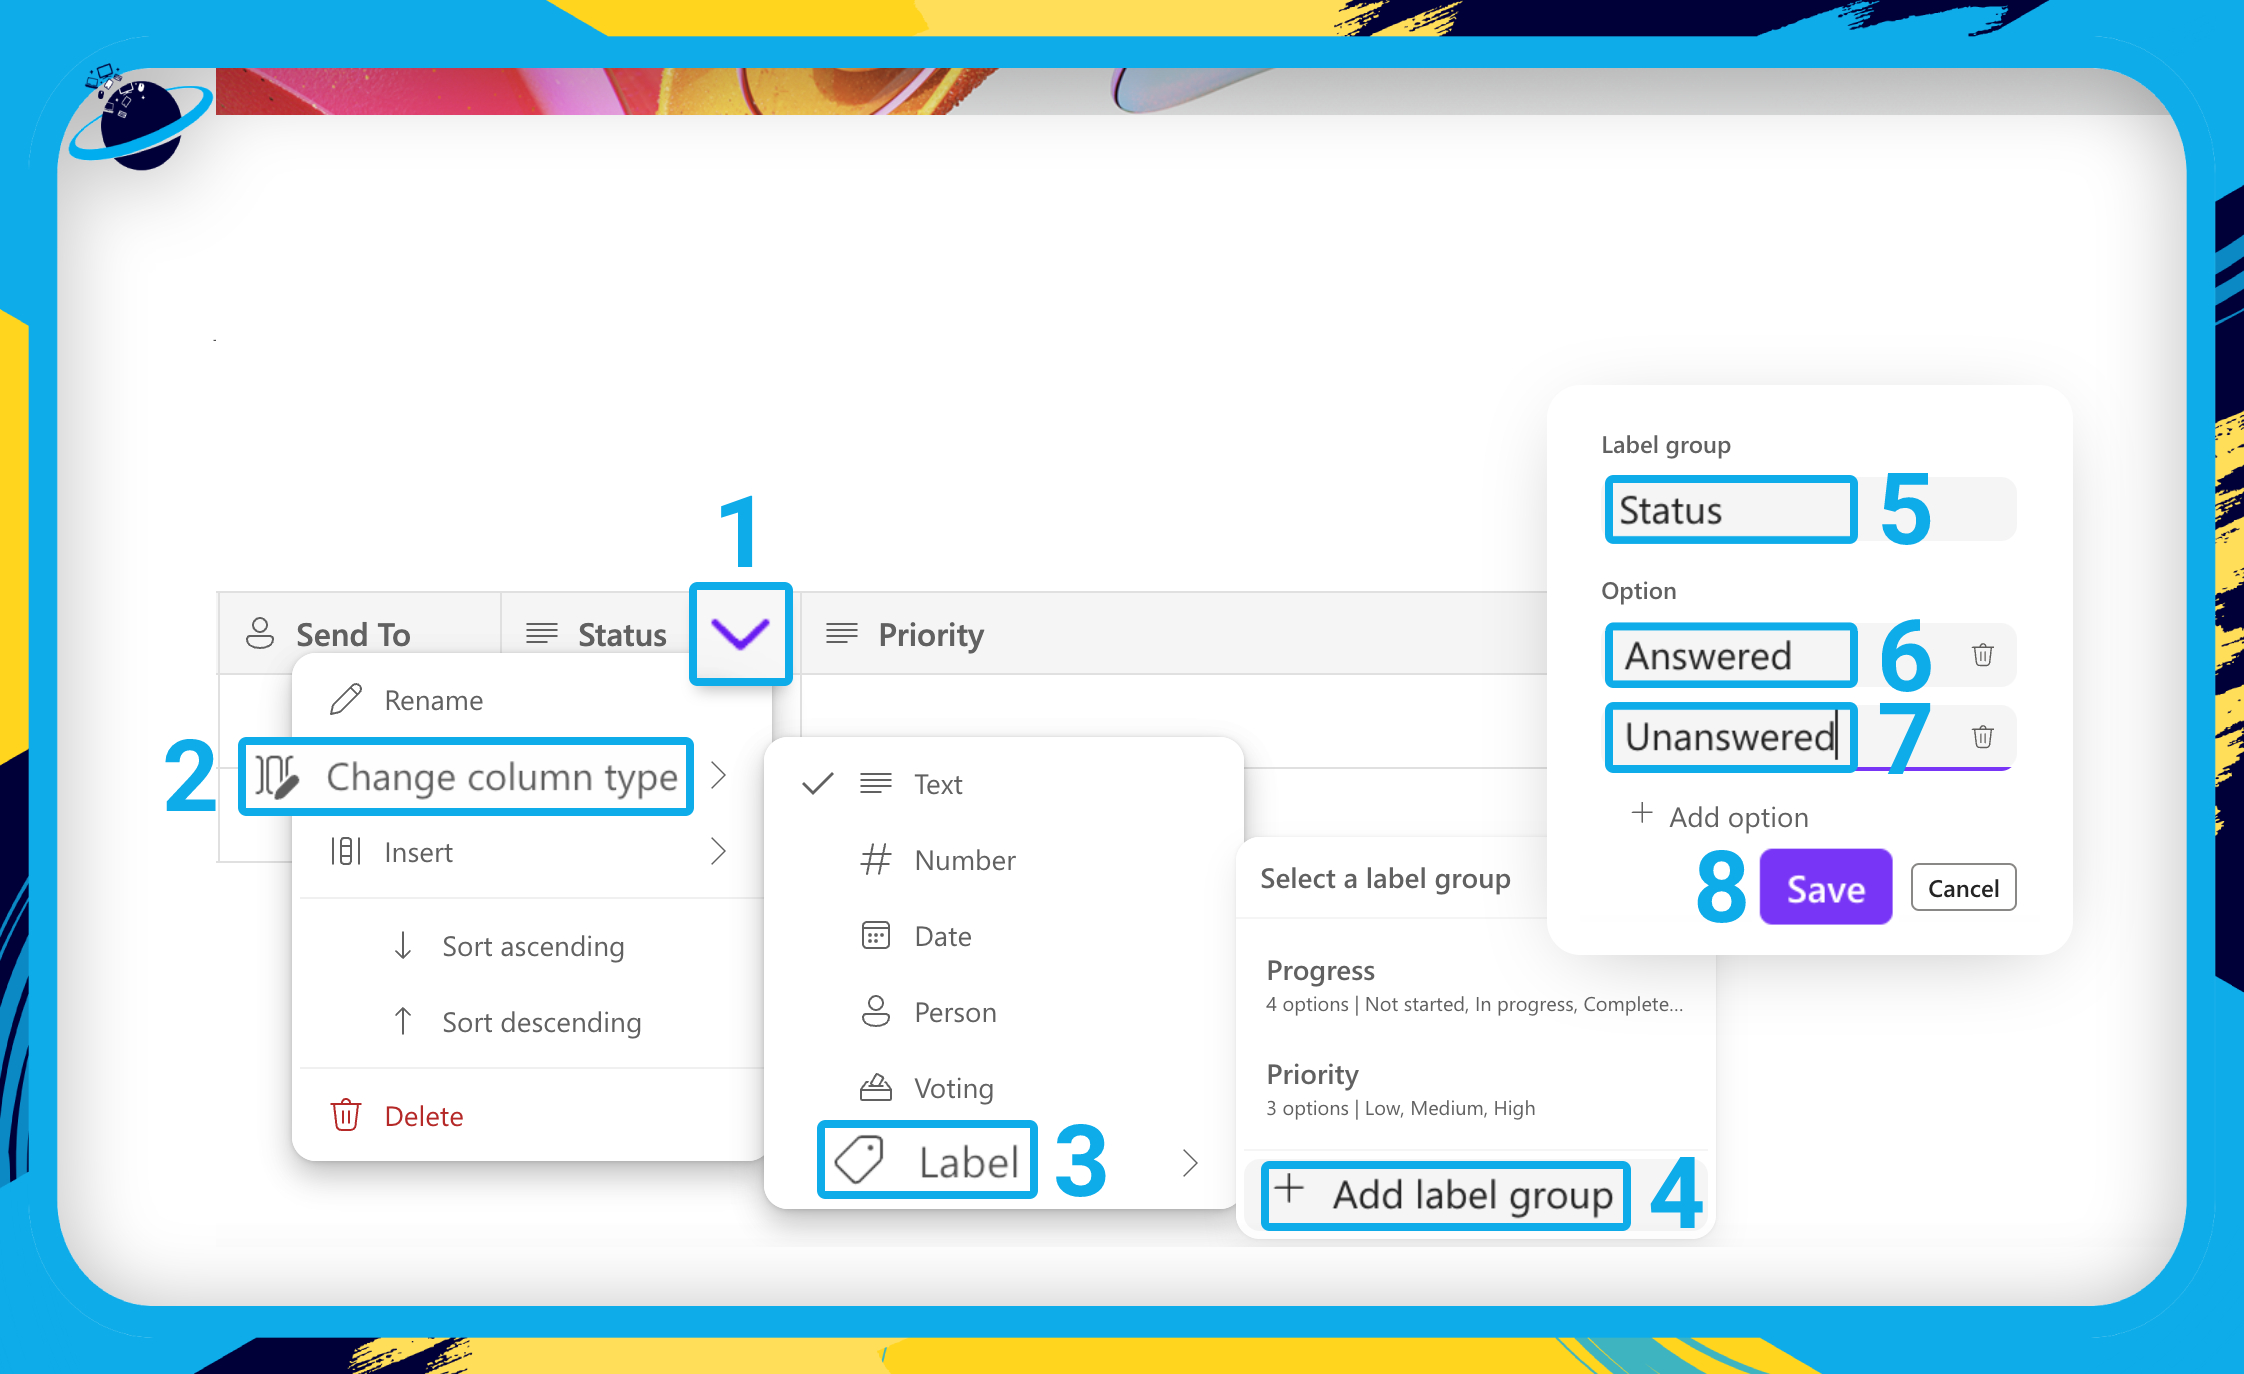
- Hover over the “Status” header and click the down arrow. [1]
- Click “Change column type” in the dropdown menu. [2]
- Go to
 “Label.” [3]
 - Then select “Add label group.” [4]
- Name the label group “Status.” [5]
- Then add the following options:
- Answered [6]
- Unanswered [7]
- Finally, click “Save.” [8]
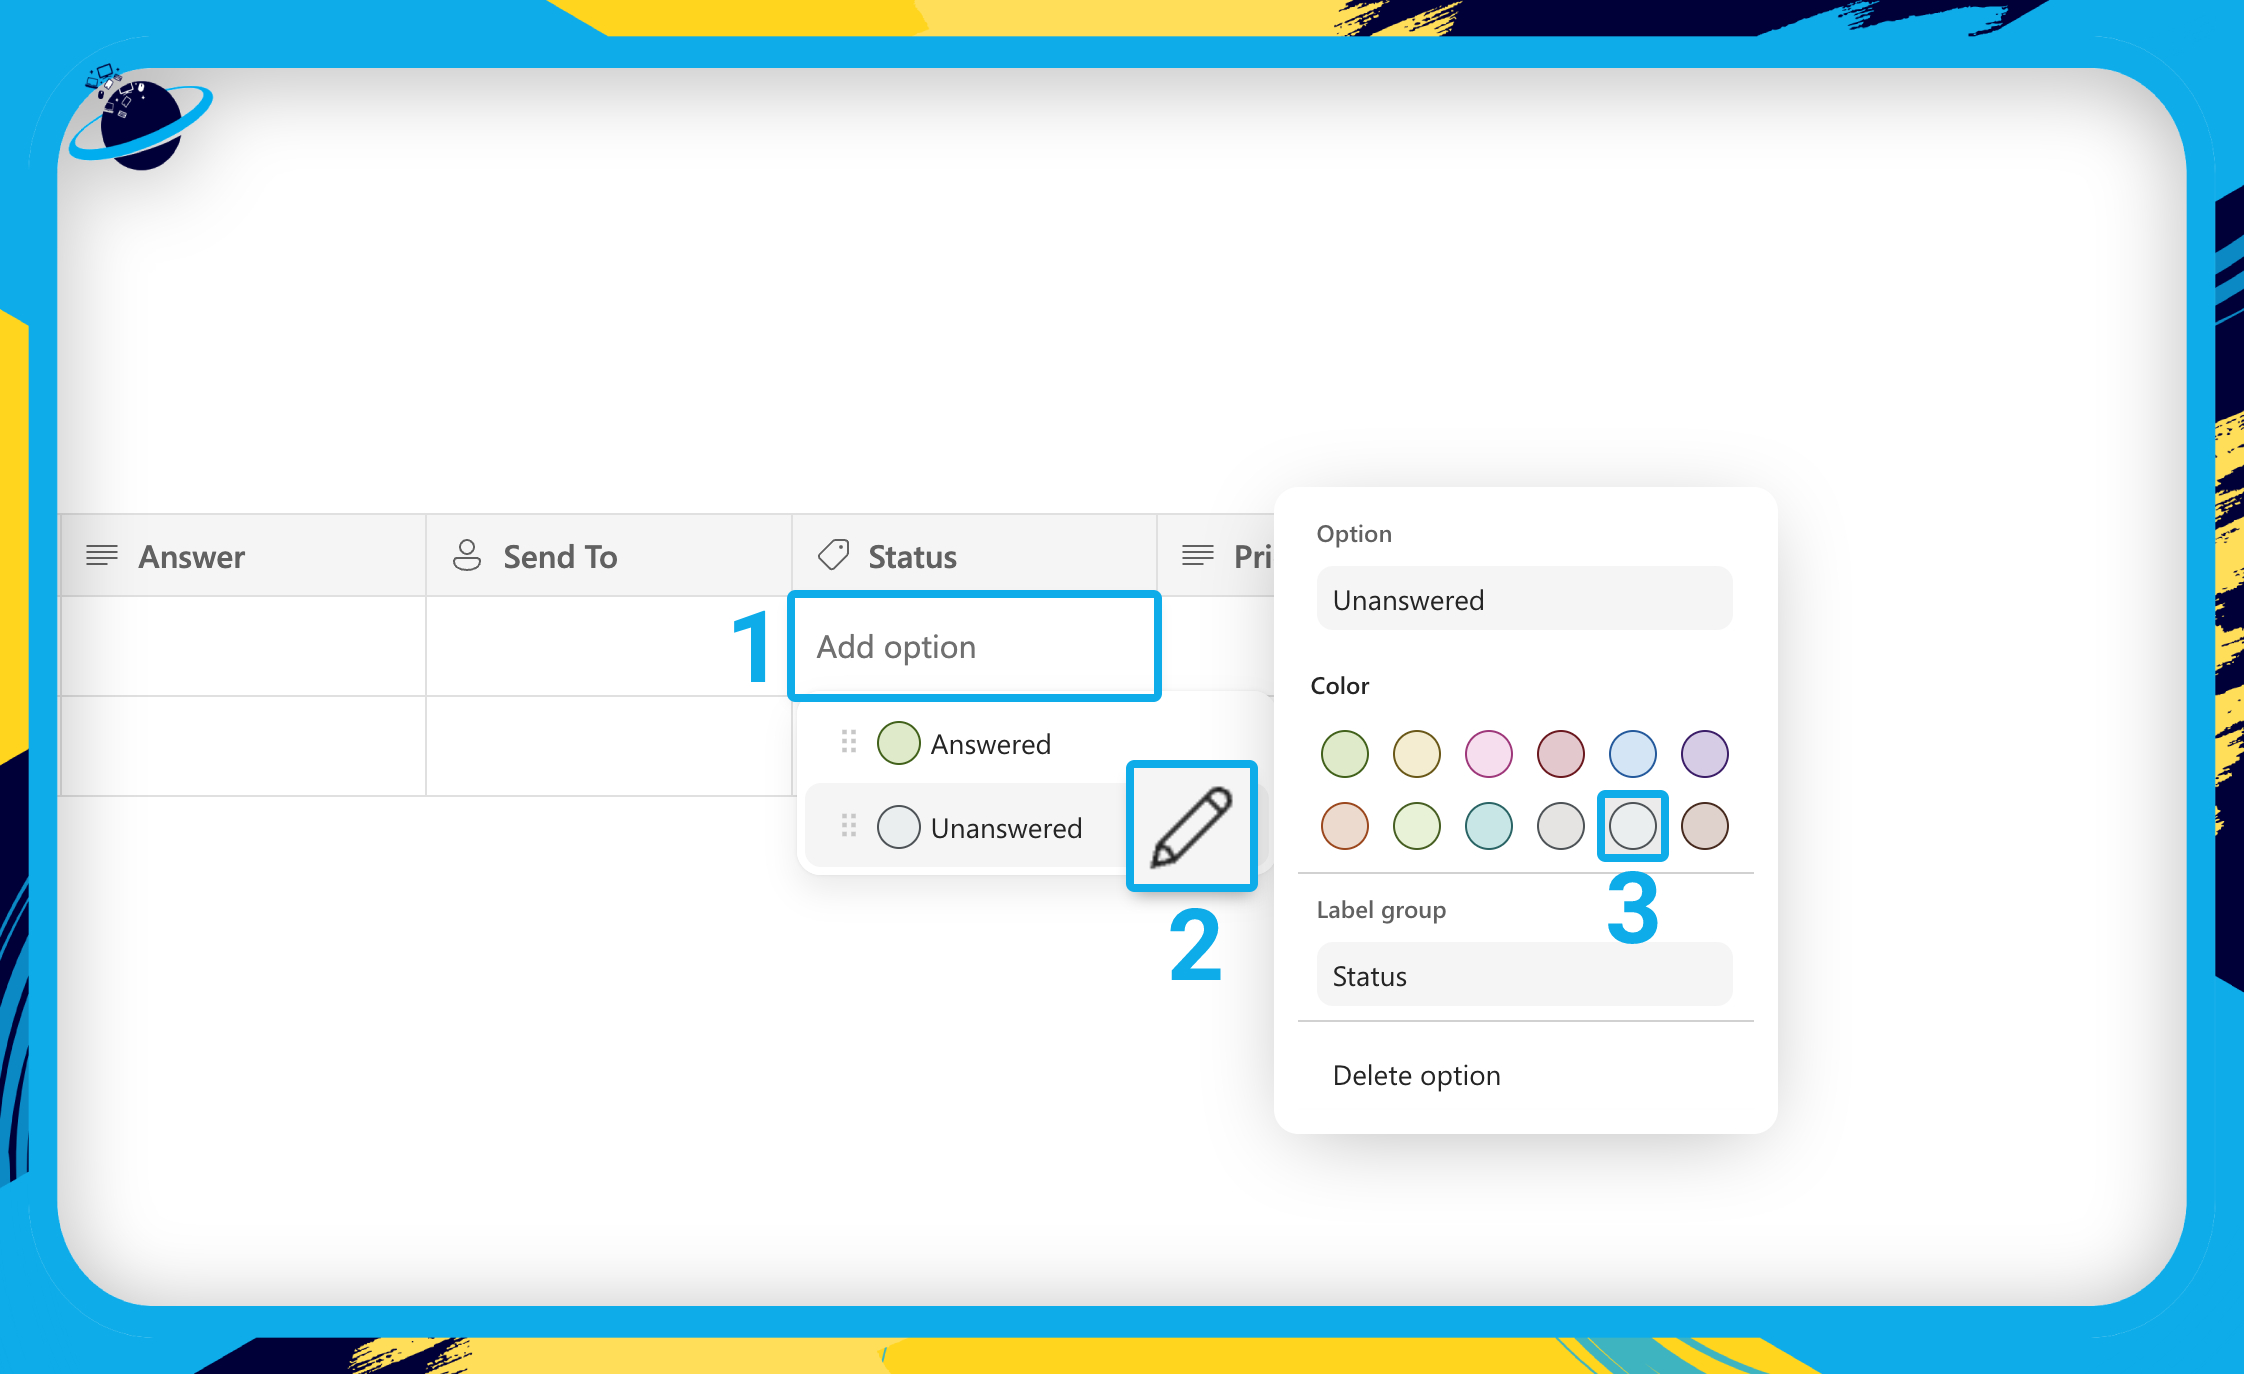
- Click any cell in the “Status” column. [1]
- Hover over the “Unanswered” option and click the
 pen icon. [2]
 - Then choose a grey color from the dialog box. [3]
- You can color the “Answered” option anything you like — we selected green.
- Change the “Priority” column type to “Label” > “Priority.”
- Change the “Date” column type to “Date.”
- Team members can now enter a question into the table:
The next step is to set up a contributor group that will be notified whenever someone creates a new question. We can achieve that by having a single person set up a rule in Outlook that forwards all messages from the Loop page to a group of contributors.
Then, the person asking the question only needs to @ mention the team leader in the “Send to” box, and every relevant contributor will be notified.
![]() Note: Watch this video for a complete guide on how to set up a contributor group.
Note: Watch this video for a complete guide on how to set up a contributor group.
To answer the question, create a new subpage in the “Answers” page and paste the question into the title section. Then, once you’ve answered the question, hit the copy icon at the top.
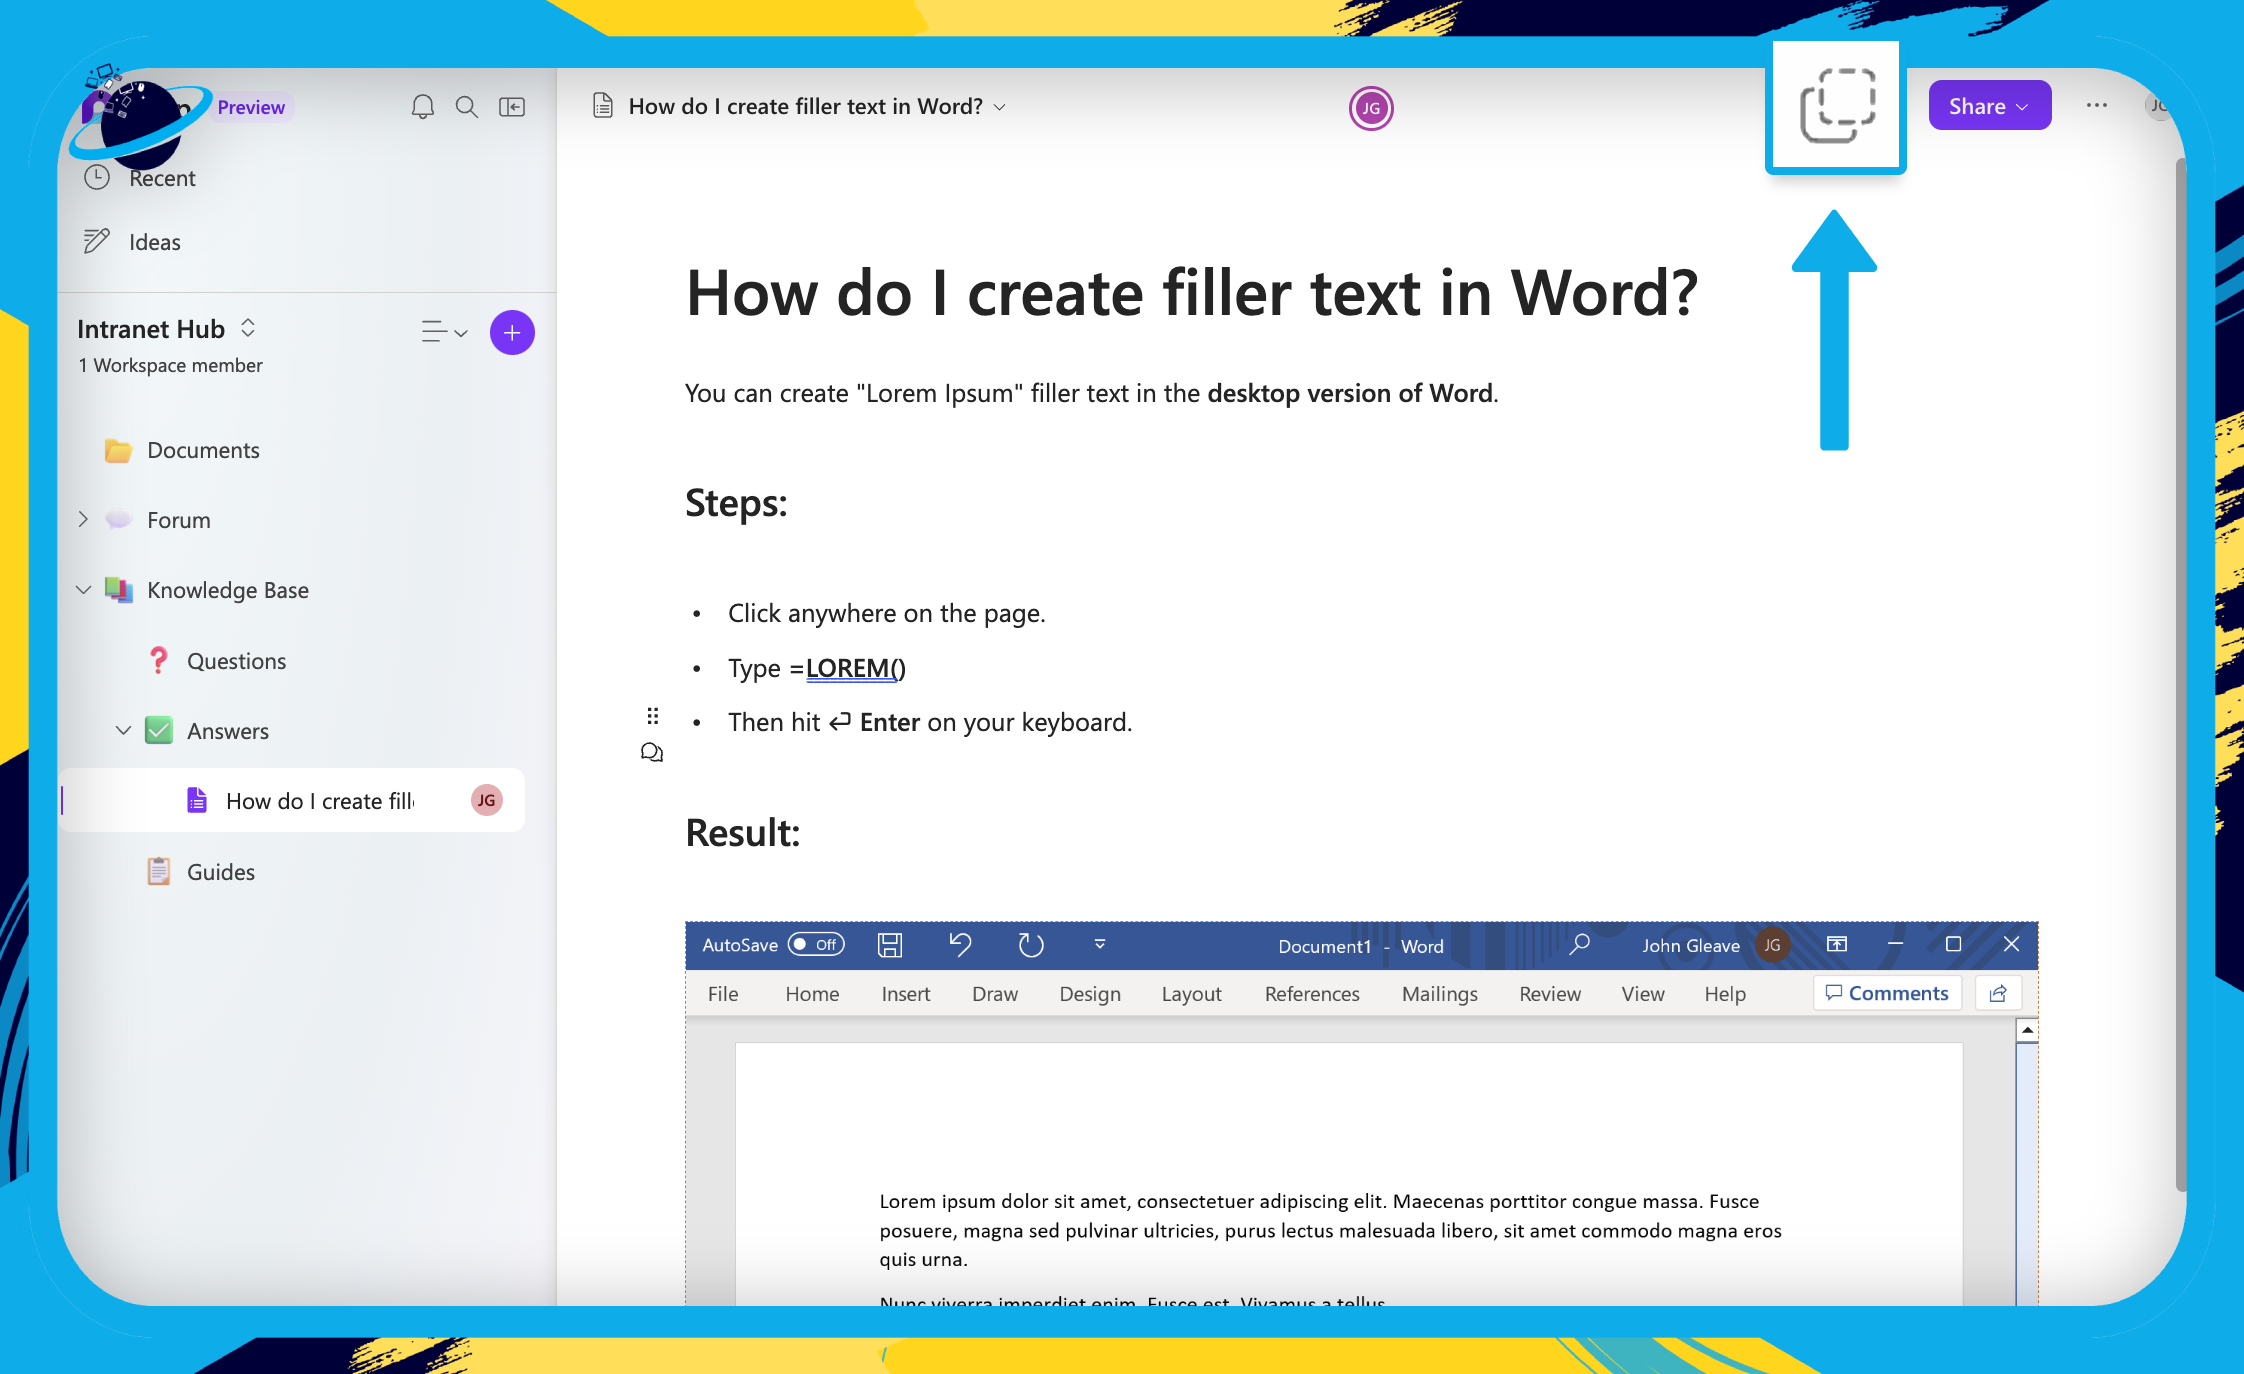
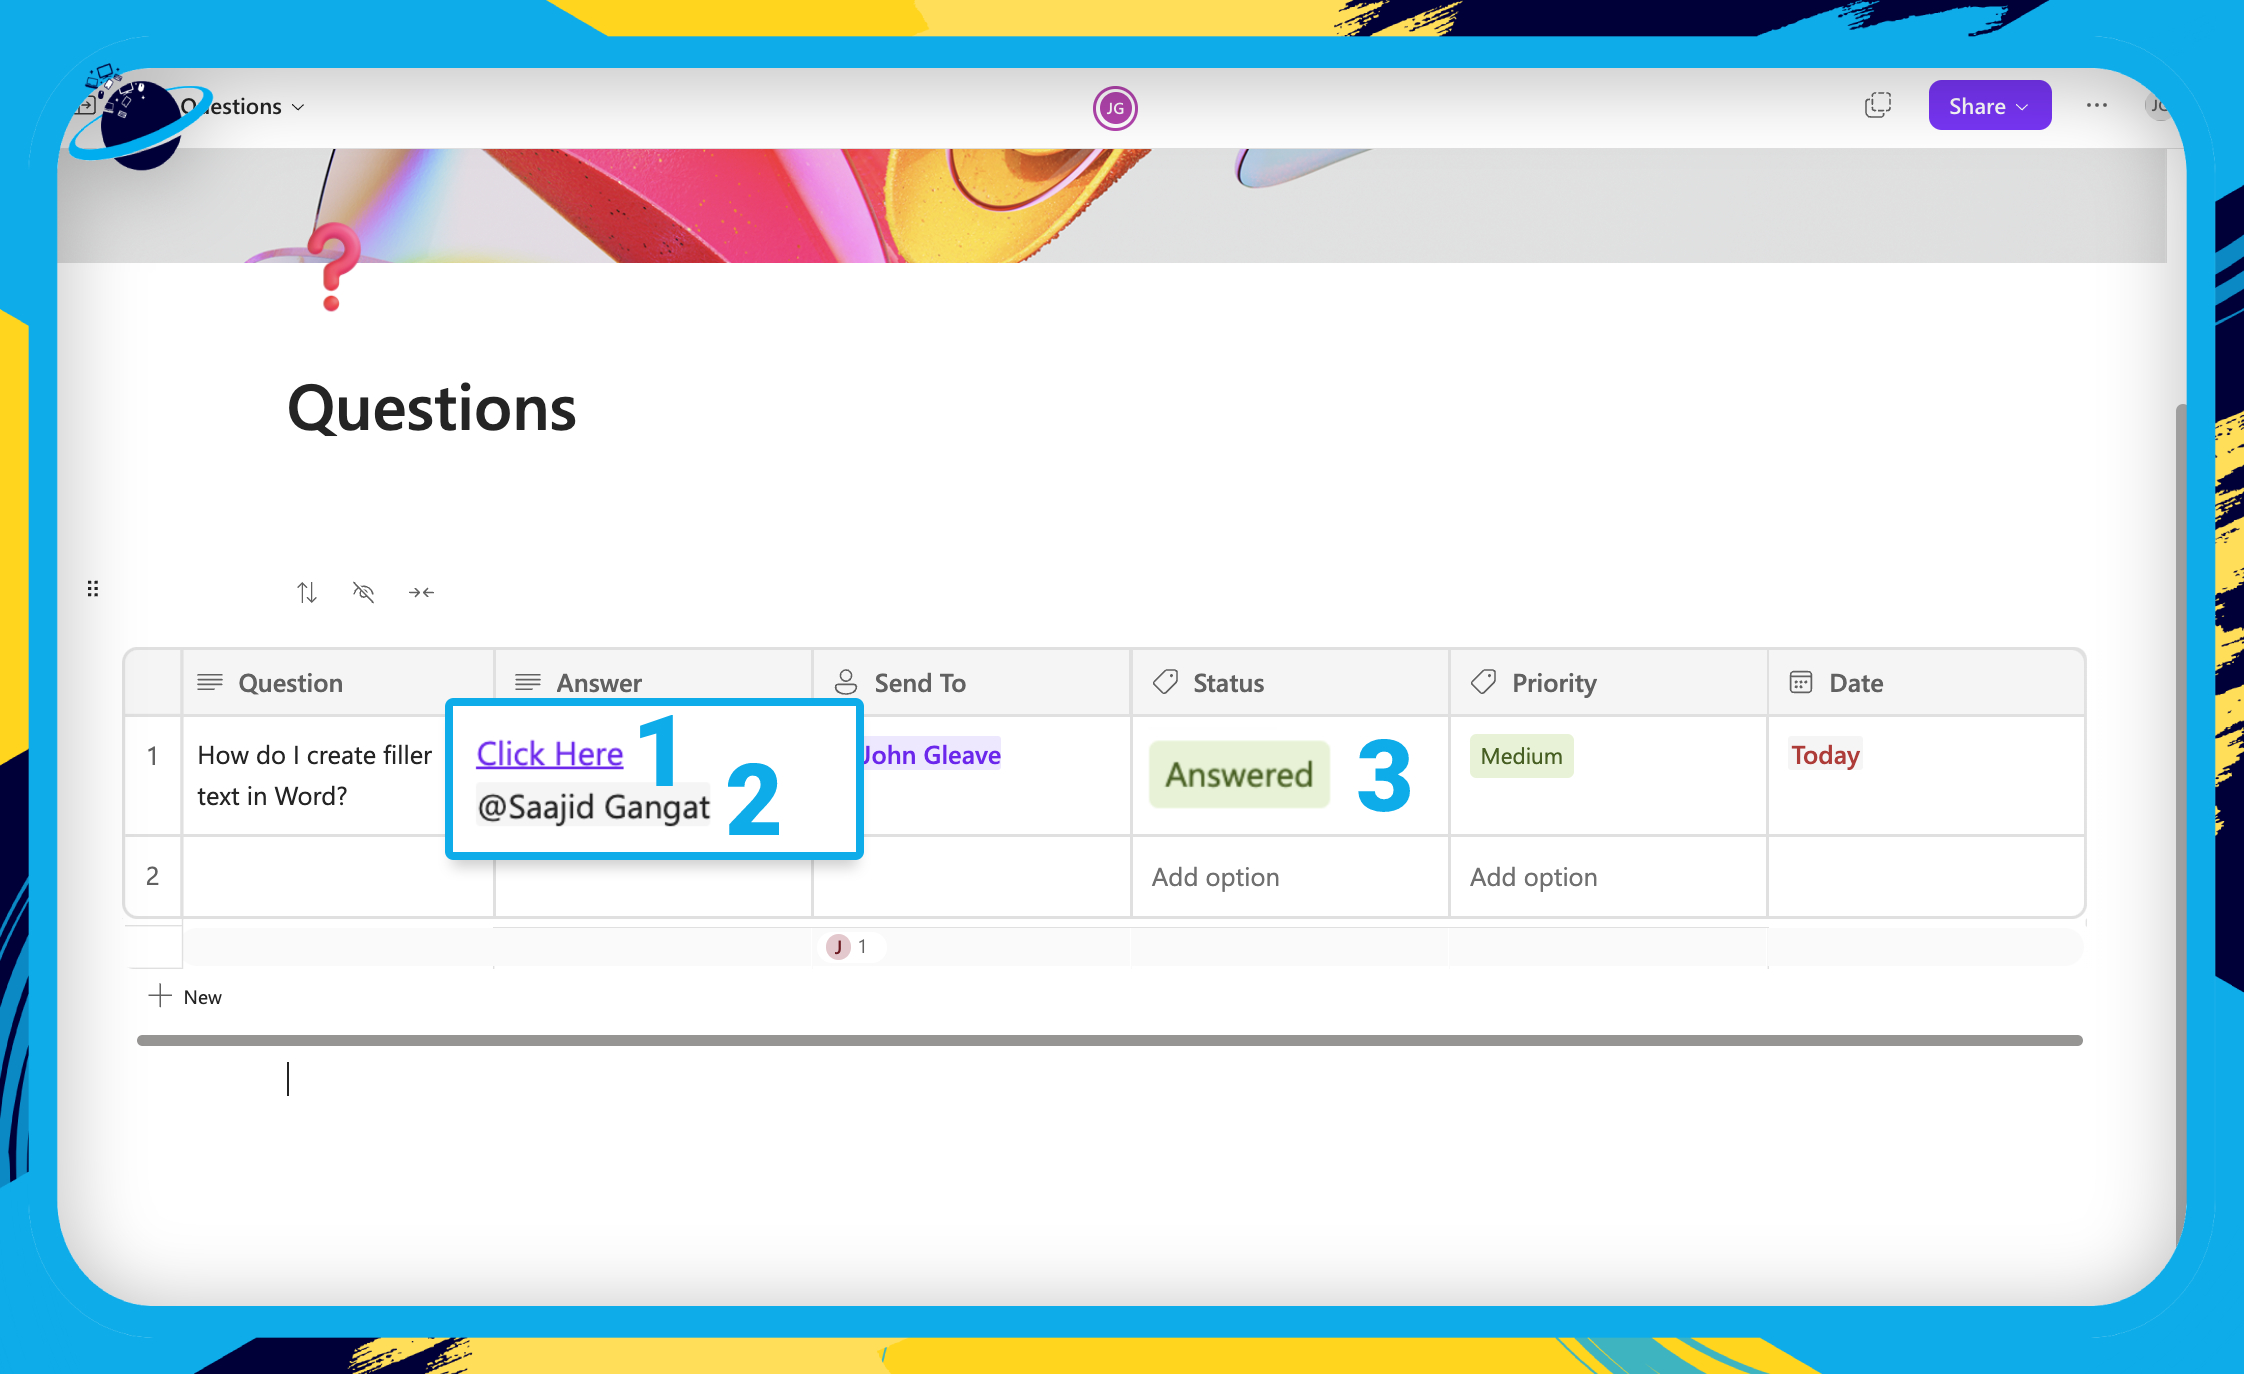
- Now head back to the “Questions” page.
- Type “Click Here” in the “Answer” column next to the question.
- Highlight “Click Here” then press Ctrl + V on your keyboard to paste the link. [1]
- After “Click Here” type an @ symbol then enter the name of whoever asked the question. [2]
- Finally, set the “Status” to “Answered.” [3]
![]() Note: For more information on how to create a knowledge base, please read our dedicated guide:
Note: For more information on how to create a knowledge base, please read our dedicated guide:![]() How to use Microsoft Loop as a Knowledge Base
How to use Microsoft Loop as a Knowledge Base

Intranet Meeting Room
In this section, we’ll show you how to…
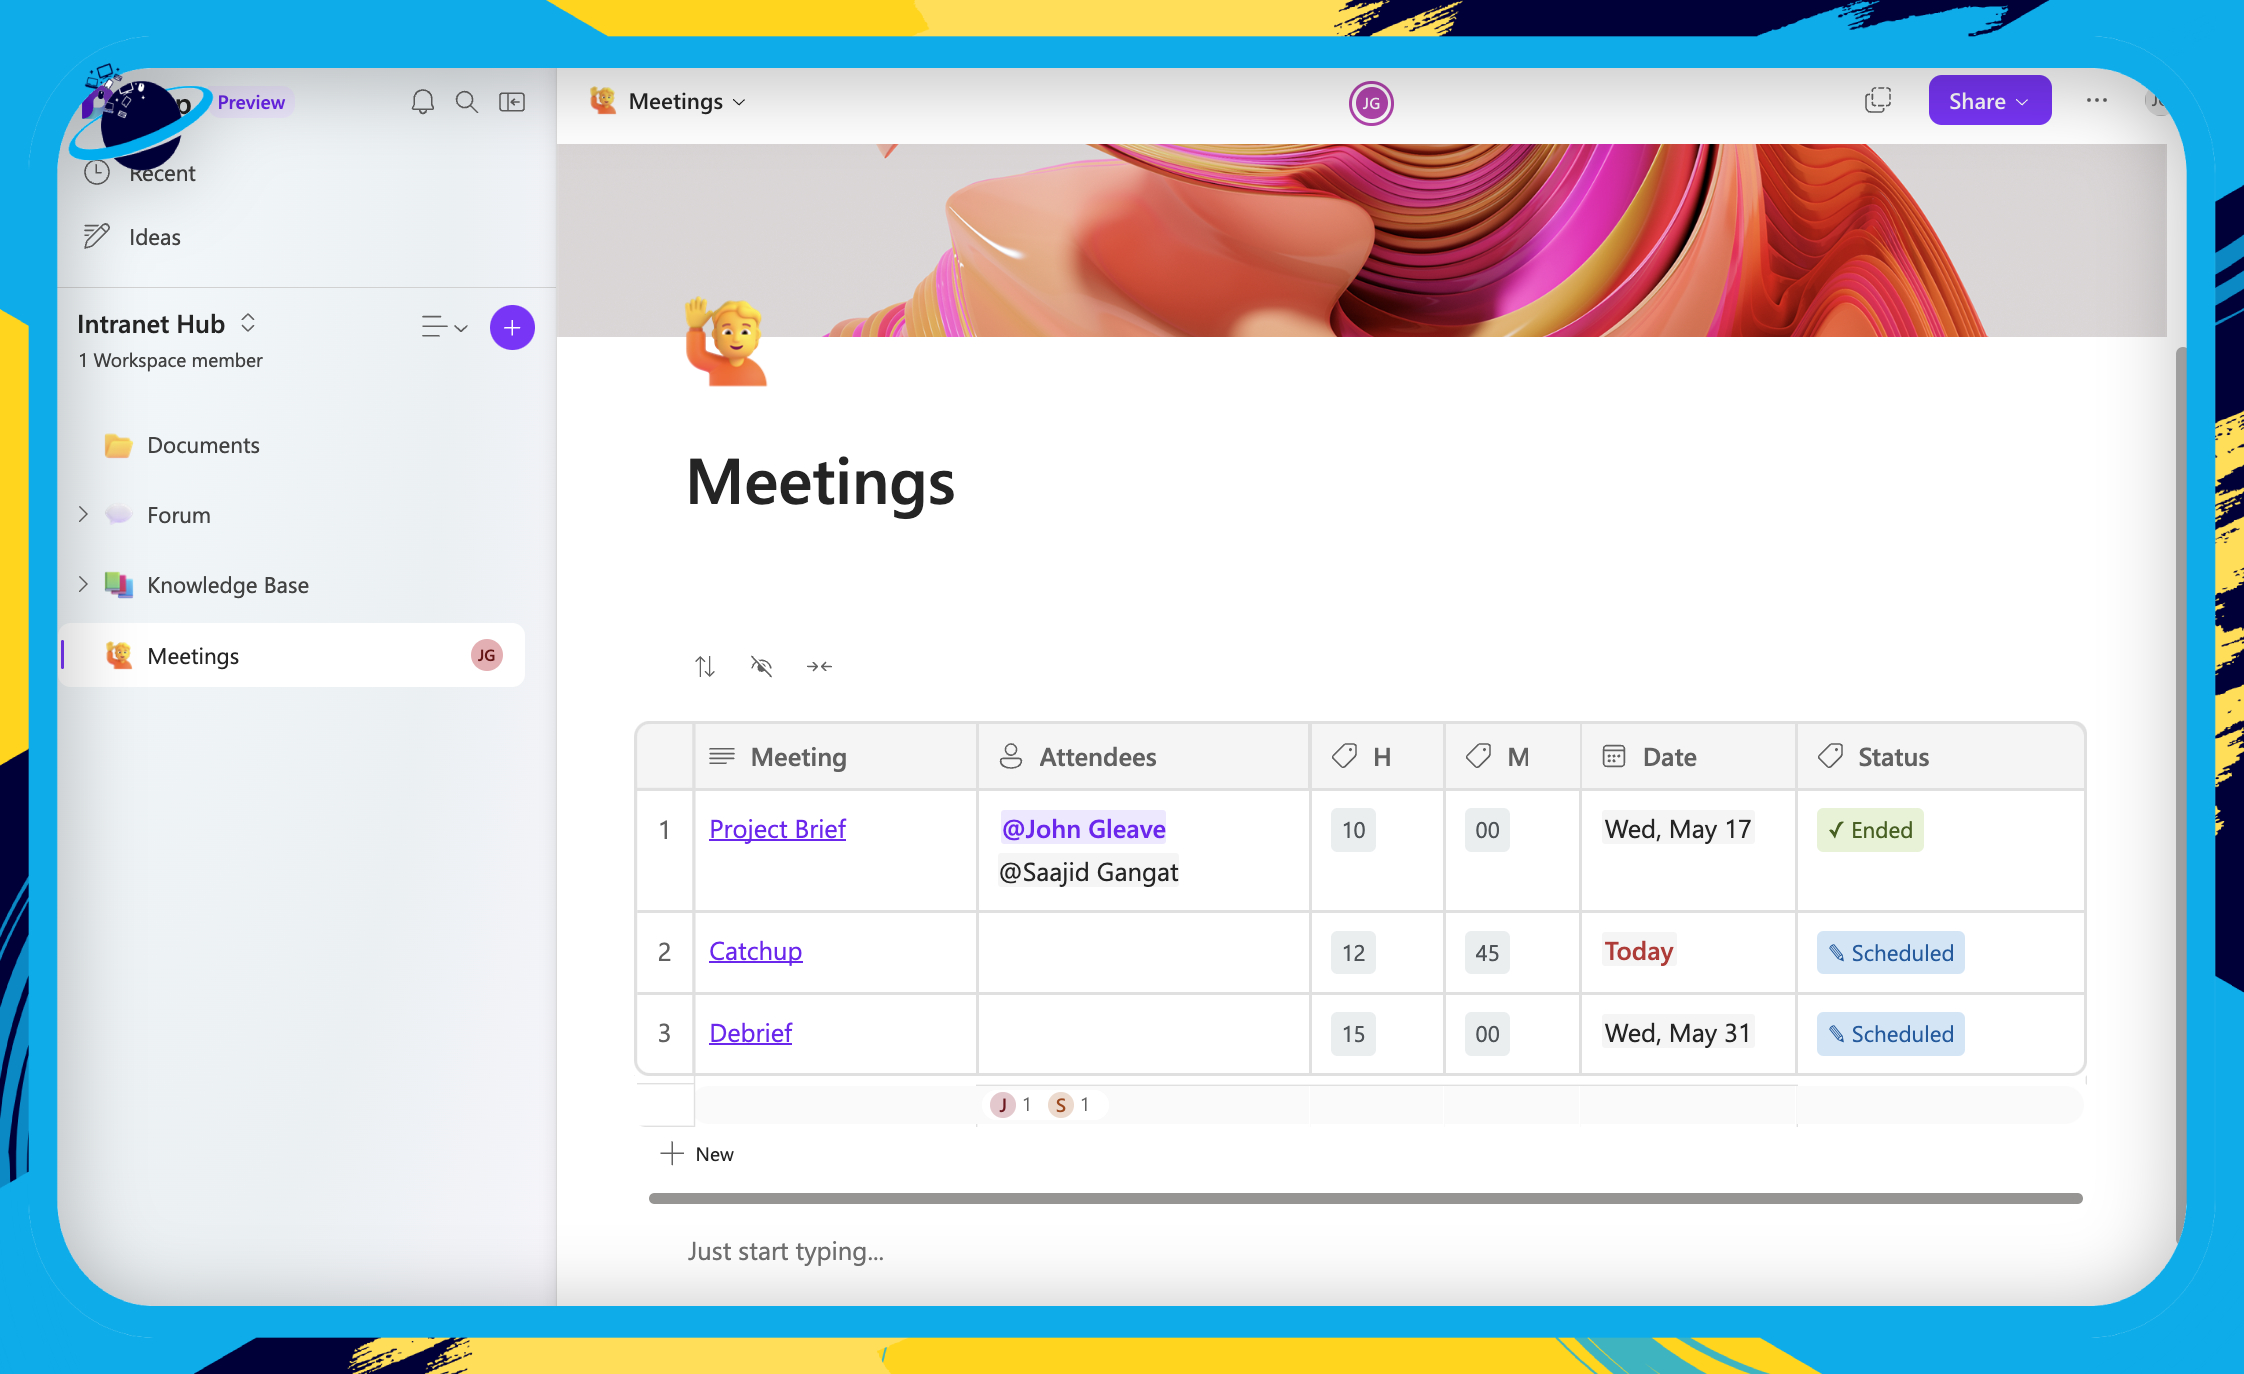
A meeting room will allow your team members to keep track of when meetings are due to take place. To start, create a new page and call it “Meetings.”
- Create a new table with six columns.
- Name the columns from left to right:
- Meeting – This is the title of the meeting and can link to a Teams meeting.
- Attendees – A list of team members who should be attending.
- H – Custom “Label” for office hours in 24h format (00 – 23).
- M – Custom “Label” for minutes in 15-minute intervals (00, 15, 30, 45).
- Date – Column type “Date.”
- Status – Custom “Label” (Scheduled, Canceled, Ended).
![]() Note: Watch this video for a complete guide on how to create the meetings table:
Note: Watch this video for a complete guide on how to create the meetings table:
When the meetings table is finished, it should look something like the image below:

More Ideas for the Intranet
In this section, we’ll make some suggestions on how you can improve the intranet.
The ideas presented in this guide are simply an outline of what is possible in Microsoft Loop. But there are countless expansions and improvements you can make to tailor the intranet to your specific needs.
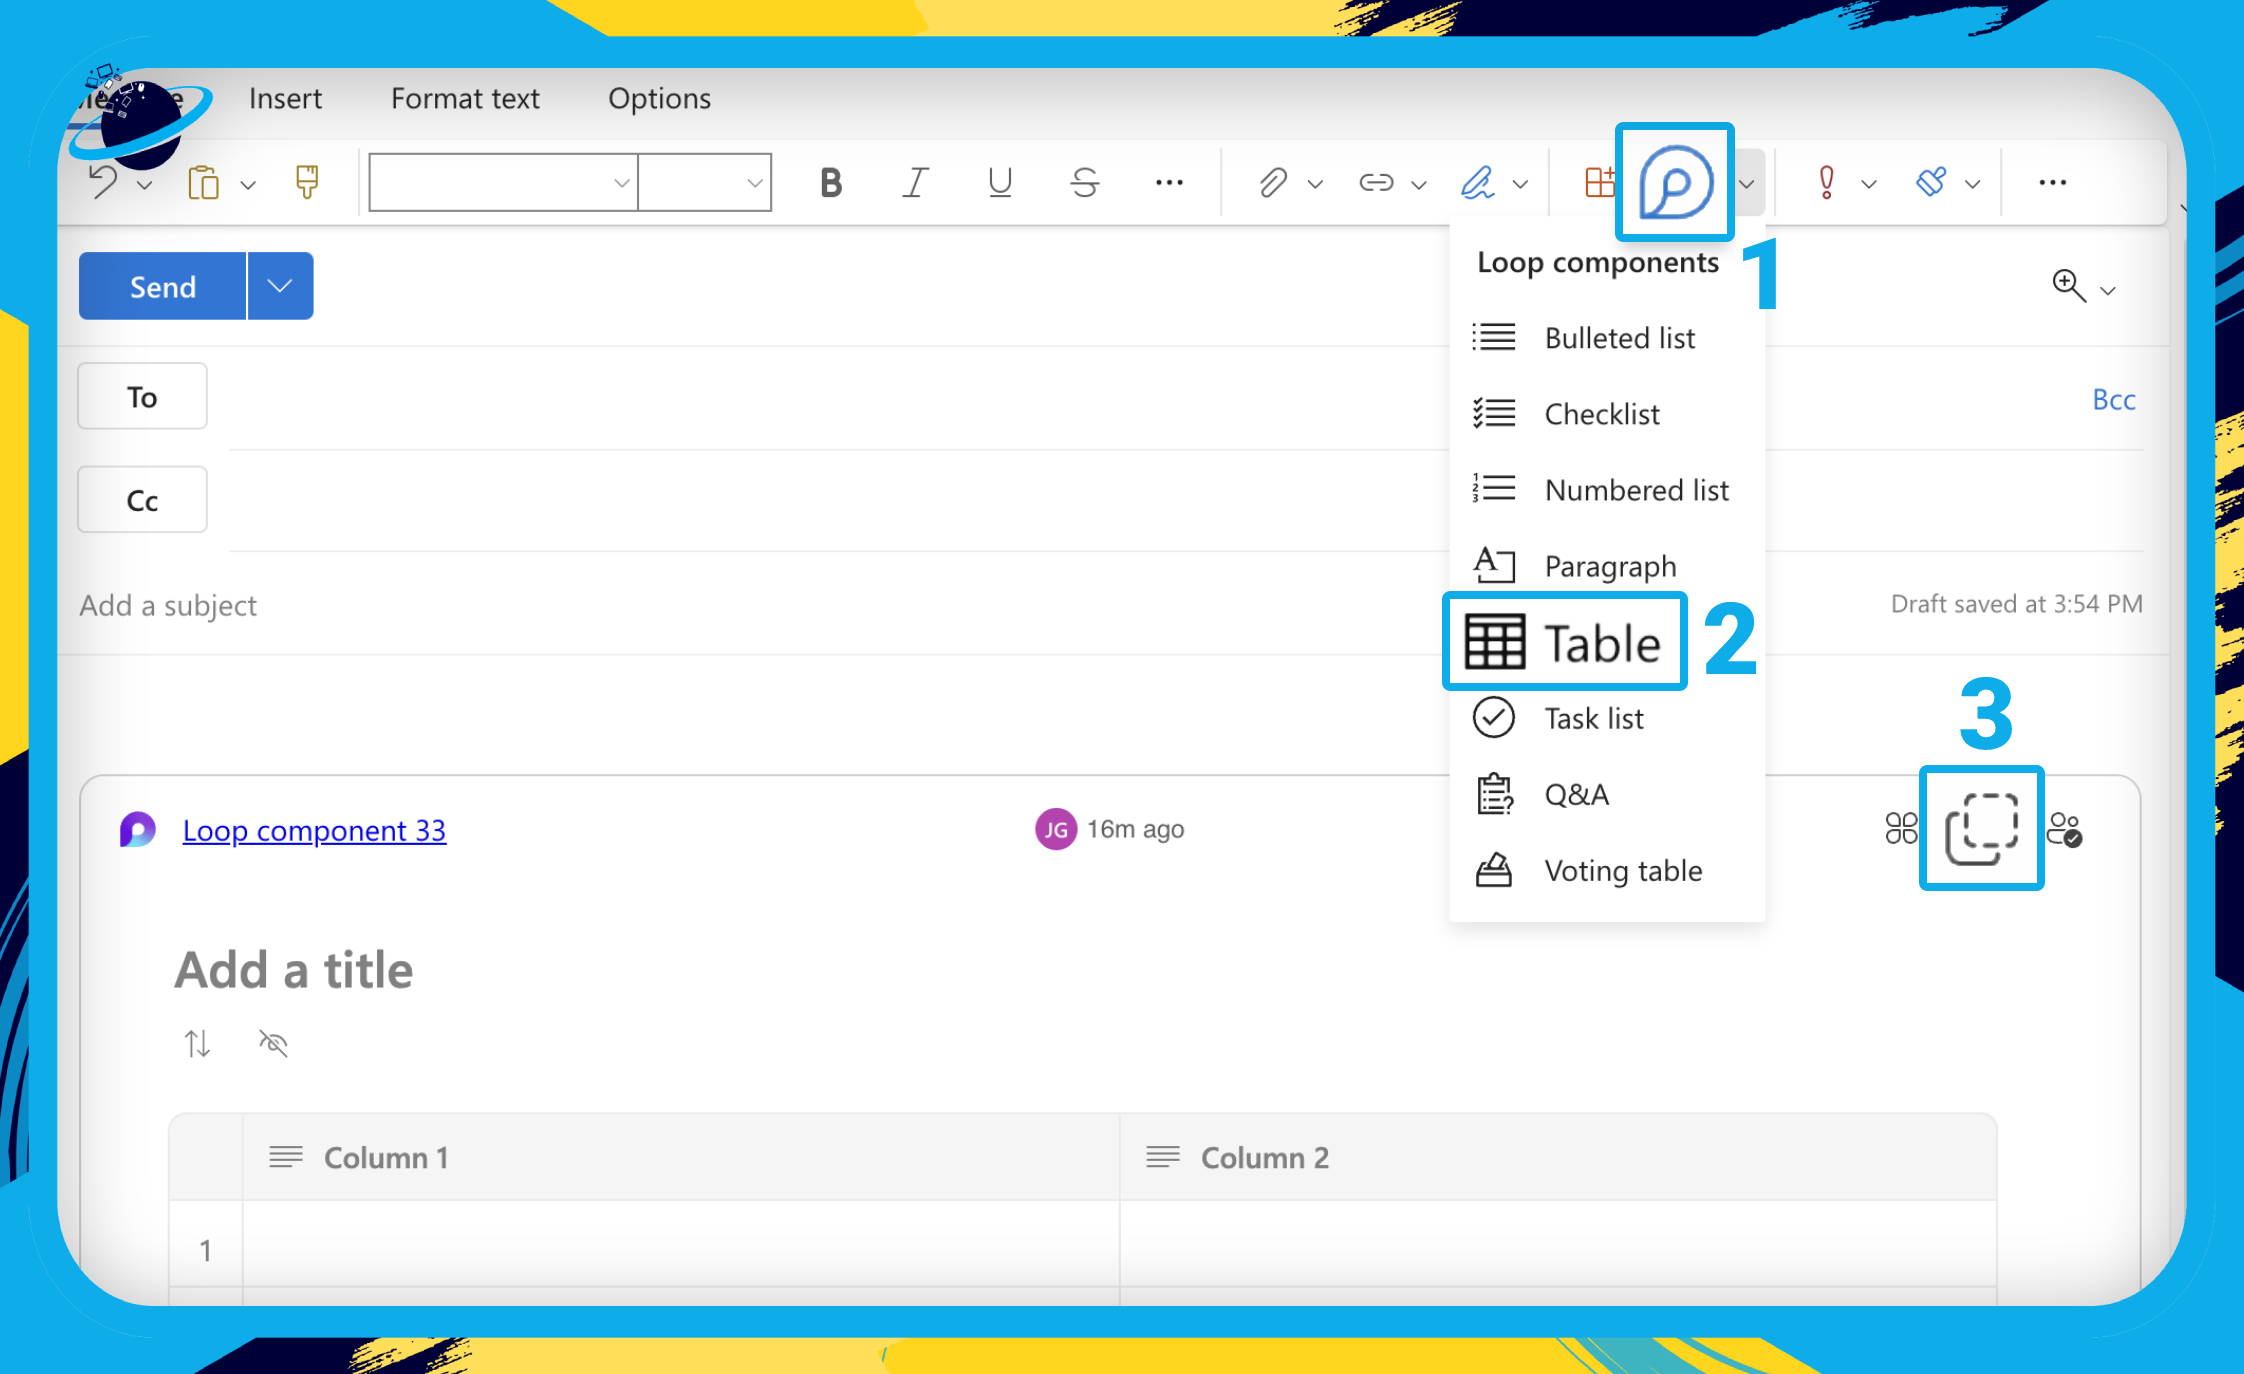
🏠 Home page with games or live chat
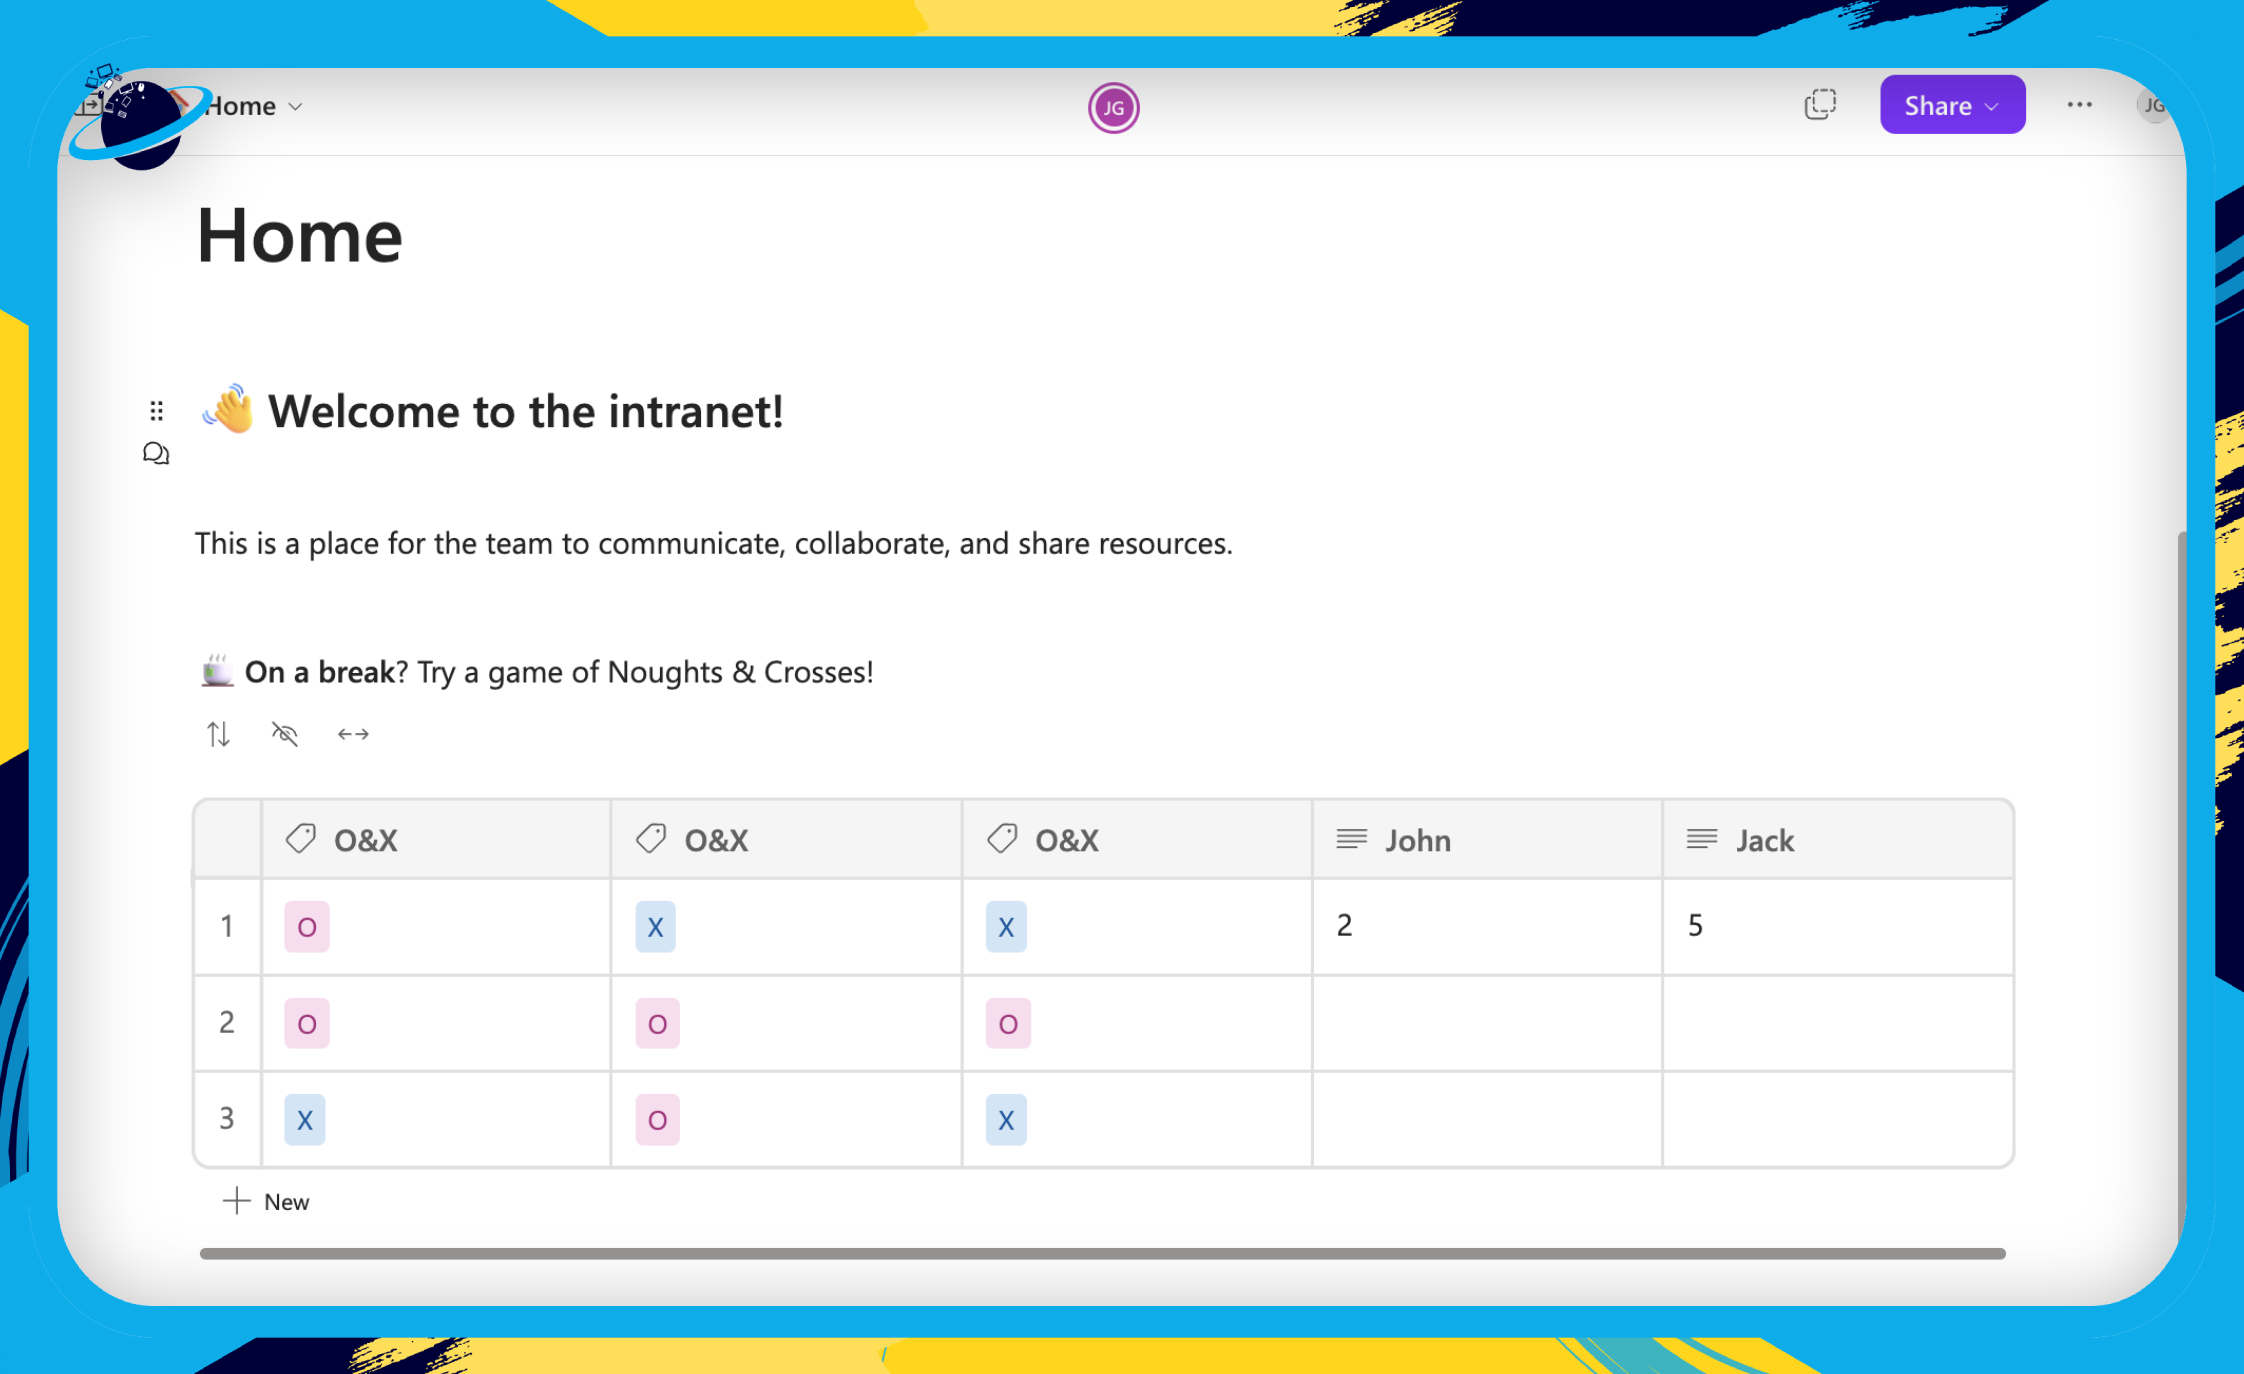
A live chat might not be the most user friendly method of communication, as each person can see what the other is typing. But an interesting way of creating a live chat is to borrow the comment component from Outlook.
- Head over to the web version of Outlook and create a “New mail.”
- There, click the
 Loop icon. [1]
 - Then select
 “Table” from the dropdown. [2]
 - Now click the
 copy icon. [3]
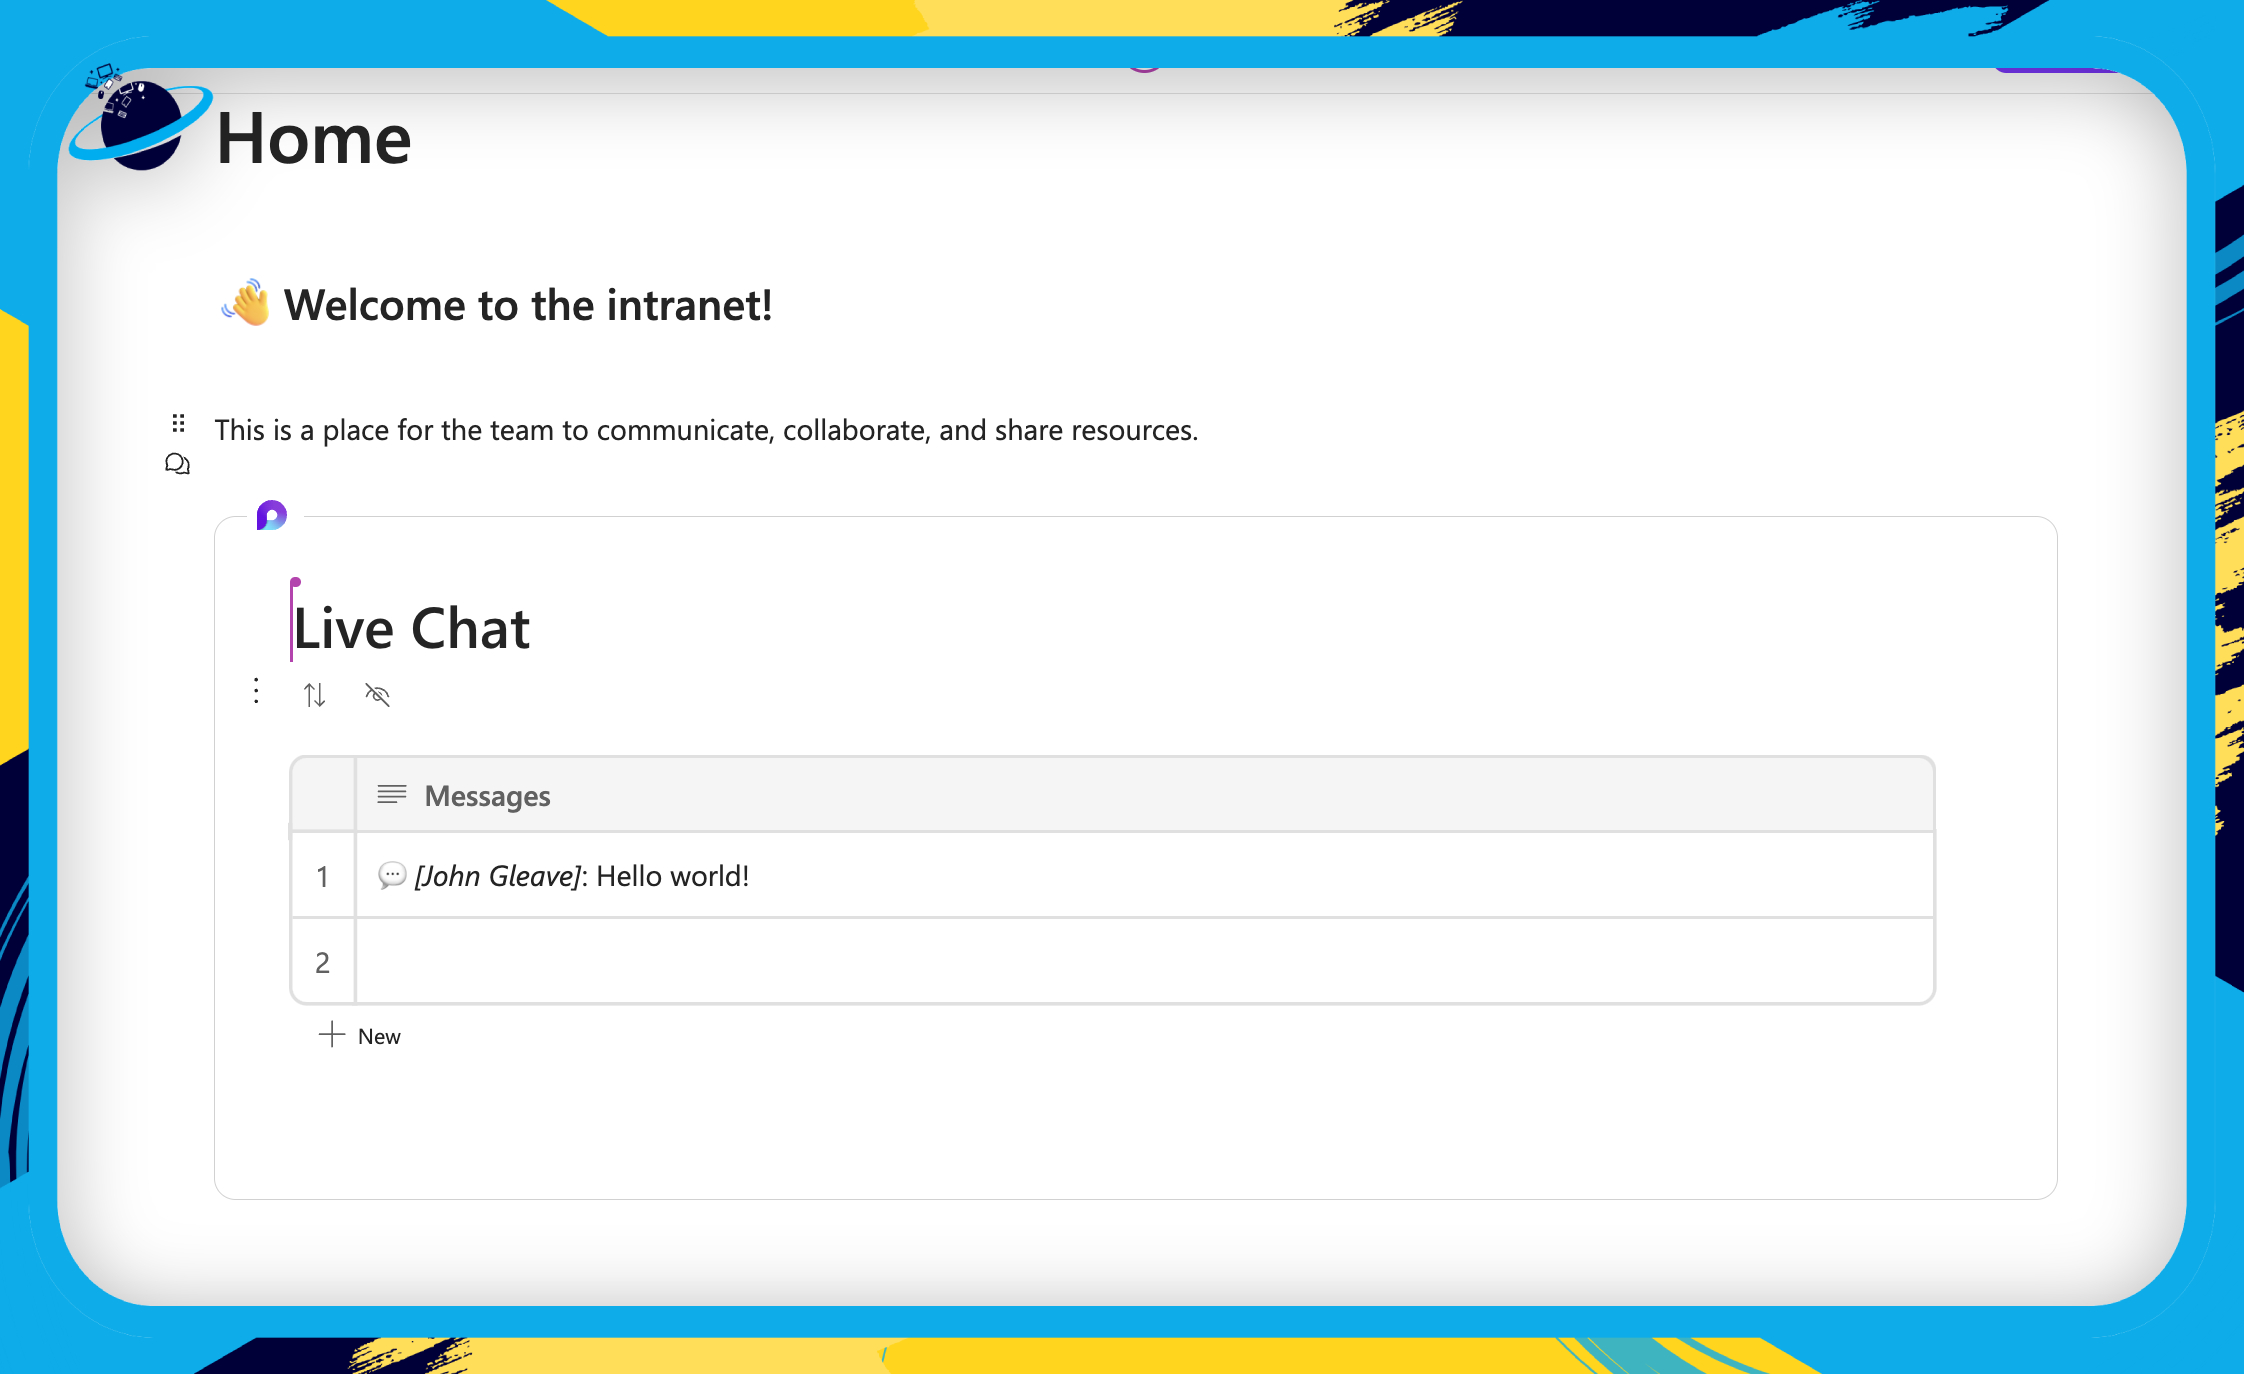
Now paste the component into your Loop page. You can then create a Home page that looks like the image below.
- To send a message, create a new row.
- Type /co and hit ⏎ Enter.
- Then type out a message.
🧾 Policies and Procedures
It’s important for your employees to stay up-to-date with company policies. You could have a page dedicated to your policies in the intranet, or you could create a subpage within the Knowledge Base.
 Embed the Intranet into a Teams channel
Follow the steps below if you want to embed your Intranet into a Teams channel.
- First, copy one of the pages — if you have a Home page, copy that.
- Be sure to hit the “Copy” button in the popup box, too.
- Then go to your Teams channel and click the plus icon at the top. [1]
- Type “Website” into the search bar. [2]
- Then select
 “Website” from the results. [3]

- Now type “Intranet” as the website tab name.
- Paste your link into the “URL” bar.
- Then hit “Save.”

⭐ Here is the finished Intranet embedded in a Teams channel:
Frequently Asked Questions (FAQ)
 What is the main function of intranet?
The main function of an intranet is to allow team members to communicate, collaborate, and share resources quickly and securely.
An intranet is created from a network of computers that can function offline — without an internet connection. That makes sharing much quicker and safer.
What is internet vs intranet?
The internet is a global network of computers that anyone can connect to.
An intranet is a closed network of computers that only certain people can access.

Conclusion
If you want to use an intranet for your company, we advise going with SharePoint. It’s a cheap and powerful tool that allows you to grant specific permissions to any file or folder, and to create fully integrated sites.
If you choose to build an intranet in Microsoft Loop, the structure will largely depend on the specific requirements of your company. However, some key elements to include are:
- A documents page where your team can access shared files.
- A forum where your team can present ideas and discuss various topics.
- A knowledge base where your most important guides and information are organized — this is vital for a smooth onboarding process.
- A policies page, so your team can stay up-to-date with positions adopted by the company.
Thanks for reading!