 Key Takeaways
 The basic requirements for a knowledge base in Loop is to create a table where users can insert questions.
But to make the system more efficient, you should add priority labels to the questions [More…] and forward all notifications to a group of contributors. [More…]
It may also be a good idea to embed the Knowledge Base directly into your Teams channel. [More…]
 If you don’t want to make your own knowledge base, try some of the following add-ins for Microsoft Teams:
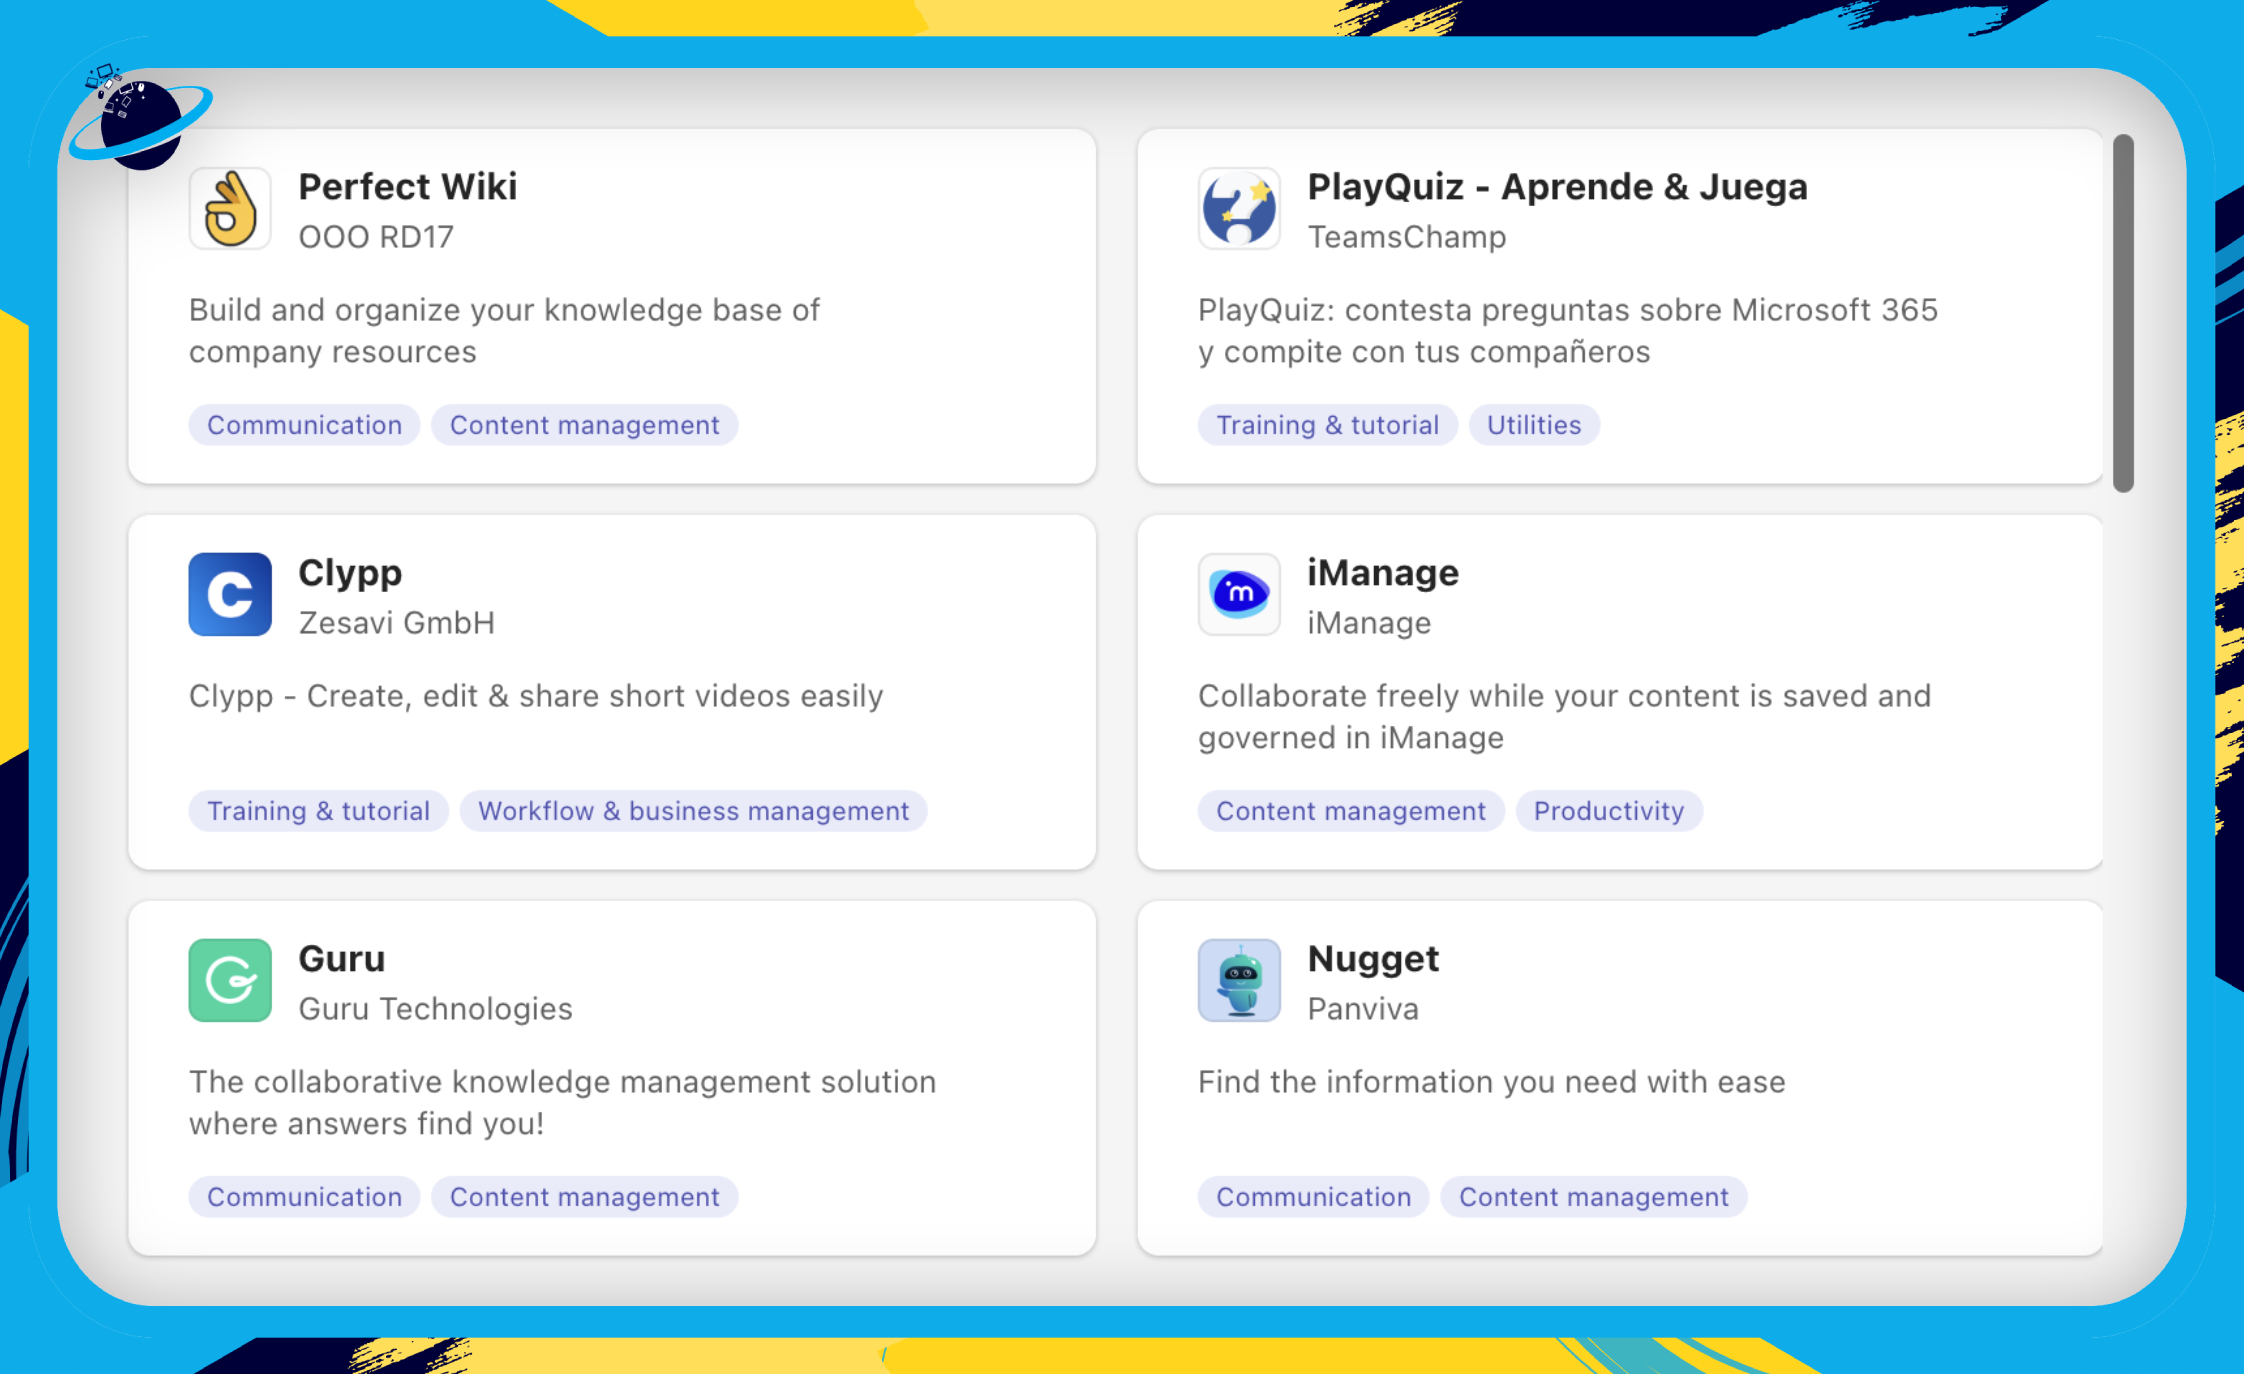
 Perfect Wiki
 Guru
Guru Stack Overflow for Teams

It can be difficult for new team members to hit the ground running in a complex working environment. It can also be difficult for existing team members to stay up-to-date with changing policies and information. That’s why a knowledge base is so important for your organization.
Today, we’ll be showing you how to create your own knowledge base by integrating Microsoft Loop into a Teams channel.
How to use Microsoft Loop as a Knowledge Base:
- Step 1: Create a new workspace called “Knowledge Base.”
- Step 2: Create a “Questions” table.
- Step 3: Create a contributor group by forwarding notifications in Outlook.
- Step 4: Create an “Answers” page.
- Step 5: Order the questions using a “Priority” label.
- Step 6: Embed the knowledge base into a Teams channel.
We’ve also created a video to help guide you through the steps:
 What is a knowledge base and why is it useful?
A knowledge base is a centralised repository of information that can be utilized by your team members to stay up-to-date with new policies and information.
The knowledge base featured in this guide will allow team members to ask questions that can be ordered by priority. It will also allow contributors to provide short or extensive answers.
The system will also notify all selected contributors when a new question has been asked, provided that the person asking the question @ mentions the team leader.

 How to use Microsoft Loop as a Knowledge Base:
To start this guide, please ensure that Loop is enabled for you and your team. If you haven’t enabled Loop, please refer to our comprehensive guide on ![]() How to enable and access Microsoft Loop for your organization.
How to enable and access Microsoft Loop for your organization.
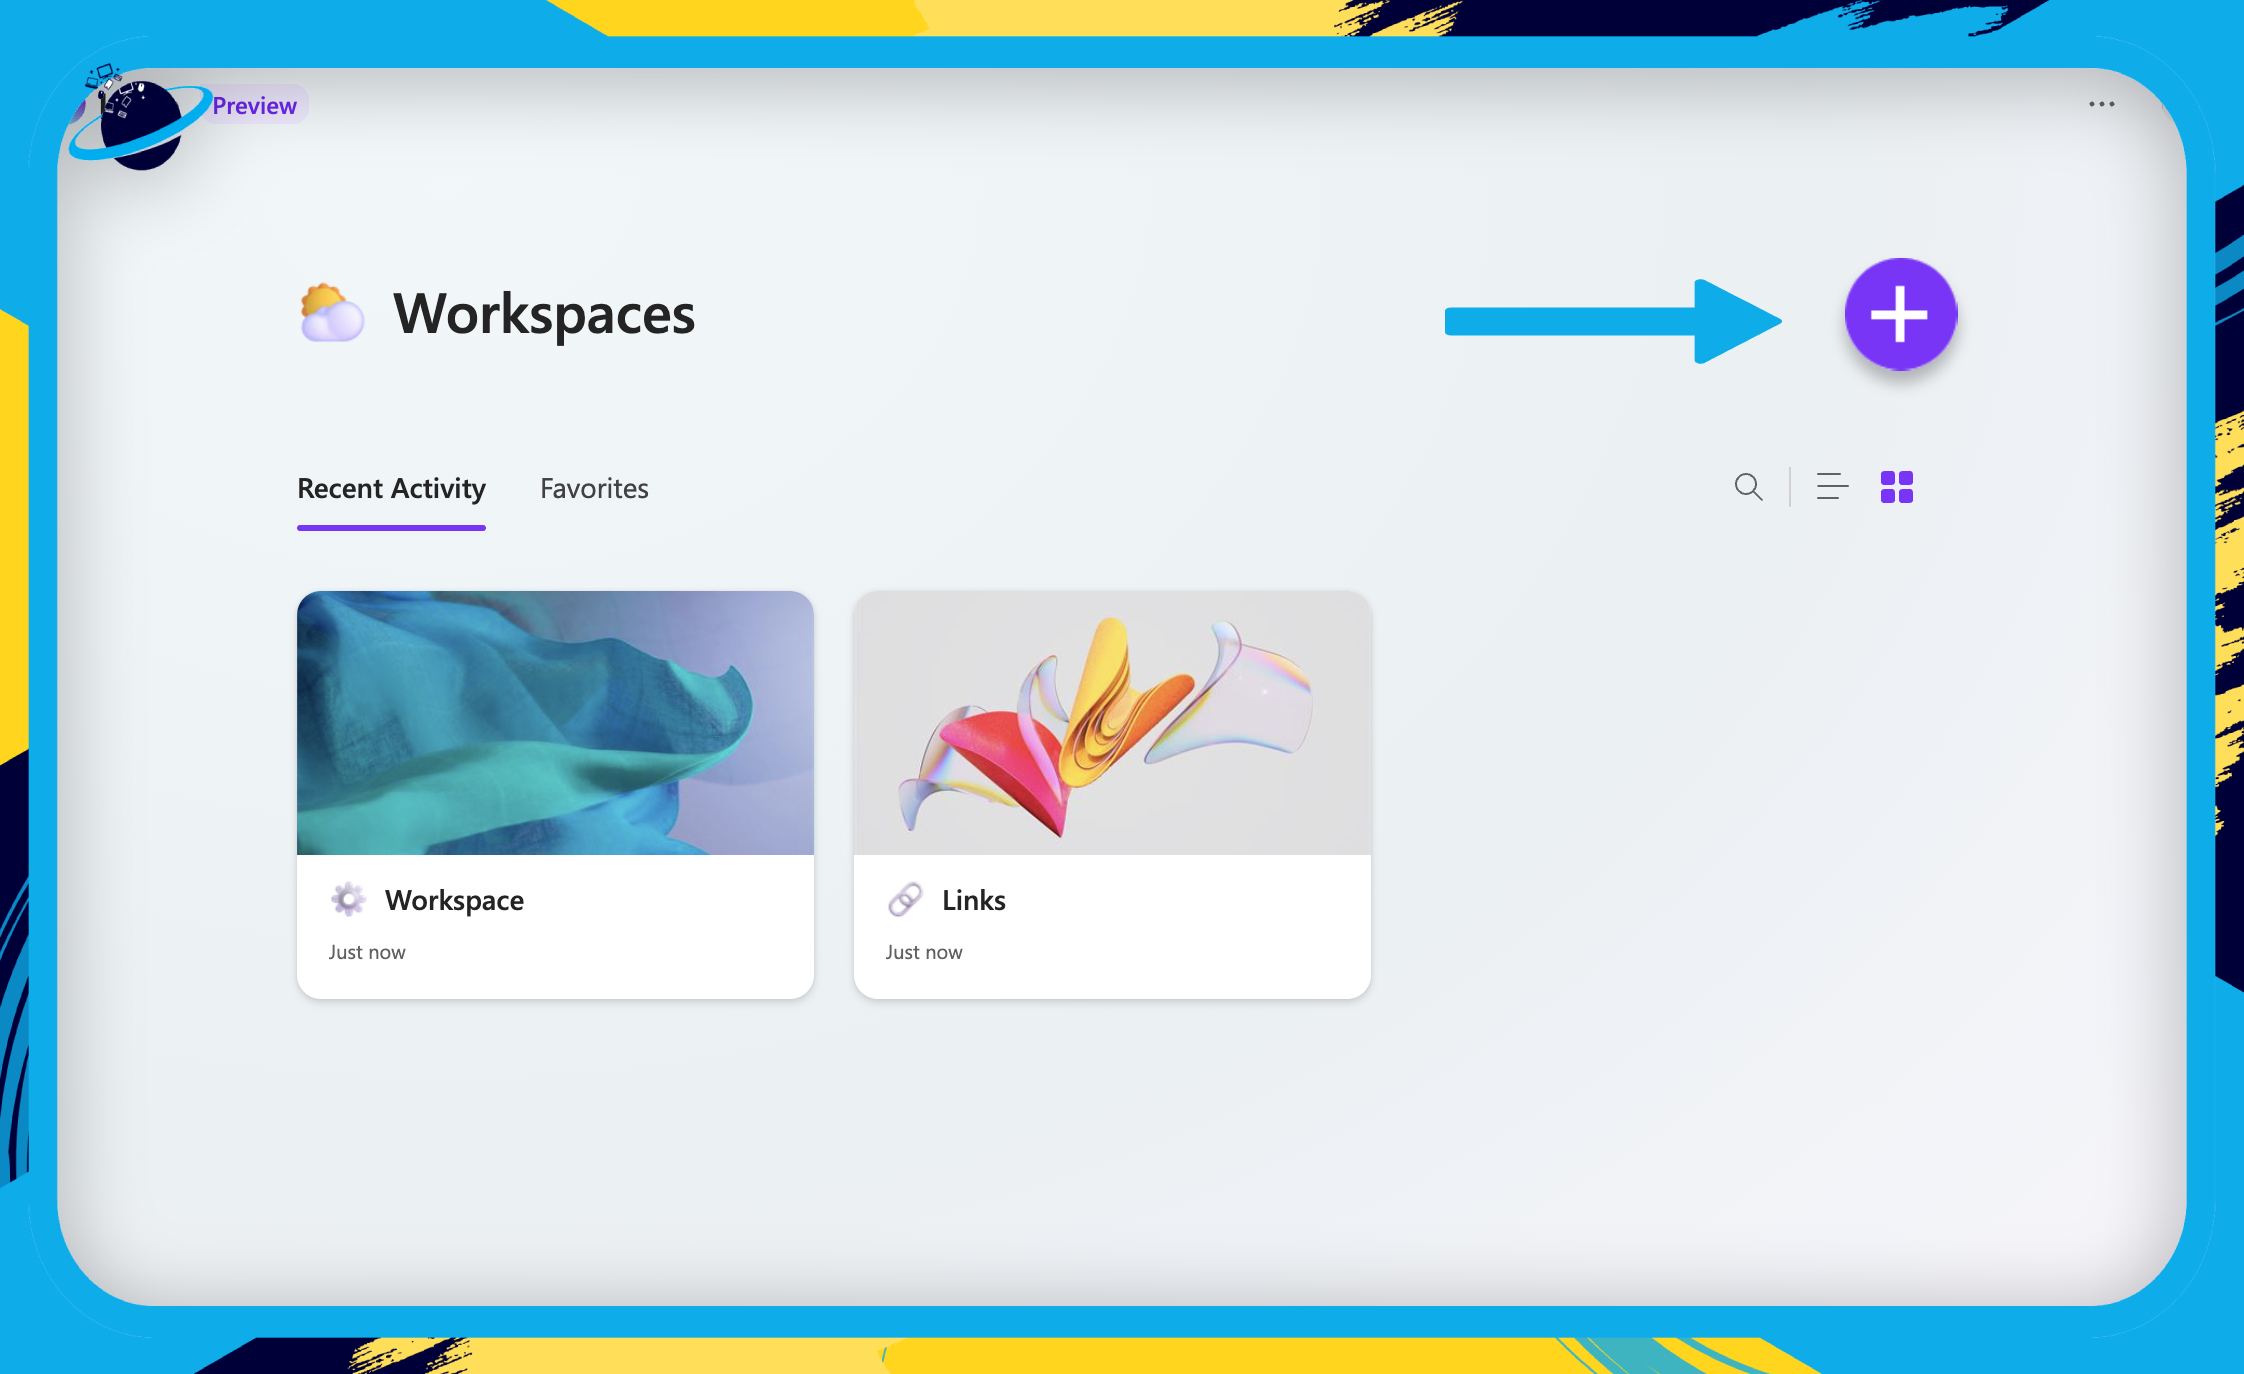
Create a workspace for your Knowledge Base
In this section, we’ll show you how to create a workspace that will serve as the hub for your knowledge base.
- First, open
 Microsoft Loop and sign in.
 - Click the
 circular plus button.
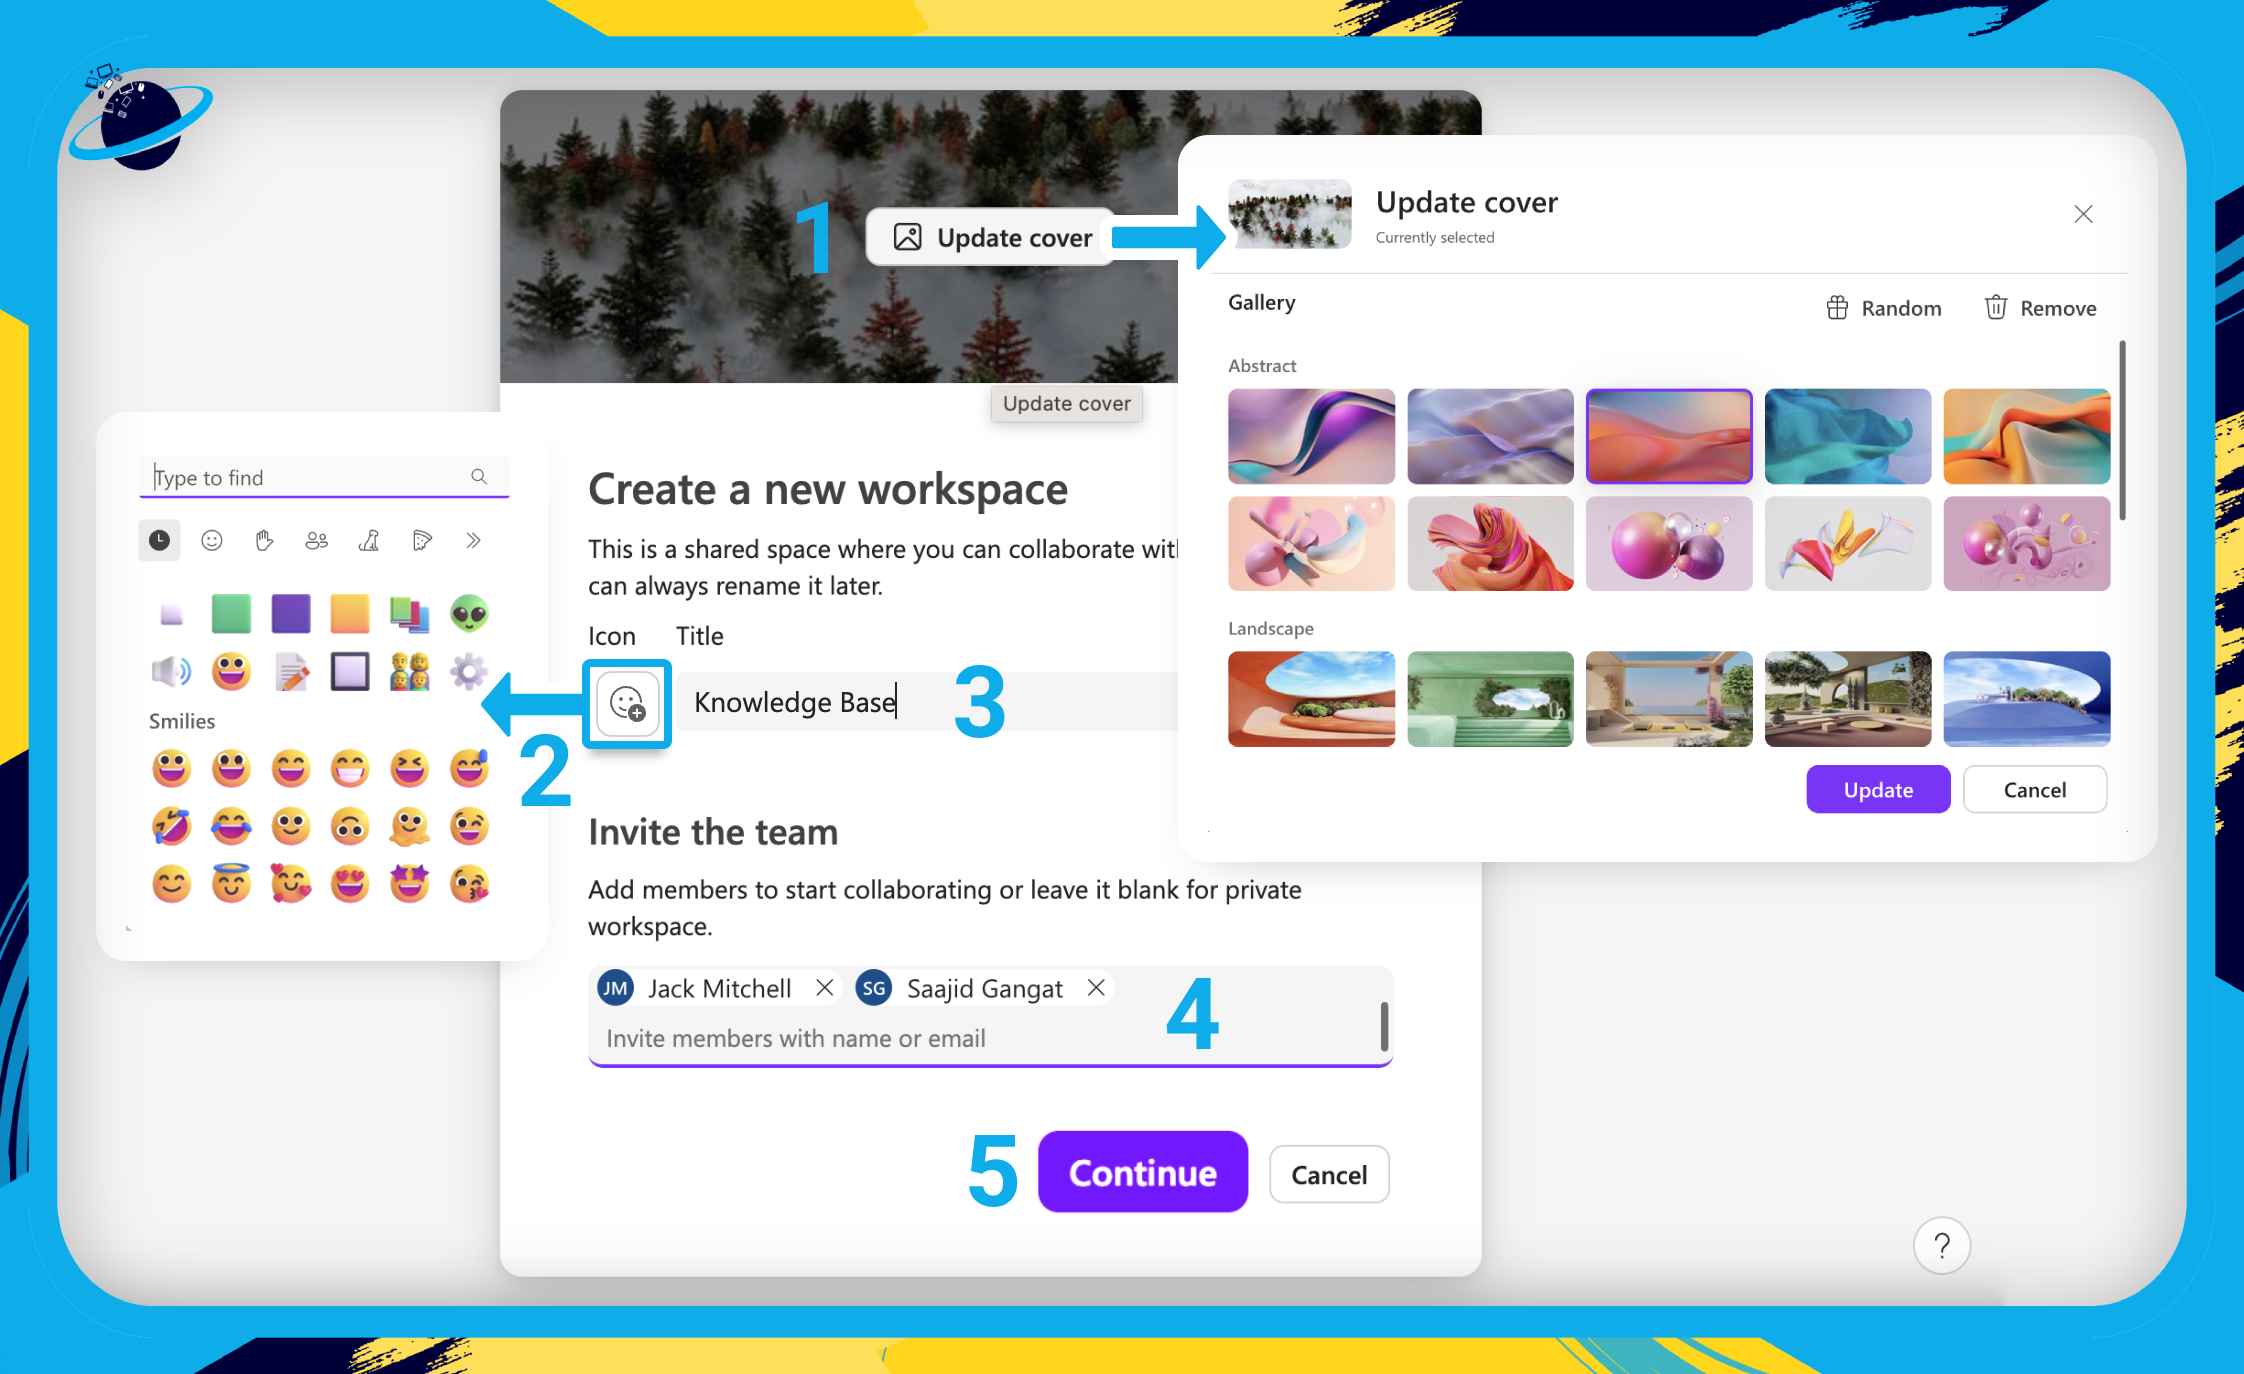
- Hover over the image at the top and click
 “Update cover.” [1]
- There, select a cover image and click “Update.”
- Click the
 emoji to select an icon. [2]
 - Add a title for your workspace. [3]
- Add team members to the workspace. [4]
- Click the “Continue” button. [5]

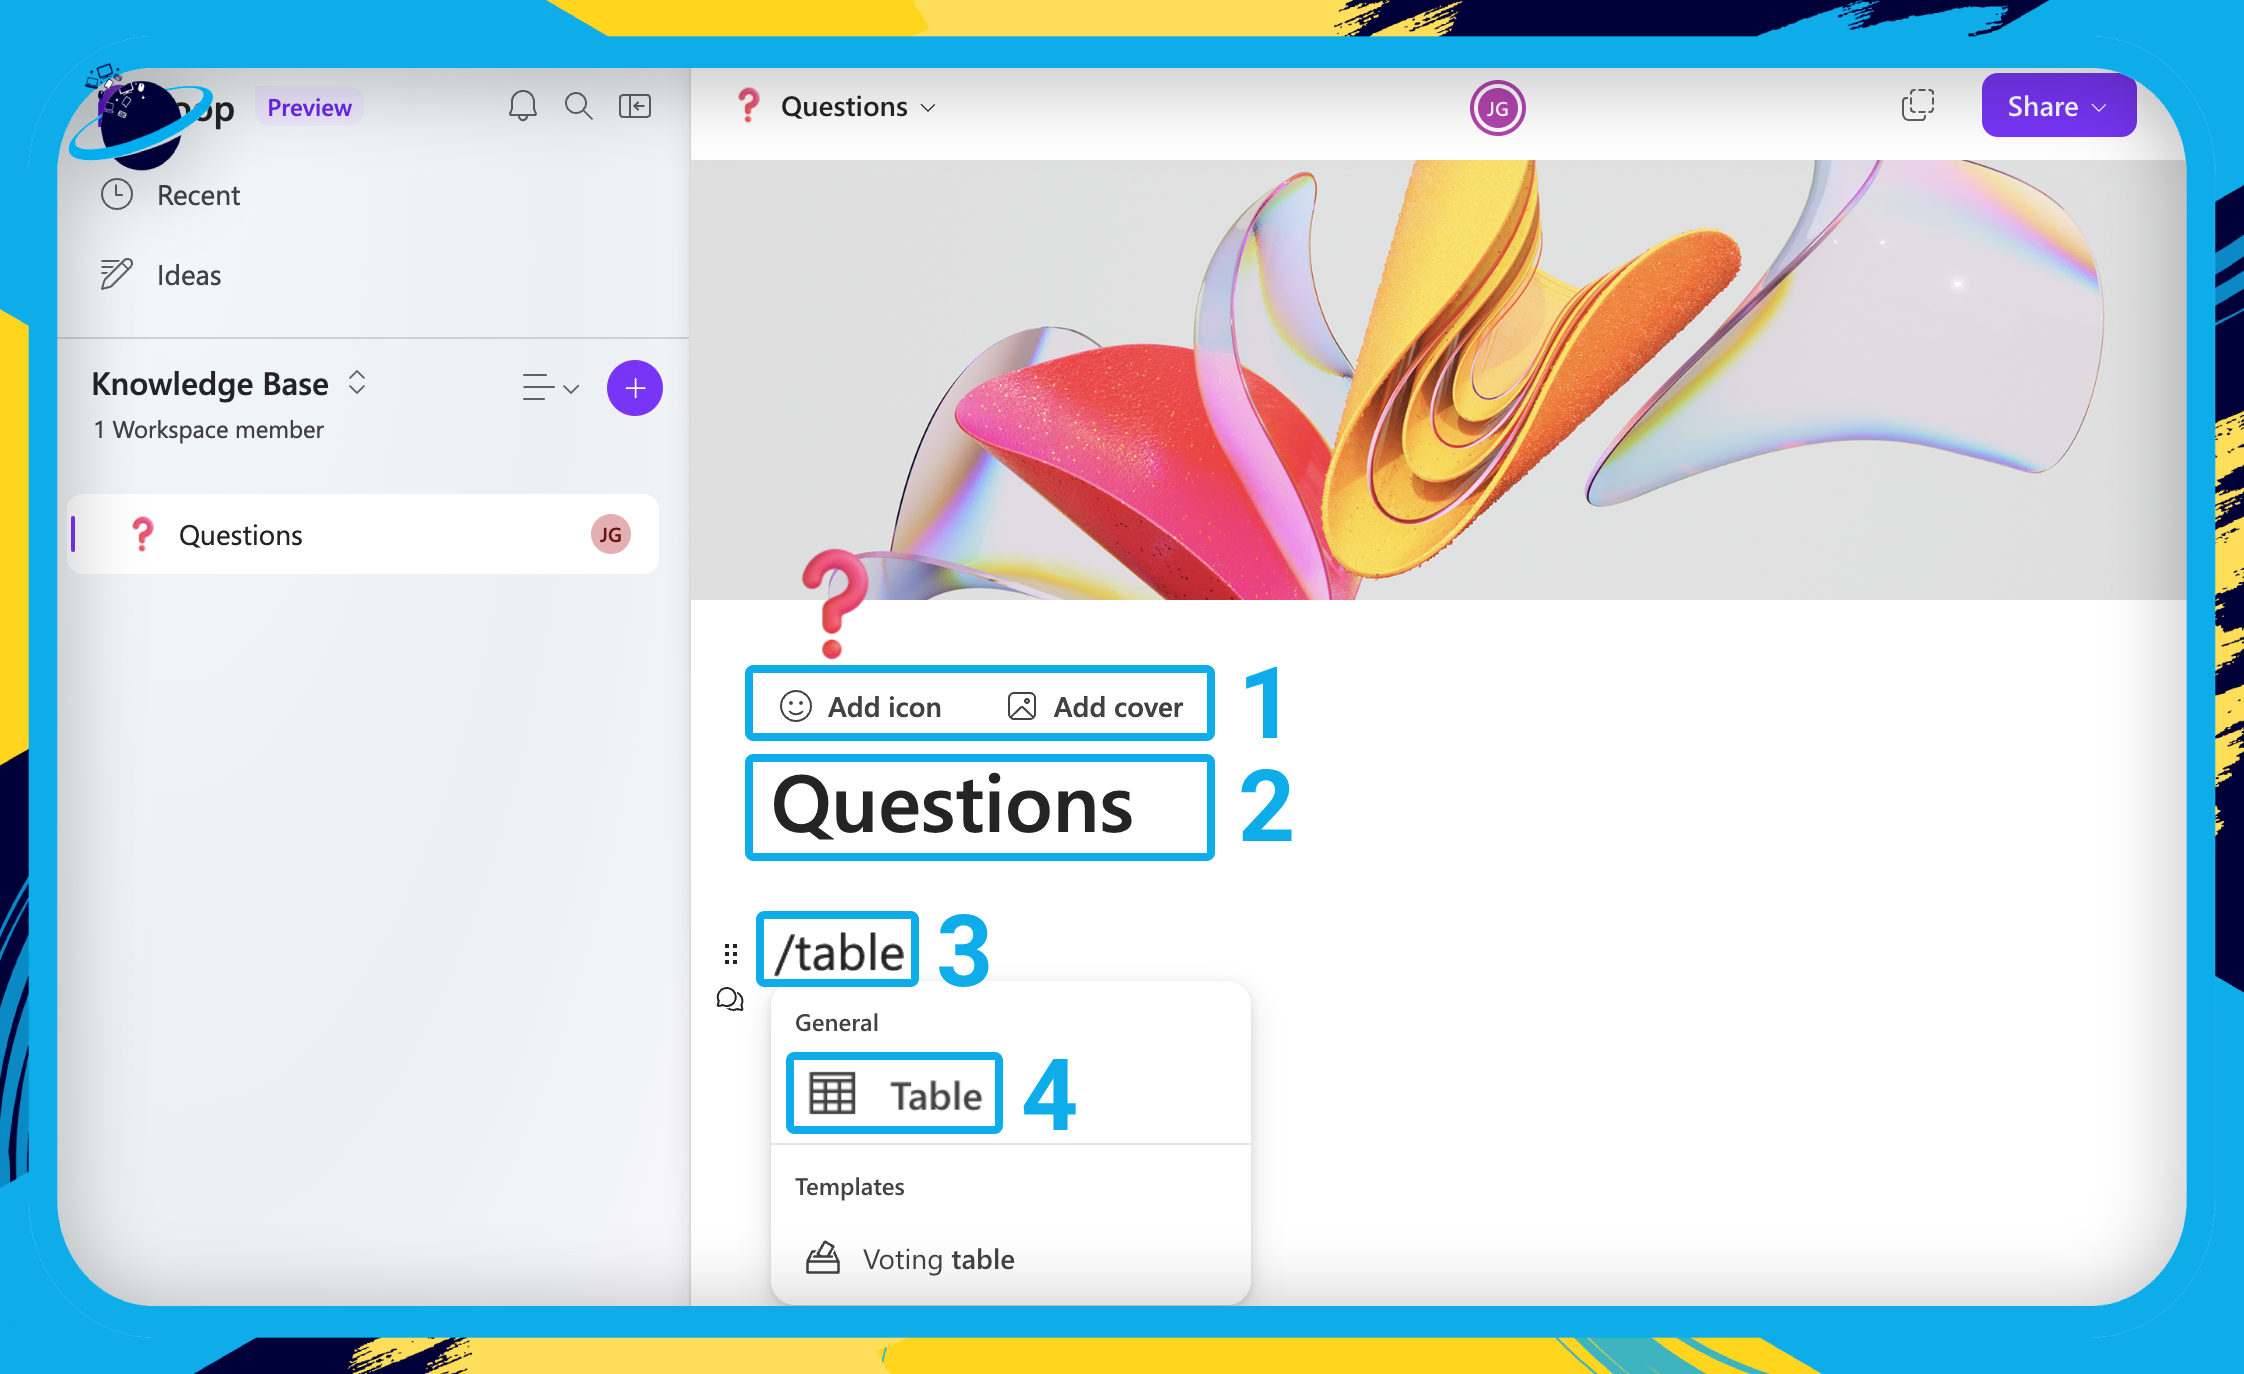
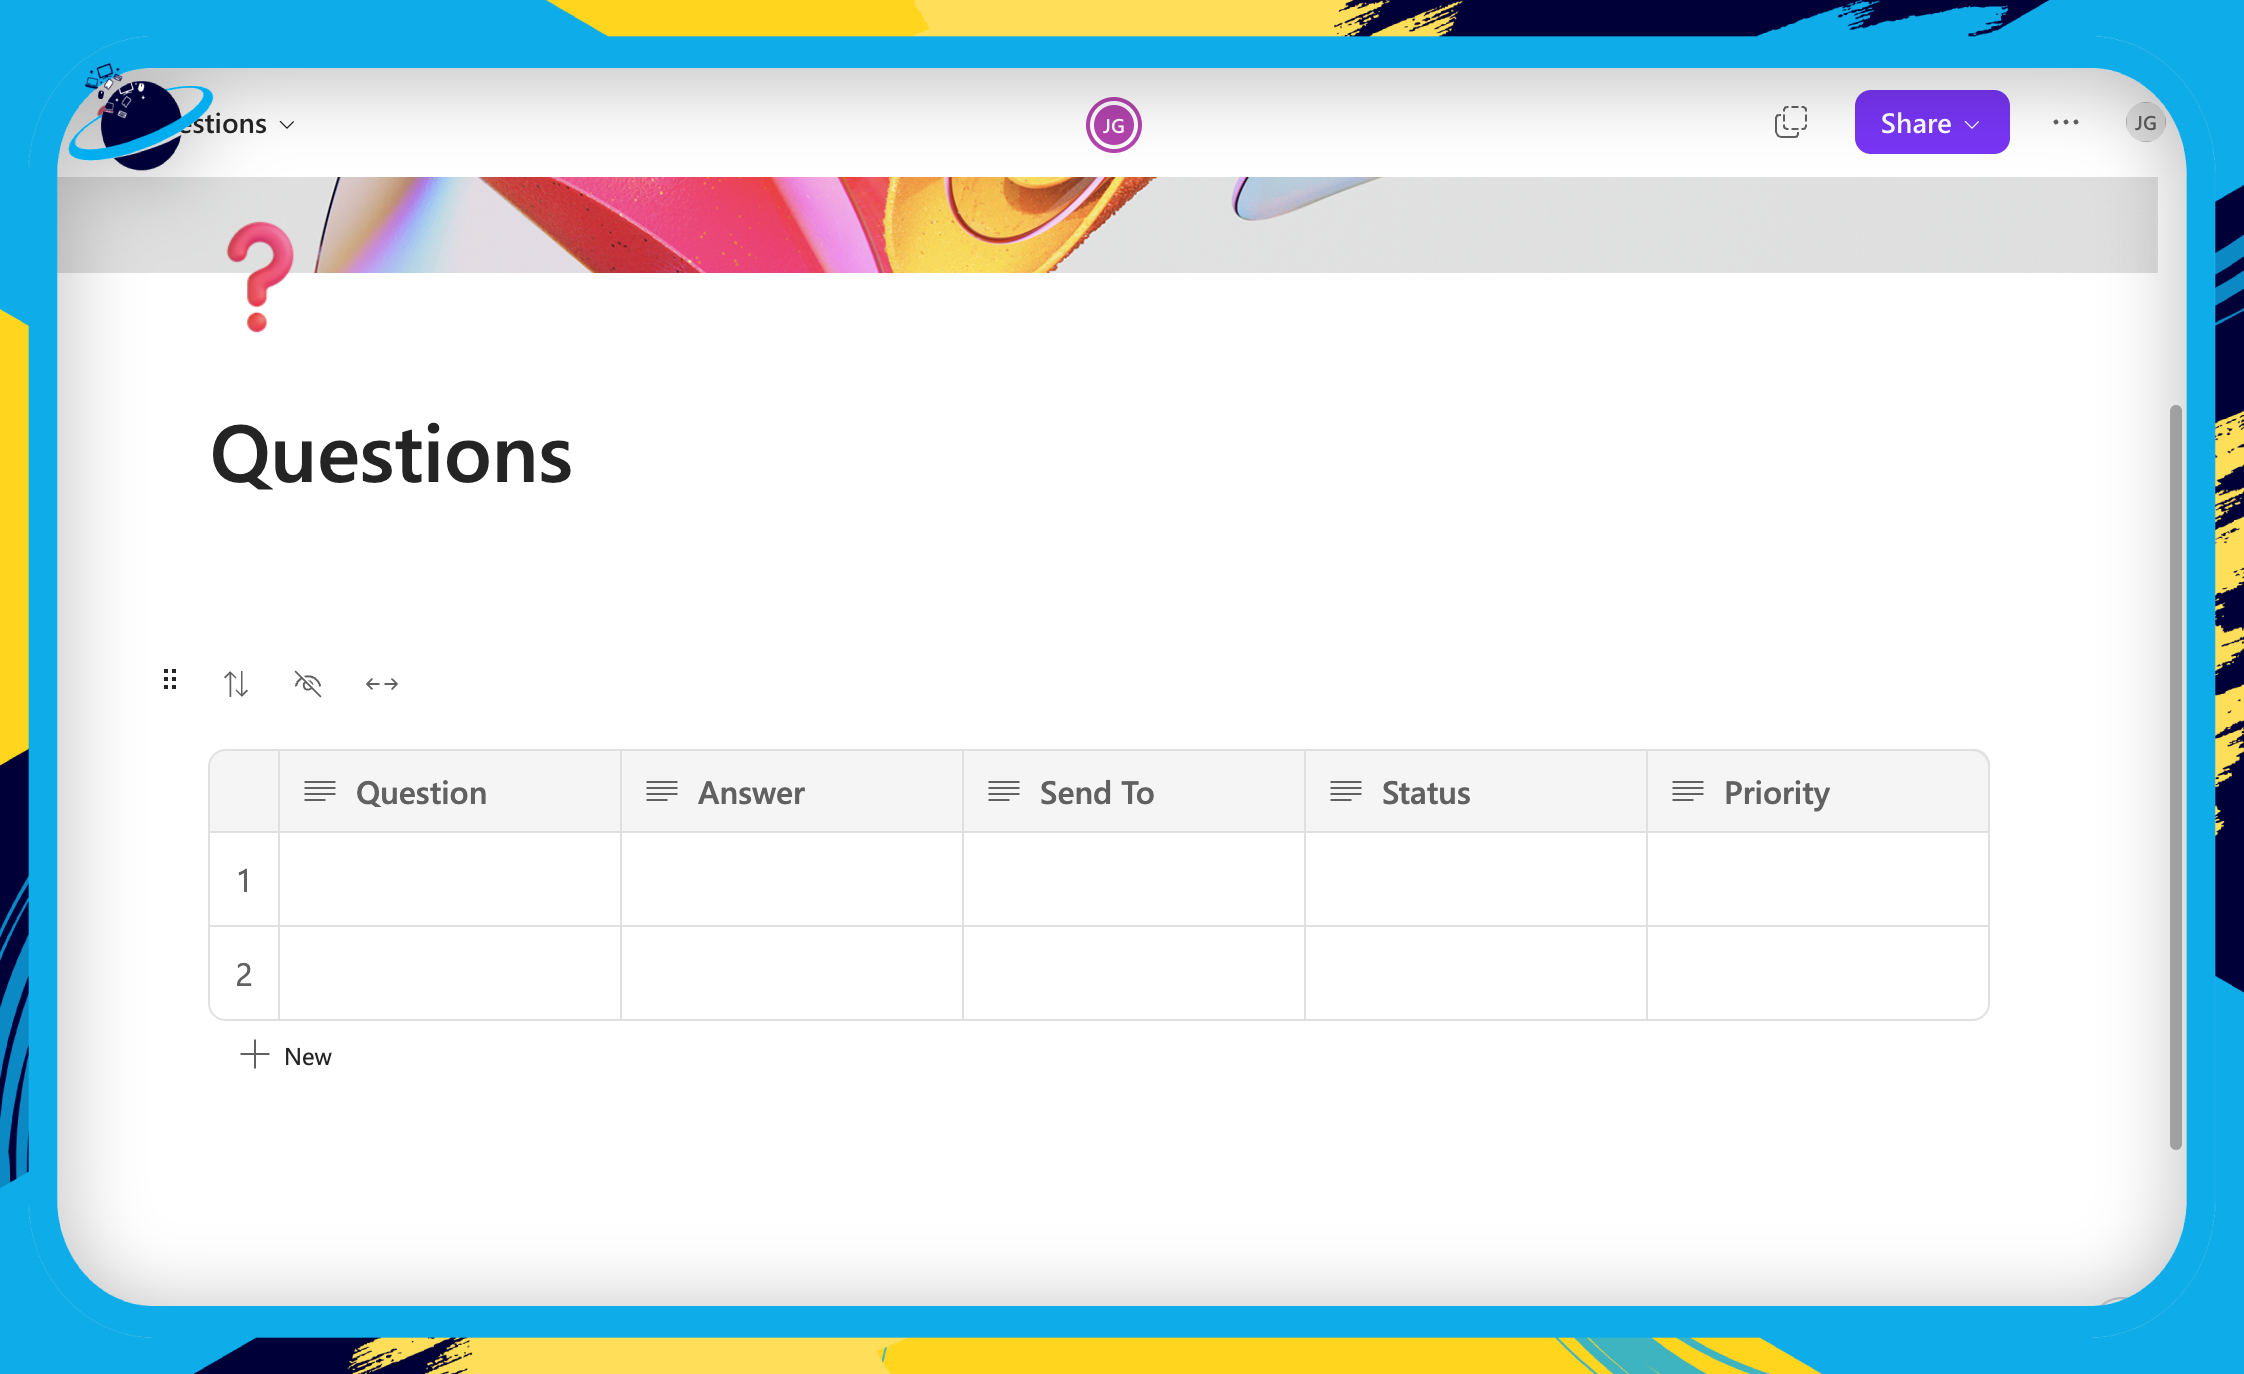
Create a questions table for your Knowledge Base
In this section, we’ll show you how to create a questions table where users can post questions and contributors can leave answers.
Although a table isn’t necessary, it will allow you to order the questions, which can’t be achieved with a regular list or paragraph.
- Hover above the title and click
 “Add icon” and
  “Add cover” to style your page. [1]
 - Name your page “Questions.” [2]
- Click the main body of the page and type “/table” including the forward slash. [3]
- Select
 “Table” from the list of components. [4]
- Hover over the left or right border of either column and click the
 plus icon.
 - Click the plus icon until you have five columns to work with.
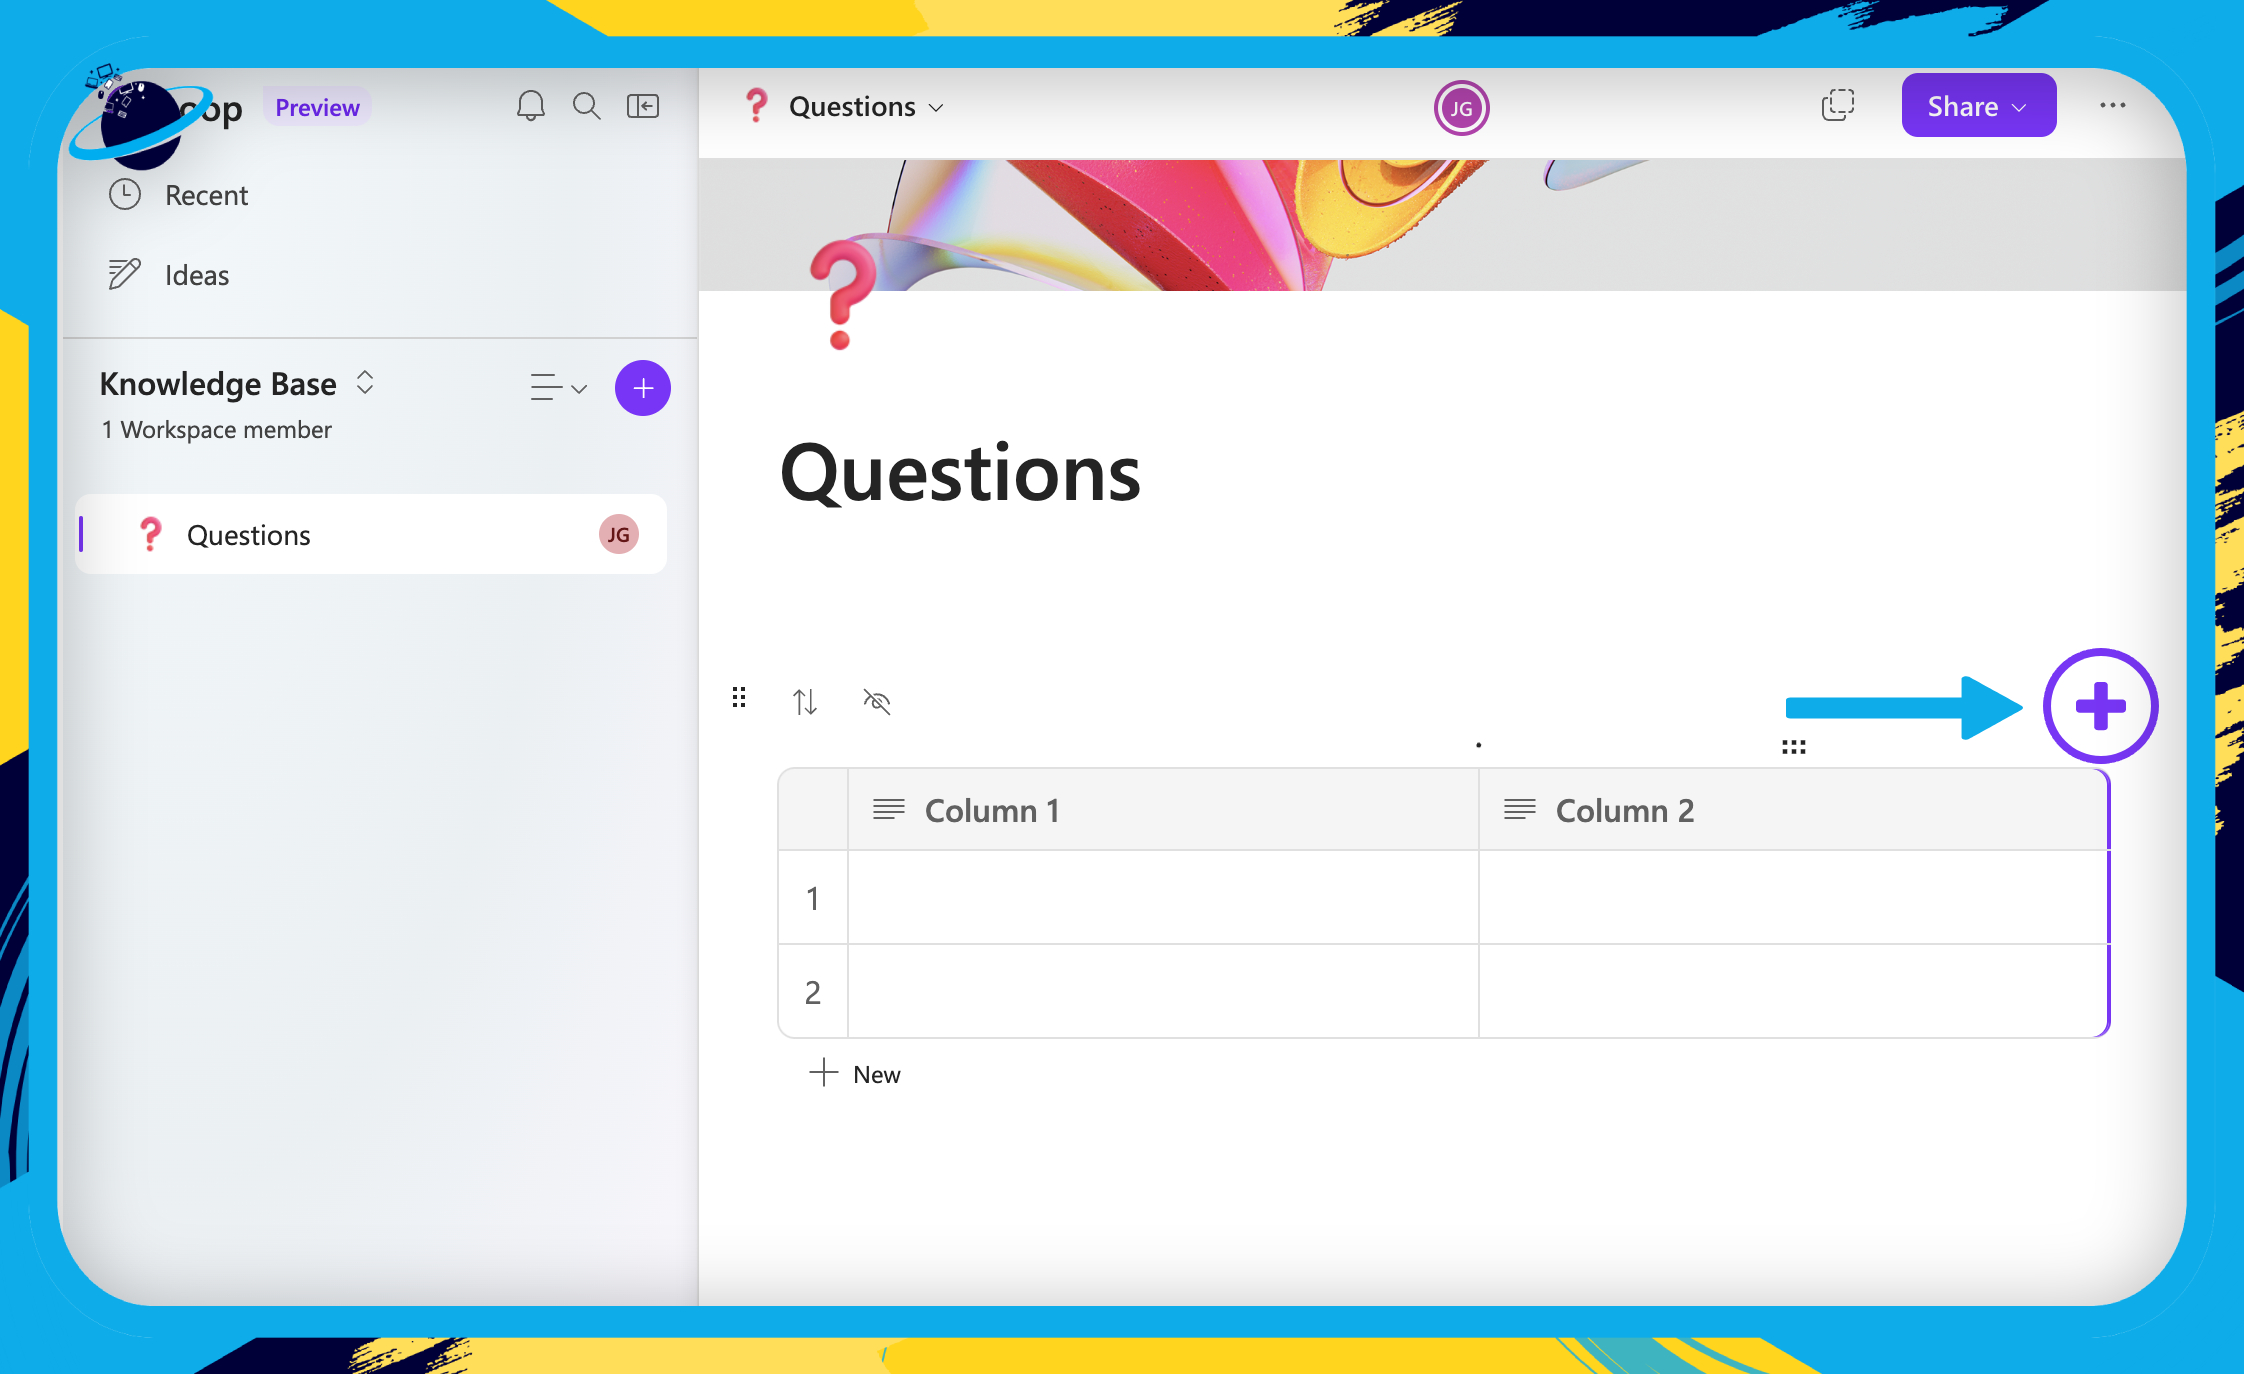
- Double-click the column headers and name them as follows:
- Question
- Answer
- Send to
- Status
- Priority
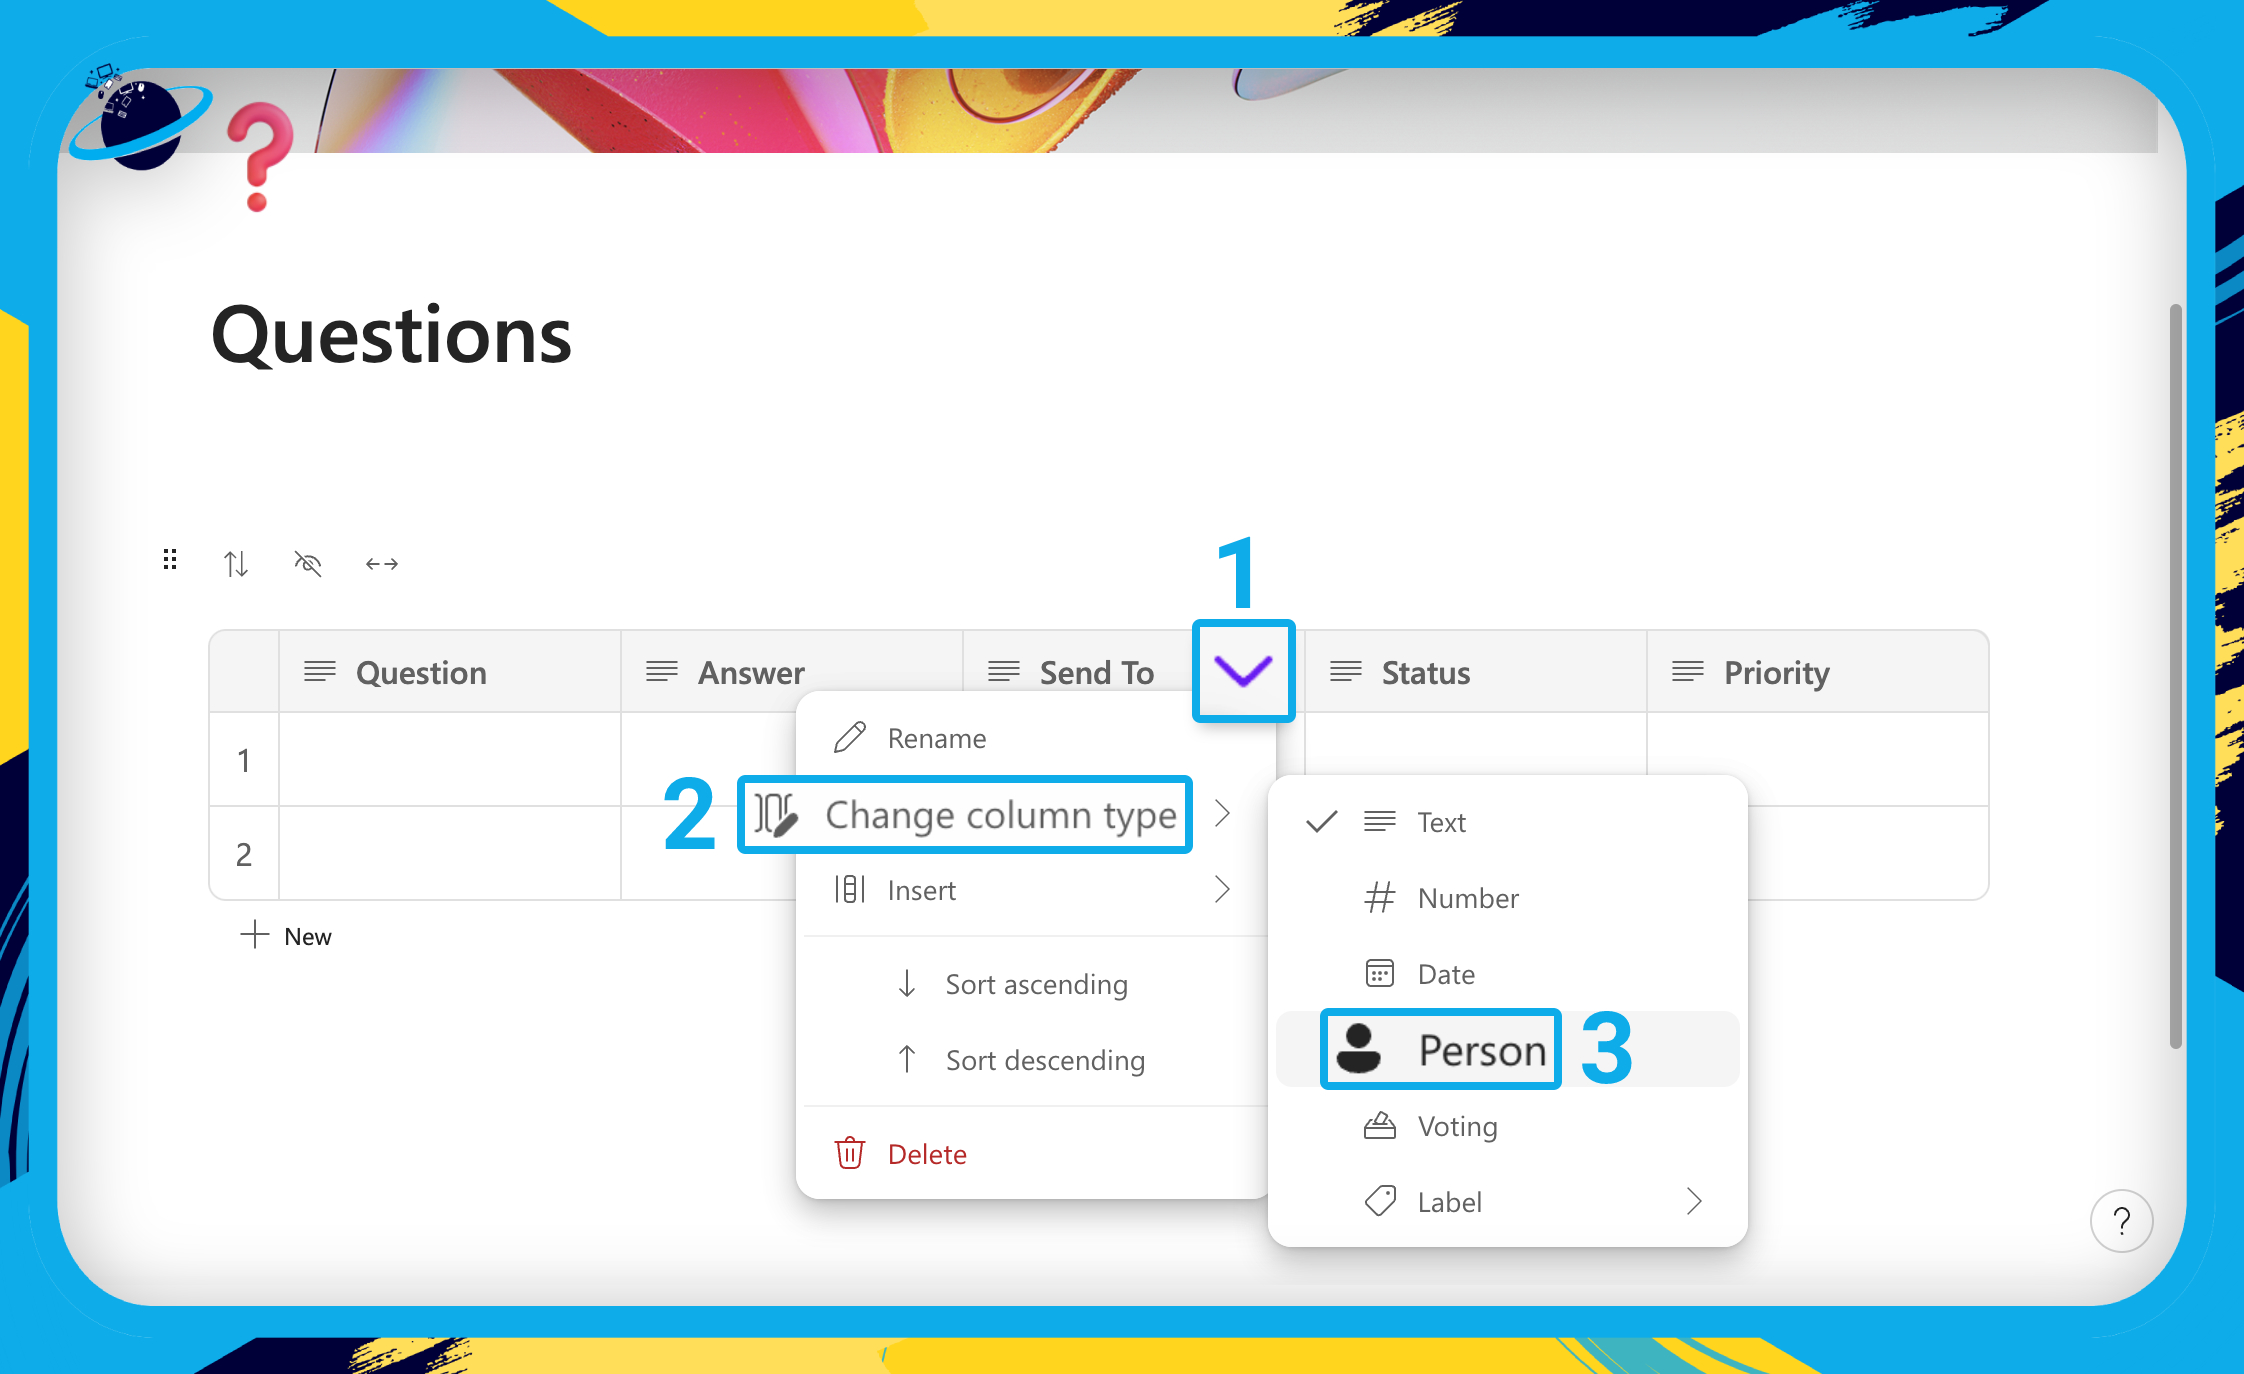
- Hover over the “Send To” header and click the
 down arrow. [1]
 - Click
 “Change column type” in the dropdown menu. [2]
 - Then select
 “Person.” [3]
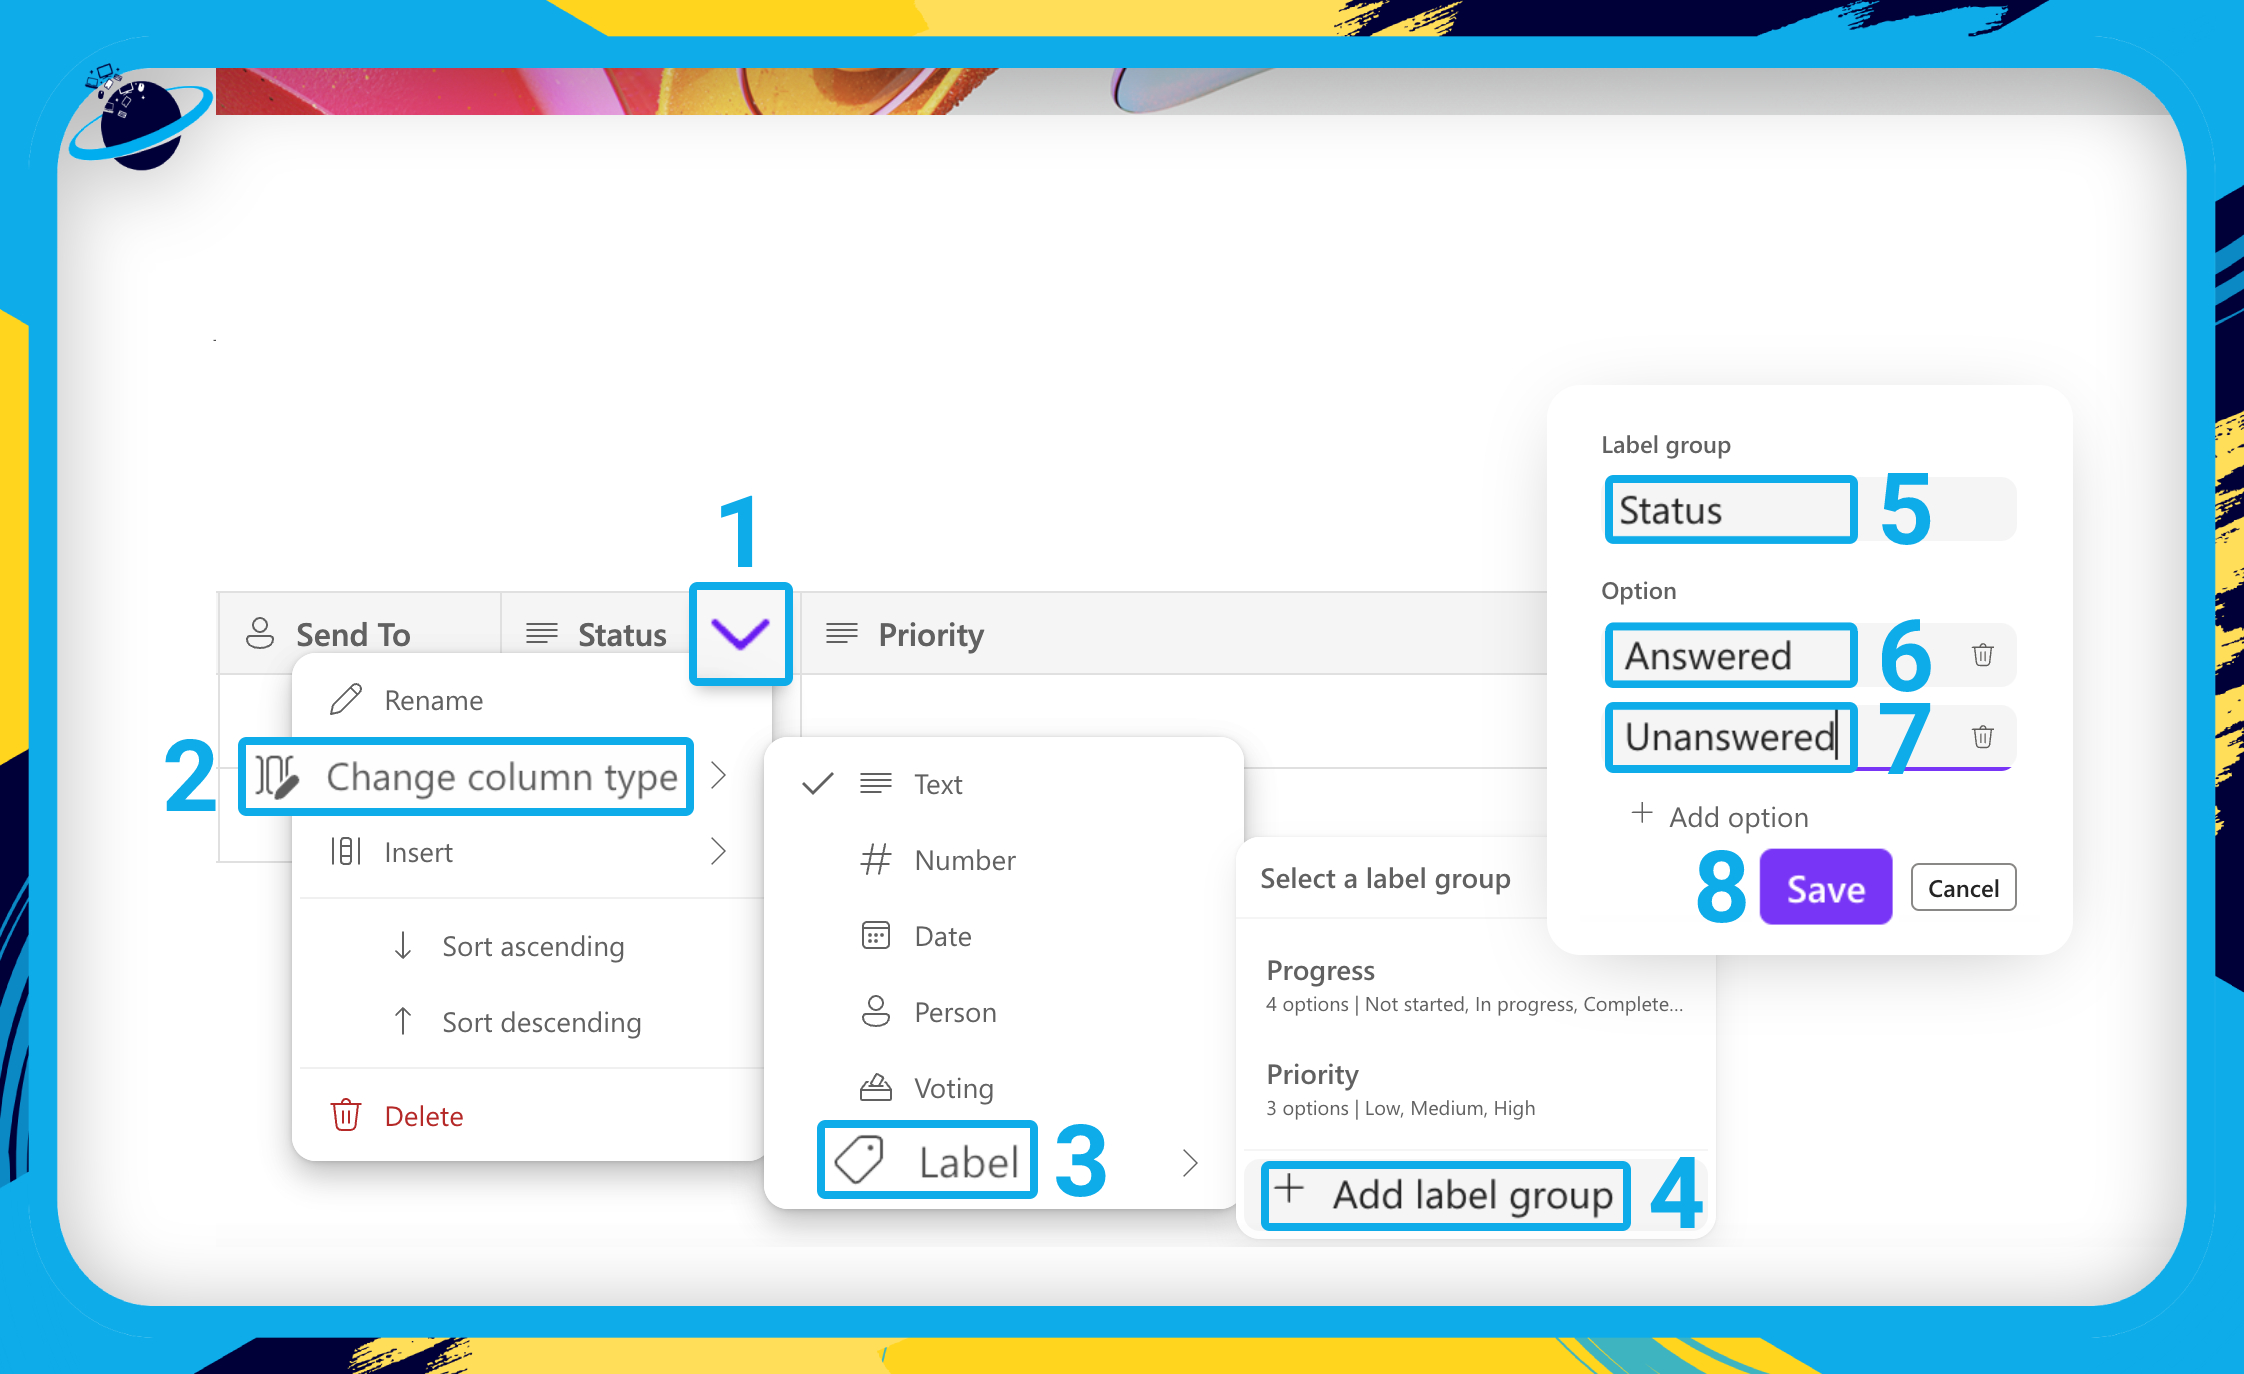
- Hover over the “Status” header and click the down arrow. [1]
- Click “Change column type” in the dropdown menu. [2]
- Go to
 “Label.” [3]
 - Then select
 “Add label group.” [4]
 - Name the label group “Status.” [5]
- Then add the following options:
- Answered [6]
- Unanswered [7]
- Finally, click “Save.” [8]
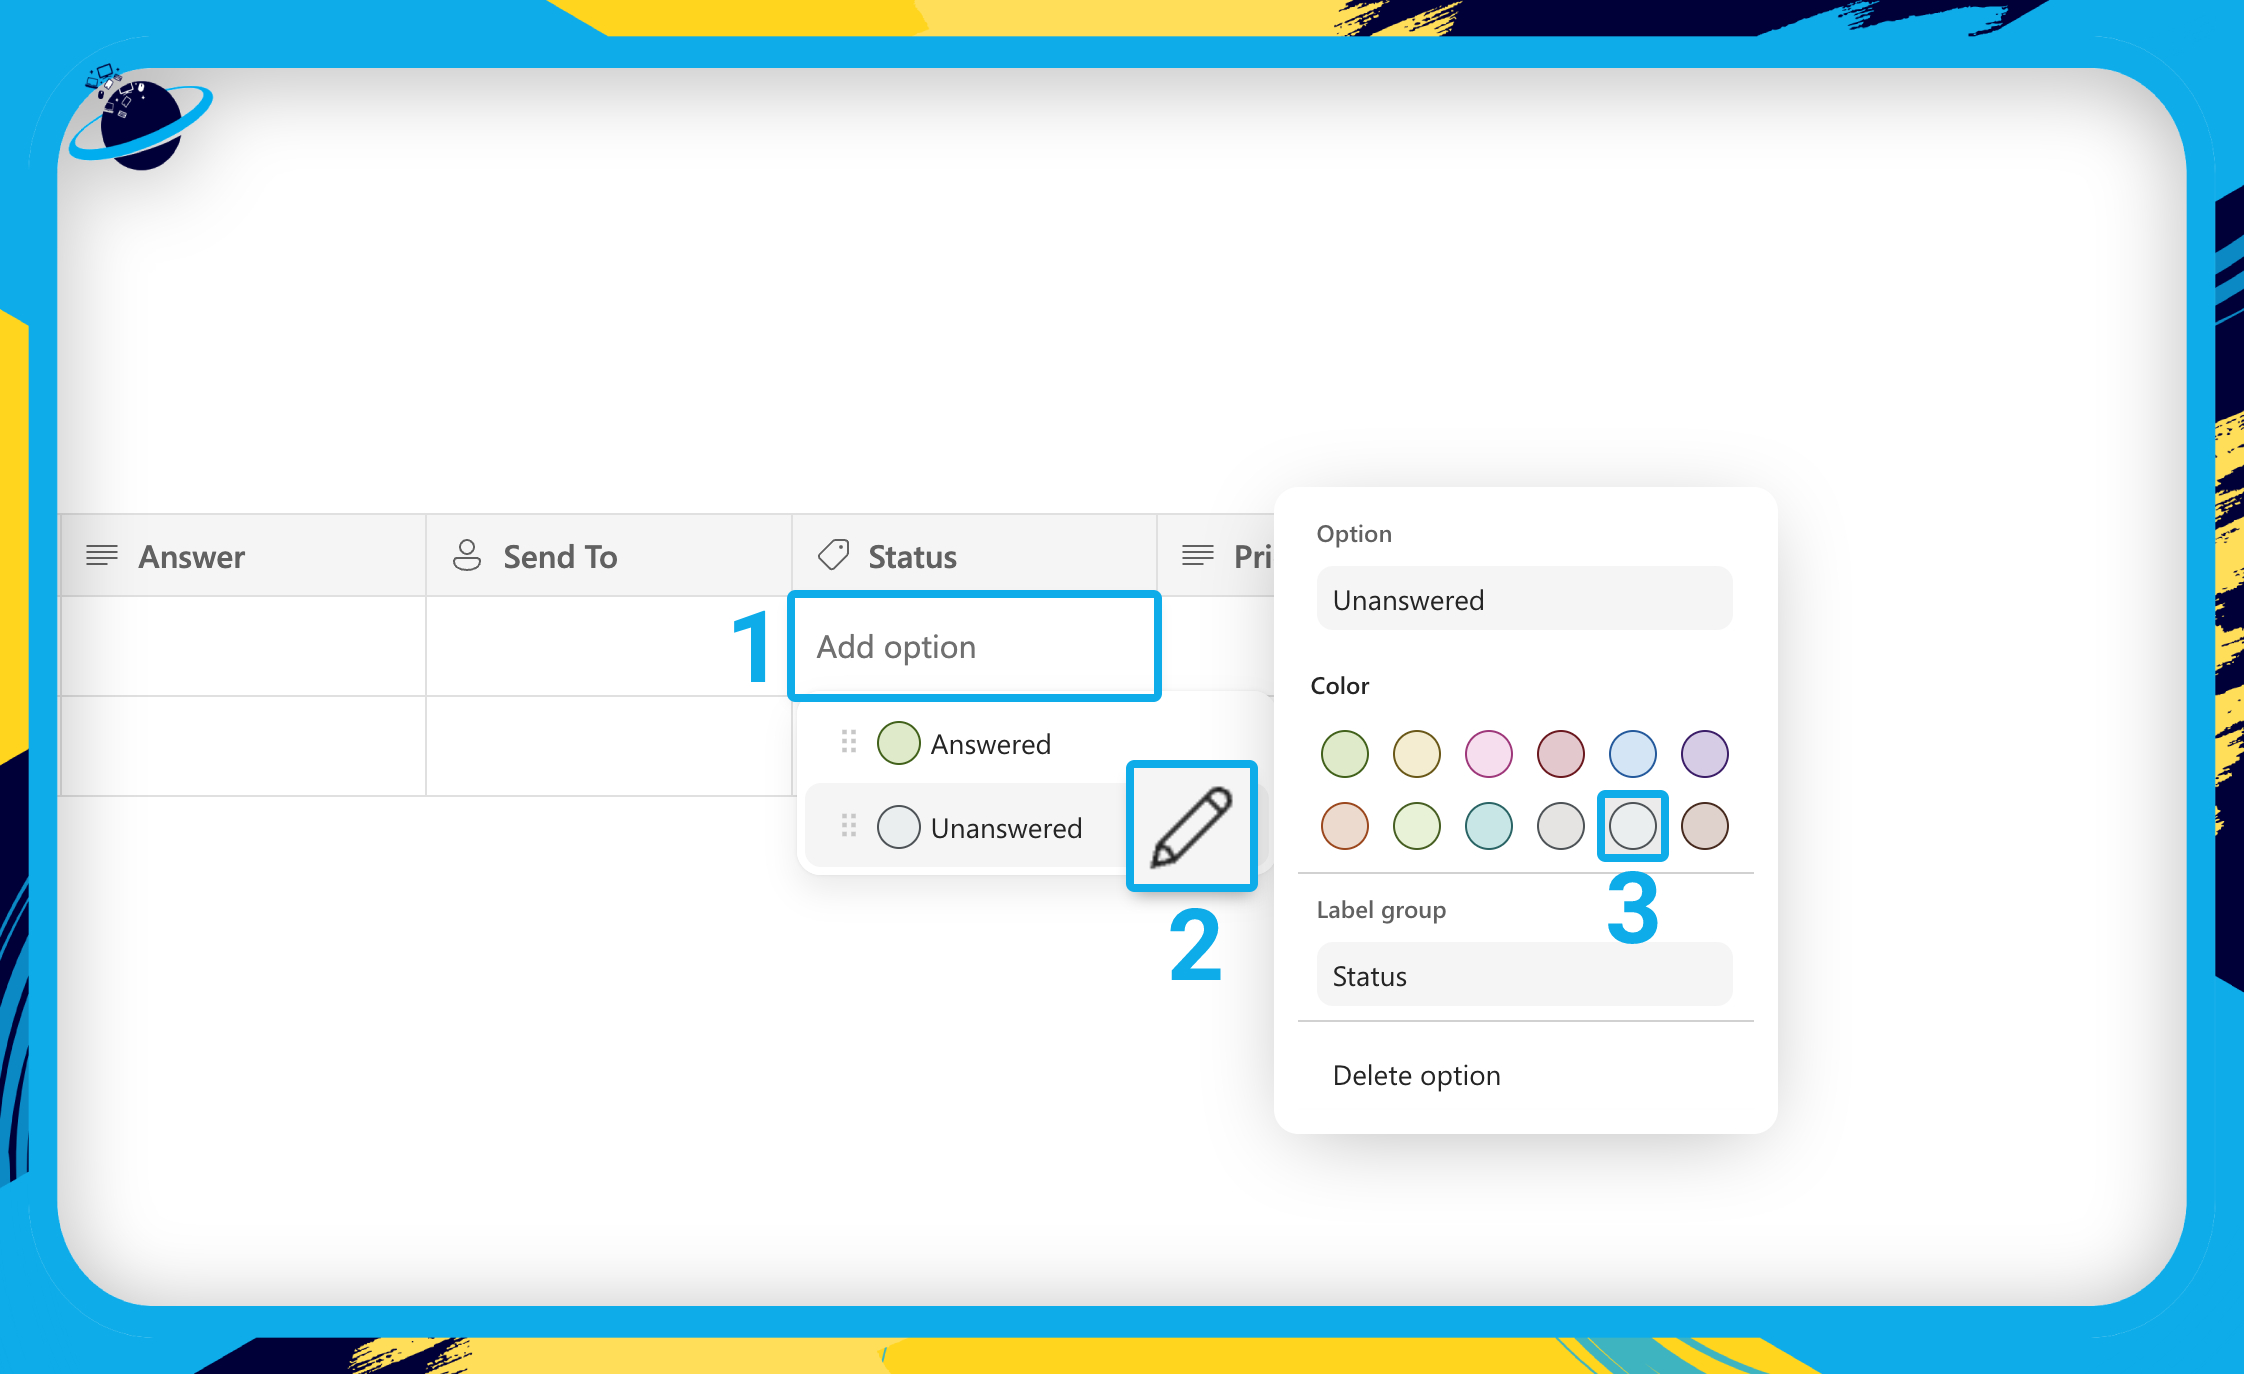
- Click any cell in the “Status” column. [1]
- Hover over the “Unanswered” option and click the
 pen icon. [2]
 - Then choose a grey color from the dialog box. [3]
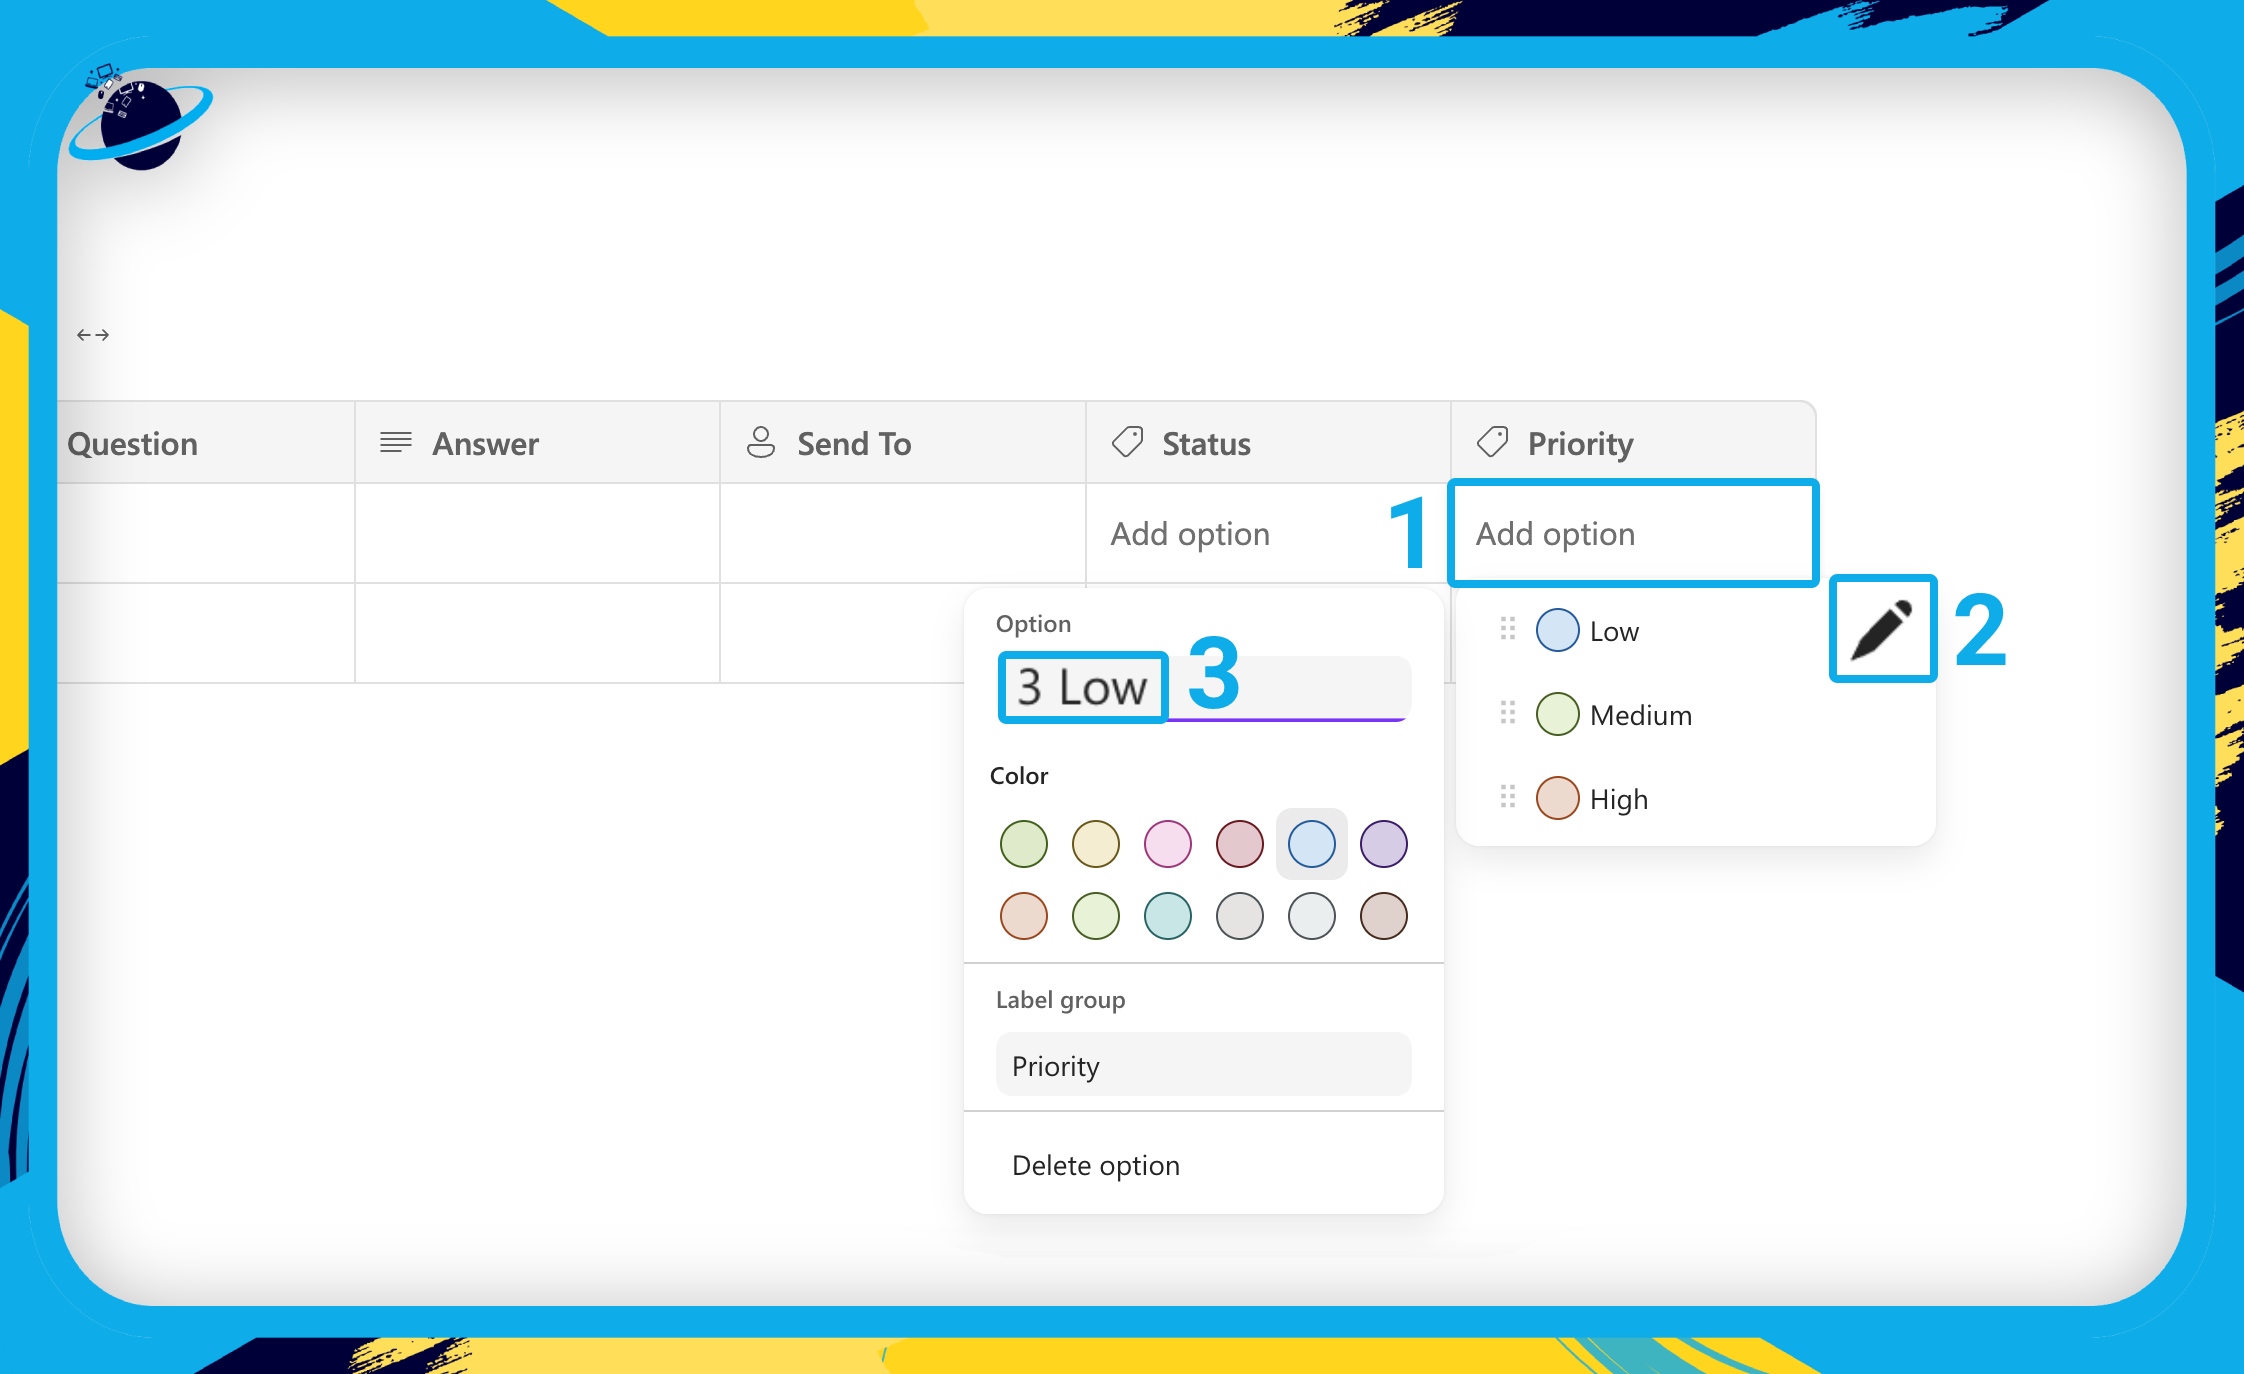
Follow the same process as above for the “Priority” column. However, instead of adding a new label group, select “Priority.” The steps below are optional but they will enable you to order the questions by priority.
- Click any cell in the “Priority” column. [1]
- Click the pen icon for each option. [2]
- For each option add a number in front as follows: [3]
- 1 High
- 2 Medium
- 3 Low

Create a contributor group for the Knowledge Base
In this section, we’ll show you how to create a contributor group so contributors get notified when new questions are asked.
To create the group, we’ll redirect all notifications sent to the team leader to a group of contributors. We’ll do this using the web version of Outlook (OWA).
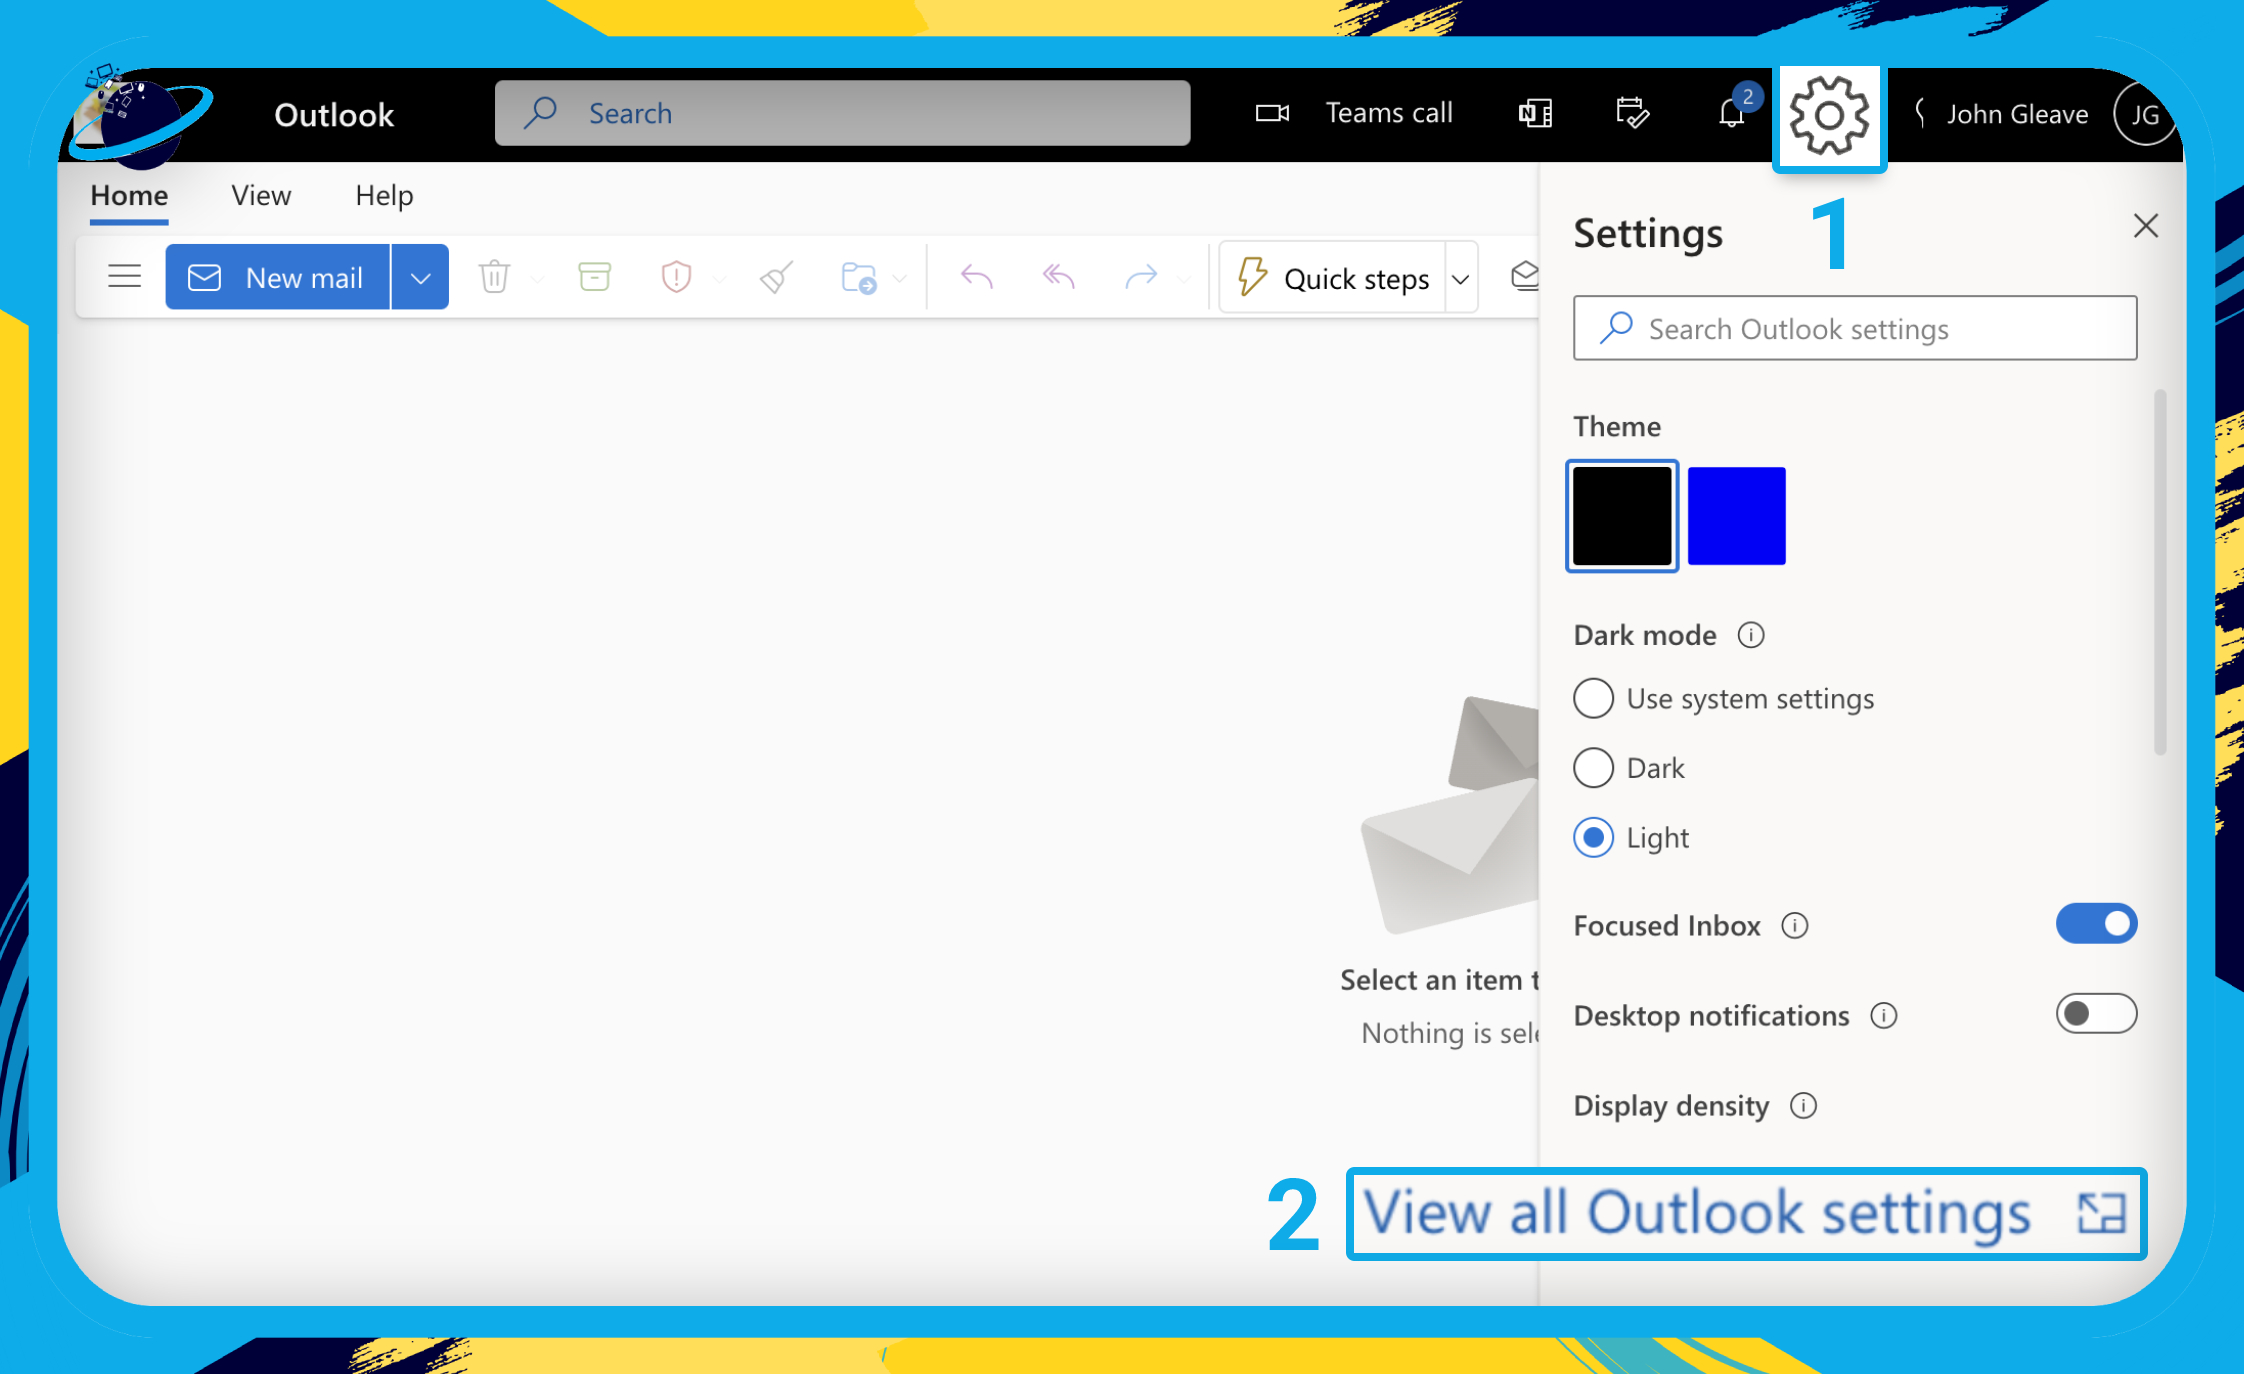
- Start by opening Outlook in your web browser.
- Click the
 settings icon in the top right. [1]
 - Then click “View all Outlook settings” at the bottom of the menu. [2]
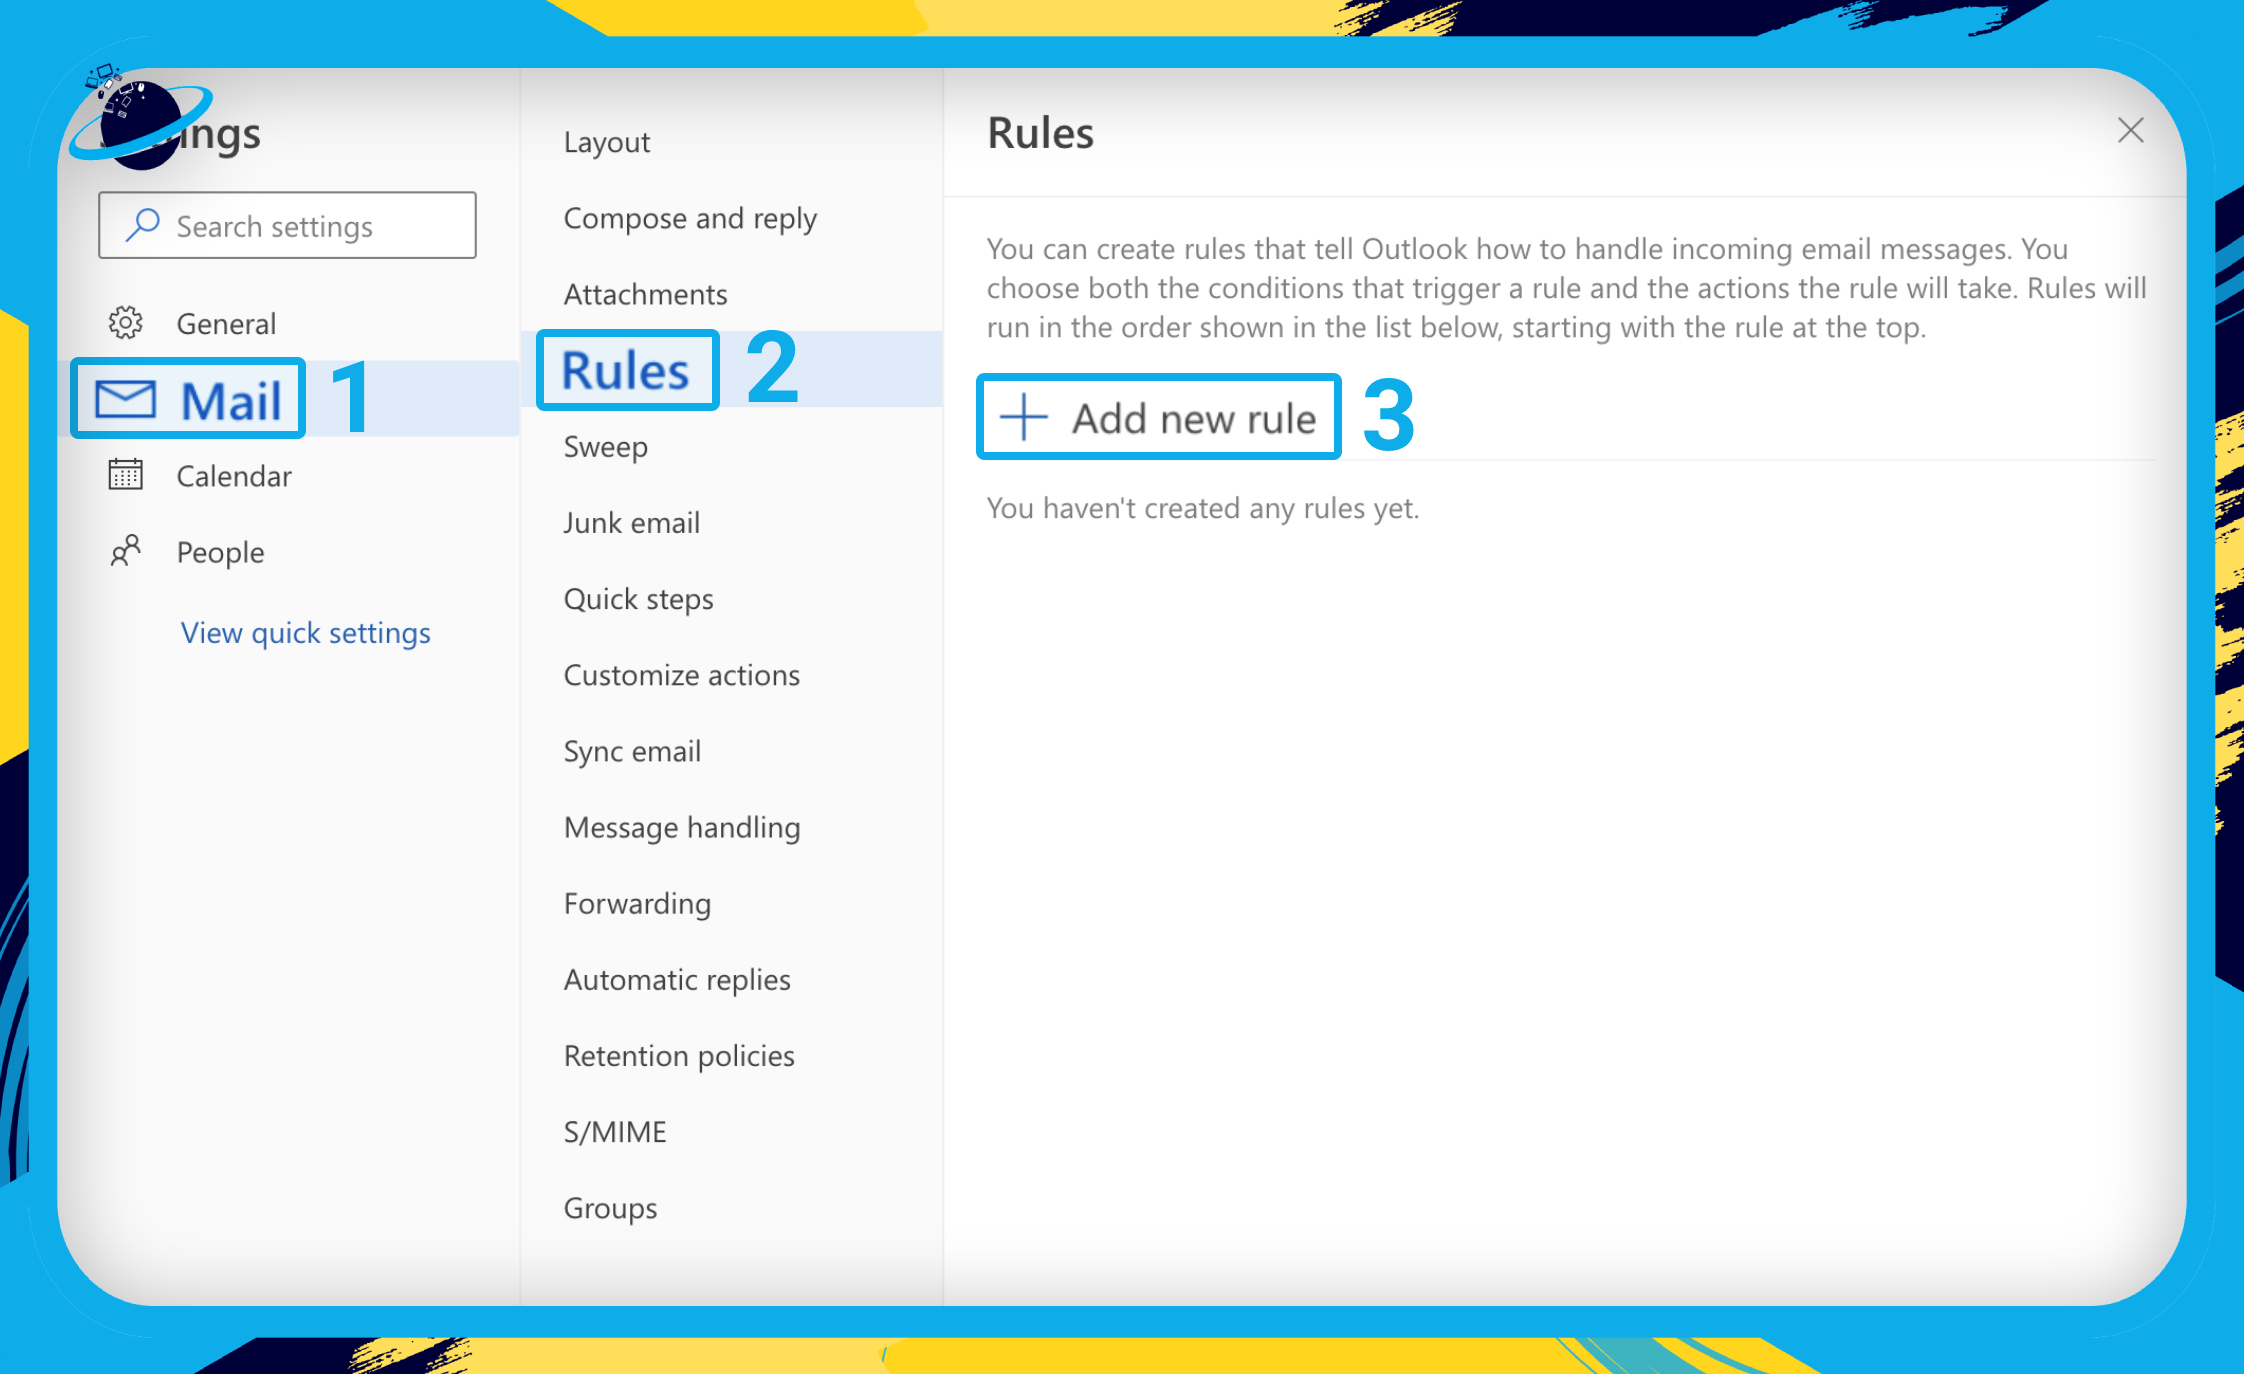
- Go to
 “Mail” in the Settings navigation pane. [1]
 - Select “Rules” from the list of options. [2]
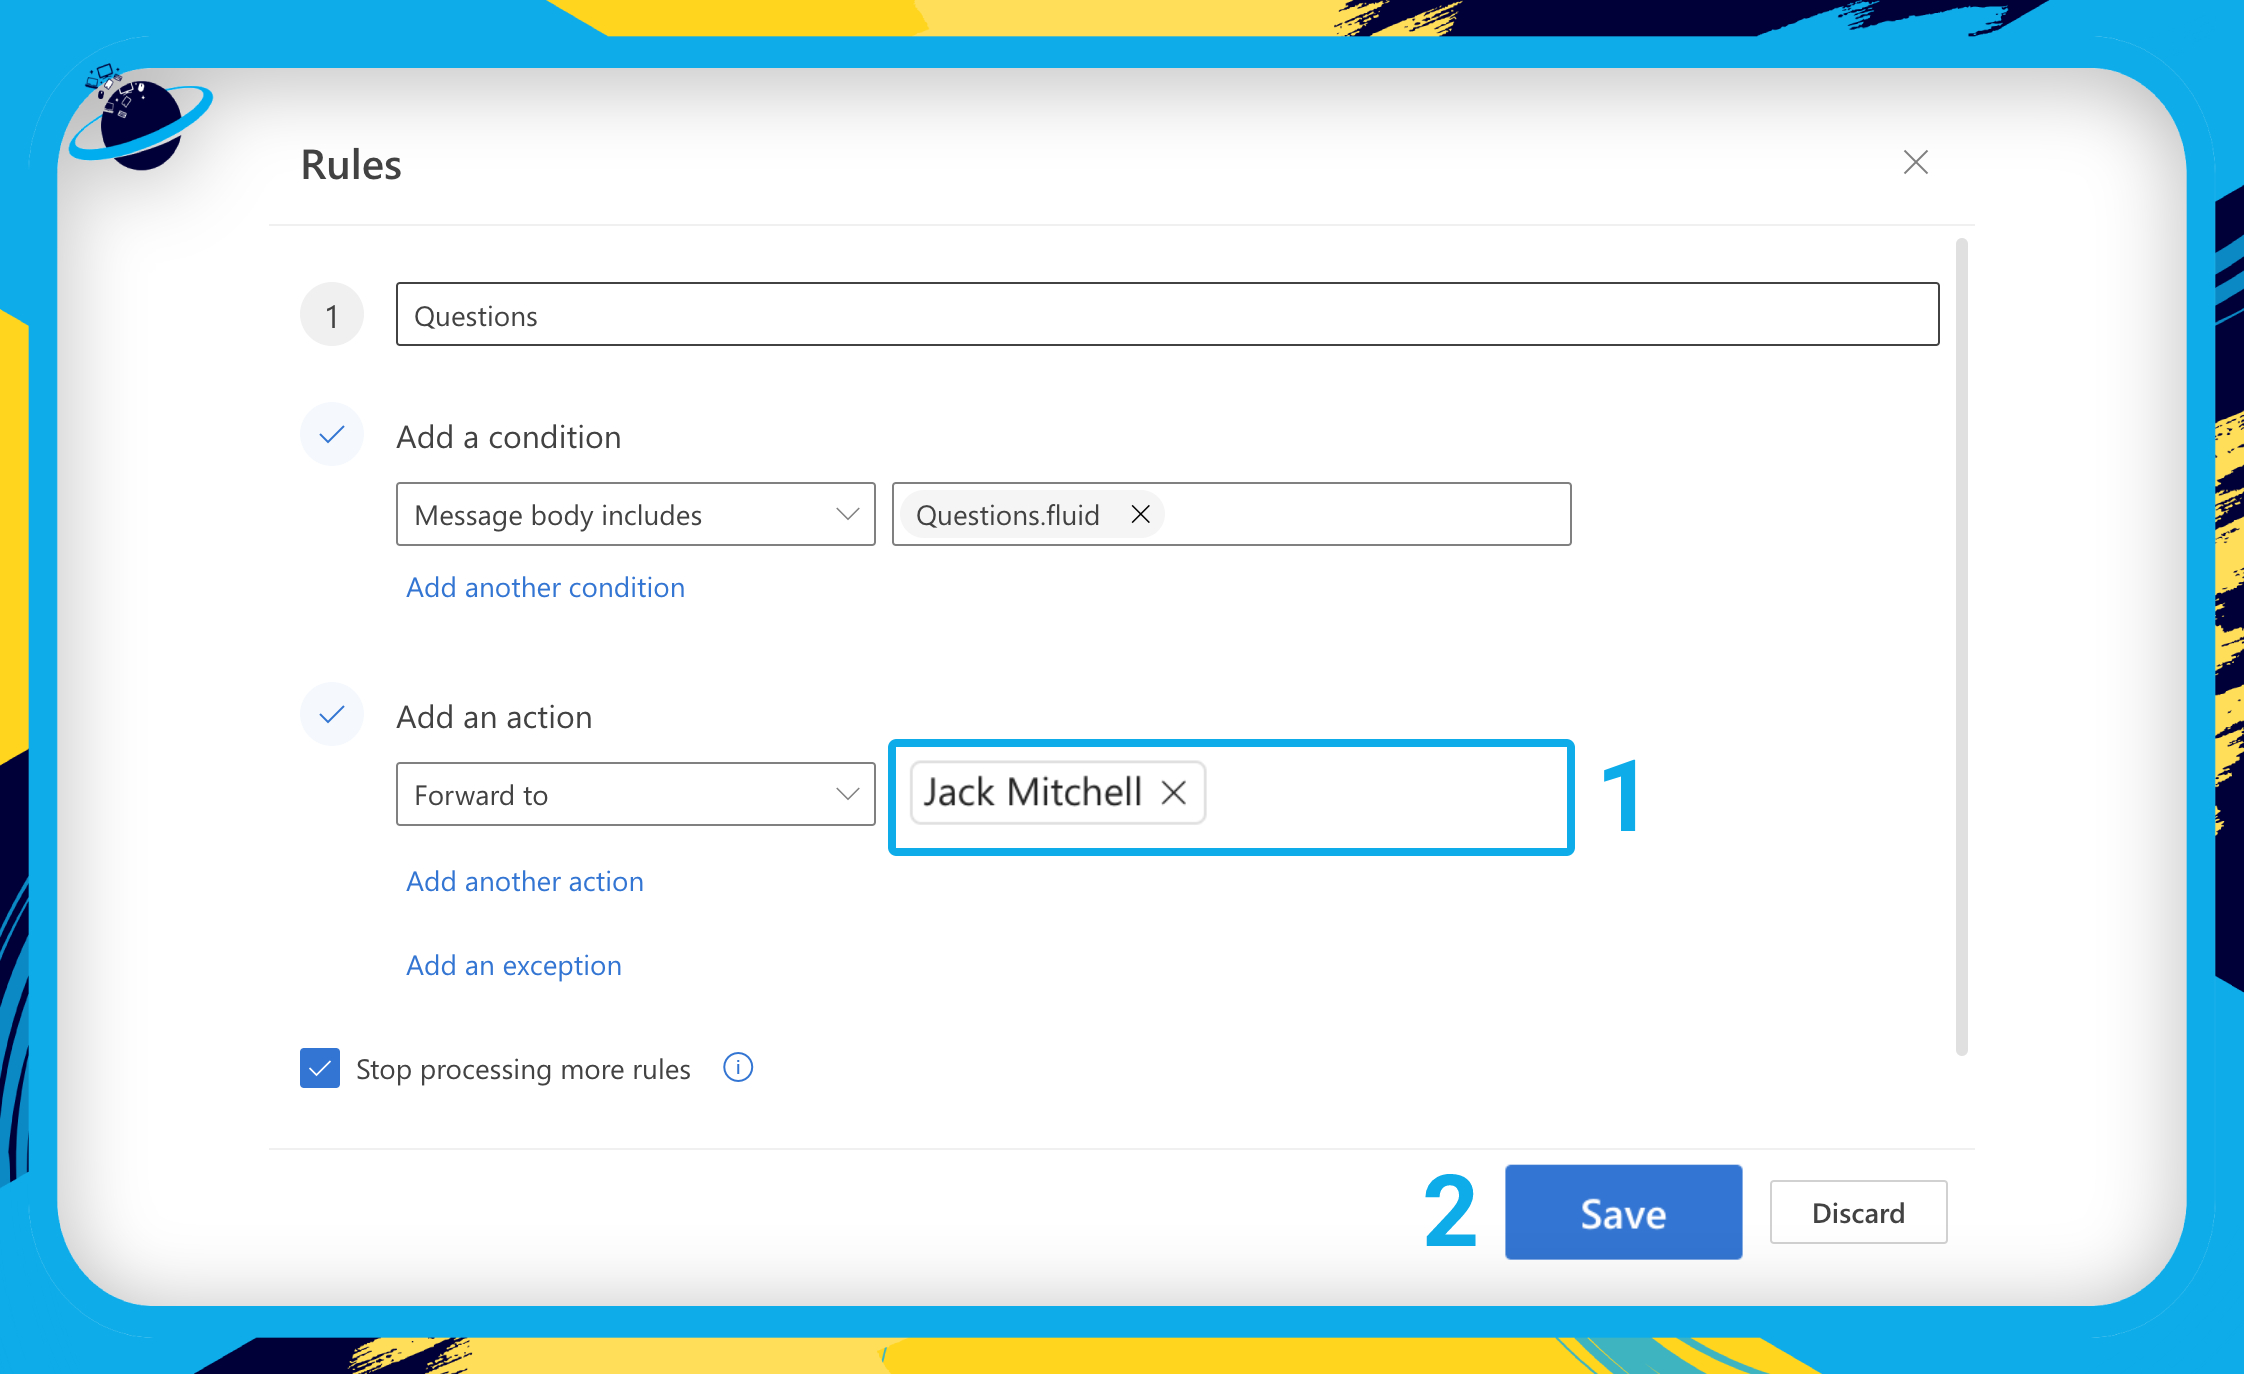
- Then click “Add new rule.” [3]
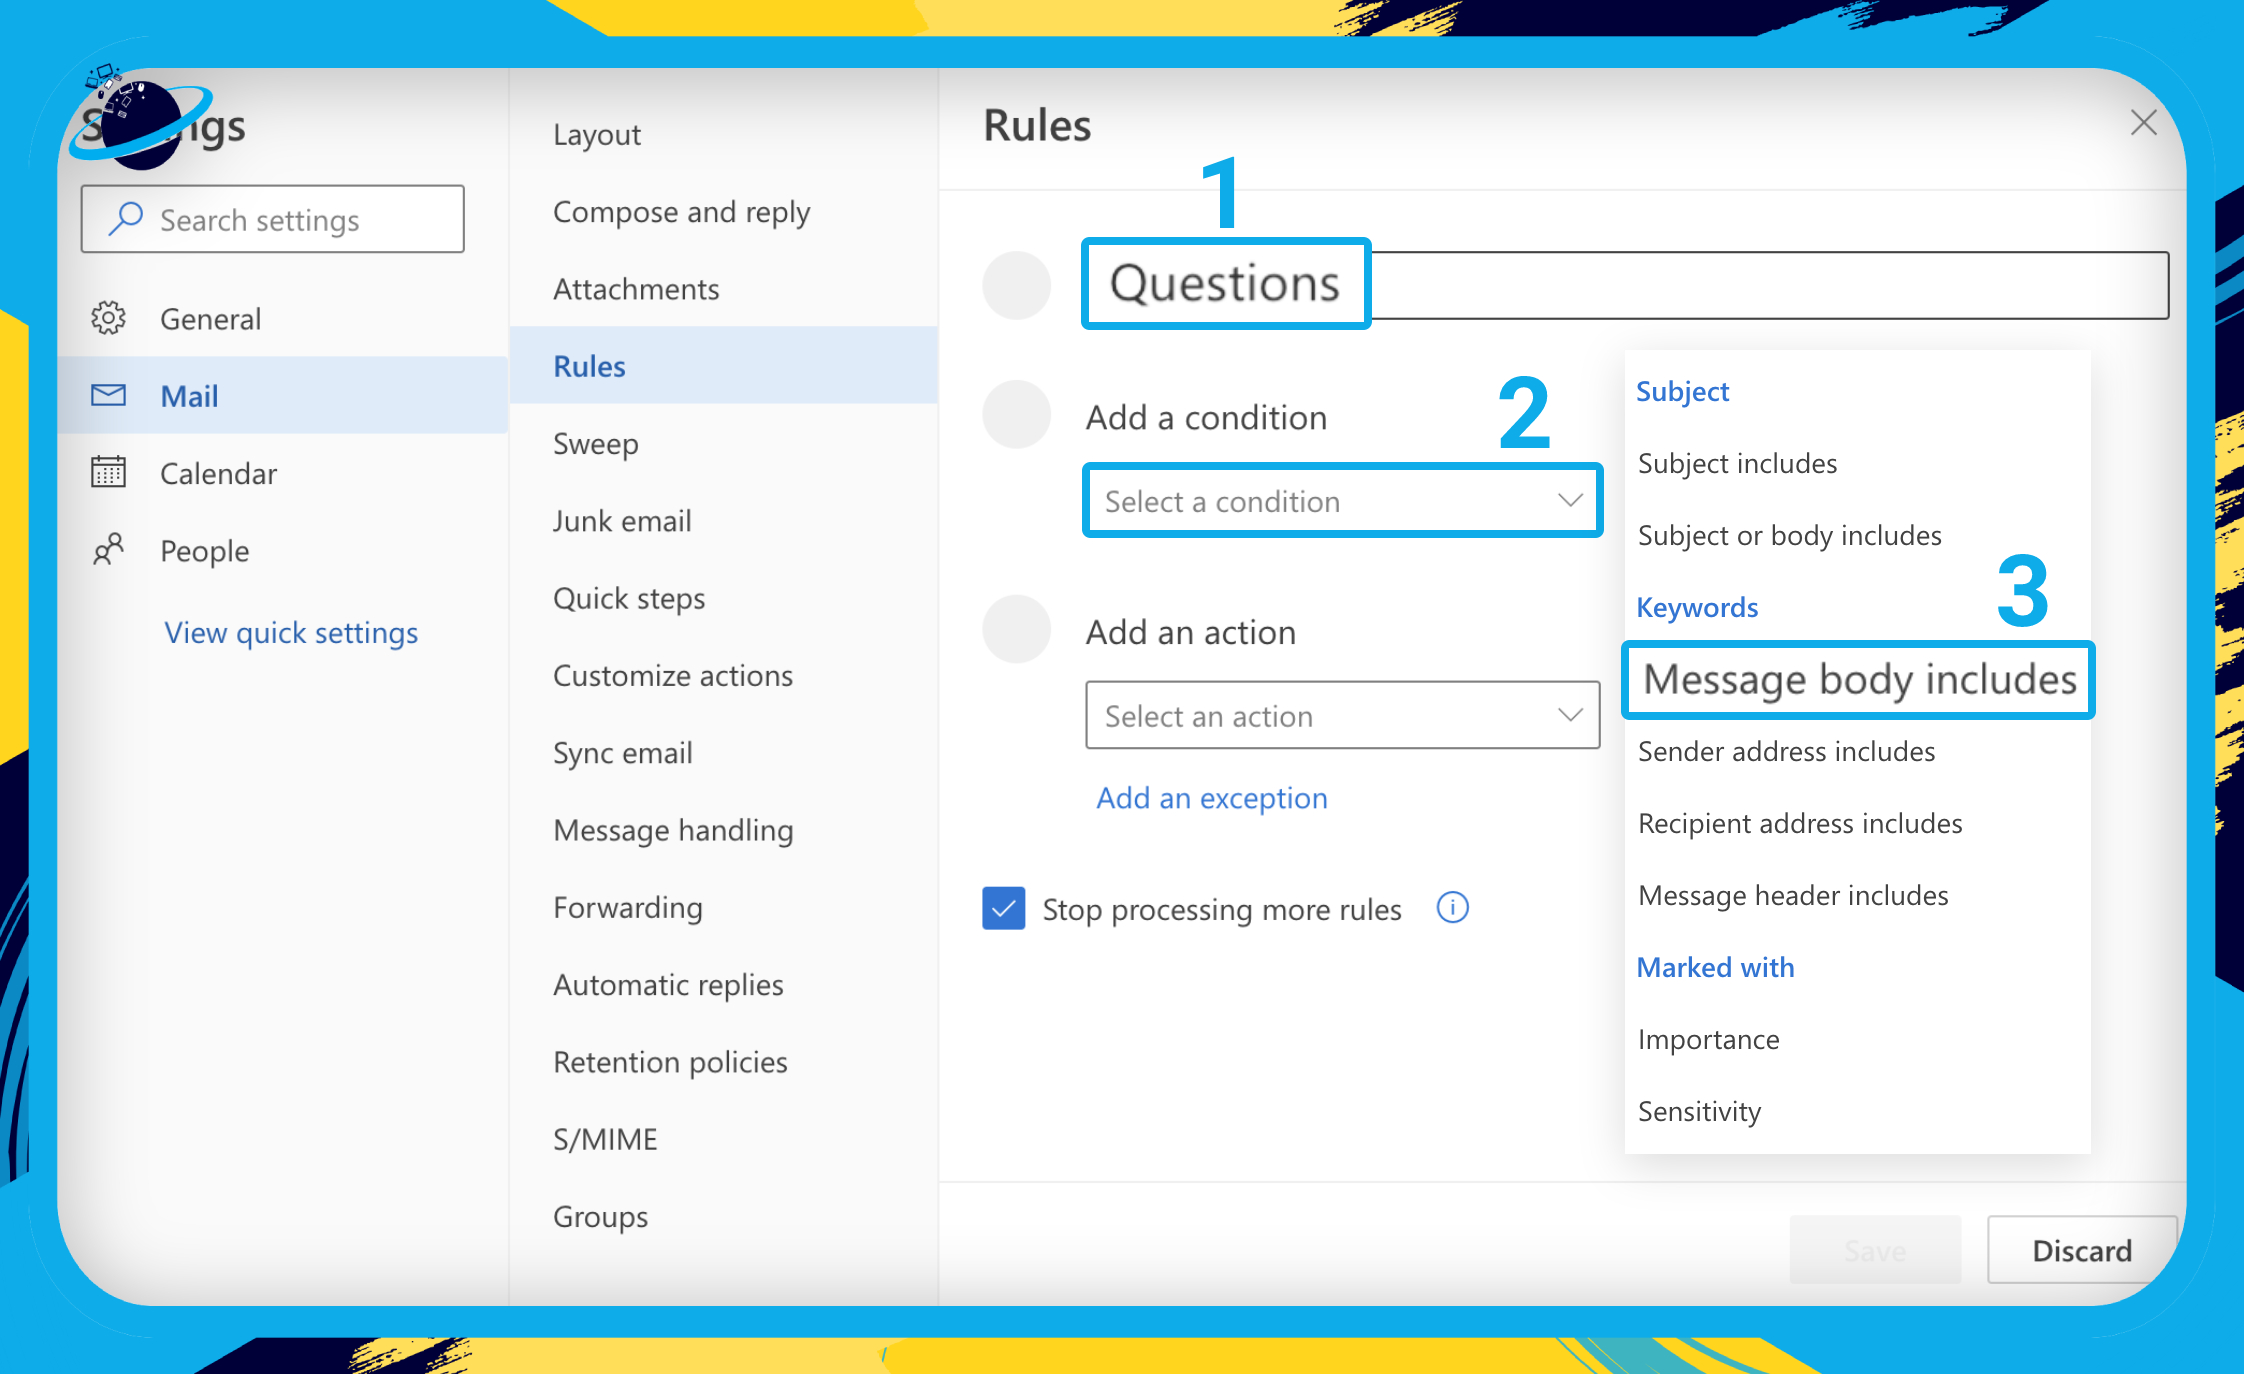
- Name your rule “Questions.” [1]
- Click the select box under “Add a condition.” [2]
- Select “Message body includes” from the list of conditions. [3]
The keyword to search for will depend on whether or not you’ve converted your questions table to a Loop component.
A simple way to find out what to search for in the message body is to @ mention yourself in the questions table. When you do that, you should receive an email notification.
Check your inbox in Outlook.
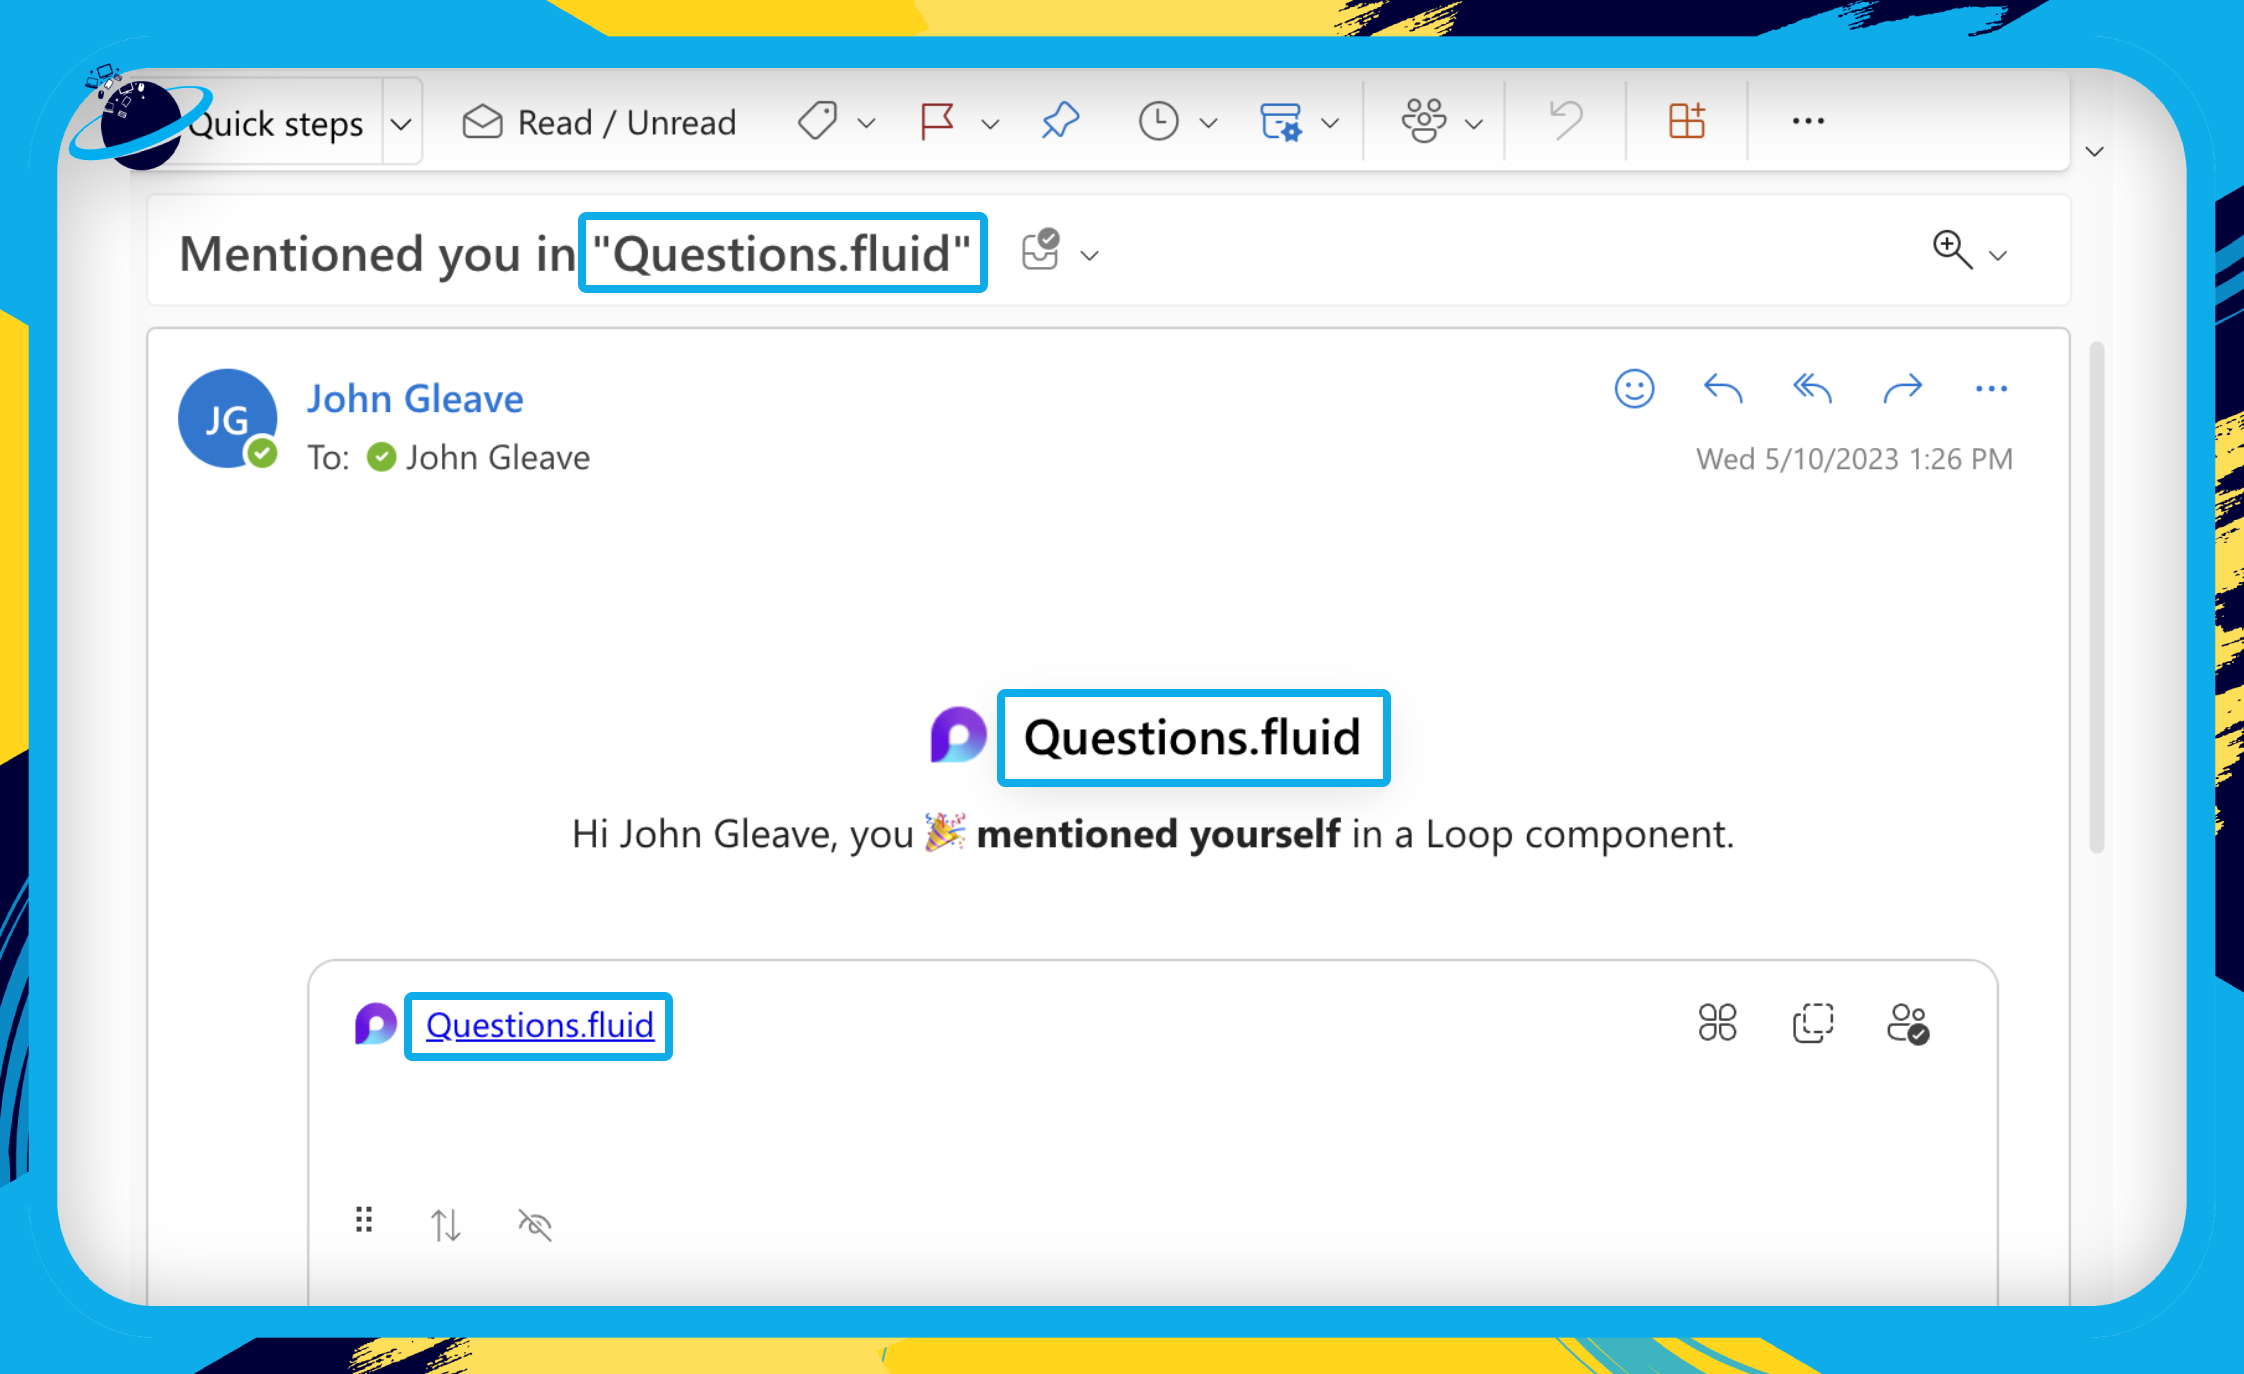
- Enter the name of your questions page or component then add “.fluid” after.
- Click the select box under “Add an action.” [2]
- Then select “Forward to” from the list of actions. [3]

- Enter the names of the people you want to notify. [1]
- Then click “Save.” [2]
Mention yourself in the questions table to make sure the rule is working. If successful, the people you added to the “Forward to” action should also receive an email notification.

Create questions & answers for the Knowledge Base
In this section, we’ll show you how to add questions and answers.
Create a question in the questions table:
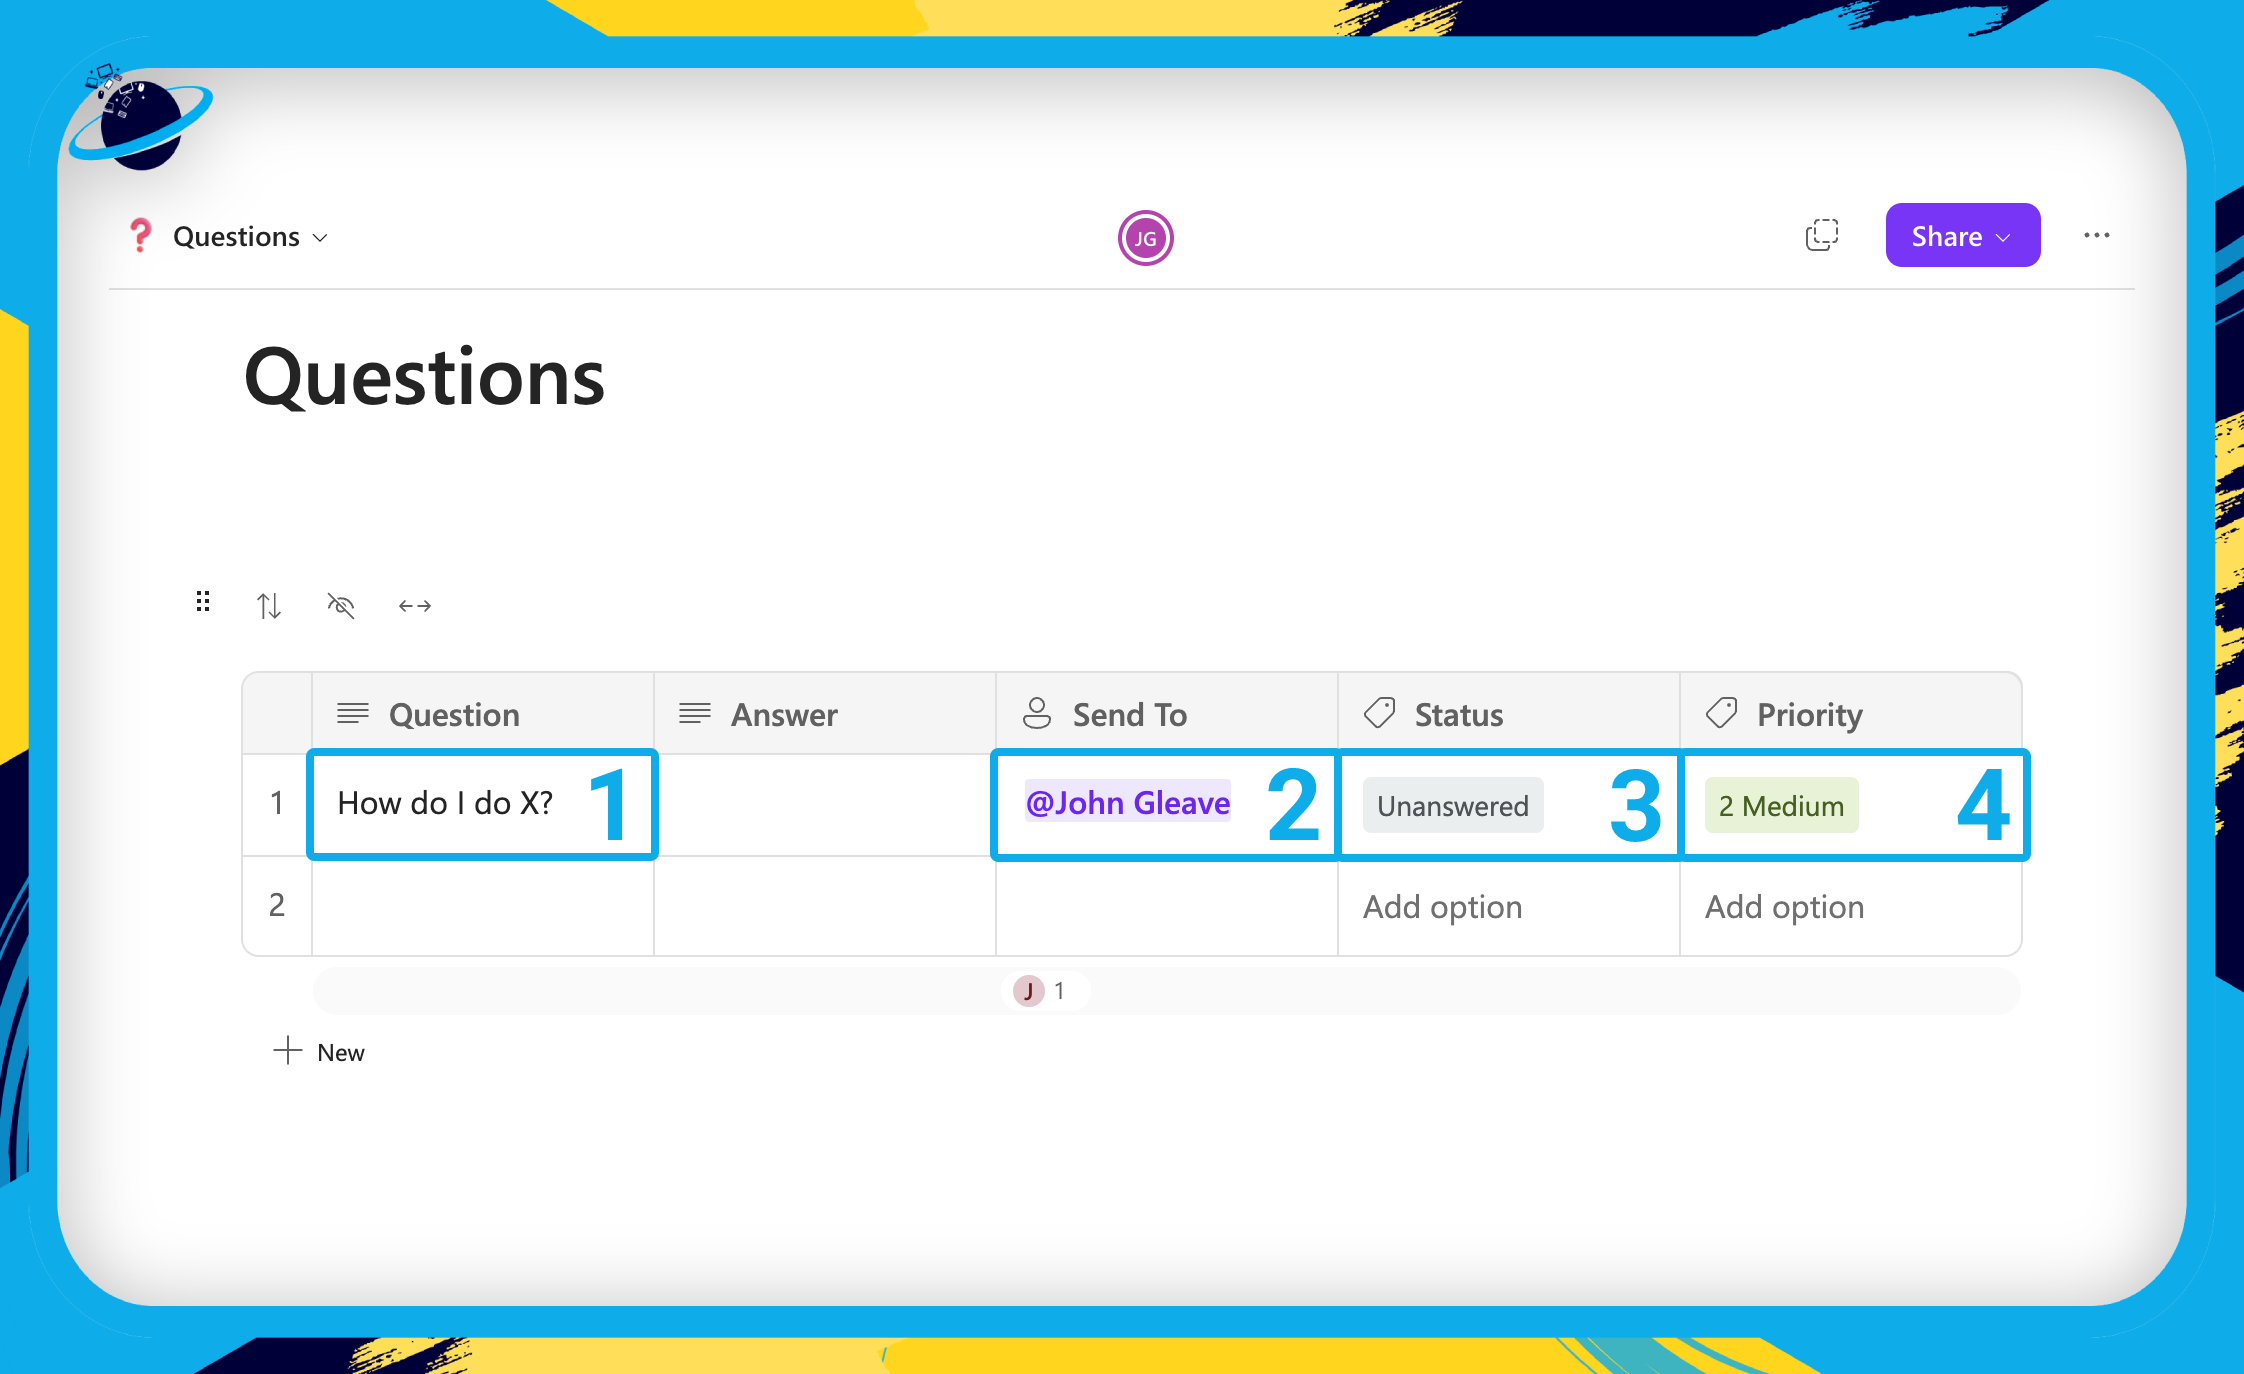
- Enter any question in the “Question” column.
- Click “New” to add a new row.
- Click the cell in the “Send to” column.
- Enter the name of the person you set the forwarding rule for and select them.
- Click the cell in the “Status” column.
- Select “Unanswered.”
- Click the cell in the “Priority” column and select a priority.
Add an answer to the questions table:
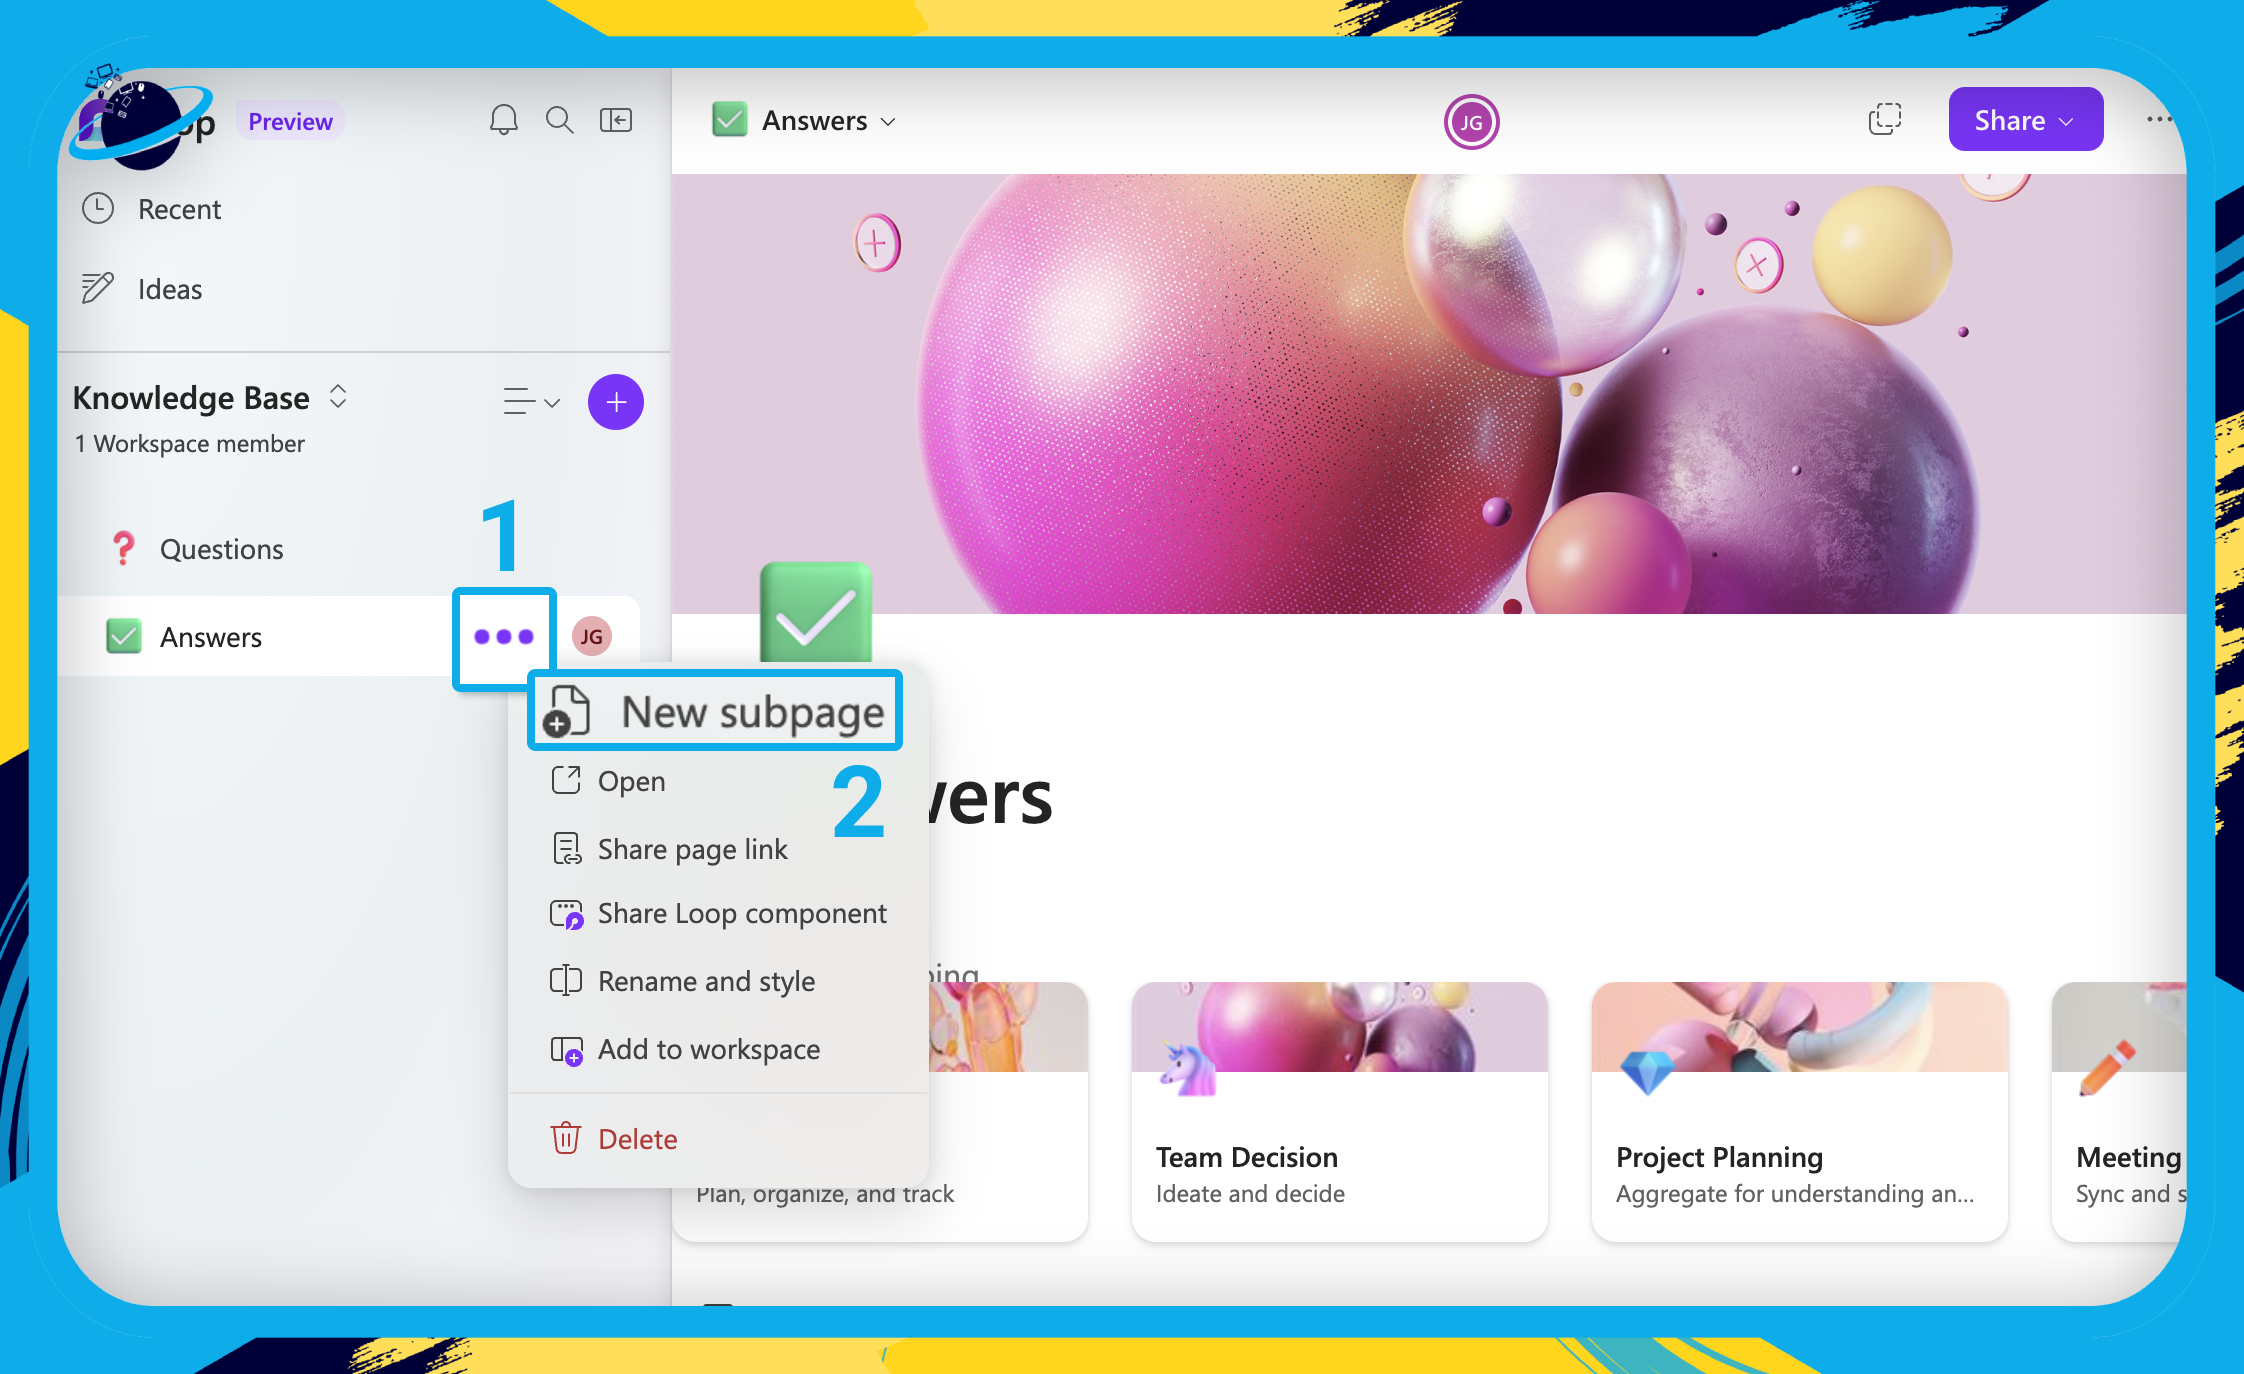
- Create a new page titled “Answers” and style it to your preference.
- Hover over the page on the left menu and click the
 three dots. [1]
 - Then select
 “New subpage” from the popup list. [2]
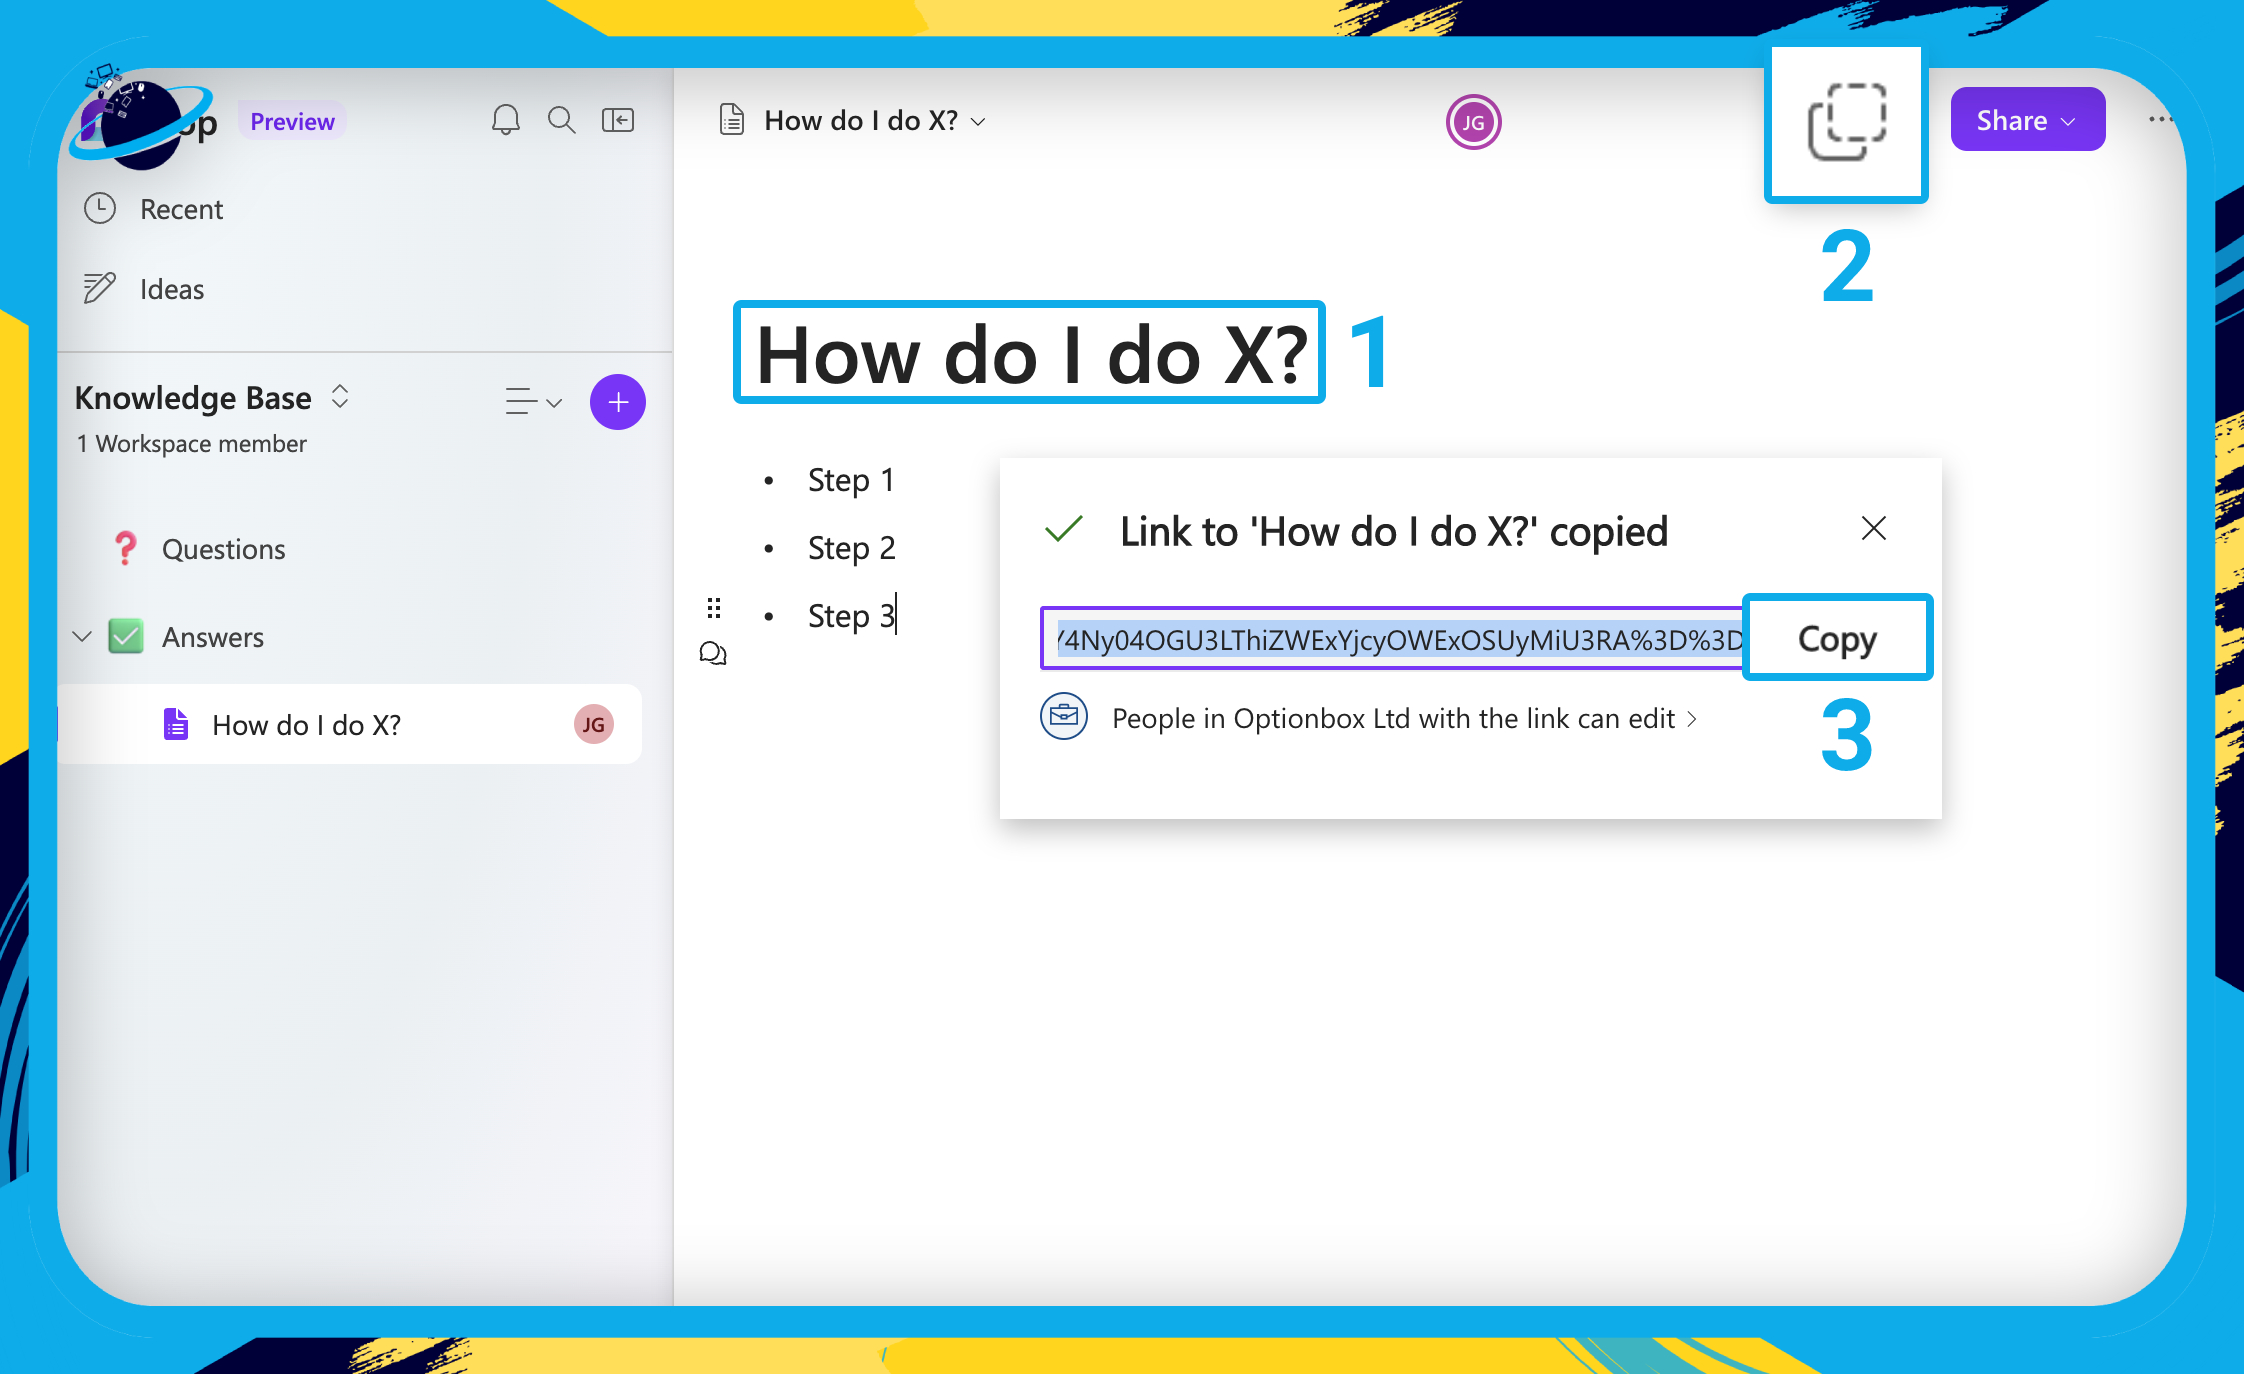
- Now copy the question and paste it into the title section of the new subpage. [1]
- Once you’ve fully answered the question, click the
 copy icon. [2]
 - Then click “Copy” to ensure you’ve copied the link correctly. [3]
- Head back to the “Questions” page.
- Type “Click Here” in the “Answer” column. [1]
- Then highlight “Click Here” and press Ctrl / command + K on the keyboard.
- Alternatively, click the three dots on the format bar.
- Then select
 “Link” from the popup menu.
- Alternatively, click the
- Now paste your link into the “Address” bar. [2]
- Then click “Insert.” [3]
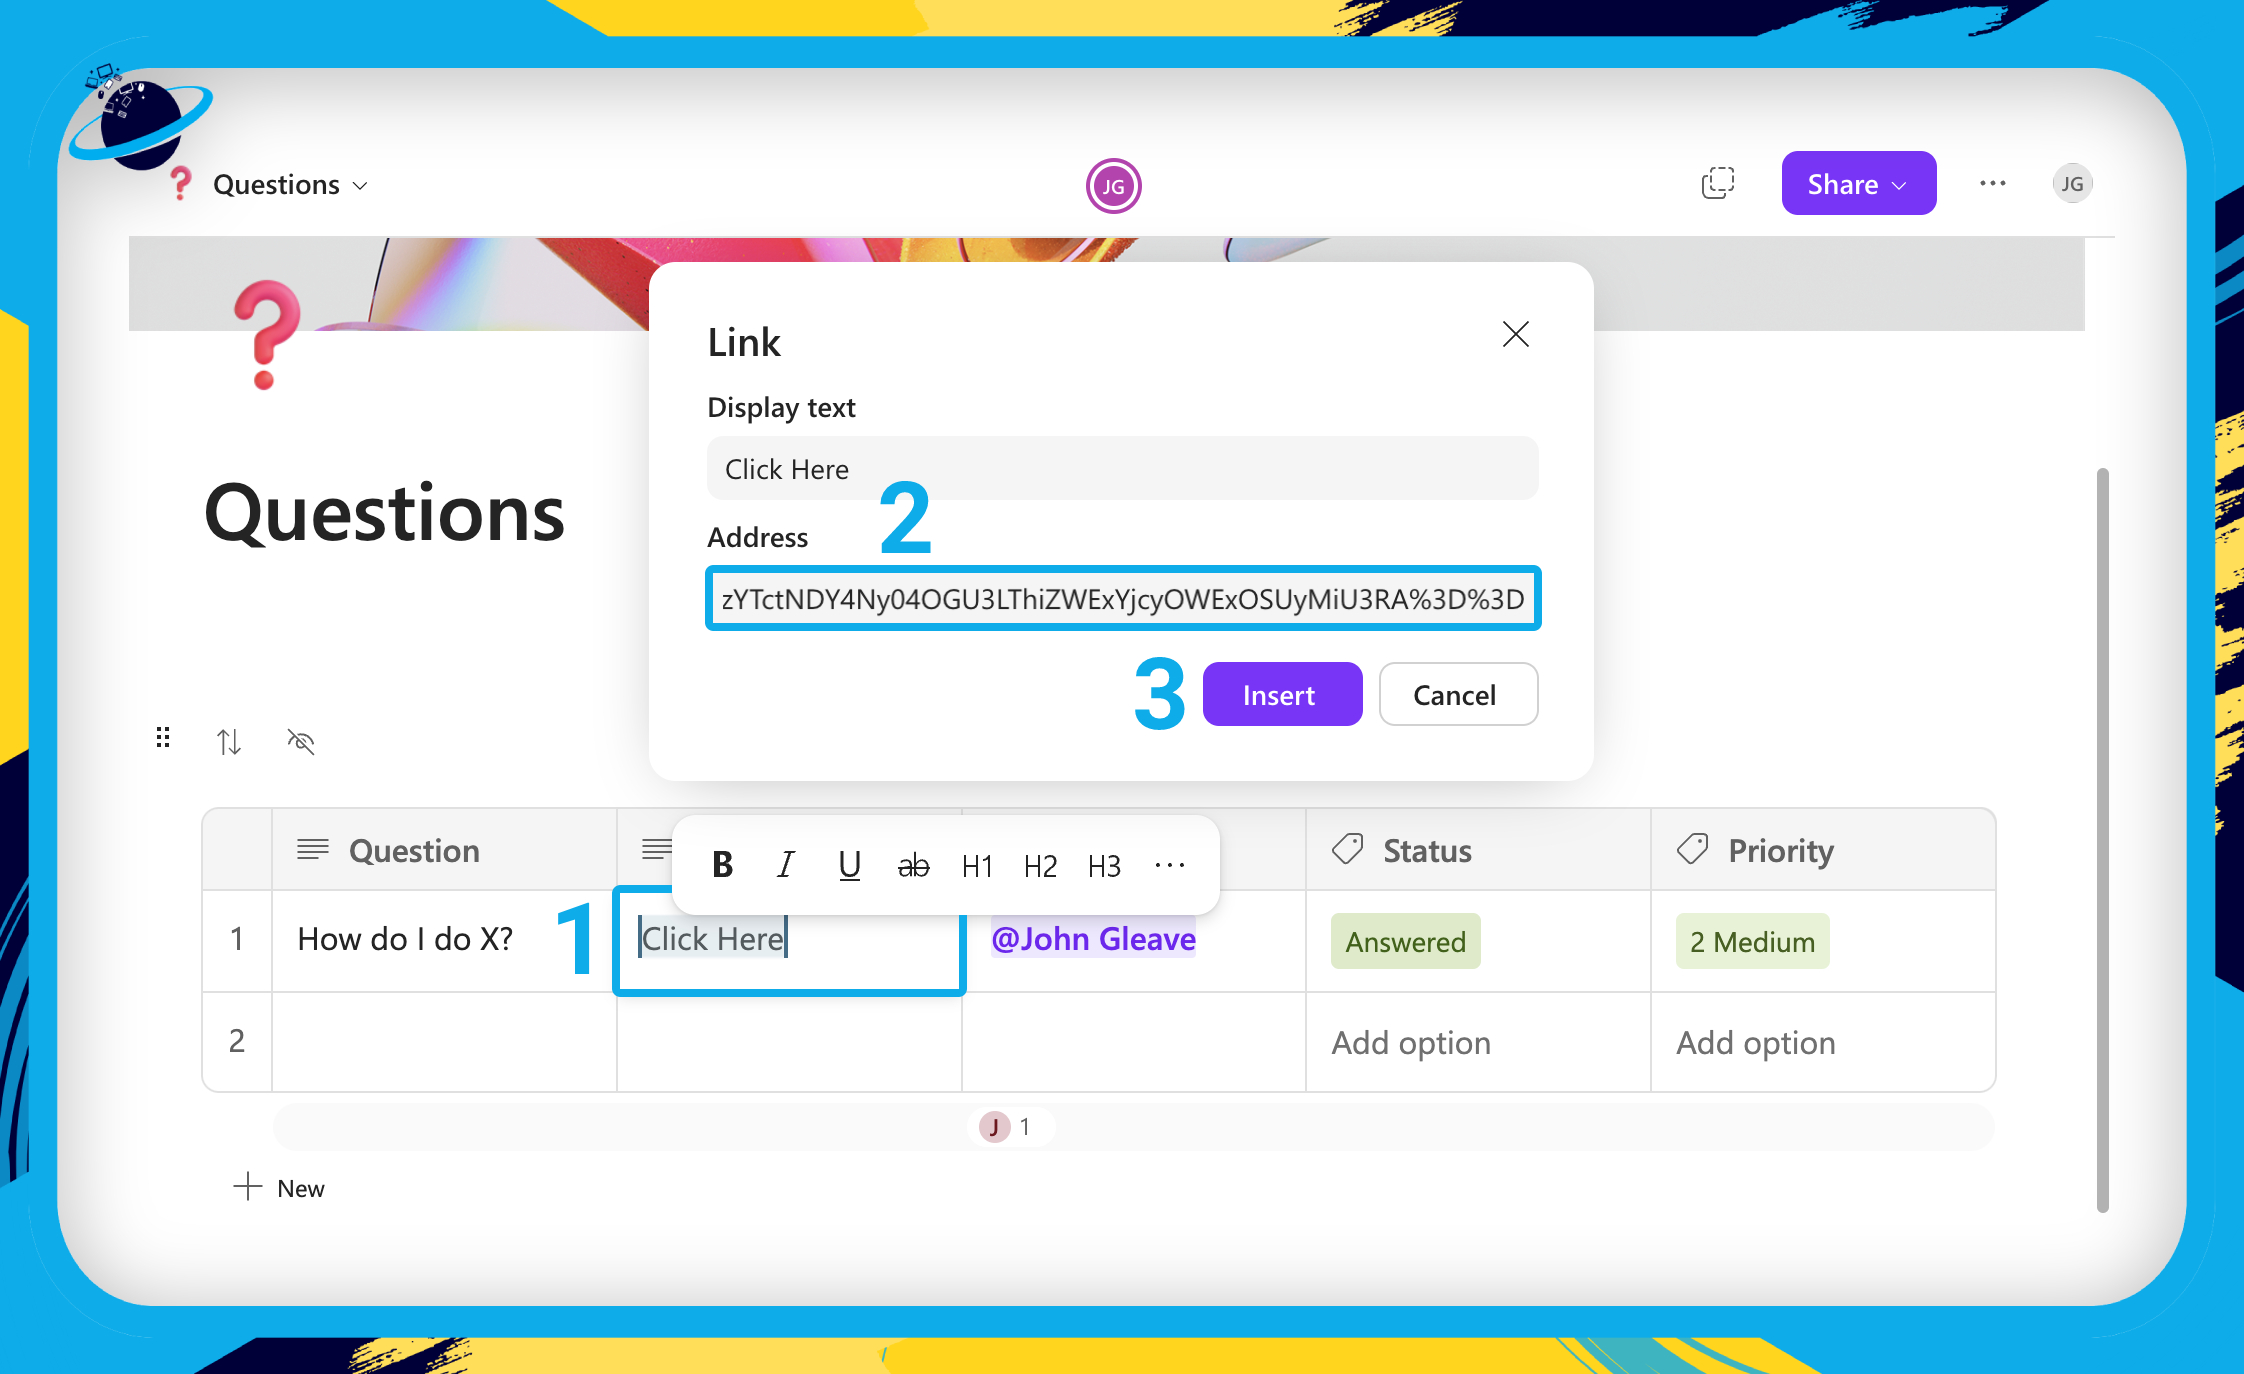
Your team can now access the answer by pressing Ctrl / command + left click on “Click Here.” You should also set the “Status” to “Answered” so other contributors know that an answer page exists for that question.

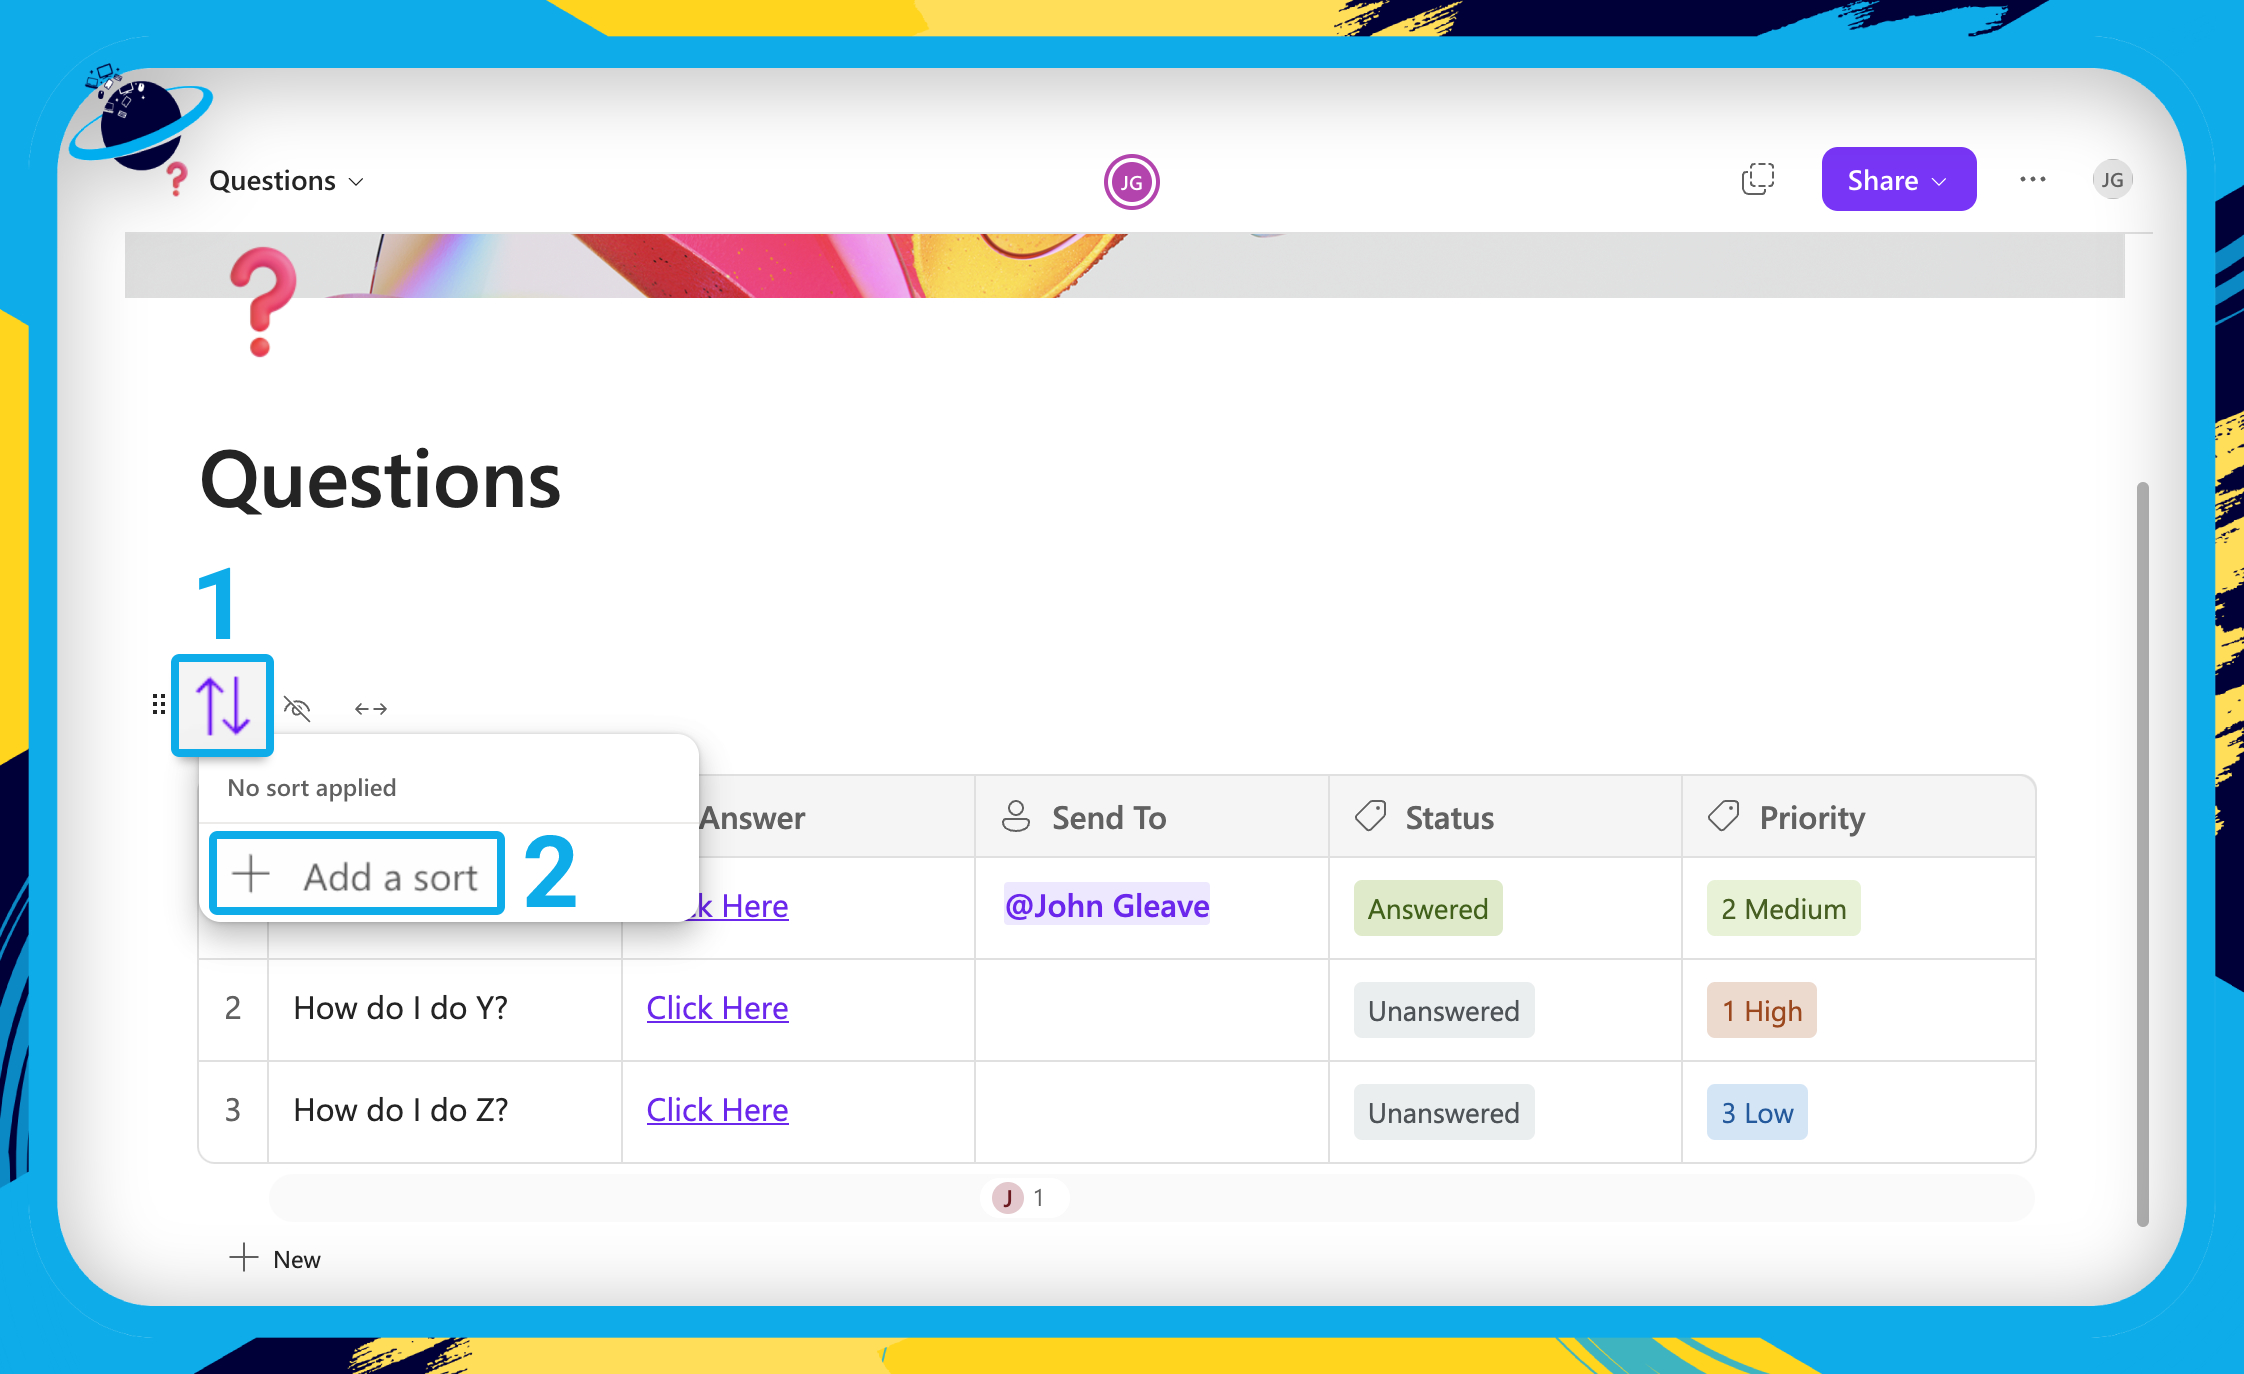
Order the questions in the Knowledge Base
In this section, we’ll show you how to order the questions table by priority.
Ordering the questions by priority will allow your contributors to see which questions need answering most urgently.
- First, click the
 sort icon located at the top left of the table. [1]
 - Then select “Add a sort” from the dropdown. [2]
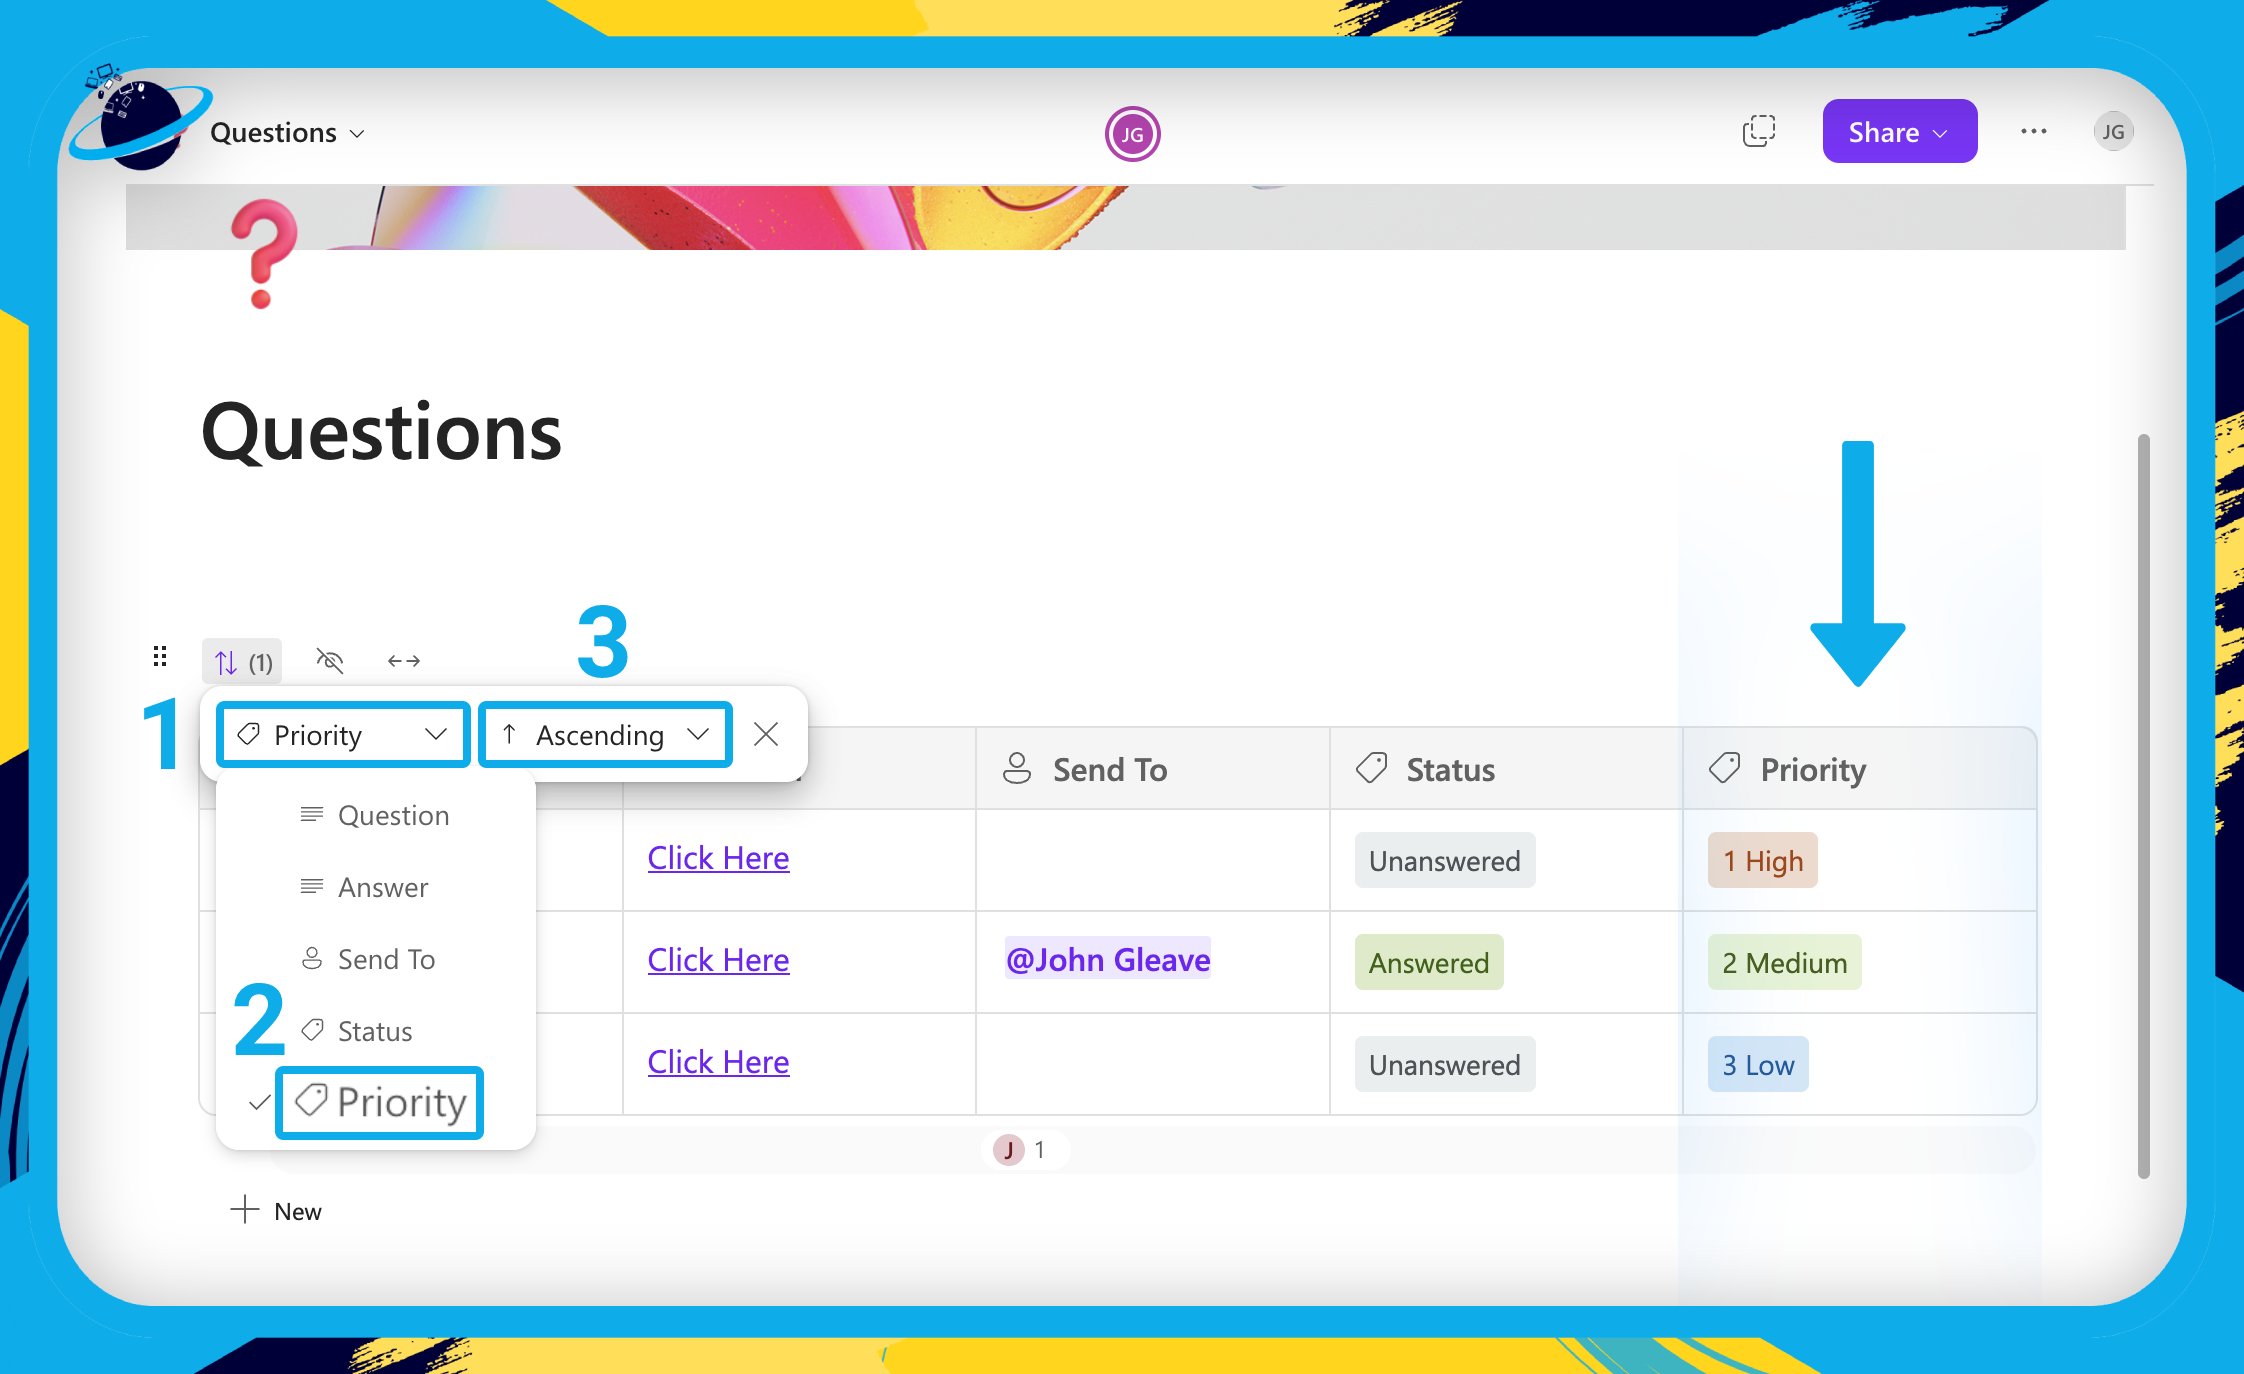
You will see two select boxes. The first contains column names, the second contains the options to order by “Ascending” or “Descending.” To order a list of numbers starting from the lowest, or words alphabetically from A to Z, be sure to select “Ascending.”
- Click the first select box. [1]
- Choose “Priority” from the list. [2]
- Then set the sort to “Ascending.” [3]
The “Priority” column will be ordered from “1 High” to “3 Low” because columns are always ordered by the first character. In this case, we added numbers to the priority labels, so the labels are sorted from 1 to 3.

Embed the Knowledge Base into a Teams channel
In this section, we’ll show you how embed the Knowledge Base into Teams using a Website tab.
Your team members won’t need to open the Microsoft Loop app if you embed the Knowledge Base into the channel. To do that, we’ll use a Website tab.
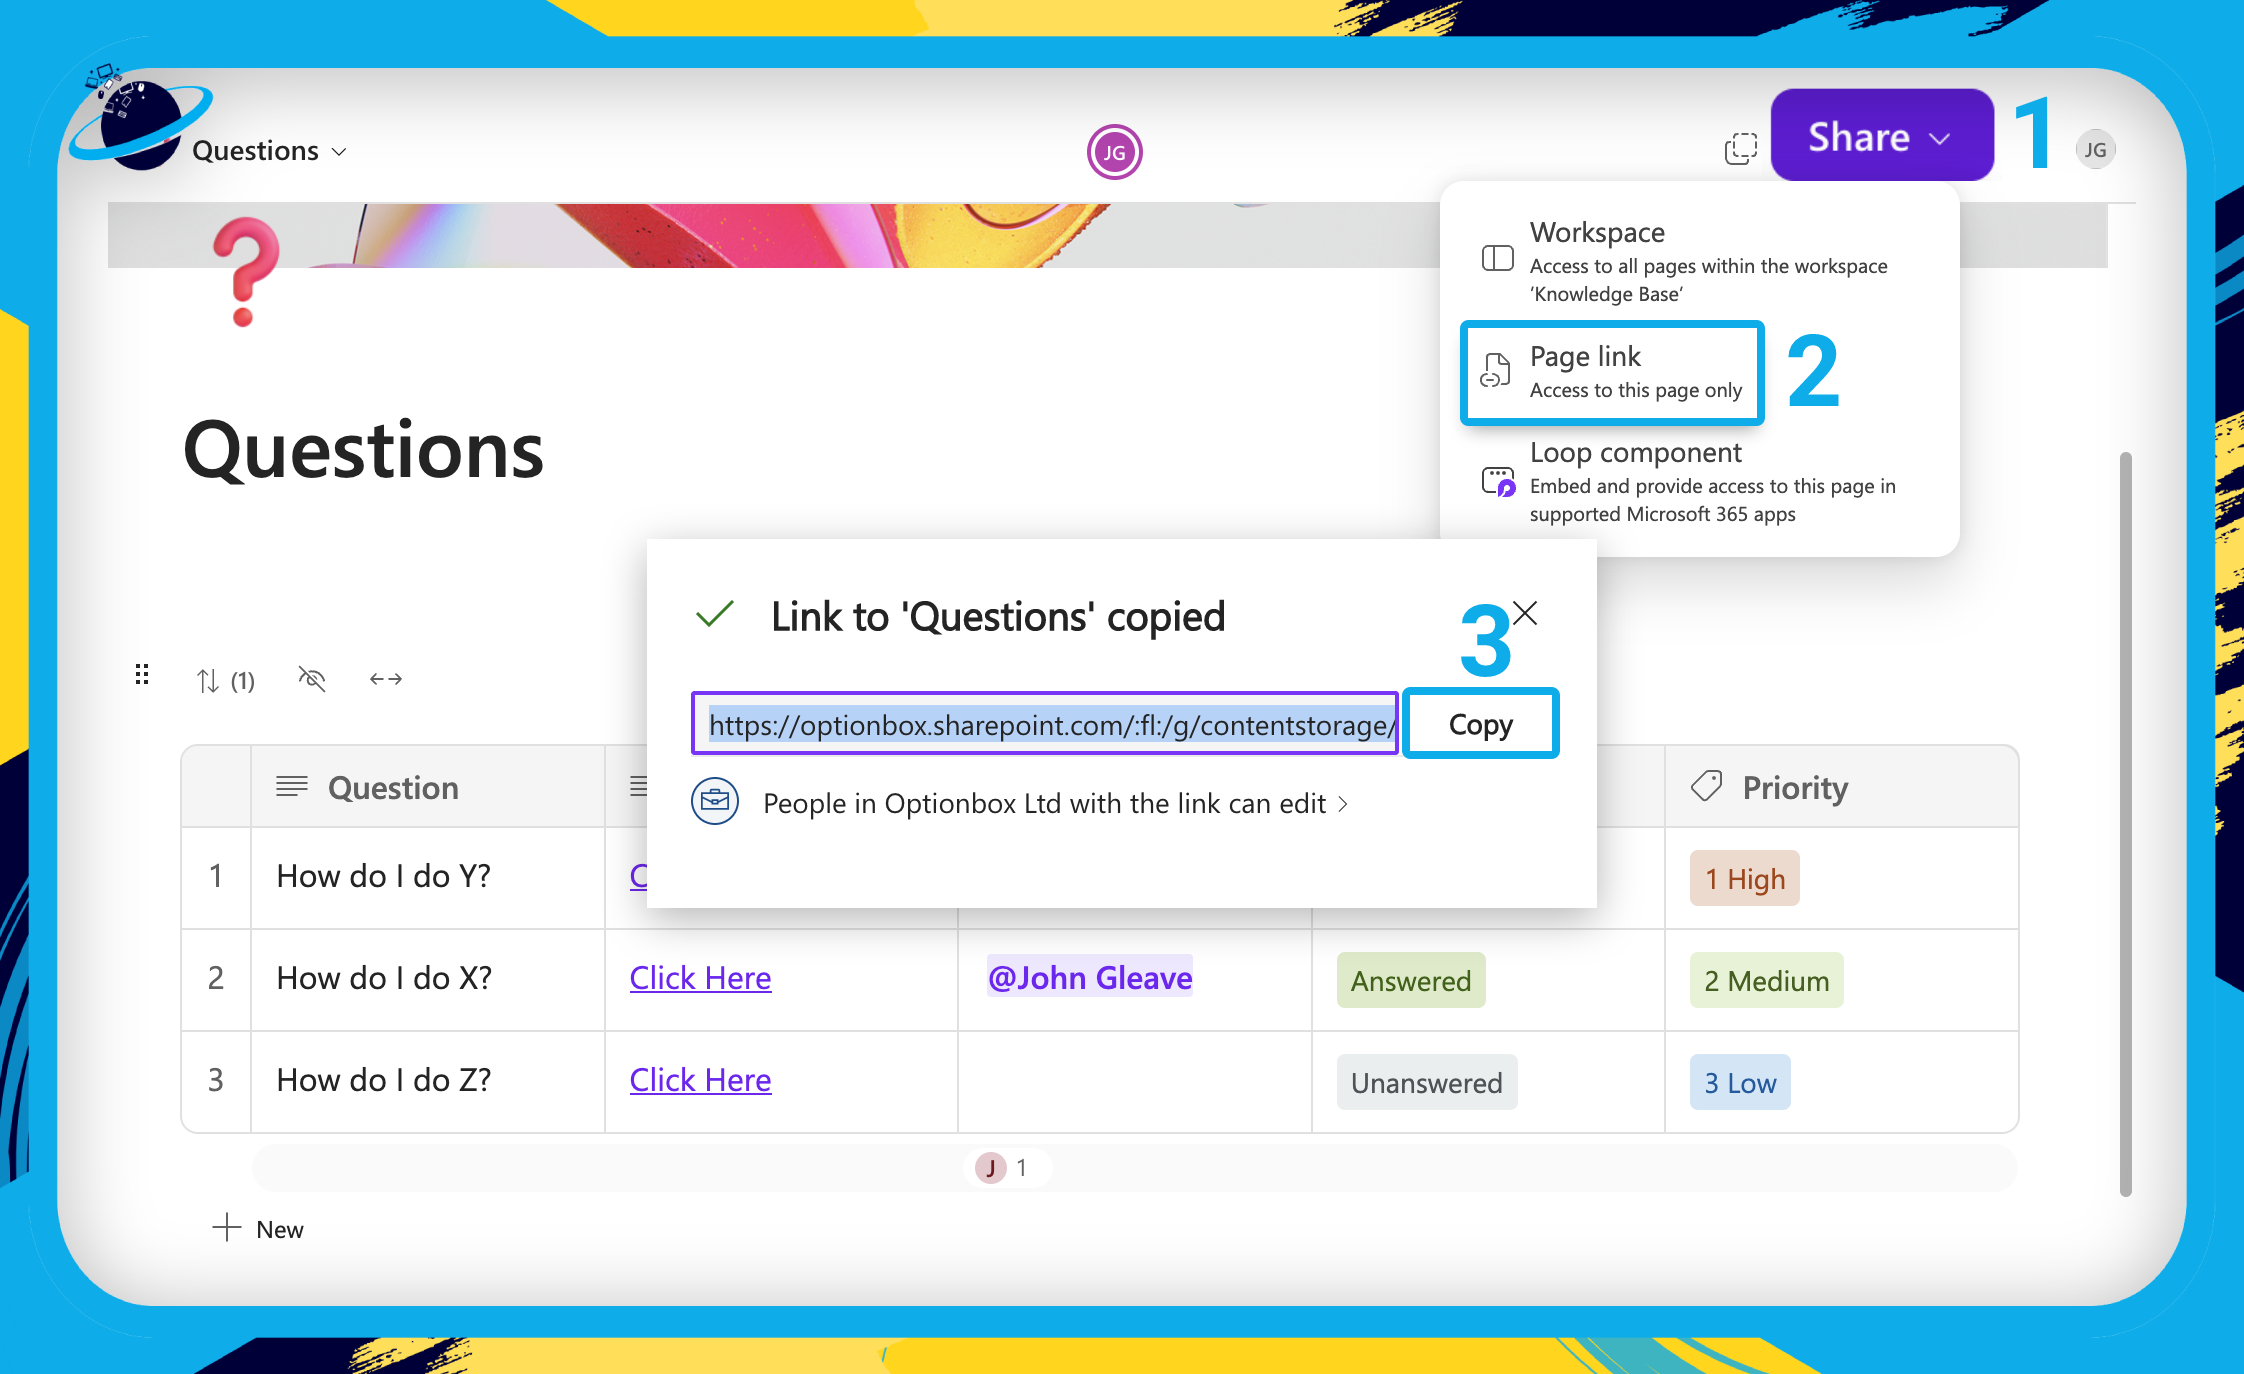
- First, head to your “Questions” page and click “Share” at the top. [1]
- Then select
 “Page link” from the dropdown. [2]
 - Be sure to click the “Copy” button so the link is copied correctly. [3]
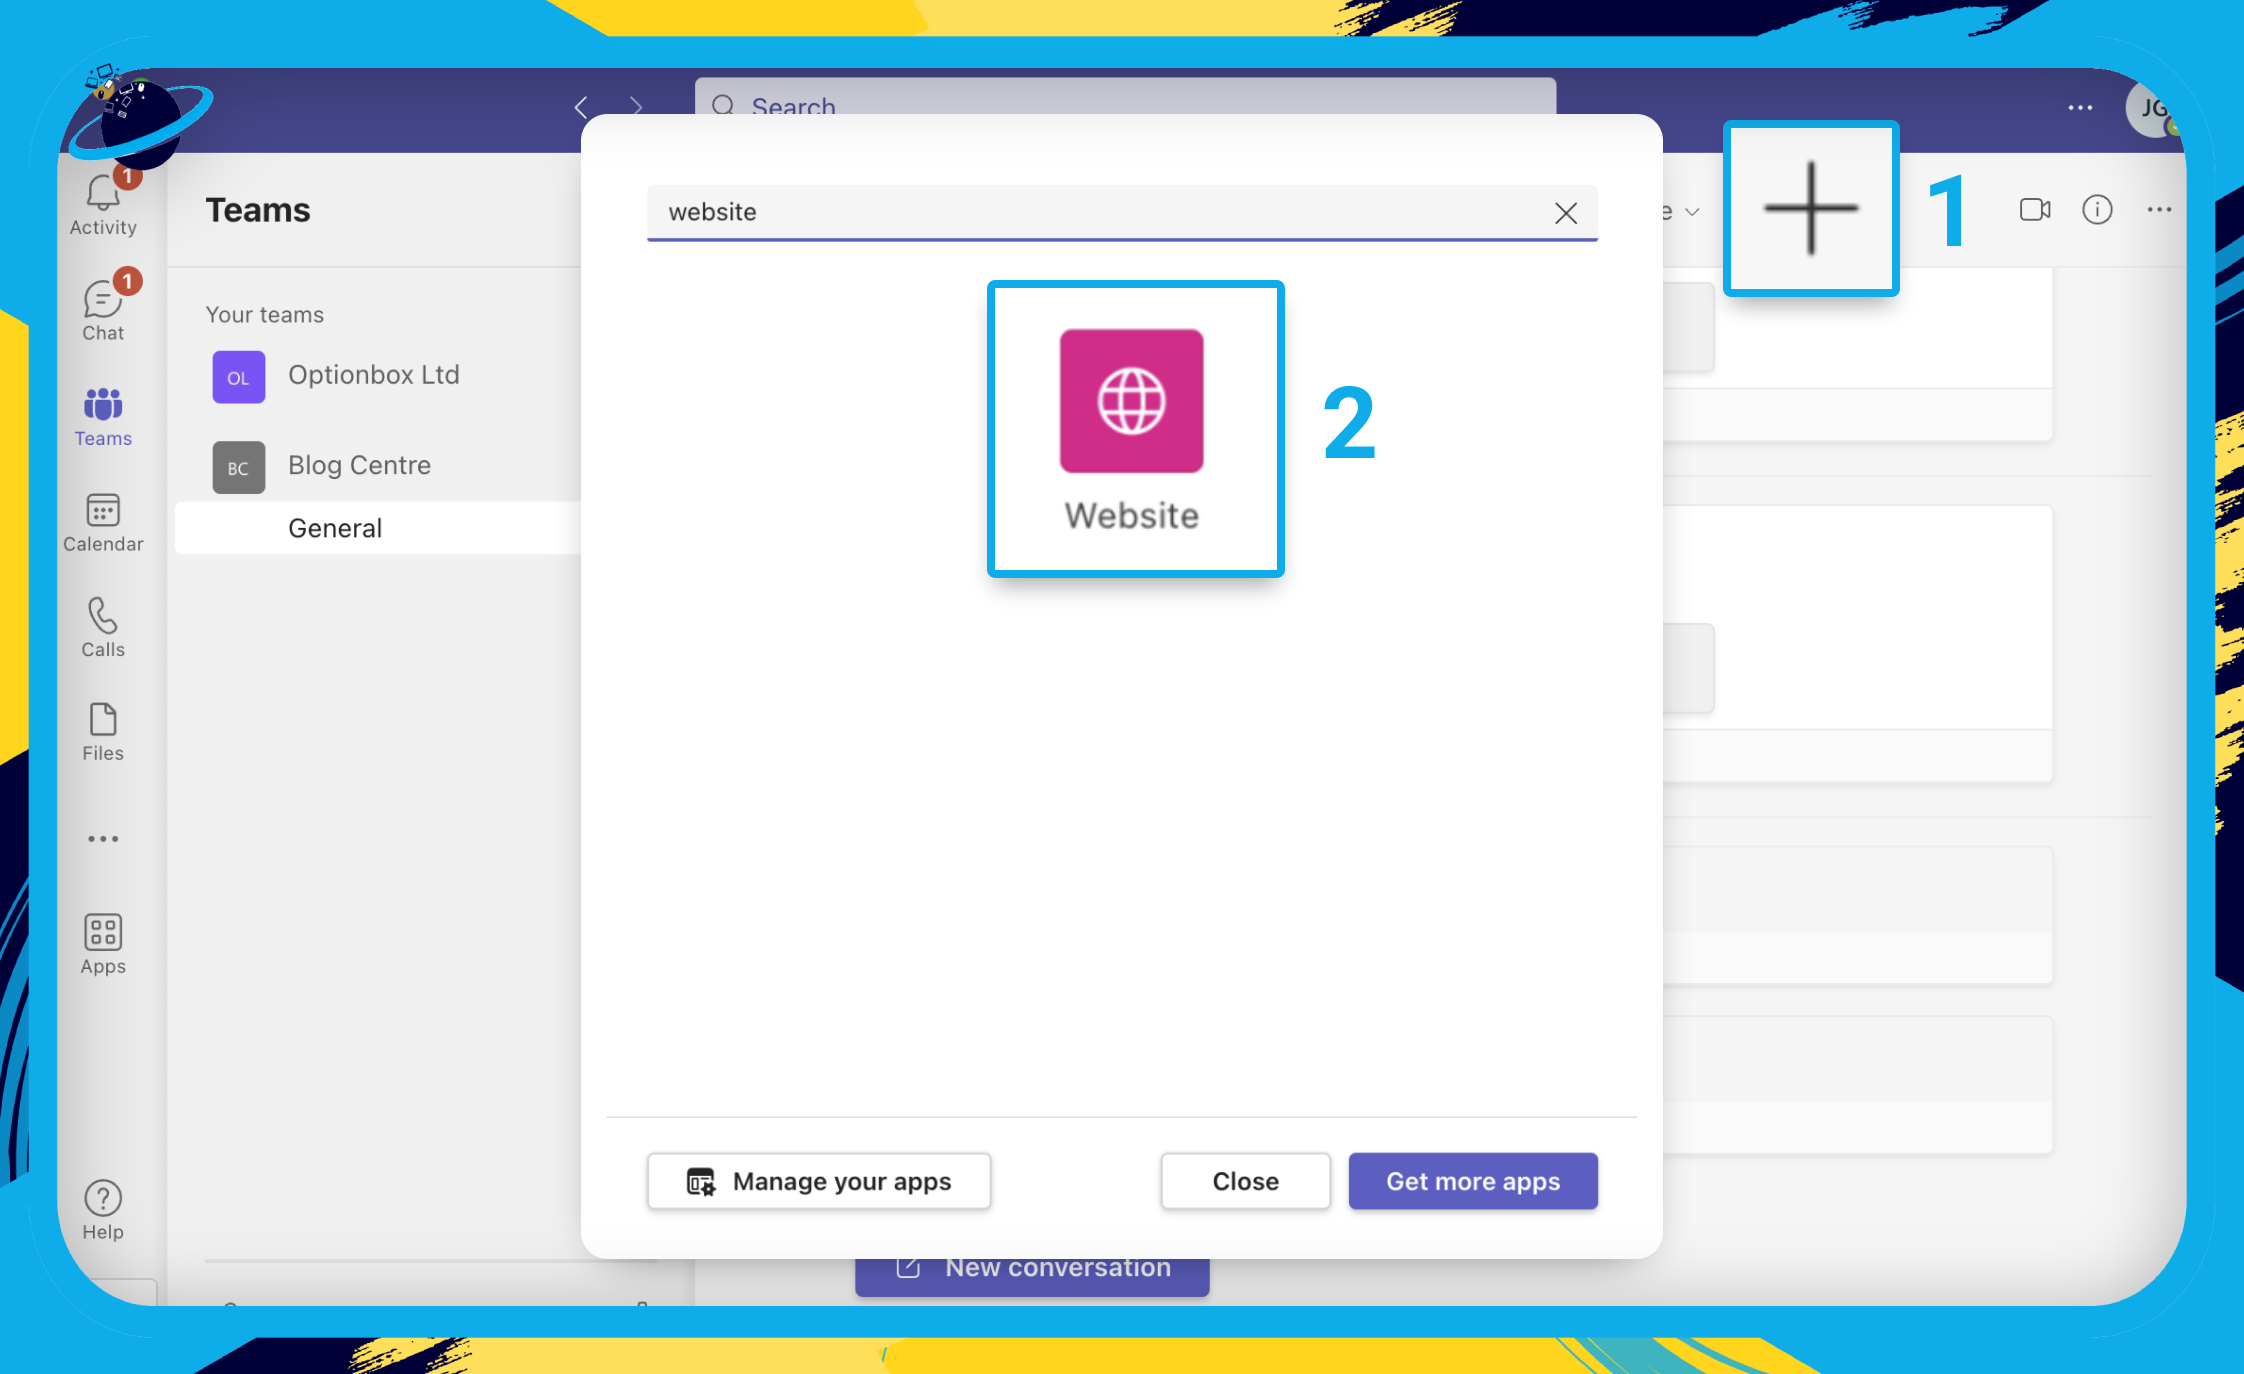
- Next, open a Teams channel in the web or desktop version.
- There, click the plus icon at the top. [1]
- If you can’t see “Website,” type “website” into the search bar and select from there. [2]
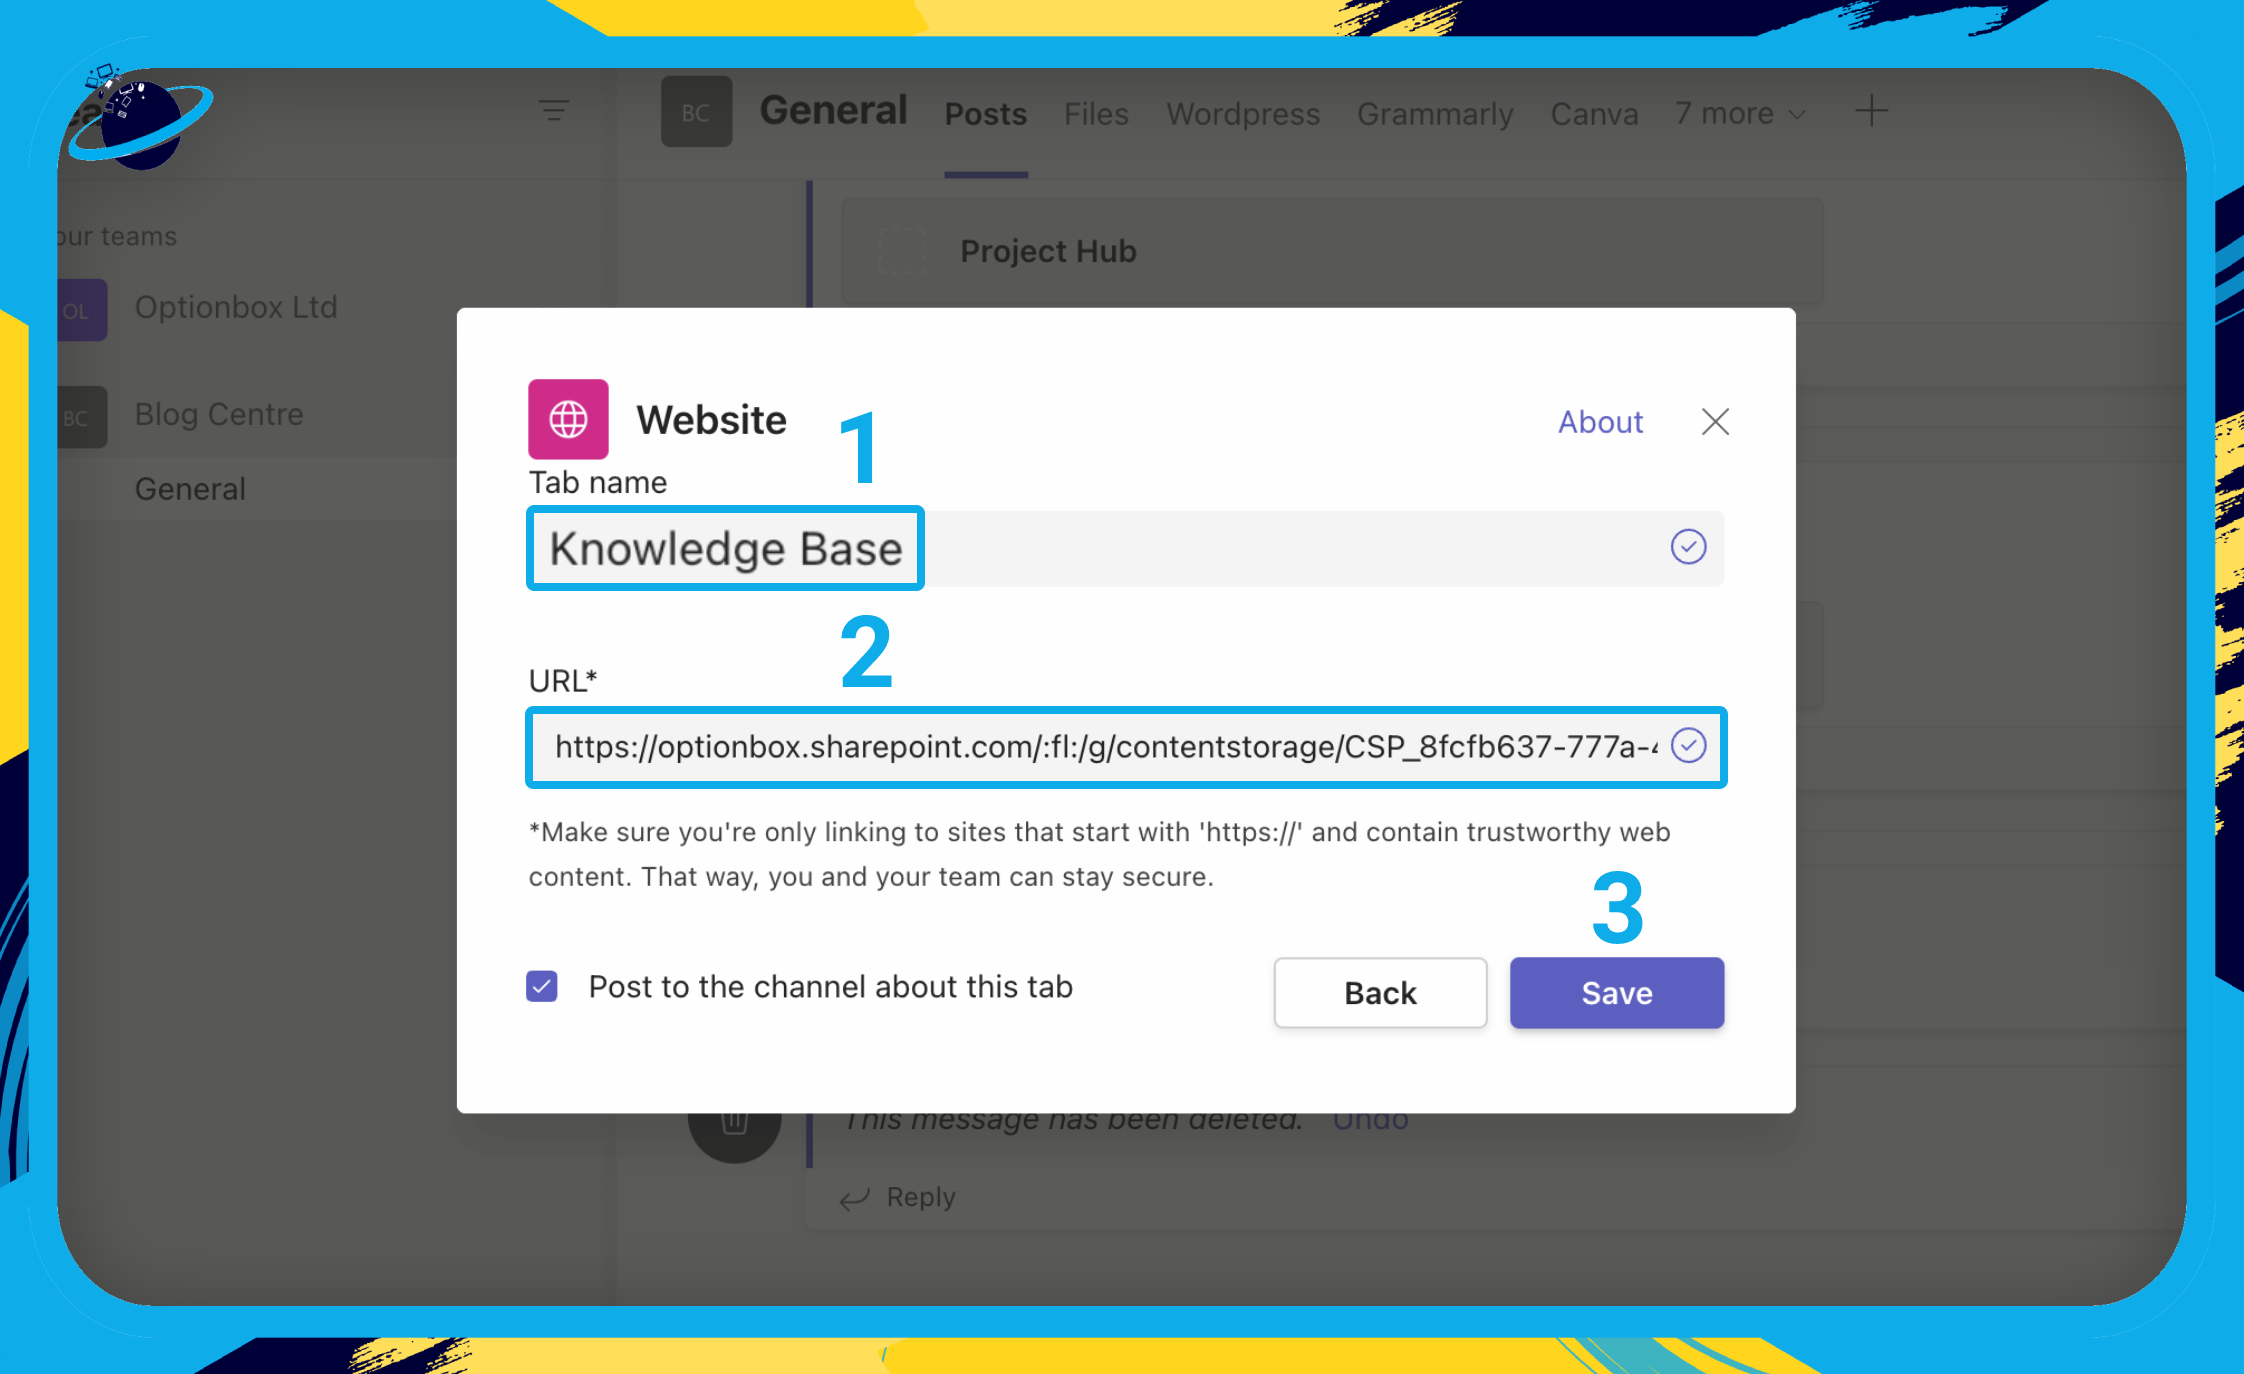
- Next, name your website tab “Knowledge Base.” [1]
- Then paste your link into the “URL” bar. [2]
- Finally, click “Save.” [3]
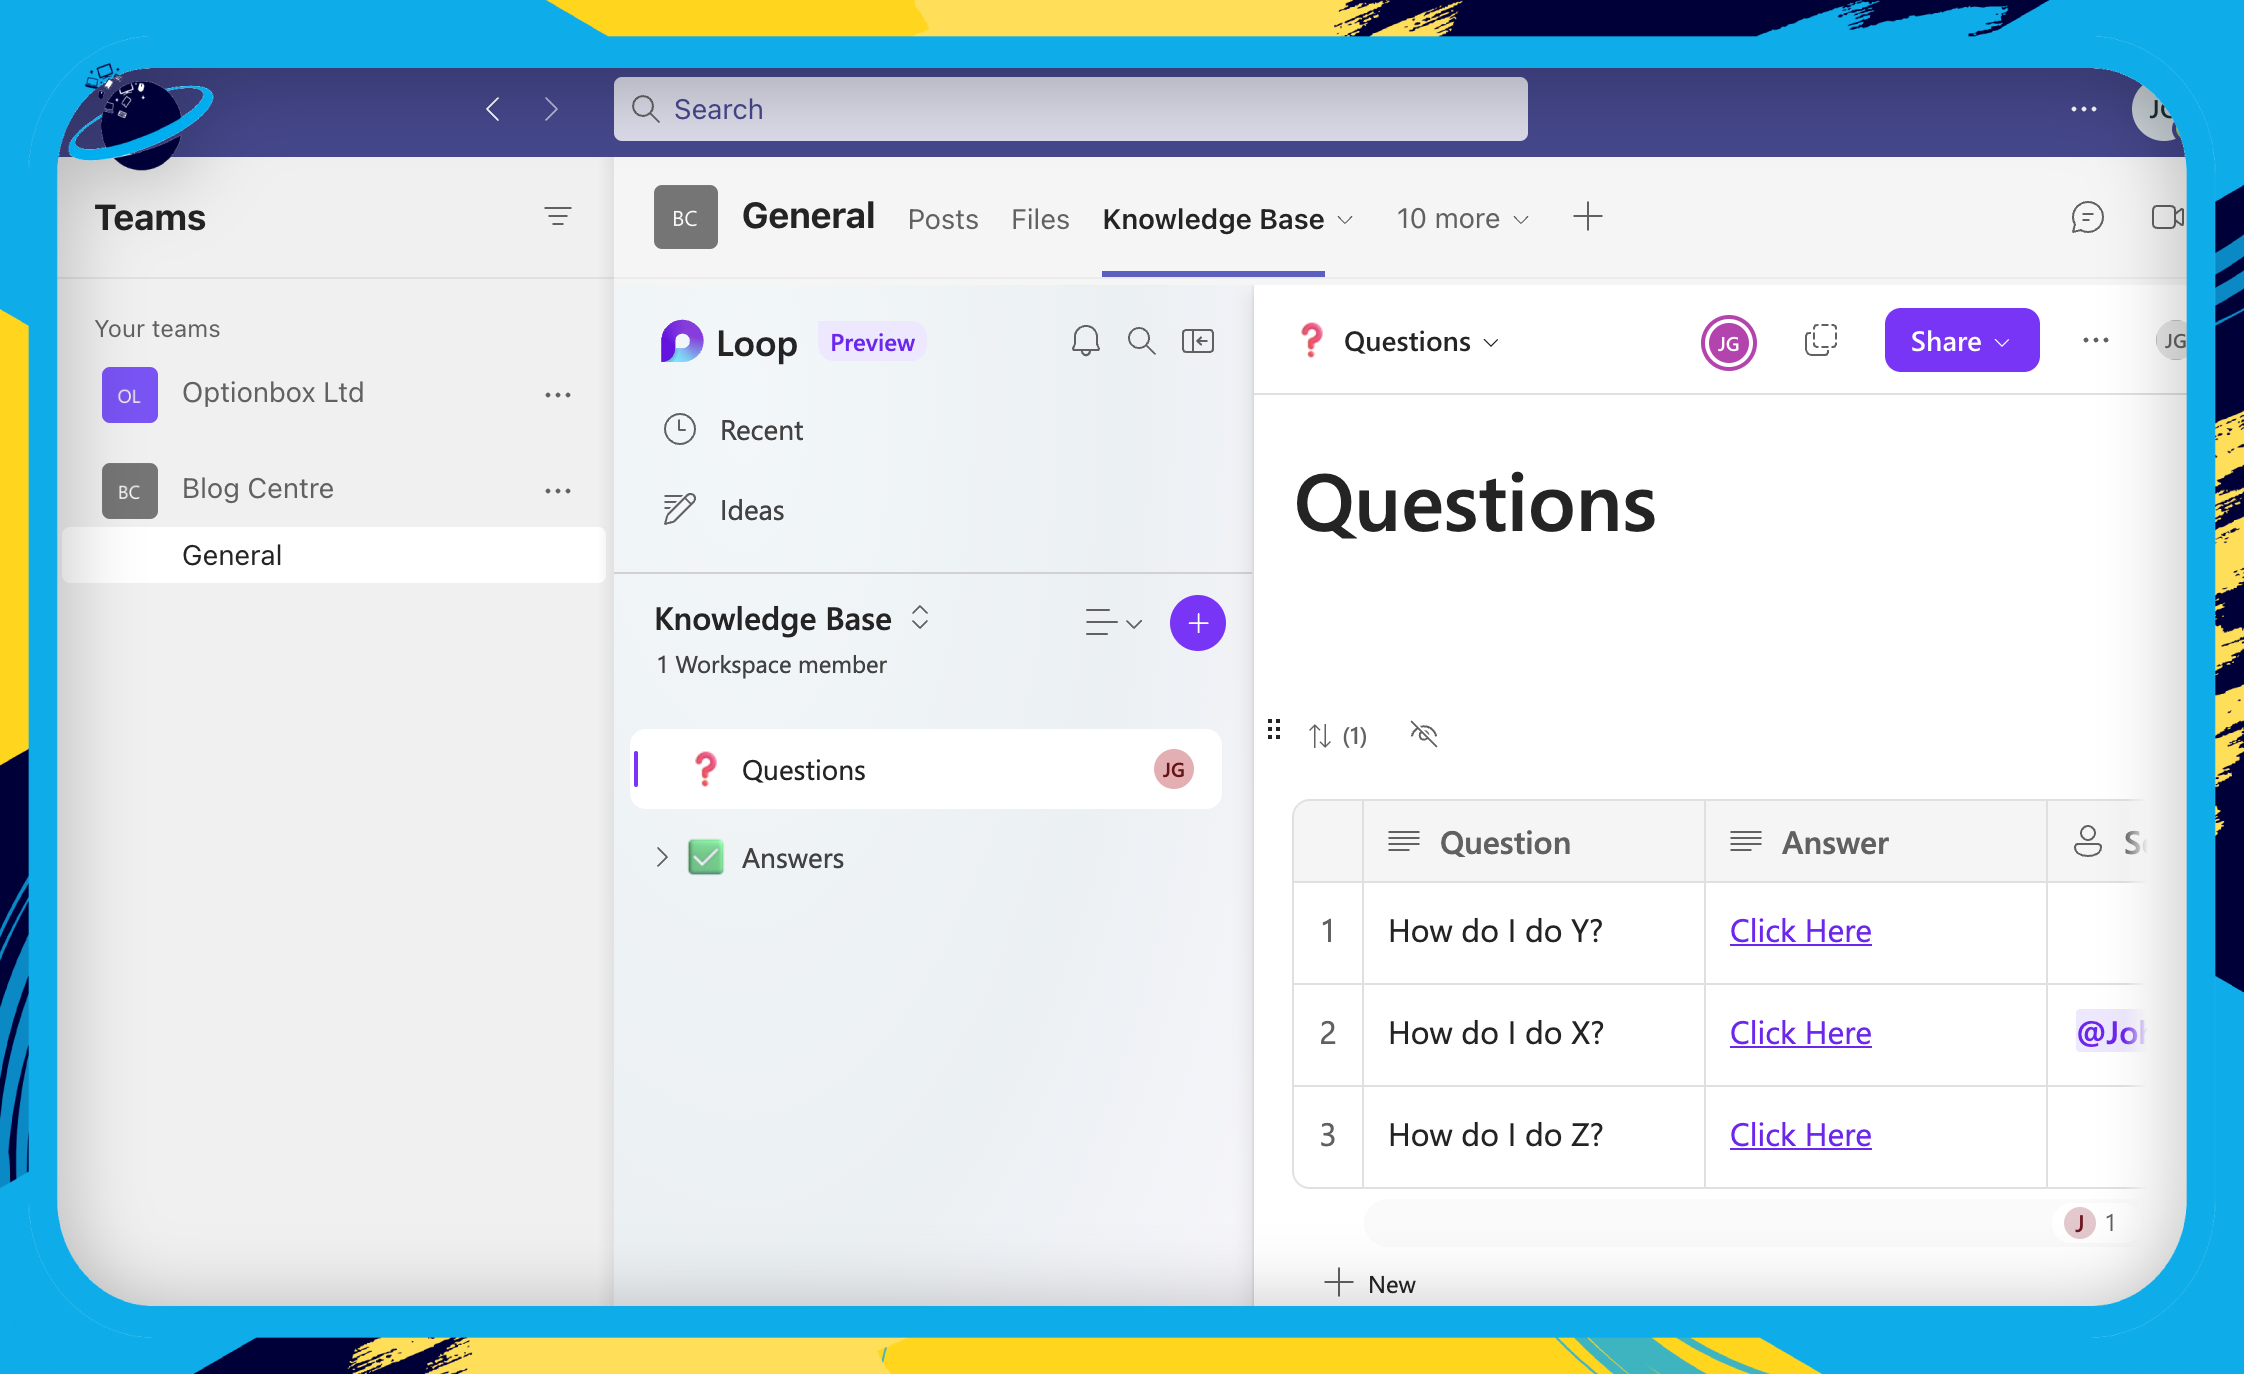
Your team can now access the Knowledge Base directly from the Teams channel.
Frequently Asked Questions (FAQ)
 Can Microsoft Teams be used as a knowledge management?
The easiest way to use Microsoft Teams as a knowledge or content management system is to use an add-in.
To do that, head to “Apps” on the left and search for “Knowledge” or “Content management.” Apps that you may find useful are “Perfect Wiki” or “Stack Overflow.”
Why is a knowledge base important?
A knowledge base serves as a repository for information, such as tutorials, policies, and FAQs. Having these resources located in one place makes the information much easier to access and allows your team to stay up-to-date with new trends.

 Conclusion
In this guide, we’ve given you the basic outline of how to create a Knowledge base in Loop. But there are many ways to expand upon this template. For example, you could create a “Files” page with a table containing links to relevant documents.
You can link to documents in Loop by typing an @ symbol and typing out the document’s name.
You could also add additional columns to your table, such as a “Date” to serve as a deadline for when an answer is required.
Users who leave a question can also create a checklist of possible answers in the “Answer” column. That could be beneficial if they’re looking for a yes/no or a specific kind of answer.
Thanks for reading!