As the modern workplace continues evolving, businesses of all sizes seek efficient ways to collaborate. Enter Microsoft Teams, a powerful collaboration platform that integrates with Office 365. This article will dive into the features that make Microsoft Teams an excellent tool for productivity and streamlining teamwork. Whether you use Teams regularly or are new to the platform, our informative guide will help you unlock the full potential of Microsoft Teams to transform your business collaboration experience. So, let’s get started!
 Table of content


Channels and Group Chats
One feature of Teams is its Channels and Group Chats feature. These provide a good environment for collaboration. Let’s break down the different aspects of Channels and Group Chats to understand their value.
Channels
A channel is a dedicated space within a team for conversations and file sharing related to a specific topic or project. They help to keep your team organized and reduce clutter. Here are some critical aspects of channels:
- Standard Channels: Visible to all team members and used for general discussions.
- Private Channels: Accessible only to a select group of team members, providing a secure space for sensitive information or focused discussions.
- Channel Tabs: Customize your channels with tabs that integrate other Office 365 apps and third-party tools, making relevant information and resources easily accessible.
How to create a channel in Teams
- First, open the Teams web or desktop app.
- Now click on “Teams.”
- Click on “More options” next to a team.
- Select “Add channel.”
- Fill out the channel information, including name, description, and privacy settings.
- Finally, click on “Add.”

Note: You can only add members to a private channel; if you use a public channel, all team members can access that channel.
Group Chats
Group Chats are an alternative to channels, allowing you to communicate with multiple colleagues in a more informal setting. These are great for smaller collaborations that don’t require a dedicated channel. Here are some notable features of Group Chats:
- Instant Messaging: Quickly send your colleagues messages, files, and images.
- Audio and Video Calls: Make group calls to communicate effectively or address urgent matters.
- Mentions: Use the @ symbol to mention specific team members, ensuring they receive a notification and stay in the loop.
Pro tip: Use a mix of Channels and Group Chats to balance your organization’s structured collaboration and informal discussions. This will help you optimize productivity and keep everyone engaged.
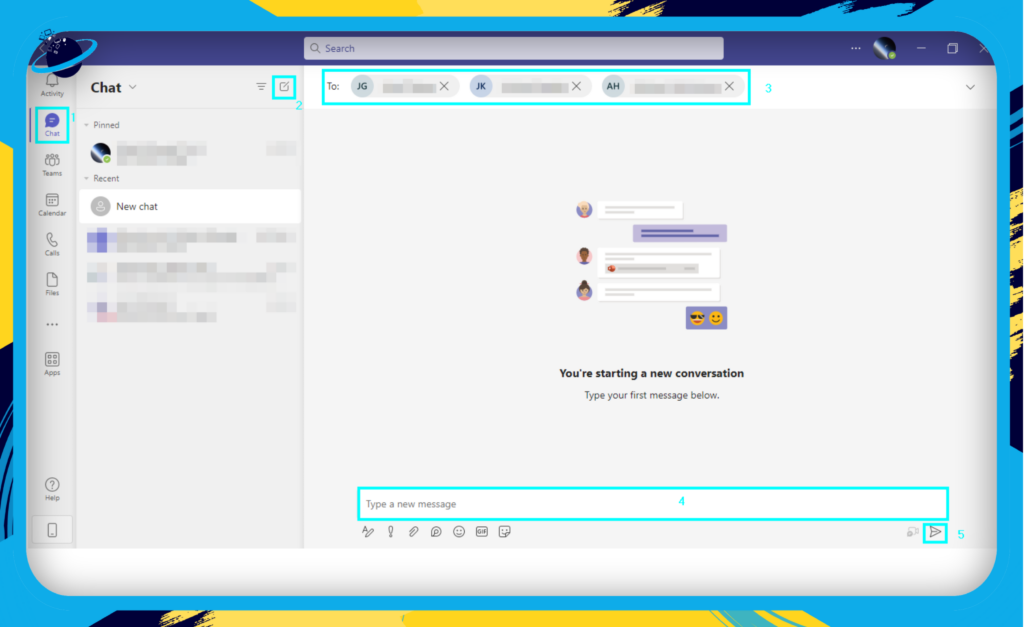
How to create a group chat in Teams
- First, open Teams.
- Now click on “Chat.”
- Click the “New Chat” symbol.
- Input the names of everyone you want to be part of the group chat.
- Type out a message and click “Send” to create the group.
In the next section, we will dive into Private Chats and Calls, which offer even more options for personalized communication within Teams.
Private Chats and Calls
When working with a team, sometimes you need to have a private conversation with just a few individuals. Microsoft Teams provides two essential features that cater to these needs: private chats and calls.
Private Chats
In addition to channels and group chats, Microsoft Teams enables users to engage in private conversations. These chats are perfect for:
- Discussing sensitive information
- Quick check-ins with colleagues
- Providing feedback or asking for clarification
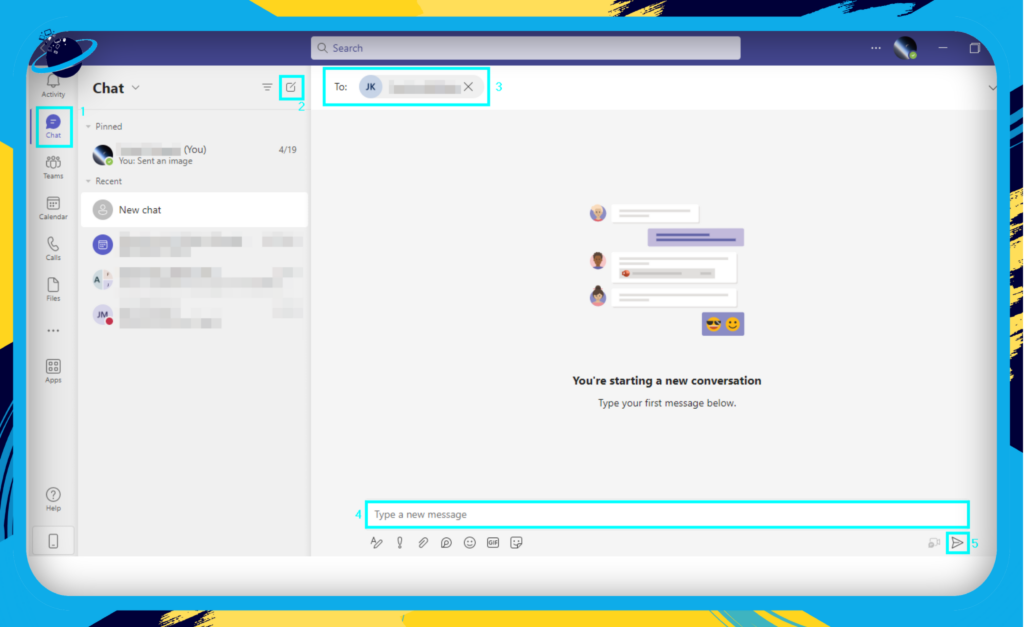
To start a private chat, simply:
- Click on “Chat.”
- Click the “New Chat” icon at the top of the app.
- Type the names of the participants in the To field.
- Begin your conversation in the message box.
- Click on “Send.”
You can also use the Search bar to find an existing conversation or a specific user.
Calls
When a text-based conversation isn’t enough, you can switch to a voice or video call within Microsoft Teams. Both one-on-one and group calls are supported, with features such as:
- Audio and video calls: Choose between voice-only or video-enabled calls.
- Screen sharing: Share your screen or a specific application window during a call.
- Call recording: Record the call for future reference or for colleagues who couldn’t attend.
- Blur or replace background: Enhance the privacy and reduce distractions during video calls.
- Raise hand: Signal that you have a question or want to contribute without interrupting the speaker.
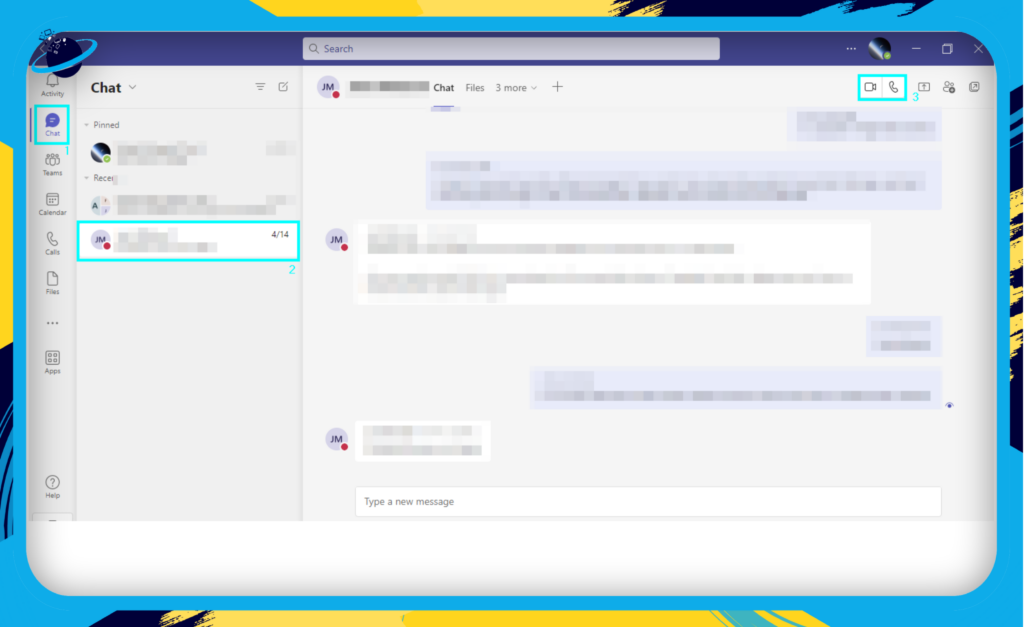
To initiate a call:
- Click on “Chat.”
- Locate the contact or chat you want to call.
- Click on the video camera or phone icon to start a video or audio call, respectively.
Remember to use a headset or headphones with a microphone for the best audio experience during calls.
Note: Private chats and calls are separate from channel conversations, ensuring your discussions remain focused and organized. By leveraging these features, you can maintain effective communication with your colleagues.
Video Conferencing
Microsoft Teams offers a robust video conferencing solution that enables businesses to host virtual meetings, workshops, and presentations effortlessly. Let’s dive into the key features that make video conferencing in Microsoft Teams a powerful asset to your business communication toolkit.

Scheduling and Invitations
- Calendar Integration: Microsoft Teams integrates with Outlook, allowing you to schedule meetings and send invitations directly from your calendar.
- Customizable Meeting Links: Generate unique meeting links that can be shared with attendees via email or messaging, enabling easy access to your video conferences.
- Joining Options: Participants can join a Teams meeting through various methods, including the Microsoft Teams app, a web browser, or even a phone call with a dial-in number.
In-Meeting Tools and Features
- Screen Sharing: Share your screen with attendees to present slides, documents, or other content during the meeting.
- Breakout Rooms: Divide larger meetings into smaller groups with breakout rooms, perfect for workshops or brainstorming sessions that require focused discussions.
- Meeting Controls: As a meeting organizer, you can mute/unmute participants, enable/disable video, and manage who can present or share their screen.
- Participant View Options: Attendees can choose from various layouts, such as a gallery or speaker views, to optimize their meeting experience.
- Live Captions: Improve accessibility and comprehension with real-time captions that automatically transcribe spoken words into text.

Recording and Post-Meeting Features
- Meeting Recording: Record your video conferences to capture important information, create training materials, or review discussions at a later time.
- Cloud Storage: Save recorded meetings securely in the cloud, making it easy to access and share with colleagues or team members.
- Meeting Notes: Keep track of key points and action items by taking notes within the meeting, which all attendees can easily share and access.
- Post-Meeting Follow-ups: Use the chat feature to continue the conversation, ask questions, or share additional resources after the meeting.
By leveraging these video conferencing features in Microsoft Teams, you can foster better communication, enhance collaboration, and improve overall productivity in your organization. So go ahead and explore the power of virtual meetings with Microsoft Teams!
File Sharing and Co-Authoring
One of the critical strengths of Microsoft Teams is its seamless integration with other Office 365 apps, allowing users to collaborate on documents in real-time. In this section, we will explore the following aspects of file sharing and co-authoring in Teams:
Centralized File Storage
Microsoft Teams stores files in a central location, making it easy for team members to access documents. Files shared in a channel are stored in the team’s SharePoint site, while files shared in private chats are stored in OneDrive for Business. This integration ensures that your files are always available and secure. Key benefits include:
- Streamlined file access: Access files directly within Teams without switching between apps or searching through email attachments.
- Version control: Keep track of changes with automatic versioning and the ability to restore previous versions if needed.
- Access permissions: Control who can access, edit, or share files, ensuring data security and compliance.
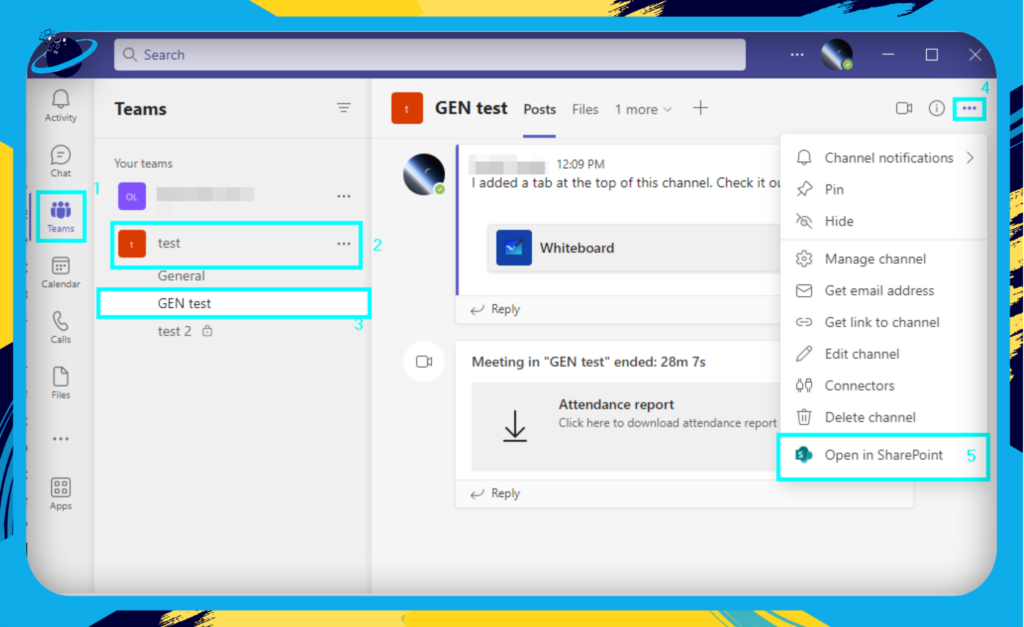
How to access Teams content in SharePoint
- Firstly, click on “Teams.”
- Now select a team.
- From there, click on a channel.
- Now click on “More options.”
- Finally, click on “Open in SharePoint.”
Real-Time Collaboration
Microsoft Teams enables real-time co-authoring for Office documents such as Word, Excel, and PowerPoint. This feature allows multiple users to work on the same document simultaneously, boosting productivity. Some of the standout advantages include the following:
- Live editing: See your colleagues’ changes as they happen, with visual indicators to show who’s editing and where.
- Comments and suggestions: Provide feedback or ask questions using the built-in commenting feature, making it easy to discuss and resolve issues.
- Conflict resolution: Teams will alert users in case of conflicting changes and provide options to resolve the issue.
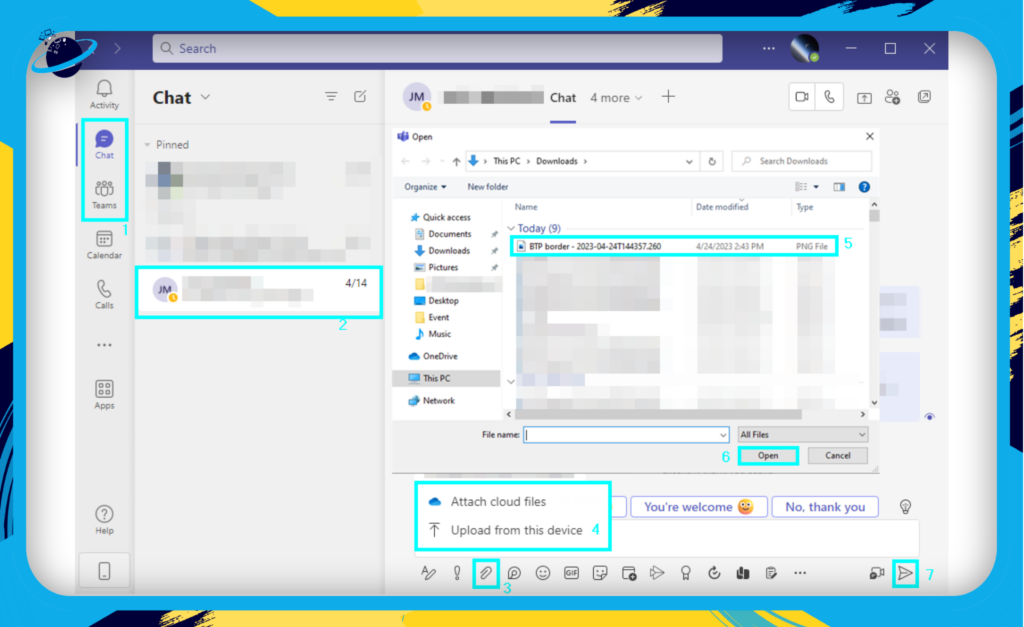
Sharing Files in Teams
Sharing files in Microsoft Teams is a breeze, whether in a channel, group chat, or private conversation. Simply follow these steps:
- Select a chat from the “Teams” or “Chat” sections.
- Select a chat.
- Now click on “Attach file.”
- Select “Upload from this device.”
- Choose a file.
- Click on “Open.”
- Input a message if needed and click on “Send.”
By leveraging the power of file sharing and co-authoring in Microsoft Teams, businesses can enhance collaboration and ensure everyone stays on the same page, ultimately driving success in the digital workplace.
Whiteboard Collaboration
Microsoft Teams offers an innovative digital whiteboard feature that enables users to collaborate visually in real time, enhancing communication during meetings. Here we will explore the different aspects of the whiteboard functionality and how it can improve your team’s collaboration.
Whiteboard Basics
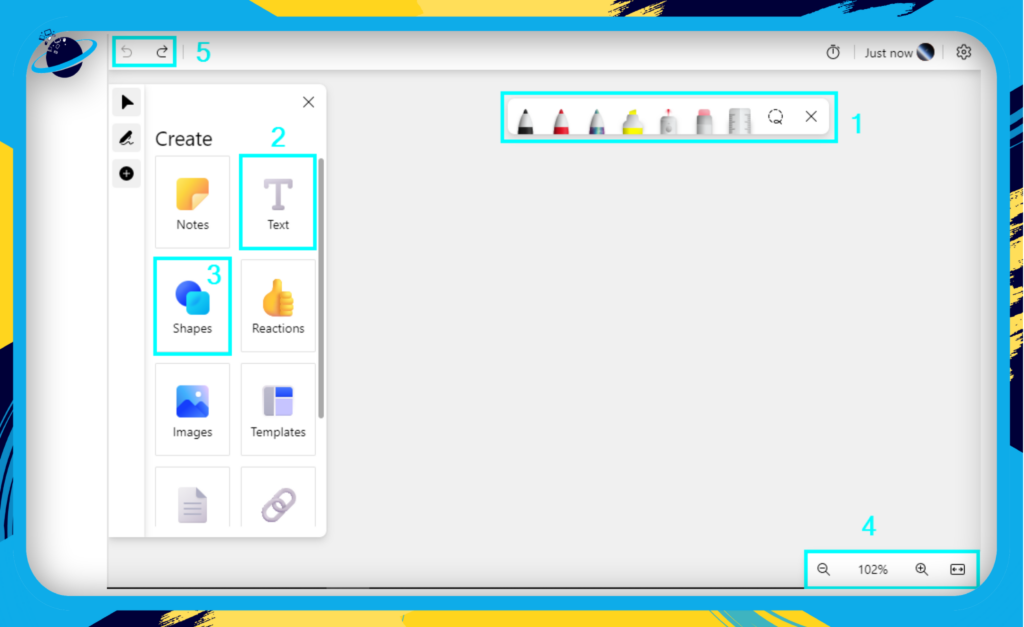
The digital Whiteboard in Microsoft Teams provides a blank canvas for users to draw, write, and brainstorm ideas. You can access the Whiteboard during a Teams meeting or create a standalone whiteboard to share with your colleagues. Key features include:
- Drawing tools: Pencil, pen, and highlighter options are available to create sketches, diagrams, and illustrations.
- Text input: Add and edit text on the Whiteboard for notes, labels, or descriptions.
- Shapes and lines: Easily create geometric shapes and straight lines to organize content or flowcharts.
- Infinite canvas: Zoom in and out or move the canvas around to create more space for your ideas.
- Undo and redo: Correct mistakes or revert to previous versions with ease.
How to access a standalone whiteboard in Teams
- Firstly, click on “Teams.”
- Now select a team or channel.
- Click on the plus symbol at the top.
- Find the Whiteboard app and then select it.
- Choose the Whiteboard you want collaboration for and click on “Save.”
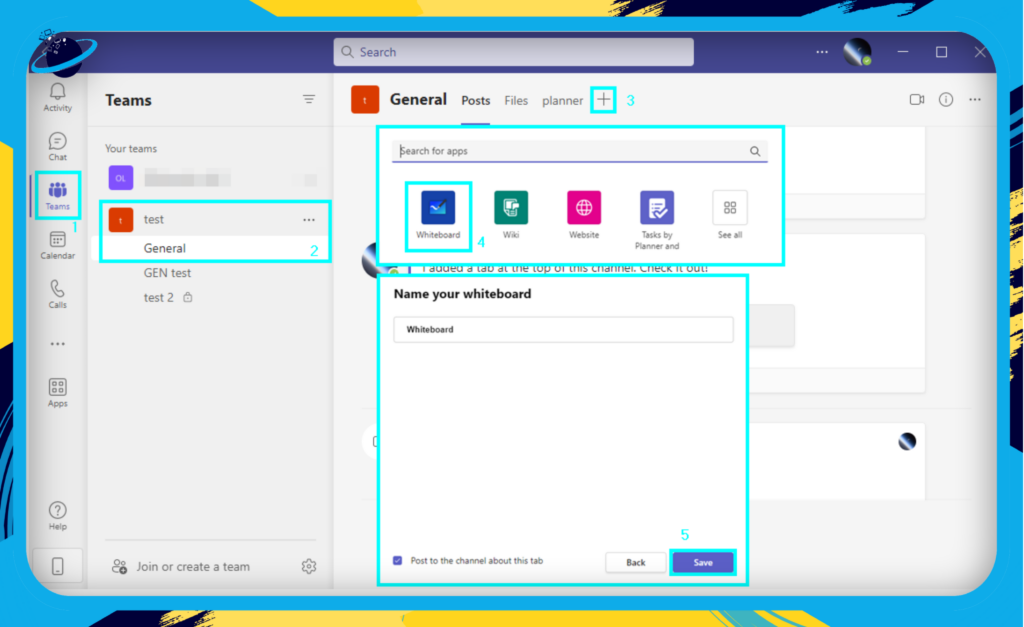
Now you can work on the Whiteboard and have other team members work on the same Whiteboard.
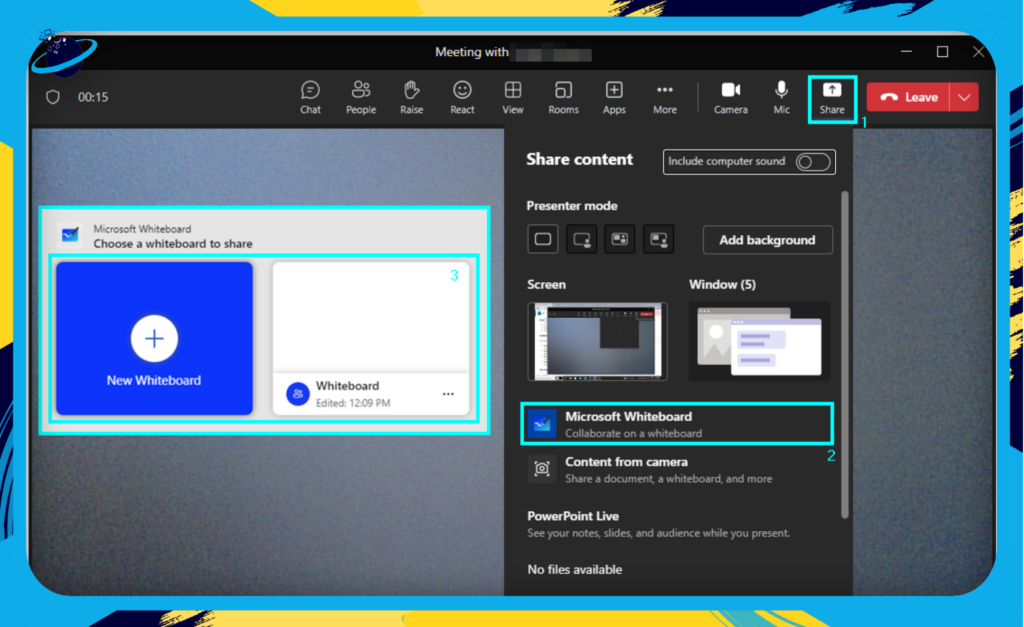
How to access a Whiteboard from a meeting in Teams
- In a Teams meeting, click on “Share.”
- Select “Microsoft Whiteboard.”
- Choose a Whiteboard and start collaborating.
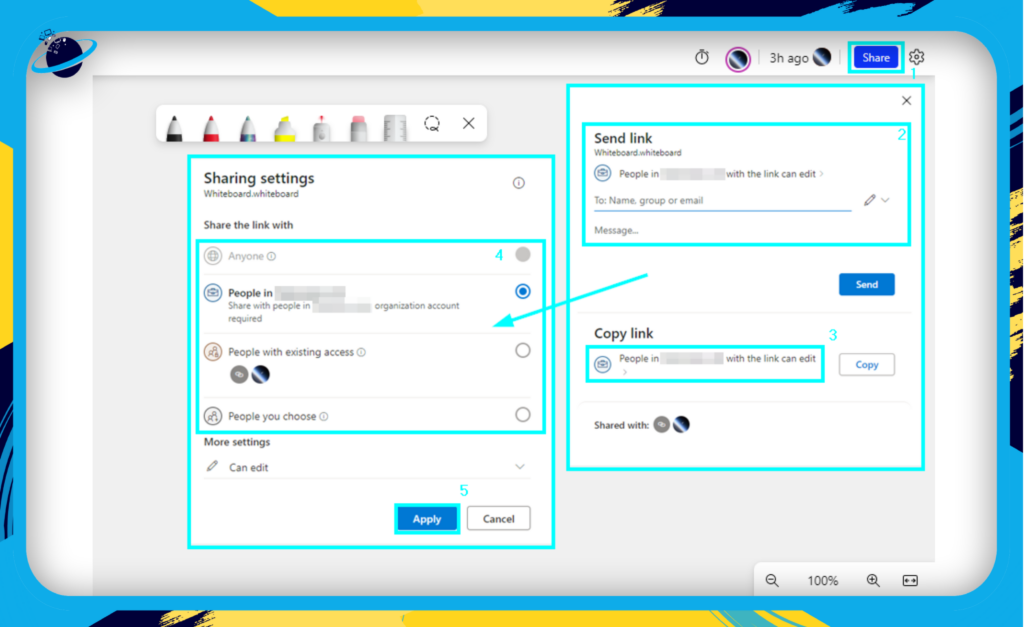
Collaborating on a Whiteboard
To make the most of the whiteboard feature in your meetings, follow these tips:
- Invite participants: Share the Whiteboard with meeting attendees, or invite specific team members to collaborate.
- Assign roles: Control the level of access for participants by assigning roles such as presenter or attendee.
- Real-time collaboration: Watch as ideas come to life with multiple users contributing simultaneously on the canvas.
- Export and share: Save the Whiteboard as an image or export it as a PowerPoint file for easy sharing and future reference.
Use Cases for Whiteboard Collaboration
The digital Whiteboard can be used in various scenarios to enhance collaboration and communication within your team. Here are a few examples:
- Brainstorming sessions: Encourage team members to share and develop ideas visually and interactively.
- Project planning: Outline project timelines, milestones, and dependencies using flowcharts or diagrams.
- Problem-solving: Break down complex issues into smaller parts, visualize potential solutions, and identify areas for improvement.
- Presentations: Enhance your presentations by incorporating live annotations, illustrations, or diagrams.
By leveraging the digital Whiteboard in Microsoft Teams, you can have creativity and facilitate better communication among your team members, leading to more productive and engaging meetings.
Accessibility and Inclusivity in Microsoft Teams
Ensuring everyone in the workplace can access and utilize Microsoft Teams is essential to fostering an inclusive and collaborative environment. Microsoft has made significant strides in implementing accessibility features and inclusive design principles that cater to diverse user needs. This section will explore the various accessibility features that make Microsoft Teams more user-friendly.
Live Captions
Live captions are an essential feature that can benefit users who are deaf or hard of hearing and those who prefer to read text or are in a noisy environment. Microsoft Teams offers real-time captioning during meetings, making it easier for everyone to follow along and participate.
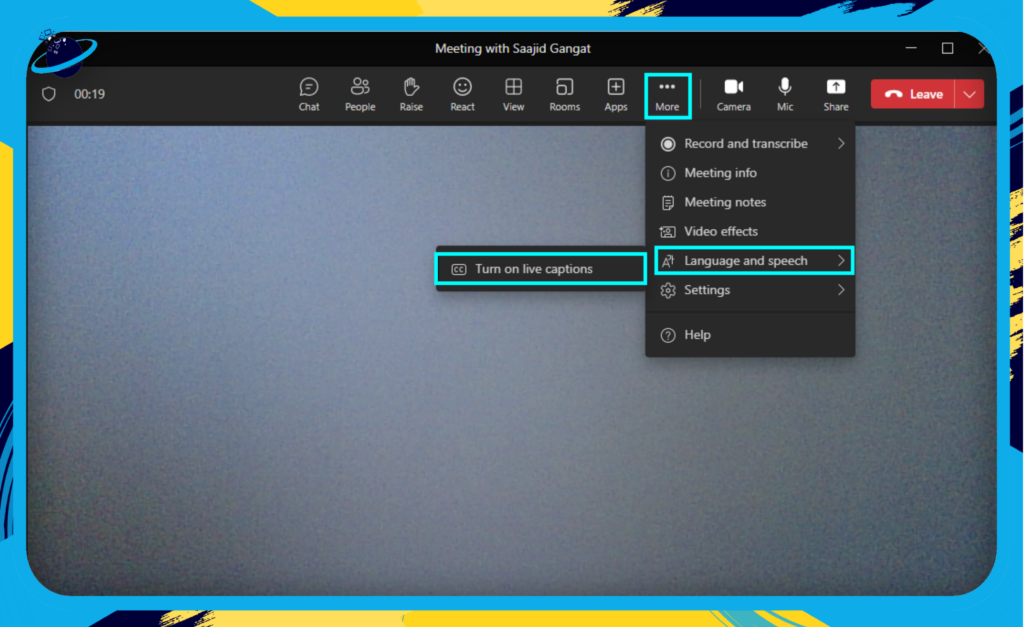
How to activate live captions in Teams meetings
- First, click on “More options.”
- Now click on “Language and speech.”
- Finally, select “Turn on live captions.”
Immersive Reader
The Immersive Reader is invaluable for users with dyslexia, visual impairments, or learning a new language. This feature, available in Microsoft Teams, provides text-to-speech functionality, enhanced readability with customizable font sizes and spacing, and color themes to reduce eye strain.
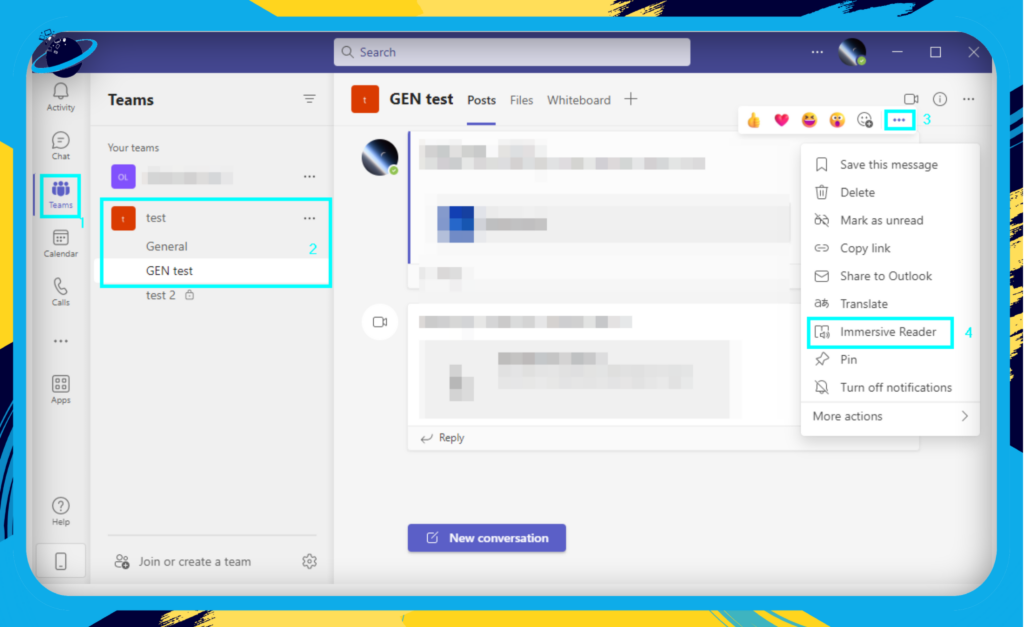
How to enable immersive reader in Teams
- First, select the “Teams” option.
- Now click on a team or channel.
- Click on “More options” next to a chat.
- Click on “Immersive reader.”
Tips and Best Practices
We’ve compiled a list of helpful tips and best practices to ensure you get the most out of Microsoft Teams and optimize your collaboration experience. These will boost your productivity and enhance your overall user experience.
Organize Your Channels
- Create relevant channels: Set up channels based on specific projects, departments, or topics to keep discussions organized and focused.
- Use naming conventions: Establish a consistent naming system for your channels to make them easily identifiable and searchable.
- Archive inactive channels: Regularly clean up and archive channels no longer in use to reduce clutter and maintain an organized workspace.
Optimize Meetings and Calls
- Schedule meetings with agendas: When scheduling a meeting, include a plan outlining the topics to be discussed. This helps participants come prepared and makes meetings more efficient.
- Utilize video conferencing features: Make the most of Teams’ video conferencing features, such as screen sharing, recording, and live captions, to enhance your remote meetings and presentations.
- Follow up with meeting notes: After a meeting, share a summary of the key points discussed, decisions made, and any assigned tasks to keep everyone on the same page.
Leverage File Sharing and Co-Authoring
- Store files in Teams: Upload and store your files in Teams to ensure easy access and real-time collaboration among team members.
- Set access permissions: Manage access permissions for files and folders to control who can view, edit, or delete content.
- Use version history: Take advantage of the version history feature to track document changes and revert to previous versions if necessary.
Streamline Task Management
- Create and assign tasks: Use Microsoft Planner and To Do to create tasks, set deadlines, and assign them to team members.
- Monitor progress: Regularly review task progress and make adjustments to ensure projects stay on track and meet deadlines.
- Integrate with other tools: Connect Microsoft Teams with third-party project management tools to enhance task management capabilities.
Utilize Search Functionality
- Search effectively: Use the search bar to quickly find messages, files, or people by entering keywords or phrases.
- Filter search results: Apply filters to narrow your search results and find what you want.
- Bookmark important content: Save important messages, files, or conversations by bookmarking them for easy access later.
By incorporating these tips and best practices, you’ll be well on your way to maximizing the benefits of Microsoft Teams and boosting collaboration within your organization.
Conclusion: The Power of Microsoft Teams in the Modern Workplace
As we’ve explored the various collaboration features of Microsoft Teams, it’s clear that this platform plays a vital role in empowering businesses to stay connected, organized, and efficient in today’s fast-paced digital landscape. To wrap up our journey, let’s recap the key points and benefits of using Microsoft Teams for collaboration:
Key Takeaways
- Channels and Group Chats: Stay organized and focused with dedicated channels for projects, departments, or topics.
- Private Chats and Calls: Communicate effectively with one-on-one or smaller group conversations.
- Video Conferencing: Enhance remote meetings and presentations with scheduling, screen sharing, and recording capabilities.
- File Sharing and Co-Authoring: Seamlessly collaborate on documents in real-time, thanks to integration with Office 365 apps.
- Task Management: Keep track of tasks and deadlines with Microsoft Planner and To Do integrations.
- Whiteboard: Foster creativity and visual collaboration using the digital whiteboard feature.
- Customization and Apps: Tailor Microsoft Teams to your organization’s needs with custom tabs, apps, and bots, including third-party integrations.
- Security and Compliance: Protect user data and maintain regulatory compliance with robust security measures.
- Accessibility and Inclusivity: Ensure a user-friendly experience for everyone with features like live captions, immersive reader, and keyboard shortcuts.
Unlocking the Full Potential of Microsoft Teams
Embracing the power of Microsoft Teams can transform how your business communicates and collaborates. By leveraging the platform’s diverse features, you can streamline processes, boost productivity, and foster a more connected and engaged workforce. As you continue to explore and utilize Microsoft Teams, remember to:
- Stay organized: Keep channels and group chats well-structured for easy navigation and focused discussions.
- Set clear agendas: Improve meeting efficiency by setting and sharing agendas in advance.
- Utilize the search functionality: Save time and effort by using the search bar to find messages, files, or people quickly.
We hope this friendly and informative guide has provided valuable insights and tips for harnessing the full potential of Microsoft Teams in your business. Happy collaborating!
Additional resources
Our resourceful guides help millions of people with the technical issues they may encounter. Please have a read of some of our other related content so you can gain a better understanding of the platform.
How to see messages from all channels and teams in one place (Microsoft Teams)
What is the maximum number of private channels in Teams?
What is the maximum number of channels in Teams
How to set up breakout rooms in advance in Teams
Can you have multiple users manage breakout rooms in Teams?
Who can manage breakout rooms in Teams?
How to copy from one Microsoft Whiteboard to another