Welcome to our guide on Microsoft Teams, a powerful collaboration tool that has revolutionized how teams interact in today’s hectic corporate world. Microsoft Teams is a crucial part of the Microsoft 365 package and provides a one-stop shop for all your office needs. It was created to make communication and collaboration simple.
This post will give an educational overview of the essential features that make Teams a vital tool for organizations. So let’s get started and see how Microsoft Teams can improve collaboration and increase productivity in your business.
Here is an overview of everything that will be covered in this blog:
- Getting started with Microsoft Teams
- Channels
- Chat and messaging
- Video and audio calls
- Meetings and scheduling
- File sharing and collaboration
- Task management
- Apps and integrations
- Security and compliance
- Tips and best practices
- Conclusion
 Getting Started with Microsoft Teams
This section will walk you through the basics of setting up and configuring Microsoft Teams to suit your organization’s needs. We’ve got you covered, from creating an account to inviting team members.
Setting Up an Account
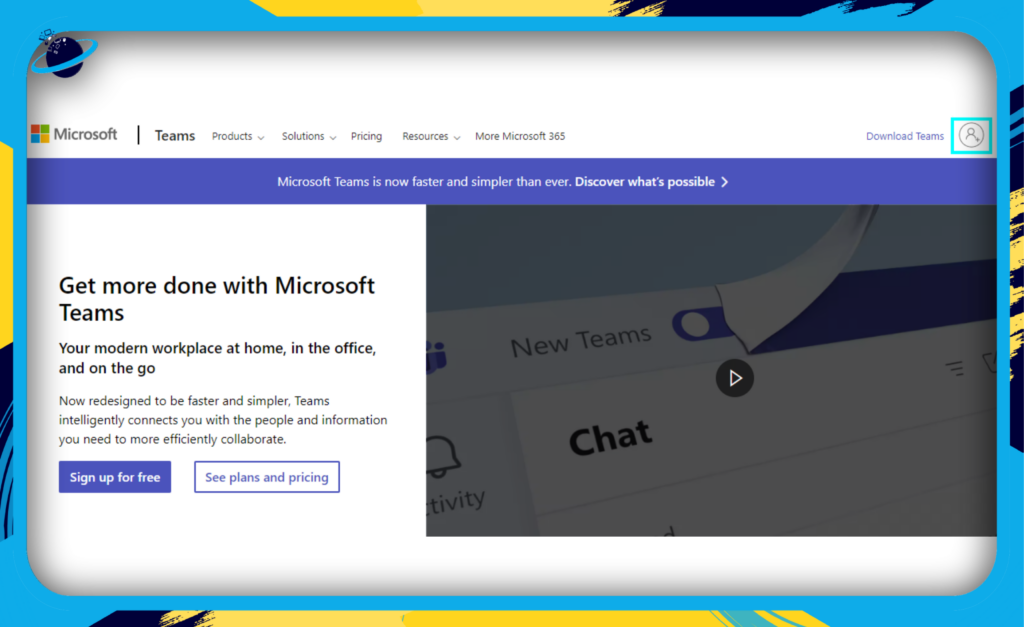
To start with Microsoft Teams, you’ll first need to sign up for a Microsoft 365 account if you haven’t already. Microsoft Teams is included with most Microsoft 365 business plans (read our dedicated guide to help you pick a plan), making it an easy choice for organizations already using the suite.
- Visit the Microsoft Teams website.
- Click on “Sign In” if you already have a Microsoft 365 account or “Get Teams” to sign up for a new one.
- Once you are in the Sign in section, click “Create one.”
- Input your email address and click on “Next.”
- Now add a new password and click on“Next.”
- Type out your name and then click on “Next.”
- Add your birth credentials, then click “Next.”
- Input the verification code sent to your email and then click “Next.”
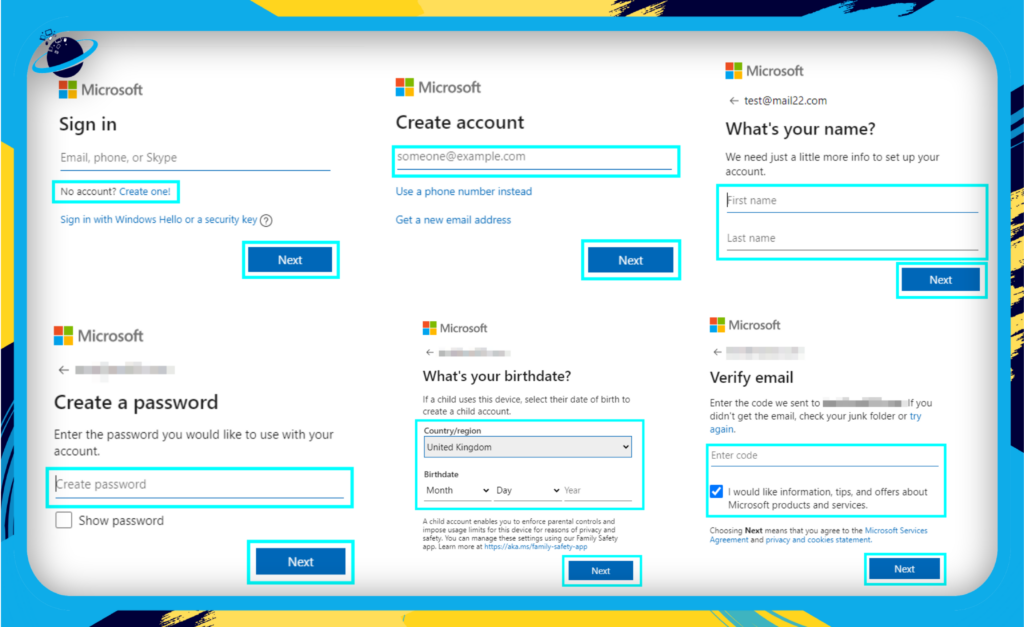
Once these steps are complete, you will have managed to set up a Microsoft Teams account.
Creating and Joining a Team
Once you’ve signed in, it’s time to create a new team or join an existing one. Here’s how:
- Launch Microsoft Teams.
- Click on the “Teams” icon in the left-hand navigation pane.
- For a new team, click “Join or create a team” at the bottom of the Teams list, then choose “Create a team.”
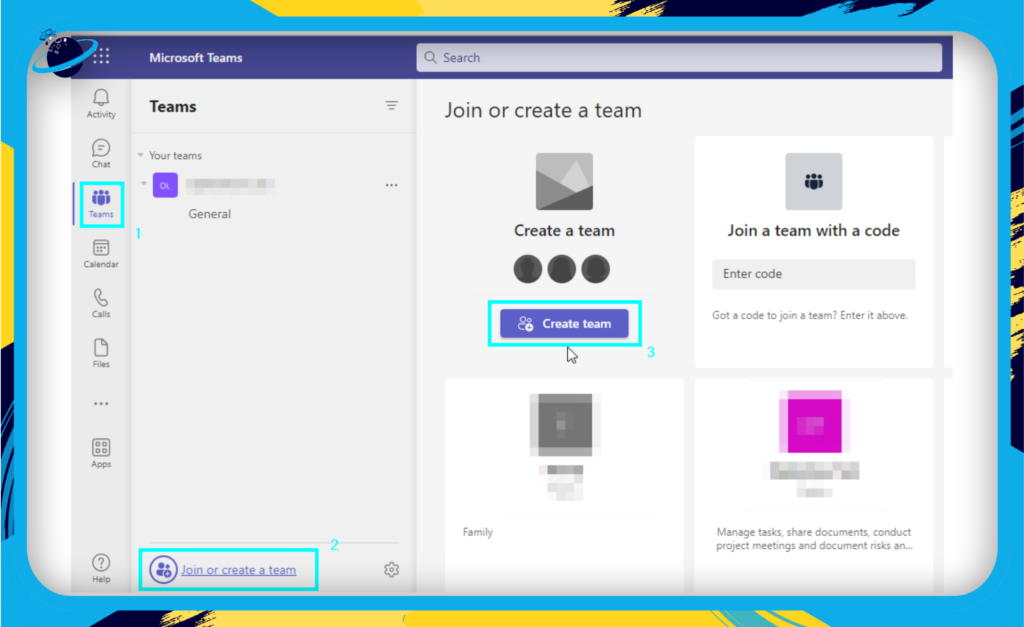
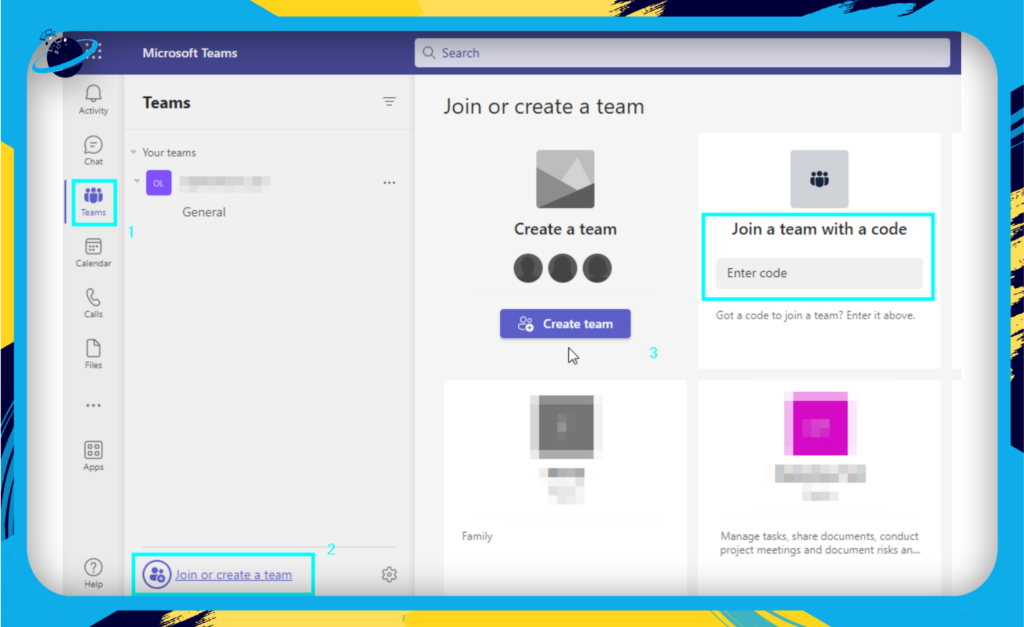
- To join an existing team, click “Join or create a team” and enter the team code given by the admin.
How can you invite team members?
You may now continue to add team members once you have your team in place. The actions listed below can be used to include new team members:
- Choose the team you wany to add members to on the Teams page.
- Next to the team name, click the “More options” button (three dots).
- Now choose “Add member.”
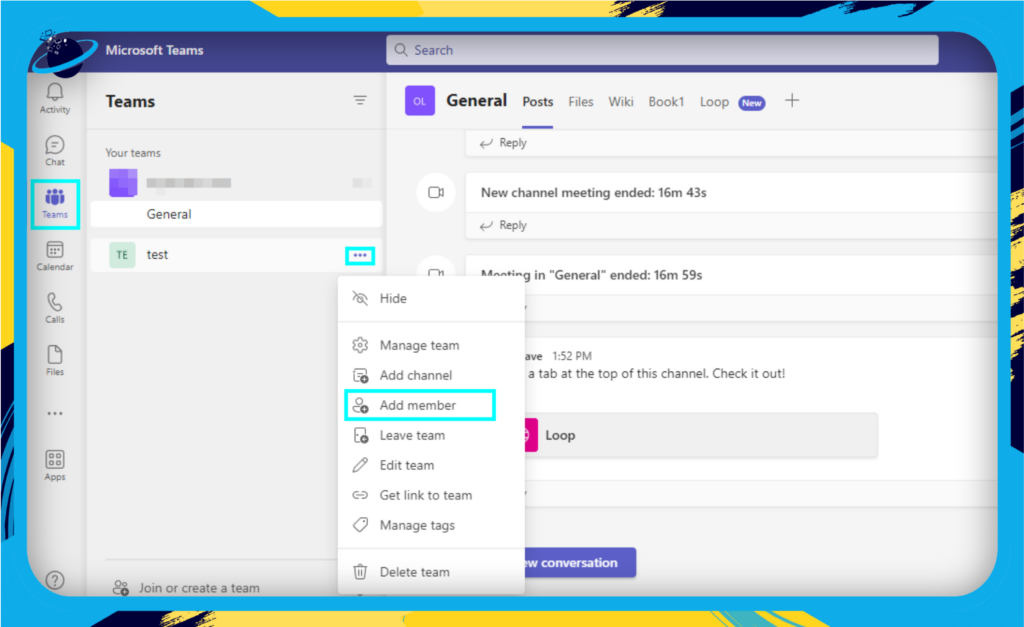
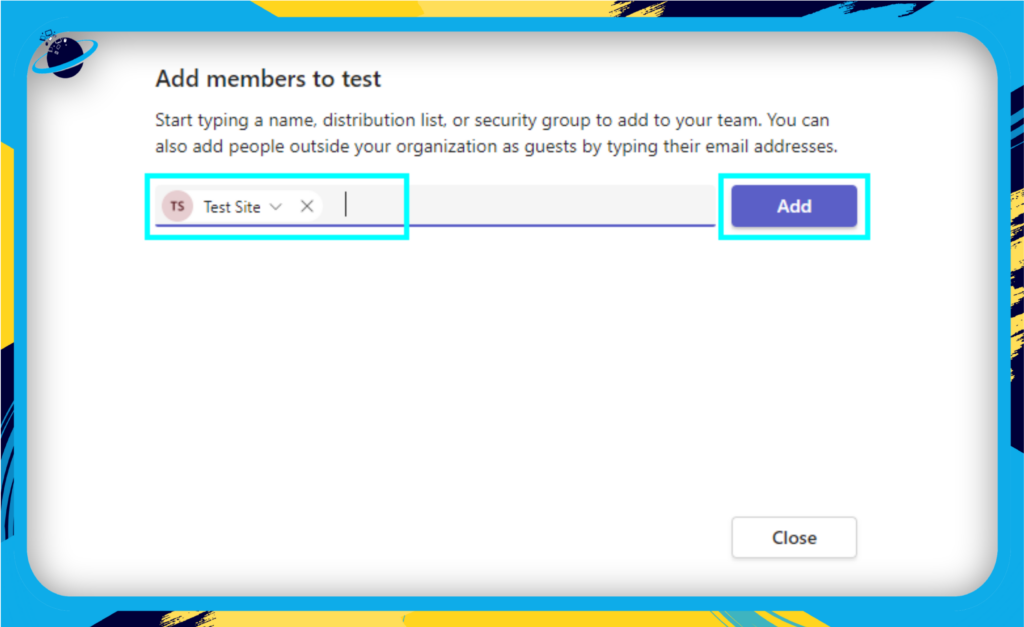
- Enter the team member’s email address, and click “Add.” You can also assign roles (member or owner) during this process.
Tip: For large organizations, consider utilizing the bulk invite feature to invite multiple team members at once using a .csv file.
By following these steps, you’ll have successfully set up your Microsoft Teams account, created or joined a team, and invited team members. In the next section, we’ll explore the various features and functionalities of Microsoft Teams that will help you enhance collaboration and productivity in your organization.

Channels: Organize Your Team’s Communication
One of the key features of Microsoft Teams is its ability to create channels that keep your team’s communication organized and focused. Channels are topic-based discussion spaces tailored to specific projects, teams, or themes, making it easy for team members to stay on top of relevant conversations and collaborate more efficiently.
Types of Channels
- Standard Channels: These channels can be accessed by anyone. They provide a good way to share information amongst members of the Channel.
- Private Channels: These channels are invite-only and provide a more secure location to engage with Teams. Team owners can control access to private channels.
- Shared Channels: Introduced in late 2021, shared channels allow for cross-organizational communication to be made simple. Users from different organizations can work together on the same projects.
Creating and Managing Channels
To create a new channel, follow these simple steps:
- Navigate to the “Teams.”
- Select the team you want to create a channel for and click on “More Options,” which is outlined by three dots.
- Choose “Add Channel.”
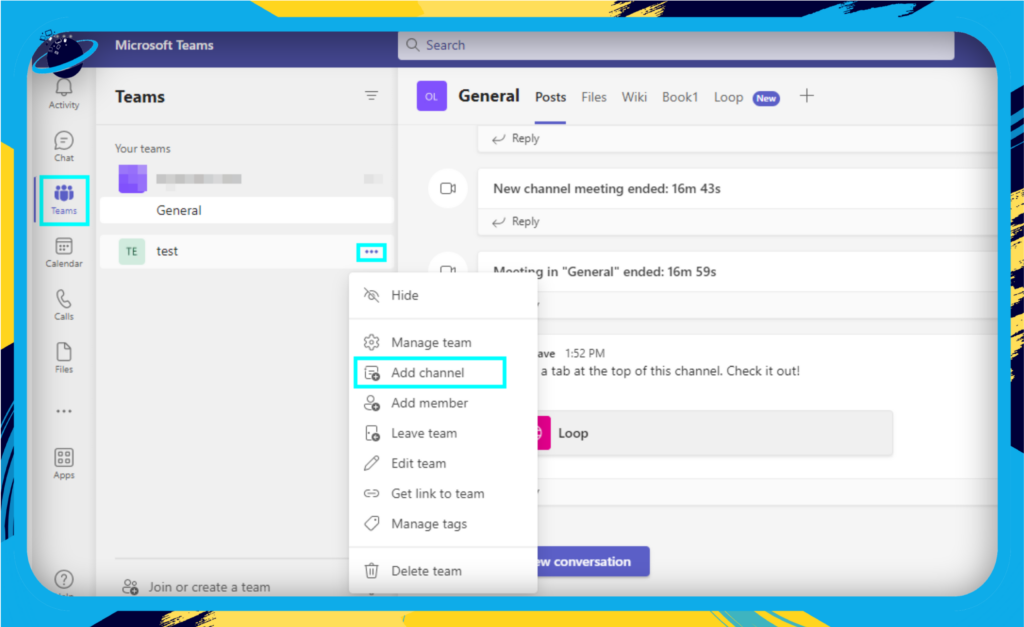
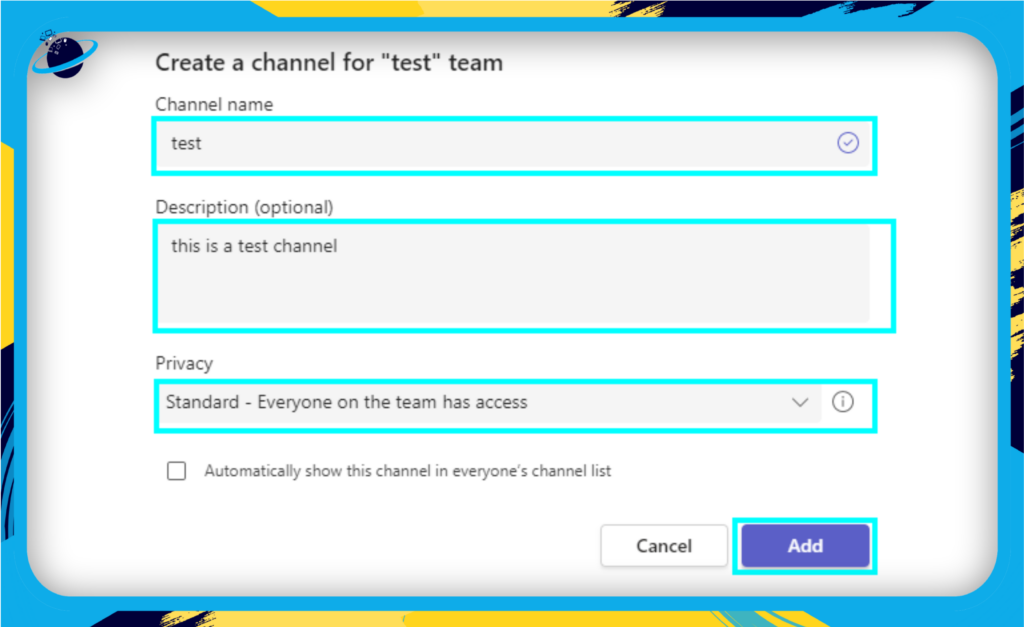
- Give your channel a name and description that reflect its purpose.
- Select the channel type (standard, private, or shared), and configure any additional settings as needed.
- Click “Add” to create your new channel.
Once you’ve created a channel, you can manage its settings by clicking the ellipsis (…) icon next to the channel name and selecting Manage Channel. From here, you can edit the channel’s name, description, or privacy settings, add or remove members (for private channels) and manage channel moderation settings.
Tips for Effective Channel Organization
To make the most of channels in Microsoft Teams, consider these best practices:
- Be specific: Create channels with clear purposes and descriptive names to help team members easily find and join relevant discussions.
- Limit channel proliferation: Avoid creating too many channels, as this can lead to information overload and make it difficult for team members to track conversations.
- Archive inactive channels: If a channel is no longer needed or has become inactive, consider archiving it to declutter your team’s workspace and maintain focus on active projects.
You can create a well-organized and efficient communication environment that fosters collaboration and enhances your team’s productivity by effectively using channels.
Chat and Messaging
The goal of Microsoft Teams is to improve organization and efficiency in communication. The chat and message features that make communication with your team members simple will be covered in this section.
One-on-one and Group Chats
One-on-one chats:
Any team member may be reached privately by selecting the “Chat” button from the left-hand menu and typing their name. Direct communication or discussing delicate topics is best done in this way.
Group chats:
Start a group conversation and invite people by selecting the “New Chat” option. Group chats are ideal for exchanging updates with a small group, brainstorming, and debating projects.
Threaded Conversations
You may discover threaded discussions that keep topics organized and simple to follow in channels. Click “Reply” to add a new thread to an existing message or to reply to an existing message. Doing this may prevent the clutter in typical group chats and guarantee that chats stay focused and pertinent.
Additional chat personality features
Make your communications more memorable by using different formatting options:
- Rich text editing: To emphasize important points, use rich text editing to bold, italicize, underline, or highlight the content.
- Emojis: Emojis can be used to express feelings or sentiments or to set a more informal tone.
- GIFs: Use GIFs to add excitement and engagement to your messaging.
- Stickers: To express yourself artistically, pick from a variety of stickers.
@Mentions
Want to make sure someone sees a certain message, or do you need their urgent attention? Utilize @mentions to let them know:
- @person: To contact a team member personally, use “@” after their name. They’ll get a notification and may join the chat right away.
- @channel: Mention a whole channel to alert all members who have that channel’s alerts turned on.
- @team: In a channel post, type “@team” to alert all team members. To prevent overwhelming your coworkers, use this carefully.
Incorporating these chat and messaging features into your daily workflow can enhance communication, reduce miscommunication, and foster a more connected and engaged team.
Video and Audio Calls
Microsoft Teams makes connecting with your colleagues easily through video and audio calls. In this section, we’ll explore how to initiate and join these calls and discuss key features that can enhance your virtual meeting experience.
Initiating and Joining Calls
To initiate a video or audio call:
- Navigate to the “Chat” or “Teams” tab.
- Select a conversation or channel.
- Click the “Video call” or “Audio call” icon in the top right corner.
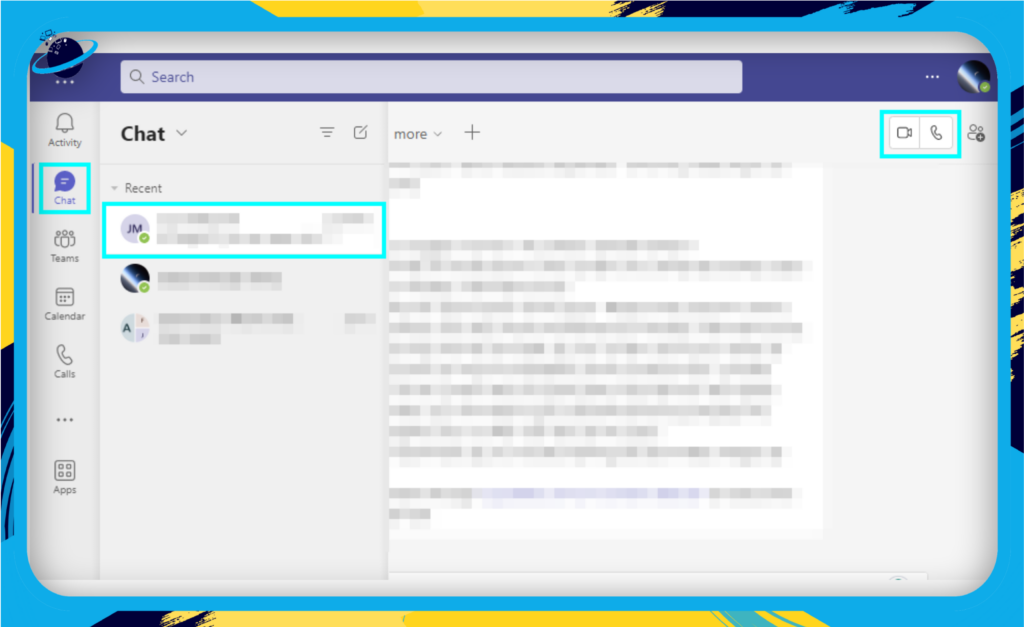
To join an ongoing call, click the “Join now” button in the call notification or the meeting invitation.
Screen Sharing
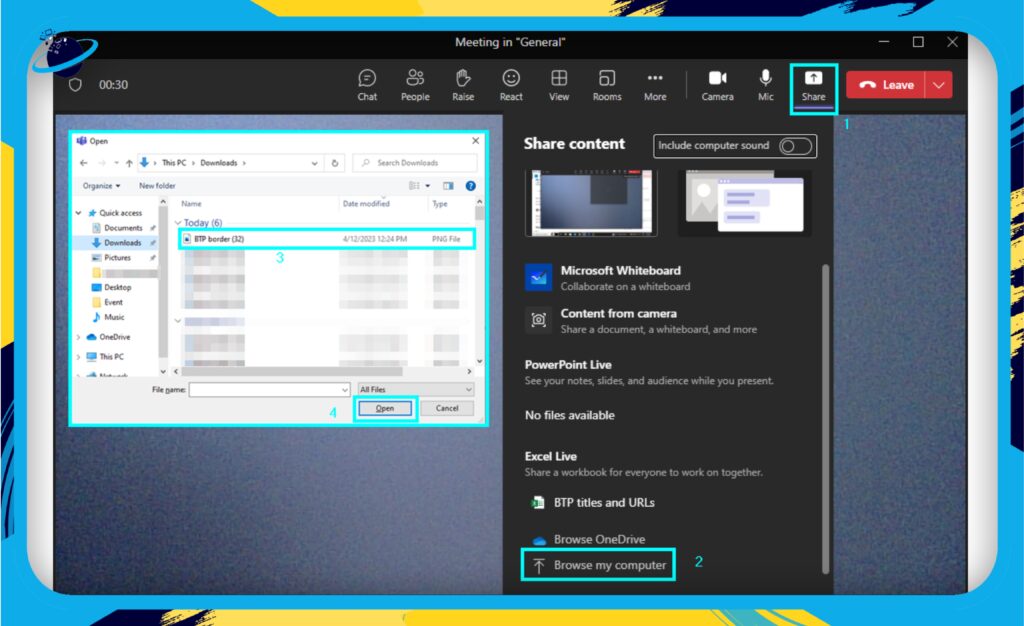
During a call, you can share your screen to present your work or collaborate on documents. To do this:
- Click the “Share” icon on the call control bar.
- Select the desired screen or window you want to share.
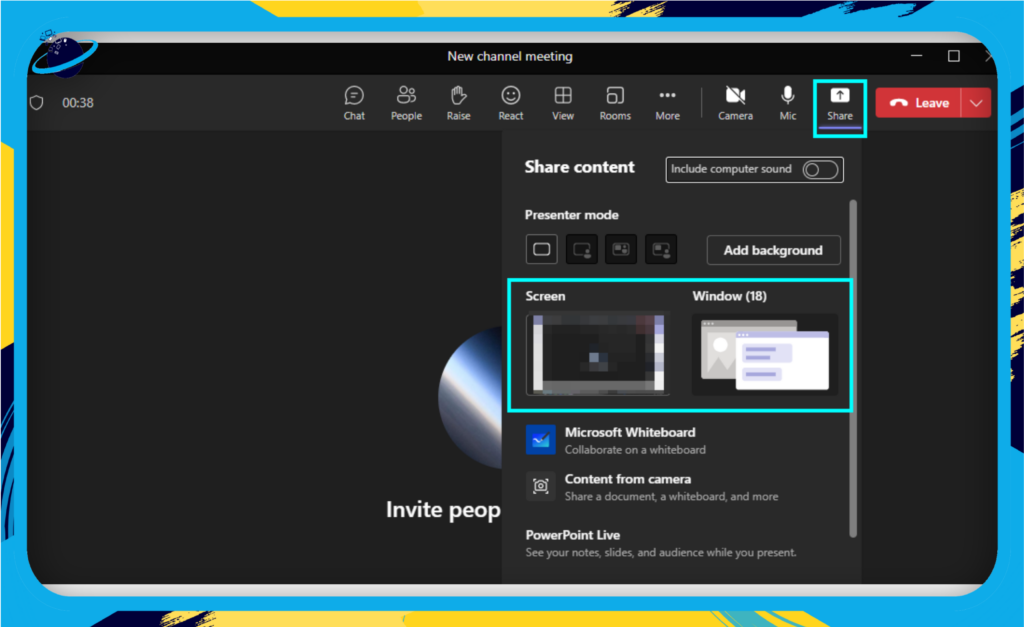
Optionally, give control of your screen to another participant by clicking “Give control.”
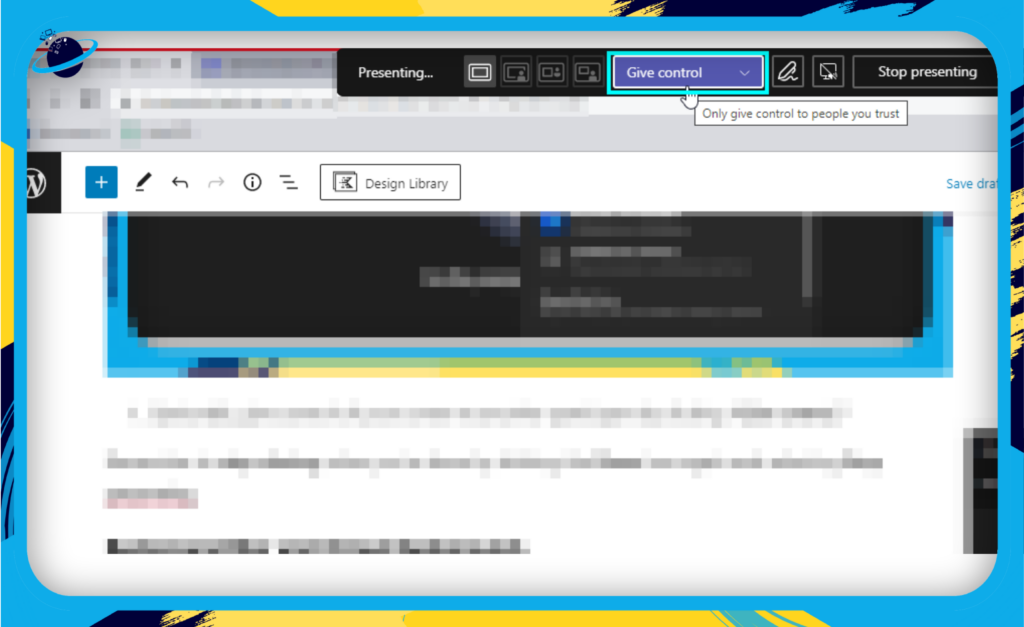
Remember to stop sharing when you’re done by clicking the Share icon again and selecting Stop presenting.
Background Blur and Virtual Backgrounds
Microsoft Teams allows you to blur your background or use virtual backgrounds to maintain a professional appearance and minimize distractions during video calls. To enable this feature:
- Click the More actions (three dots) icon on the call control bar.
- Select “Video effects.”
- Choose “Blur” from the options.
- Alternatively, you can choose a background from the available options.

Breakout Rooms
Breakout rooms are a powerful tool for dividing participants into smaller groups for focused discussions or collaborative work. To create breakout rooms:
- Click the “Rooms” icon on the call control bar.
- Choose the number of rooms you’d like to create.
- Select the desired method for assigning participants (automatically or manually).
- Finally, click on “Create rooms.”
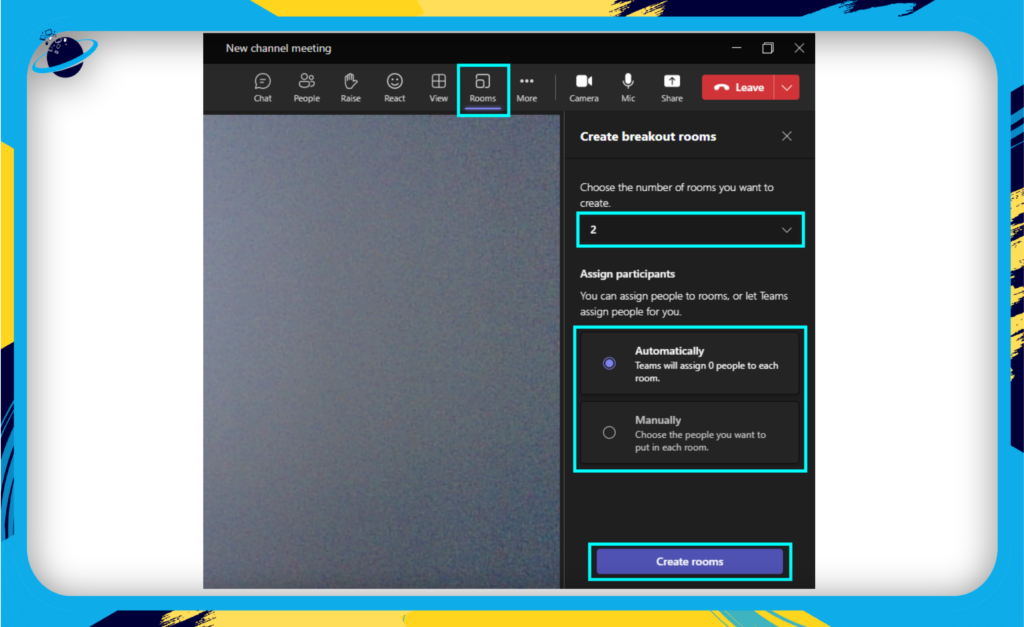
You can open, close, and manage breakout rooms during the call and broadcast messages to all rooms simultaneously.
By leveraging these video and audio call features, you can create a more engaging and productive virtual meeting experience for you and your team members.
Additional resources
How to join a Microsoft Teams meeting using Meeting ID
How to use video backgrounds in a Microsoft Teams meeting
Where do recorded Teams meetings go?
What happens if the organizer leaves a Teams meeting?
How to get rid of background noise in Microsoft Teams
Can you pre-assign breakout rooms in Teams?
Can you have multiple users manage breakout rooms in Teams?
How to let people move between breakout rooms in Teams
How to set a default background for Microsoft Teams
Meetings and Scheduling
Microsoft Teams makes scheduling, managing, and joining meetings with colleagues, clients, and partners easy. By integrating with your Outlook calendar, Teams ensures that meeting invitations and reminders are in sync, helping you stay organized and on top of your schedule.
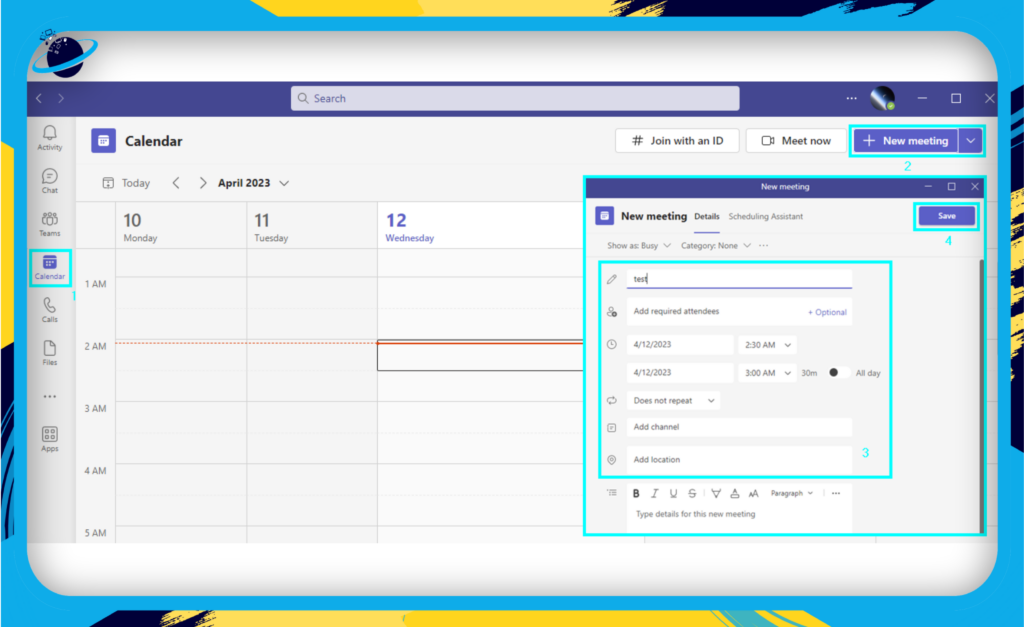
Scheduling a Meeting
To schedule a meeting in Microsoft Teams:
- Click on the “Calendar” tab on the left-hand side of the app.
- In the top-right corner, click “New Meeting” or choose a specific time slot in your calendar.
- Fill in the meeting details, including the title, date, time, and attendees.
- Customize your meeting options, such as the lobby settings, attendee roles, and audio and video settings.
- Click “Save” to send out the meeting invitations to the attendees.
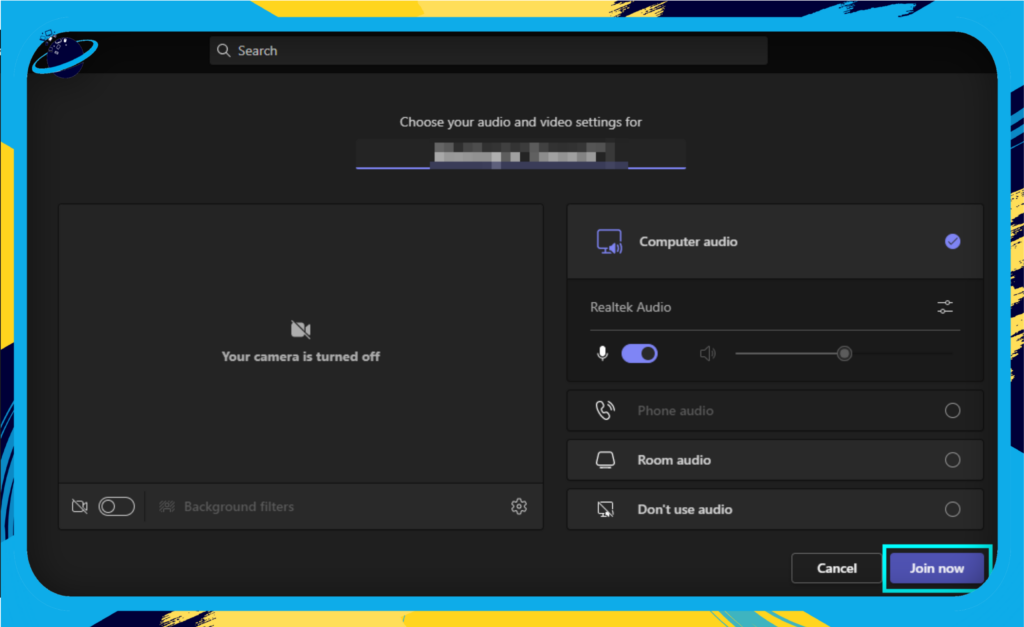
Joining a Meeting
Joining a meeting in Teams is just as simple:
- Click on the “Calendar” tab to view your upcoming meetings.
- Find the meeting you want to join and click on it.
- Click “Join” to enter the meeting.
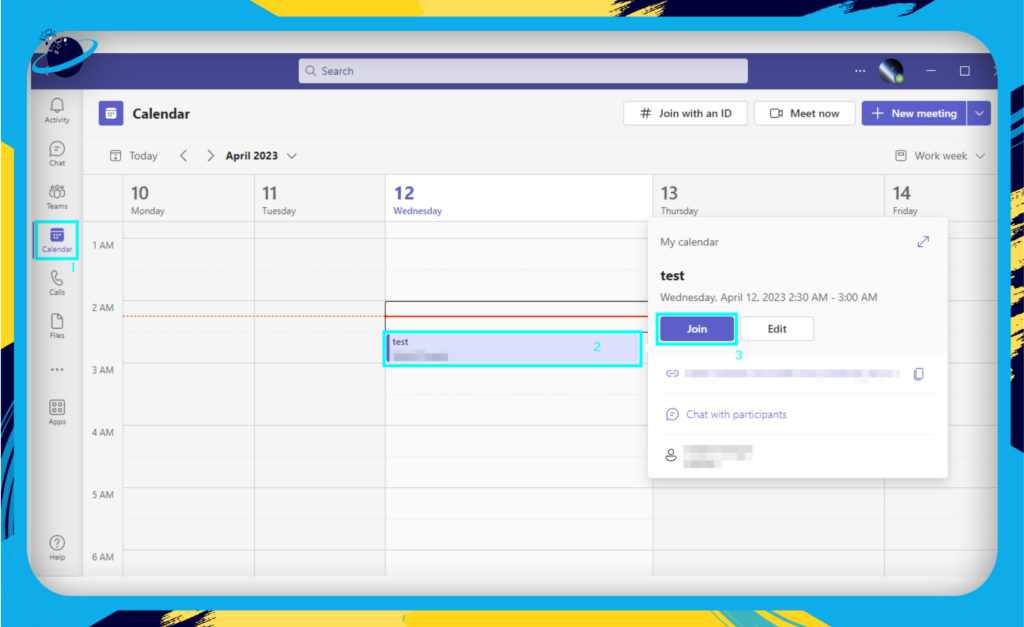
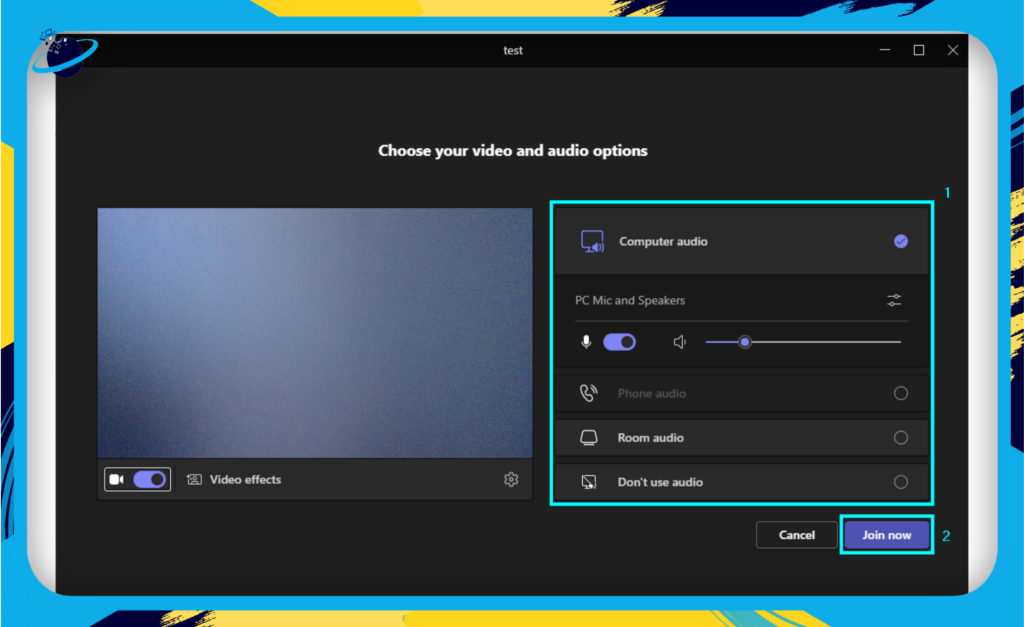
- Customize your meeting preferences, such as whether you want the mic or camera active upon entry.
- Finally, click on “Join now.”
Pro tip: You can join meetings from the meeting reminder or by clicking the meeting link shared in a chat or email.
Meet Now
The Meet Now feature in Teams allows you to quickly start an impromptu meeting with your colleagues:
- Go to the “Calendar” tab or a specific channel in your team.
- Click “Meet Now” and name your meeting.
- Click on “Get a link to share” and then copy the link.
- Share the link with all meeting participants, then click “Start Meeting.”
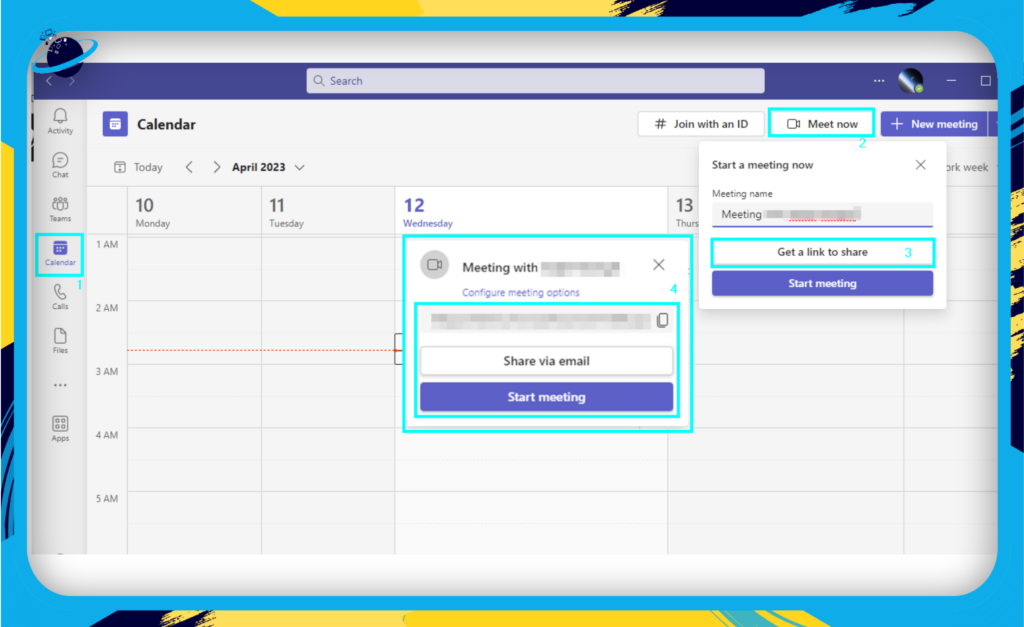
- Select your audio and video settings, then click “Join Now.”
Meeting Controls
Once you’re in a meeting, you can access various controls to help you manage the session effectively:
- Mute/Unmute: Control your microphone to prevent background noise.
- Camera: Turn your camera on or off during the meeting.
- Share content: Share your screen, a specific app, or a PowerPoint presentation.
- Raise hand: Sign the meeting organizer with a question or comment.
- Chat: Open the meeting chat to share links, files, or messages with the attendees.
- Participants: View and manage the attendees, including promoting or demoting roles and muting participants.
- Meeting options: Adjust settings such as the lobby, attendee roles, and audio and video permissions.
By exploring the features in this section, you’ll be well-equipped to schedule, manage, and participate in meetings that help drive your business objectives forward.
File Sharing and Collaboration
In this section, we will explore the robust file-sharing capabilities of Microsoft Teams and how it integrates seamlessly with other Microsoft 365 apps to provide an unparalleled collaborative experience. Let’s dive into the key aspects of file sharing and collaboration in Teams.
Integration with OneDrive, SharePoint, and Office Apps
The Office suite of programs, including Word, Excel, and PowerPoint, as well as OneDrive and SharePoint, are all closely connected with Microsoft Teams. Thanks to this connection, you can access, share, and modify files right inside the Teams platform. Here is a brief explanation of how these integrations function:
- OneDrive: You may save, sync, and share files with your team members using OneDrive, your online storage.
- SharePoint: SharePoint is a potent platform for team sites and document repositories, enabling teamwide file collaboration.
- Office Apps: You may create and modify Word, Excel, and PowerPoint documents in real time without leaving the platform with the help of Office Apps: Teams.
Real-Time Co-Authoring
Real-time co-authoring is one of Microsoft Teams’ most notable capabilities. With this feature, many team members may edit the same document simultaneously and see each other’s changes as they happen. Real-time co-authoring begins here:
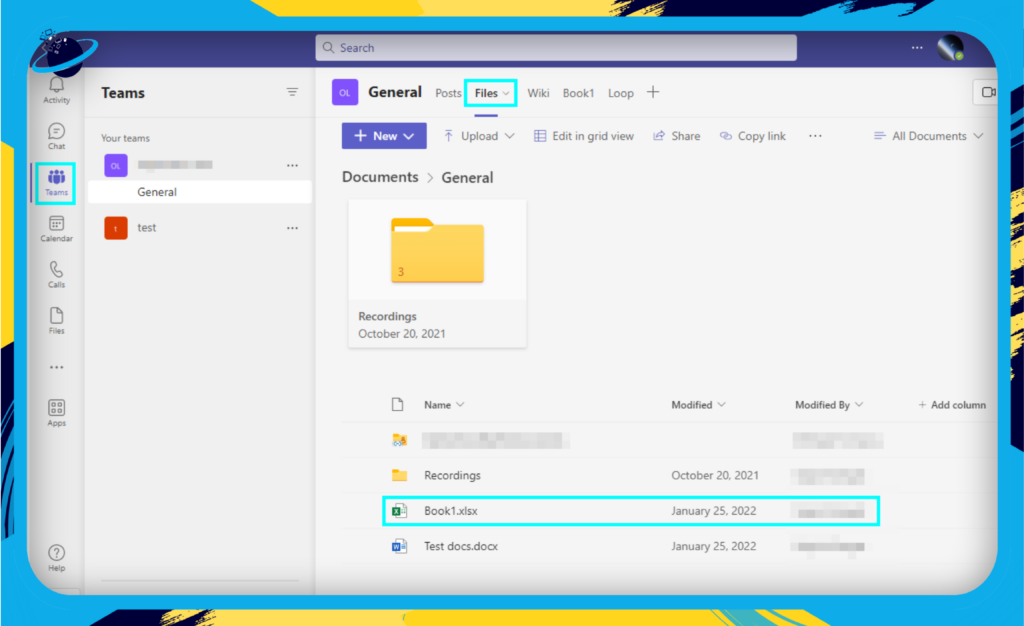
- Click on the “Files” tab in the relevant channel or chat.
- Open the document you want to collaborate on.
- Team members can now edit the document together in real-time, with each person’s cursor represented differently.
Version History and Access Permissions
Managing versions and access permissions is crucial when working on shared documents. Microsoft Teams ensures you have full control over these aspects:
- Version History: Teams automatically saves all changes made to a document, allowing you to access previous versions if needed. To view version history, right-click on the file, and select Version History.
- Access Permissions: You can manage access permissions for shared files by right-clicking on the file, selecting Manage Access, and adjusting settings for specific users or groups.
Sharing Files in Teams
Sharing files in Microsoft Teams is a breeze. Here’s a quick guide on how to share files in different scenarios:
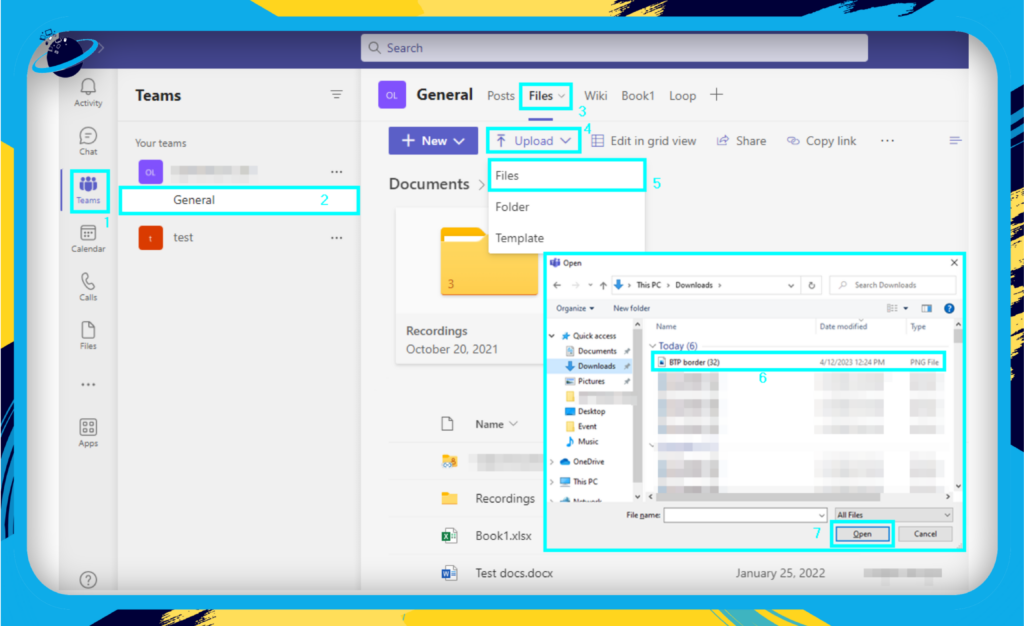
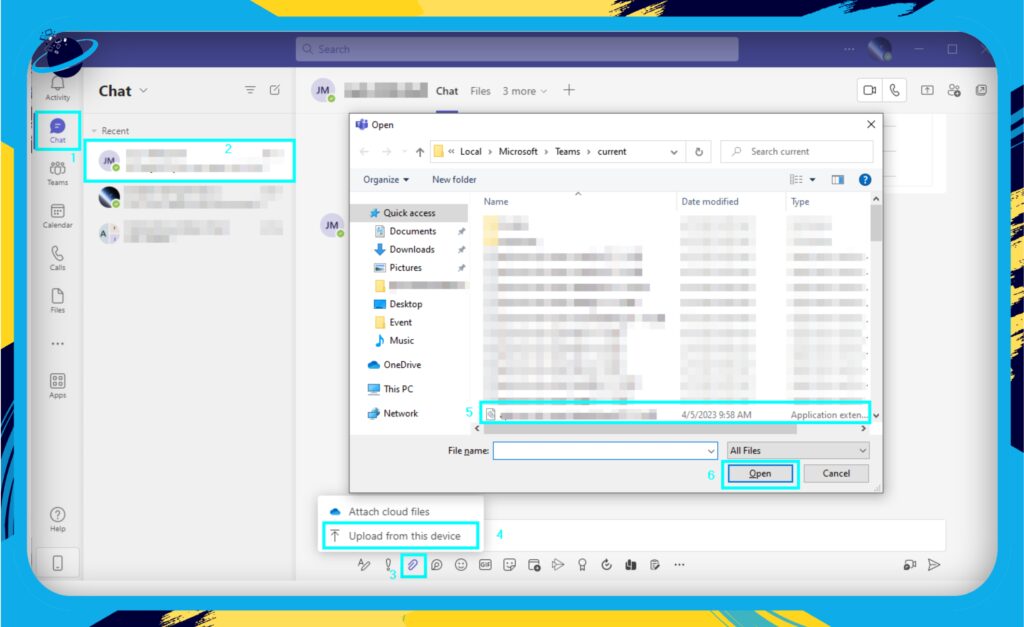
- In a channel: Upload a file directly to the Files tab, or share a file in a conversation by clicking the Attach icon.
- In a chat: Share a file by clicking the Attach icon, or simply drag and drop the file into the chat window.
- During a meeting: Share files or your entire screen by clicking the Share button in the meeting controls.
By mastering these file-sharing and collaboration features, you can ensure that your team stays organized and works together more effectively, harnessing the full potential of Microsoft Teams to boost productivity and streamline communication.
Task Management
Any project’s success depends on effective task management, which Microsoft Teams makes quick and easy. In this part, we’ll look at how to use the Teams integration with the “Tasks by Planner and To Do” app to create, assign, and monitor tasks for your team members.
Tasks by Planner and To-Do App
Your tasks from Microsoft Planner and Microsoft To-Do are combined into a single view via the “Tasks by Planner and To Do” app in Teams. This makes it simpler to keep track of all your work across many platforms and projects. The “Tasks by Planner and To Do” app should be added:
- Click on the “Apps” option.
- Search for “Tasks by Planner and To Do.”
- Click on the app.
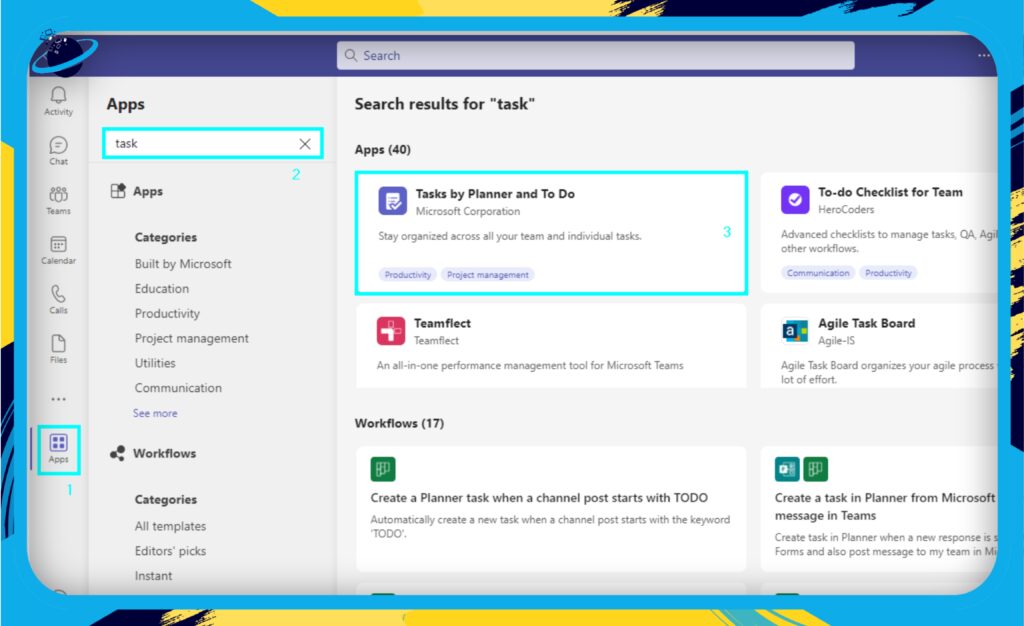
- Click on “Add.”.
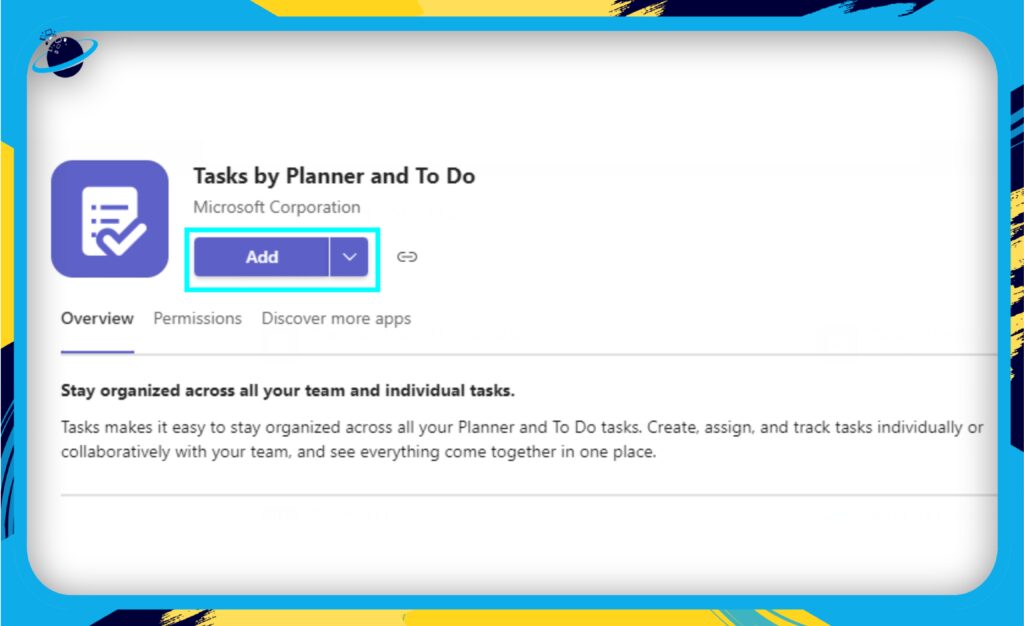
With the app installed, you can now manage your tasks more efficiently.
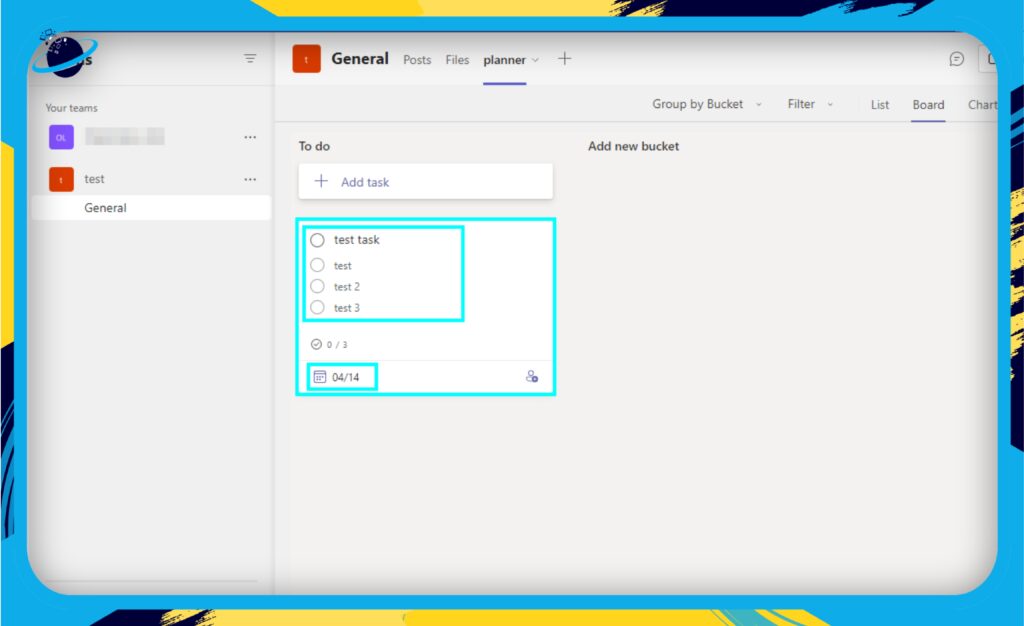
Creating and Assigning Tasks
- Go to the Planner tab in your channel or open the “Tasks by Planner and To Do” app.
- Click on “+ Add task” to create a new task.
- Enter a task name, set a due date, and assign it to a team member using the “Assign” option.
- As needed, add any additional details, such as priority, labels, or a checklist.
- Click “Add task” to save your new task.
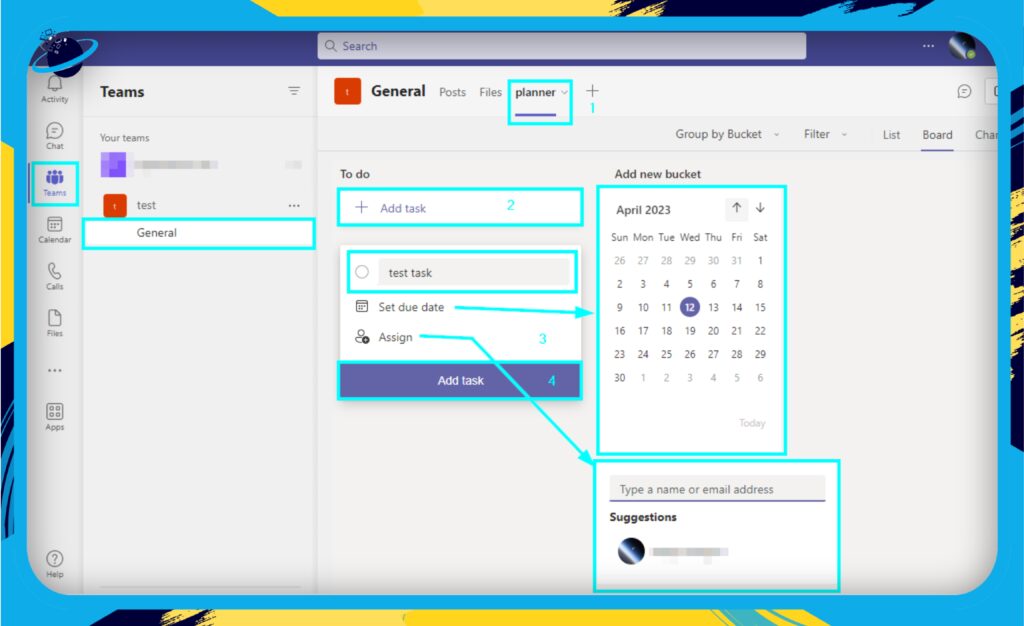
Now your team members can see and track their assigned tasks within Microsoft Teams.
Tracking Task Progress
Keeping an eye on task progress is essential for ensuring your projects stay on track. With Microsoft Teams, you can:
- View the progress of individual tasks, including their status and due date.
- Use the Charts view in Planner to visualize the overall progress of your plan.
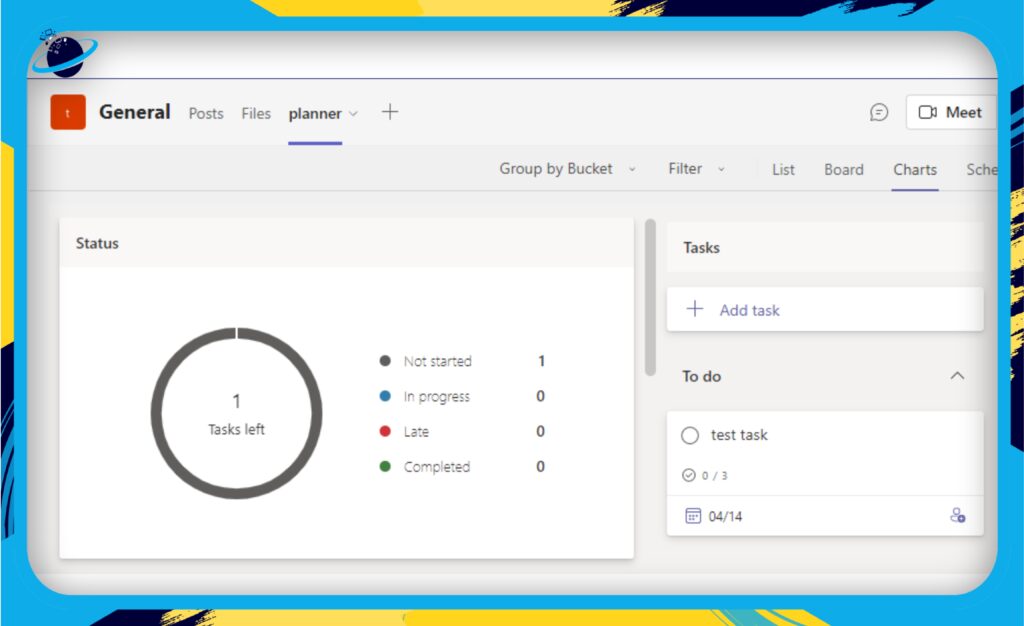
- Filter tasks by assigned team member, due date, or priority.
By effectively managing and tracking tasks in Microsoft Teams, you can ensure that your team stays organized, accountable, and focused on achieving project goals. Remember to communicate regularly and provide feedback to your team members to foster a collaborative and productive working environment.
Additional resources
Apps and Integrations
One of the greatest strengths of Microsoft Teams is its ability to integrate with a wide range of third-party apps and services, enhancing its capabilities and ensuring that it meets the diverse needs of businesses. In this section, we’ll explore some popular apps and integrations to help you further customize your Teams experience and boost your team’s efficiency.
Types of Apps and Integrations
There are three main types of apps and integrations available in Microsoft Teams:
- Tab apps: These apps provide additional functionality within your Teams channels, allowing you to access and work with external tools and services directly from your Teams interface.
- Bot apps: Bots are AI-powered assistants that can help automate tasks, provide information, and interact with users via chat.
- Connector apps: Connectors enable you to receive notifications and updates from other services, keeping you informed without leaving Teams.
Popular Apps and Integrations
Below is a list of some popular apps and integrations that can help enhance your Microsoft Teams experience:
- Trello: A popular project management tool, Trello can be integrated as a tab app in Teams, allowing you to create and manage Trello boards, lists, and cards directly within your Teams channels.
- Asana: Another powerful project management solution, Asana can be connected to Teams to help you stay on top of tasks, assignments, and project progress.
- GitHub: The integration enables developers to collaborate on code, track issues, and manage repositories without leaving Teams.
- Adobe Creative Cloud: This integration connects Teams with Adobe’s suite of creative tools, allowing users to access, share, and collaborate on design projects directly within Teams.
- Zoom: If your organization prefers to use Zoom for video conferencing, you can integrate it with Teams for a seamless meeting experience.
- Google Drive: Connect Google Drive to Microsoft Teams to access, share, and collaborate on Google documents, spreadsheets, and presentations.
- Salesforce: Integrate Salesforce with Teams to manage customer relationships, track leads, and receive real-time updates on deals and opportunities.
- Power BI: By integrating Power BI with Teams, you can share and analyze data visualizations, making data-driven decisions more accessible to your team.
Explore the Teams app store to find other apps and integrations catering to your organization’s specific needs.
Adding and Managing Apps
- Firstly, click on the “Apps” icon.
- Search for the desired app using the search bar.
- Click on“Add” to install the app.
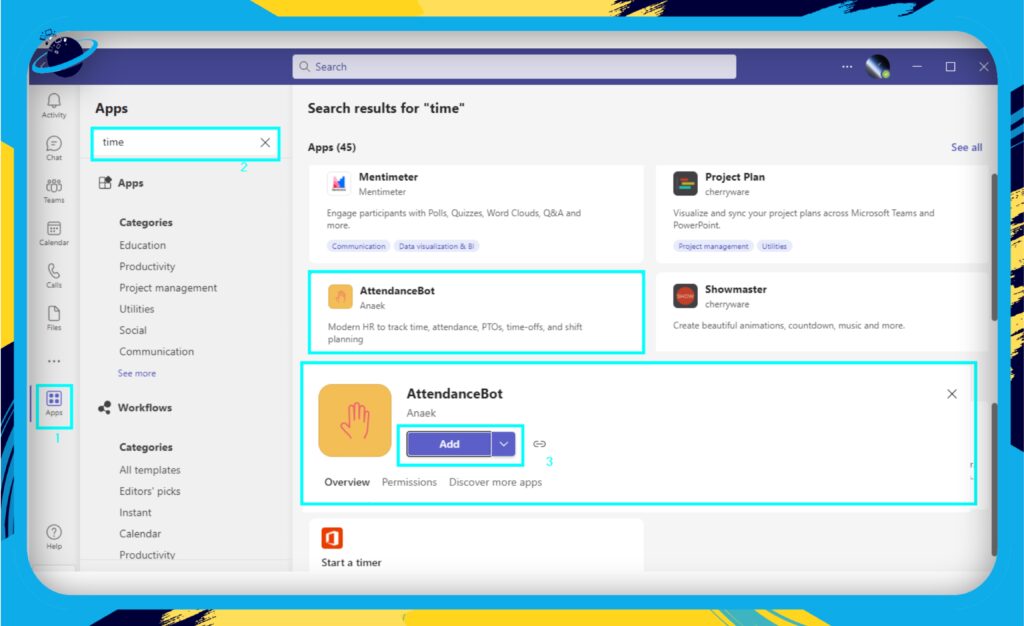
To manage your apps and integrations, click on your profile picture in the top-right corner of Teams, and then select Manage apps. You can view, update, or remove apps and configure app permissions here.
In conclusion, the vast array of apps and integrations available for Microsoft Teams provides endless opportunities for customization, ensuring that the platform is tailored to suit the unique needs of your business.
Security and Compliance
Microsoft Teams is designed to enhance collaboration and productivity and ensure the highest level of security and compliance for your organization’s data. This section will explore some key security features and compliance measures built into Microsoft Teams.
Data Encryption
Microsoft Teams employs robust data encryption protocols to protect your information at rest and in transit. Key features include:
- End-to-end encryption: Teams’ messages, files, and calls are encrypted to prevent unauthorized access.
- Secure storage: Data stored in Teams, including files and chat history, is encrypted at rest in Microsoft’s secure data centers.
- Transport Layer Security (TLS): Microsoft Teams uses TLS to encrypt data transmitted between users and the service.
Multi-Factor Authentication (MFA)
To strengthen user authentication, Microsoft Teams supports Multi-Factor Authentication (MFA), which requires users to provide at least two forms of identification to access their account. MFA reduces the risk of unauthorized access by ensuring that attackers cannot gain access without the additional authentication method even if a password is compromised.
Compliance with Industry Standards and Regulations
Microsoft Teams is designed to meet various industry standards and regulations, helping your organization maintain compliance in a complex regulatory landscape. Some key certifications and compliance features include:
- ISO 27001 and ISO 27018: Microsoft Teams is certified under these international standards for cloud information security management and data protection.
- HIPAA and GDPR: Teams complies with the Health Insurance Portability and Accountability Act (HIPAA) and the General Data Protection Regulation (GDPR), ensuring the privacy and security of sensitive health and personal information.
- Built-in compliance tools: Microsoft Teams data loss prevention, retention rules, and eDiscovery to help you manage your organization’s data.
Advanced Security Features
Microsoft Teams additionally offers the following extra cutting-edge security capabilities to help protect the data of your company:
- Advanced Threat Protection (ATP): ATP defends users from various cybersecurity threats, including malware, ransomware, and phishing attacks.
- Secure Guest Access: With Teams, you can work securely with outside parties since Azure Active Directory manages guest access and is subject to the same security controls as users within your company.
- Audit Logs and Reporting: Microsoft Teams allows administrators to keep tabs on user behavior and produce reports to ensure policies are being followed and to keep an eye out for any suspicious behavior.
By implementing comprehensive security measures and compliance tools, Microsoft Teams ensures that your organization’s data remains safe and secure, allowing you to focus on what matters most—effective collaboration and productivity.
Additional resources
Tips and Best Practices
This section will give helpful hints to optimize team cooperation and improve your overall experience using Microsoft Teams.
Establish Clear Communication Guidelines
- Set expectations: Communicate the purpose of each channel and how team members should use them. This ensures everyone is on the same page and helps prevent information overload.
- Encourage collaboration: Promote a culture of open communication and active participation, fostering an environment where team members feel comfortable sharing ideas, asking questions, and providing feedback.
- Practice good etiquette: Encourage team members to use @mentions, reply in threads, and utilize emojis and reactions to create a more engaging and organized communication experience.
Organize Channels Effectively
- Create specific channels: Instead of having a single channel for all topics, create separate channels for different projects, departments, or discussions. This keeps conversations organized and easy to navigate.
- Use naming conventions: Establish consistent naming conventions for channels to make them easily identifiable and searchable.
- Archive inactive channels: Regularly review and archive channels no longer in use to reduce clutter and maintain a clean workspace.
Leverage Platform Features
- Utilize video and audio calls: Encourage team meetings or one-on-one interactions to be held via video and audio calls. This can foster closer ties and enhance communication.
- Maximize file sharing and collaboration: Integrate Teams’ with Office apps to maximize efficiency. Real-time communication and file sharing will be streamlined as a result.
- Customize with apps and integrations: Explore third-party applications and integrations to improve your Team’s experience. Customize with applications and integrations. Using these tools, you may manage projects, monitor performance, and automate tasks.
Prioritize Security and Compliance
- Educate team members: Provide training on security best practices and ensure your team understands the importance of protecting sensitive information.
- Monitor access and permissions: Regularly review and manage access permissions for team members, ensuring they have the appropriate level of access to channels and files.
- Stay updated: Keep informed about new security features and updates, and regularly review your organization’s compliance with industry standards and regulations.
Conclusion
Your company can gain from increased cooperation and simplified operations by using Teams. Let’s review some of the important topics we talked about:
Key Features
- Channels: Organize your conversations and projects by creating and managing channels (standard, private, and shared).
- Chat and messaging: Engage in one-on-one chats, group chats, and threaded conversations with rich text editing, emojis, GIFs, and stickers.
- Video and audio calls: Initiate and join high-quality video and audio calls, and take advantage of screen sharing, background blur, and virtual backgrounds.
- Meetings and scheduling: Schedule and join meetings easily, integrate with Outlook, and use the “Meet Now” feature for impromptu gatherings.
- File sharing and collaboration: Seamlessly work with Microsoft 365 apps, including OneDrive, SharePoint, and Office apps, to collaborate on documents in real-time.
- Task management: Track tasks and assignments with Microsoft Planner and Teams’s “Tasks by Planner and To Do” app.
- Apps and integrations: Enhance your Teams experience using third-party apps and integrations like Trello, Asana, and GitHub.
- Security and compliance: Trust in the platform’s robust security features, such as data encryption, multi-factor authentication, and industry-standard compliance.
Best Practices for Success
To make the most of Microsoft Teams, consider implementing these best practices:
- Establish clear communication guidelines: Set expectations for response times, channel usage, and meeting etiquette.
- Organize channels effectively: Create a logical structure for channels, and use naming conventions to make it easy for team members to navigate and find relevant content.
- Leverage platform features: Take advantage of Teams’s powerful tools and integrations to streamline your workflow and improve productivity.
With a friendly, informative approach, we hope this article has given you the knowledge you need to confidently navigate Microsoft Teams and harness its potential for your organization. So, explore the platform, and watch your team’s productivity and communication soar to new heights!