If you are a business user searching for ways to enhance your team’s efficiency, you have come to the right place! As the popularity of remote work continues to rise, organizations are turning to Microsoft Teams as a tool to stay connected. In this guide, we will explore the features of Microsoft Teams that can boost your productivity and streamline your workflows.
 Table of content
- Channel organization
- Tabs
- Chat and messaging
- Audio and video calls
- Screen sharing
- File sharing and collaboration
- Task management
- Search and filter
- Customization and integrations
This guide covers different aspects of Microsoft Teams to improve productivity in a business environment.


Channel Organization
Efficient team productivity relies on effective organization, and Microsoft Teams provides just that with its channel organization capabilities by creating dedicated spaces for various projects, departments, or topics. Let’s delve into how you can optimize these features to your advantage.
Creating Channels
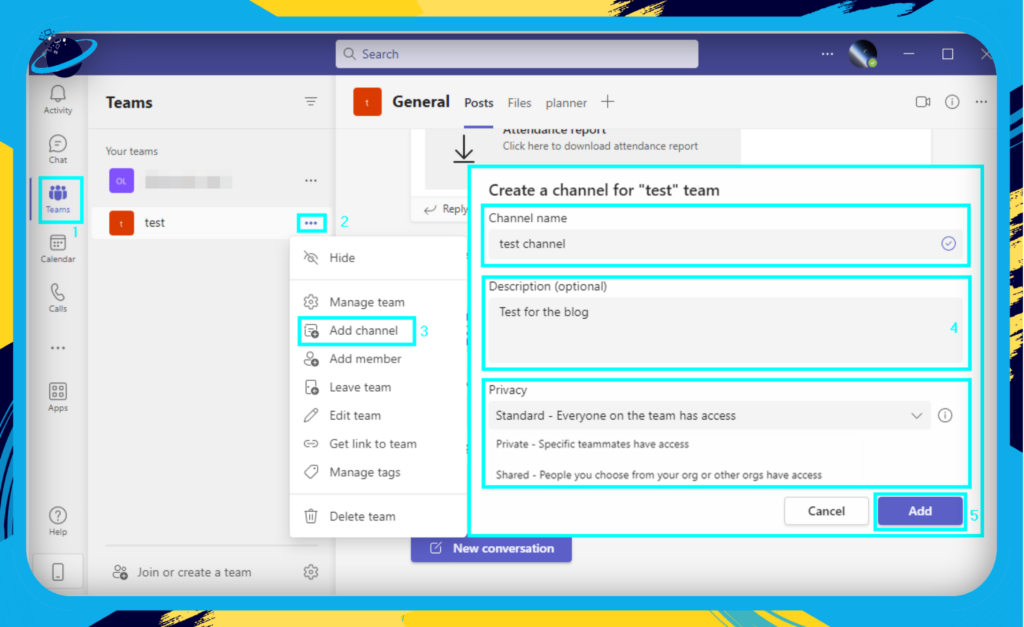
To create a channel, simply follow these steps:
- Navigate to the “Teams” tab.
- Click on “More options” next to the team name.
- Select “Add channel.”
- Enter a name, description, and choose the privacy settings for the channel.
- Click on “Add” to complete the process.
Channel Types
There are two types of channels you can create:
- Standard channels: These channels are accessible to all team members, and everyone can view and contribute to the conversations.
- Private channels: These channels are only accessible to a specific group of team members, and conversations are kept confidential.
Organizing Channels
Organizing your channels is crucial for improving productivity. Here are some tips:
- Group channels by topic or project: Create separate channels for different projects or departments, allowing team members to focus on relevant conversations and resources.
- Utilize channel descriptions: Use the channel description field to provide an overview of the channel’s purpose, helping team members understand its relevance.
- Prioritize channels: Pin the most important channels to your list for easy access. Simply right-click on the track and select “Pin.”
Channel Notifications
To stay informed about relevant updates without being overwhelmed, customize your channel notifications:
- Click on the “More options” next to the channel name.
- Select “Channel notifications“ from the dropdown menu.
- Configure the notifications for channel mentions, replies, and new posts according to your preference.

By leveraging the channel organization features in Microsoft Teams, you can create a well-structured, efficient environment for your team, ultimately improving productivity and collaboration.
Best Practices for Channel Organization
To make the most of Microsoft Teams channels, consider these best practices:

Keep it simple:
Avoid creating too many channels, which can lead to clutter and confusion. Stick to a few key channels that cover the main topics or projects your team is working on.

Be descriptive:
Use clear and descriptive names for your channels to help team members quickly identify their purpose.

Use prefixes:
Adding prefixes to channel names (e.g., “Proj-” for project channels or “Dept-” for department channels) can help with organization and sorting.

Set up guidelines:
Establish guidelines for creating new channels and ensure team members understand when and how to use them.

Archive inactive channels:
Regularly review and archive channels that are no longer active to reduce clutter and maintain organization.
Using Tabs
Tabs are an incredibly useful feature in Microsoft Teams that allows you to add and access important documents, spreadsheets, or applications within a channel. By leveraging tabs, you can keep all relevant resources centralized and easily accessible for your team.
Adding Tabs
- First, click on “Teams.”
- Now select a team or channel.
- Here select the “+” symbol.
- Now select an app. In this instance, I chose the Whiteboard app. However, you can select whatever app you need. You can have Excel and manage sheets directly within channels. You can have Word added and work on documents as a team. These additional features make it easy to both collaborate and improve productivity.
- Choose your settings and click “Save.”
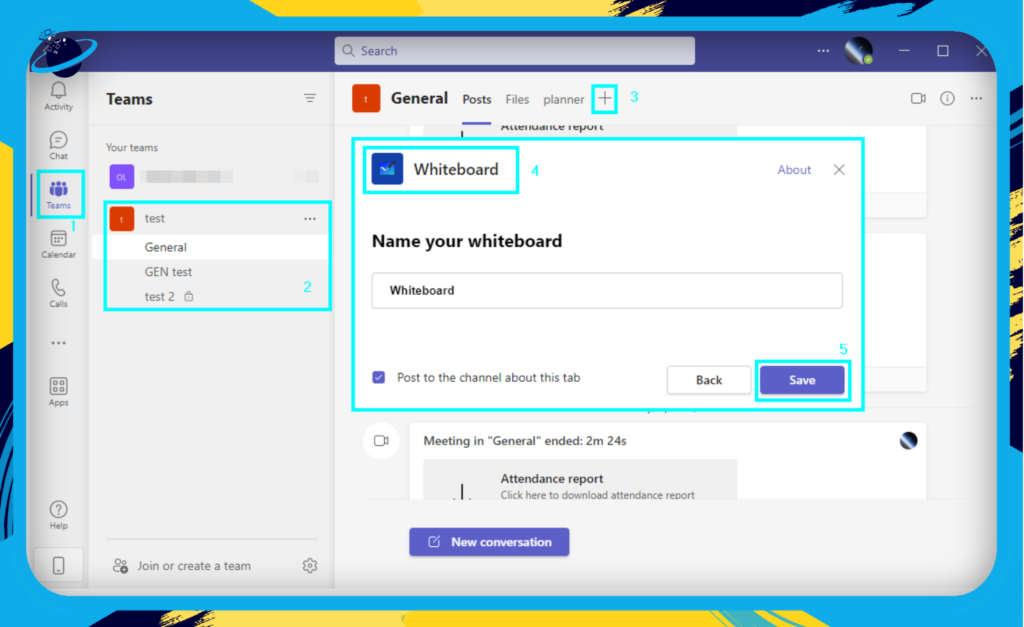
Your tab will be added to the channel or team, and you can collaborate using the platform.
Popular Tab Integrations
Microsoft Teams supports a wide variety of applications that can be added as tabs, including:
- Microsoft 365 apps: Word, Excel, PowerPoint, etc
- Project management tools: Planner, Trello, and Asana
- File storage services: SharePoint and OneDrive
- Video conferencing platforms: Zoom and Webex
Remember to explore and experiment with different tabs to find the ones that best suit your team’s needs and enhance productivity.
Chat and Messaging: Stay Connected with Your Team
Microsoft Teams offers many chat and messaging features to help you communicate with your team members. From group chats to one-on-one conversations and @mentions, let’s explore how these functionalities can help you stay in the loop and collaborate efficiently.
Group Chats: Collaborate Seamlessly
Group chats allow you to create focused discussions with multiple team members, making brainstorming ideas, sharing updates, or coordinating projects easy. Use these steps to start a group chat:
- Firstly, click on “Chat.”
- Click on “New chat.”
- Input the names of everyone you want in the group.
- Add a message and click “Send” to create the group.
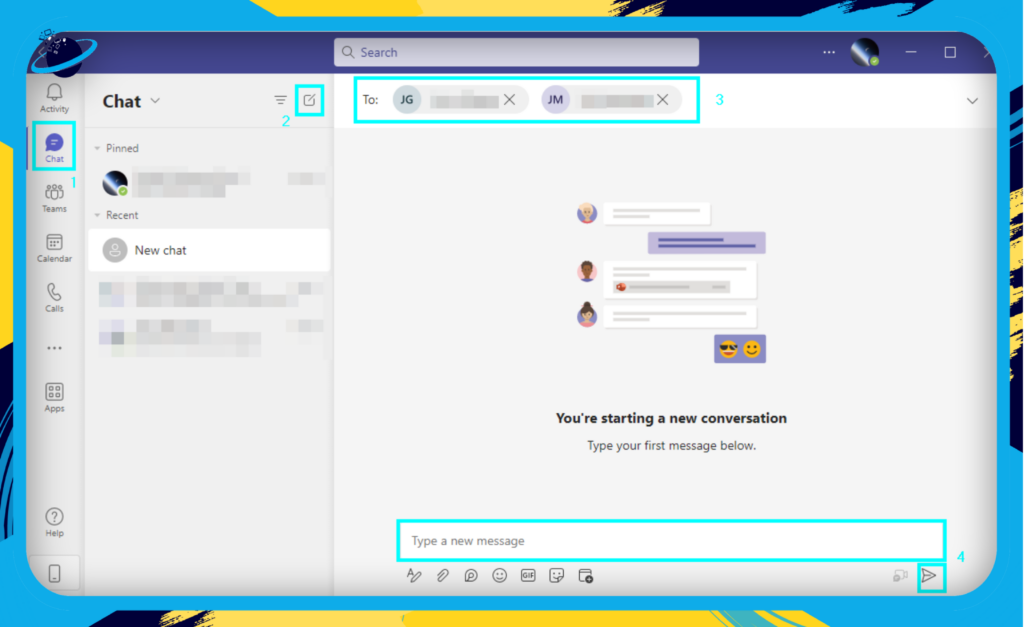
A group chat will be created automatically, allowing all members to see and respond to your messages. This enhances productivity as everyone can stay informed about tasks and who is responsible.
One-on-One Conversations: Connect with Colleagues
Use one-on-one chats for private conversations or to clarify information with a colleague quickly. Simply follow these steps to start a chat.
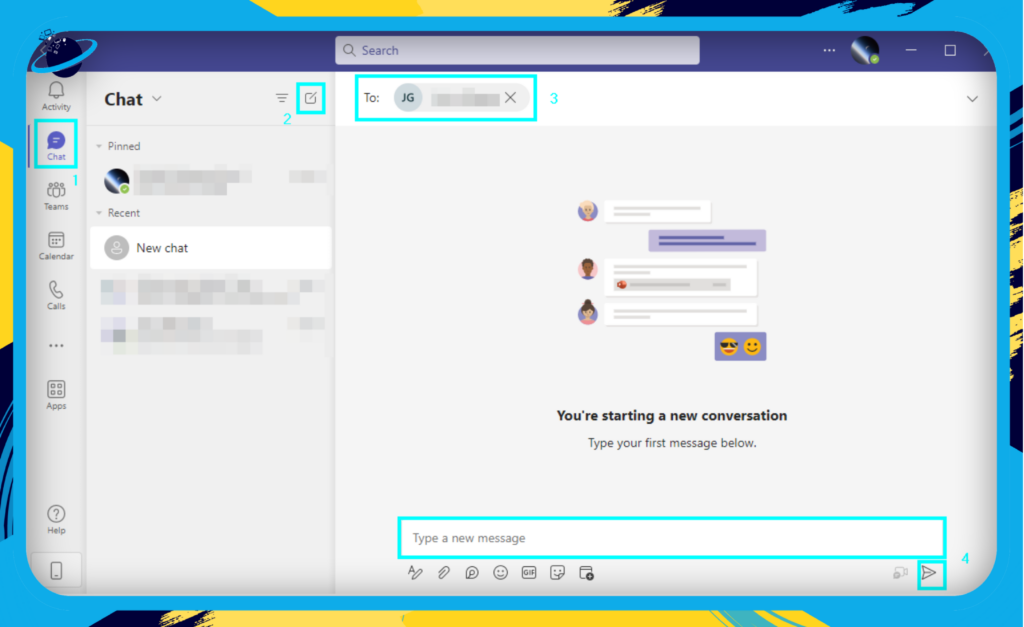
- First, click on “Chat.”
- Now click on “New chat.”
- From there, input the name of the person you want to send a message to.
- Input your message and click on “Send.”
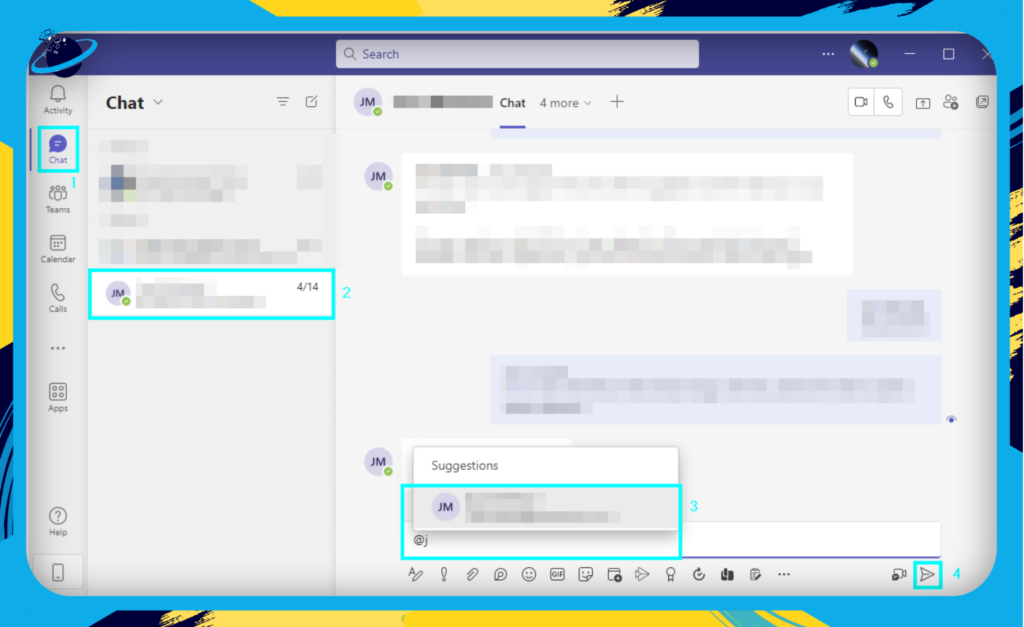
@Mentions: Grab Attention and Assign Tasks
Using @mentions is an effective way to grab someone’s attention, ask questions, or assign tasks in a group chat or channel. Follow these steps to @mention someone:
- First, click on “Chats.”
- Now open a chat.
- In the type box, input the “@” symbol followed by a group member’s name.
- Finally, input the message and click on “Send.”
Rich Formatting: Make Your Messages Stand Out
Microsoft Teams supports rich formatting, allowing you to format your messages with bold, italic, underline, and more to emphasize key points and make your communication clear and engaging.
Emojis, GIFs, and Stickers: Add Personality to Your Chats
Sometimes, lightheartedness can boost morale and foster a positive work environment. Teams offer a range of emojis, GIFs, and stickers to help you express yourself and add a touch of personality to your chats.
By leveraging these chat and messaging features, you can maintain clear and efficient communication with your team, helping you stay connected and productive in your day-to-day work.
Audio and Video Calls
Microsoft Teams excels at connecting team members, no matter where they are. The platform’s audio and video call capabilities allow you to stay in touch and collaborate with your colleagues easily. In this section, we’ll cover the different types of calls available and how to make the most of them.
One-on-One Calls
Whether you need a quick chat with a colleague or a more in-depth conversation, one-on-one calls are a great way to connect. To start a call, simply:
- Find the person you want to call in the “Chat” tab or by using the search bar.
- Click on their name to open a chat window.
- Select the video or audio call icon in the top-right corner of the chat window.
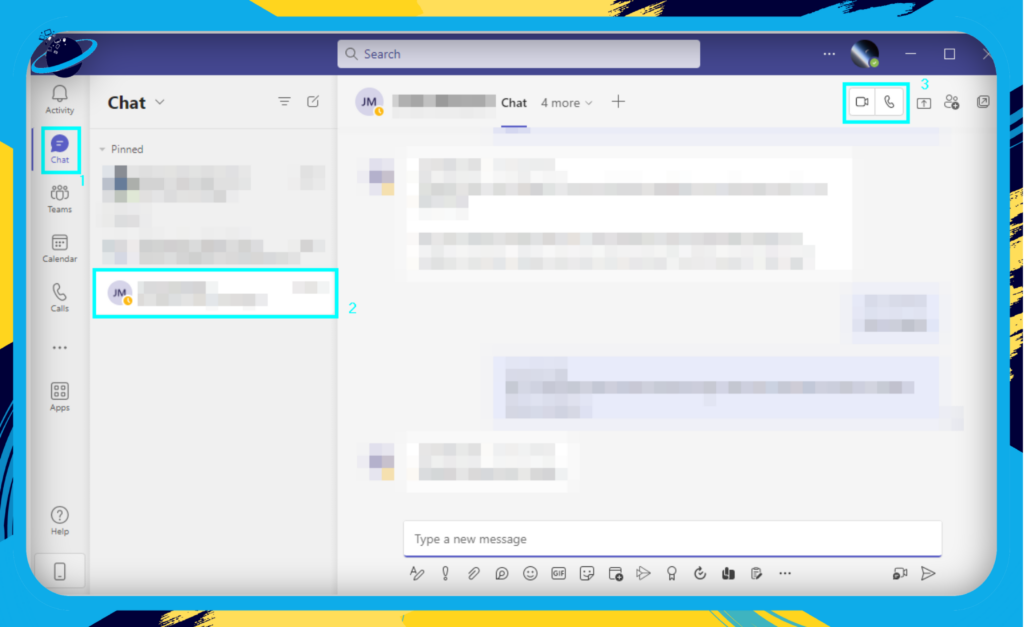
Test your audio and video before starting a call to ensure a smooth experience.
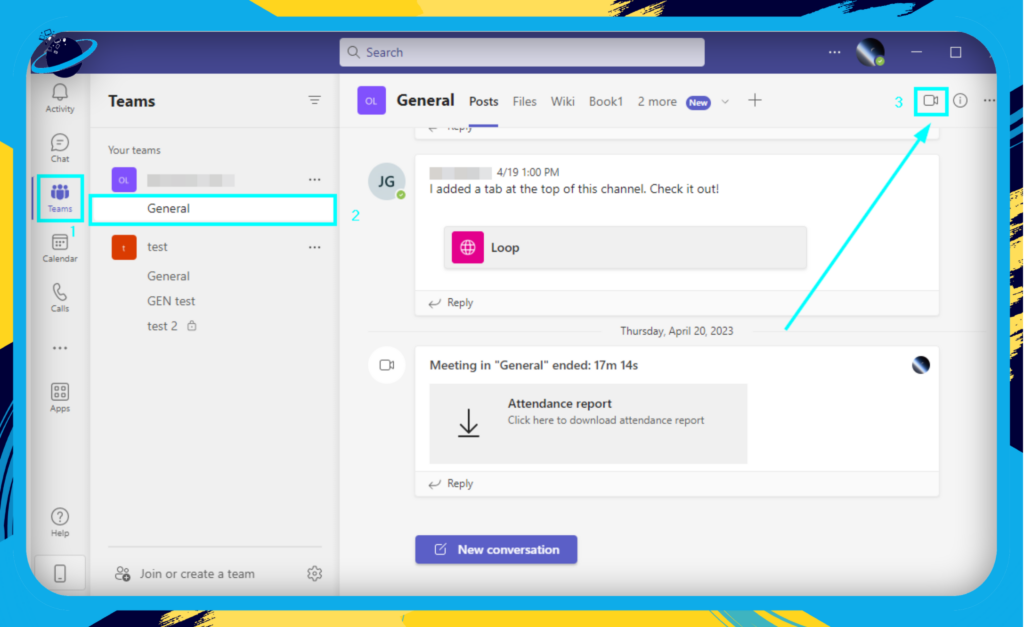
Group Calls and Meetings
Microsoft Teams also supports group calls and meetings, making collaborating with multiple team members easy. Here’s how to get started:
- Schedule a meeting: Click on the “Calendar” tab and select “New Meeting.” Add attendees, set a date and time, and send the invites.
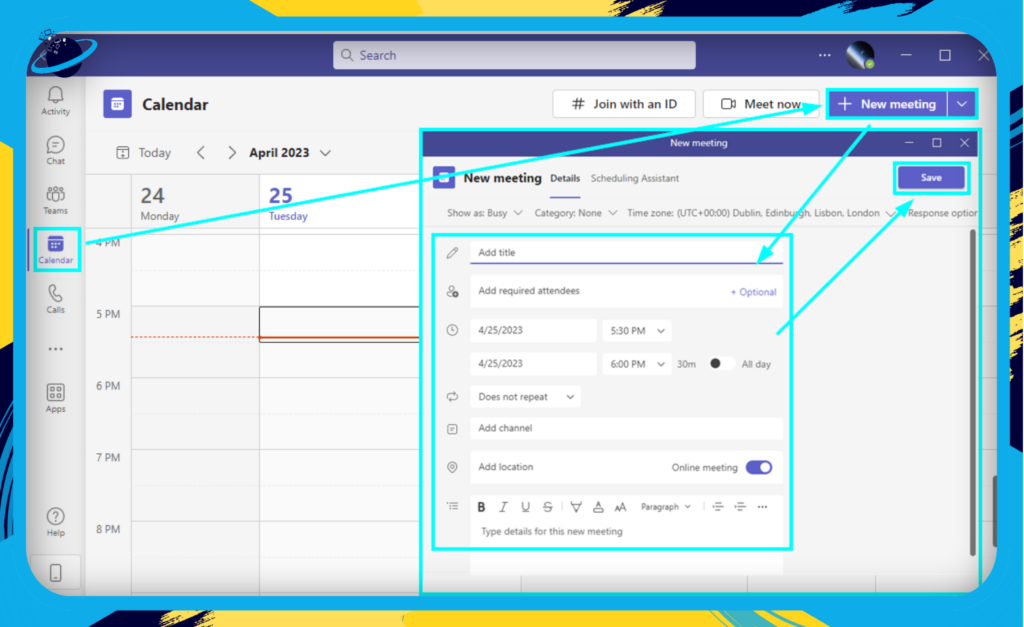
- Start an instant meeting: In a channel or group chat, click the video call icon in the top-right corner to start a discussion with all members.
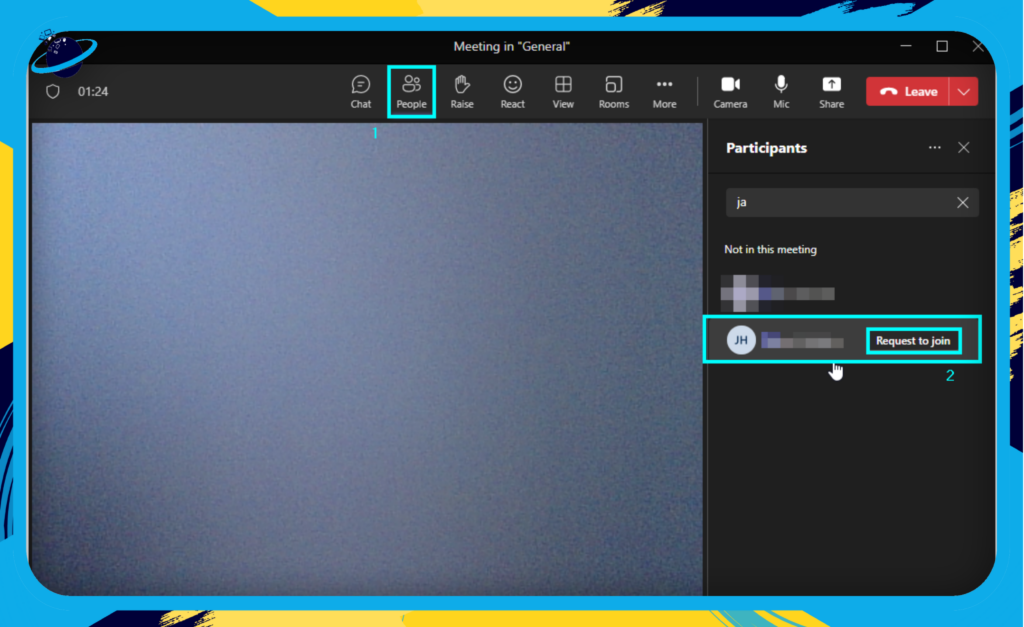
- Add participants during a call: Click on the “People” icon and search for the person you want to add, then click on their name and select “Request to join.”
Tip: For a more engaging meeting experience, use Microsoft Teams’ built-in features, such as screen sharing, whiteboard, and live captions.
Meeting Options and Controls
Make the most of your meetings by utilizing these helpful options and controls:
- Mute/unmute: Click the microphone icon to mute or unmute yourself during a call.
- Turn video on/off: Control your camera by clicking the video icon.
- Share your screen: Click the ‘Share’ icon to present your screen or an individual window.
- Record the meeting: Click the three-dot menu and select ‘Start recording’ to capture the meeting for future reference or to share with those who couldn’t attend.
- Raise your hand: Use the ‘Raise Hand’ feature to indicate that you’d like to speak or ask a question without interrupting the current speaker.
Incorporating these audio and video call features into your daily workflow can significantly enhance your team’s communication and collaboration in Microsoft Teams.
Screen Sharing: Enhance Your Meetings and Collaborations
One of the most valuable features of Microsoft Teams is its screen-sharing capabilities, which can elevate your virtual meetings, presentations, and collaborative sessions. Whether you’re presenting your latest project, working together on a document, or troubleshooting an issue, sharing your screen can make your interactions more efficient and engaging. Let’s explore how you can use screen sharing in Microsoft Teams.
How to Share Your Screen
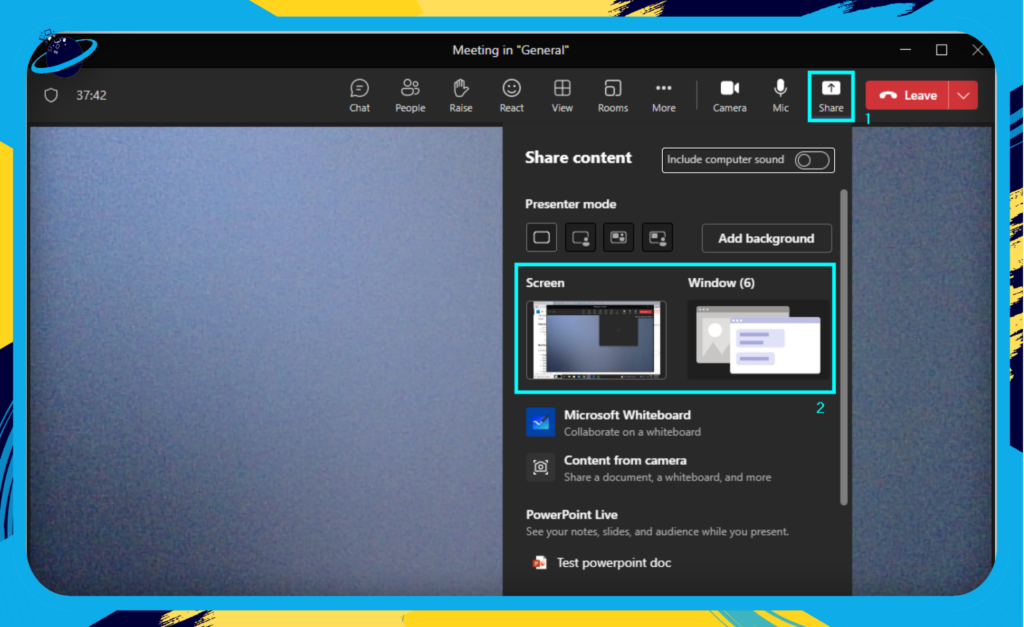
- Firstly, join a meeting in Teams.
- Now click on “Share.”
- Select the screen you want to share. Choose the “Screen” option to share what’s on your screen.
- Choose the “Window” option to share a specific window, such as a browser or another app.
Best Practices for Screen Sharing
To ensure a smooth and successful screen-sharing experience, keep these tips in mind:
- Prepare your screen: Before sharing, close any unrelated or sensitive information to avoid accidental disclosure.
- Check your connection: A stable internet connection is crucial for seamless screen sharing. If you’re experiencing lag, try closing other bandwidth-intensive applications.
- Use presenter mode: When sharing a PowerPoint presentation, use presenter mode to see your notes and navigate slides easily while your audience only sees the presentation.
- Communicate clearly: While sharing your screen, describe what you are doing, and ask for feedback to ensure everyone is on the same page.
Collaboration with Microsoft Whiteboard
Microsoft Teams also offers integration with Microsoft Whiteboard, a digital canvas allowing you to collaborate with your team in real-time. Use it to brainstorm ideas, create diagrams, or annotate images during a screen-sharing session. Here are the steps to have a Whiteboard in a meeting:
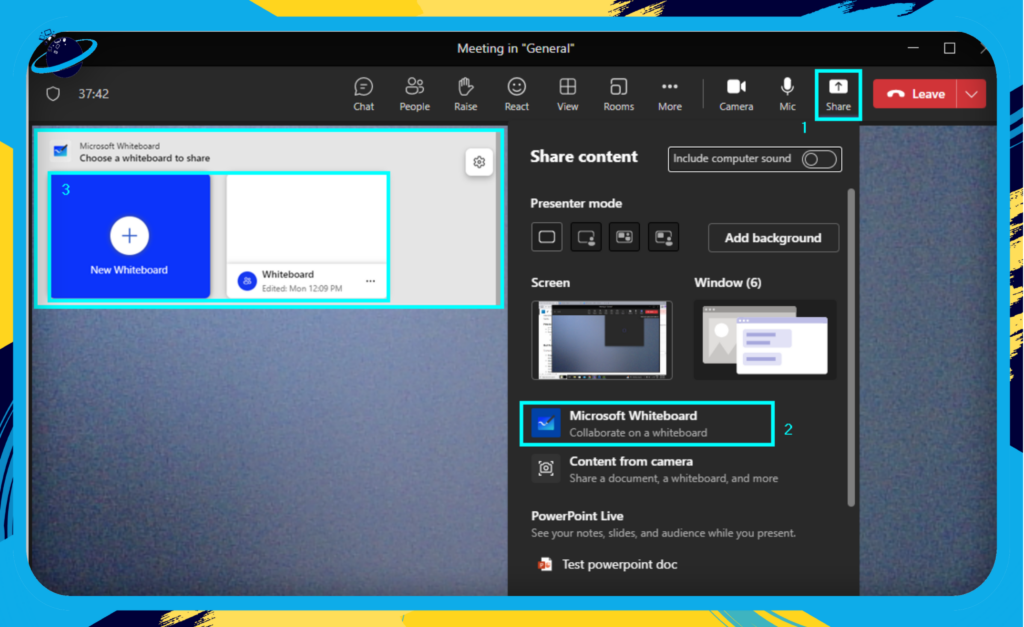
- First, join a meeting in Teams.
- Now click on “Share.”
- Select “Microsoft Whiteboard.”
- Choose the whiteboard you want to share.
By leveraging the power of screen sharing in Microsoft Teams, you can enhance your communication and collaboration, making your meetings more interactive and productive. Don’t forget to follow the best practices and explore the various sharing options to find the perfect fit for your needs.
File Sharing and Collaboration
Whether you’re working on a project or sharing essential documents, Teams offers seamless integration with Microsoft 365 applications like Word, Excel, and PowerPoint. This section will explore how to make the most of these features to streamline workflows and boost productivity.
Uploading and Sharing Files
Sharing files in Microsoft Teams is as easy as 1-2-3. To upload and share files, simply follow these steps:
- Navigate to the desired channel or chat: Choose the channel or chat where you want to share the file.
- Attach a file in the chat: Click the “Attach” icon below the message compose box, and select where you want the file to be uploaded from. You can upload from OneDrive or your local desktop.
- Select a file and send: Choose a file and click on “Open.” Click on “Send” to send the file.
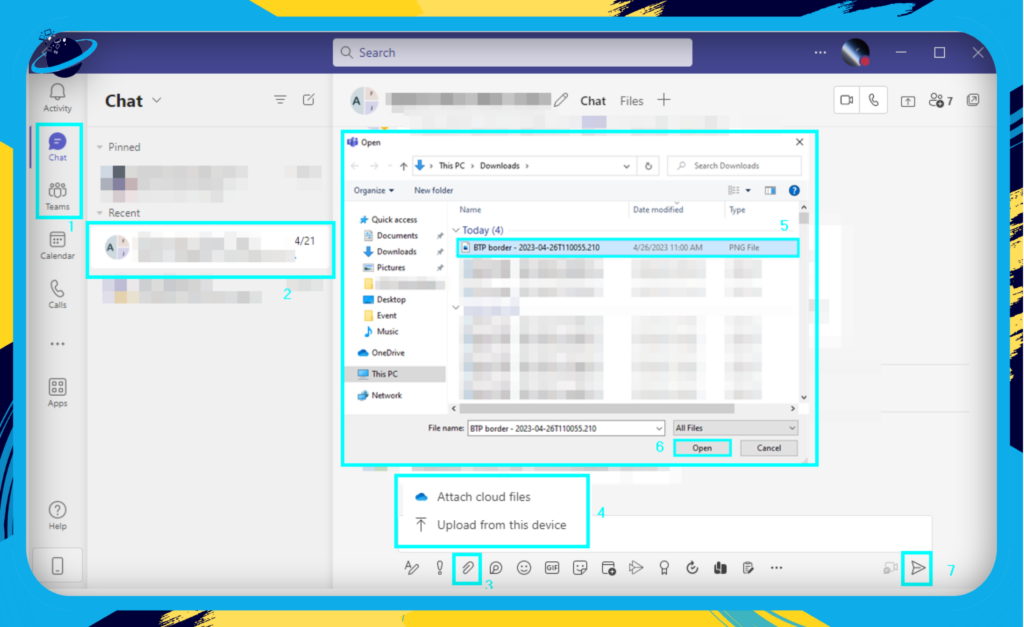
After you upload the file, all members of the channel or chat will be able to access it. This enables team members to view, edit, and work together on the file.
Real-Time Collaboration
Microsoft Teams allows you to collaborate on documents, spreadsheets, and presentations. With its integration with Microsoft 365 applications, you can:
- Co-author documents: Multiple users can work simultaneously on a Word, Excel, or PowerPoint file, with each person’s changes visible.
- Track changes: Use the version history to view and revert to previous versions of the document.
- Leave comments: Add comments to specific document sections for discussion and feedback.
Pinning Important Documents
To keep essential files easily accessible, consider pinning them to the channel’s top. To pin a file, follow these steps:
- Locate the file: Open the “Files” tab in the channel where the file is located.
- Select the file: Click on the file you want to pin.
- Click “More Options”: Click the three-dot icon next to the file name.
- Choose “Pin to top”: This will pin the file to the top of the “Files” tab.
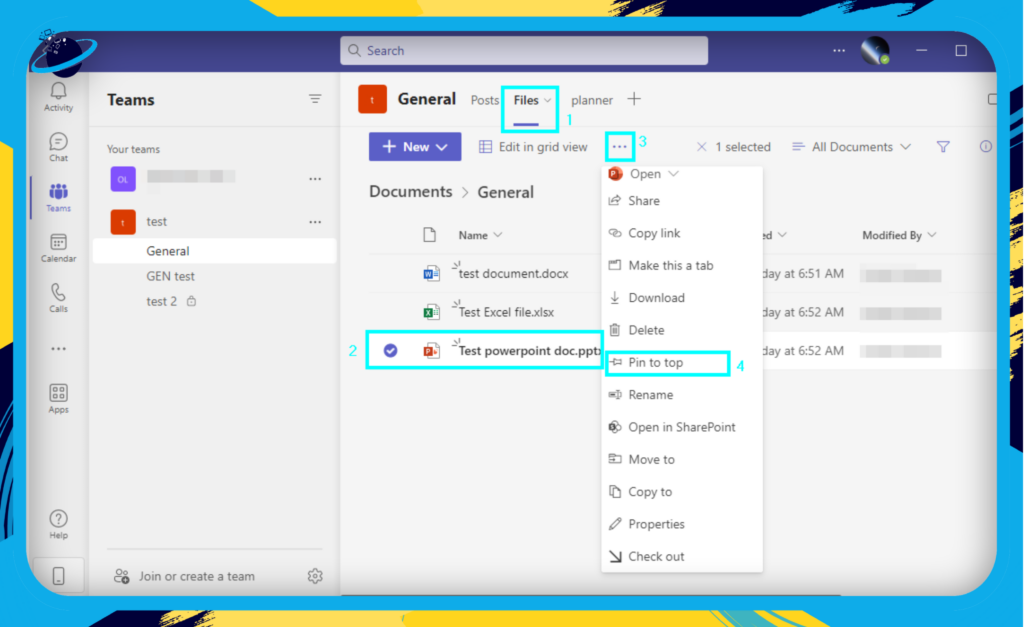
By pinning essential documents, you ensure they are always within reach for quick reference and collaboration.
In conclusion, Microsoft Teams’ file-sharing and collaboration features provide a powerful way for teams to work together efficiently. By leveraging these tools, you can streamline your workflows and keep your projects moving forward easily.
Task Management: Boosting Efficiency with Planner and To-Do
Microsoft Teams integrates Planner and To-Do for efficient task management, allowing you to assign tasks, set due dates, and manage them without leaving the Teams interface.
Microsoft Planner Integration
Microsoft Planner is a versatile tool that allows you to create, assign, and manage tasks within your team. To leverage its features within Microsoft Teams, follow these steps:
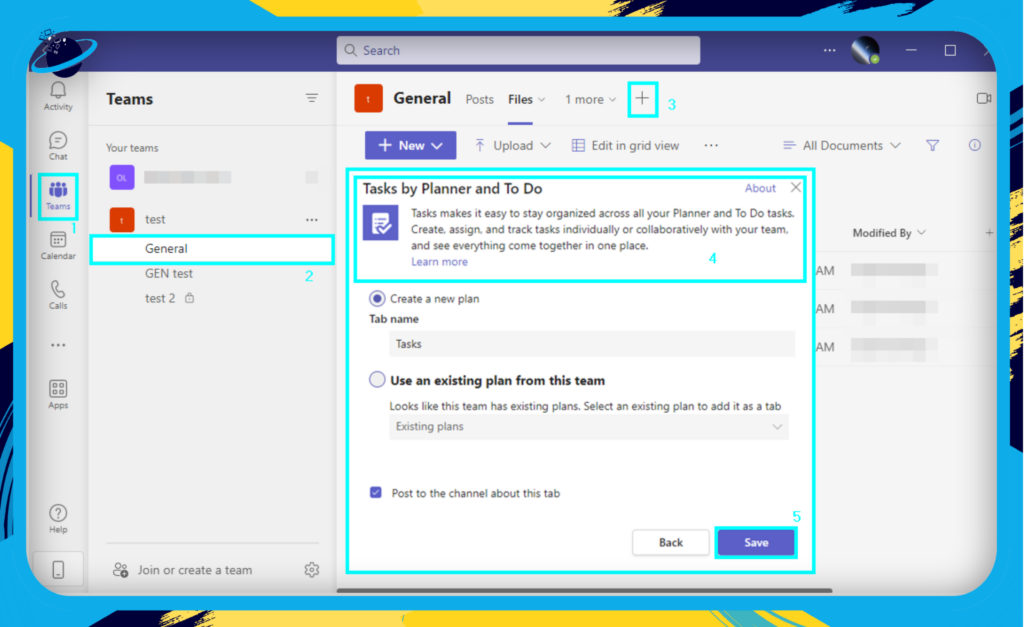
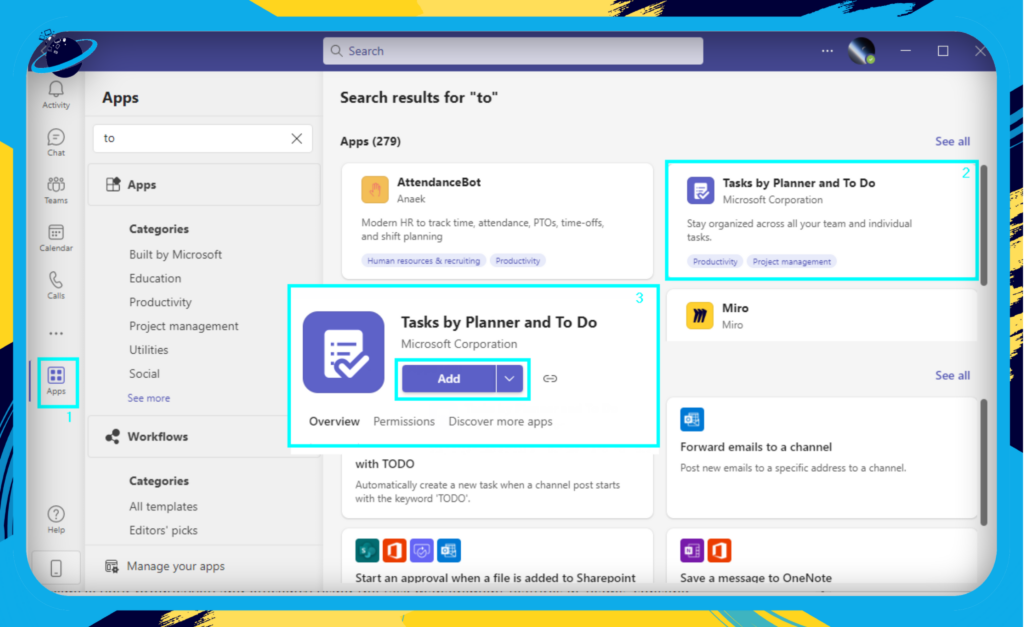
Add the Planner tab:
- Click on “Teams.”
- Now choose a “Channel.”
- Select the plus symbol.
- After that, choose the “Tasks by Planner and To Do” app.
- Click on “Save” to add the planner tab.
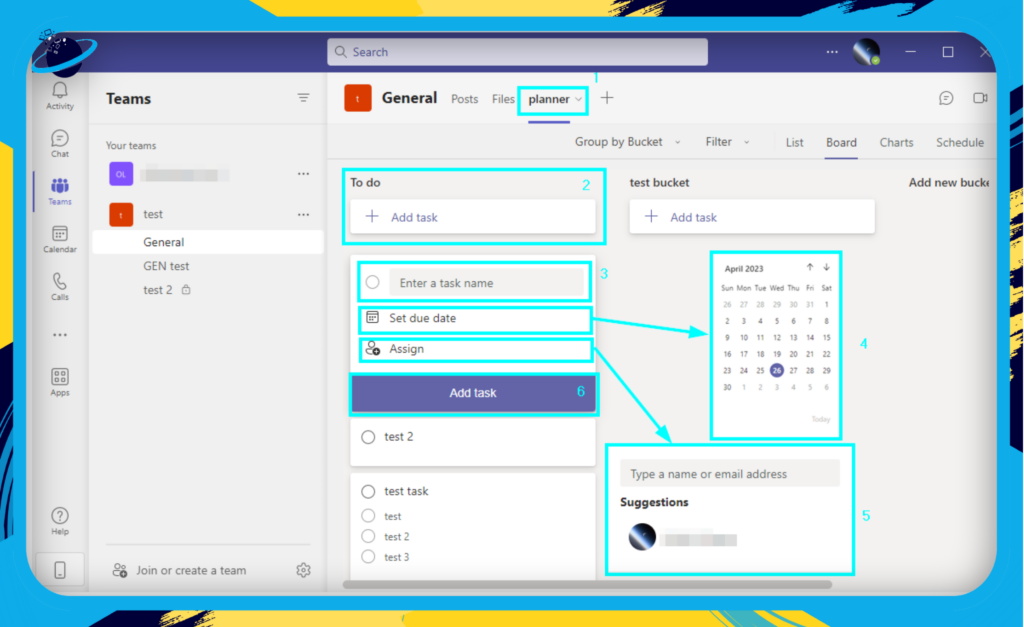
Create a new plan or use an existing one:
- Click on the newly added Planner tab.
- Under To do, select “Add task.”
- Input task information. Input a task name; this can be anything you want.
- Now you can choose a due date; again, you can choose any date.
- Click on “Assign” to add members you want to be involved in this task.
- Select add “Task.”
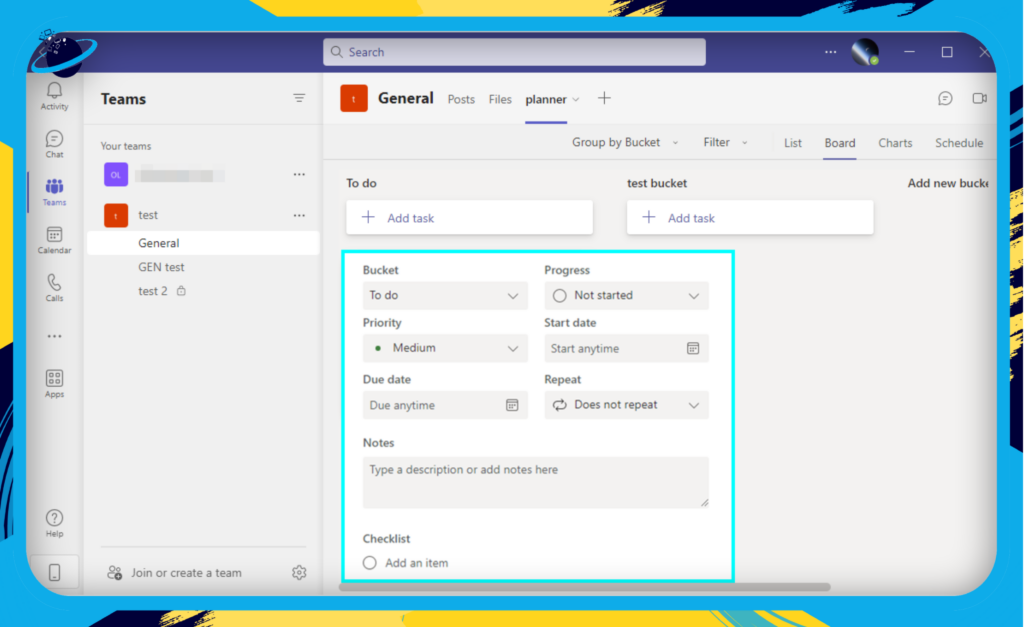
- Click on the newly created task to fill in other information, such as checkboxes, progress, and notes.
Organize tasks with buckets:
- Click on where it says “Add new bucket.”
- Name the bucket.
- Press the enter key to create the new bucket.
- You can move tasks to the new bucket or create new ones.
Monitor progress: Use the “Charts” view to visualize your team’s progress and identify bottlenecks or delays.
Microsoft To-Do Integration
Microsoft To-Do is a personal task management tool that can also be used within Teams to help you stay on top of your tasks. Here’s how to access and use it:
- Add the To-Do app: Click on the “Apps” icon in the left sidebar, search for “To-Do,” and select the app to add it to your Teams.
The To-do app allows you to organize your tasks by creating specific lists. You can also add tasks to your lists and set due dates, reminders, and priority levels to ensure you stay on track. Finally, you can sync with Outlook to relay your tasks across both platforms.
Tips and Best Practices for Task Management in Microsoft Teams
To maximize your productivity and efficiency using the task management features in Teams, consider these tips:
- Regularly review tasks: Schedule a recurring time to review your tasks and make adjustments as necessary. This will help you stay on top of your workload and ensure nothing falls through the cracks.
- Break down tasks: Break large tasks into smaller, more manageable subtasks to make them easier to tackle and track.
- Use labels: Assign labels to tasks to categorize and filter them based on priority, project, or any other relevant criteria.
- Collaborate on tasks: Use the comment feature in Planner and To-Do to communicate with your team members and provide updates or ask questions about specific tasks.
By leveraging Microsoft Teams’ task management features and implementing these best practices, you can effectively manage your workload and ensure your team stays on track to achieve its goals.
Search and Filter for Swift Navigation
Efficiently navigating through the wealth of information stored in Microsoft Teams is critical for maximizing productivity. This section will explore how to make the most of the search and filter features to quickly find messages, files, or people and save time in your daily workflows.
Mastering the Search Bar
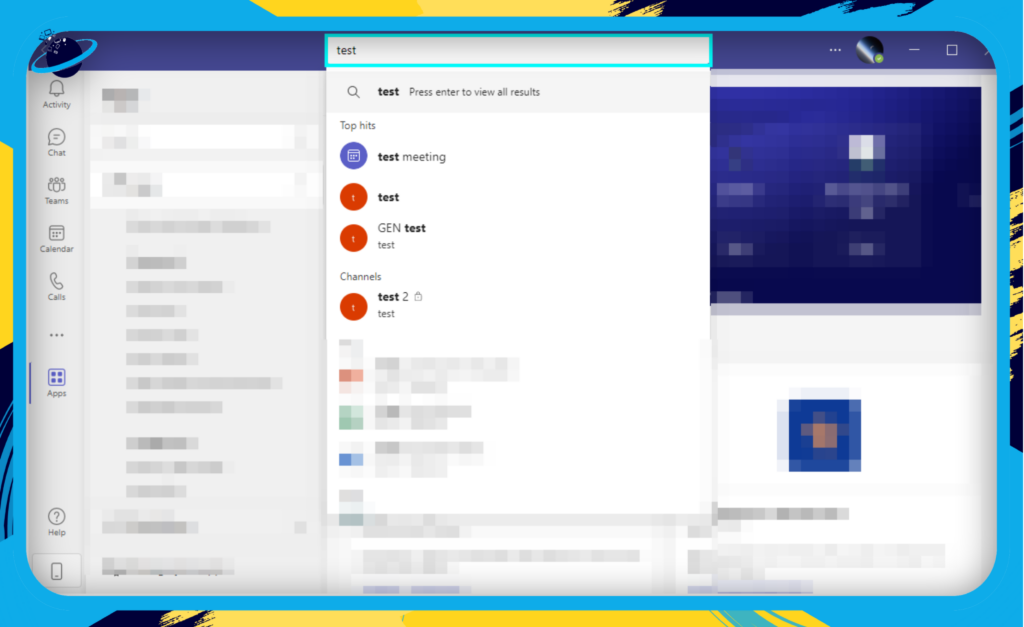
When locating important information in Microsoft Teams, the search bar is your best friend. Positioned at the app’s top, it allows you to search across your entire organization’s channels, chats, and files. Here’s how to make the most of it:
- Quick access: Use the search bar to find recent chats, channels, and files by typing a few keywords or the name of a person you’re looking for.
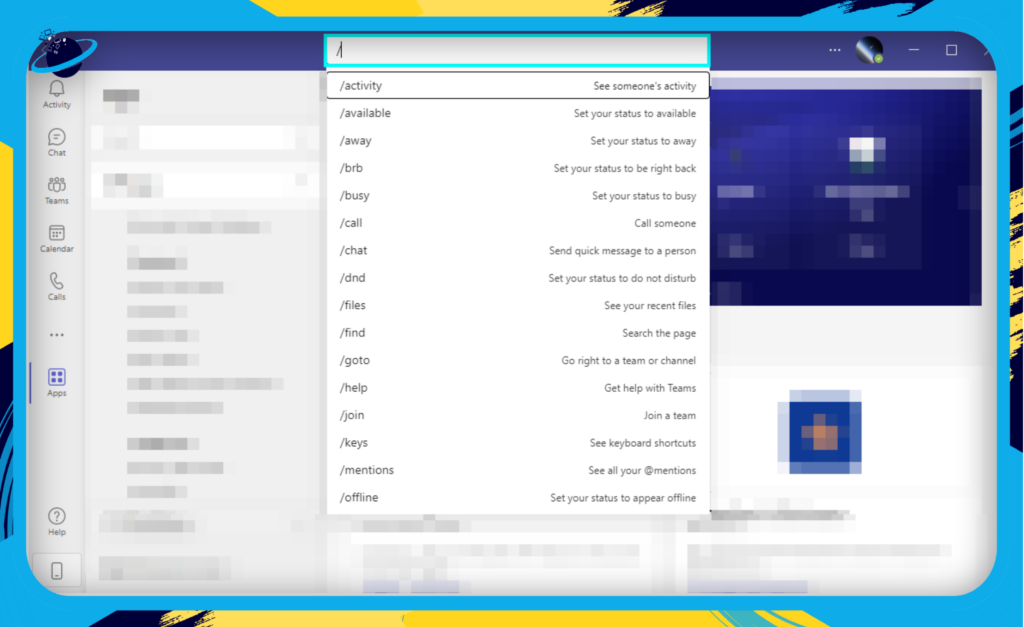
- Commands: Enter a forward slash (/) to access a list of available commands, such as /call or /unread, for quick actions right from the search bar.
- @mentions: Review messages where you’ve been mentioned by typing @ followed by your name in the search bar.

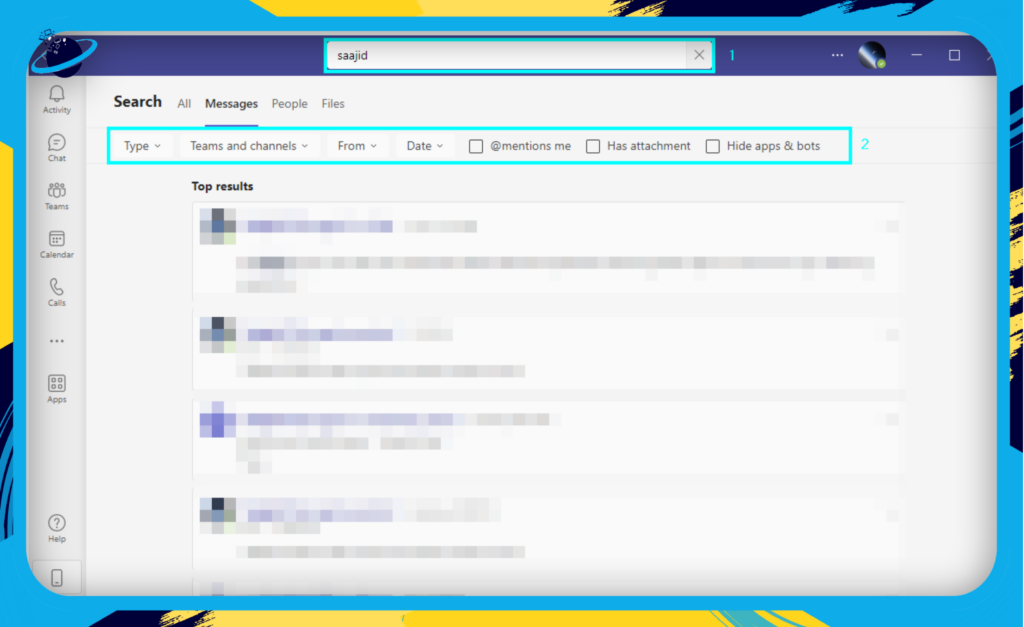
Filtering Your Search Results
Sometimes, a simple search may yield too many results. In such cases, filters can help you narrow the search results and find what you’re looking for more efficiently. Follow these steps to apply filters to your search:
- Perform a search using keywords, names, or phrases.
- Choose one or more filter options to refine your search:
- From: Filter results by the sender.
- Type: Narrow results to specific content types, such as messages, files, or channels.
- Date range: Specify a date range for the search.
- Mentions: Filter results to show only messages where you or someone else has been mentioned.
- Attachments: Display results that include attached files.
By mastering the search and filter functionalities in Microsoft Teams, you can locate important information swiftly and stay focused on your tasks. As a result, you and your team will enjoy increased productivity and smoother collaboration.
Customization and Integrations
Microsoft Teams offers customization options and integrations with third-party applications that greatly enhance productivity and streamline workflows. This section will examine how to tailor your Team’s experience to your unique business needs.
Customizing your Teams environment
Microsoft Teams allows you to personalize your experience to make it more efficient and enjoyable. Some ways to customize your Teams environment include:
- Changing the theme: Choose between different themes (default, dark, or high contrast) to match your visual preferences.
- Pinning apps: Pin your most frequently used apps to the left-hand sidebar for quick and easy access.
- Customizing notifications: Adjust your notification settings to receive alerts only for the most important updates and reduce distractions.
- Setting up status messages: Use custom status messages to let your team know when you’re busy or away or to share important information.
Integrations with third-party applications
Teams are built with extensibility and offer various third-party app integrations to help you accomplish more without leaving the platform. Here are some popular integrations to consider:
- Project management: Trello, Asana, and Monday.com are just a few examples of project management tools that can be integrated with Teams for seamless task tracking and collaboration.
- File storage and collaboration: Connect Teams to file storage services like Google Drive, Dropbox, or Box, enabling you to access and share documents easily.
- Analytics and reporting: Use tools like Power BI, Tableau, or Domo to create data-driven dashboards and reports to share and discuss with your team.
- Customer support: Integrate support tools like Zendesk or Freshdesk to manage and track customer tickets directly within Teams.
To find and add these integrations, click the “Apps” icon in the left-hand sidebar and browse or search for your desired app. Follow the instructions to connect your account and start using the app within Teams.

Conclusion
To sum up, Microsoft Teams is a helpful tool for businesses aiming to increase productivity and encourage smooth collaboration among team members, regardless of their location. You can establish an efficient work environment by utilizing the platform’s robust features like the ones shown here. So, try these strategies and witness your team’s performance improve. You will be fully equipped to utilize Microsoft Teams by following the tips.
Additional resources
Have a read through some of our other blogs to get a better understanding of Teams and its various features.
What is the maximum number of channels in Teams
How to limit who can create team channels in Teams
Tabs in Teams team channels won’t load: Troubleshooting guide
What do the symbols mean in Microsoft Teams chat?
How To Remove Microsoft Teams Audio Device
How to set default audio device in Microsoft Teams