Welcome to our Microsoft Teams guide for beginners! In today’s world, effective communication and collaboration are more important than ever. In this guide, we’ll walk you through the essential features of Microsoft Teams and provide step-by-step instructions to help you make the most of this powerful tool.
- Introduction
- Setting up an account
- Navigating the interface
- Creating a team
- Chatting and messaging
- Scheduling and joining meetings
- Integrations and apps
- Customizing settings
- Troubleshooting and support
So, let’s dive in and start exploring the world of Microsoft Teams!
 Introduction to Microsoft Teams
Microsoft Teams is a powerful communication platform that combines chat, meetings, file sharing, and app integration. Developed by Microsoft, it is part of the Microsoft 365 suite of productivity tools designed to help businesses of all sizes.
Why use Microsoft Teams?
Businesses use Microsoft Teams as their primary communication platform for several reasons, including:

Unified workspace:
Microsoft Teams eliminates the need to hop between programs by providing a single platform where team members collaborate on projects.

Seamless integration:
Microsoft Teams connects with several third-party applications and services and other Microsoft 365 applications, including Outlook, Word, Excel, and SharePoint.

Enhanced security:
Teams benefit from the same security and compliance in the Microsoft 365 suite, ensuring your data is safe and secure.

Scalability:
Small teams and massive corporations with thousands of people can use Microsoft Teams since it can be tailored to their needs.

Remote work support:
Microsoft Teams makes it simple for distributed and remote teams to connect, communicate, and work effectively together no matter where they are.
Core features of Microsoft Teams
Here are some of the key features to consider if you are deciding to get Microsoft Teams:
- Chat: Send instant messages to individual colleagues or groups, with the ability to format text and add emojis, gifs, and stickers to enhance communication.
- Channels: Organize team conversations into topic-specific channels, making finding and participating in relevant discussions easy.
- Audio and video calls: Make one-on-one or group calls with high-quality audio and video, screen sharing, and the ability to record meetings for later reference.
- File sharing and collaboration: Share files directly within a chat or channel and collaborate on documents in real-time using Microsoft Office apps.
- Calendar integration: Schedule, join, and manage meetings directly from Microsoft Teams, seamlessly integrating with your Outlook calendar.
- App integration: Extend the functionality of Microsoft Teams by adding third-party apps and integrations to your workspace.

Setting Up an Account
Before you can start using Microsoft Teams, you’ll need to set up an account. In this section, we’ll guide you through creating a Microsoft Teams account and help you get started on the right foot.
Prerequisites
To use Microsoft Teams, you’ll need the following:
- A computer or mobile device with internet access
- A Microsoft 365 subscription (previously known as Office 365), as Microsoft Teams is included with most Microsoft 365 plans
Use our handy Microsoft 365 business plan guide to pick the right subscription for your team!
If your organization already uses Microsoft 365, you likely have access to Microsoft Teams. If you’re unsure about your subscription, check with your IT department or office administrator.
Creating a Microsoft Teams Account
If you don’t already have a Microsoft 365 account to use Teams, don’t worry! Creating a 365 account is a very simple process. Either use our handy infographic below, or read a full step-by-step process on our Teams features explained post.
Congratulations! You’ve successfully created your Microsoft Teams account and are ready to explore the platform.
Note: If you don’t have a Microsoft 365 subscription, you can sign up for a free trial or choose a plan that suits your needs at https://www.microsoft.com/microsoft-365.
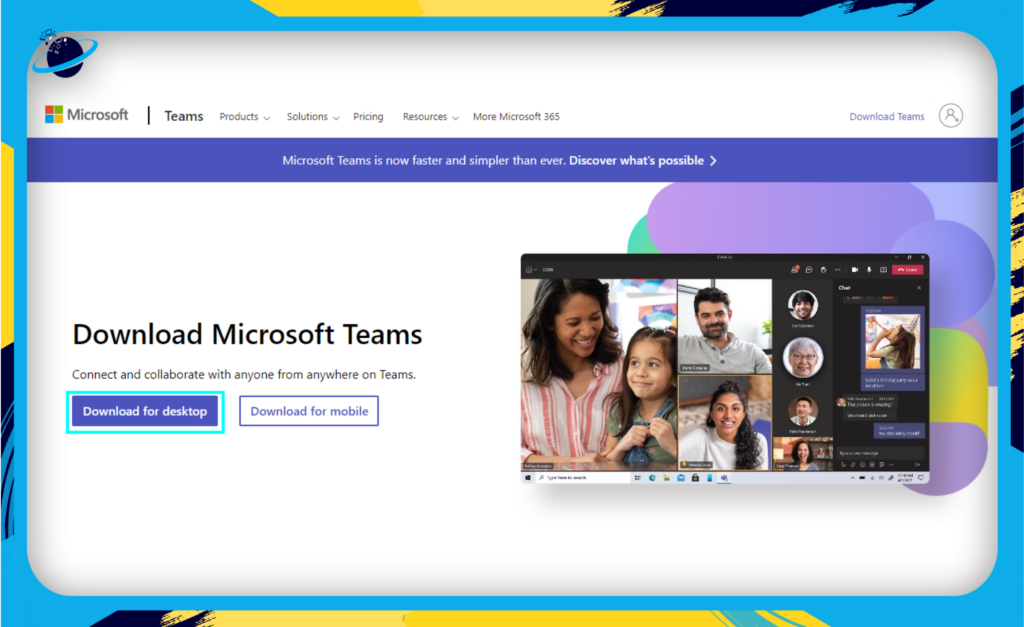
Downloading the Microsoft Teams Desktop App
Although you can access Microsoft Teams through your web browser, the desktop app offers additional features and a more streamlined experience. Here’s how to download and install the Microsoft Teams desktop app:
- Visit the “Microsoft Teams download page” at https://www.microsoft.com/en/microsoft-teams/download-app.
- Click “Download for desktop” to download the installer for your operating system (Windows, macOS, or Linux).
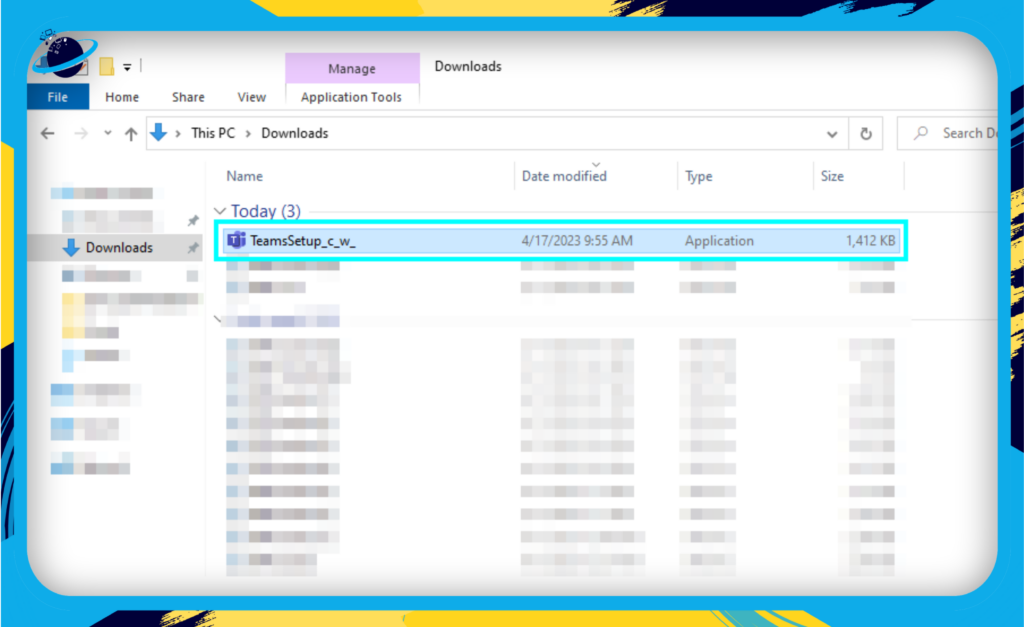
- Open the Teams setup file.
- Let Teams download onto your desktop.
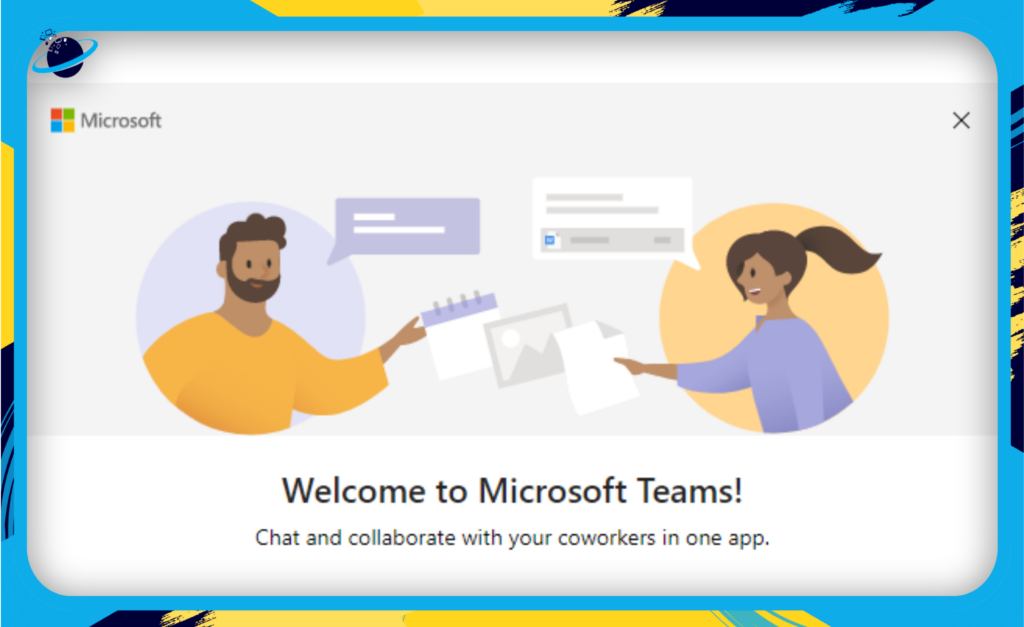
- Once installed, launch the Microsoft Teams app and sign in using your Microsoft 365 email address and password.
Tip: Don’t forget to download the Microsoft Teams mobile app for iOS or Android to stay connected on the go. You can find the app in the Apple App Store or Google Play Store.
Navigating the Interface
One of the first steps in mastering Microsoft Teams is getting familiar with its interface. In this section, we’ll cover the main components of the Teams environment, helping you understand where to find the tools and features you’ll need.
The Sidebar
The sidebar is located on the left side of the Microsoft Teams window and provides quick access to the main features of the platform:
- Activity: This feed displays notifications about recent actions and updates, such as mentions, replies, and team or channel updates.
- Chat: Access your private one-on-one or group conversations, start new chats, and search for specific messages or contacts.
- Teams: View and manage your teams and channels and join or create new teams.
- Calendar: Keep track of your meetings and events, schedule new ones, and join virtual meetings.
- Files: Quickly access your shared files and recent documents and sync files to your local device for offline access.
Resources for Further Assistance
If you want to make the most of the sidebar in Teams, read through some of our other blogs; here, we give you further tips and tricks to improve your usage of the Teams sidebar.
How to add apps to the sidebar in Microsoft Teams
How to pin a Teams app to the sidebar for all users
How to hide the sidebar when viewing a document in Teams
Team and Channel Views
When you select a team or channel, the main window will display content relevant to your selection. Let’s look at some key elements:
Conversation Tab
In each channel, you’ll find the Conversation tab. This is where you and your team members can discuss, share files, and collaborate on documents. Some key features include:
- Compose Box: Type and format messages, attach files, and insert rich content like emojis, GIFs, etc.
- Threaded Conversations: Reply to specific messages to keep discussions organized and easy to follow.
- Pinned Messages: Pin important messages to the channel’s top for quick reference.
Files Tab
The Files tab within a channel provides a centralized location for your team to access and collaborate on documents. Key features include:
 Upload: Add files from your computer or cloud storage services like OneDrive.
 Co-authoring: Collaborate in real-time on documents, spreadsheets, and presentations.
 Version History: Track changes and revert to previous versions of a file if needed.
Search Bar
The search bar at the top of the Microsoft Teams window is a powerful tool that helps you find content quickly. Use it to:
- Search: Type keywords to find messages, files, or people within your organization.
- Command Shortcuts: Execute quick actions by typing a forward slash (/) followed by a command, such as “/call” to start a call or “/files” to find a file.
Profile and Settings
Click on your profile picture in the top-right corner of the Microsoft Teams window to access your account options and settings. Here, you can:
- Set Status: Choose from options like Available, Busy, Do Not Disturb, or set a custom status message.
- Settings: Customize your Microsoft Teams experience, including notification preferences, privacy settings, and more.
- Help: Access the Help Center, provide feedback, or report a problem.
By familiarizing yourself with the Microsoft Teams interface, you’ll be well-equipped to navigate the platform efficiently and make the most of its powerful features.
Resources for Further Assistance
It is important to maintain your profile in Teams; use some of our additional blogs to help:
How to remove your profile picture in Microsoft Teams
How to fix incorrect Teams presence status
How to change your name in Microsoft Teams
Creating a Team
A team is a group working together on a project, division, or area of interest. They make collaborating on Teams a lot easier as there is generally a lot more structure to manage the projects.
Creating a New Team
Use these steps to create a new team:
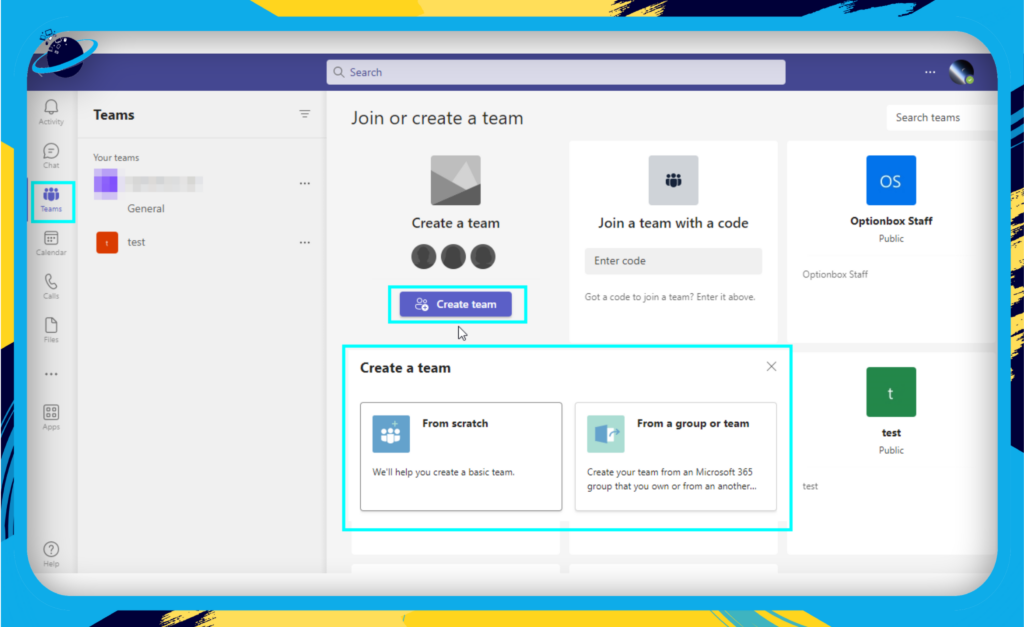
- Open Teams and select the “Teams” tab from the menu on the left.
- At the bottom of the screen, select the “Join or create a team” button.
- Choose “Create a team” and then one of the following:
- Build a team from scratch: Create a new team from the start with no members.
- Create from a current team or group: You can create a team from an existing Office 365 group or team.
- Choose the team’s privacy setting:
- Private: Only approved members can join.
- Public: Anyone within your organization can join the team.
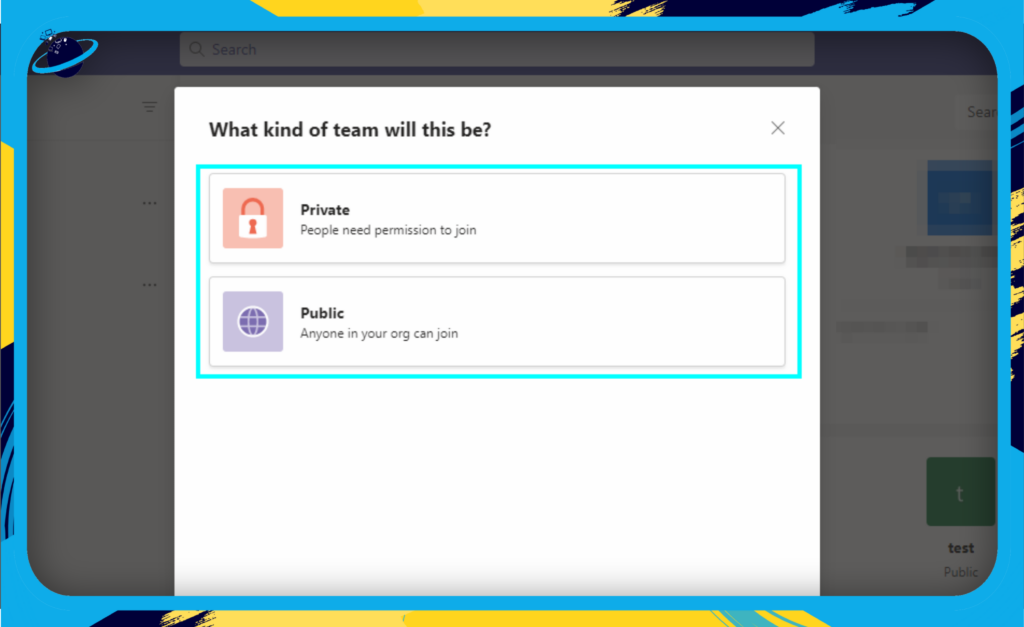
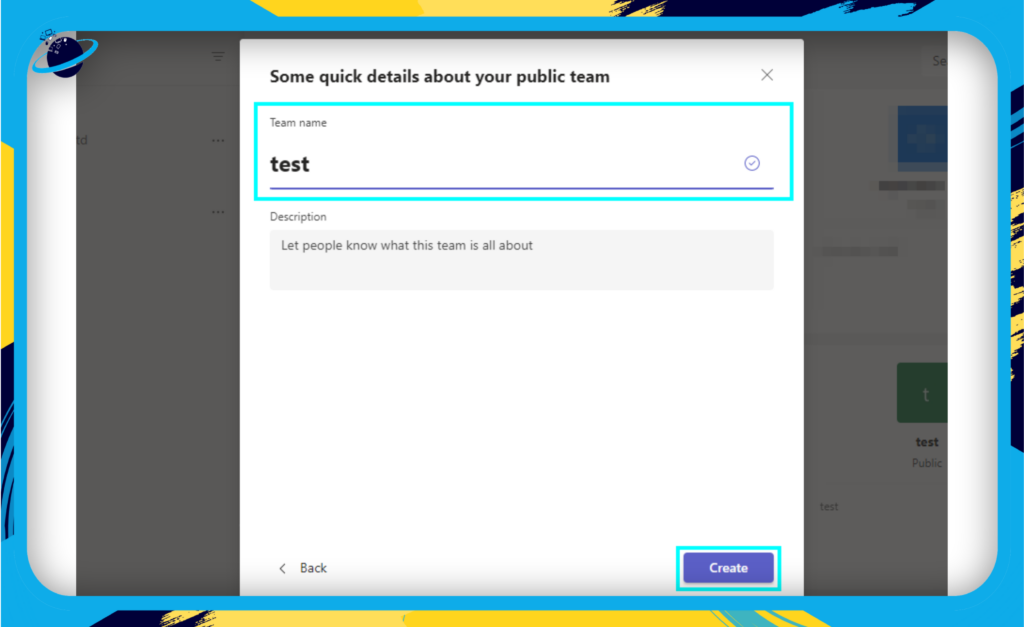
- Enter a team name and an optional description, then click “Create.”
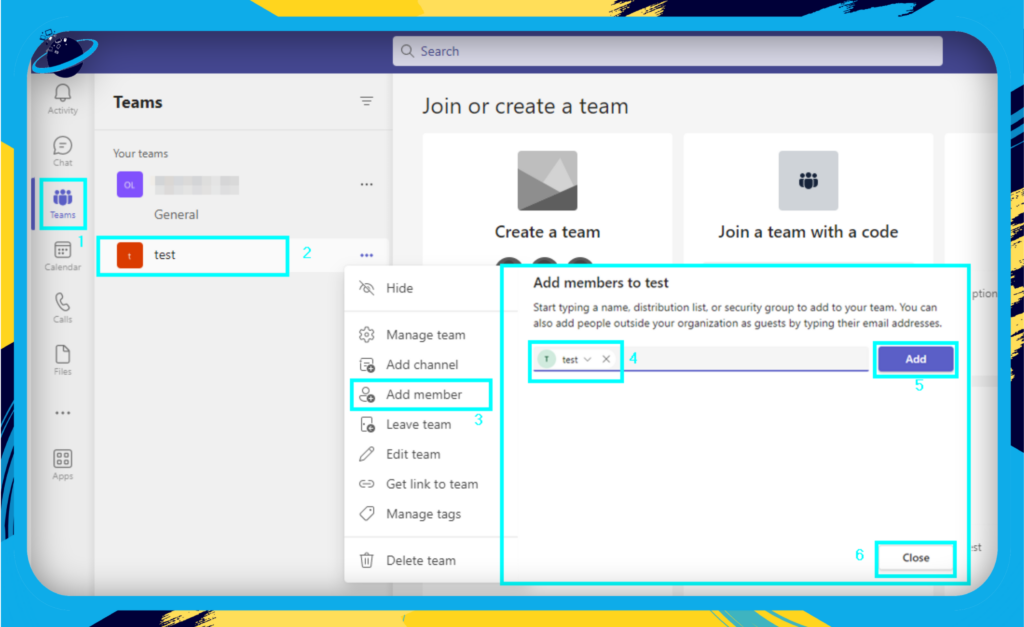
Inviting Members
Once you’ve created your team, you’ll want to invite members to join. Here’s how:
- In the “Teams” tab, select your newly created team.
- Click the “More options” (three dots) button next to the team name, and choose “Add member.”
- In the Add members window, search for people by name or email, then click “Add.” You can also assign roles (Member or Owner) to the invited members.
- Click “Close” when you’ve finished inviting members.
Note: If your organization allows, you can also invite external users (guests). Guests will have limited access to the team’s features. To invite a guest, enter their email address in the Add members window.
Managing Team Settings
As a team owner, you can manage various team settings, including member permissions and team-wide settings. To access these settings:
- In the “Teams” tab, select your team.
- Click the “More options” button next to the team name, and choose “Manage team.”
- In the Manage team window, you can:
- Add or remove members: Add or delete team members using the Members tab. You may also modify the roles of team members.
- Configure channels: To add, remove, or manage channels for the team, use the Channels tab.
- Adjust settings: To adjust team-wide preferences, including team photos, member rights, and visitor access, use the Settings tab.

You may begin working with your coworkers on Microsoft Teams since you know how to build a team, invite members, and manage team settings.
Chatting and Messaging
Any successful team relies on effective communication to function. Microsoft Teams’ user-friendly chat and messaging capabilities make it simple for you to communicate with your coworkers. In this part, we’ll go through the fundamentals of chatting, group messaging, and how to use different formatting choices to make your messages more interesting and understandable.
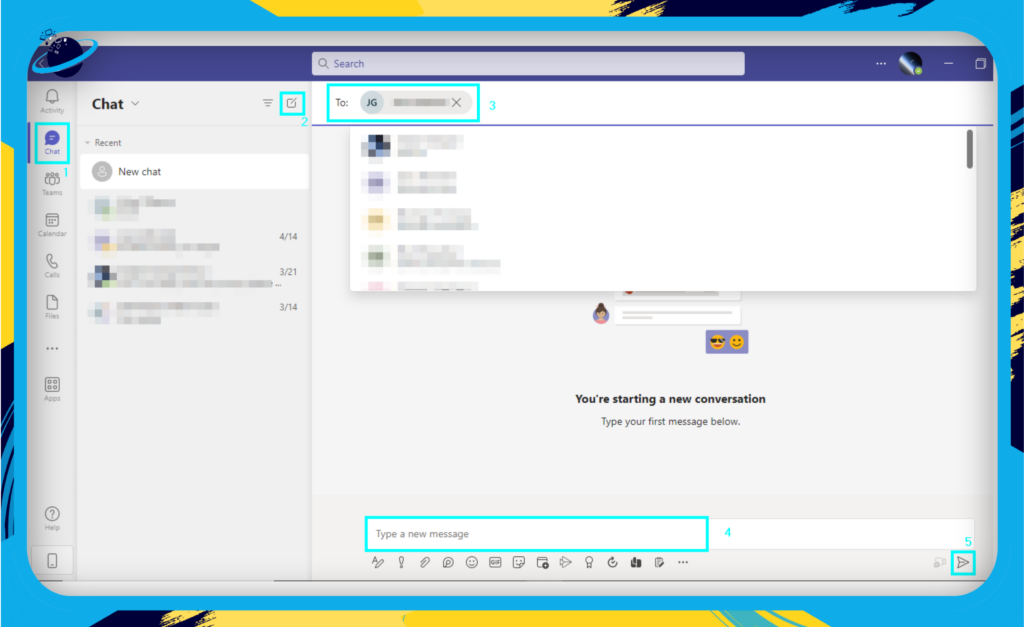
Sending Messages
To send a message in Microsoft Teams:
- Navigate to the “Chat” tab on the left-hand side of the interface.
- Click the “New chat” icon located at the top.
- Type the name of the person you want to chat with in the “To” field.
- Write your message in the Type a new message box at the bottom.
- Press Enter to send the message.
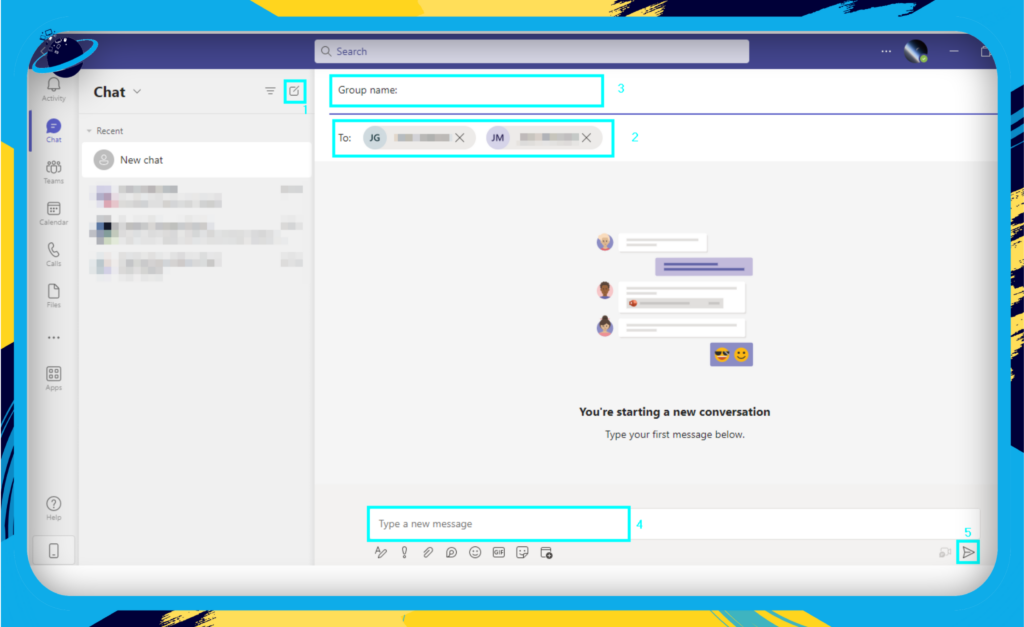
Creating Group Chats
To start a group chat with multiple team members, follow these steps:
- Click the “New chat” icon at the top of the Chat tab.
- Type the names of the people you want to include in the group chat in the “To” field.
- Enter a group name in the “Group name” field (optional).
- Write your message in the Type a new message box.
- Press Enter to send the message and create the group chat.
Formatting Text
Microsoft Teams offers several formatting options to help you emphasize important information and enhance the readability of your messages. To access the formatting toolbar, click the Format icon (represented by an ‘A’ with a pencil) below the Type a new message box. Some popular formatting options include:
- Bold, Italic, and Strikethrough: Use the corresponding buttons on the toolbar or keyboard shortcuts (Ctrl+B, Ctrl+I, and Ctrl+Shift+S, respectively) to apply these styles to your text.
- Bulleted and Numbered lists: Organize your information using bullet points or numbers by clicking the appropriate icons on the toolbar.
- Quotes: Highlight important information or quotations by clicking the Quote icon on the toolbar.
- Code Snippets: Share code with your colleagues by clicking the Code icon and pasting your code into the box provided.
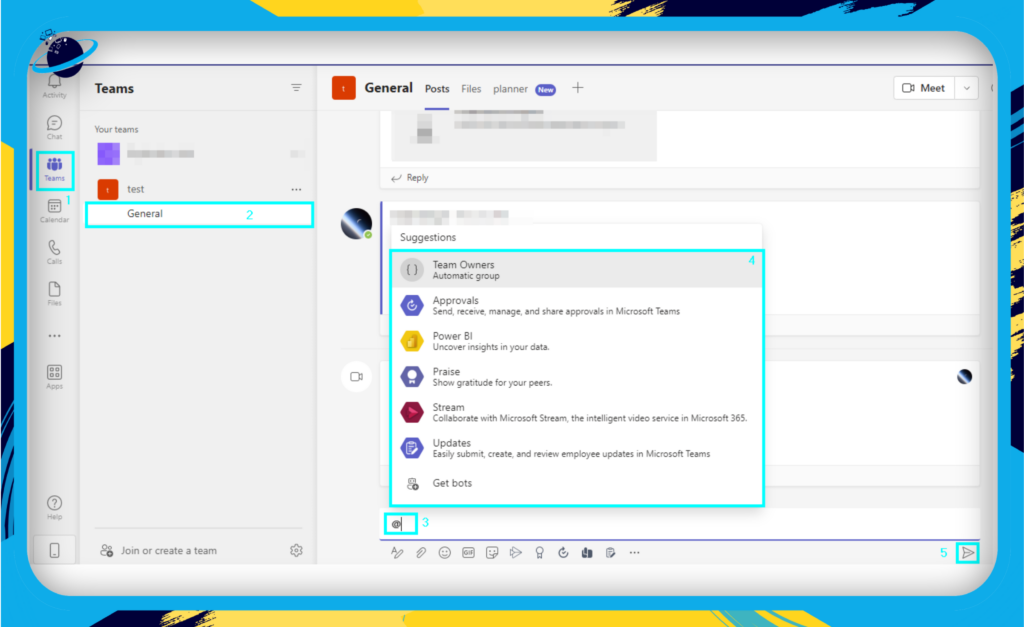
Using @Mentions
To grab someone’s attention or ensure they receive a notification about your message, use the @mention feature:
- Type “@” followed by the person’s name in the Type a new message box.
- Select the correct person from the list that appears.
- Write your message and press Enter to send.
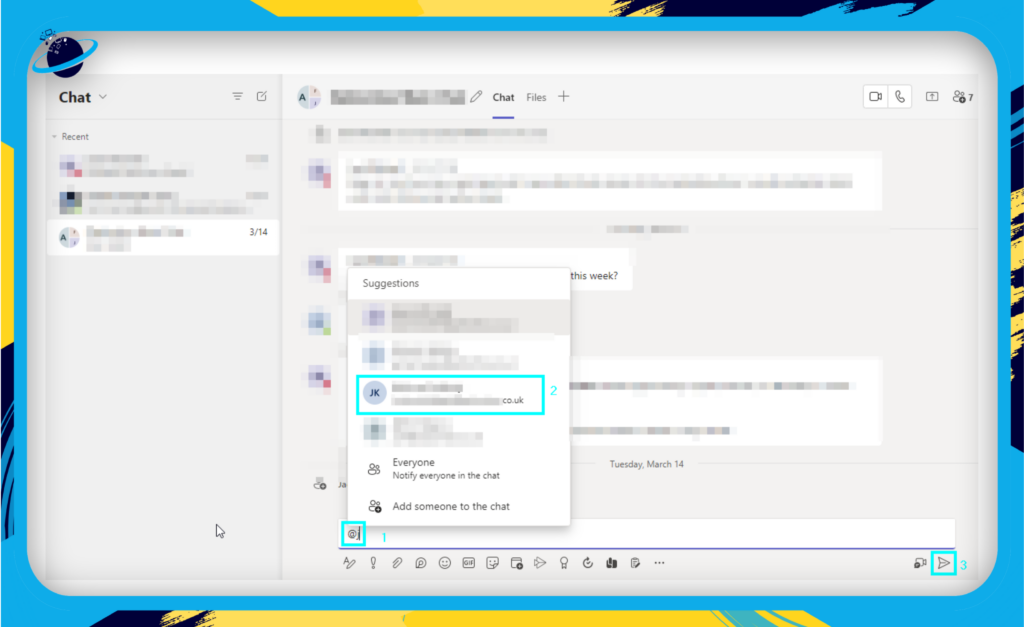
You may also use @team or @channel to refer to a whole team or channel.
By getting to know these chat and messaging options, you can efficiently connect with your coworkers and keep everyone informed while collaborating on projects and assignments.
Scheduling and Joining Meetings
This section will cover the essential points regarding meetings and how to schedule and join them.
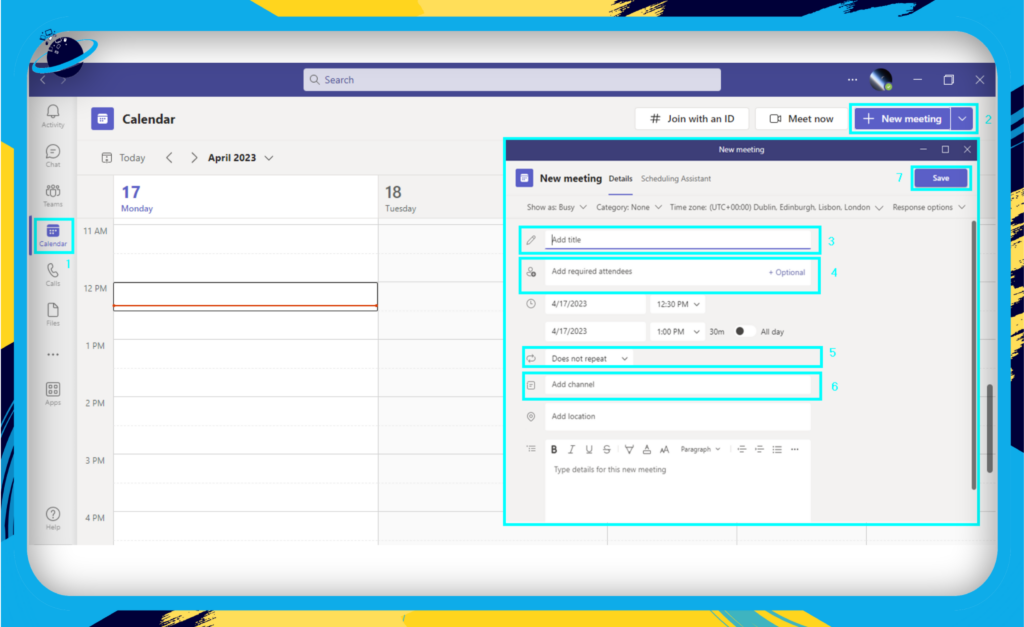
How to schedule a meeting in Teams?
Follow these steps to schedule a meeting:
- Go to the Calendar tab: Click the Calendar icon in the left-hand navigation pane.
- Create a new meeting: Click on the “New Meeting” or + button in the upper right corner of the Calendar tab.
- Add meeting details: Fill in the required information, such as the meeting title, date, time, and duration.
- Invite attendees: In the “Invite people” field, start typing the names or email addresses of the participants you’d like to invite. Microsoft Teams will suggest contacts as you type.
- Set recurrence (optional): If the meeting is a recurring event, click on the “Does not repeat” dropdown and choose the appropriate frequency.
- Choose a channel (optional): Click the “Add channel” field and select the desired channel.
- Save and send invites: Click the “Send” button to save the meeting and invite the participants.
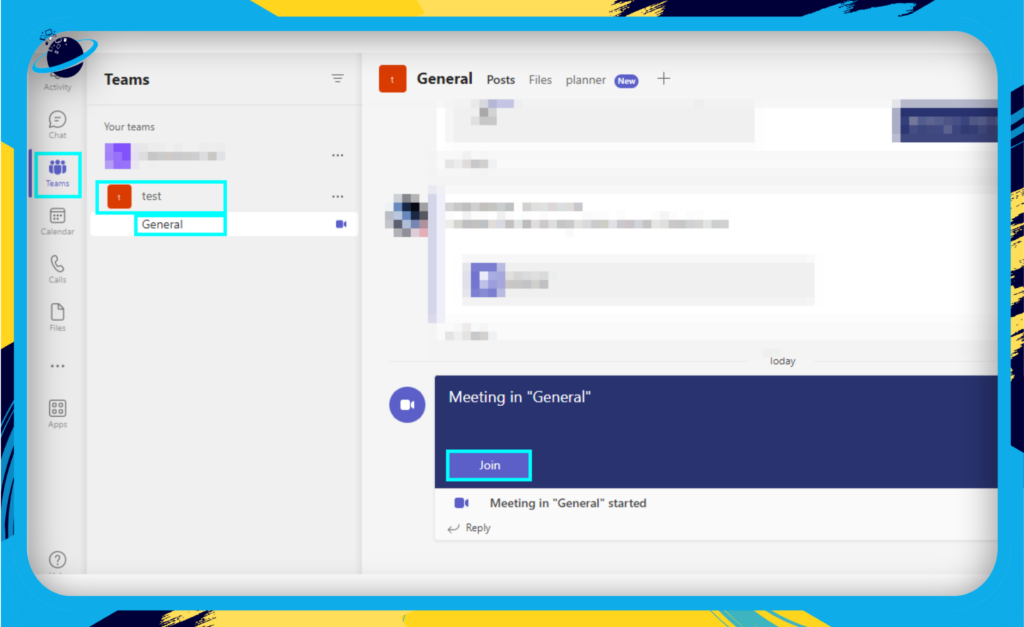
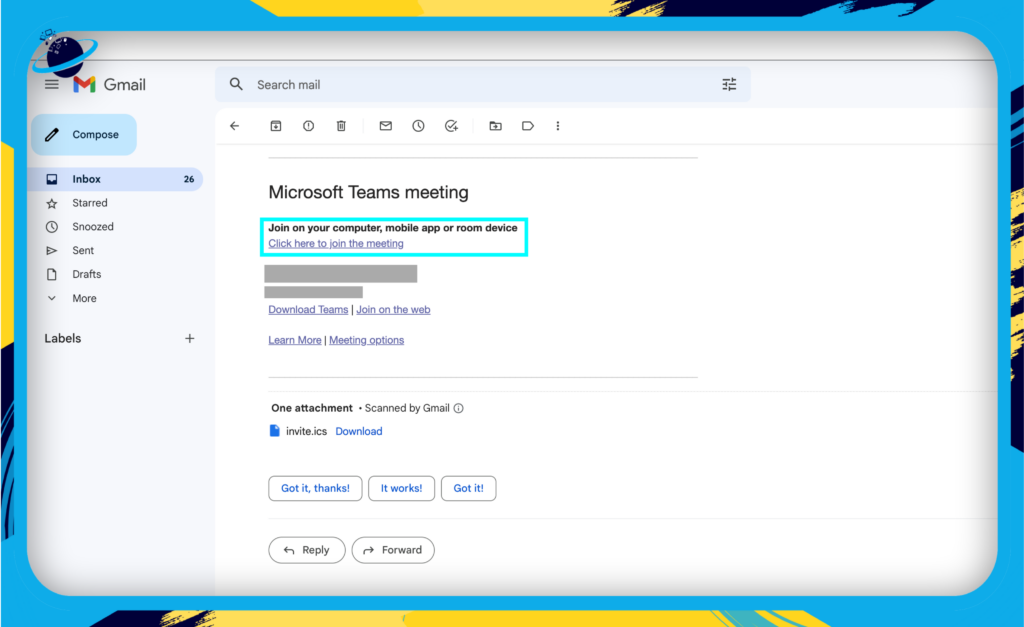
Joining a Meeting
When it’s time to join a scheduled meeting, you have a few options:
- From the Calendar tab: Find the meeting in your calendar and click the “Join” button.
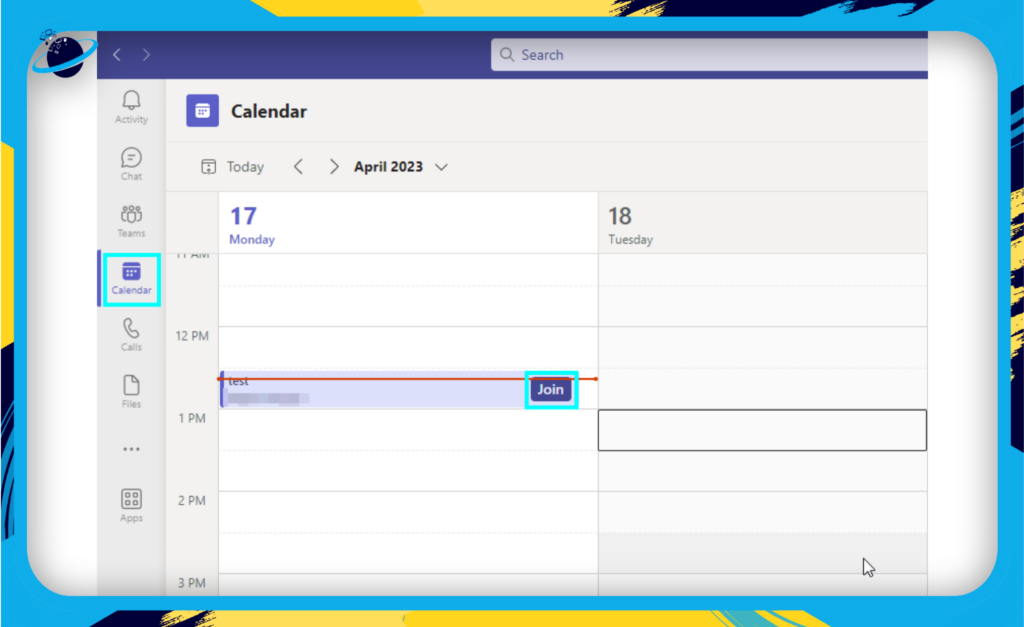
- From a channel: If the meeting is associated with a channel, navigate to the channel and look for the meeting post.
- From an email invitation: Open the meeting invitation and click on the “Click here to join the meeting” link.
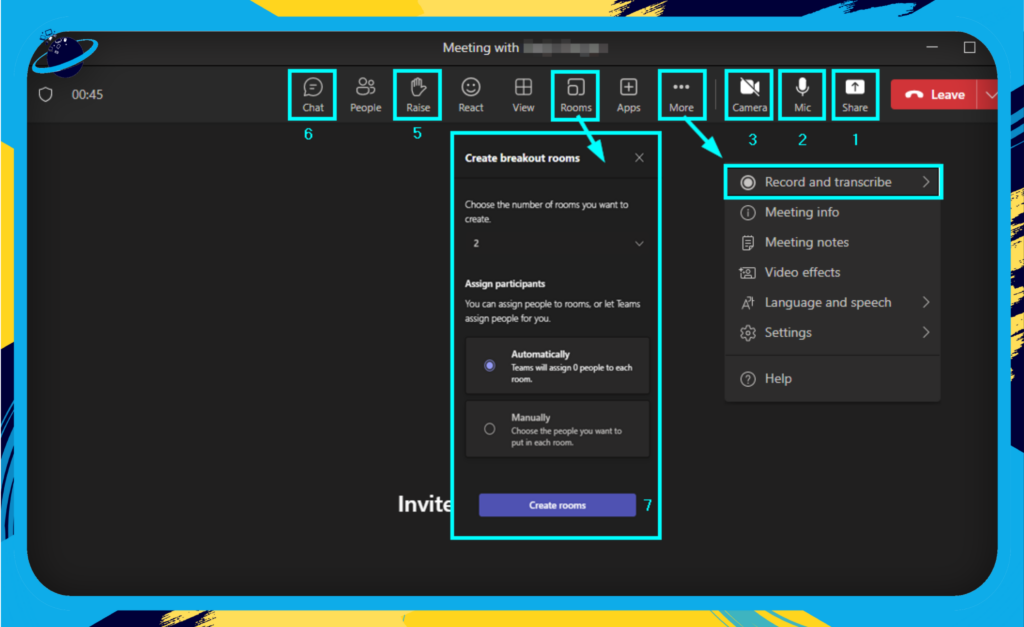
Managing Meetings
- Share your screen: Click the “Share” icon to present your screen or a specific window to the participants.
- Mute/unmute your microphone: Click the “Microphone” icon to toggle your audio on or off.
- Turn on/off your video: Click the “Camera” icon to enable or disable your video feed.
- Record the meeting: Click on the ellipsis (…) icon and select “Start recording” to capture the meeting for later review.
- Raise your hand: Click on the hand icon to signal that you have a question or comment without interrupting the current speaker.
- Use the chat: Utilize the meeting chat to share links, files, or messages with the participants without interrupting the meeting flow.
- Breakout rooms: Click on the ellipsis (…) icon and select “Breakout rooms” to create and manage smaller discussion groups within the meeting.
By following these tips, you’ll be able to easily schedule, join, and manage meetings in Microsoft Teams, ensuring effective communication and collaboration with your team members.
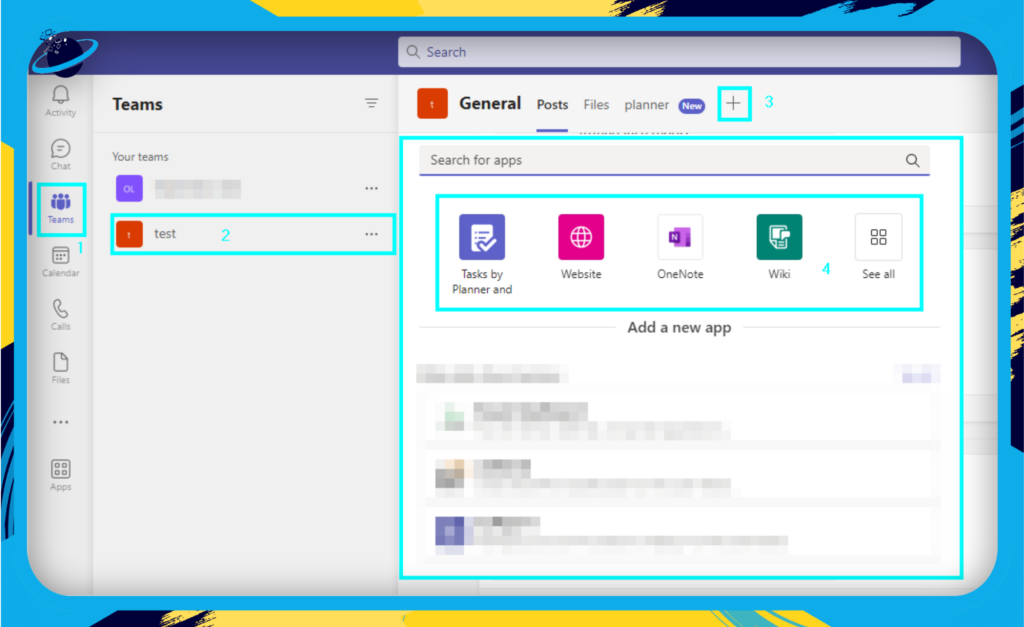
Integrations and Apps
One of the biggest strengths of Microsoft Teams is its ability to integrate with various third-party apps and services, helping you and your team stay productive without leaving the platform. In this section, we’ll explore some popular integrations and apps and guide you on installing and using them in Microsoft Teams.
Types of Integrations
Microsoft Teams integrations can be categorized into three main types:

Tabs:
These integrations allow you to embed web-based apps and services directly within a Teams channel or chat.

Bots:
Bots are AI-powered virtual assistants that can perform tasks and answer questions based on your input.

Connectors:
Connectors enable you to receive updates and notifications from other apps and services within a Teams channel.
Popular Microsoft Teams Integrations
Here are some popular integrations and apps that can help enhance your team’s productivity and collaboration in Microsoft Teams:
 Trello: Organize and manage projects directly within a Teams channel with Trello boards, cards, and lists.
 Asana: Create, assign, and track tasks from Asana projects without leaving Teams.
 Zoom: Schedule and join Zoom meetings directly from the Microsoft Teams interface.
 GitHub: Collaborate on code, track issues, and manage pull requests from your repository.
 Adobe Creative Cloud: Share, preview, and collaborate on creative assets from your Adobe Creative Cloud libraries.
Adding Integrations and Apps
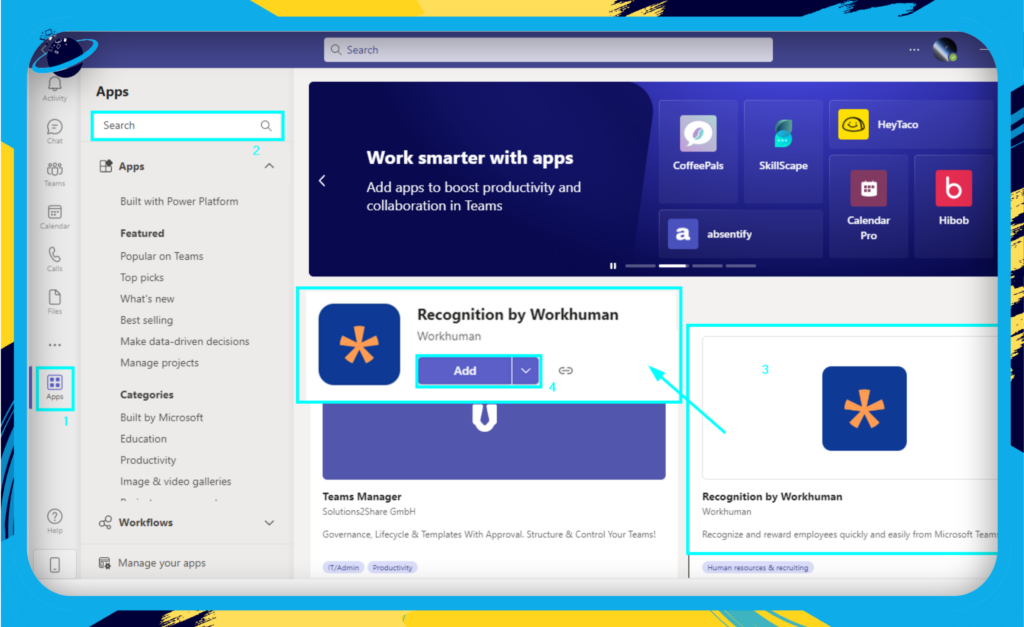
Follow these steps to add an integration or app to Microsoft Teams:
- Go to the “Apps” area in the sidebar.
- To find the app, use the search box.
- Now click on the app.
- To add the app to your Team’s workspace, select “Add.”
Note: Depending on your organization’s policies, you may need administrative approval to install certain apps.
Using Integrations and Apps
Once you’ve installed an app or integration, you can access and use its features within Microsoft Teams.
- To set up Tabs, choose an app by clicking the “+” button in the channel or chat’s top menu and then follow the on-screen instructions.
- To ask a question or issue a command to a bot, open a new chat window with the bot or @mention it in a channel.
- Navigate to the appropriate channel, and click the… (More choices) icon, and choose Connectors from the list of possibilities. Then, look for the desired connector and adhere to the existing configuration instructions.

Explore the Microsoft Teams App Store for more apps and integrations to enhance your team’s productivity and collaboration. Happy teamworking!
Customizing Settings
This section will discuss how you can personalize your Microsoft Teams experience by customizing various settings. Tailoring these settings to your preferences can help you work more efficiently and focus on your tasks. We’ll cover notifications preferences, status messages, and keyboard shortcuts.
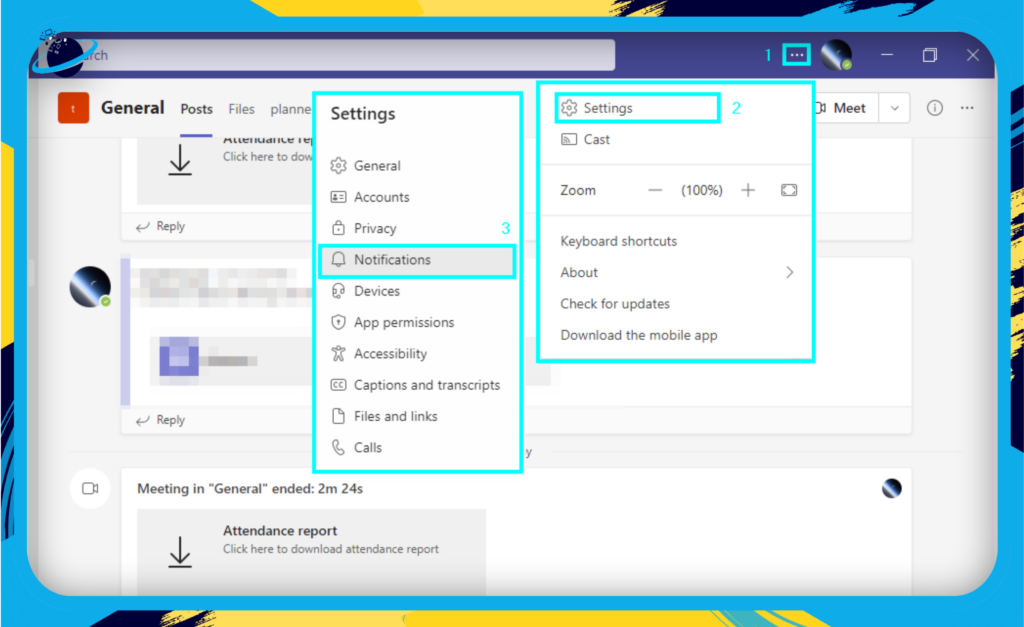
Notification Preferences
- Click on the “Settings and more” button in the top-right corner.
- Select “Settings” from the dropdown menu.
- Choose “Notifications” from the left sidebar.
Here, you can adjust settings for:
- Mentions: Choose the level of notifications for @mentions, including channel, team, and individual mentions.
- Messages: Set preferences for chat, replies, and reactions.
- Other: Configure settings for meetings, missed calls, and voicemails.
- Status: Enable or disable notifications when someone you follow changes their status.
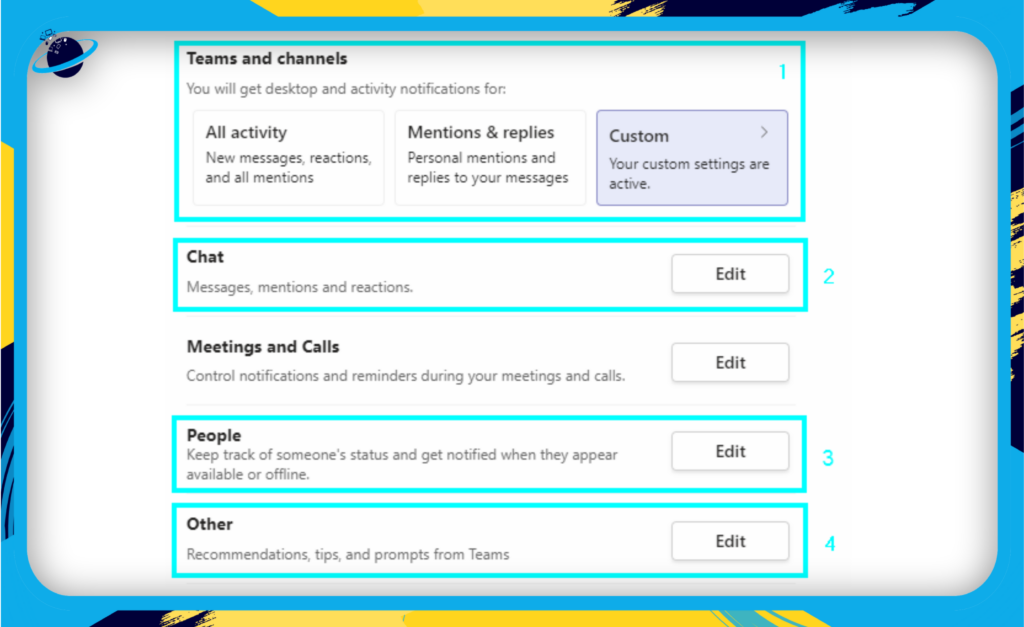
Pro tip: Consider enabling notifications only for essential activities and mentions to minimize distractions.
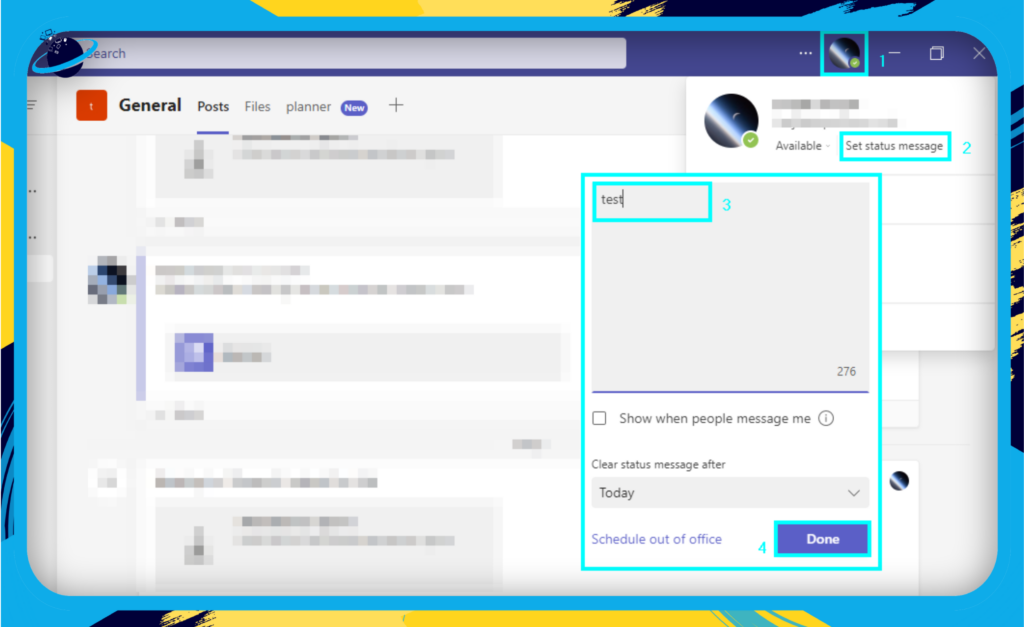
Status Messages
Status messages can help you communicate your availability to colleagues, particularly useful for remote or distributed teams. To set a custom status message, follow these steps:
- Click on your profile picture in the top-right corner of the Microsoft Teams window.
- Click on “Set status message.”
- Type your custom message in the text box, and optionally set a time frame for it to be displayed.
- Click “Done” to save your status message.
Pro tip: Use status messages to inform your colleagues about your current task, meeting availability, or planned absences.
Resources for Further Assistance
You can turn to these guides if you need further assistance, tips or guides on Teams status.
How to fix incorrect Teams presence status
How to change 5 minute Auto Away Status in Microsoft Teams
How does Microsoft Teams determine status?
Does Teams notify the contact that their status is being monitored?
Keyboard Shortcuts
Keyboard shortcuts can help you navigate Microsoft Teams more efficiently and perform common tasks faster. To view a list of available shortcuts, press Ctrl +. (period) on Windows or Cmd +. (period) on macOS. Here are some useful keyboard shortcuts to get you started:
- Ctrl + N (Windows) or Cmd + N (macOS): Start a new chat.
- Ctrl + E (Windows) or Cmd + E (macOS): Access the search bar.
- Ctrl + / (Windows) or Cmd + / (macOS): Toggle between bold, italic, and underlined text in a chat message.
- Ctrl + Shift + M (Windows) or Cmd + Shift + M (macOS): Mute or unmute your microphone during a call.
- Ctrl + Shift + O (Windows) or Cmd + Shift + O (macOS): Turn your camera on or off during a call.
Customizing your Microsoft Teams settings allows you to create a more comfortable and efficient work environment tailored to your needs. Take some time to explore and adjust these options to find the best configuration for your daily workflow.
Troubleshooting and Support
No software is without its quirks, and Microsoft Teams is no exception. In this section, we’ll cover some common issues you might encounter while using Teams and provide solutions to help you resolve them quickly. Additionally, we’ll point you toward valuable resources for further assistance.
Common Issues and Solutions
Here are a few frequently encountered problems and their possible solutions:
- Unable to log in:
- Double-check your email and password for any typos.
- Ensure you have a valid Microsoft 365 subscription.
- Verify that your organization’s IT administrator has enabled Microsoft Teams for your account.
- Missing teams or channels:
- Check if your organization’s administrator has archived or deleted the team or channel.
- Look for the team or channel in the “Hidden teams” or “More channels” sections.
- Reach out to your team owner to confirm your membership status.
- Audio or video issues during calls and meetings:
- Verify your audio and video settings within Teams and your device.
- Ensure your microphone and camera are not being used by another application.
- Close any unnecessary applications or browser tabs to free up system resources.
- If the issue persists, try restarting your computer.
- Problems with file sharing or editing:
- Confirm that you have the necessary permissions to access or edit the file.
- Check if the file is locked for editing by another user.
- Make sure your internet connection is stable.
- Clear your browser cache if you’re using Teams on the web.
Resources for Further Assistance
Sometimes, you may need additional help or information to troubleshoot an issue. Here are some resources you can turn to for support:
How to check who created a team in Teams
Should I create a channel or a team in Microsoft Teams?
How to limit who can create team channels in Teams
Remember, learning a new platform can take time, and encountering issues is a normal part of the process. Don’t hesitate to seek help in our Teams troubleshooting knowledge base or consult with your colleagues if you’re unsure about anything. Happy collaborating!