Clearing cache in Microsoft Teams is a lot like performing a system restart, which can resolve various problems. For example, if your program is sluggish, clearing the Microsoft Teams cache could help to speed up performance. So in this guide, I will explain how you can clear the cache in Microsoft Teams.
Clearing your Teams cache will remove some of the app’s local files. Doing so won’t damage user data and can even resolve some of your problems. The process to clear the cache data differs for both Mac OS and Windows devices; I will provide a guide for both below.
How to clear cache in Microsoft Teams (Windows):
- First, close your Teams app.
- Open File Explorer.
- Type %appdata%/Microsoft/Teams into the search bar and press enter on your keyboard.
- Open the “Cache” folder.
- Select all items in that folder.
- Finally, right-click any of the selected files and choose “Delete.”
How to clear cache in Microsoft Teams (Mac):
- Firstly, quit Microsoft Teams.
- Launch “Finder.”
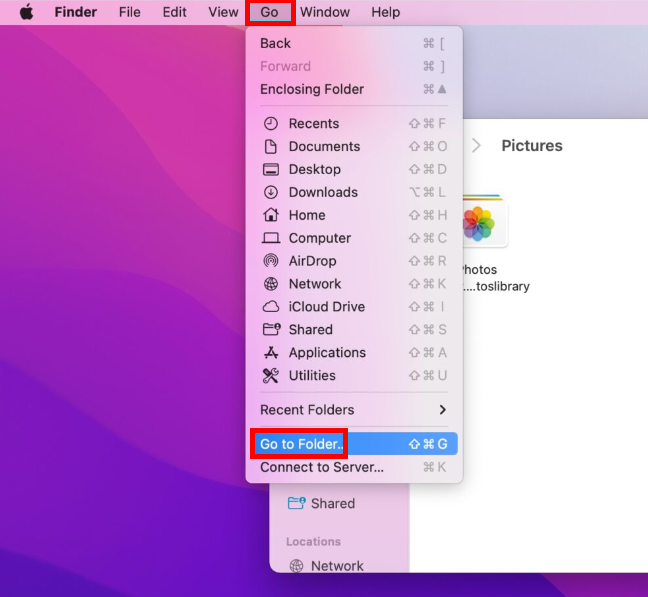
- Press “Go” on the apple search bar to open the Finder.
- Select the “Go to Folder” option.
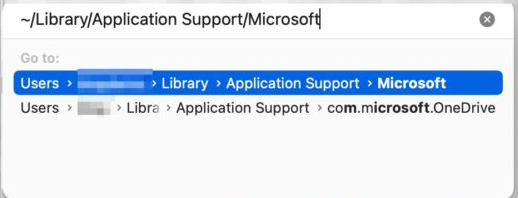
- Type “/Library/Application Support/Microsoft” into the box.
- Select “Move to bin” by right-clicking the Teams file.
- To finish the procedure, open the bin and remove the deleted files.
Please continue reading for a detailed guide on how to clear the cached data for Microsoft Teams on Windows and Mac OS devices.
- How to clear the cache data for Teams on Windows devices.
- How to clear the cache data for Teams on Mac OS devices.
How to clear the cache data for Teams on Windows devices
Cache content can build up in Microsoft Teams causing unnecessary issues such as inconsistent performance and lagging. Avoid these issues by using the steps to help clear the cache folder. Microsoft has given users an effective method of clearing the cache content folder if something is not working correctly on their Microsoft Teams account.
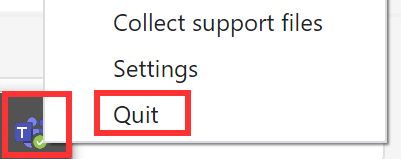
- Start by right-clicking your Teams icon and selecting “Quit” from the popup menu.
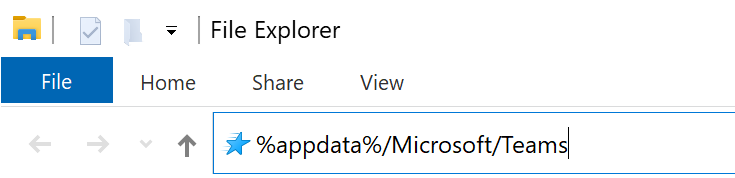
- Then, launch “File Explorer.”

- Type %appdata%/Microsoft/Teams into the search bar and press enter on your keyboard.
- Open the “Cache” folder from there.
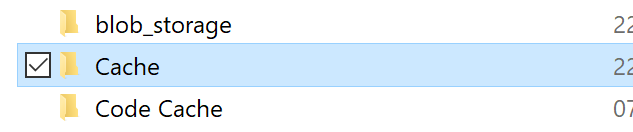
- Choose all items in that folder.

- Finally, right-click any of the selected files and choose “Delete.”

After completing the steps above, you will have erased the cached files from the app data folder. By deleting the cached files, you will reset the folder and enable the creation of new cached data without the previous set interfering with data input.

How to clear the cache data for Teams on Mac OS devices
The guide below will show you how to clear the Microsoft Teams cache folder using a Mac OS device. For a more detailed guide on clearing cached Teams data on MacOS devices, please read our dedicated guide, ![]() How to clear the Teams cache on Mac.
How to clear the Teams cache on Mac.
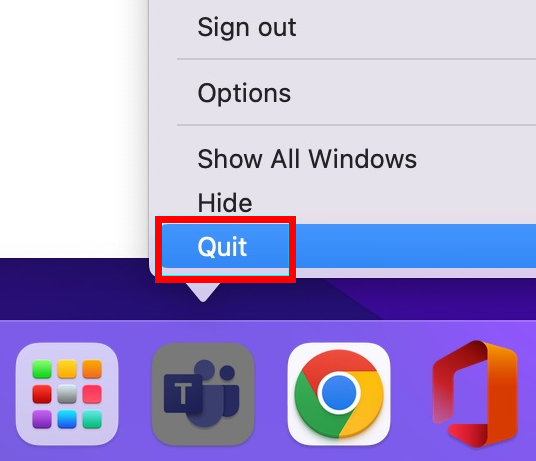
- Firstly, quit Microsoft Teams.
- Launch “Finder.”

- Press “Go” on the apple search bar to open the Finder.

- Select the “Go to Folder” option.
- Type “/Library/Application Support/Microsoft” into the box.
- Select “Move to bin” by right-clicking the Teams file.
- To finish the procedure, open the bin and remove the deleted files.
Upon completion of the steps, you will have managed to delete the cache content folder from Microsoft Teams on a Mac OS device. You must remove the content folder from time to time to ensure no issues with processing data. Sometimes if unnecessary bits of information are stored inside this folder, you may get issues such as lagging, and your computer may not run the software correctly. You may also get issues with not being able to sign into the program correctly.
Primary reasons for clearing the cache for Microsoft Teams
You can use cache clearing to solve latency and storage problems. Not only for Teams but for any program you use, especially ones that store a lot of data for faster processing, emptying your cache has several advantages. The processing of even the small sections of cached data consumes a significant amount of RAM. Therefore, removing the cached data eliminates the unnecessary material and only retains the required sections when you open the program again.
However, deleting cached data may also hurt how well that program runs on your device. All the information that Microsoft previously stored will be deleted when you erase cached data. You must sign in again and restore your previously established preference settings when you launch the program once the cache has been deleted. When you reopen the program after removing cached data, you can experience some delay since some removed cached data also need to be restored.
What is cached data?
In devices such as computers, the term “data cache” or “cached data” refers to the information and memory that a website or application such as Microsoft Teams accumulates through time and use. Users may take advantage of it to make the app launch more quickly, but the data would take up space on your device.
The choices “Clear cache” and “Clear Data” vary in that “Clear Cache” enables you to delete temporary data from a website or app without affecting data stored in an account. Clearing data, on the other hand, will remove all app data.
Conclusion
Thank you for reading our content and how you can clear the cache folder for Microsoft Teams on various devices. I provided the steps to clear the cache folder on both Windows and Mac OS devices. The process to remove the cache data on each device is different, so I suggest you go through each process to understand how to clear the cache folder correctly.
I have also provided more information on what a cache folder is and why you should remove it; I suggest you go through it to properly understand the importance of clearing a cache. If you require further assistance with the steps, drop a comment below, and we will address your issues.