Microsoft Teams is a powerful tool for staying connected and productive with your team. Our guide will help you master the interface, from setup to chats and meetings. Let’s explore the exciting world of Teams together!
 Table of content


What is Microsoft Teams?
![]() Microsoft Teams allows users to communicate and share files via text, audio, and video. Additionally, it seamlessly integrates with other applications. Let’s take a look at some of its most notable features.
Microsoft Teams allows users to communicate and share files via text, audio, and video. Additionally, it seamlessly integrates with other applications. Let’s take a look at some of its most notable features.

Chats and Channels:
You can engage in one-on-one chats, create group chats, or use channels for topic-based discussions.

Meetings and Calls:
Teams allow audio, and video calls with individuals or groups, plus the ability to schedule meetings and webinars.

File Sharing and Collaboration:
You can share files directly in your chats, channels, or meetings and collaborate on them in real-time.

Integration with Other Apps:
Teams isn’t an island – it’s a connector. You can integrate it with a wide range of other apps, both within the ![]()
![]() Office 365 suite (such as
Office 365 suite (such as ![]()
![]() Word,
Word, ![]()
![]() Excel, or
Excel, or ![]()
 PowerPoint) and third-party services (like Asana, Trello, or GitHub).
Who are Microsoft Teams For?
Microsoft Teams is perfect for professional communication and collaboration, no matter the size of your business. From project managers to executives, it helps keep everyone on the same page and achieve their goals.
We’ll guide you on using Microsoft Teams, covering installation, setup, meetings, calls, integrations, and more to help make your teamwork a success!
Stay tuned for Section 2: Installation and Set-up, where we’ll get you up and running with Microsoft Teams.
Installation and Set-Up
Let’s check if you have Microsoft Teams set up on your device. We can assist you whether you’re on desktop or mobile.
Installing on Desktop (PC or Mac)
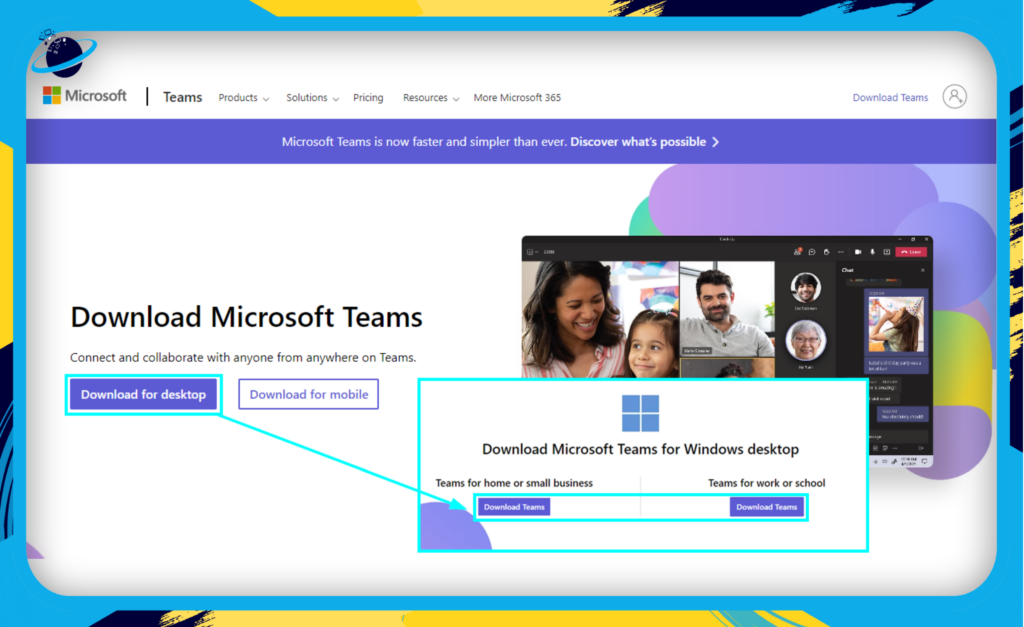
- Open your preferred web browser and go to the
 Microsoft Teams Download page.
 - Select the version you need: Windows or Mac.
- After the download is complete, open the installer and follow the prompts to install Microsoft Teams.
Pro Tip: Keep your Teams app up-to-date to benefit from the latest features and improvements. Most updates happen automatically, but you can always check manually from the Teams desktop app by clicking on your profile picture at the top of the app, then selecting Check for updates.
Installing on Mobile (iOS or Android)
- Open the App Store (for iOS devices) or the Google Play Store (for Android devices).
- Search for Microsoft Teams.
- Tap Install or Get to download the app onto your device.
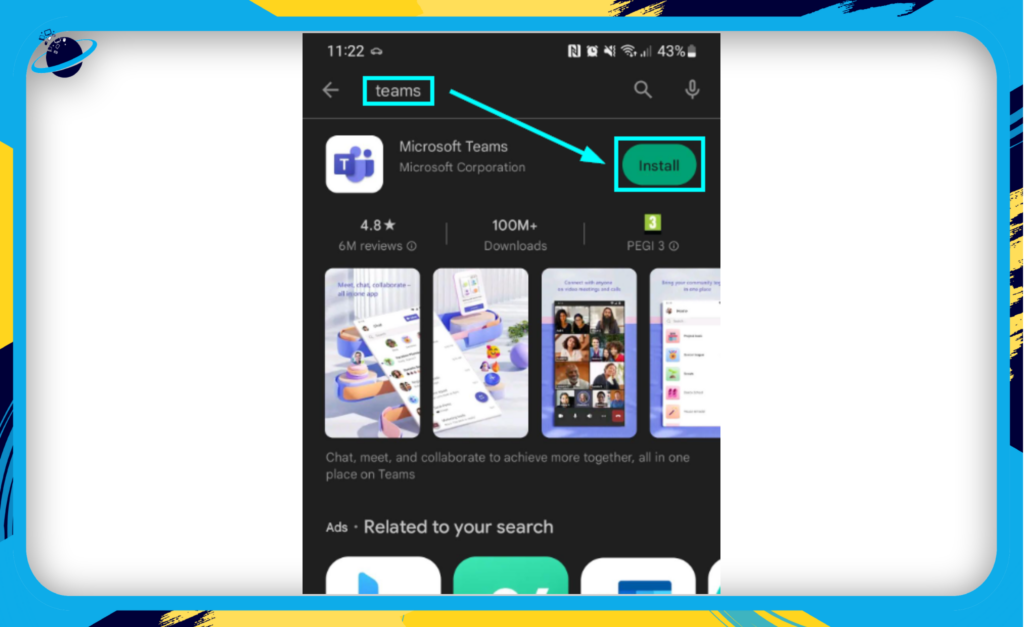
Note: To use the Teams mobile app, you’ll need iOS 11.0 or later or Android 5.0 or later.
Setting Up Your Account
Now that you’ve installed Teams, it’s time to set up your account:
- Click “Create one” on the sign-in page.
- Add an email address and click “Next.”
- Add your name and click “Next.”
- Create a password and press “Next.”
- Input your birth date and click on “Next.”
- Verify your email address and click on “Next.”
Check your email inbox for a code to verify your password. You can also view your spam or additional folders to check if the email hasn’t reached your primary inbox.
Important: Make sure to sign in with the correct business credentials. If you’re part of multiple Teams organizations, you’ll have to switch between accounts to access different Teams.
And voila! You’re now ready to start exploring Microsoft Teams. Whether you’re at your desk or on the go, Teams is designed to be your go-to hub for work, communication, and collaboration. So let’s get started on mastering it!
Understanding the Teams Interface
When you open Microsoft Teams, you’ll be greeted with a dashboard filled with various sections, each designed to serve a specific purpose. Let’s break it down, piece by piece, so you can navigate like a pro.
Activity Feed
At the top of the left-hand navigation bar, you’ll see the Activity icon. Click it, and you’ll open up your activity feed. This feed is a hub of your notifications and mentions.

Notifications:
Here, you’ll find updates about recent activities within your Teams. Whether someone has replied to your messages or there’s a new post in a channel you follow, it will all show up here.

@Mentions:
If someone mentions you specifically (using @YourName), this mention will show up in your activity feed, ensuring that you never miss an important message.
Chat
Just below the Activity icon, you’ll see the Chat icon. This section is your personal space for one-on-one or small group conversations.

Starting a new chat:
To start a new conversation, click the pencil-and-paper icon located at the top next to the ‘Chat’ title. Enter the name of the person you want to chat with, and voila! You’re ready to roll.

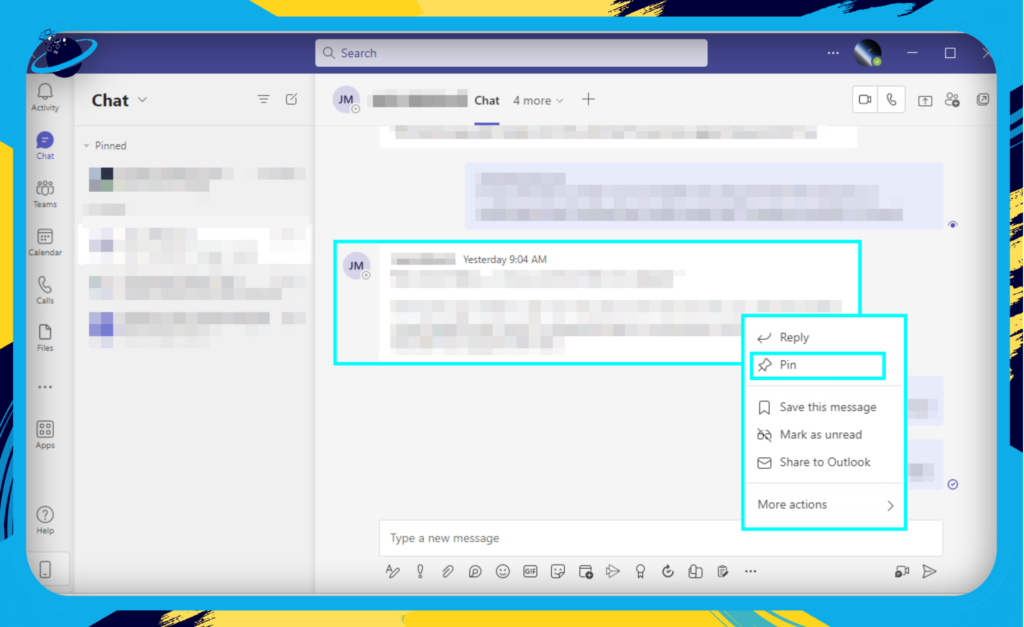
Pinning chats:
For those critical discussions you keep going back to, consider pinning them. Just right-click on the chat and select ‘Pin.’ Your chat will stay at the top of your list, always at your fingertips.
Teams
Further down the navigation bar, you’ll find the Teams icon. This section is where the magic of collaboration happens. Here, you can see all the teams you are a part of.

Join or create a Team:
At the bottom of your Teams list, you’ll find the ‘Join or create a Team’ option. Clicking on this allows you to either create a new team or join an existing one using a code.

Navigating Teams and Channels:
Each team has channels dedicated to different topics or projects. Click on a Team to expand it and see its channels. Select a channel to view its posts and files.
Meetings & Calls
The next icons are for Meetings and Calls. Here, you can schedule, manage, and join video meetings or audio calls.
- Scheduling meetings: In the Meetings tab, you can view your calendar, schedule new meetings, and join ongoing ones. To schedule a new meeting, click on the ‘New meeting’ button at the top right.
- Making calls: The Calls section is where you can make individual or group calls, access voicemail, and view your call history.
Files
Last but not least, the Files icon leads you to a section where you can access all the files shared across your chats and teams.
- Recent and Microsoft Teams files: Here, you’ll see your recently accessed files and those shared within Teams. It’s a quick and easy way to find that important document without trawling through endless conversations.
By understanding these key sections of the Teams interface, you’re well on your way to becoming a Teams expert! In the next section, we’ll dive deeper into creating and managing Teams. Stay tuned!
Creating and Managing Teams
Teams are at the heart of Microsoft Teams. They’re where your coworkers come together to collaborate, share files, and get things done. But before the collaboration begins, someone needs to create the team. That someone could be you!
Creating a New Team
Creating a new team is simple:
- Click on the “Teams” icon on the left sidebar.
- At the bottom of the team’s list, click “Join or create a team.”
- Then click “Create team.”
- Choose the kind of team you want to create – from scratch or from an existing team or group.
- Give your team a name and, optionally, a description.
- Decide whether you want the team to be private (people need permission to join) or public (anyone in your organization can join).
- Click “Create.”
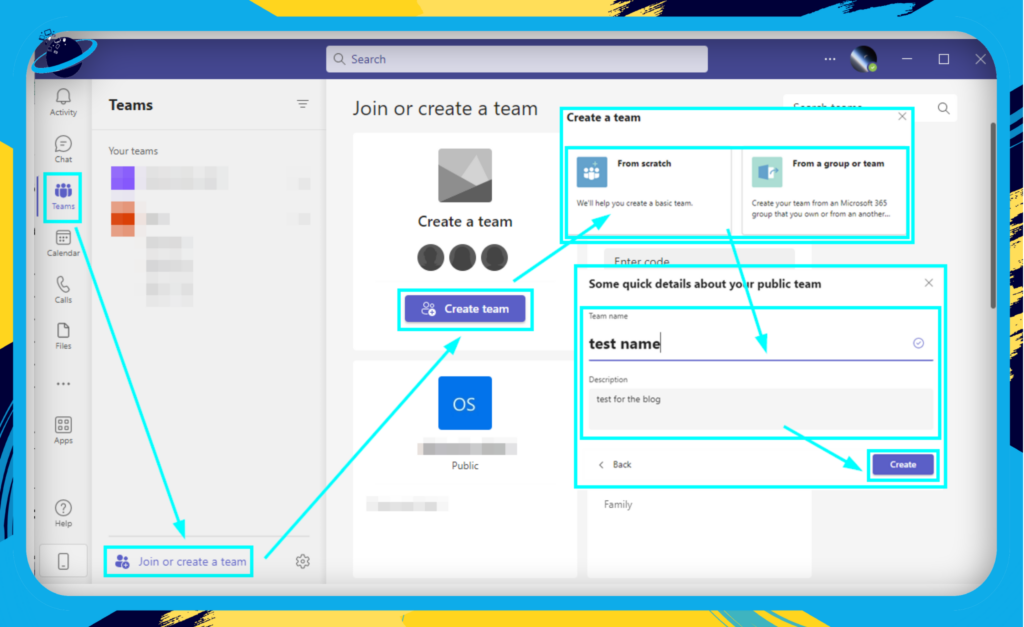
And voila! You’ve created your first team.
Adding Members to Your Team
Once you’ve got your team set up, you’ll want to add some members. Here’s how:
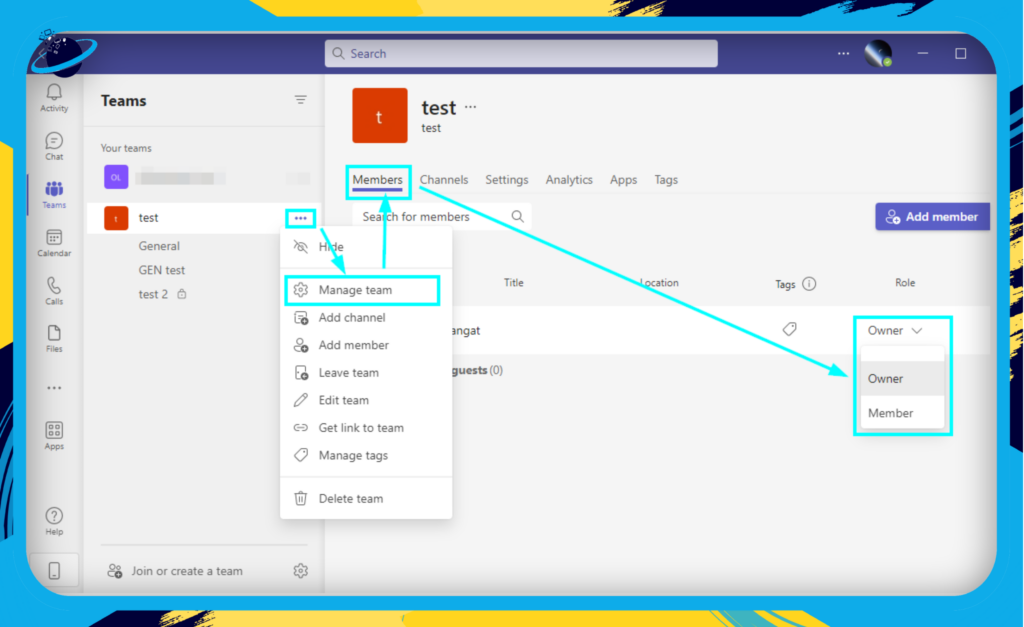
- Navigate to the team you’ve just created and click on “More options” (the three dots to the right of the team name).
- Choose “Add member.”
- Type the name or email address of the person you want to add.
- Choose the role you want to assign to them (member or owner).
- Click “Add.”
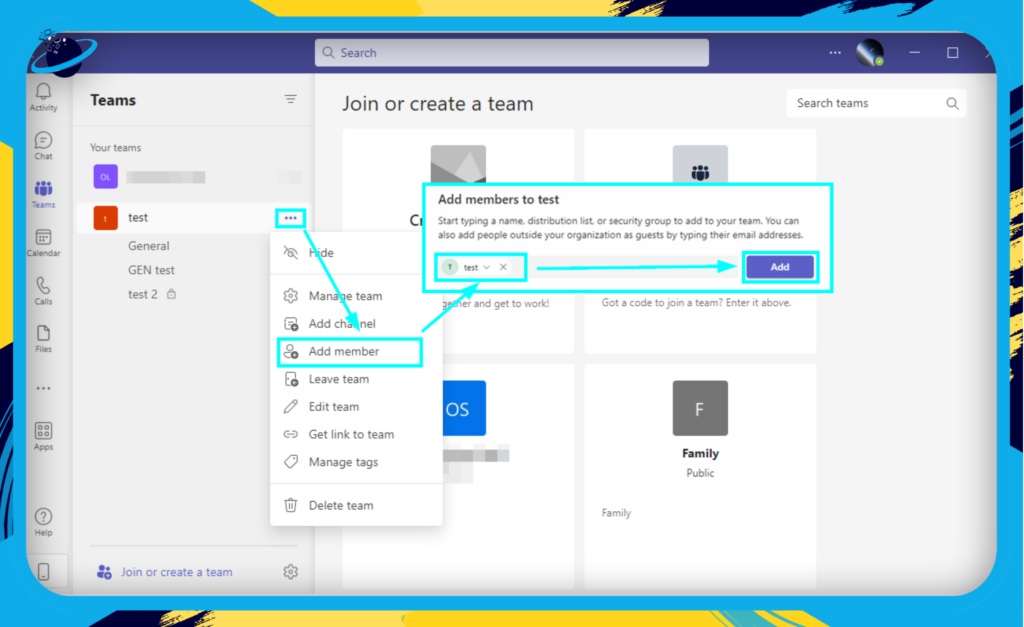
Don’t worry; you can always change a person’s role or remove them from the team later.
Managing Roles Within the Team
Roles define what permissions members have within a team. There are three roles: owners, members, and guests. Here’s a quick breakdown:
- Owners have the most power. They can add or remove members, change team settings, and more.
- Members can contribute to the team by sharing files, participating in conversations, and so forth.
- Guests are typically outside your organization. They can participate in conversations and meetings and can share files.
To change a person’s role:
- Navigate to the team and click on “More options.”
- Choose “Manage team.”
- You’ll see a list of members and their roles. Click the dropdown next to a person’s name to change their role.
Remember, with great power comes great responsibility. Be thoughtful about who you assign as team owners.
Leaving or Deleting a Team
There might come a time when you want to leave a team or delete it entirely. Here’s how:
- Navigate to the team and click on “More options.”
- Choose “Leave the team” to exit the team or “Delete the team” to remove it entirely.
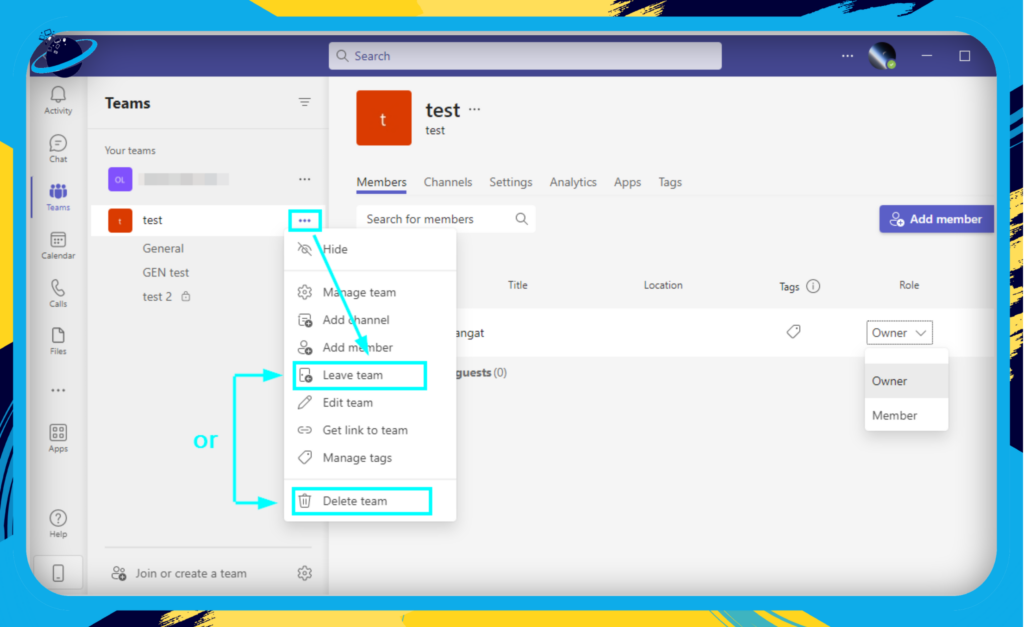
Remember, deleting a team is permanent. All conversations, files, and other data will be lost. So only delete a team if you’re absolutely sure!
Unleashing the Power of Channels
Channels are where the magic of collaboration truly happens in Microsoft Teams. Think of channels as dedicated sections within a team where specific conversations, meetings, and file sharing occur. This organization ensures everyone has a clear view of who’s working on what, and it makes finding past information a breeze.
Standard vs Private Channels
Before we dive in, let’s first distinguish between standard and private channels.
- Standard Channels are open to all members of the team, promoting transparency and open collaboration. Everyone can view and participate in these discussions.
- Private Channels, on the other hand, are exclusive spaces for a subset of team members. They’re perfect for sensitive conversations or projects that only involve certain individuals.
Creating a Channel
Creating a channel in Microsoft Teams is as easy as pie. Follow these simple steps:
- Navigate to the team where you want to create a channel.
- Click on the three-dot menu icon (“More options”) next to the team’s name.
- Select “Add channel.”
- Fill out the form with the channel’s name, description, and privacy settings.
- Click “Add.”
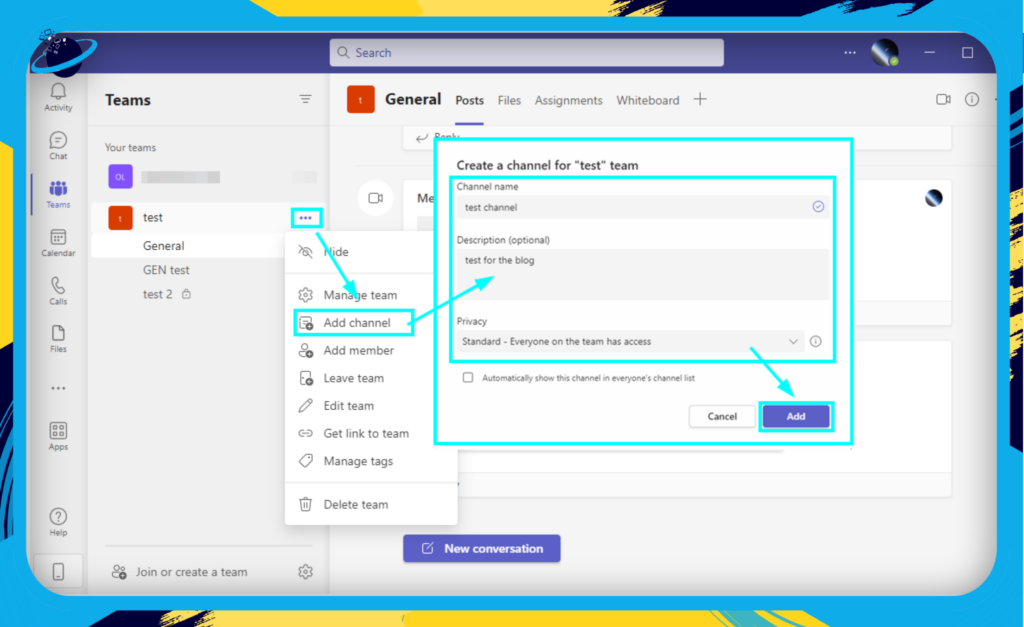
And voila! Your new channel is ready to foster amazing collaboration.
Navigating a Channel
Now that you’ve created a channel let’s explore its layout:
- Posts: This tab is the heart of your channel. It’s where all the conversations happen. Remember, you can @mention individuals or the whole team to direct their attention to a particular post.
- Files: The Files tab is your channel’s dedicated space for sharing and collaborating on documents. And the best part? Files shared here are automatically saved in a SharePoint folder linked to your team, so you never have to worry about losing important documents.
- Wiki: The Wiki tab is a convenient place for jotting down notes, minutes from a meeting, or any other information you want to be easily accessible to the team.
Managing Channels
Maintaining your channels is just as important as creating them. You can add tabs to a channel for quick access to frequently used files, apps, or websites. To edit or delete a channel, just click the three-dot menu icon next to the channel name and select the appropriate option.
Remember, a well-managed channel leads to a well-informed team!
Mastering the Art of Chatting on Microsoft Teams
One of the most essential features of Microsoft Teams is the Chat function. Whether you’re having a quick exchange with a co-worker or discussing a project with your entire team, Teams makes it effortless. Let’s dive into the ins and outs of Chatting on Microsoft Teams.
Starting a New Conversation
Initiating a conversation on Teams is a breeze. Simply follow these steps:
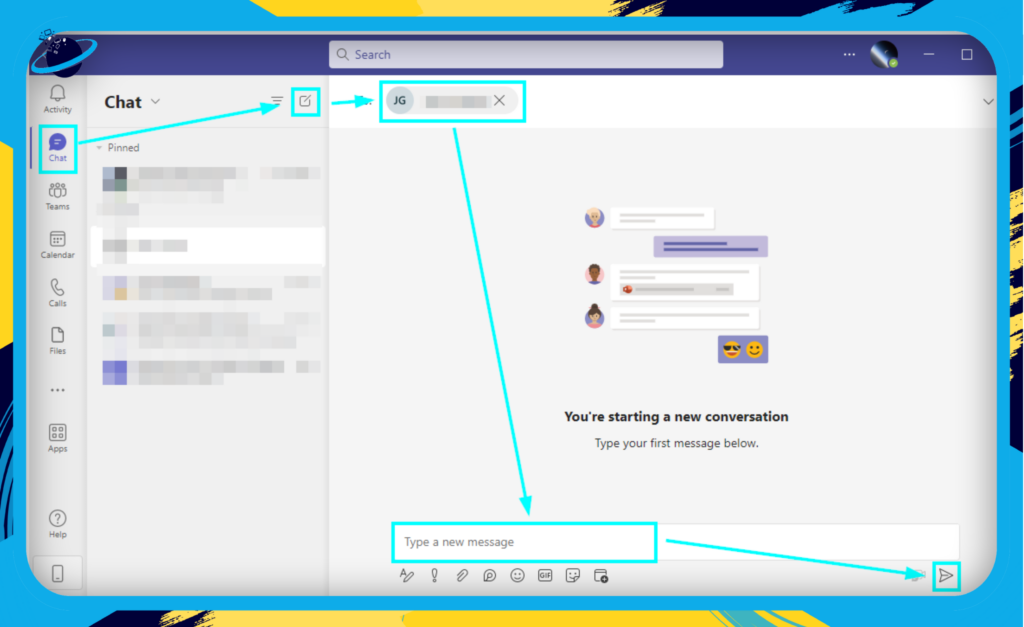
- Click on the “Chat” icon.
- Click the “New chat” icon.
- Enter the name of the person you want to chat with.
- Type your message in the “Compose box” and hit Enter to send.
Remember: To start a chat with someone directly from your Contacts list, select the person you want to chat with and click the “Chat” icon.
Advanced Chat Features
Teams provide a variety of features to enhance your chatting experience:
- Formatting: Click on the ‘A’ icon below the compose box for formatting options like bold, italics, and underline.
- Attachments: Attach files to your chat using the paperclip icon. You can add files from your computer or Teams.
- Emojis, GIFs, and Stickers: Add a bit of fun or emphasis to your chats with these creative tools.
Managing Your Chats
Stay organized and never miss a beat with these chat management features:
- Pin a Chat: Right-click on a chat and select “Pin” to keep important chats at the top of your chat list.
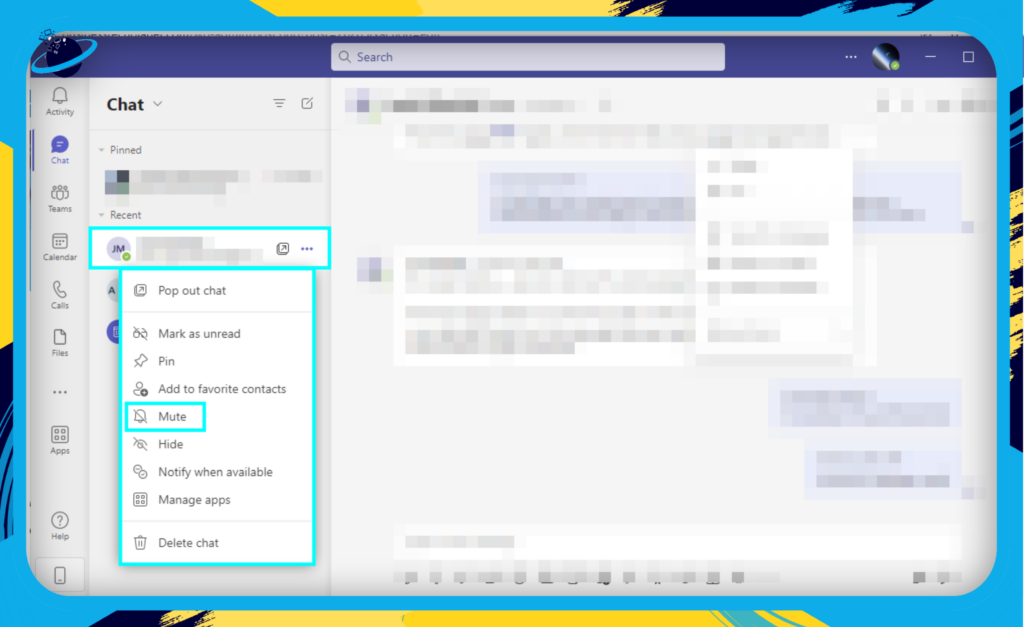
- Mute a Chat: If a particular chat is too noisy, you can mute it by right-clicking on the chat and selecting “Mute.”
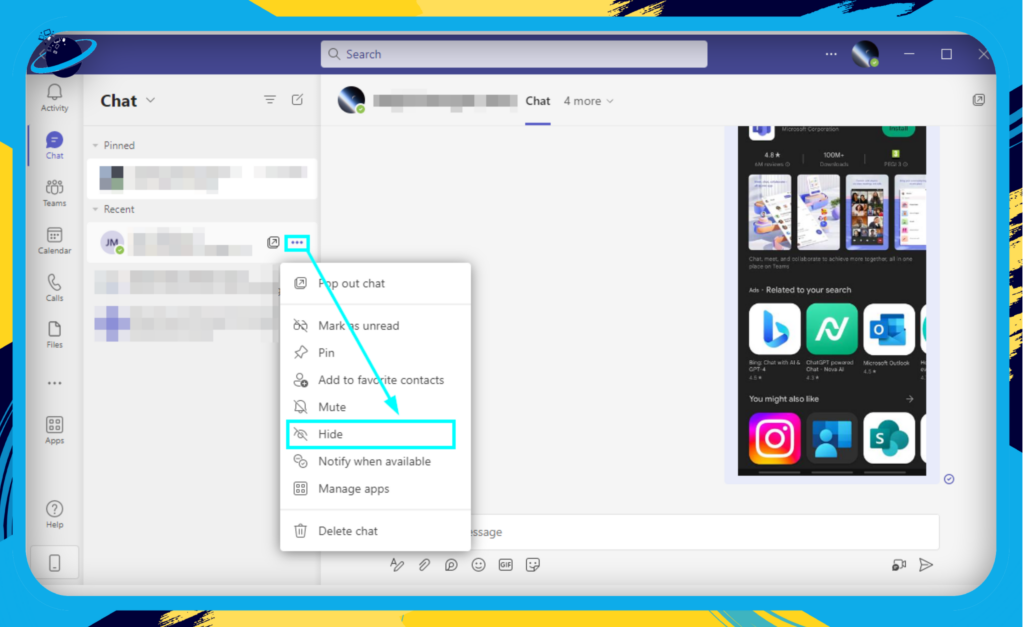
- Hide a Chat: To declutter your chat list, you can hide a chat by right-clicking and selecting “Hide.” Don’t worry, it will reappear when there’s a new message.
- Mark a Message as Unread: If you want to revisit a message later, you can mark it as unread by right-clicking the message and selecting Mark as unread.

Pro Tip: To quickly navigate between chats, use the Ctrl + Alt + Arrow keys shortcut on Windows or Command + Option + Arrow keys on Mac.
Using the Chat feature effectively can significantly enhance your communication efficiency. Next time, we’ll look into making the most of video and audio calls on Teams, so stay tuned!
Mastering Video and Audio Calls
Microsoft Teams is much more than a messaging platform; it’s also a full-fledged communication tool that allows you to make audio and video calls directly from your workspace. Whether it’s a quick one-on-one discussion or a scheduled team catch-up, Microsoft Teams ensures every conversation is a breeze. Let’s dive in!
Initiating a Call
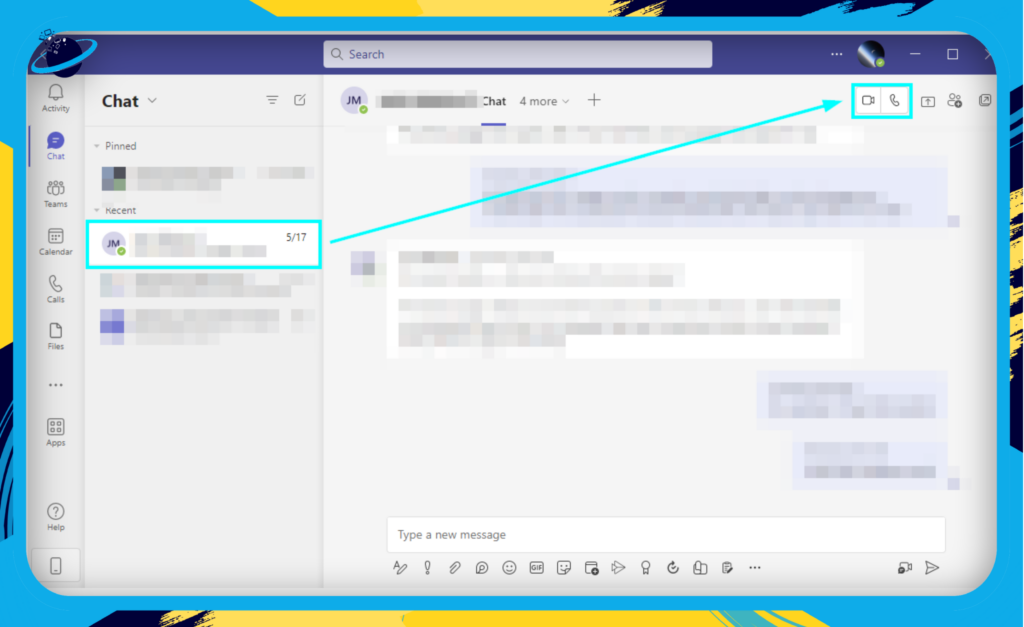
- Navigate to the “Chat” section from the left-hand toolbar.
- Select the chat thread of the person you wish to call.
- Once the chat is open, click on the video icon (for a video call) or the phone icon (for an audio call) at the chat’s top right corner.
Don’t forget to check your audio and video settings before placing a call.
Answering a Call
When someone calls you on Teams, a pop-up will appear on your screen. You can choose to Accept (blue phone icon), or Decline (red phone icon).

Managing In-Call Features
Once you’re on a call, there’s a lot you can do!
- Muting/Unmuting: Click on the microphone icon to mute or unmute yourself.
- Turning Video On/Off: Use the camera icon to manage your video.
- Sharing Screen: Click the screen share icon (rectangle with an arrow) to share your screen.
- Recording: With the three-dot menu, select Start recording to record your call.
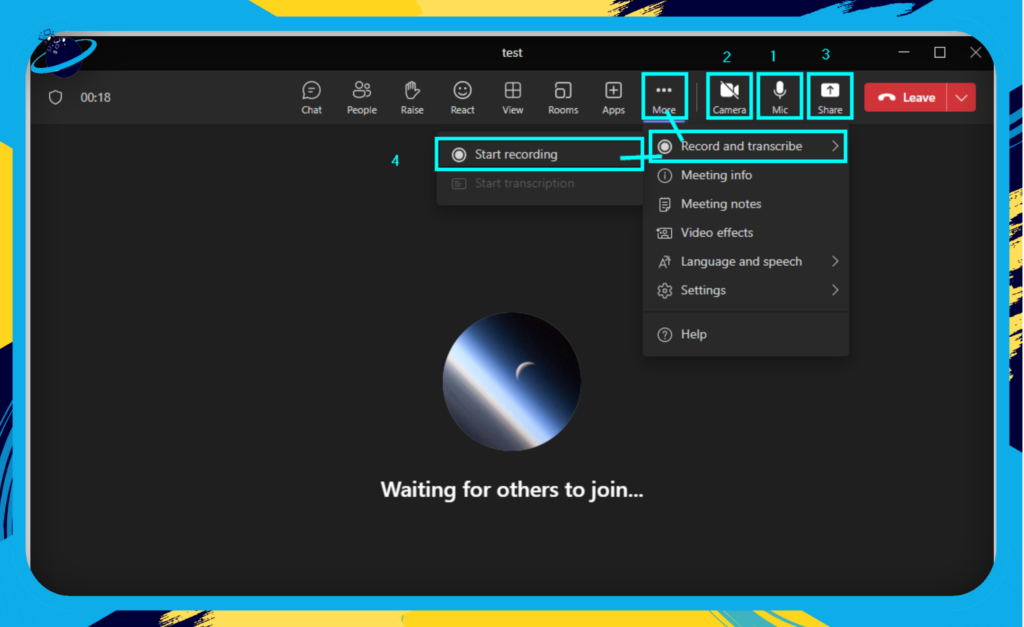
Remember, always notify and get consent from all participants before starting a recording.
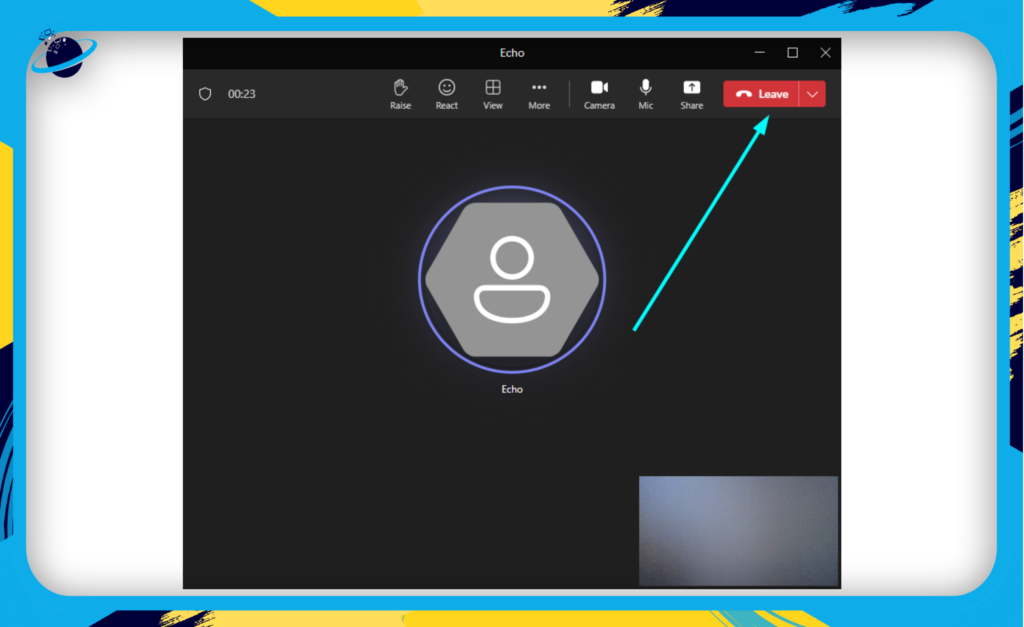
Ending a Call
To hang up, click the red phone icon on your call screen.
By mastering these essential features, you’ll be able to leverage Teams’ calling capability for improved collaboration and productivity. Next up, we’ll explore how to supercharge your meetings with Teams!
Harnessing the Power of Meetings in Microsoft Teams
Meetings are an integral part of business communication, and Microsoft Teams makes the process seamless and efficient. Here’s how to create, join, manage, and optimize your Teams meetings.
Scheduling a Meeting
To schedule a meeting:
- Click on the “Calendar” tab on the left-hand sidebar.
- Select “New Meeting” on the top right corner.
- Fill in the details like title, attendees, date, and time.
- Add a brief description or agenda in the “Details” section to keep everyone on the same page.
- Click “Save” to distribute the invitations.
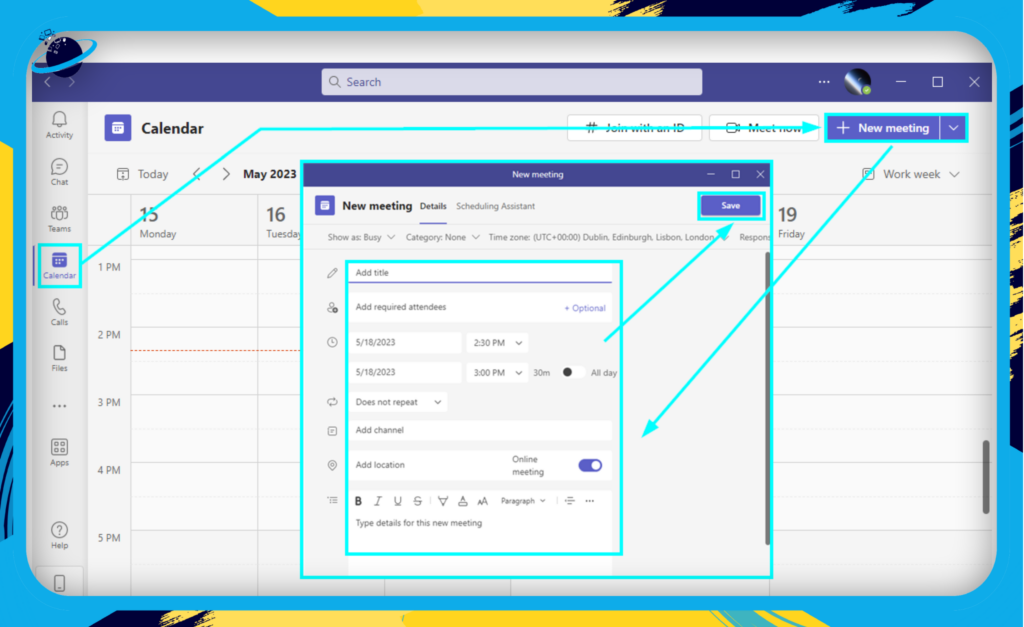
Remember, you can also schedule a meeting directly from a chat or a Teams channel.
Joining a Meeting
Joining a meeting is as straightforward as scheduling one.
- Navigate to your “Calendar” tab.
- Find the meeting and click on it.
- Click the “Join” button at the top right of the meeting details page.
- Choose your audio and video settings, then click “Join Now.”

Alternatively, you can join through the meeting link sent in your email or directly from a notification if the meeting is starting soon.
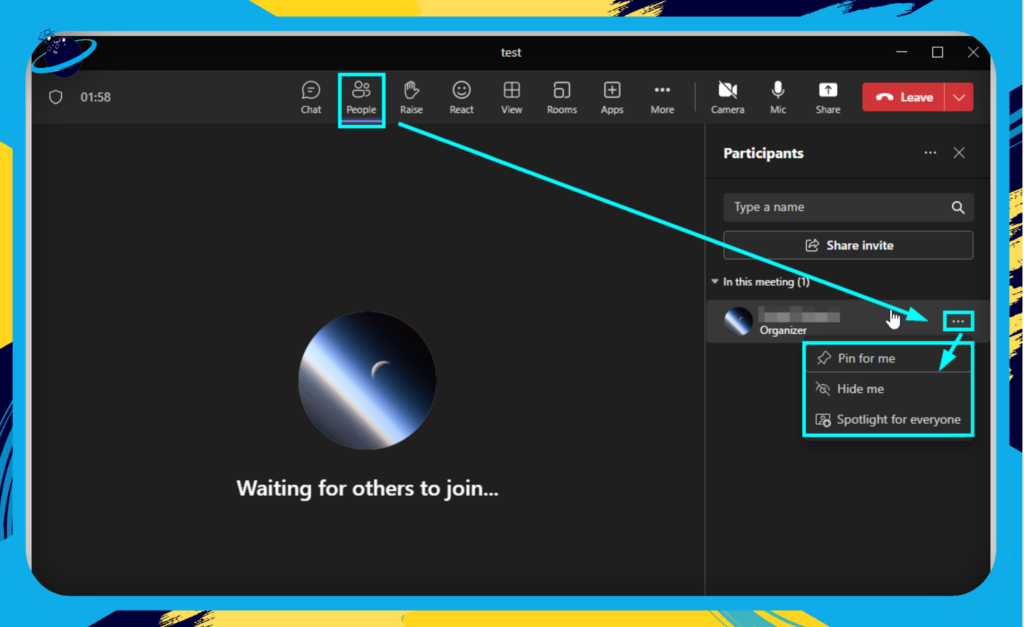
Managing Participants
As a meeting organizer, you have several controls at your disposal. You can mute participants, remove them, or prevent them from unmuting themselves. To access these options:
- Click on the “People” icon.
- Click the three dots next to a participant’s name to see the available actions.
Navigating In-Meeting Features
Microsoft Teams offers several features to enhance your meeting experience:

Together Mode:
This view places all participants in a shared background, creating a more connected experience.

Breakout Rooms:
These are sub-meetings that can be created and managed by the meeting organizer – perfect for brainstorming sessions or team discussions.

Whiteboard:
A collaborative space for visualizing ideas, accessible by clicking the “Share content” button and choosing “![]() Microsoft Whiteboard.”
Microsoft Whiteboard.”
Remember, for the smoothest possible meeting experience, ensure your software is up-to-date and your internet connection is stable.
Note: Always respect your colleagues’ time and attention during online meetings. Being punctual, prepared, and considerate goes a long way in creating productive digital workspaces.
Conclusion
Congratulations on completing the comprehensive tour of Microsoft Teams! With installation, navigation, chats, channels, meetings, and more covered step by step, you’re on your way to becoming a pro. Remember to practice and explore new features to maximize productivity and collaboration. Stay up-to-date with updates and enhancements, as the world of technology is constantly changing. Enjoy your personalized and efficient workspace with Microsoft Teams!
Additional resources
We’ve gathered a comprehensive collection of resources designed to help you delve deeper into the world of Microsoft Teams and its interface. These invaluable assets offer detailed insights, step-by-step tutorials, and hands-on advice to maximize your proficiency and effectiveness in using Teams.
 How to pin a Teams app to the sidebar for all usersCan you pre-assign breakout rooms in Teams?How to set up breakout rooms in advance in TeamsWhat to do if a user cannot add apps in Microsoft TeamsHow to Install 3rd Party Apps for users in Microsoft Teams