When in Microsoft OneDrive, you may sometimes encounter a message that reads “processing changes”. Often, this message can be there for a prolonged period of time, and will become an item of increasing annoyance and limitation as you are trying to work. Chances are, if that is the case, then that is why you are here today.
A common issue with trying to resolve this error is trying to find out where the issue actually stems from. You see, the “processing changes” message can be caused by numerous things. It could be that you have an online file open. It could be that you have had an error with your syncing, or it could be that a very large file of yours is syncing.
Even still, these are just some examples. However, do not worry if this message is something that has been plaguing you as of late in your attempts to work. Not only will this article aim to highlight the potential causes of the issue to you, but it will then look to offer you a viable solution to said issue, in the hopes that its resolution will prevent the error message from appearing.
So, whilst we discussed a handful of potential causes above, the issue we will be focusing on today will be what to do if an error within your syncing has caused the message to appear.
The case will be as such. First, we will offer you the solution in a very narrowed manner, a mere sentence for those who need minimal assistance with their technological plights. Then, we will break it down into a step-by-step, bullet pointed list, which will serve to offer at least a little more detail in the explanation.
Then, if this still isn’t enough assistance, which is completely understandable, we will go into a complete walkthrough of the process, with annotated screenshots and consistent assistance throughout the explanation.
So, how to manage the syncing of a lot of files. If your OneDrive attempts to manage more than its capabilities allow, then it may be the reason you are getting stuck on the “processing changes” message. In order to prevent your OneDrive from syncing a lot of files at the same time, you will need to manually pause and resume your OneDrive sync.
Stp by step: Why does OneDrive get stuck on “processing changes”?
- Look towards the bottom navigation bar of your desktop on your device.
- In the bottom right corner, near the time and date, should be a cloud.
- This cloud represents OneDrive, and will be blue or white. Either way, click it.
- This will open up a small menu, still in that bottom corner of your screen.
- Here, you will want to click the option titled ‘Help and Settings’.
- From here, click the option labelled as ‘Pause syncing’.
- You will be offered the chance to pause syncing for two, eight or 24 hours.
- Regardless of what you choose, make sure you select one of them.
- Now, your OneDrive should be paused.
- From this position, click again on the OneDrive cloud in the bottom right corner.
- And again, click ‘Help and Settings’.
- Now, select ‘Resume syncing’ to, well, resume the syncing of your files.
Again, do not worry if this is not enough detail for you to work with. We will now take a deeper look at the process.
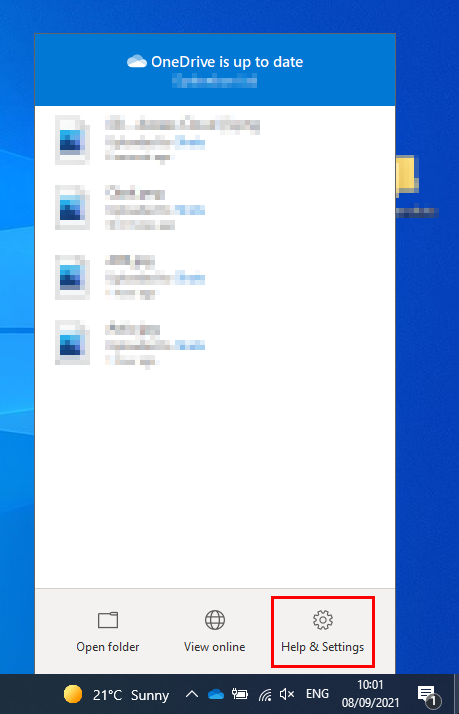
So, you will first want to look at the navigation bar of your device, be that a laptop or desktop computer. In the bottom right corner, next to where your time and date are displayed (at least by default), there should be a cloud. Now, whether this cloud is blue or white, it doesn’t matter, as it represents OneDrive regardless. Click on this.

Clicking the OneDrive cloud will open a small, pop-up menu from which you will want to continue to work. Of everything presented to you, there should be an option at the bottom of the menu titled ‘Help and Settings’, which is the option you will want to click.
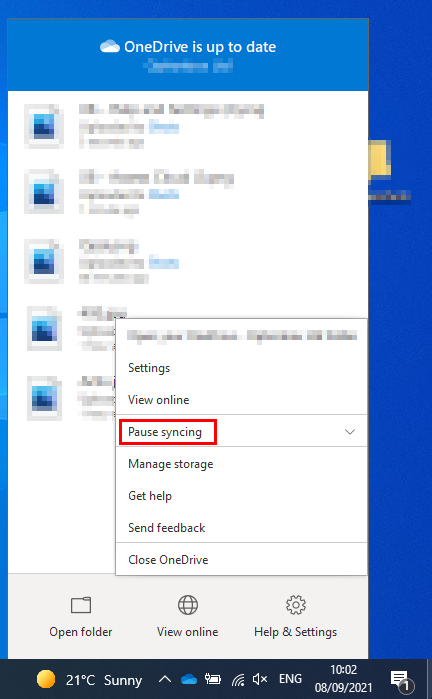
Clicking ‘Help and Settings’ will, yet again, open something of a pop-up menu with numerous settings for you to browse. Of these options, there should be one titled ‘Pause syncing’, which is the option you will need to access.
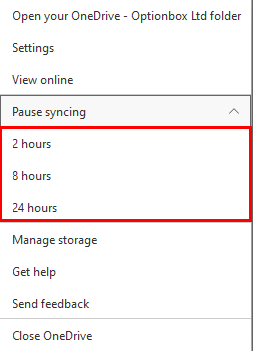
Clicking ‘Pause syncing’ will show you three options, being ‘two hours’, ‘eight hours’, or ‘twenty-four hours’. This, of course, relates to how long you would wish to pause your OneDrive syncing for. Seeing as though this is something of an immediate restart, it doesn’t necessarily matter which option you click, just make sure you click one of them.
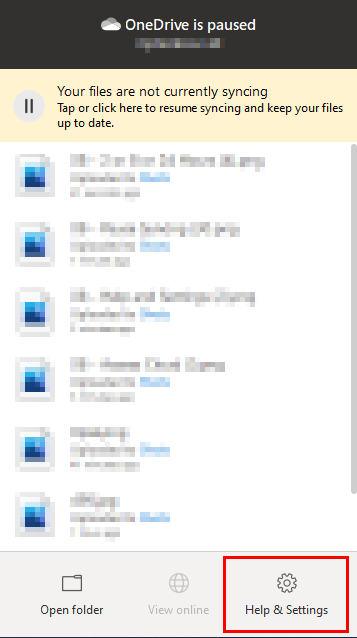
Clicking this will result in the pausing of your OneDrive syncing. In case you need further proof to ensure your syncing has indeed been paused, look towards the cloud in the bottom corner of your screen. If you successfully paused the syncing, then there should be a pause icon that now neighbours your OneDrive cloud, as you will see below:

Now, as was mentioned, this is an immediate restarting of your OneDrive syncing, so you do not have to wait out the period of time you opted to turn your syncing off for. After seeing that your syncing has stopped, click on that very cloud yet again and, once more, opt to click the ‘Help and Settings’ option.
You’ll notice a difference in the top banner of the menu now, with the once blue heading being blackened due to it being offline. This is a positive indication that you have completed the process correctly up until this point.
Click ‘Help and Settings’, and where it once said ‘Pause syncing’, it will now say ‘Resume syncing’. It is this that you will want to click.
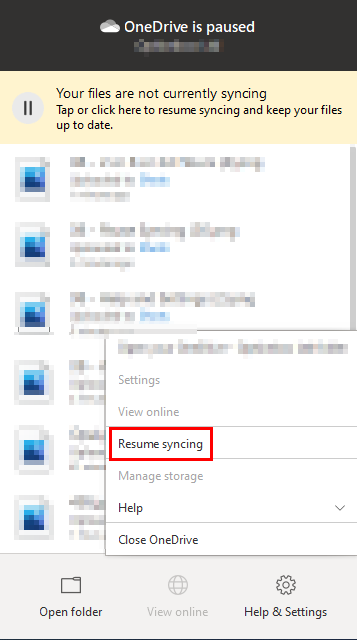
Clicking ‘Resume syncing’ will, as you would expect, resume the syncing of your OneDrive, and the process is now completed!
In order to avoid the “processing changes” message in the future, it would require some fairly simple changes. Essentially, make sure you are not overloading your OneDrive. Keep an eye on its workload and the amount of documents or other files it is trying to process at one time. Ensuring your OneDrive is not overloaded is pivotal when aiming to keep it in operation.
Thank you for taking the time to read this blog, I hope you found it as helpful as you wanted it to be! As is the case with every piece we write, if you run into any issues whilst following this walkthrough, or simply wish to share some thoughts you have on it, then please do not hesitate to get in touch with a member of our team.