Sharing a file from OneDrive is a crucial part of working with others, especially if they are external to your company. When sharing important files, it’s vital to make sure that the file is protected and won’t be shared with others or won’t be edited (depending on why and with who you need to share the file with). OneDrive has provided a useful feature to keep your file password protected so that whoever receives the link from your file will be asked for a password before they can access it. However, what happens if the password option seems to be missing from One Drive when you try to share a file? The most likely reason why this option is missing is because the link setting may not be on the correct setting to allow you to set a password.
In this blog post I will demonstrate how you can get access to the option to set a password when sharing a OneDrive file, as well as suggesting some other ways that you can ensure your shared files will remain protected.
Ways to keep your file protected when sharing from OneDrive:
- Set up a password for anyone with the link
- Add an expiration date for share links
- Share the file as a ‘view only’ file

Why share files online if it can be so risky?
File sharing lets people share information and work together. The ability to collaborate, and communicate smoothly is a very crucial process in most workplaces. One of the most effective ways to do this is through file sharing. However, it is also important to consider the risks of file sharing. Security is one of the main concerns as the leakage of sensitive information can negatively affect businesses. Using the right file sharing tool with appropriate measures in place to prevent such things from happening is important for a business who shares files on a regular basis.
When it comes to OneDrive, there are a number of effective ways users can protect their files while sharing. The most common way to protect a file before sharing, is to set a password for the file. Follow the step by step process below to find out how to add a password to your files when the option to add a password is missing. I will also suggest some other helpful ways to keep your files protected when sharing with others.
Step by step process to set up a password for anyone with the link:
- Open up OneDrive and locate the file you want to share

Sign in to your OneDrive and find the file you want to share. For this tutorial, I will be sharing a document from ‘My files’.
- Hover your mouse over the document and click on the share icon

When you hover your mouse over the document or file that you want to share, a small share icon will appear next to it as shown in the screenshot above, click on this icon.
- Click on the small arrow next to the share setting option

A small window will then appear to send the link for the file. Before sending the link, make sure you change the settings to add a password. To do this, click on the small arrow as shown in the screenshot above.
- Ensure that the setting for the link is set as ‘Anyone with the link’
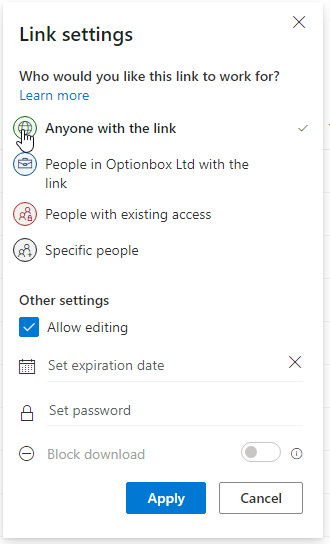
When the new window appears, under the section for ‘Who would you like this link to work for?’ make sure that ‘Anyone with a link’ is selected’ if any other option is selected the option to set a password will disappear.
- If you would like to allow editing, then click on the box to tick it

This is an optional step as you can still set up a password without the editing permissions affecting the link.
- At the bottom of the window is an option to set a password. Type in the password you’d like to create.

As you can see from the screenshot above, there is a box to type in your desired password. Please be aware that you need to tell the users who you will be sharing the file with what the password is.
- Click ‘Apply’
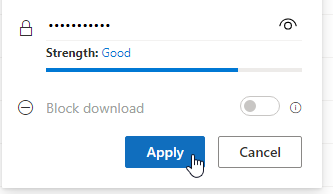
Once you have entered a password with a good strength, click ‘Apply’ at the bottom of the window
- Select how you would like to share the file

There are two ways to send the file. The first option is to click in the box and type in the name, group or email address of who you would like to send the file to, as well as typing in a message and pressing send. The second option (which is the option I decided to go for) is to click on the ‘Copy link’ option at the bottom of the window.
- Send the link to whoever you’d like to share it with.

Copy the link from the small window that appears and send the link to the relevant people.
The most effective way to protect a file when sharing is to set a password before allowing others to access it. However, there are also other ways to protect your files when you’re sharing them. Follow the guides below to see how to add an expiration date for sharing links as well as setting files and ‘view only’ before sending them.
Step by step process to add an expiration date for share links in OneDrive
- Open up OneDrive and locate the file you want to share
Sign in to your OneDrive and find the file you want to share. For this tutorial, I will be sharing a document from ‘My files’.
- Hover your mouse over the document and click on the share icon
When you hover your mouse over the document or file that you want to share, a small share icon will appear next to it as shown in the screenshot above, click on this icon.
- Click on the small arrow next to the share setting option
A small window will then appear to send the link for the file. Click on the small arrow as shown in the screenshot above.
- Ensure that the setting for the link is set as ‘Anyone with the link’
When the new window appears, under the section for ‘Who would you like this link to work for?’ make sure that ‘Anyone with a link’ is selected’ if any other option is selected the option to set an expiry date will disappear.
- If you would like to allow editing, then click on the box to tick it
This is an optional step as you can still set an expiry date without the editing permissions affecting the link.
- Click in the box for ‘Set expiration date’

- Select a date

A calendar will then appear where you can select an appropriate date for the link to stop working.
- Click ‘Apply’
Once you have selected an expiry date, click ‘Apply’ at the bottom of the window
- Select how you would like to share the file
There are two ways to send the file. The first option is to click in the box and type in the name, group or email address of who you would like to send the file to, or click on the ‘Copy link’ option at the bottom of the window.
- Send the link to whoever you’d like to share it with.
Copy the link from the small window that appears and send the link to the relevant people.
Step by step process to share the OneDrive file as a ‘view only’ file
- Open up OneDrive and locate the file you want to share
Sign in to your OneDrive and find the file you want to share. For this tutorial, I will be sharing a document from ‘My files’.
- Hover your mouse over the document and click on the share icon
When you hover your mouse over the document or file that you want to share, a small share icon will appear next to it as shown in the screenshot above, click on this icon.
- Click on the small arrow next to the share setting option
A small window will then appear to send the link for the file. Click on the small arrow as shown in the screenshot above.
- Ensure that the setting for the link is set as ‘Anyone with the link’
When the new window appears, under the section for ‘Who would you like this link to work for?’ make sure that ‘Anyone with a link’ is selected’.
- Ensure the ‘Allow editing’ option is unchecked

Under ‘Other settings’ uncheck the box for ‘Allow editing’ this will automatically turn on the ‘Open in review mode only’ setting.
- Click ‘Apply’
Once you have unchecked the box, click ‘Apply’ at the bottom of the window
- Select how you would like to share the file
Again, there are two ways to send the file. The first option is to click in the box and type in the name, group or email address of who you would like to send the file to, or click on the ‘Copy link’ option at the bottom of the window.
- Send the link to whoever you’d like to share it with.
Copy the link from the small window that appears and send the link to the relevant people.
Thank you for reading! If you have any questions, feel free to leave a comment below and we’ll be sure to get back to you.